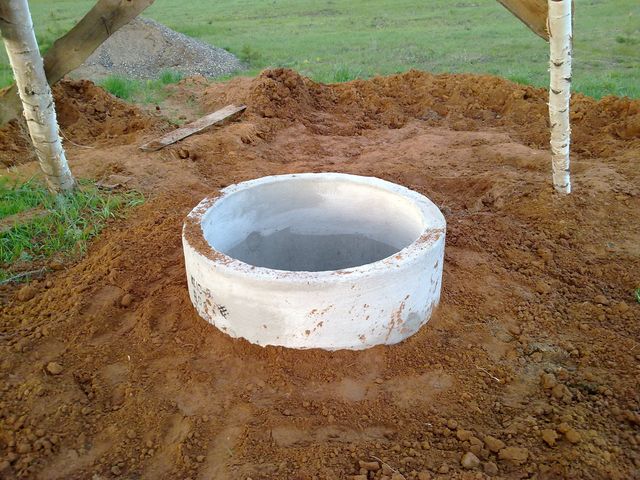
Hello. I planned to dig my well at the dacha. He delivered the rings and hired workers to dig the mine. Now they tell me that in addition to the rings, I need some kind of clay lock for a well or a soft blind area. Should I listen to them - maybe I don't need any lock? And if necessary, then advise me what to choose: a castle or a blind area?
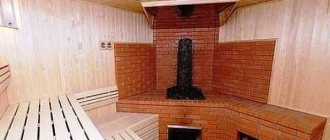
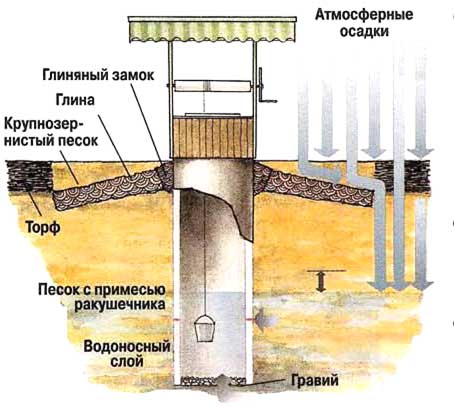
Diagram of a clay castle for a well
Your workers have given good advice. The device of a clay castle or a soft blind area will provide reliable waterproofing of the mine of the new source. A plastic interlayer or a soft membrane, arranged at the level of the second ring, cuts off the well from rain and soil suspensions, preserving the original quality of the water accumulated in the mine.
If you abandon the castle or blind area, then all the dregs from the upper layers of the soil will rush into the well, seeping through the cracks between the rings. As a result, all efforts to equip the source will be in vain - water from such a well will only be used for technical needs.
Which is better: a castle or a blind area?
The price of a clay castle is made up of the cost of raw materials and labor. At the same time, raw materials can be obtained from the ground, and the work of excavators is relatively inexpensive. Therefore, the main advantage of the lock is the low cost and step-by-step availability of this waterproofing technology. After all, all the components are already present at the construction site, and you can open the pit with your own hands.
But will such a lock be effective? It depends not only on the efforts of its creators, but also on the quality of the building material - clay, as well as on the moisture content of the soil in which the well is equipped. Poor-quality clay, which does not have the proper plasticity, will sooner or later crack and will not be able to retain dirty groundwater. And excessively wet soil will provoke heaving deformation in the castle, even from the best clay. Indeed, in winter, excess moisture will turn into ice, which will swell the clay bedding, violating the tightness of the lock.
Is it worth the risk, paying attention only to the cheapness of the arrangement, but not to the quality of the insulating layer? And do you need a clay castle for a well at all, taking into account the voiced shortcomings. It's up to you to decide.
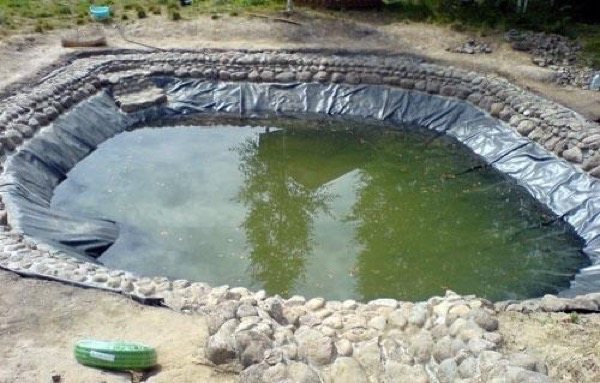
The price of the blind area is comparable to the cost of equipping the castle. For construction, we need a reliable waterproofing film, which is pressed to the ring in a ballast manner - sand bedding. That is, in addition to paying excavators, you will have to fork out for film and, possibly, sand.
However, despite some high cost, this waterproofing option has very enviable advantages, namely:
- High speed of arrangement
... Indeed, immediately after the completion of the construction of the well, only the blind area is mounted in the zone of the second ring - a clay castle can be installed only two or three years later, when the soil surrounding the mine is finally compacted. - Almost absolute reliability
... No matter how the soil swells, the membrane will not let a single milliliter of dirty liquid into the mine. And there is no connection to plasticity - for sand, this parameter is not at all important.
In short, if you value reliability, get ready for additional expenses.
How to make a clay castle?
Work on the arrangement of the clay castle should be started only after the soil has settled - 2-3 years after the completion of the construction of the well. To form a waterproofing bed, you will need washed clay or oily loam in a volume of up to 5 cubic meters.After all, the depth of the clay castle of the well, according to sanitary standards, cannot be less than 200 cm, and the thickness - the distance from the walls of the mine to the edge of the pit - 50 cm.
The construction of the castle itself is as follows:
The quality of the castle depends on the diligence of the person kneading the layer of clay. The more thoroughly you wash it, the more reliable the waterproofing will be. Therefore, before filling it into the pit, the clay is crumpled in small concrete mixers, moistened abundantly with water, or mixed with construction mixers.
How to equip a soft blind area?
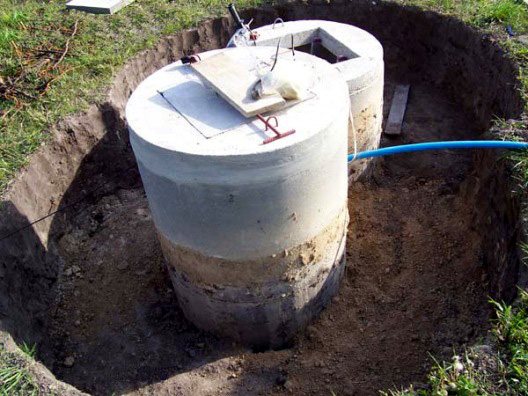
The construction of the blind area begins after the completion of the installation of the rings.
To form it, you will need the following consumables:
- Sand - 2-3 cubic meters. It can be obtained by digging a well shaft.
- Polyethylene film or polymer coating for waterproofing swimming pools 150 cm wide and up to 500 cm long.
- Metal tape - 5 cm wide, 300-350 cm long.
- Self-tapping screws and dowels.
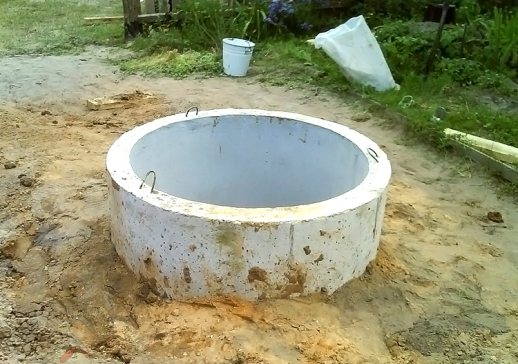
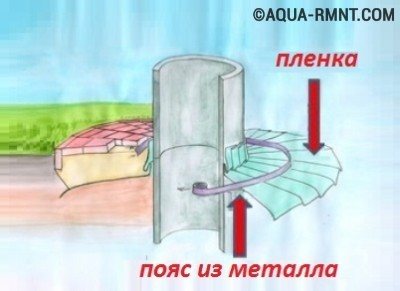
Soft sand area
The process of forming the blind area itself is as follows:
- Remove the soil layer around the top ring. The width of the pit is up to 1.5 meters. Depth - to the level of the junction of the first and second rings.
- We lay out the plastic wrap along the bottom of the trench, raising the edge closest to the well above the level of the junction of the first and second rings (the overlap is 10-15 centimeters).
- We fix the film to the well with a steel tape, forming a belt. We fasten the tape with self-tapping screws and dowels.
- We fill up the trench with sand.
- We form a decorative finish. In this case, it is best to use gravel or paving slabs, laid at an angle from the well to the edge of the trench.
As you can see: nothing complicated. Moreover, the quality of insulation in this case is much higher than with the arrangement of an earthen castle.
Clay castle around the foundation
- layers or several layers of mint, well-tamped clay along the wall and foundation.
Purpose of construction:
waterproofing basements and foundations from contact with groundwater and wastewater. A layer of clay of 40-50 centimeters is absolutely waterproof.
Stages of construction of a clay castle and its device
Clay castle device
- Clay selection.
For the construction of a clay castle, oily clay with a sand content of no more than 15 percent is used for the foundation. The use of loam is also possible, but it requires prolonged soaking in water. To improve the properties of the clay, lime should be used at the rate of 15 percent of the total weight of the clay. Recently, bentonite clay has been used instead of ordinary clay. It produces fewer cracks and hardly shrinks. - Preparation of clay mass.
1-2 days before you start making a clay castle, the clay should be filled with water. Important: do not let the clay mass dry out. To determine readiness, it is clenched in a fist. The resulting lump should not crumble. The ideal time to harvest clay is autumn. During the winter, it will freeze well, be saturated with moisture and become plastic and homogeneous. - We build a movable formwork.
The formwork is made taking into account the depth of the foundation and the thickness of the formwork. With a foundation depth of up to 2 meters, which is standard for most buildings, the width of the bottom of the formwork should be 0.4 meters. Towards the top, the clay castle narrows to a width of 0.25 meters. Instead of formwork, you can use a foundation pit. The height of the clay castle should not exceed the height of the foundation. - Clay laying.
Clay is applied in layers of 5-10 centimeters. The thinner the layers, the easier it is to tamp. Important: in the intervals between laying, the clay castle must be covered with moisture-proof materials (film, etc.). Otherwise, the clay will begin to dry and cracks will form between the layers, which will lead to the rapid destruction of the castle in the future. - .
The main purpose of the blind area is to protect the foundation and the clay castle.The blind area should be built in a couple of weeks, after the completion of the construction of the clay castle. All this time, the castle must be protected from rainwater. Therefore, from above it is covered with a waterproofing film. Also, for this period, a drainage system for precipitation should be organized. You can build a blind area from a variety of materials. In fact, it is the top layer of a clay castle.
- the most detailed guide to self-waterproofing vertical and horizontal type for any type of foundations.
In our article, this is an excellent and very affordable method of vertical waterproofing.
Liquid pond waterproofing
A pond without waterproofing can become a source of problems at any time. When equipping a pond, it is necessary to take into account many factors: the type and volume of the future pond, the surface relief, the type of soil.
Waterproofing works are not always as simple as we would like, because you need to take into account the operating conditions of the pond, to know the features of a particular coating. In addition, all manipulations are carried out in the open air, which means that temperature changes affect the waterproofing. You should also bear in mind the possible swelling of the soil, a change in the physical properties of the material upon contact with a large amount of water, etc. As soon as the slightest crack or very small defect appears in the waterproofing of the pond, the entire coating can be irretrievably destroyed. That is why you need to choose the material for equipping the pond in the most careful way. First of all, the coating must be not only durable, but also elastic - this is the only way it can withstand high loads without losing its functional qualities.
One of the best types of waterproofing for an artificial pond is liquid rubber. She has a lot of advantages. It is reliable in operation, has a long service life, and is not afraid of low temperatures down to -60 ° C. Simple and easy to use. The actual waterproofing material for the pond is a two-component mastic, the basis of which is a water-polymer bitumen emulsion. As for the thickness of the coating, it will be different for each reservoir. Liquid rubber is more puncture resistant than film. She can serve up to 20 years.
How to waterproof a pond with this material? First you need to dig a pit, overlay it with geotextile, securing the fabric around the edges. It was the turn of liquid rubber. By applying it to the bottom of the future pond, you will thereby create a dense film that will repeat every bend of the bottom, moreover, without joints and seams. No additional activities are required. If you place natural stones near the pond and decorate this corner of the site with pretty vegetation, then such a reservoir can be distinguished from a real one only with great difficulty.
Another advantage of this waterproofing material is that it is absolutely environmentally safe. Liquid rubber does not contain toxic substances. The resulting pond can be used not only for swimming, but also to breed fish in it. Rubber emulsion does not allow cracking, does not crack at low temperatures.
If you list all the benefits of waterproofing a pond with liquid rubber, you get the following list:
- it can be sprayed or applied with a roller or brush;
- all work is done as soon as possible;
- liquid rubber has good elasticity even at low temperatures;
- the material is environmentally friendly;
- any configuration can be selected for the substrate;
- easy to increase strength with a reinforcing layer;
- there are no seams and joints;
- the material is resistant to abrasion and tearing.
Blind area options
- Fill up the clay castle sand and gravel
. - Turf.
Turf layers can be used as a blind area, but a prerequisite is the organization of a drainage system. - Tile.
Tiles are laid on top of the clay castle along the house. Having previously covered the base layer. - Concrete blind areas.
They are more expensive than the previous one and after a few years they will begin to let moisture through even with additional reinforcement. Consequently, its replacement and additional costs will be required.
To protect the foundation from destruction by groundwater and sewage, a drainage system should be organized, a clay castle should be built and it should be closed from above with a blind area. If additional funds are available, it is possible to use additional waterproofing materials.
What is a clay castle and what is it for? The clay castle provides protection during the construction of walls, the foundation of a house (foundation) or basement. Clay castle, or in another way, a clay screen. A clay screen is a clay layer that is rammed and compacted; it also protects the structure from the influence of groundwater. Crumpled clay prevents water from entering, so the overall structure remains safe.
The clay castle, like all designs, has its own advantages and disadvantages. Let's consider all the benefits first:
- the clay castle around the well is completely protected from groundwater and rainwater;
- you will not need to seal the seams on the structure every year;
- you can save money as clay is a free and environmentally friendly material. You do not have to spend extra money on the purchase of other materials.
Since there are advantages, therefore, there are also disadvantages:
- although a clay castle is protected from moisture, clay waterproofing is still the wrong step. For this it is necessary to use other materials;
- the clay layer located in the zone where the soil cover freezes, the clay begins to increase in volume. This happens annually in the spring. After a certain time, it may happen that the structure begins to gradually collapse;
- due to the high sand content, the clay sediment will decrease after the erection of the earthen castle.
Advantages and disadvantages
The advantage of a clay castle is the low cost of equipping it. During installation, mainly natural materials are used - clay, a small amount of sand, pebbles. Another advantage of such a waterproofing structure is durability.
With the right choice of materials and adherence to the technology of their laying, the clay layer will retain its strength and integrity. Such a water seal will reliably protect the source from moisture seeping into the soil from the surface.
The disadvantage can be called the complexity of the arrangement of the castle. The soil must be laid in thin layers and carefully tamped. You should use a material of high quality, without the content of impurities, while it can be difficult to find clay with the desired characteristics in nature or to acquire it.
Disadvantages and advantages of clay locks on the well.
Disadvantages of a clay castle
Let's consider the disadvantages of a clay castle in more detail. It is almost impossible to make this structure perfectly tight. The material used, that is, the clay must have excellent plasticity, be tamped tightly so that no air bubbles form.
Clay must be constantly rammed, if this is not done, then a layer of insulation from moisture is not created. But most often, the owners do not carry out this procedure. Thus, water will not penetrate from the surface of the earth, but groundwater will certainly seep and fall into the mine itself.
If the impermeability of liquids (sealing) is made at the seams of the well rings and all the walls are smeared, then underground moisture will not be able to affect your drinking water. The nuance is different: the water that accumulates under this structure will become ice.
If in your area the ground contains a huge amount of groundwater, then all this will put pressure on the first ring of the well. As a result, all the seams are deformed and there will be a large advance in the top of the well shaft, all debris, dirt and much more will begin to penetrate into the inside. To prevent this, this structure must be covered with a waterproofing material, namely concrete or tiles.
The disadvantage may be poor clay quality or your soil layer freezes badly in winter.
Attention!
It is better to install a clay castle two years after the excavation of the well shaft was carried out. During this huge period of time, the earth at the walls will become dense and settle. The upper part is covered with a temporary waterproofing layer. But if you do not want to wait two years, then all you have to do is to make a soft waterproof covering around the well.
All these shortcomings can be eliminated.
Conclusion + useful video
Summing up all of the above, we determine that all work related to the installation of a clay castle can be done independently. The teams that claim that this is not necessary cannot be considered professional, or they are cunning in front of the customer. The described procedure is one of the mandatory measures for the improvement of natural drinking water sources.
The only thing to consider is that the clay castle is installed two years later, after the well was put into operation.
This means that in some cases the decoration will have to be postponed. And during the biennium, sand will be laid instead of clay. Otherwise, there are no difficulties, and the water in the well will remain clean and transparent for years.
The process of creating a clay castle
Since the foundation is the foundation of the house, it must be completely isolated from the influence of groundwater and rainwater. The structure of a clay castle and its width depends on the depth of the location of the base of the house in the ground. If the depth of the foundation is equal to two meters, then the width in the lower part of the clay castle is 40-50 centimeters, and the upper part is 25-30 centimeters. A clay lock around the foundation is not installed very often.
Before starting the entire installation, a pit of the required width is dug. Crumpled clay should be placed in the pit in layers.
Important!
The layer should be equal to ten centimeters.
If you did not manage to do all the work in just one day, then the entire structure must be covered with a membrane that will protect the structure from moisture. In order to make a waterproof covering around the building, it is necessary to wait approximately half a month after the construction of the earthen castle.
In order to provide complete protection from any moisture, a waterproofing membrane can be placed between our structure and the base of the house.
What is good about waterproofing a pond with vinyl?
Today, people are increasingly concerned about the environmental friendliness of the materials around them. That is why vinylite has been gaining popularity in recent years.
This geomembrane for pond waterproofing is made on the basis of purified polyvinyl butyral (PVB) and is completely safe for human health.
The device of a pond in the country with a film waterproofing with a Geofilm Vinilit has the following advantages:
- The guarantee for the material is 20 years, but it can serve over 40. It is not afraid of ozone radiation and ultraviolet radiation.
- Vinylite retains elasticity at temperatures up to 10 degrees Celsius. If the temperature is lower, it's okay: the material does not lose its strength, no stress or shrinkage occurs. Extremely comfortable to work with, it can easily cover interior corners, all kinds of bevels and slopes. The film does not dry out even after many years of use, and therefore does not collapse.
- Vinylite lends itself well to cutting into the desired pieces, which can then be glued using any alcohol (ethyl, isopropyl, etc.). In addition to it, nothing else is needed for gluing.
- If the temperature is above zero, then the geomembrane can be stretched three times without any consequences. When waterproofing a pond, this is especially important - if the pit has just been dug and the earth has not yet settled. Vinylite can be laid without much difficulty, and thanks to the elasticity of the material, plant roots cannot harm it.
- The geomembrane easily attaches to filtration systems, drainage, and pond-related pumps.
- The quality of vinylite does not decline over time. In addition, if necessary, the old film can be easily covered with patches from the new one. No additional processing is required for this.
- This geomembrane can be used to equip a wide variety of objects, from small streams to large ponds. It is suitable for waterproofing natural and decorative ponds, communal drainage ponds and even city fountains.
With vinylite:
- They decorate petroleum storage facilities - gas stations, oil depots, etc.
- They cover accumulators of liquid and solid waste: landfills, manure storages, burial grounds, etc.
- Canals and ponds, dams, slopes are waterproofed.
- Devices for the accumulation of liquid waste are made.
- Protect roads and underground structures. Waterproofing foundations, basements and roofs.
In addition, vinylite is now used in the construction of port facilities, as well as to protect all kinds of tunnels, passages and escalators from moisture.
If you want to buy a similar waterproofing for a pond, then keep in mind: the price of the product will depend not only on the size of the reservoir, but also on the thickness of the film.
Owners of suburban areas can use vinylite not only to decorate ponds, but also to protect terraces, basements, and retaining walls with it. The geomembrane is very resistant to mechanical damage, and therefore is not afraid of the natural movements of the earth, it can be backfilled with soil either manually or using mechanical equipment. This material is able to withstand the growth of the root system of trees, groundwater currents and the appearance of chemicals in the soil. Vinylitis is not afraid of the growth of fungi and the rapid reproduction of soil bacteria.
When assembling a geomembrane, you can not be afraid to accidentally puncture it. Also, the material is resistant to abrasion and cracking.
Clay well lock
An important point is insulation from the moisture of the well. This is necessary because the drinking water in the well can become contaminated if groundwater gets into it. The most common procedure is to create a clay castle around the well. In general, the whole process is quite laborious, all work requires a huge amount of material. In general, as soon as all the work is done, do not forget to clean the well.
During all work, it is necessary to follow a certain algorithm of actions. Installation procedure:
- There is a long deep ditch along the entire surface of the well shaft. The dimensions of this trench are: width - 600 millimeters, depth - 1700 millimeters.
- The trench is filled with clay. Clay is always important to tamp.
- A small waterproof coating is created at the top of the earthen castle. This blind area should tilt from the well, and its height should be two hundred millimeters.
How to make an artificial pond with a bowl (no film)
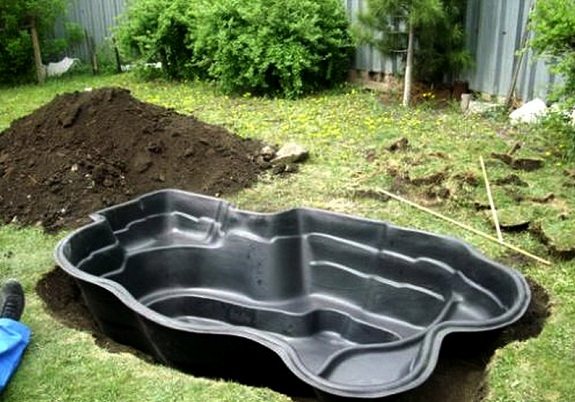
The easiest and fastest way to make an artificial reservoir in the country is to bury the finished bowl in the ground, decorating and decorating its edges. There are plastic bowls - ready-made in various shapes, sizes and colors (mostly blue, green and black).
The device of a plastic garden or country pond is a simple matter. Here's a step-by-step guide:
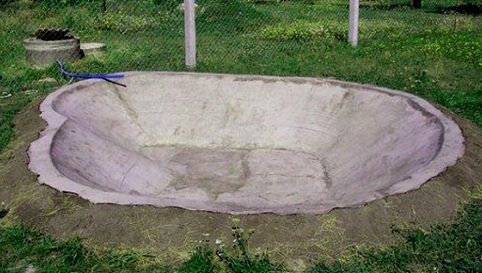
- It is necessary to dig a pit in the shape of a bowl.If the shape is very non-standard, you can turn it upside down at the installation site, outline something with a contour (at least dig it with a shovel). The bowl is taken to the side, a foundation pit is being dug. It should be slightly larger in size - slightly wider, but not deeper. The edges should either be flush with the ground, or protrude slightly. If you manage to raise the edge a little, it will be even better: when it rains, dirty water will not flow.
- After the desired depth is reached, the bottom is leveled into the horizon: it is leveled first with a shovel, then compacted and the excess is removed with an even bar. The surface must be flat and hard: the plastic must have good support. If the ground is poorly leveled (clay), you can pour 5-10 cm of sand, wet it and tamp it.
- The next step is to install the bowl in the pit. If the bottom has been flattened, the edges of the bowl will be level with the horizon. Now the space that remains between the wall of the bowl and the pit needs to be covered with soil or sand and tamped well.
- Now it's up to the design: the installation is complete, you can fill in the water.
How to build a pond in the courtyard with lighting using this technology, see this photo report (you can flip through the photo gallery yourself by clicking on the thumbnails below).
Digging a pit. We decided that the sides will be 1-2 cm above the level of the track - there will be less debris inside, and we will decorate the edges with stones. From this side, just below the maximum level, a pipe was cut into the bowl so that excess water would drain. She was taken down the drain
But it is not always and not everywhere it is possible to constantly add and drain water into the pond. Then you will have to either plant such plants that will clean it, or periodically change it.
The pond from the old bathroom
You don't have to buy a bowl. Any container can be used. Even an old bathtub. It turns out very well. All actions are the same, the foundation pit is dug first, a bath is placed in it, what goes on, look at the series of the following photos. On them, the pond from an old bathtub is transformed into a truly delightful corner.
The site was still entangled with wire - so that the clay does not float and the site does not sag. It's such beauty in a month - a garden pond built with my own hands makes me happy
A pond from a car tire (with a film)
A mini pond can be made from an old car tire, or rather from a tire. The larger it is, the larger the reservoir. The hardest part in this business is to cut off one side part. If the resulting edges are sharp, sandpaper them. The second most difficult task is to dig a hole of a suitable size. The difficulties ended there. The rest is quite easy.
A trimmed tire is installed in the pit, covered with earth on the sides, and compacted well. Also, earth or sand is poured inside, the bottom is leveled. Take a piece of thick plastic wrap, which can be folded in half, and cover the resulting tank. Do not try too hard: pour water, it will straighten the film itself.
Instead of polyethylene, you can take a banner film (available in advertising companies that produce outdoor advertising) or a piece of special for pools and ponds. They are much stronger (but more expensive).
The protruding ends of the film are tucked around the walls of your pond and decorated with stones. The pond is finished, then - decorating and planting plants. See how to make a pond from a tire in the photo report.
The next stage of making a mini-pond for a summer residence is decorating the edges with stones
There is certainly nothing complicated in such a device. Anyone can build such a reservoir in the country with their own hands, and the investment is minimal.
In general, mini-ponds are made from tanks, barrels, pots, even flower pots. The main thing is that there is a corps, but it is not very difficult to arrange it: experience gradually comes. They put them in the garden, in the country, near the house. There is an opportunity to bring water, make a trickle, it can be planted under trees, for example, or shrubs. And beauty and benefit at the same time.
Installation technology
There is a certain technology:
- To create a castle, you need to use a material that has natural moisture. When it is extracted from the ground cover for future storage, the material should be soaked in water and then covered with something. In order to check the quality of the created material, try to mold something out of this clay. If the quality is poor, then the clay should crumble in your hands. The material should slide off your hands. All this will help you understand if the material is ready to start using. Since clay contains a huge amount of sand, twenty percent of lime can be added to it.
- You can achieve the best results when compacting the material in the auxiliary structure (formwork). To install the formwork, you will need wood shields. It must be installed so that the thickness of our clay castle is two hundred millimeters. The rammer should pass in layers, the height of which should be on average 250 millimeters.
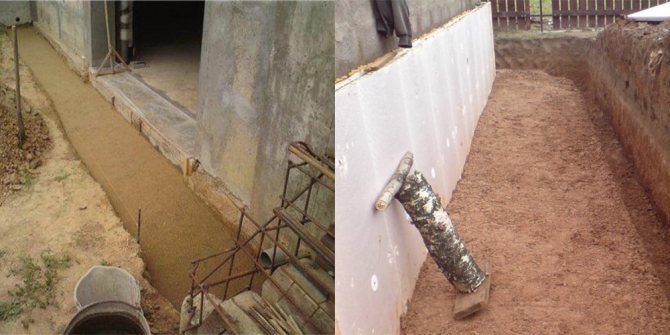
- Geotextiles should be placed on the outside of the clay castle. This canvas will become an obstacle to erosion of the structure by groundwater.
- The process of making a clay castle is similar to the process of creating a blind area for a building. The width from the clay castle can be different, it starts from one meter, the depth starts from 50 centimeters. It is most desirable that all these indicators were higher. The clay is covered with a geotextile, you can put a cobblestone on the canvas.
As you can imagine, clay is a suitable material that can be used to isolate a well from underground moisture. The cost of clay, as a material, is low, or it may be completely absent, since the clay is right under your feet. Any procedure that involves clay can be done on your own. This work does not require any specific skills and efforts. But at the same time, the work is quite laborious.
Do-it-yourself pond bottom waterproofing - basic rules
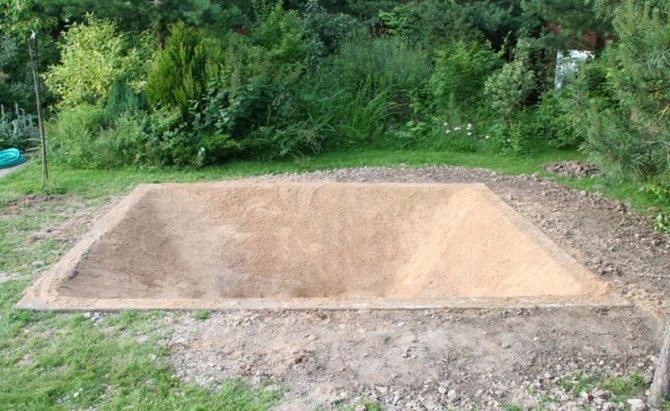
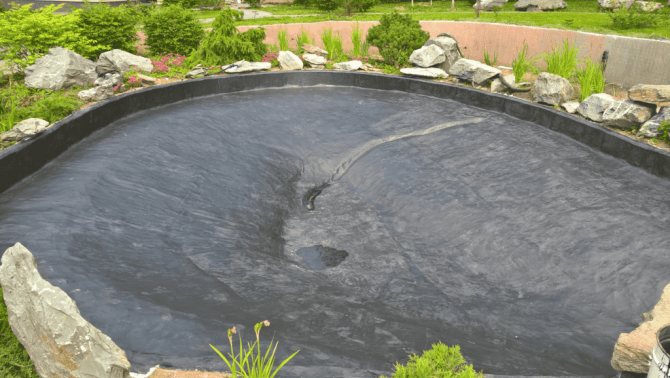
Whichever method you choose, there are general rules to follow. First of all, you need to dig a pit under a reservoir of the required size and shape, carefully form the bowl of the pond. Then it is necessary to level the bottom and walls, fill in a layer of sand, which is tamped into the ground.
The next step depends on the chosen waterproofing material.
If we use a film, then first we lay the geotextile fabric
(to protect the film from germinating plant roots, sharp stones). The edges of the film should extend beyond the pond by 50 cm, they are well fixed and masked with stones and earth. Next, they fill in the earth, gravel and fill it with water.
If you use a ready-made form
, then simply insert it into the pit so that the edge protrudes a couple of centimeters above ground level. Pour water into the container and use the level to adjust the location of the pond. Then fill the free space between the walls of the mold and the pit with sand, tamp it, periodically moistening it.
In the case of using concrete, it is better to consult a specialist
... But when using clay, the base of the pit bowl should be sprinkled with ash from insects living in the soil. Then on the bottom and walls we lay a layer of clay (10-15 cm), which should be well tamped and covered with straw from the sun. When the layer dries up a little, we lay the second one, which we also ram.
Remember that when dry, the clay shrinks up to 20%. As a result, the thickness of the earthen castle will be 20-50 cm. After that we fill in crushed stone (fractions with a diameter of 3-4 cm), tamp it. Plus, we make a layer of gravel and river sand, which will serve as additional protection against erosion of clay by water. It is worth knowing that it is impossible to put clay on a vertical wall, so the banks should be gentle.
When using liquid rubber, geotextiles are laid out first.
, securing it with staples, and then using a spray gun, several layers of liquid rubber are applied.
Correctly executed waterproofing is the basis of a beautiful reservoir, always filled with water.
Leonid Karpov
Returning from Fokine, I wandered around the small Vladimir train station, waiting for the train, and wondered how to use the time with benefit. Approaching the bookstore, I immediately drew attention to the book "Reservoirs and Pools". "But at each site Anastasia offered to dig a lake
“, - I remembered and began leafing through the book with interest. However, everywhere it was supposed to be an artificial waterproof layer-film, roofing felt, etc., which did not in any way interweave into the light image of the estate - the banks must "breathe"! Later I learned that when covering the bottom with a film, the water must be regularly drained, otherwise it will deteriorate.
Arriving in Chelyabinsk, I pondered how water holds in natural reservoirs - there is natural waterproofing! And in the book by Anastasia Semyonova "Living Water of Your Garden" I met the project of the lake "on a clay castle
«.
Clay replacement
Today, many companies offer materials that can replace clay. Such materials include a mixture of sand and gravel or ordinary sand. But can all this be a substitute for clay?
Sand, as a material, is not designed to retain water. Sand is a filter for water, that is, this material simply passes it through. After the sand passes the water, it comes into contact with the concrete rings and penetrates the well shaft through possible cracks. Clay, although it can get wet, is completely waterproof. Due to the fact that the clay can get wet, during severe frosts in winter, you can observe a small displacement or movement of the well rings.
Although manufacturers offer us a variety of materials today, clay is indispensable. It will not allow the soil to be moistened.
How is it possible to waterproof a pond in the country
If the reservoir, even not too large and deep, is left without waterproofing, you risk turning your site into a swampy area. To prevent this from happening, it is necessary to take preventive measures.
Waterproofing a pond using plastic
There is an option for arranging a reservoir, in which there is no need to waterproof it. We are talking about the purchase and further installation of a plastic container. The material from which it is made itself has reliable waterproofing properties. It would seem that a way out of the situation has been found: to equip the pond in this way - and all the problems are solved. Unfortunately, not everything is so simple. If there are severe frosts in your area, then the construction material may simply crack.
There are also a couple of problems, although not so serious. Firstly, despite the fact that plastic pond containers are sold in almost any specialty store, it is rather difficult to find a suitable size and depth. Secondly, having settled on a specific option, you will no longer be able to change the shape of the reservoir. Of the advantages, in addition to the absence of the need to waterproof the pond, it should be noted that it is possible to dig a suitable pit and immerse a container in it quite quickly.
However, there are some important points to keep in mind. So, digging a mold in the ground for installing a container, do not forget to make it 20 cm wider around the entire perimeter of the reservoir. The depth of the pit should be 5 cm deeper - this space will be covered with sand. By the way, before filling in the sand, be sure to remove all stones from the ground and pull out the roots, then carefully tamp the earth. If you are worried that the waterproofing of the pond may be compromised due to damage to the plastic, cover the soil with a layer of geotextile.
Among the advantages of a "plastic" pond is not only the ease of its installation, but also the ability to choose a wide variety of shapes.In addition, such a reservoir can be used for different purposes. The downside is not only that it will not be possible to change the appearance of the object. Unfortunately, the service life of such a pond is not too long.
Recommended reading articles:
- Roof waterproofing - from A to Z
- Leisure tent: types and selection criteria
- An artificial pond in the country - easy and simple!
Waterproofing a pond with concrete
The most commonly used material for waterproofing water bodies is concrete. If this material is used during the construction of the object, then there will be no questions about the duration of the pond's operation - it will be in order for many decades. Concrete is especially suitable for waterproofing large ponds, which are used not only for swimming, but also for fish breeding.
If you do not have skills in the construction business, it would be better to hire specialists for such work. But if you wish, you can do the waterproofing of the pond with your own hands. In order for the result to turn out the way it was intended, all actions must be performed in a certain sequence and according to the rules. Otherwise, instead of a colorful reservoir, you risk getting a completely swampy area.
It is advisable to concrete the walls and bottom of the pond within one day. A reservoir intended for breeding fish must not only be waterproofed with concrete, but also covered with liquid glass, which will protect the water from concrete chips entering it.
Waterproofing under the order at the best price!
Swimming pool waterproofing D = 3m SportStyle RUB 9,300
More details
Waterproofing of a concrete pool 3 * 4m SportStyle 10 400 rubles.
More details
PVC film for the pool 3 * 2m SportStyle 6 400 rubles.
More details
All-season mesh curtains SportStyle 430 rubles.
More details
Waterproofing, industrial geomembrane SportStyle 350 rubles. / sq m
More details
Film for a pond with a thickness of 700 microns 380 rubles.
More details
The stages of waterproofing a pond with a concrete cover will look like this.
You need to start with earthworks, the purpose of which is to give the pit walls a slope of about 45 °. Remove all stones and roots from the ground, and then tamp it well - both at the bottom of the future reservoir and on its walls.
Then cover the entire inner surface of the pond with a thick plastic wrap. Place at least a 10 cm layer of concrete on top of the plastic. Until it hardens, reinforce it with rebar. To do this, you can use a metal mesh by pressing it into the surface of the material.
But the waterproofing of the pond is not over yet. Place the next layer of concrete on the reinforcement, at least 5 cm thick. Thoroughly level and compact the entire coating. After the concrete hardens, cover it with liquid glass. Instead, if desired, you can use special polymer materials. These coatings are not only considered more modern, but also look quite original.
Before you start waterproofing the pond with your own hands, make sure that you have:
- the material with which you want to arrange waterproofing;
- polyethylene film;
- geotextile;
- construction scrap:
- shovel;
- scissors to cut geotextiles and polyethylene.
Waterproofing a pond with a foil
If you prefer the most budget-friendly option for waterproofing, then it can be done using a regular film. But its thickness must be at least 500 microns, while the polyethylene must be folded in half. As you understand, the material is not the most reliable, and therefore the guarantee for the action of this kind of pond waterproofing cannot be long. The maximum service life in this case is no more than five years.
However, if you use PVC film, then the quality of waterproofing will be much higher. The reinforced PVC material will last even longer, which differs from the usual one by the presence of a special woven mesh inside its two layers. PVC film has good elasticity and can be repaired.However, this material also has a minus: such a film is destroyed by the sun.
Instead of polyethylene or PVC film, butyl rubber sheet can be used for waterproofing a pond, which is considered the most durable among such materials. The service life of a pond with waterproofing from such a film reaches fifty years. The very work on the arrangement of the reservoir with the help of butyl rubber does not present any difficulties.
Waterproofing a pond with liquid rubber
Liquid rubber is positioned as the most modern waterproofing material. A pond trimmed in this way will be reliable and durable. Liquid rubber has two components and is made on the basis of polymer-bitumen emulsion. It is not even afraid of sixty-degree frosts, it is rather difficult to pierce it. Waterproofing guarantee for ponds and other reservoirs - up to 20 years.
The technique of working with this coating is not difficult. Dig a pit of the required size, cover it with geotextiles, which should be well fixed on the "banks" of the pond. Then cover the geotextile with waterproofing mastic. It can be applied either manually or with a special spray, preferably in several layers.
After the liquid rubber hardens, you get a strong and rather elastic film, repeating the shape of the pit to the smallest detail. Thanks to this, the pond will look absolutely natural, especially if you decorate it with plants. This waterproofing material is absolutely harmless from the ecological point of view.
Providing protection of the well rings from displacement
In order to prevent any advancement of the well rings, it is necessary to install additional fasteners. To install additional fasteners, you will need plates that will not corrode, as well as fasteners that anchor in the supporting base and hold any structure (anchor bolts).
The stainless plates should be started to be installed from the soil surface. It is necessary to finish laying when you reach a height that will be two hundred millimeters below the second seam.
An interesting moment!
The best option for this job is to use nonwoven plastic materials, as they do not rot.
Making a pond with a film
By creating this artificial pond from a film, you almost exactly repeat the work described above, only without installing a bowl:
- mark the shape of the future pond;
- digging a pit, forming, if necessary, ledges;
- clean the bottom of any sharp objects: roots, stones, etc.;
- level the banks of your pond;
- spreading a waterproofing film;
- fill the pond with water;
- fix the edges of the film;
- decorate.
The dacha pond created using this technology may already be of a more solid size. An important point: on loose soil, just make a pit and put the film will not work. We'll have to come up with some measures to strengthen the banks. In this case, you will have to either put a bowl, or make a more serious structure - of brick or concrete. Next, let's look at examples of how to inexpensively make a film pond.
First project: sides flush with the ground
Eight simple steps and your pond in the country is built. How to dig and equip a pond in the country, to make it look like a natural one, see the photo report.
Second project: the sides are raised
The second version of a homemade pond in the first stages is built in almost the same way as the first. Only after the pit reached the design depth, the sides were raised, laid out along the edge with bricks and concreted. The result is a reservoir with raised sides. A water circulation system has also been made. It is shown in the figure below.
As you can see, this pond is more multi-layered and its capacity is more serious.If you want to have a reservoir of at least medium size and not build a serious bowl at the same time, you can do as shown in the figure: pour the created pit with sand, cover it, and only put the film on top. Geotextiles evenly distribute the load and prevent the germination of plants. This is especially true if you are building a pond in your garden and there are shrubs or trees nearby.
Correct earth compaction technology
This procedure must be carried out in several approaches, as soon as you have laid two hundred millimeters. If a poor-quality seal is made, then the whole process must be carried out from the beginning. The clay used for a clay castle should have a moisture content of 20-30 percent.
Important!
For effective tamping, use a low footprint but high mass sole.
When to install a clay well lock? As soon as you made the well, do not install the clay castle, the prepared earth must settle.
Otherwise, cracks and cracks will appear in the ground, and a clay castle in this case will be useless. This work can be done with your own hands or with someone together. It is best to entrust the work to specialists.
What can be clay on a pond
If after completing all the work there is still clay left, it can be used to make decorative elements. For example, you can organize a waterfall by forming an earthen bowl and placing it over the side of a pond. To do this, you will need an additional device (pressure pump), which will provide circulation, but the reservoir will be significantly transformed.
Here you can learn how to make a fountain for a summer residence from a flower pot.
Clay pots with plants along the coastline will look beautiful and natural. Such a decoration will simplify the care of the reservoir. In addition, it will be possible to decorate the pond with a variety of flowers, even thermophilic ones, since they can be brought into the house for the winter.
You can make various garden figures from clay, paint them and form interesting compositions near the pond. This is not as difficult as it seems at first glance. On the Internet, you can find many step-by-step tips on how to mold, for example, a cute forest stump, a turtle, mushrooms, gnomes and other decorations.
You may be interested in how to make a decorative bath fountain with your own hands.
Outcome
This structure (clay castle) is a protection for the source of drinking water (well), which protects it from the penetration of groundwater there. You should not use materials other than clay. Because they do not have the required characteristics. To create a lock for a well with your own hands, you need to observe some nuances, and then you can get an excellent result. But if you have enough money, then entrust the work to professionals.
The whole procedure is quite simple, but at the same time laborious. During installation, a certain sequence of actions must be followed. The most important point is the compaction of clay and earth. The soil must definitely settle. This procedure must be approached with all seriousness, because the health of your body depends on it. Drinking water must be kept clean. Do the job well and enjoy clean drinking water. We wish you success!
The importance of the well is difficult to overestimate. After all, drinking water is one of the key resources that a person needs for life. In other words, you can't do without it. But it is one thing to build a well, and quite another to protect it from the ingress of surface rain and seasonal waters. It is for these purposes that the clay castle is being set up.
This technology was invented a long time ago. But this factor can be considered its main advantage, because it has stood the test of time.In general, a clay castle is a technology for waterproofing various surfaces in direct contact with the ground. It got its name from the natural material used - clay. But not all clay is suitable for such purposes. Only the bold variety can be used to furnish the castle. This is due to the fact that such material will not crack when it dries, otherwise there will be no effect from such waterproofing. Usually, for these purposes, clay is selected, the sand content of which does not exceed 15%.
You can find a lot of information about how to build a well, but not all sources tell you about how to protect it from surface water. And this is a very important aspect of operating a drinking water source. It also happens that the clay castle for the well is recommended to be replaced with sand, or But in this case, melt or rainwater still seeps into the mine, being cleared only of large debris. And therefore, about any can not go. Such water can be used only as technical water. And instead of a well, there will be a reservoir for irrigation.
But don't think that you can just throw clay around the well and enjoy life. No, it won't work that way. It is necessary to clearly understand how to correctly make a clay castle so that the created insulation layer properly fulfills its functions. The whole arrangement procedure can be divided into several stages.
- The well shaft must be dug to a depth of 1.5-1.8 meters. The width of the pit must be at least 0.5 meters.
- The resulting trench should be covered with crushed clay in layers of 20 centimeters. Each layer must be carefully tamped.
- The last layers of clay are filled up 15 centimeters above the ground plane with a slope from the well.
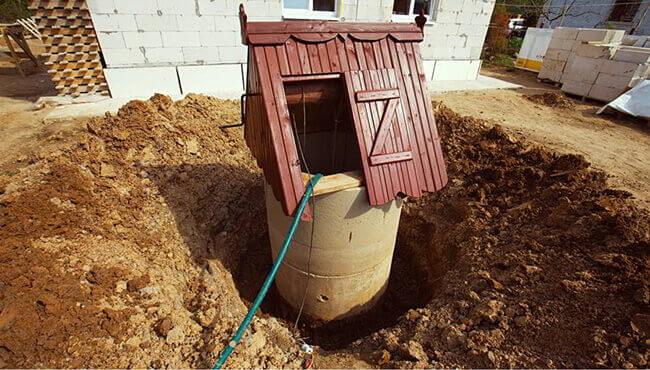
The well at the summer cottage - ice, "live", crystal clear water all year round. But in order to provide it with such properties, it is necessary to correctly complete the arrangement of the structure. One of these devices is a clay castle on a well. If it is made with high quality, the water will always be clean, and the seams between the rings will never break. The article discusses the question of how to make a clay castle around the well with your own hands.
Waterproofing a pond with clay
Scientific progress has touched the most diverse aspects of our life, and the construction technology did not stand aside. If the ancient Egyptians, erecting their pyramids, did not attach much importance to waterproofing, then the European peoples living in a rather cold and humid area just had to think about it. For example, protecting the underground parts of structures in Holland from moisture is another problem!
Time has shown that clay is the best waterproofing material, at least for the medieval level of development of building technologies.
We can say that people are lucky that it is easy to find it in low-lying areas with high soil moisture.
In such areas, until the mid-19th century, a simple and at the same time very reliable construction practice was applied. The foundations of buildings were folded from bricks or rubble, fastening the material with lime mortar. An 8–10 cm layer of clay was applied on top, which, in turn, was covered with natural matting. Drainage was made from crushed brick from below. If the soil was too wet, drain pipes were used. Many cities in Europe are built using this method. If we take examples from Russia, then we can recall St. Petersburg, which was built in a very swampy area. Moreover, a huge number of cellars there are located below the water table, but do not leak to this day.
If you look even further into our past, you can remember Novgorod. Archaeologists excavating 14th century structures have found clay waterproofing systems underground.The basements of many old buildings remain dry as long as the waterproofing made by ancient builders is not violated during the construction of new communications. And it turns out to be bad to restore it with modern methods.
High quality greasy clay is best suited for waterproofing ponds and other structures. Take, for example, the adobe floors, which are still found in village huts. If water is not spilled on these floors from above, they will be completely dry even in humid climates.
The floors in wealthy houses and churches were made of bricks, which were coated on top with a 10-15 cm layer of clay. Moreover, the latter was first "improved", diluting it with bovine blood, threshing with chains, pouring it with tar water or even slurry. A stone or ceramic tile was placed on top of the floor, gluing them with the same clay.
In the 19th century, compounds with stronger waterproofing properties appeared - various kinds of bitumen and tar. But the construction technologies did not stop there, and now materials are used for insulation, the basis of which is cement, petroleum bitumen and various polymers. But, be that as it may, it is too early to write off clay completely. It is still used today for waterproofing ponds and other structures. Moreover, this happens not only in distant Russian villages, but also in many European countries.
Nowadays, in the construction of reservoirs, a film is used in addition to clay, but this only benefits the object, preventing erosion of the primary protective layer. By the way, many modern waterproofing materials contain clay elements.
For example, the American one is known for its three-layer waterproofing mats "NaBento". They are based on bentonite clay wrapped in a geotextile shell. As soon as the sinuses of the pit are filled up, these mats expand and tightly seal up all possible holes. The company's products are also used in the construction of various underground structures being erected in difficult conditions. However, Akzo Nobel Geosynthetics is far from the only company producing clay-based mats. Many enterprises in Canada, the European Union and even China have adopted this technology.
Clay is used not only for waterproofing ponds, but also for the most common wells. Moreover, its use is mandatory, otherwise dirty surface water will enter the well through the walls.
Advantages of waterproofing a pond with clay:
- Clay can be stored forever without losing its properties.
- A pond with clay waterproofing does not need to be repaired, as it does not "break".
- The clay is very plastic and finely dispersed.
- Clay will not crack, and it is not able to erode groundwater.
It should be remembered: clay does not allow water to pass through, but the same cannot be said about moisture. If the foundation does not have surface insulation, then it will not get wet, but it will definitely become wet. Based on this, the clay castle is best used in conjunction with surface insulation.
One of the physical properties of clay is expansion when frozen. Under certain circumstances, this can play against you. Clay soil at a construction site implies the construction of a foundation with a smooth surface and an outer profile that does not expand upward, otherwise, when cold weather sets in, the base may be squeezed out. But if such a castle is made in sandy or sandy loam soil, there is absolutely nothing to worry about.
To make a reliable clay castle, it must be tamped in layers in the formwork, and the latter does not have to be even.
Clay tips:
- The best clay should be as greasy as possible, that is, with a sand content of no more than 5-15%. The color of the clay, especially for the waterproofing of the pond, does not matter.For construction, you can take loam, but its efficiency is much worse.
- The quality of the clay can be literally determined by touch, simply by wrinkling it in your hand.
- For a clay castle to be good, the material must be naturally moist. Clay, which is planned to be stored for some time, needs to be poured with water and covered on top. If you can build something out of clay, the material does not slip between your fingers and does not crumble in your hands, then it is ready to use. Clay, diluted by about a fifth or a tenth with lime, improves its properties - especially when it has a high sand content.
- If the clay is carefully tamped into the formwork, the result will be excellent. Wooden shields installed in the pit can provide a 15–20 cm thickness of the castle, which will have a good effect on the waterproofing of the pond. When the reservoir is not too large, and there is more than enough clay, then the walls of the future reservoir themselves can act as formwork.
- The clay needs to be rammed in layers, the height of each is from 20 to 30 cm. If the castle is covered with geotextiles, the waterproofing will improve significantly, since the clay will not be washed away by groundwater. Until the moment, until the blind area is made, a strip of geotextile will also not interfere around the building. The backfill should be with a slope from the house. For the construction of the blind area, they most often take a mixture of mint clay with rubble, which is then paved from above. With a narrow pit, it is not necessary to expose the formwork.
- For a well, a clay castle is built in the same way as a blind area. It must be at least one meter wide. As for the depth, it is not necessary to make it too large, 50 cm is enough. In many houses, water pipes are laid from the well to the housing. At whatever depth they are laid, they must also be insulated with a clay castle.
- On the clay, previously covered with geotextile, you can put cobblestone or paving slabs. For waterproofing a pond, a three-layer clay castle 8-12 cm thick is suitable. The procedure is as follows: the clay must be kneaded so that it becomes like a soft dough, then applied to the surface - horizontal or inclined. After that, the material must be carefully compacted and allowed to dry. When the consistency of the dried clay is comparable to the hardness of plasticine, you need to tackle the next layer of the castle.
- If the clay is allowed to dry, it can crack. To prevent this from happening, it must be covered with foil or ordinary hay. A special pond liner spread over the clay will make your pond almost perfect.
- The clay area must be paved or covered with geotextiles on top.
Today, clay remains a very popular material for waterproofing both ponds and buildings. Not only is it not difficult to find it, but no special qualifications are needed to work. True, you have to work hard, but the result is worth it.
Why do you need a clay castle
To preserve clean drinking water in a well for many years, when doing it, two important conditions must be observed:
- Ensure the tightness of its walls.
- Equip a clay castle.
If initially chopped is made in such a way that "extraneous" water does not flow through its walls. And the wood itself expands from moisture and seals all cracks, then it is more difficult to seal a device made of concrete rings. Now many factories that produce reinforced concrete products make special rings from concrete for wells, which already have locks at the joints. It remains only to seal the seams between the rings with a special mastic for sealing. Well digging technology is as follows:
- The mine is dug first.
- Rings are installed in it, a gap of about four centimeters is formed between the ground and the shaft of the rings for the entire depth of the device.
- The new well should shrink, this happens most often during a flood, the gap between the mine and the ground is filled with upper water, the soil gets wet, begins to fall and compresses the mine tightly.
- In this case, strong water pressure acts on the seams between the rings.
- Some of the seams do not stand up and break, and muddy melt water gets into the well, which can fill the well to the brim, the earth shrinks around the well - “falls through”. This can also happen due to prolonged rains.
The advantages of making elements from clay are:
- Reliability of protection of the structure from the ingress of melt and ground water, rain.
- There is no need to patch up the joints every year.
- Low price.
The disadvantages include:
- The need for additional waterproofing.
- In the zone of soil freezing, an increase in the clay layer is necessary. This usually occurs in the spring and can deform structures.
- In clay, there is an excess of sand up to 30%. That can lead to a sufficiently large reduction in the clay sediment at the end of the installation of the castle.
How to find clay for your castle
Clay castles are usually built from oily clay with a maximum sand content of up to 15%. If there is no greasy clay, you can replace it with another one. Improvement of the plastic properties of the material, which is used for the production of reliable locks, is achieved by soaking it and subsequent aging.
Tip: Care must be taken to ensure that the clay does not dry out.
To increase the plasticity of the clay, it is harvested in the fall and left to lie in an open place throughout the winter. In this case, the clay gradually freezes and gets wet, which leads to the penetration of water into all particles of the material, and makes it plastic.
Tip: Improve the quality of clay, which is taken for the construction of clay castles, by adding about 20% lime to it.
Where are clay castles used
Clay locks are used in many cases. But most often they are used:
- When building foundations. The soil, which is directly adjacent to the foundation, is replaced by greasy, well-washed and tamped clay. A small slope is formed from it. It provides an outflow of water from the foundation. In this case, not only the foundation is preserved from the effects of moisture, but also the subfloor or basement - all the space under the house that remains drier.
- Clay locks are often used to waterproof wells. The instruction suggests how to roughly make a clay castle: the well is dug in to a depth of about 200 centimeters, 20 centimeters thick. Densely soft oily clay is compacted into the resulting space. Around the well in the upper part, it is made of clay at least one meter wide and 20-30 centimeters high and also compacted well. This makes it possible for the formed clay castle to prevent the water from entering the well, which carries fertilizers and various organic substances washed out of the soil.
When building foundations. The soil, which is directly adjacent to the foundation, is replaced by greasy, well-washed and rammed
- The device of a clay castle is becoming more and more popular in the manufacture of artificial reservoirs.
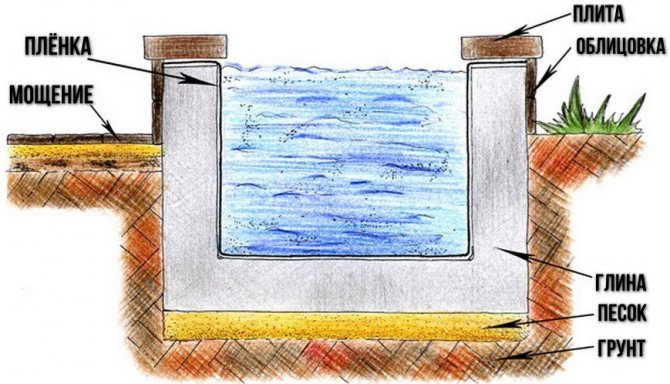
It is such a structure that is the only way to create a fully self-regulating pond with a closed ecosystem. When making it for a pit dug under a pond, three layers of thick clay dough, each about 15 centimeters thick, are placed on the bottom and walls in succession. Moreover, these layers must be thoroughly mixed and tamped. Along the banks, a layer of clay is arranged above the estimated water level by about 15 centimeters. Then a layer of gravel or large stones is laid on top of the clay castle, the device is poured from above with small pebbles or river sand. After that, the water in the pond will not leave through the walls, and it will be pleasant to walk along the bottom.
How to line a soft blind area around a well
Sometimes, when asked whether a clay castle is needed when constructing a well, experts recommend using a soft blind area. This is due to the fact that it is better to make a clay castle two years after digging the column, when the soil near the walls compresses and settles naturally. In the meantime, the top can be covered with temporary waterproofing. Features of the soft blind area:
- A soft blind area is created on top around the second, as shown in the photo.
- The main materials for the device are sand and a dense waterproofing film. You can add geotextiles, tiles, stone, gravel or grass to them.
- The waterproofing film is stretched over the concrete with one edge, closing the seam between the rings. This creates an additional blockade for the seepage of the verkhovodka.
- The design is made like a puff pastry: first, a film is laid, then sand, on top - geotextiles and decorative material.
The laying technology is as follows:
- The entire fertile soil layer is removed to the level of the second ring installation depth.
- The film is laid: one edge of it covers the soil near the wall for at least a meter, the second is wound up on the ring itself. In doing so, he closes the seam between the first and second rings.
- The film adheres well to the well, it should not slip. For this, the wall of the first ring is wrapped with a metal tape, and the film is firmly pressed.
- Fastening is carried out with screws directly to the concrete. The task can be simplified: around the ring, the film can be fixed with tape by wrapping it several times. But in this case, it is necessary to close the pasting site with decorative material.
- On top of the film, a sand cushion is poured with a slope from the well and a decorative coating is laid.
This method protects the seam from rupture, with any heaving of the soil. The loose-fitting film will be able to adapt to any movement of the soil. How to make the correct clay castle can be seen in the video. This article introduces some provisions about devices.
How to do it yourself
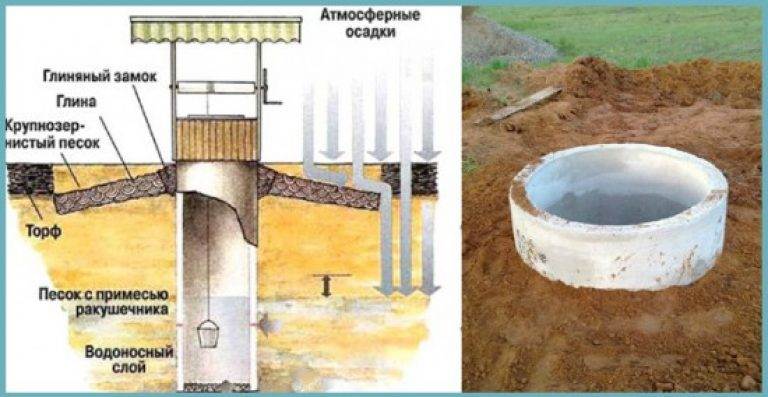
Diagram of a clay castle for a well made of concrete blocks.
To build a clay castle for a well from concrete rings should after the soil around the hydraulic structure has settled and stabilized. The soil around the reinforced concrete rings is removed to a depth of about 2 m, the width of the pit is 1 m.
The bottom of the trench should slope away from the well walls and be narrower than its diameter at ground level. Before laying clay, the bottom of the trench must be covered with a small layer of sand or pebbles. It is permissible to lay sand on top of the geotextile - it will strengthen the bottom of the trench.
The clay mixture should be moistened and thoroughly washed to a plastic state before placing it in the pit. The optimum moisture content of the material for making the lock is 15-30%.
The prepared mixture is placed in a trench in a layer no more than 15-20 cm thick and intensively compacted. The layers are tamped with a heavy tool with a small foot area. They are laid out one by one until the surface of the castle is equal to the surface of the ground. A roller is arranged around the well above the level of the castle so that rainwater flows from the walls of the shaft.
Thoroughly compacted clay does not allow moisture to pass through, but its surface becomes viscous after rains. A nearby blind area or a pebble layer around the well will help to ensure the convenience of using the source.
To prevent clay swelling from affecting the integrity of the well shaft, the concrete rings are wrapped with a layer of non-woven material. In this case, the soil near the walls will be able to move freely up or down without affecting the structure of the well.
Serious projects: brick and concrete
If you want to have a large pond in the country, and you want to build it yourself, you will have to study the topic of building pools. First, the construction of the bowls - one to one repeats all the stages. Even the forms are sometimes made stepwise.True, the banks are not decorated with plants, and they are not planted in the pool itself ... But the construction process itself, with reinforcement, plaster, waterproofing, is the same. Moreover, the water supply and water treatment system is also similar. Except that no chemical cleaning methods are used in ponds, but filters, scrimmers and ultraviolet light can be used.
In general, a large pond is not a cheap pleasure. Moreover, costs are required only for the construction, but also for the maintenance of a large reservoir in a normal state: filters need to be regularly cleaned and replaced with cartridges or backfill. But the pleasure, of course, is great ...
Not the largest pond, but 10 bags of cement, 30 bags of sand (20 coarse and 10 fine) were used for it, a hydrophobic additive - 5 bags to make the concrete water-repellent. Plastered on a grid fixed in the ground