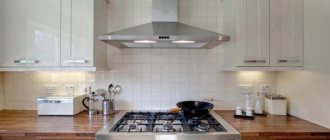
Heating systems that use solid or liquid fuels cannot function without a constant supply of air and exhaust gases. To ensure the second, you cannot do without a chimney. It can be made from a variety of materials. How to properly pass the roof plane and fix the chimney from above? What mistakes should be avoided? This will be discussed in the article.
Advantages and disadvantages of a brick chimney
Despite the fact that the metal pipe is no longer exotic, chimneys continue to be laid out of bricks. In some ways, this looks like an anachronism, but there are good reasons why you should not abandon the classic technology of laying chimney ducts.
The main one is that the brick has a high thermal inertia. The hot exhaust gases heat it up weakly, which significantly reduces the fire hazard of the heating device. We must not forget about another aspect - the smoke temperature at the upper cut of the pipe should not fall below 60-70 degrees. Otherwise, condensation will flow through it. Brick plays the role of a thermos shell and does not allow the smoke to cool down excessively.
But there are two fatal flaws:
Column with a base area of not more than 0.25 sq. meter, the whole mass presses on the stove. This is a concentrated load. If the total height of the pipe exceeds 5 meters, then it is placed on a separate base, and a transition pipe is connected to the heating device.
What are brick chimneys - requirements, size, configuration
There are three types of chimneys.
- Shell-on design. She continues to bake. Such a chimney is mounted on a concrete pipe fixed to the ceiling. Its slab is reinforced and must be at least 5 cm thick.
- Root construction. A separate foundation is being built for it. A root pipe is rarely used and only in cases where it is impossible to make a chimney of a different type.
- Wall outlet channel. It is built in internal load-bearing walls made of brick or stone.
Sometimes the construction of a wall chimney is carried out in an external load-bearing wall. Then it is necessary to carry out additional work:
- Thicken the wall from the inside (in the form of a pilaster) in the area where the pipe will pass.
- Stop chimney hypothermia, it will reduce draft due to steam condensation. To do this, it is necessary to maintain the required distance from the pipe to the outer plane of the bearing wall.
Brick chimney as an engineering structure
The chimney, for all its outward simplicity, is a complex engineering structure, to which serious requirements are imposed. They relate to strength, fire safety, the ability to effectively remove hot gases. Therefore, the installation of a chimney in a wooden house should start with an acquaintance with its device.
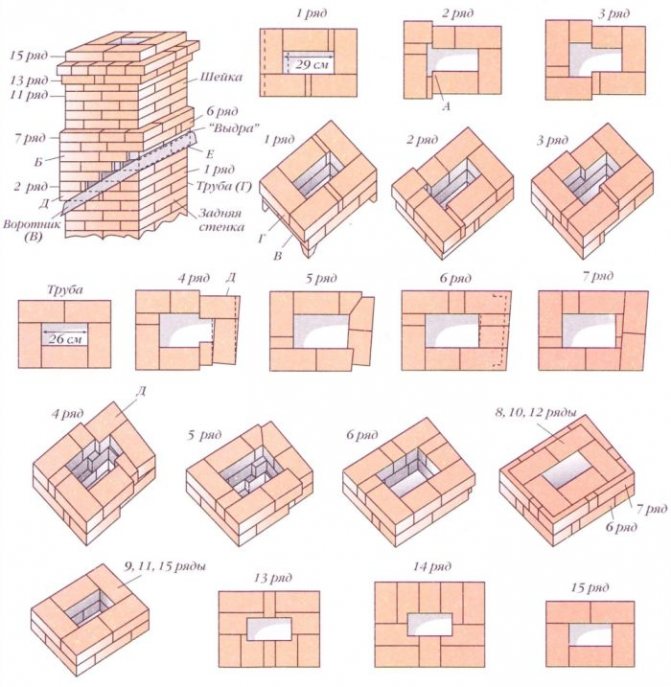
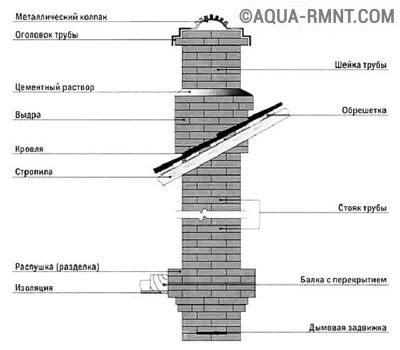
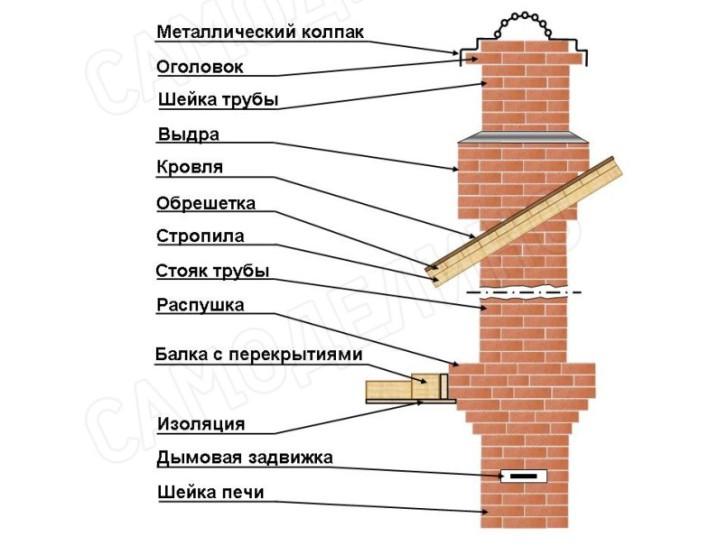
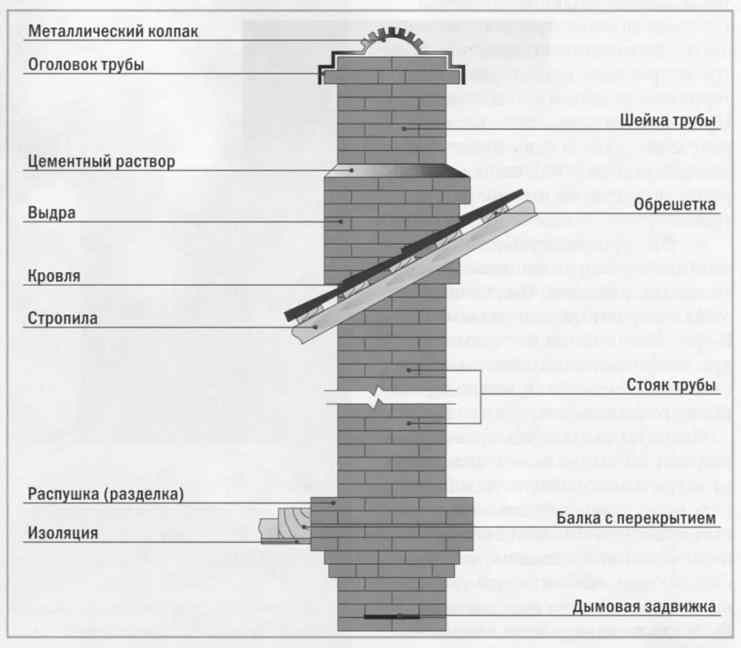
Main elements
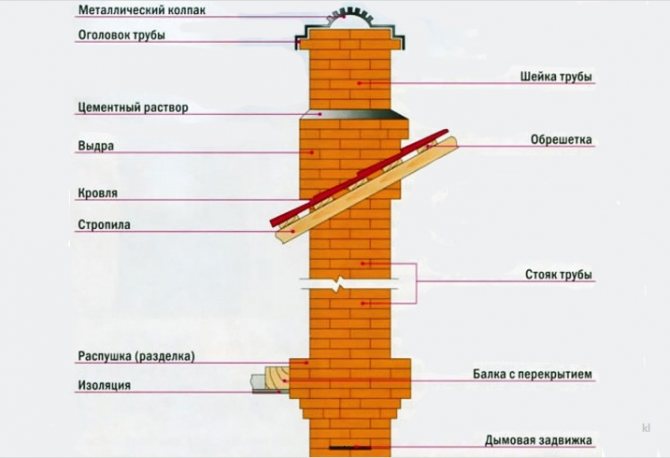
- Internal chimney - carried out from the ceiling of the furnace to the level below the ceiling by four rows of brickwork.
- Cutting (fluffing) - expansion of the pipe wall thickness as it passes through the ceiling.
- External chimney - is carried out through the attic to the level of the roof.
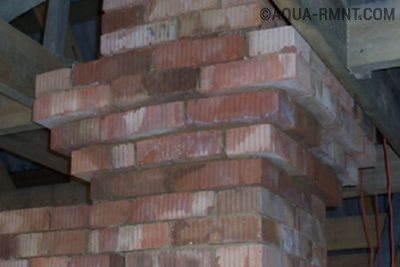
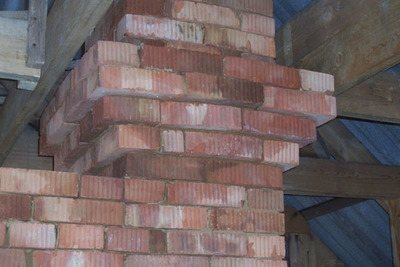
- Otter - another expansion of the thickness of the chimney walls, arranged to cover the gap between it, the roof lathing and its covering.
- Neck - continuation of the external chimney.
- Head - thickening of the walls, playing the role of a deflector.
Requirements for a brick chimney
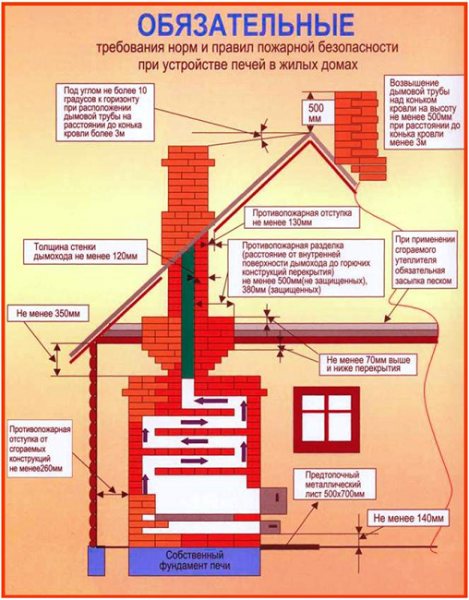
The main one is the distance "from smoke" to combustible structures. It is equal to 250 mm - this is the full length of a ceramic solid brick.
The second requirement is the strict verticality of the structure. A deviation from it by more than 3 degrees (one meter of height) is not allowed. Also, there should be no through cracks in the brickwork.
Chimney calculation
The main criterion is the inner section. The ability to remove hot gases mainly depends on it. The more powerful the stove, the wider the chimney should be. There are three standard sizes used for each type of heating device.
- "Quartet" - a row of which is formed by four bricks. Section 125 x 125 mm. Used for low power cookers or heating stoves.
- "Five" - a rectangular chimney formed by a row of five bricks. Section 250 by 125 mm. Used for heating and heating-cooking stoves. It is not recommended to make chimneys for fireplaces smaller than this section.
- "Six" - a square tube, a row of six bricks. Section 250 by 250 mm. It is used for fireplaces and Russian stoves - wherever minimum resistance to the movement of hot gases is required.
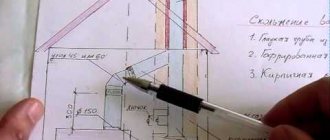
The second most important criterion in the calculation is height. It depends on the place of its output to the roof relative to the ridge:
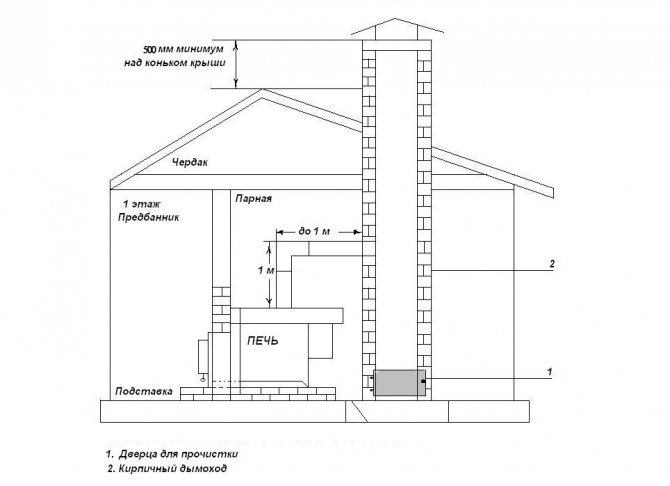
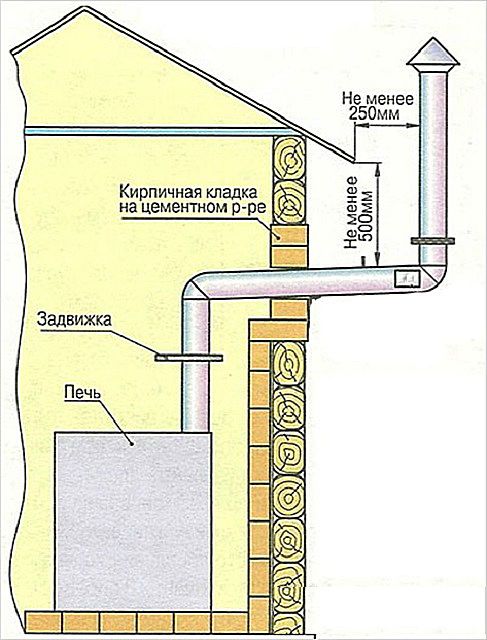
- Pipes installed on the ridge or at a distance of no more than 1.5 meters from it, rise 0.5 meters above the roof.
- Chimneys passing through the roof at a distance of one and a half to three meters to the ridge are made with a height equal to it.
- If the distance is more than three meters, then the angle between the ridge and the upper cut of the pipe should be 10 degrees.
Chimney classification
By design, stove pipes are brick-built, brick root, prefabricated, wall.
Masonry packings are a heavy structure that rests on the masonry of the furnace. The thickness of the masonry must be at least half the brick. Brick root - a free-standing structure in the form of a riser. Can be made of asbestos-cement pipes with a diameter of 150-250 mm.
Prefabricated structures are made of refractory concrete in the form of individual blocks. Wall - installed in the main wall of the bearing type of the house to save space and volume of the room. A chimney built into a load-bearing wall should be located in the middle of the room.
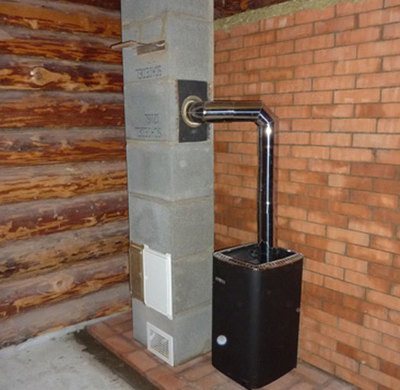
It is not recommended to install chimneys outside the walls, as the outside air cools the flue gas, reduces draft and forms condensation on the inner walls of the duct. It is impossible to obtain a large coefficient of efficiency from a furnace with such a pipe. If it is impossible to offer another option for the location of the wall pipe, work is carried out on the installation of a pilaster with a protrusion towards the room.
Installation of such a structure is carried out with maintaining key distances from the smoke to the outside wall. The distances are 2.5 bricks (from 20 to 30 - 650 mm), 2 bricks (from 20 and above - 510 mm), 1.5 bricks (from 20 and below - 380 mm).
The chimney is placed strictly vertically, without indents in the inner part. If the construction is supposed to lead, then it should not be more than 1 m. The recommended cross-section of the inner chimney should be at least 140x140 mm. To create the best draft, the pipe height should be at least five meters. If the height is less than five meters, a deflector diffuser is used to create thrust.
Diagram of the construction of a brick chimney.
With the simultaneous use of air heating and a fireplace, two chimneys are installed in the house, as well as with different draft, one of the used hearths can smoke.
If, for example, a house is made of wood, in places where the chimney adjoins, a thickening of 1-1.5 bricks is built. Flammable structures from the chimney are covered with asbestos-cement or metal sheets.
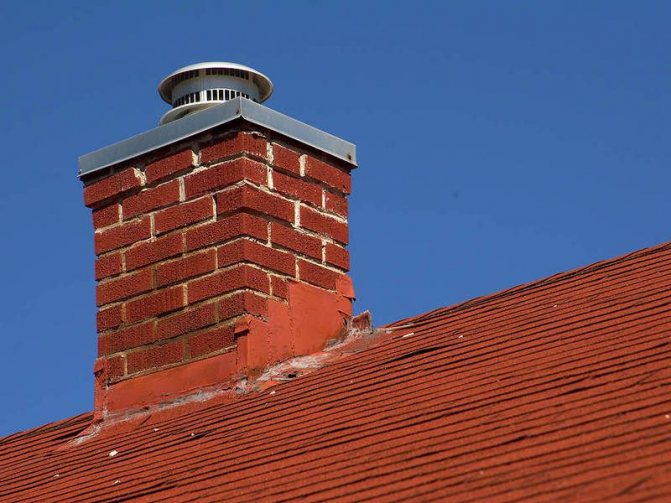
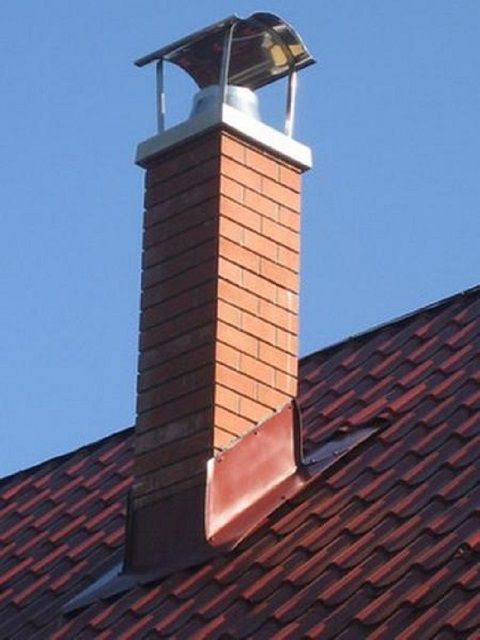
In order to remove the pipe skidding with snow, its height should be half a meter higher relative to the roof.The end of the pipe head is protected with an iron cap or a sheet-based steel edging.
At the outlet of the chimney, a node of passage through the roof is installed in order to exclude the penetration of moisture into the attic room. The passage node is made with your own hands using sheet steel.
A deflector on the chimney prevents the draft from tipping backwards. In the absence of a deflector, the pipe head can be made chamfered.
To make a chimney with your own hands, you need the following tools and additional devices:
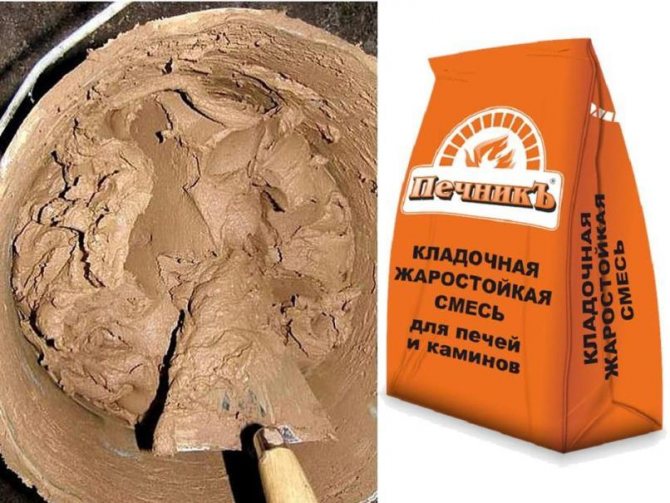
- clay-sand mortar (lime-sand);
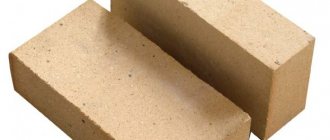
- brick (red, hearth or fireclay);
- hammer pickaxe;
- Master OK;
- trowel;
- rule;
- measuring devices (level, m, plumb line);
- container for solution preparation;
- asbestos-cement slab;
- sheet metal.
Chimney masonry
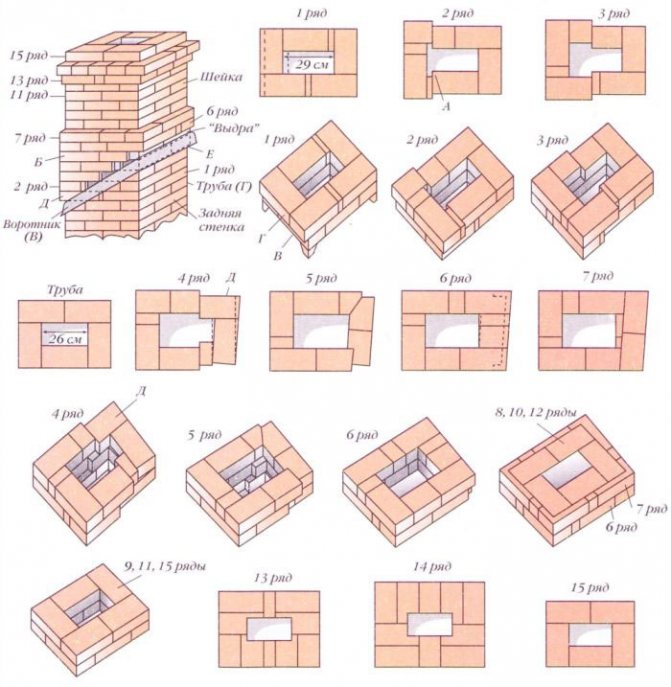
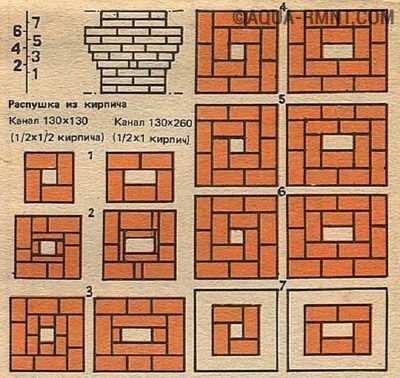
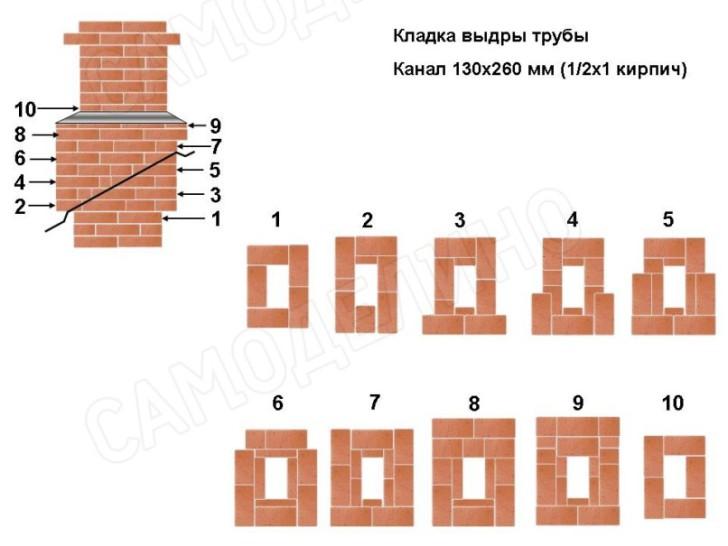
There is no fundamental difference between the brickwork of the stove and chimneys. It is carried out on a clay-sand mortar using the same tools - an oven hammer-pick, a trowel and a plumb line. However, items such as fluff and otter are laid out using a large number of pieces of brick in sizes 1/8, 1/4, 1/2 and 3/4 of the whole.
To avoid splitting and cracking, which are accompanied by clouds of brick dust and rarely give the desired result, it is worth using a "grinder" with a diamond wheel for ceramics. This guarantees the accuracy of work, eliminates tedious work and a lot of useless brick fighting.
Solution
For masonry up to the level of the roof, a mixture of sand and clay is used, since it has a coefficient of linear expansion similar to that of a brick, which is a certain guarantee against cracking.
Pure clay used as a binder can be oily or skinny. In some places, there are deposits where the proportional ratio of the amount of clay to sand is optimal by nature: one to three or four.
With an increase in the volumetric part of the clay, the solution cracks after drying, and with a decrease, it crumbles. To determine the optimal ratio of volumetric parts, you need to knead the ready-made solution in your fingers. It should be neither perceptibly slippery nor rough like sandpaper.
The excavated clay is soaked in an iron container for 3-4 days. As a result, you should get a homogeneous clay pulp without stones, similar in consistency to liquid sour cream.
Clay and sand are mixed in volumetric parts in a ratio of one to three or four. Water is added gradually, in small portions. The finished solution should leave traces on the trowel (but not stick to it) and not drain from it.
To avoid errors in proportions, it is better to buy a ready-made dry clay-sand masonry mixture. Please note that the one marked "fireproof" is not suitable for masonry.
Brick
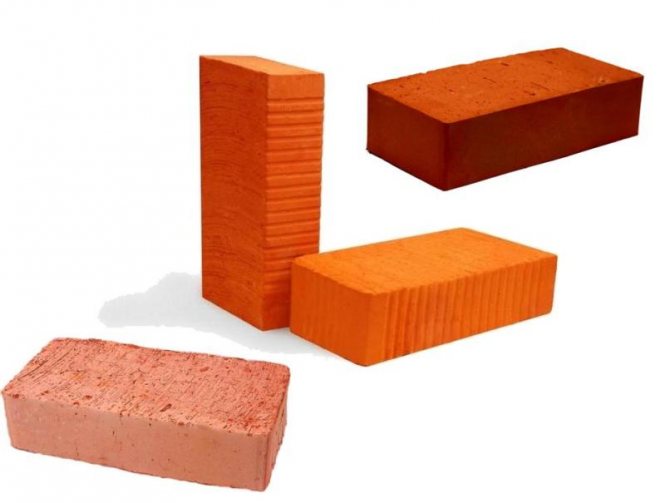
Used solid red fired brick.
Its edges should be smooth, without cracks, and the sound made when lightly hitting it with an oven hammer should be resonant.
The standard size used for masonry is 250 mm long, 125 mm wide and 75 mm high.
Internal chimney masonry
It begins immediately after the damper is installed and the stove overlap is completed. Masonry techniques are the same - applying a layer of mortar, laying a brick, shaking it with your hand and lightly tapping it with a pick. The verticality and horizontalness are checked after laying each row. They finish it four brick heights to the ceiling.
Do you want to know how to quickly and inexpensively make a reliable chimney from asbestos? Read here.
Find out how to make a septic tank from concrete rings with your own hands from this article:
Laying fluff
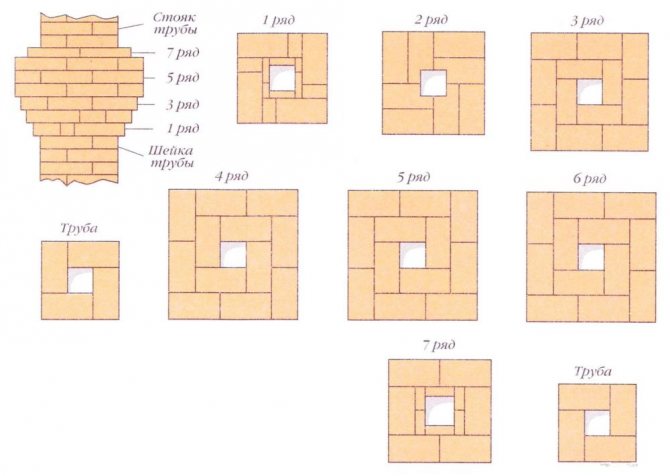
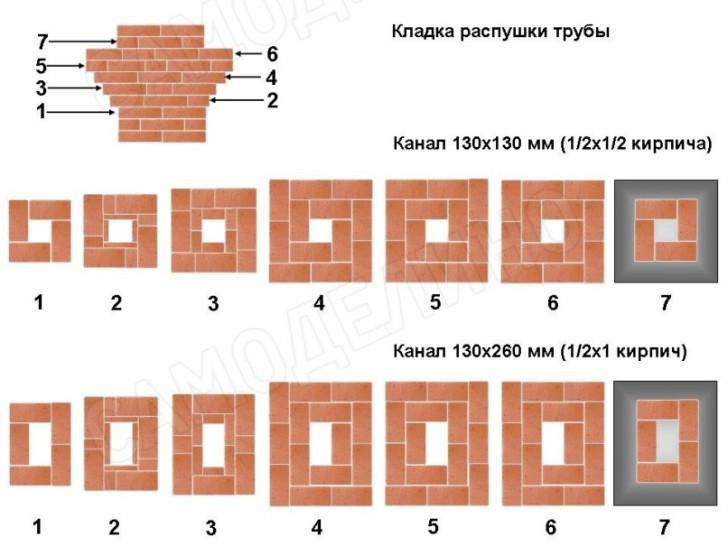
Expansion of the chimney wall thickness is performed to comply with the requirement to locate combustible structures at a distance of 250 mm "from the smoke". The usual wall thickness of the chimney is 125 mm.To double it, it is required to fold four rows, each of which is shifted outward by 1/8 of the width of the brick relative to the lower one - just the amount that allows the brick to lie without being thrown over. The masonry principle is the same for all three sizes:
- The inner surface (to smoke) of the first row is laid out in 1/8 pieces. The gaps between the outer bricks are filled in 1/4 pieces.
- In the second row, the parts increase, respectively, to 1/4 and 1/2.
- The third row uses 1/2 and 3/4 pieces.
- The outer belt of the fourth row of fluff is laid out with whole bricks.
Having reached the ceiling, they put it, observing the dressing of the seams, another two or three rows higher. A gap of 2–3 cm is left between the ceiling and it to eliminate the pressure of the structure on the masonry. It is covered with mineral wool slabs. Laying up to the roof is carried out in the usual way - with bandaging of vertical seams and control of verticality.
Otter clutch
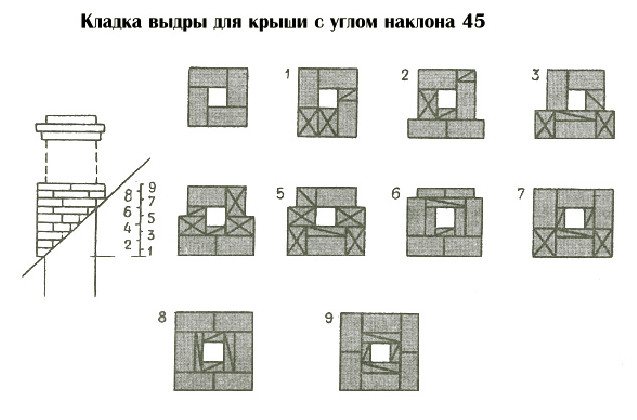
It begins after the edge of the chimney brick has risen above the roof. It is conducted outside, in compliance with all safety measures when working at height. You can use cement mortar. They start it from the edge that is lower along the slope. The distance from the smoke on each row is equal to 1/8 of the brick width. There should be six rows in the otter. After it, a neck is placed - the usual continuation of the chimney. The slots between the roof and the chimney are closed with a “collar” made of sheet roofing steel.
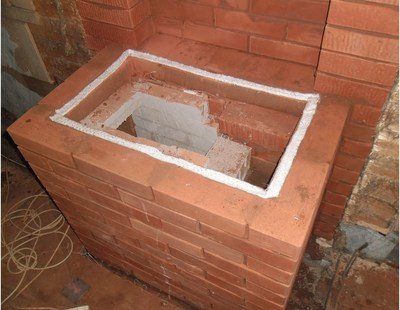
Making a hole in the roof for a pipe
It is very important to accurately calculate the size of the hole for the pipe in the roof. Otherwise, after folding the stove, you will also have to resort to the services of a tinsmith. It is much easier to take care of this in advance. When the pipe is folded to the level of the roof, it is necessary to transfer the dimensions of the pipe in the corners to the roof using a plumb line L, a hammer and a nail. This must be done from the attic (punch four holes in the roof with a nail according to the markings). Having connected four holes on the top of the roof with a pencil, we get rectangle B, which is a projection of the horizontal section of the pipe onto the roof plane. Next, you need to step back from each side of the rectangle by 7-10 cm and build another smaller rectangle B inside it. If at the exit of the pipe there are seams in the roofing gland G, then they can be nailed (knocked down) to the roof.
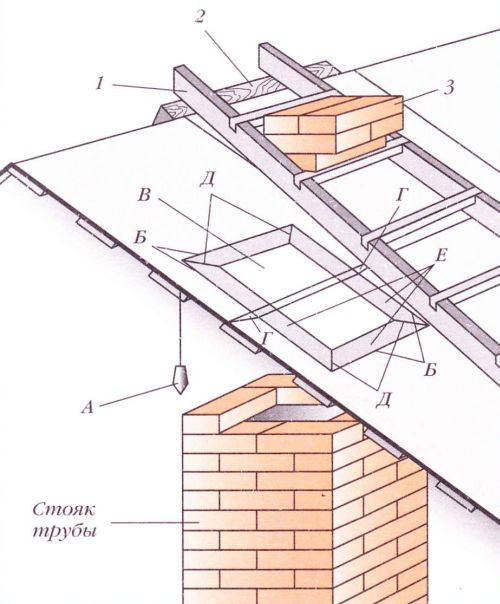
Making a hole for a pipe in the roof
The corners D of the two resulting rectangles must be connected, cut out the smaller rectangle B and cut the roof along the line connecting the corners. The resulting four strips E must be bent over a leaning bar (board) so that they do not slightly reach the vertical position. Then the iron will be more tightly pressed against the pipe wall. The remaining unprotected triangular voids between the sides (bent strips E) in the corners of the pipe are sealed from the inside with cement mortar, pressing the brick to them, and from the outside, above the iron sides, they are plastered.
How much will it cost
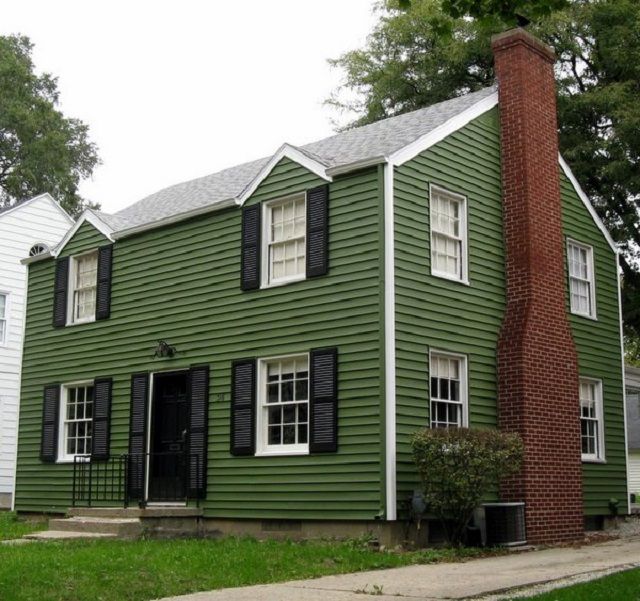
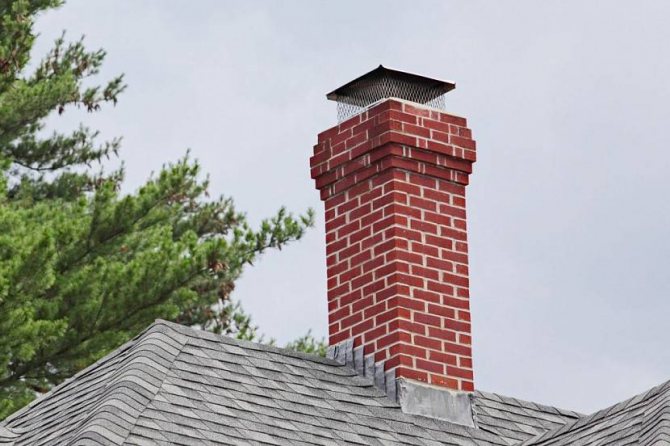
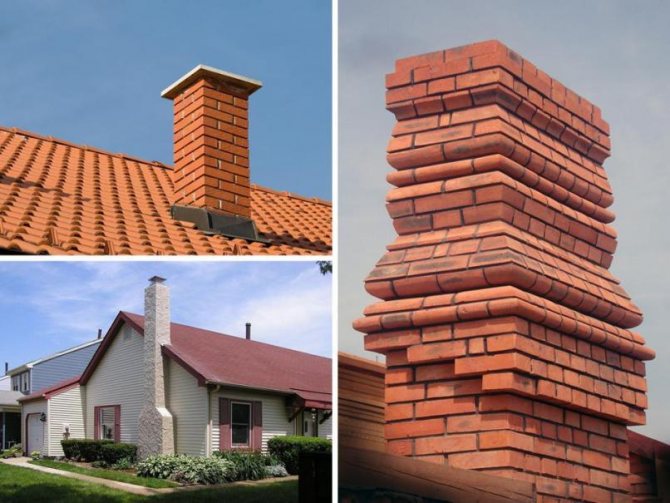
The brick chimney on the roof has become a visual constant in three centuries. And a building with such a finish looks, according to subjective estimates, much more attractive.
It remains only to determine how much it will cost you to comply with the canons. If you attract third-party craftsmen, then the price of the work will be added to the cost of the brick. And she is rather big. In St. Petersburg and the region, for example, laying one brick will cost from 50 to 90 rubles.
The solution, if you prepare yourself, is free.
Five kilograms of ready-made masonry mixture cost 60-70 rubles. One package is enough for 10-15 rows of a pipe with a section of 125 by 250 mm (sixes).
Let's compare the cost of a meter of a metal sandwich pipe with a diameter of 250 mm and a brick one with a cross section of 250 by 250 mm. Just the kind that can be used for chimney flues.
| Brick (at a price of 15 rubles per piece) | Masonry mix | The work of the master | Total, rubles | |
| Brick chimney | 900 rubles | 70 rubles | 3000 rubles | 3970 |
| Metal sandwich pipe | – | – | – | 3800 |
As you can see, the prices are almost the same. Of course, it is worth adding the price of fluff, otter and head masonry. But, given the best performance characteristics of brick pipes - the absence of corrosion, high thermal resistance, it makes sense to spend money on such an acquisition. And if you are going to lay a brick chimney with your own hands, then it will cost almost half the price of metal sandwich pipes.
Selecting a pipe cross-section for a furnace
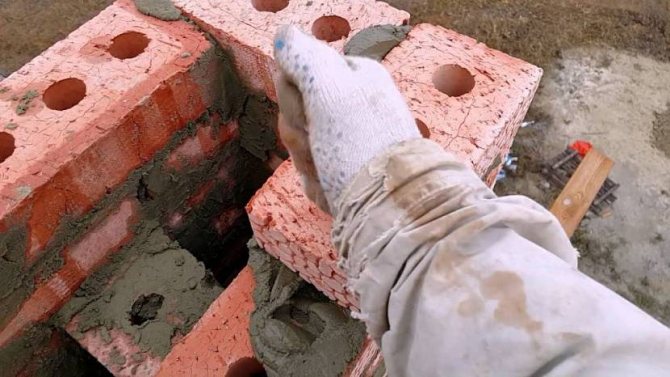
Experts do not recommend tapping the ceramic brick additionally in order for it to snap into place. In the process of tapping, an air space is formed, which affects the draft of the flue gas. If you need to lay 4-6 rows of bricks from the inside of the pipe, then the brickwork of the chimney is wiped with a damp cloth, and all the seams are rubbed. The masonry seam is usually 0.5 cm in the horizontal direction and 1 cm in the vertical direction.
The shape of a brick chimney for a metal stove or fireplace affects the level of hydraulic resistance in the pipe, so its cross-section can be rectangular or square. The best option is the round shape of the chimney, but it is rather difficult to lay it out of bricks with your own hands.
The chimney should not have turns and slopes, since these types of elements lead to the creation of additional air resistance. If it is impossible to do without turning, it is easy to equip it at an angle of 60 °. The laying of the pipe involves the arrangement of a headrest, made in 1 brick. The upper part is laid out on a cement-sand mortar.
The level of heat transfer of the stove or fireplace should depend on the choice of the section. The section can be within 260x260 mm. For example, if the selected section is 130x130 mm, then the heat transfer is 3.5 kW, and with a section of 130x250 mm - more than 3.5 kW. You should not choose a very large pipe cross-section for a boiler, stove or fireplace, since this loses heating efficiency, which leads to a decrease in heat transfer.
Secrets of the stove-makers
- Before laying, the brick must be soaked - immersed in water and wait until the violent eruption of air bubbles stops. Wet ceramic blocks adhere more firmly to the mortar.
- For splitting and cutting bricks, use a grinder with a diamond disc for stone.
- When laying in the attic, hang a plumb line on the rafters, between the future pipe and the workplace. This saves you the hassle of touching it for verification. To control the verticality of the angle, it is enough to change the position of the head.
Do not forget that a chimney in a private house is not only a convenience, but also a technical device that requires proper operation and maintenance. Clean it from soot, inspect it for cracks, heat the stove or fireplace with dry wood and it will serve well for many years.
The wood-fired oven works thanks to the traction principle... Hot gases released during combustion rush up the chimney, giving off heat along the way to the heat exchangers.
A properly sized chimney is needed to generate traction. For a long time, ceramic bricks have been used for this purpose, due to the properties burnt clay.
When designing a heating system it is very important to check compliance pipes and stoves - brick is not suitable for all systems.
Do-it-yourself chimney in the bath - a step-by-step guide, how to do it right?
A properly arranged chimney will ensure long-term preservation of heat and safety for visitors in the bath, since it will remove the products of fuel combustion on time, but at the same time, it will not allow the stove to cool down too quickly. Is it possible to make a chimney for a bath with your own hands and save money on the work of a master?
Do-it-yourself chimney for a bath
I must say that it is quite possible to do this, especially since at present in specialized stores, sales consultants can, according to a developed scheme and using special software, quickly and accurately select a set of elements necessary for a correct chimney. However, their varieties are not at all limited to metal structures, and it is worth taking a closer look at what types of chimneys there are in general, and how best to choose a suitable scheme for a built sauna stove.
The content of the article
1 Types of chimneys1.1 Brick chimney1.2 Metal chimney1.3 Video: "short course" on the types of chimneys2 Materials for the construction of a chimney2.1 Brick chimney2.2 Metal chimney2.3 Video: design features of sauna chimneys3 Installation of a sauna chimney3.1 Metal chimney3. 2 Video: a variant of a metal bath chimney with access to an external wall 3.3 Brick chimney
Chimney types
Stove sauna chimneys are distinguished according to several criteria.
First of all, according to the material of manufacture. If earlier they were traditionally laid out of baked bricks, then in recent years metal chimneys have become more popular.
The chimney can be placed inside or outside the building
According to their design and the place of installation, these elements of the sauna stove can be divided into two types: the one that passes inside the room, through the ceiling and the roof, or, in another version, the chimney is led out through the wall and rises along it from the outside of the building.
To determine the choice, you need to consider all the pros and cons of each type of chimney.
Brick chimney
Previously, chimneys were traditionally laid out only from bricks, since there simply were no other worthy alternative materials for the construction of this part of the furnace. The construction of brickwork is a rather laborious process, especially since it must be carried out according to a special scheme, with strict observance of all sizes.
Not so long ago, the overwhelming majority of chimneys were brick
However, brick chimneys are just the time-tested option. They have higher strength and are much more durable than metal ones. In addition, brick, due to its structural structure, itself has good thermal insulation and heat storage properties.
A brick structure is more fireproof than a prefabricated metal chimney, even made using the most modern technologies.
However, a rather big drawback of brick chimneys is their inner surface, since it is rough and has corners. Soot deposits are retained on it, clogging the smoke passage and reducing draft, which negatively affects the heating of the stove. In addition, the inside of the pipe overgrown with soot can cause smoke in the bathhouse or even catch fire during the heating of the stove from sparks that fall on it, which sometimes leads to very dangerous situations.
Metal chimney
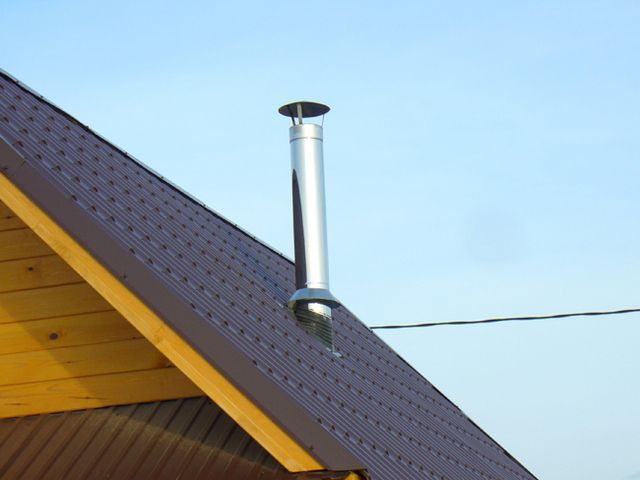
The metal chimney is much easier to install
A metal chimney is much easier to install than a brick one, and should be much cheaper. Modern sandwich structures made with the use of insulation are more practical than just single-wall metal pipes, but they also do not give such a heat preservation effect inside the furnace as a real brick chimney.
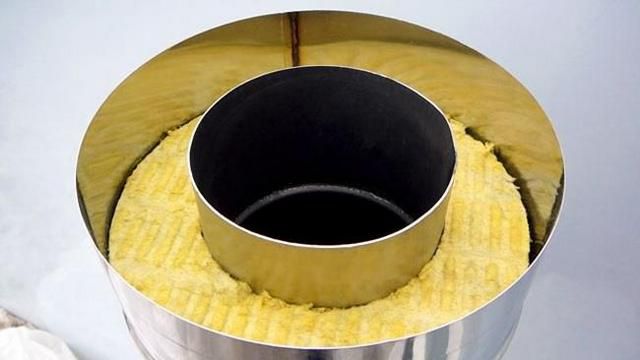
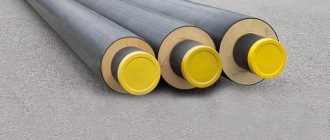
Insulated sandwich pipe structure
The advantage of the metal structure can be considered an almost ideally smooth inner surface that does not have edges, which allows smoke to go out unhindered in a directed turbulent flow. However, with sudden temperature changes on the internal surfaces, condensation may well form - this phenomenon will directly depend on the temperature outside in winter.If such a pipe is installed in a region with harsh winters, then it is necessary to choose pipes with the thickest insulating layer.
The metal chimney can be placed inside and outside
Another criterion for choosing the type of chimney is its external or internal installation. Each type of accommodation has its own advantages and disadvantages, which you also need to know when choosing a suitable option for yourself.
External chimney
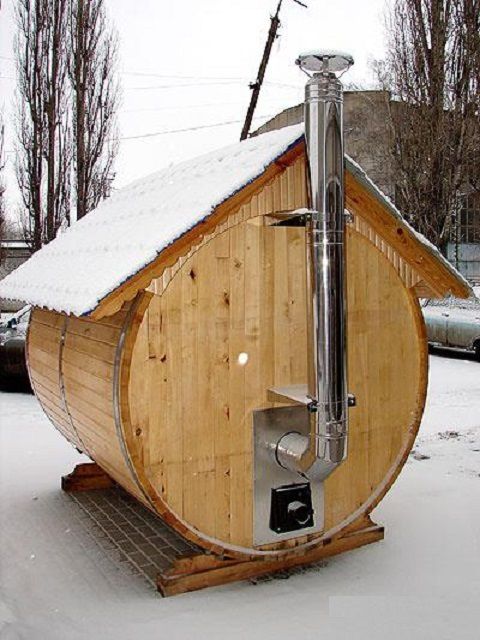
The idea to move the chimney to the outside wall belongs to American architects. This installation has become popular in domestic buildings, due to its simpler device. The chimney connected to the stove does not rise to the ceiling of the room, but is led out through the wall.
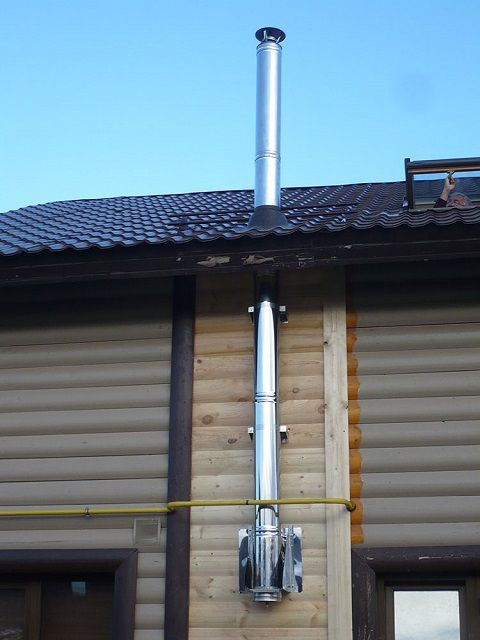
External chimney
The advantages of a metal chimney arranged in this way are in increased safety, in the fact that it is not necessary to arrange isolated passages for it in the attic floor and in the roof. Such a chimney will save the building from the risk of rain or melt water flowing into the gaps between the pipe and the roofing.
Serious disadvantages of the appearance of the chimney device include its rapid cooling, which means that condensation forms inside it, therefore such a chimney must be intensively insulated.
The second disadvantage is that the chimney, taken out to the outside, will not be able to supply additional heat to the bath room, and this will increase fuel consumption.
There are external chimneys and brickwork
There are also combined chimneys, which are brought out of knowledge. In this case, a metal pipe is removed from the stove, which is then led out through the wall and enters the brickwork of the chimney, which is built into the wall and rises to the desired height.
Internal chimney
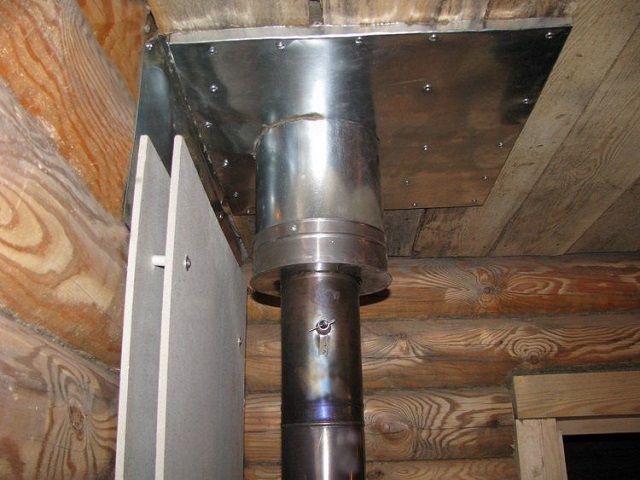
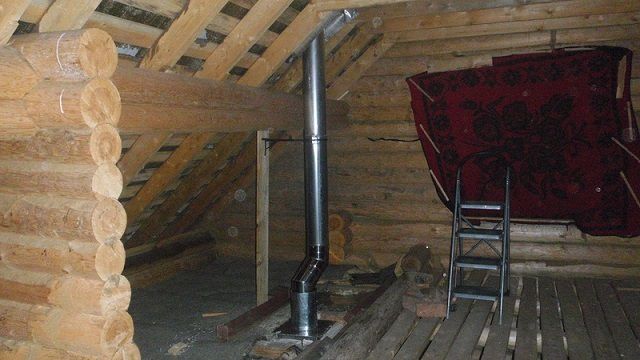
The metal chimney passing inside is mounted on top of the sauna heater and raised to the ceiling, then passed through the attic and the roof, then raised to a level corresponding to the relative position with the roof ridge. The advantage of this design is that all the heat that comes from the firebox, when passing through the pipe, will also warm the room of the bathhouse and attic, which means that the stove will cool down longer. This has a positive effect on fuel economy.
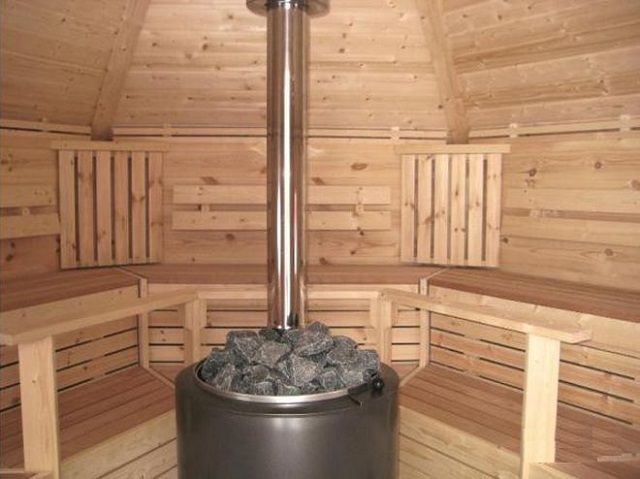
Heater stove with internal chimney
If you correctly plan and assemble the structure of the internal chimney, constantly keep the joints under control, then such a system will serve without problems for many years.
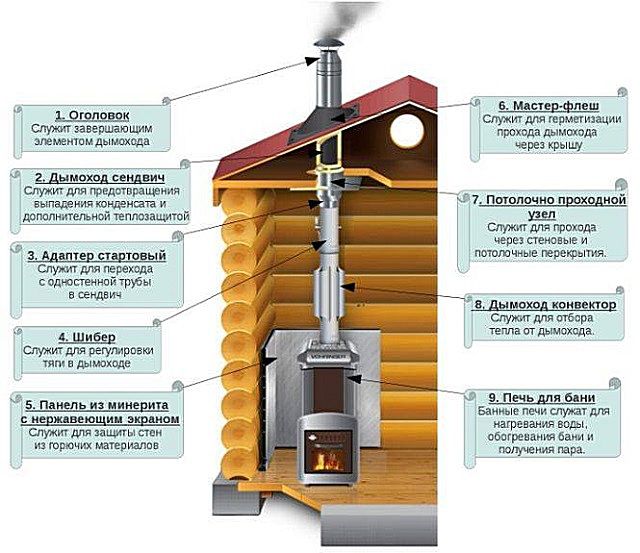
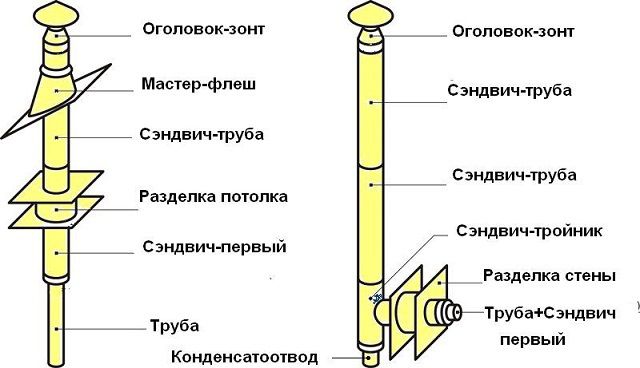
The main components of the internal metal chimney
The disadvantages of this design option include the fact that you will have to pass the pipe through the ceilings and through the roof.
Video: "short course" on the types of chimneys
Materials for the construction of a chimney
Materials are purchased after deciding on the design option for the chimney.
Brick chimney
For a brick structure, you need to purchase a heat-resistant brick and a masonry composition - this can be a special construction dry mixture intended specifically for laying chimneys and stoves. Some craftsmen prefer to use a well-chosen clay mortar.
In addition, it will be necessary to provide material for the fungus above the pipe.
Metal chimney
Manufacturers produce all the necessary parts for assembling a chimney
We recommend: Do-it-yourself home carpentry workshop in the garage, in the country - we describe in detail
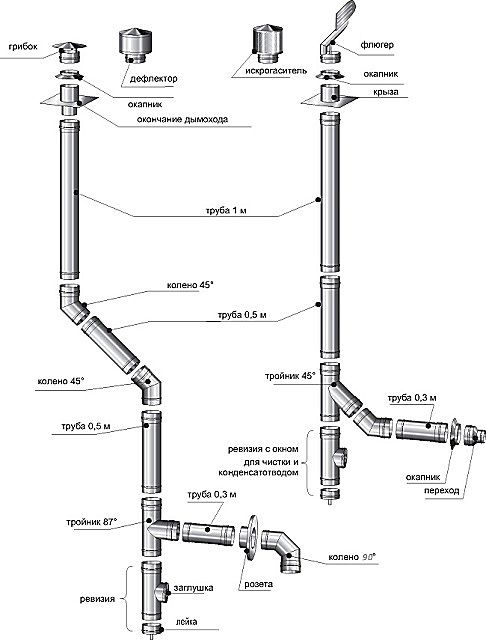
For a metal chimney, all the necessary parts are purchased after drawing up a detailed design diagram, taking into account all the corners and turns of the pipe.
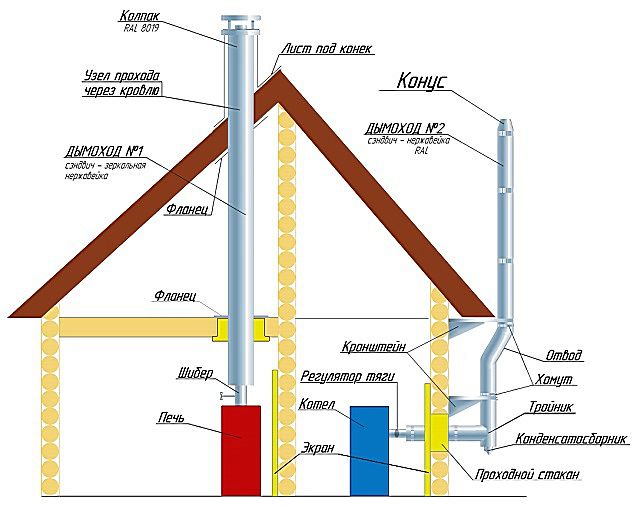
The diagram can be drawn with one line, on which the places where the chimney passes through the wall, ceiling and roof will be indicated, and at turns - the approximate value of the angle. With such a drawing, you can contact the store with a request to choose everything you need for installation.
In addition, two metal sheets with holes equal to the diameter of the pipe will be needed, which will be fixed on the ceiling of the bath and on the floor of the attic. Next, you need to think about a heat-resistant material that will be in the attic floor around the pipe, thereby creating protection for easily flammable materials. For waterproofing around the pipe on the roof, you will need to have waterproofing, in the form of sealant glue and a special rubber seal that is put on the chimney.
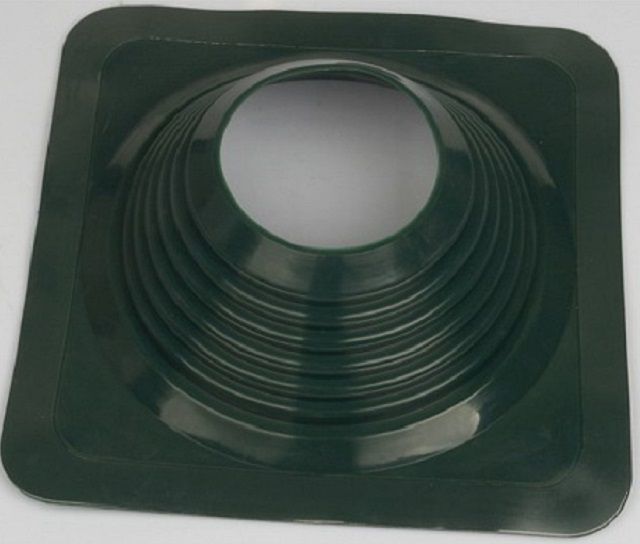
Elastic element for roof penetration
Separately, it must be said about the parameters for choosing pipes. The first thing to consider when buying metal chimney pipes is their internal section. It is calculated taking into account the power of the furnace, and usually for the bath version, the inner diameter is taken equal to 150-200 mm. If the diameter is too large, the heat will not be retained in the stove, and the pipe with an excessively small cross-section will not create the draft necessary to remove the smoke. In any case, the diameter in any of the sections can in no way be less than that of the outlet of the installed heater. The total height of the pipe must be at least 5 meters. And the exact value of this parameter will depend on its location on the roof. If the pipe comes out in the middle of the slope, then it must be raised above the level of the ridge, about half a meter. The best option for the location of the chimney on the roof is considered one and a half meters from the ridge, but this parameter is optional and depends on the location of the stove in the bath room. The quality of the draft will also depend on the height of the pipe. The metal from which the pipes are to be made must have a thickness of at least 1 mm, then the chimney will last a longer period. If it is conceived to install a tank for heating water in the chimney system, then the drawn up diagram may look like this. It can be modified and adjusted for a specific version of the installed stove and chimney.
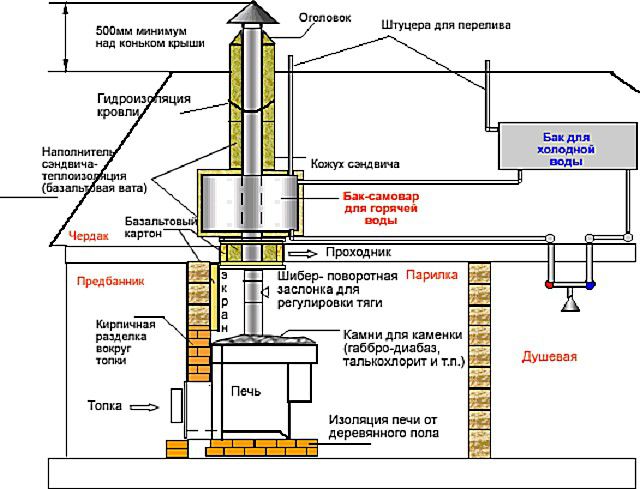
Chimney scheme option with a water tank
The tank shown in the figure works according to the "samovar" system, that is, it is tightly welded to the chimney. Some companies manufacturing this type of pipes produce such an element with a hot water tank already installed on it, which has two or three inlets for connecting water pipes - for filling the tank and for taking water at points of consumption.
Video: design features of bath chimneys
Installation of a bath chimney
After the sauna stove is finally installed, the chimney installation begins from the stove pipe. This can be the beginning of a metal chimney or a metal section that will connect the stove to a brick pipe.
Metal chimney
Since there are two types of chimneys, their installation is different.
Internal construction
If the pipe runs inside the building of the bath, then usually the whole system has an almost perfectly vertical appearance. The chimney is assembled from separate elements, while each of its higher parts is put on top of the lower one - installation "by smoke".
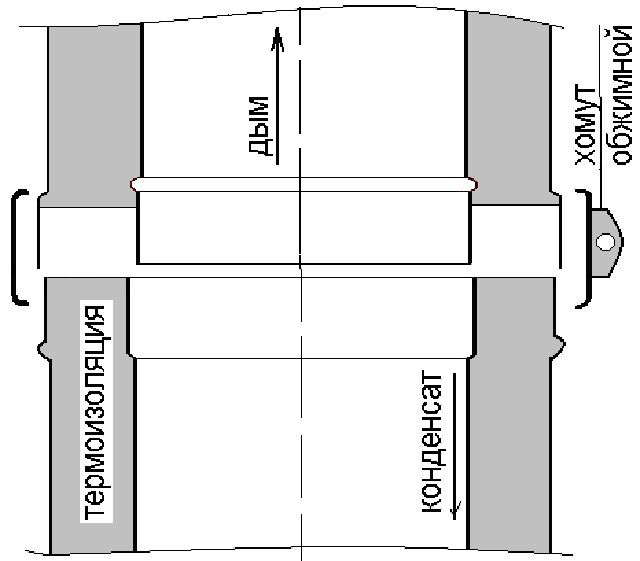
The usual connection scheme of sandwich pipes: the inner part - "by condensate", the outer - "by smoke"
If sandwich pipes are used, the approach changes somewhat - the installation of their inner part is carried out "by condensate" (the upper pipe enters the socket of the lower one) and the outer part - "by smoke". Such a system allows the accumulated moisture to drain freely inside the pipe down into the condensate trap, without getting into the heat-insulating material, which loses its properties due to waterlogging.
It is very important to calculate the placement of the joints in such a way that the joints do not fall on the levels of attic or interfloor floors, as well as the roof. Provided that the stove is located next to wooden walls, they must be protected from possible overheating and fire with heat-resistant materials, for example, it can be asbestos plates, which are better fixed in two layers.
Thermal insulation of walls and ceiling transition
If a samovar-type water-heating tank is installed, then a place is found for it not far from the firebox, placing it directly above it, or in the attic, if the distribution of heated water goes into two rooms - into the washing room and into the shower room. Before installing the pipes, their joints are coated with a heat-resistant sealant, and after installation from above, they are additionally fixed with special wide clamps.
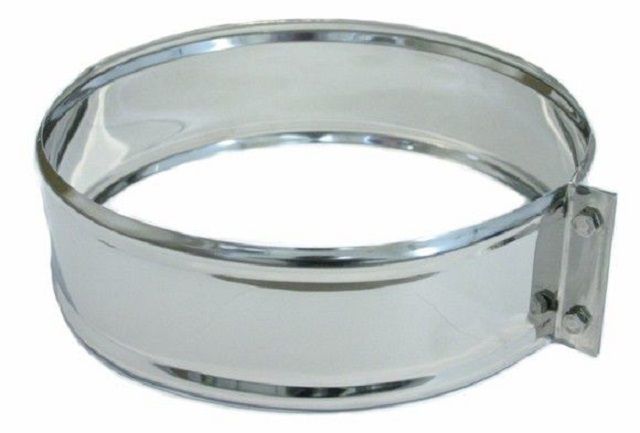
Clamp for secure fixing of pipe joints
If, when combining the individual elements of the chimney, sufficiently large gaps are found, then the inserted part is sealed with an asbestos cord, which is wrapped around the pipe. However, it is best to choose items that fit perfectly together in size. The first section of the chimney, fixed to the stove nozzle, cannot be multilayer, that is, it is an ordinary single-walled metal pipe with special connections. It usually has a gate valve, which is otherwise called a gate valve. This control element is necessary in order to create and maintain the required level of draft, for the period when the bath is warming up, and to preserve the heat of the stove as much as possible after the end of the furnace. The installation location of this element can be clearly seen in the above chimney installation diagrams.
Pipe section with gate valve
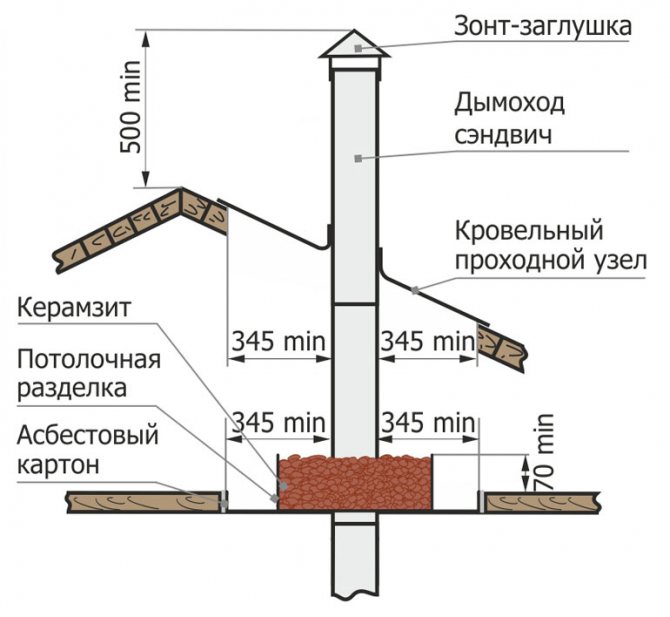
To pass the pipe through the ceiling, it is convenient to use a box with a wall height 30 ÷ 40 cm higher than the thickness of the ceiling. The distance from the pipe to the duct walls must be at least 180 ÷ 200 mm.

Pass-through block - special box for ceiling slabs
A square hole is cut in the ceiling slab, into which the main box will easily enter. Its bottom, that is, the lower part, is fixed to the ceiling, Through the hole in the bottom part, the chimney is passed into the attic.
Then the box is filled with a light heat-resistant material - it can be medium-grained expanded clay or rock wool. With such thermal insulators, the box is filled completely, to the top, with the maximum possible density.
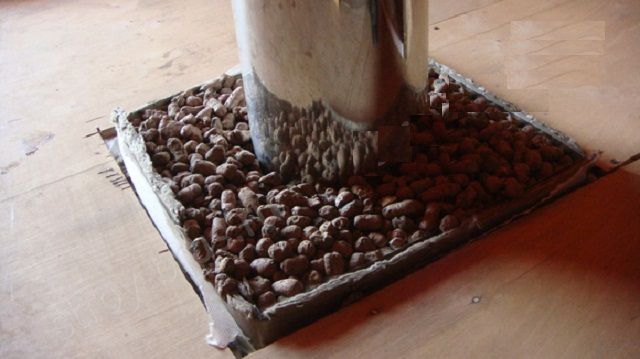
Box filled with thermal insulation material (in this case - expanded clay)
In the attic, the box is closed with a metal lid with the same round hole that fits over the protruding part of the pipe.
In the attic, the chimney usually runs smoothly, but if it suddenly falls on the lathing bars, then you can make a small bend with the help of bends.
In the attic, in order not to fall on the rafter or beam, you can make a slight bend
When the pipe passes through the roof, a metal or asbestos sheet with a hole is also fixed from the attic side. The hole can be round or oval, depending on the slope of the roof.
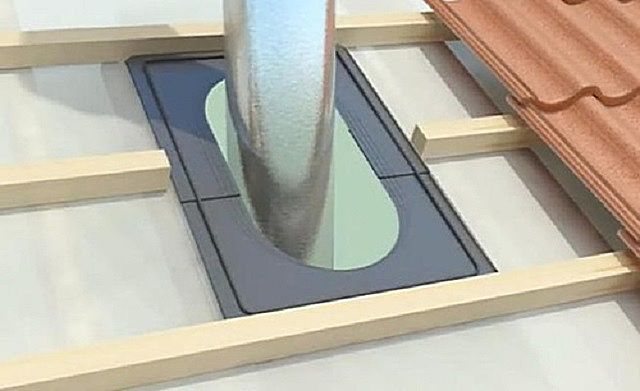
Pipe passage through the roof
A safe heat-resistant insulation made of asbestos boards or mineral wool is laid around the pipe. Such a gasket or box will protect the combustible elements of the rafter system.
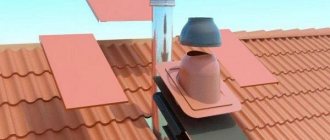
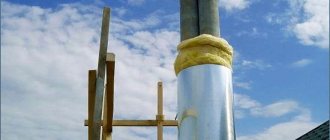
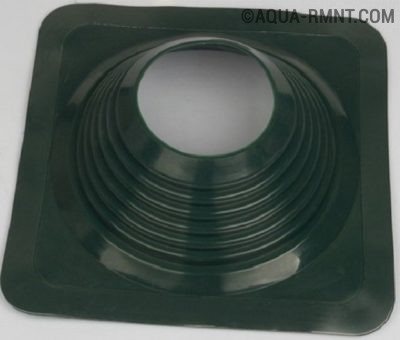
Further, after laying the roofing material, it is necessary to carry out waterproofing work, since moisture can penetrate into the gaps between the pipe and the roof covering. To do this, a special elastic element is put on the pipe, which is glued to the roof surface with the help of a moisture-resistant sealant, and then securely fixed with fasteners (for example, roofing, self-tapping screws).
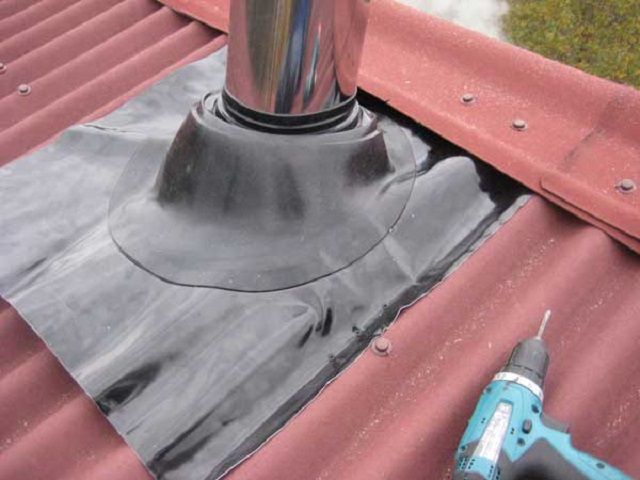
"Flush" - an elastic element for sealing the pipe passage through the roof
It is imperative to install a protective umbrella on top of the pipe, which will protect the chimney from the ingress of not only atmospheric precipitation, but also various debris or dust.
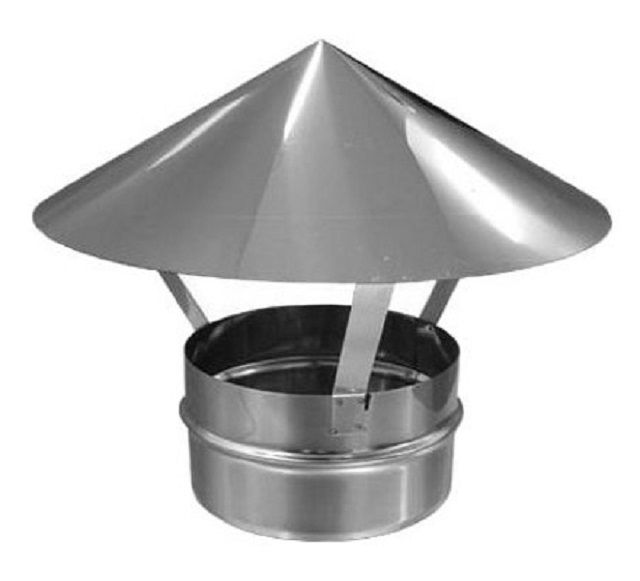
Pipe umbrella
External structure
In order to install the chimney according to the scheme with its external placement, the pipe from the stove is led out through the wall.To ensure safe operation in this case, it is best to use brickwork, which will cover the brick wall at the back of the stove and insulate the wall from heat when the chimney passes through it.
The diagram shows you how a section of a pipe through a wall looks like.
One of the options for external placement of the chimney. Disadvantage - condensate collection is not provided
In order to turn the pipe towards the wall, you will need an element of the system, which is called a bend or elbow. Such parts are produced with rotation angles of 90 or 45 degrees (sometimes there are others), so it can be selected for any arrangement of the structure.
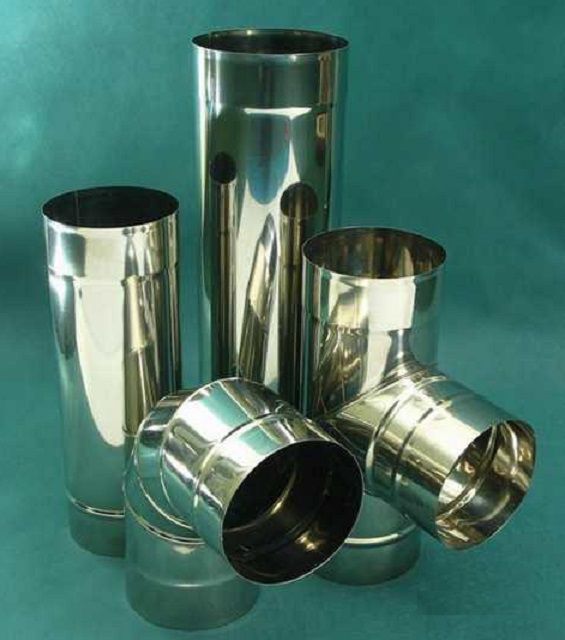
Tees and Elbows
A pipe can also be led through a wall through a metal box, as well as through an attic floor. In this case, the box is filled with stone wool, and small gaps around the pipe are sealed with a heat-resistant sealant. A tee is installed on the outer wall, from which further installation will go - up, along the wall, and down to the condensate collector. Special fasteners-holders are installed on the wall, which will fix the chimney vertically. The pipe is raised above the ridge height by about half a meter - this is necessary to create good traction. A protective fungus is put on top of the pipe head.
Installation of an external sandwich chimney explained very approximately, since in more detail, with all the nuances, it is described in the publication of our portal specially devoted to this issue.
Video: a variant of a metal bath chimney with access to an external wall
Brick chimney
Brick chimneys are divided into root and top-mounted. For sauna stoves, the first one, the root one, which is located next to the stove, is ideal.
If the stove is also made of bricks, then the chimney is attached to the overall structure. Well, if the stove is metal, then it is connected to the brick chimney with a metal pipe.
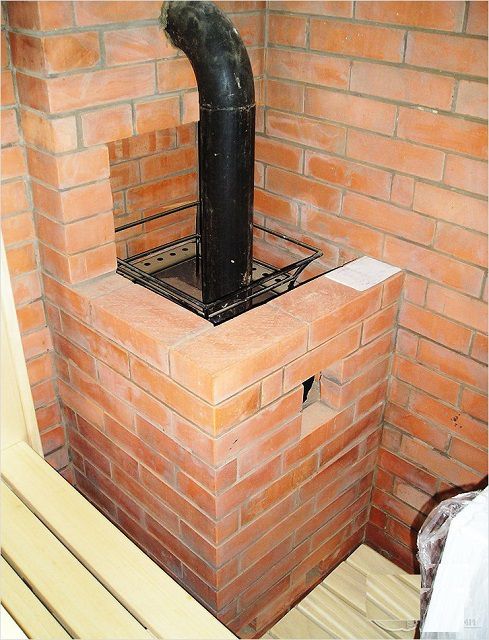
The sauna stove is connected to the main chimney by a metal pipe
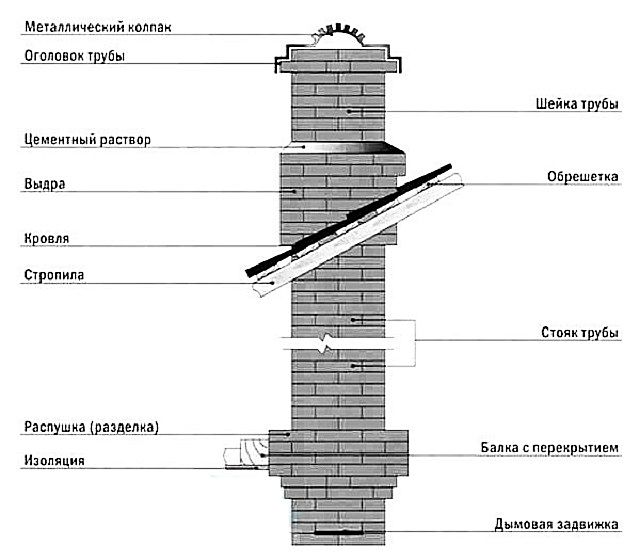
The figure shows an approximate diagram of a brick chimney, with all its departments:
Closer to the ceiling, a smoke damper is arranged on the pipe, which regulates the draft inside the furnace, on which both the intensity of combustion and the long-term preservation of the entire structure in a hot state depend. Further, for the passage of the pipe through the attic floor, fluff is performed in the chimney structure. Fluffing or cutting is called the thickening of the walls of the chimney while maintaining its internal section. This is provided in order to protect the combustible materials of the floor from possible overheating and fire.
Scheme of a "classic" brick chimney
Above the fluff there is a straight section of the pipe, which passes through the attic and is called a riser. Above, when passing through the roof, an otter is laid out, which, in principle, "works" in the same way as fluff, protecting the rafter system from overheating. However, in addition, it closes the gaps between the roofing material and the chimney masonry with bricks protruding from the general structure. Then the pipe is narrowed to its original external size - this section is called the neck. Above the neck of the pipe there is a head, the bricks of which also protrude outward beyond the width of the walls, providing additional protection from precipitation. From water and dirt getting inside the pipe, the chimney will be protected by its final element - a metal cap.
Chimney installation
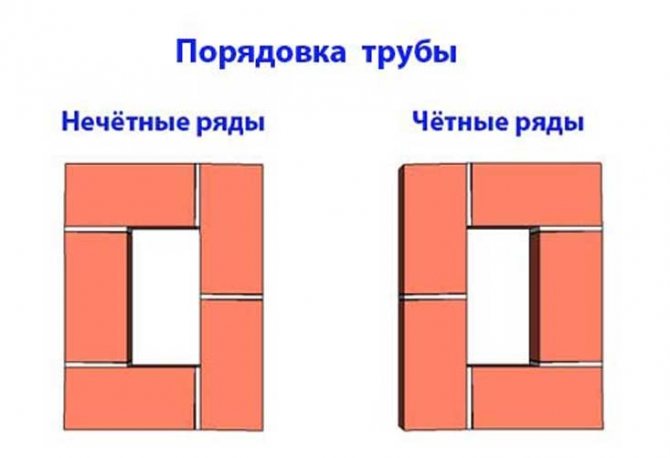
The chimney is removed from the foundation according to the same row pattern, since the structure should be even and not have any protrusions or windows, with the exception of leaving a hole in it for embedding a metal pipe from the stove.

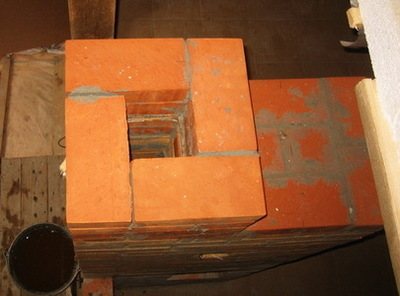
Inner channel of a brick chimney
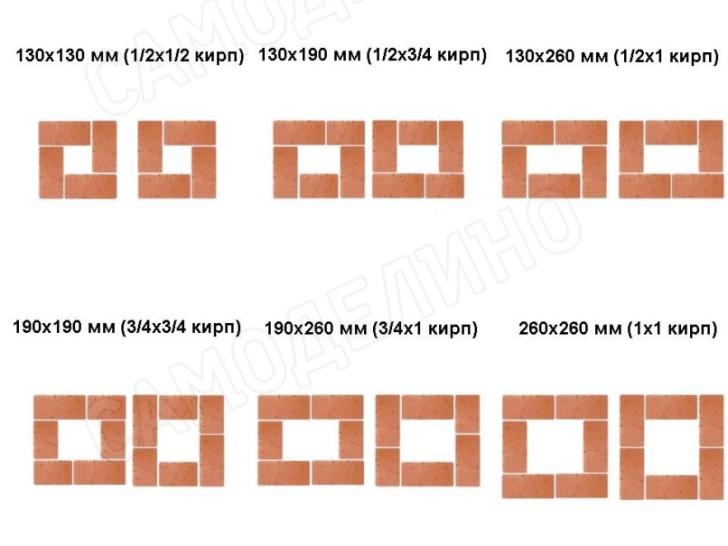
This chimney is built in the form of a square column with a well-shaped section inside. The size of the section can be "half brick" - 130 × 130 mm, "brick" - 130 × 260 mm, or even two bricks - 260 × 260 mm. It all depends on the power of the sauna stove.
The foundation for the chimney will be the foundation - usually it is made of the same thickness as for the sauna stove, and forms a single structure with it. Having raised the pipe to the desired row, a valve is installed in it, and then the work proceeds according to a scheme that is suitable for both the overhead and main chimney.
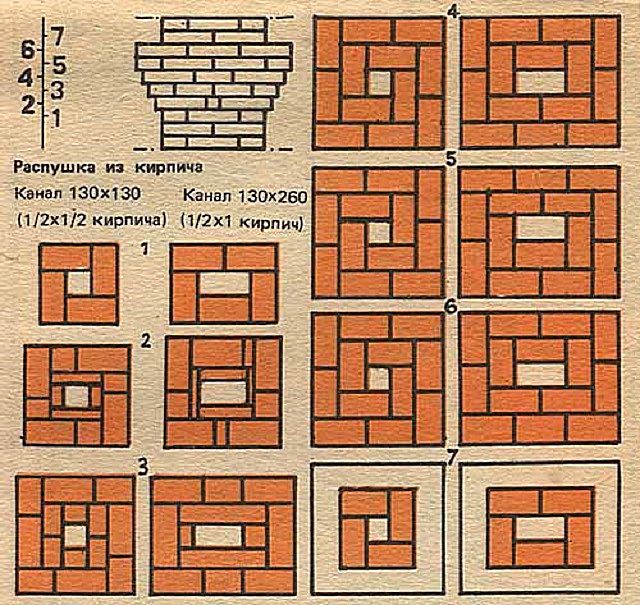
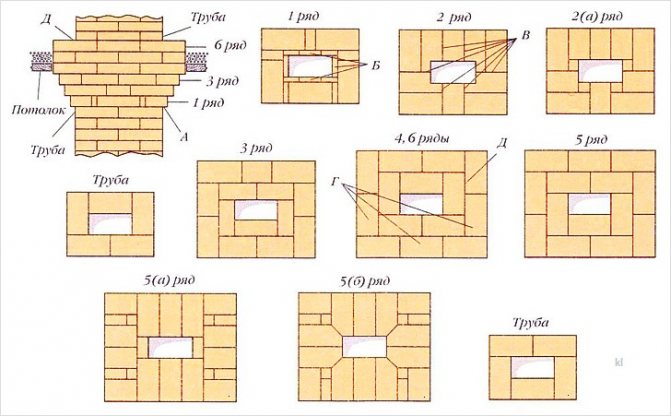
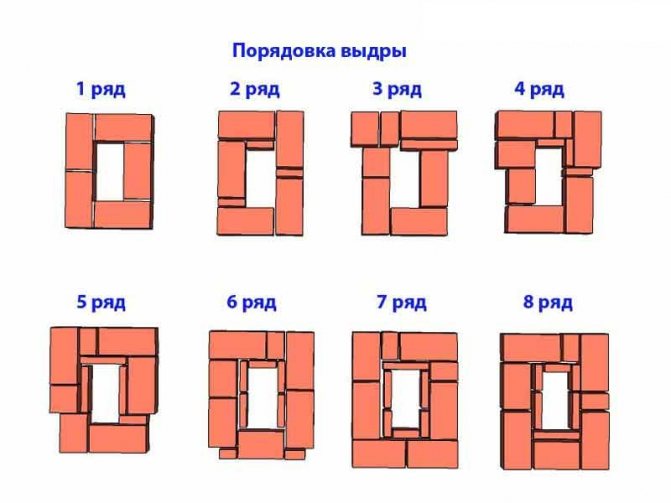
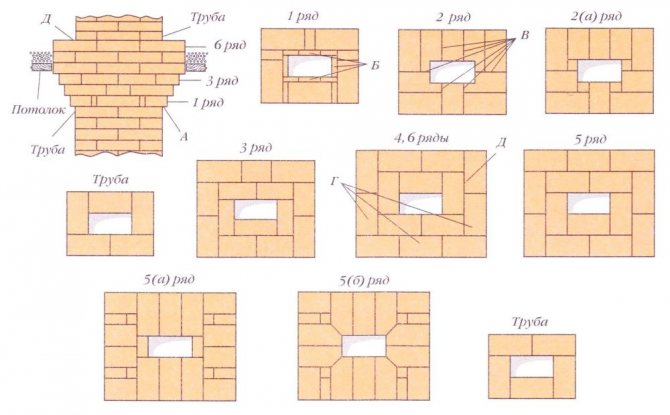
Schemes of the ordinal masonry of the chimney and fluff
This diagram shows two pipe options. They are given as an example for performing masonry, therefore, given the size of the chimney, the number of bricks on each side can vary in one direction or another.
- The first row in the diagram is the final row of the pipe neck.
- In the second row, the fluff starts to be laid out, so the bricks are laid with a shift to the outside, by about ⅓ of the brick. Here you will have to use not only solid bricks, but also their parts. To do this, using a pick, they are carefully broken into the necessary fragments.
- Moving the bricks to the side, they need to be supplemented inside with additional fragments, since the inner section of the well must remain unchanged throughout the entire masonry. Failure to do so can significantly reduce thrust.
- From the third to the fifth row of fluff, the brick also moves outward by ⅓ of the length, while still maintaining the size of the inner section.
- The sixth row is the same size as the fifth row and is laid out without shifting to the side.
- The seventh and eighth rows correspond to the laying of the first row.
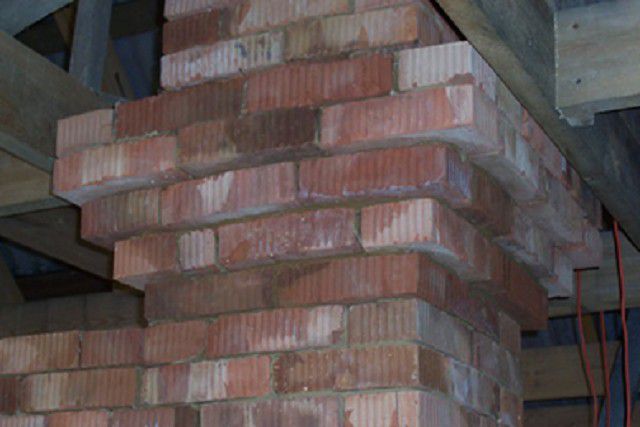
This is what the finished fluff looks like
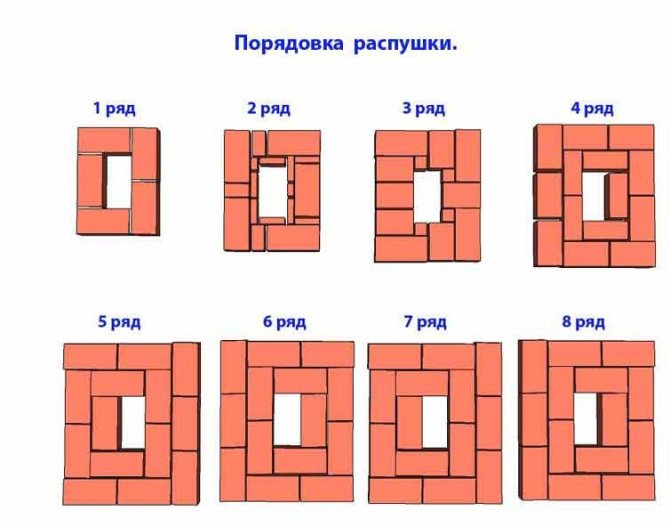
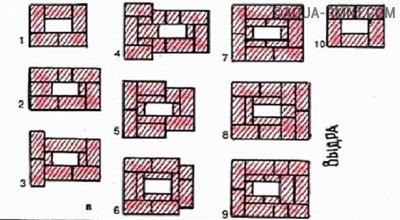
After the laying of the cutting is completed, it is the turn of the erection of the otter. This is a rather difficult task, since it is necessary, with the help of each subsequent row, to bring out a step that protrudes outward by ⅓ of the brick.
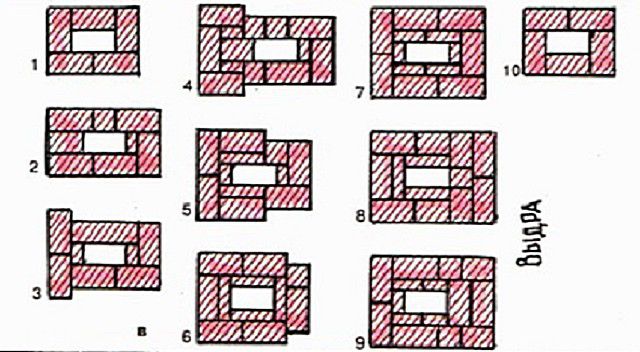
Otter masonry scheme
- The first row of the otter is the same size and shape as the last row of the cut.
- In the second row, the laying of steps begins, which expand the chimney to the outside also by 1/3 of the width of the brick.
- Further rows are laid out in accordance with the otter pattern.
Then, there is the neck of the pipe - it can be clearly seen in the presented diagram. Next, lay out the head, which consists of two rows, and at the same time the lower one should also protrude somewhat outward. The last step is to install the roof-hood.
In the attic floor, the combustible elements in this case will be well protected by fluff, but you still cannot do without waterproofing the pipe on the roof.
The waterproofing of the brick pipe begins to be done before the roof is covered with roofing material. It can be done with roofing material and mastic. After applying the mastic to the surface of the lower part of the pipe, it is heated with a burner, and then roofing material is glued to it, firmly pressing it to the heated surface. Further, close to the pipe, roofing material is laid on top of the roofing material, and a decorative finish (apron) is installed on top of it. The remaining gaps must be tightly filled with sealant to prevent moisture from entering through the cracks between the roof and the brick pipe.
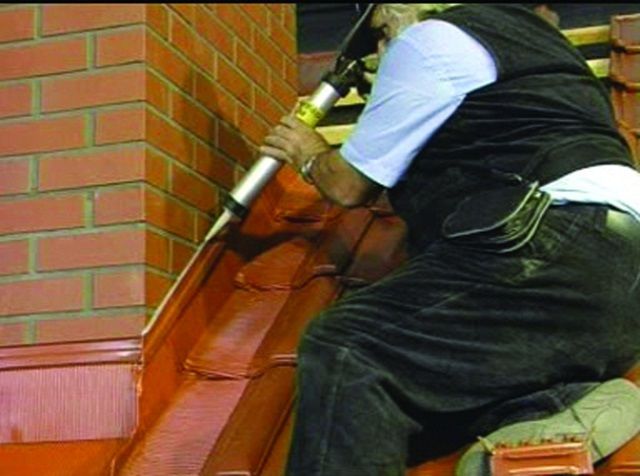
Sealing the gap between the apron and the brickwork
So, in principle, any of the chimneys can be built with your own hands. Probably the most difficult of all installation is to correctly mount the nodes for the passage of the pipe through various obstacles. Any problems can be solved if you approach them competently, after studying all the instructions and choosing the right option. However, it is imperative to close this article with an important warning:
A chimney is a structure on which the health and even life of people, the safety of buildings and all the property in them directly depends. There are no trifles in the process of building a chimney and cannot be, no amateurish simplifications are acceptable. If there is even the slightest doubt about your abilities or about the correctness of the design being created, you need to seek help from specialists.You shouldn't be ashamed of your ignorance or inexperience - the stakes are too high!
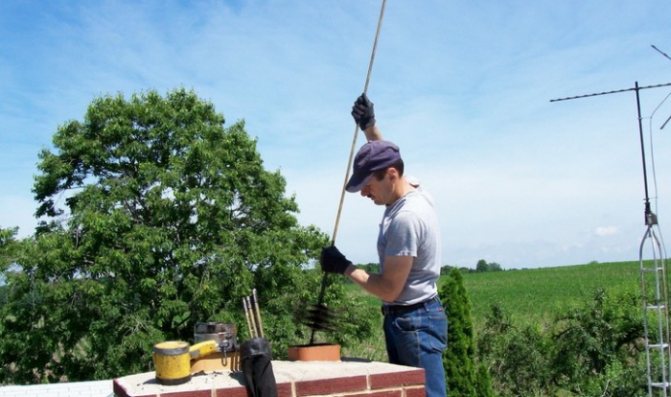
Find out the available ways on how to clean your chimney with your own hands from our new article.
Chimney types
To build you need to decide with pipe type... Depending on the location, there are:
- Indigenous pipes. They have their own foundation - they rest directly on the foundation. They can be both inside the house and outside. Advantages - connectivity several heaters, as well as construction "in reserve", with the subsequent connection of not yet purchased heating equipment. This option is perfect for any type of metal stove.
- Mounted pipes. They rest directly on the stove itself, which stands on the foundation.
For metal stoves, it is better not to use a top-mounted chimney - too large a mass leads to deformations.
- Suspended pipes. They are supported by a special bracket attached to the wall or ceilings.
Such a chimney cannot be built from brick; it is better to use metal light pipes, thermally insulated and sewn into the body (sandwich chimneys).
- Wall pipes. If the outer wall or partition is made of bricks, a smoke outlet can be designed in it. This technique has been used in the construction of stone buildings since the days of the Roman Empire.
This saves material and does not hide free space, the pipe can be made several floors without loss of strength. Cons - when soot ignites, the wall turns into a hot pillar, which leads to a fire, and with constant soaking from condensate, the pipe can collapse.
If only brick is available from the materials for the chimney of an iron stove, it is worth stopping at the option of a root or wall pipe. It does not put pressure on the oven itself, you can connect at different levels and is not difficult.
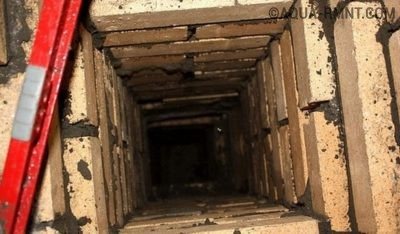
Cutting the pipe in the ceiling opening
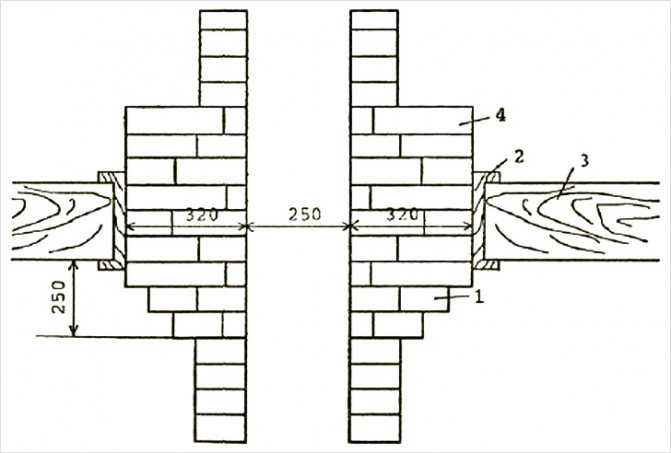
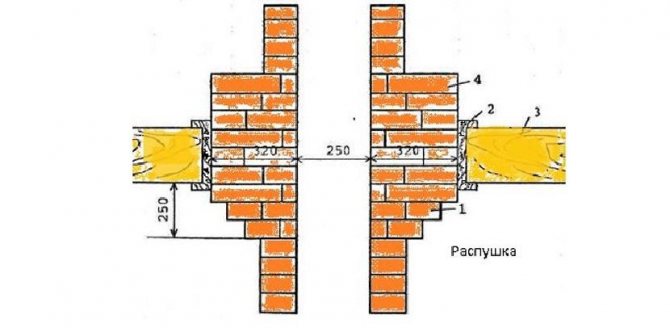
Before laying the cutting (expansion) of the pipe, you need to check the horizontality of the masonry, determine how many rows are left to the ceiling, take into account the height of the cutting, the draft, for example, of a log house. The figure shows a cut with a 13.5 × 26 cm flue gas duct in a house that has already precipitated. If you make the cutting masonry at the same level in a new log house, then after it has settled, the upper cutting row will be in the attic, and the place where the cutting was previously will look like a hole. This means that in a new house, taking into account its probable draft, cutting should be started at least 7-10 cm below the ceiling.
Cutting the pipe in the ceiling opening with a flue size of 13.5 × 26 cm
It should be borne in mind that each material has a different sediment. Depending on the height of the room and the oven, cutting will start a few centimeters higher or lower. If the groove is one row lower, then the upper overlap will look a little wider, but since it is under the ceiling, after laying, all the groove rows will look the same in height. There is a rule: if you do not know the size of the house draft, then it is better to cut it below the ceiling. It is more convenient to cut the pipe into four laps A up to 3 cm according to the template, starting with the corner bricks and leveling the top and side of the row with the rule. The size of the gas duct in the groove should be the same as it was at the beginning of the laying (in the pipe riser), therefore, in the 1st row of the groove from the inside, you need to lay the quarters of bricks B flush with the gas duct. It happens that cutting without dressing with the center falls off, because it can be stepped on from above when walking in the attic. Therefore, it is imperative to connect the rows with the center.
Sometimes it is advised to make gaps in the groove more than 6 cm.However, with such an overlap, the brick simply turns out of the masonry from the pressure from above. You need to know that when laying a cut with an overlap even of 25 mm, the hanging brick still tries to lean over the void. In the 2nd row, the masonry is connected to the middle of the pipe.It can be placed in the same way as row 2 (a), where square cubes are applied to the three-quarters, but they are more difficult to make. It is good to start the admitting the 3rd and 4th rows from the gas duct, then the bricks will be fixed around it with the lower row, and it is easier to put the outer bricks against them with an overlap, but all the same, the admitted part of the brick needs to be maintained for several seconds until the moisture from the solution is not will be absorbed into the brick. The inner seam will keep the brick from tilting well.
Cutting is done for fire protection purposes, so the seams should be as thin as possible. The chipped or chipped part of the brick must be ground in (leveled) with the brick plane or with an emery stone. Before chipping away something else from the already chipped brick, you must first level the chipped off site. It is best to make the grooves in the groove in the first three rows of 32 mm. These overlaps allow you to make a gradual expansion of the pipe with the same pitch on each side into a half-brick plus a seam. In the process of cutting, the laying of the 4th row begins from a gas duct made of a whole brick.
Row 2 has six B seams from the flue to the edge of the groove. This row is below the ceiling, so such seams are not dangerous. But if this masonry is made in the middle of a wooden ceiling, then with incomplete joints and in the case of cracks with an uneven settlement of the furnace foundation, there is a danger of fire. To avoid this, near the parts of the ceiling to be burned, the cutting is done in rings (rows 3-6) so that the seam from the gas duct is overlapped by the middle of the brick G of the second, outer ring. Since on top of the ceiling they make a thermal backfill from combustible materials (leaves, sawdust, peat, etc.), then the ceiling cut is placed one or two rows above the backfill.

Cutting the pipe in the ceiling opening with a flue size of 13.5 × 13.5 cm
The laying can be finished as shown in the usual orders, but in this case, the upper rows in place D will not be connected to each other and there is a feeling that they can disperse. For reliability, I did the laying as shown in the figures. A pipe begins on top of such a row, which will secure the cutting masonry. It would be nice to finish the top of the groove with 6 cm ledges around the entire groove, as shown in the 7th row, where the groove was laid with a pipe flue size of 13.5 × 13.5 cm.
Sometimes, when laying masonry in the middle of the ceiling opening, when the last bricks in a row are placed next to each other with a thin seam, uncertainty about the strength of the seam is created. In this case, the seam must be sealed. They do it like this. The entire width of the hammer blade is pushed into the seam between the brick and the ceiling and, tilting the hammer, the blade is pressed more tightly against each other in the middle of the bricks. An even pipe stand is laid up to the roof.
What does a brick pipe consist of?
Brick stove pipes are of various designs. But any chimney necessarily has the following elements:
- Door or a knockout brick for cleaning. They are located at the bottom of the channel and in the turns of the hog, if there is one.
- Base with a view or catch. The most even bricks without cracks are selected - the entire chimney will rest on them. If possible, the base should be wider than the pipe on a brick and form a "heel" - a large support area.
- The pipe itself. Smooth, with smooth inner walls, seams without voids and cavities.
- Fire-fighting fluff when passing overlaps - expansion of the pipe for 1 brick. It is needed to reduce the temperature of the edge in contact with the heat-insulating box.
- Waterproofing "otter" - optional element, expansion of the pipe when laying outdoors. It plays the role of a dropper - raindrops do not flow along the root of the pipe, but flow down the walls of the thickening.
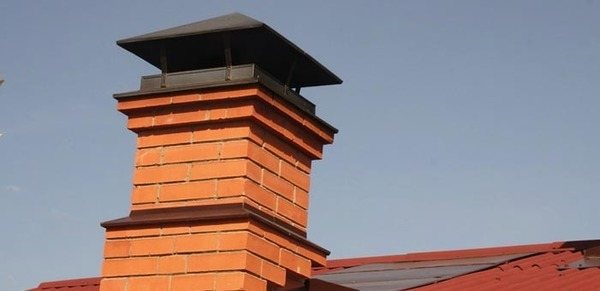
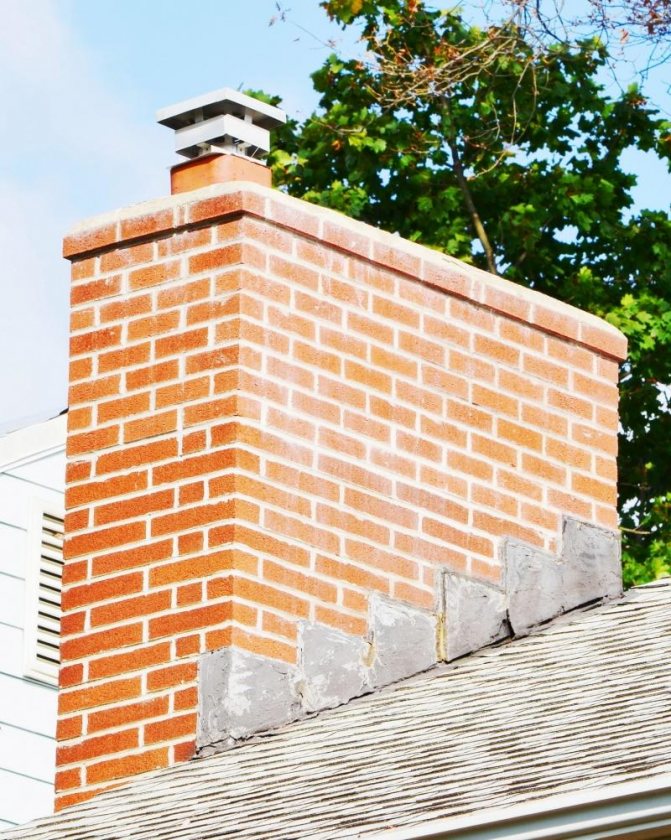
Photo 1. It looks like a brick pipe with a waterproofing "otter" and above it - a metal "umbrella" to protect it from moisture.
- Top protection against rain and snow. It can be a metal or concrete "umbrella", or finishing the top row of bricks with waterproofing fiber cement mortar.

How to assemble a chimney correctly?
Fire safety rules when installing a chimney prescribe the observance of certain standards. For wiring a sandwich pipe through wooden structures, high-quality thermal insulation of metal parts from wood (or any other combustible) is required.
In the case of a finished metal pipe, it is possible to purchase ready-made structures that insulate the roof from the effects of heat (pass-through unit) and precipitation (oblique pad and protective corrugated flange).
Rules for assembling a sandwich part of a chimney:
- The assembly of the structure is carried out from the bottom up.
- Metal parts are inserted into one another according to the principle of socket connections. The joints are sealed with a special non-flammable compound and reinforced with clamps (special clamps).
- There should be no joints in the pipe section through the floors. This is a fundamental fire prevention rule when assembling a chimney structure.
- If the roof is made of flammable material, it is necessary to install a spark arrestor on the pipe head. In any case, a protective cap is required.
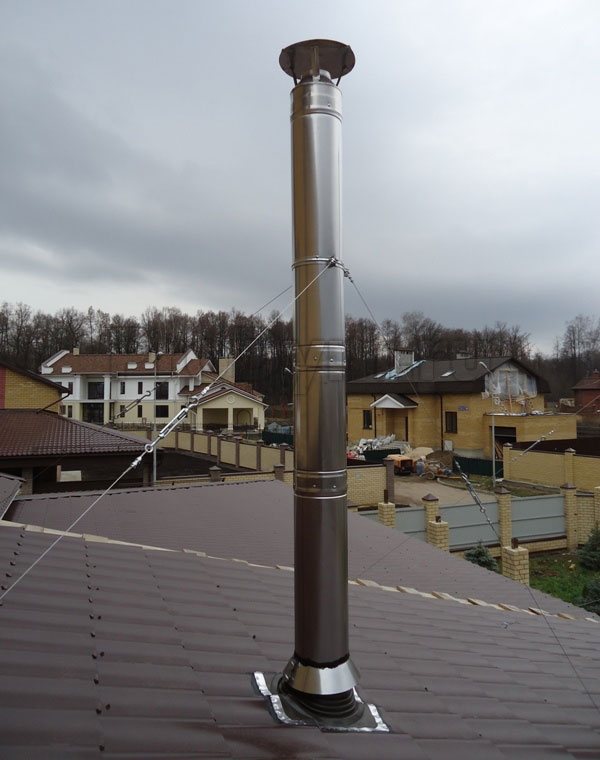
- To secure the high structure, I use tension cables.
General rules for installing the transition:
- The metal part of the pipe can be partially recessed into the brick part according to the sleeve principle.
- It is unacceptable to reduce the inner part of the channel or install mechanical barriers (protrusions, fittings) for the passage of combustion products.
- To ensure tightness, a black oven sealant with a resistance of up to 1500 degrees is used. If the pipe is not supposed to be disassembled, then the sealant passes through the inside of the pipe. If the structure will (in the future) need to be disassembled, then only the outer seam is sealed. Later, during disassembly, the sealant is removed by mechanical action (broken).
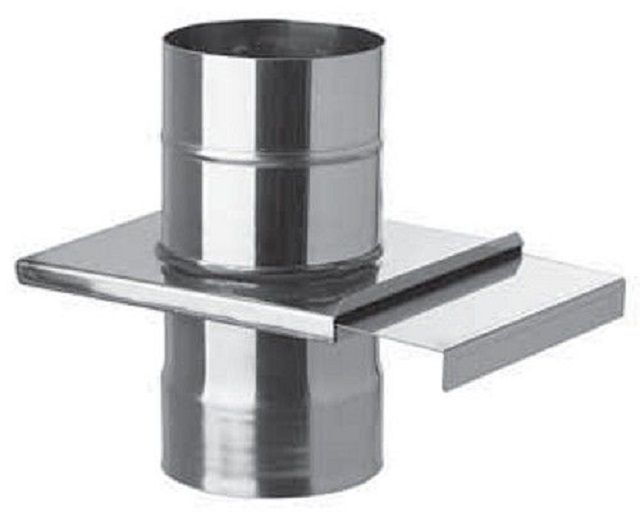
- To switch from a square shape to a circular section, a support platform (square) and a branch pipe (cylinder) are required. Better if it is a one-piece construction.
We recommend that you familiarize yourself with: Features of the installation and use of chimneys made of a metal pipe with your own hands
There are several options for switching from a brick chimney to a sandwich pipe. Each of them has its own advantages.
DIY chimney construction for a metal stove
It requires skills to build it. bricklayer... In the old days, the most experienced stove-maker was always invited to build a pipe. A self-confident person will fully cope with this task if he has patience and will lay each brick carefully.
The construction of a chimney consists of a number of important stages - design, foundation preparation, purchase of materials, pipe laying, finishing.
Attention! Neglecting technological nuances will lead to serious consequences! Bad cravings will cause smoke inside the room, carbon monoxide poisoning.
Poor quality materials or non-compliance with masonry technology leads to the destruction of the chimney.
Project selection
In order not to be mistaken, the following factors are taken into account:
- Boiler type and fuel combustion mode.The main enemy of brick pipes for the furnace is condensate... It is formed when the flue gases from the boiler cool down below a certain level. For pyrolysis boilers and long-burning furnaces of the type "Stropuva" or "Buleryan"the temperature of the exhaust gases is low, the condensate settles on the walls of the chimney, and the brick gradually gets soaked and destroyed.
Type of fuel. Wet wood, even with a "hot" fast burning, emit a lot of moisture. It evaporates and penetrates into the pores of the brick.
The condensate contains sulfuric acid, which has a detrimental effect on masonry. You need to heat with well-dried wood with moisture no more than 15%.
Brick dimensions. The inner diameter depends on this.The smallest pipe, a quadruple, is formed of four bricks and has a wall width of half a brick - 125 mm, six - 250 mm.
The more powerful the firebox, the wider the smoke outlet should be.
Consequences of incorrect installation
Companies that provide services for the installation of heating devices rarely perform chimney installation as well. In most cases, you have to hire another contractor or do the work yourself. At first glance, such work does not require much effort, but such a view can turn into unpleasant consequences that will make themselves felt for a long time. Among them are:
- moisture seepage;
- high humidity inside the chimney;
- damage to the insulation;
- destruction of the rafter system;
- improper air circulation in the attic.
If the pipe was brought out incorrectly, then it is difficult to talk about high-quality insulation of the joint. If this is not done, then the water will seep and flow down the chimney directly to the boiler. This will lead to the destruction of the chimney if it is made of bricks. An increased level of humidity can be not only outside, but also inside the chimney. One outcome of the case will be the spread of mold and mildew, and the other is a deterioration in traction. A significant amount of fuel will have to be spent on drying the chimney. If a chimney sleeve has been made, then the fungus can spread between the brickwork and the metal pipe. In this case, a complete dismantling and replacement of the structure may be required.
When a sleeve is used, an insulation in the form of mineral wool is laid around the pipe. With a constant supply of moisture, the thermal conductivity of the insulation will increase, which will reduce its effectiveness in some cases by half. Drying may have no effect, since the formation loses its physical properties. Incorrect pipe routing can damage the roof truss system. This will happen due to the ingress of moisture on the wood and the spread of rot along the beams. The outcome may be the saddest. Through the cracks between the roof deck and the chimney, not only moisture can seep, but air can also pass through. Incorrect air exchange will lead to a rapid outflow of warm air, which will lead to an increase in fuel consumption for heating the room.
Difficulties during construction
When building, a novice bricklayer can face several troubles:
- The solution is constantly falling inside pipes. To avoid this, you need to put the solution in carefully dosing. If it is not possible to achieve, we plug the pipe with a large rag, which we constantly "raise". It will prevent the solution from remaining in the chimney.
- "Filling" pipes. Not worth putting more than 10 rows in one day - the building does not withstand the load and sags. Therefore, we put in 3-5 receptions, constantly monitoring the level.
- "Crooked" brick... Plastic molding brick sometimes sins in size up to 0.5 cm. Therefore, it is worth monitoring the horizontal level and the level inside the chimney.Protruding "teeth" and edges can lead to "ghosts" - the hum of air at high thrust.
Materials used
Elements of a metal chimney
- To understand what kind of materials you need to purchase, you first need to draw up a detailed drawing, where all the angles and turns of the pipe will be indicated. In this diagram, indicate the exact angles so that your knees are correctly selected. Pipe dimensions are also very important. It needs to be enough for the entire height of the building.
- Get a couple of sheets of metal that are the same diameter as the pipe. They will need to be fixed on the ceiling of the bathroom and on the floor of the attic.
- It is necessary to take care of heat-resistant materials that will fit on the ceilings and protect the bath structure from the high temperatures of the chimney pipe.
- On the roof, the pipe must be waterproofed. To do this, you can use a glue sealant or a special rubber seal.

Rubber seal for waterproofing - When you purchase chimneys, pay attention to the internal section in them. Depending on the power of the oven, you need to choose the right one for you. For the bath, works with a diameter of 15–20 centimeters are usually used. By installing a pipe with a larger diameter than you need, the oven will lose heat too quickly. And if the pipe is too small, then the thrust will be insufficient.
- The chimney must be at least 500 centimeters high. The quality of traction directly depends on this.
- To make the pipe last as long as possible, choose the metal from which it is made, with a thickness of 1 millimeter or more.
- If you plan to install a heating water tank, consider this as well. On the diagram, indicate its location and calculate what you need to purchase to install it.
Arrangement of elements of a furnace with a heating tank

This version of the pipe is built using heat-resistant bricks, which are connected to each other with a masonry compound (building dry mixture for the construction of stoves and fireplaces). Sometimes a well-chosen clay solution is used. In addition, the pipe will need to be treated with antifungal compounds. The amount of material is calculated based on the order.
You will also need a level, square, putty knife, etc.
Brick chimneys can be indigenous and mounted. The first option is located next to the stove and is ideal for sauna stoves.
If the stove is initially made of bricks, then the chimney is added to the overall structure. If you have a metal stove, then the brick chimney is connected to it using a metal pipe.
Connecting the chimney to the sauna stove with a metal pipe
Nuances
- A smoke damper is installed near the ceiling in the chimney, which is responsible for the draft in the stove. It also determines how intensively the fuel will burn and how long the stove will store heat.
- To pass the pipe through the ceiling of the attic, it is necessary to fluff in the chimney.
Brick chimney device diagramFluffing (cutting) is a thickening of the walls of the chimney part of the furnace while maintaining the internal section. Thus, the floor is insulated from the effects of high temperatures.
- A riser is being built over the fluff. It crosses the entire attic and has a straight and even shape.
- In the place where the chimney meets the roof, an otter is constructed, which has the same functions as the fluff. But in addition to the function of protecting the roofing materials from temperatures, the "otter" closes the gaps that form between the roof and the chimney.
- The next element of the pipe is the neck. After expansion, it returns to its original form.
- After the neck comes the head. Its bricks protrude outward and provide additional protection against moisture penetration.
- To prevent precipitation, dirt and dust from entering the pipe, a metal cap is put on it.
From the fundamental part, the chimney is laid using one ordering scheme.
Chimney well
The building must be level, without ledges and windows. The exception is the ledge where the metal pipe from the stove is embedded. The chimney is a square pillar with a well-shaped section inside. The size of this section, depending on the power of the sauna stove, is 13x13 centimeters (0.5 bricks), 13x26 centimeters (1 brick) or 26x26 centimeters (2 bricks).
- The foundation is the base of the chimney. Its thickness is the same as that of the sauna stove. They are one.
- The chimney rises to the point where the valve is installed. Then the chimney is put in order.
Chimney and fluff ordering - Row 1 completes the chimney neck.
- From the 2nd row, the construction of the fluff begins. In this case, the bricks must be shifted 1/3 outward. At this stage, solid bricks and parts are used. Parts of the required size are made with a pickaxe.
- The internal section of the chimney is unchanged throughout the entire masonry. The shifting of the fluff occurs only outward. If you break this rule, you can greatly reduce the thrust of the stove.
- The fluff moves from rows 3 to 5.
- The 6th row is placed in the same way as the 5th, without a shift.
- Rows 7 and 8 are the same as row 1.
Finished fluff steps - Once the cut is laid out, construction of the otter begins.
Otter orderingIts erection is not an easy task. Each row should protrude 1/3 above the previous one. The bottom one is glad of the same shape and size as the top row of cutting. From the second row of the "otter", the laying of steps begins, expanding the chimney outward by 1/3 of the brick. The ordering diagram clearly shows how many rows need to be made to build an otter like.
- After the otter, the chimney neck is laid out in accordance with the diagram.
- Then comes the head. It consists of 2 rows, and the lower one should protrude slightly outward.
- The last stage is the installation of the cover-cap.
We offer you to familiarize yourself with Lighting for a bath with your own hands
Waterproofing
Of course, fluff and otter protect the floors from high temperatures. But nobody canceled the waterproofing on the roof. The brick chimney must be waterproofed before the roofing material is laid on the roof. Usually, roofing material and mastic are used for this. First, apply mastic to the lower part of the chimney, heat it up with a burner and glue the roofing felt to it, pressing it firmly.
Then you can lay the roofing material, which should fit tightly to the pipe. After that, a decorative finish (apron) goes over the roof. All gaps must be carefully filled with sealant. Otherwise, moisture may leak through them.

Sealing gaps
The power of the stove is directly related to the size of the chimney section:
- For small stoves, a square section with an edge of 120-150 mm will be sufficient. Most often this is a channel with four bricks in a row, therefore, the size of such a section is often called a four;
- For a bath of 15-20 cubic meters or a fireplace, you will need a chimney with a cross-section of "five" or 125x250 mm. When laying, five bricks are placed in a row;
- For Russian stoves and large sauna heaters use the "sixth" channel size 250x250 mm. This is a very large cross-section, and should only be used for low-sitting pipes or a very large furnace.
Structurally, the laying of the chimney is no different from the laying of the stove itself.The only area that requires the hands and skill of a professional is the overhead pipe. At this point, you need to correctly bandage the brick to be laid. For a simple chimney tower structure, the pipe can be made of alloy metal and connected to the main brick duct, as shown in the figure.
What is the height of the pipe? There are certain recommendations for the installation and layout of the height of the brick pipe and the ridge of the roof of the house.If the pipe is at a distance of up to one and a half meters from the ridge, it is raised to a height of up to half a meter above the highest point of the roof, at a distance of up to three meters, the pipe cut can go to the level with the roof ridge, everything that is further should not be 0.2-0.3 m below the ridge.
They try to raise the total height of the chimney to the level of 5 meters, this allows providing "cold" air flow in the region of 1-2 m3 / hour, which is quite enough to ignite the stove. Taller pipes will make the oven uneconomical.
Conventionally, the brickwork of a chimney can be divided into two parts - before broadening, or fluff, and above it. A fluff is a thickening or brick strapping that allows a very unstable tall structure to be anchored in the ceiling system of a house. Despite the obvious ineffectiveness of fluffing, it should not be neglected, except for the possibility of attachment to ceiling beams. This element reinforces the relatively thin brick pipe and prevents the development of cracks due to lateral wind load.
In addition to the fluff, the chimney has an otter and a head. The first element is a belt or bulge on the top of the chimney above the roof. You don't have to do it, it works like an umbrella over the junction of the roof to the brickwork. The head can be made of steel or brick.

When choosing a chimney design, give preference to simple and reliable vertical pipes. They are unpretentious in work and do not require frequent maintenance.
If you choose the right materials for mortar and brick for masonry, keep the vertical above the stove, then this option will serve you faithfully for many years. Such a chimney is easy enough to adjust and modify in case of changes in the design of the stove.
For masonry, you can take high-quality red brick of the M100 brand, without cracks and signs of warping. Fireclay is usually used in overhead pipes and in places where the gas flow turns. The temperature at the entrance to the pipe rarely can rise more than 800 ° C, therefore in most of the masonry from the base to the head is made with ordinary brick. Another thing is coal or combined stoves, in this case the lower tier of bricks is supplemented with inserts of dinas or chamotte.
You cannot use silicate and clinker bricks, materials with the addition of organic fibers, natural stone fillers, they all crack under the influence of temperature, and silicate bricks, even at low temperatures, are subject to corrosion due to the large amount of carbon dioxide.
Finishing and design solutions
Children will always draw a pipe on the house. The appearance becomes "warmer" and more comfortable, the house looks well-lived and neat. A crooked or collapsed pipe indicates a bad owner, so when laying a chimney, you should also think about design.
The brick tube for the oven is already finished art object... Using the techniques of artistic masonry and contrasting facade paints, you can get a real masterpiece even from cheap bricks. However, if such masonry does not fit into the overall design, you should think about finishing.
- Plaster... Clay brick is perfectly plastering with weather-resistant cement plasters. The seams during laying should be embroidered - this way the mortar will better bond with the pipe.
The surface is primed, applied first, adhesive layer, beacon corners are installed. Then the main layer is pulled together by the rule and overwritten. The result is a flat surface for processing with facade paints.
- Warming solid basalt wool and device ventilated facade... The material of the ventilation facade can be any, the main thing is that it is non-combustible. Plastic or wood will not work - even an accidental spark can cause a fire.
- Device umbrella and weather vane. The chimney is the highest place in the house.A light weather vane won't harm a solid brick base, but it can dramatically improve the overall look of your home.
The efficiency of thermal energy generators, such as a boiler or furnace, is largely determined by the correct removal of fuel combustion products. The chimney lined with brick has excellent draft and excellent appearance.
In addition, a brick chimney has a significantly longer service life than pipe or metal products. It is possible to make a chimney from brick yourself if there is a scheme for laying it and at least initial skills in using the tool are present. When performing this work, it is required to observe many technological subtleties.
A brick chimney will serve as a decoration for the house
Metal chimney for stove
The fairly large amount of work in the manufacture of a brick chimney, especially the upper parts of the structure, makes the owners look for alternative options, for example, from a metal or asbestos-cement pipe. Despite the visual appeal of the idea, in practice, metal or asbestos is used to install the upper part of the chimney. On the lower part of the riser, transition sections made of alloy steel from the furnace to the channel of the flue pipe can be installed.
Alloy cast iron pipes are distinguished by excellent performance characteristics. Unlike brickwork, a cast iron chimney is not susceptible to shrinkage or cracking of the material. It absorbs heat well and, due to the high thermal conductivity of the material, provides a very even and stable traction in the channel. For a bath or a cooking stove, such a chimney is more interesting than heavy brickwork. The service life of such a pipe can easily reach several tens of years.
But a cast-iron channel with a diameter of 150 mm and a length of 4-5 m is very sensitive to the correct setting of thermal gaps on the chimney mount. Due to the high coefficient of thermal expansion with rigid pinching of the pipe surface, the metal can crack at the very first attempt to warm up the furnace.
A freshly folded brick chimney requires no less careful and careful handling during drying and sedimentary processes in masonry. During the first week, only paper and wood chips are burned in the canal. After a couple of weeks, after the mortar has set, the temperature is slowly raised to the working temperature and, having closed all the holes and dampers, they are also slowly cooled. If no problems arise, you can proceed to normal use.
Brick chimney properties
The main purpose of the chimney is the most complete removal of exhaust gases and the creation of good draft, without which it is impossible to maintain an efficient combustion process. The brick construction has positive properties and is not free from disadvantages.
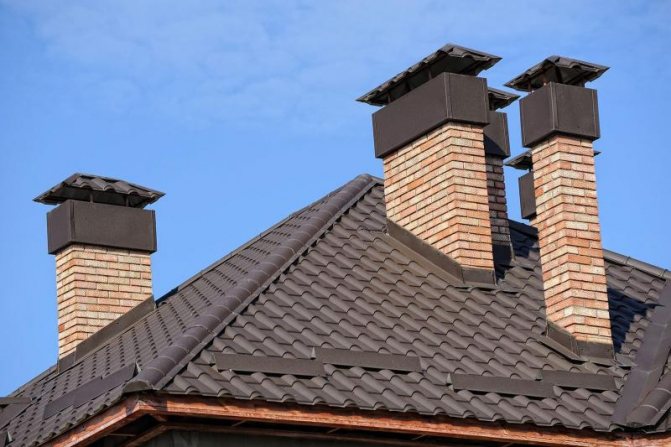
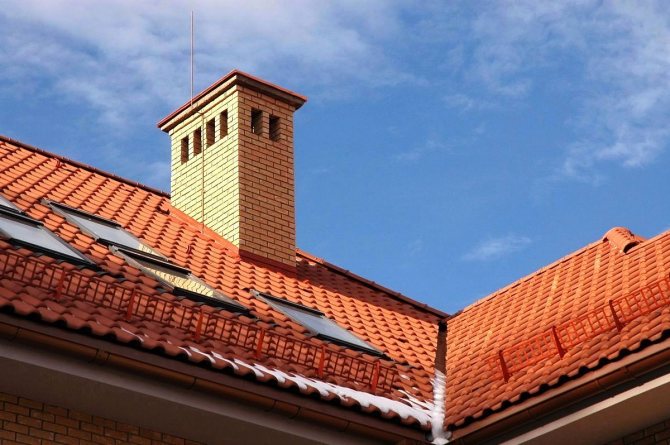
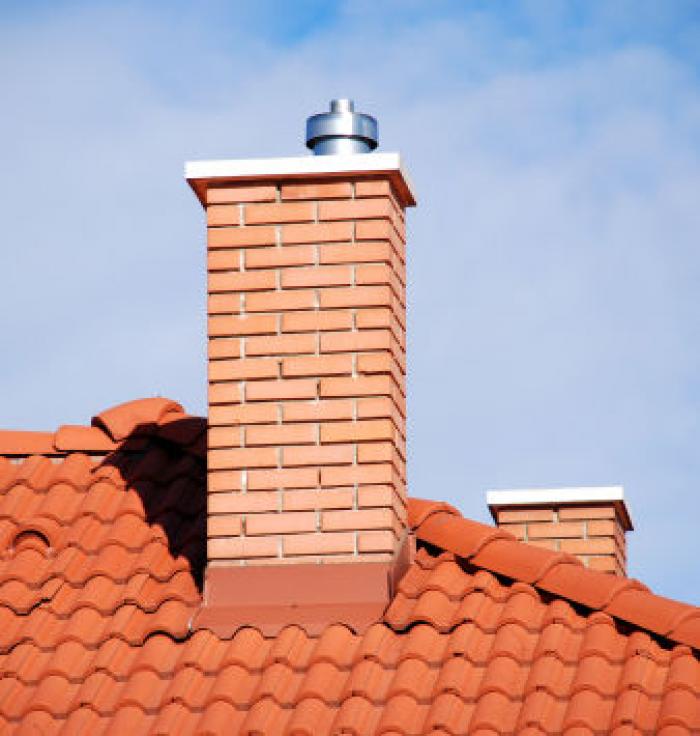
In addition, a brick pipe gives the architectural appearance of the house a finished look, ideally blending visually with many types of roofing, in particular, with tiles. Therefore, the traditional solution in the form of a brick pipe is still popular today.
The disadvantages of such a chimney include its heavy weight, requiring the creation of a reliable base, the duration and complexity of its construction. During construction, all technological standards must be carefully observed, deviation from them threatens with very unpleasant consequences.
Brick chimneys are very different
For the delivery of structural elements, special transport is required, which will have to be ordered and paid for. In addition, the rectangular shape of the internal section is not ideal for removing exhaust gases, they swirl in the corners and impair natural draft. In any case, after a while, it may be necessary to clean the chimney, which is described in the article "How to clean the chimney, chimney and stove from soot with folk remedies with your own hands."
How to lay out a brick pipe
A brick pipe is laid in the same way as a stove or fireplace, while masonry of 4, 5 or 6 bricks can be used. The laying of the pipe in the attic should be carried out along the beacon. Before carrying out the work, only 2-3 first rows are laid out, and then a plumb line is released from the roof level to any corner of the masonry. Next, 2 nails are hammered: into the location of the plumb line and into the seam of the corner of the masonry, along which the plumb line was leveled. The nails are connected with a silk thread. Laying should be carried out, focusing on the control angle. It should be checked with a special square every 3-4 rows.
The mortar for laying a pipe located higher than the roof may not be cement-sand, but clay-cement. This makes the structure more durable. In the clay-sand mortar used for laying the furnace, cement and water should be added in a ratio of 1:10. The entire composition must be thoroughly mixed using a construction mixer.
The chimney head is more of a decoration, so it can be omitted. If you had to make it, then you should not change the internal section, otherwise the change can lead to a swirl of smoke from the furnace in the channel. To protect the pipe from atmospheric precipitation, a cap made of galvanized iron is installed in its upper part. This protection should prevent moisture from entering the channel.
The height of the chimney should determine the safe operation of the stove or fireplace. If, in the process of using a gas boiler, the chimney is a chimney for combustion products at low temperatures, then the brick chimney for a solid fuel boiler should not allow any erroneous parameters. If the calculation is made incorrectly, then there is a possibility of poisoning by the products of solid fuel combustion. At the same time, unburned fractions or fragments of ignited soot can provoke a fire.
How to calculate the parameters of the chimney?
The rules that must be followed when determining the height of the chimney pipe must ensure the safety of the entire heating system. The boiler, as a heating device, can be gas or solid fuel. You should start designing a chimney by calculating the operating parameters of the heating system, all the factors of which must be taken into account.
Since the fuel used in the stove or fireplace can be different (firewood, pallets, peat or gas), the owner of a house with a heating system should ask a specialist about which boiler he should use for heating. In this case, it is important to know the power, type of radiator. If, with a large number of questions that arise, any moment is missed, then this can lead to negative consequences during the operation of the heating system.
It is common for many novice builders to make the mistake that all chimneys are the same. If a gas boiler is installed in the house, then a brick chimney on the roof is not provided for it, which is only suitable for stoves or fireplaces that run on solid fuels.
Any boiler for space heating has operating parameters that are influenced by the height of the chimney. This can affect the end result of the equipment operation. The boiler is influenced by the size of the pipe through which the combustion products must pass. This parameter provides the heating system with natural draft to the maximum or minimum extent.
A solid fuel boiler or stove chimney may require additional calculations and measurements, which is due to the use of several devices in a boiler room with one smoke exhaust duct. Self-activity in this case can lead to unforeseen results of the heating system operation or to dangerous consequences.
There is no heating system universal for any type of fuel, therefore boiler equipment is a typical solution.Therefore, developers and home owners have a lot of difficulties when choosing the type of heating system.
What height should a brick pipe have
Before laying out the chimney, you should pay special attention to its height. This is due to the release of combustion products from the safe channel into the environment. If this height is not enough for the gases to be safely cooled and mixed with the air, then a very dangerous situation can arise associated with poisoning by combustion products of fuel or fire.
During the operation of the furnace equipment, it will be necessary to study the physical process due to the appearance of traction. When the heavy air moves upward, a physical thrust arises, depending on the volume of warm air. The larger it is, the greater is the draft in the brick chimney, the height of which depends on the total volume of the pipe.
A large increase in heat loss can occur due to unbalanced natural draft, since the exhaust will have little time for heat exchange with the inner duct. This point is very important for heating systems equipped with stoves and fireplaces that run on solid fuels.
For example, if the height of the chimney is 4 m, then it will cool down faster. The higher the chimney is, the greater the natural draft will be. A tall pipe starts to cool faster than a low pipe, which creates an air lock of cool gas, which has a large volume, which prevents draft. Another phenomenon caused by abuse of pipe height is the accumulation of condensation.
You should not disregard such an important stage in the construction of a stove or fireplace, as calculating the height of a brick pipe. It is always necessary to trust the correct calculation of professionals in order to ensure the safe use of the heating system due to the optimal values of the height, diameter and type of material used for arranging chimneys for boilers of various volumes. These metrics are based on complex laws of thermodynamics, aerodynamics and materials science.
On the modern market of goods, a huge selection of various chimneys is provided. The increase in scientific developments in this area and the use of new, previously unused alloys make it possible to produce real complex machines that can resist corrosion, soot deposits and condensation without additional maintenance. But contrary to all the factors provided, buyers prefer to do the brickwork of the chimney with their own hands.
Diagram of the device and the constituent elements of a brick chimney
It may seem that a brick chimney has a very simple device in the form of a rectangular pipe. The scheme of its engineering structure is much more complicated. We list the parts of a brick chimney that have their own name:
- On top of the furnace, the overhead pipe is first laid out. It does not reach the ceiling for about six rows of brickwork.
- Then the fluff is performed, which is an expansion of the chimney masonry while maintaining its internal section unchanged. The outer part expands at this point by about three hundred and fifty millimeters.
- After the passage of the ceiling, a flat section of pipe in the attic, called a riser, follows the fluff. It is evenly laid down to the inside of the roof covering.
- Further, another expansion of the chimney, called an otter, is performed by about one hundred millimeters. This is done to prevent rain and snow from entering the gap between the pipe and the roof.
- After the otter, the neck follows - a flat section of the pipe. He equips in the same way as a riser.
- The chimney cap is made with the expansion of the outer part of the masonry. A protective cap is installed on top of it to prevent rain and snow from getting inside.
General diagram of a brick chimney device
It should be noted that all extensions of the masonry are carried out only from the outside, the cross-section of the chimney from the inside remains unchanged throughout its entire length. Instead of fluffing, you can adapt a metal box filled with sand or expanded clay, that is, non-combustible materials. This solution simplifies the work and shortens the execution time.
The functional purpose of this structural element is the same as that of the fluff - preventing the ignition of ceiling materials. Note that the chimney can be made inside the wall, if it is equipped with non-combustible materials and has the required thickness. For a metal heating stove, it is also possible to fold the chimney out of bricks.
Roof passage
The method of passage through the roof depends on the shape and section of the chimney. It can be round, elliptical, square, or rectangular. Below we will consider how to make the passage correctly.
Brick chimney
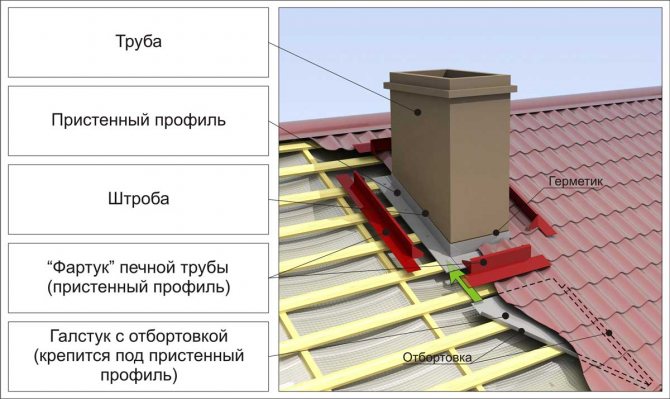
To carry out the conclusion of a brick chimney is in a sense easier from a technical point of view. This is due to the possibility of using the elements of the roof sheathing, which is currently installed. Companies that are engaged in the production of metal tiles also produce special elements that can be used to seal the joint between the roof deck and the brick chimney. An adhesive is applied to one side of the tape, which makes it easier to adhere to the material. The tape is a complex composition that includes lead or aluminum, in some cases a combination of metals is allowed.
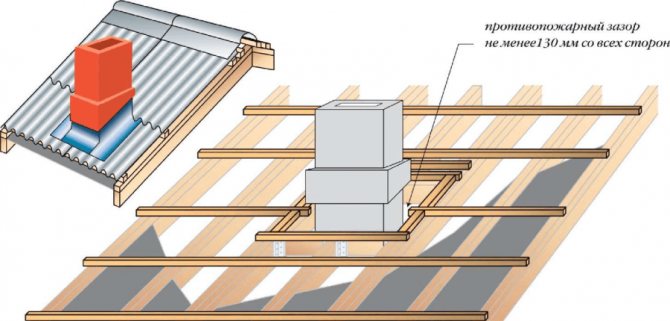
Before removing the chimney from the brick, a place is selected for its location and the roof is marked from the inside, from the attic side. With proper skill, you can also cut a hole from the inside. In this case, you will need to carefully disassemble the layer of insulation, as well as cut the waterproofing, having previously fixed it with brackets to the rafters so that it does not burst. When the chimney is raised above the level of the roof deck, you can start sealing the joint. To do this, you need the tape mentioned above. In one part, it is fixed to the crate, and the second to the chimney. For greater stability, the upper edge, which will be located on the chimney, is reinforced with a metal bar, which is fixed to the chimney with self-tapping screws and dowels.
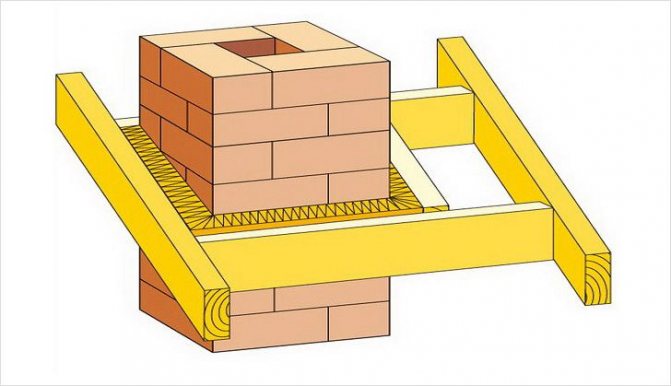
To increase the reliability of the junction of the strip to the chimney, a small groove can be made in it and a metal element can be placed in it. This will prevent water from flowing down the wall of the chimney. In a similar way, a passage is made through a soft roof. In this case, the use of an additional elastic tape is not required, since the roofing material itself is put on the sleeve or apron, which is put on the pipe.
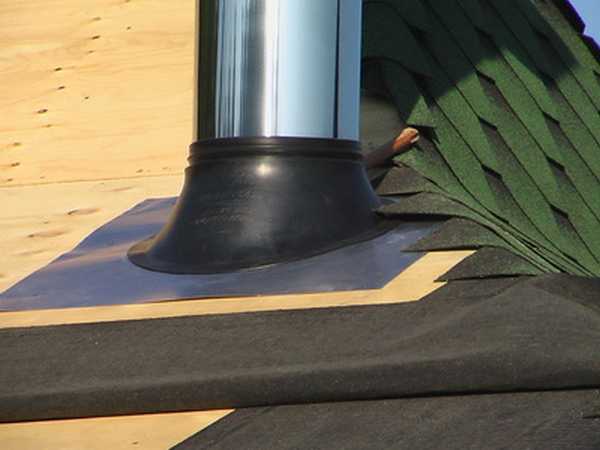
In the absence of a ready-made apron of the required size for a specific chimney, you can make it yourself. As a material for this, you can use galvanized steel sheet or aluminum. In the picture below, you can see that four basic elements are needed. The prepared strips are bent at right angles. The width should be enough for the parts to enter both the chimney and the crate. A slight bend is made at the top of the apron so that it can be brought to the chimney strobe. After that, the docking place is sealed so that water does not flow down the wall. A "tie" is made under the front sheet. It is a sheet of metal with folds around the edges.
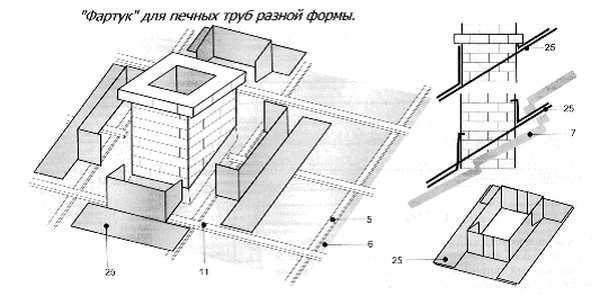
The part of the apron, which is at the highest point of the roof slope, is tucked under the roof deck. This is done so that the water flows calmly around the chimney. In some cases, the chimney may be located in close proximity to the ridge. In this case, the apron can be tucked under the skate itself.
Note! Some projects involve a large chimney width, which can be up to 80 cm.This creates a serious obstacle to water flow and promotes snow accumulation. To reduce their number, a small element in the form of a gable roof is made slightly above the chimney. This design is necessary to reduce the likelihood of water leakage.
Round chimney outlet
The conclusion of a round chimney through the roof has its own nuances. The fact is that the metal pipe heats up more than the brick channel. She will have to go through the roofing cake, which is full of flammable elements and materials. They must be protected by protecting the pipe with a special box.
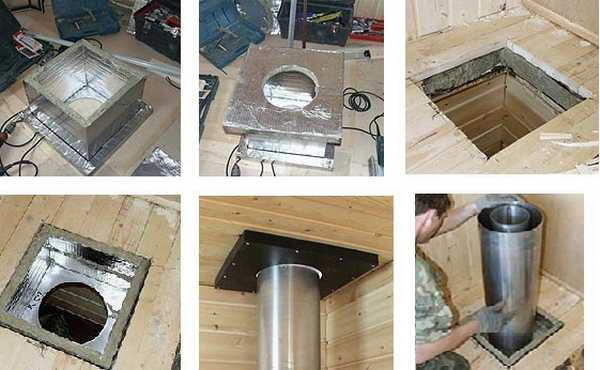
The box can be made of a rectangular form of non-combustible insulation and sheet metal. Instead of insulation, asbestos sheets can be used. The size of the chimney duct must be such that it is 15 cm from its wall to the chimney wall on each side. Such an air cushion is necessary. The next step is to make a hole in the roof, as described above. Next, the installation of the manufactured box is carried out. Through it, the pipe is withdrawn. An insulator is placed between the pipe and the duct wall. They can be stone wool or expanded clay.
After that, a vapor barrier and waterproofing are fixed, which protect against leaks through the pipe. In addition, a non-combustible apron must be installed on the pipe, which also serves to seal the hole.
Sealing elements
Sealing elements are also called penetrations. They are used to lead out a round chimney. One of the types of such penetration is a silicone sleeve. It can also be made of rubber. An element for the chimney is made of a heat-resistant material that does not deform or melt. In addition, rubber or silicone can withstand frost and various chemicals that are present in smoke. The advantage of such a sleeve is the ability to take any shape and required slope.
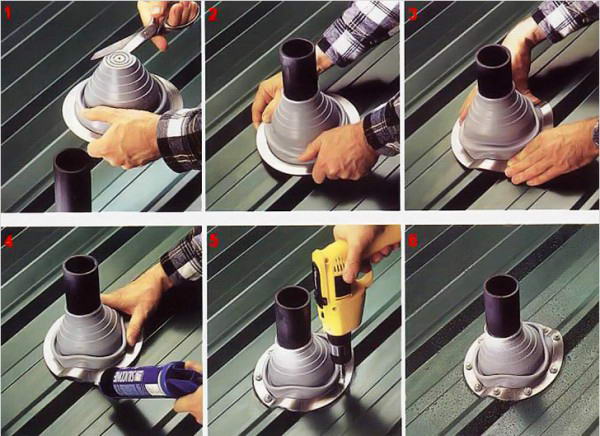
The main criterion for choosing this kind of hose is the diameter of the chimney pipe. On sale you can also find universal models that are designed for various pipe diameters. In this case, they are made in the form of steps. Trimming is performed at the location that best matches the pipe diameter. Installation of flexible penetration is carried out in several steps. It is necessary to put it on the pipe and pull it to the place where the chimney pipe comes out of the roof. A sealant is applied under it and a clamp is made using a metal plate.
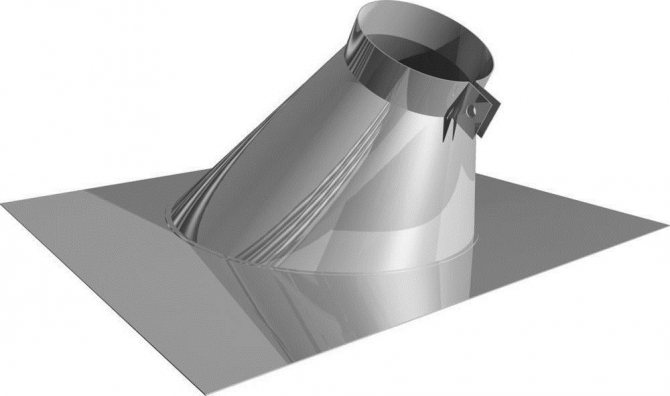
Note! There are penetrations that have been developed for a certain angle of the roof angle.
In addition to elastic passages, there are also metal passages that are used to output round chimney pipes. Such penetrations have a predetermined angle of inclination and are installed only on the flooring, which does not have ribs, since they must closely adjoin it. Such a penetration is mounted in a slightly different way. A hole is made in the roof for the pipe. If necessary, a part of the crate is cut out. The easiest way to do this is with a reciprocating saw or jigsaw.
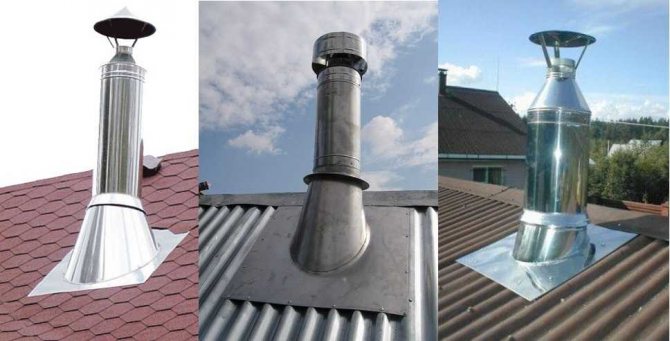
The hole is freed from waterproofing and insulation. To reduce the heating level of the roofing material from the chimney pipe, a refractory sheet is mounted on the underside. Its size should be the same as that of the box mentioned above. The transit is mounted on the pipe and tightened with a clamp. The product has a metal skirt that is securely attached to the roof deck and fixed. A special outlet pipe is put on top, which is also fixed to the pipe and screwed to the roof. The method for removing the chimney from the sandwich pipe is described in the video below.
We comply with the restrictions when planning the chimney
Laying the stove chimney with your own hands follows with unconditional consideration of the prevailing experience. When arranging a brick chimney, it is strongly recommended to comply with the requirements of building codes and regulations for the construction of such structures.The efficiency of its functioning and safety of use, the comfort of living in the house and the cleanliness of the air environment largely depend on this. The brick structure must meet the following parameters:
There should be a minimum number of horizontal sections in the chimney. In the case when it is impossible to do without them, the total length cannot be more than one meter. The elevation of the pipe above a flat roof should not be less than one meter. In the event that the distance to the ridge is less than one and a half meters, it must rise above it by more than fifty centimeters.
Rules for placing a brick pipe on the roof
In a situation where the specified distance is about three meters, the pipe head is flush with the ridge. At a greater distance from the chimney, its outlet is located along a line lowered by ten degrees from the horizon, drawn from the top point of the roof.
Chimney brick - a timeless classic
The construction of summer cottages and country residences is becoming massive in our time. Thanks to this, the demand for fireplaces and stoves is increasing many times over. Heating devices tend to be installed according to the old method, already tested by previous generations. It should be noted that the art of equipping furnaces in many regions of our country has been lost. This article describes in detail how to build a chimney with your own hands, using brick and mortar, in the shortest possible time.
Determine the size and shape of the structure
Correctly calculated chimney size is directly related to the creation of high-quality draft, the process of fuel combustion in this case occurs with high productivity. It is believed that the minimum chimney height should be approximately five meters for efficient operation. The fire safety of the structure is ensured by the thickness of its walls.
The gap between the chimney and the wall is about forty centimeters; when passing through the ceiling, special extensions of the wall thickness are performed. The dimensions and shape of the chimney are calculated depending on the structural features of the building and roof, the size of the heated rooms, and so on. The chimney should be in accordance with the general architectural appearance, so a large chimney is inappropriate in a small country house.
Chimney dimensions and configuration
The movement of smoke along the chimney occurs in a spiral, therefore, its optimal shape of its internal section is considered to be a circle. However, it is not possible to lay out such a brick surface. Therefore, most often the construction of low-rise residential buildings is accompanied by the construction of a rectangular chimney.
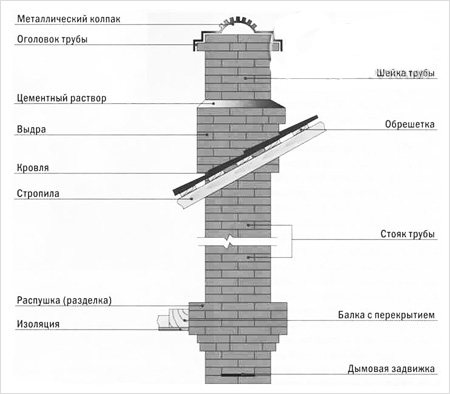
The main components of the chimney
It is believed that the corners, as well as the roughness of the masonry, are an obstacle to the uniform release of combustion products, therefore, when installing a chimney, it is often recommended to treat the inner surface with some kind of leveling mixture, for example, plaster.
However, it must be borne in mind that such a device for the smoke outlet must be done with special care - the plaster can crumble from constant temperature changes.
The dimensions of the chimney depend on the dimensions of the building - an oversized chimney on a small house will look quite comical. The smallest brick consumption is ensured when the construction of a pipe with internal dimensions of 260 x 130 mm is carried out.... Such a design will turn out if each row is folded from five bricks. Chimneys of a larger size are often found, for example, for Russian stoves with a large portal, it is recommended to make a chimney with a channel section of 260 x 260 mm.
How to build a brick chimney with your own hands
Before laying out the stove chimney, it is necessary to draw up a diagram of it. Any chimney is a unique structure, and its parameters are determined by many factors.The chimney laying scheme should simplify its construction as much as possible.
Sometimes bricks are soaked before work, other craftsmen lay it dry. In the latter case, the binder is absorbed into the building material, and the masonry is less durable. Wet brick forms a more durable surface, but it takes longer to dry. Sometimes this is quite inconvenient, for example, before the imminent onset of winter cold.
We prepare the necessary materials and tools
To carry out work from building materials, only brick and a binder mortar are required. The choice of brick has already been written above, the cement mortar must also be of the highest quality. The excellent quality of the connection of structural elements under any adverse environmental influences is ensured precisely with its help. Parts of the exhaust system operate in different conditions, therefore the composition of the cement slurry is different.
The fundamental base of the root pipe is fastened with a mortar consisting of three parts of sand and one part of cement, with the addition of half a part of lime to improve its plastic properties. In the section before the fluff, the temperature develops up to four hundred degrees Celsius, therefore, a solution of clay with sand is used here. The neck and the otter are fastened with a lime mortar, since here the temperature effect is low, and the wind load is high.
The clay used for the solution should not smell strongly, since such a smell indicates the presence in its composition of organic impurities that cause cracking of the dried mixture. There should also be no organic components in the sand. Mountain sand is well suited, as well as crushed sand-lime bricks. To complete the work, you will need the following tools:
- spatula and trowel;
- building level and plumb line;
- a hammer in the form of a pick.
To reduce the amount of waste in the form of brick breakage, you can use a grinder to cut the bricks. Accuracy and thoroughness are of great importance at all stages of the work.
Mixing mortar for masonry
The preparation of the binder is a very crucial moment that determines the strength and safety of the structure being erected. Before mixing the mortar for masonry, it is necessary to sift all its components through a fine sieve. Only a homogeneous material is capable of producing a good quality binder mixture.
Special mixtures for laying chimneys are widely represented on the market
With an increase in the cement share in it, the plasticity and mobility of the composition increases. The fillers are limestone, clay or sand. When mixing a solution, the quality and quantity of water, which is the main binding element of the constituent components, is important. To facilitate the work, you can use a construction mixer, and in its absence, mixing the solution is carried out manually.
We spread the lower part of the chimney
The lower part is equipped according to the standard of brickwork used in the construction of any objects. Each subsequent row is shifted in relation to the previous one by half a brick to the side to improve adhesion. A thin layer of grout should be applied to obtain a strong and secure bond.
The first two rows set the orientation of the entire structure, so they are laid out with maximum accuracy. The entire bottom of the chimney is laid out with no less care.
Now we make the fluff and the trunk of the pipe for smoke
The fluff is an expanding stepped structure, the next row of which is laid out with an expansion of about thirty-five millimeters. The widest part is displayed at the floor level of the attic.
The order of the laying of the pipe
The first row of the chimney barrel is mounted on top. Its parameters repeat the original size before fluffing.The uprights gradually increase in height until they approach the roof overlap.
Arrangement of pipes above the roof
To lead the pipe through the roofing, a pre-marked hole is cut out in it, for example, with a jigsaw. The final row of the chimney shaft is laid out above the outer part of the roofing by approximately the size of half a brick. An insulating layer made of asbestos or other similar material is installed between the roof and the bricks.
Further, a special thickening is set up above the roof surface, which bears the name "otter". The functional purpose is to prevent rain and snow from entering the attic.
On top of the otter, the chimney neck is laid out with the return of the dimensions of the original section. The structure rises to the required height. From above, with an extension of about forty millimeters, the first row of the head is laid. Its height should be increased by two brick rows.
Next, the final laying of the pipe is carried out. A protective umbrella is installed on top of the structure. Around the exit through the roofing, thorough waterproofing is performed, all gaps are sealed.
Laying the pipe above the roof
When laying pipes above the roof for the scaffolding, I always used an ordinary wooden ladder 1. If it was not there, then I made it myself - I nailed wooden blocks to a wide board. To keep the ladder on the roof, at the top I nailed a strong wooden beam 2, which hooked onto the ridge of the roof. If possible, it is good to put a ladder or a board with stuffed slats on the other side of the pipe. Through the hole under the pipe in the roof on top of the stairs, he piled bricks 3. If the stairs were on both sides, then the brick was enough for the entire small pipe. However, it is better to lift the brick to the pipe from the street in two or three times. This will make it more convenient to work.
On the ladder bar the first brick lies with a spoon, one edge on the roof, the other slightly overweight on the bar, because the ladder is low. If you put the first row with pokes, like the second, then the brick will not hold. For the second (butt) row, there is more support. All the weight goes up the stairs. Bricks can be placed above, on the next rung, or below. On such a platform of bricks, they often put not a box, but a bucket of mortar. The wider the ladder, the wider you can put the brick post.
When laying the pipe, when it is already above the roof, it is more convenient to put a bucket of mortar behind the pipe. It is necessary to periodically check the verticality of the pipe laying. When the house is still without a roof or there is a large space around the pipe, the pipe may tilt from the pressure from above. To prevent this from happening, it is necessary to temporarily nail a bar or board from the bottom to the roof lathing or close to the rafters to the pipe being built, this will prevent the pipe from deviating from the vertical position.
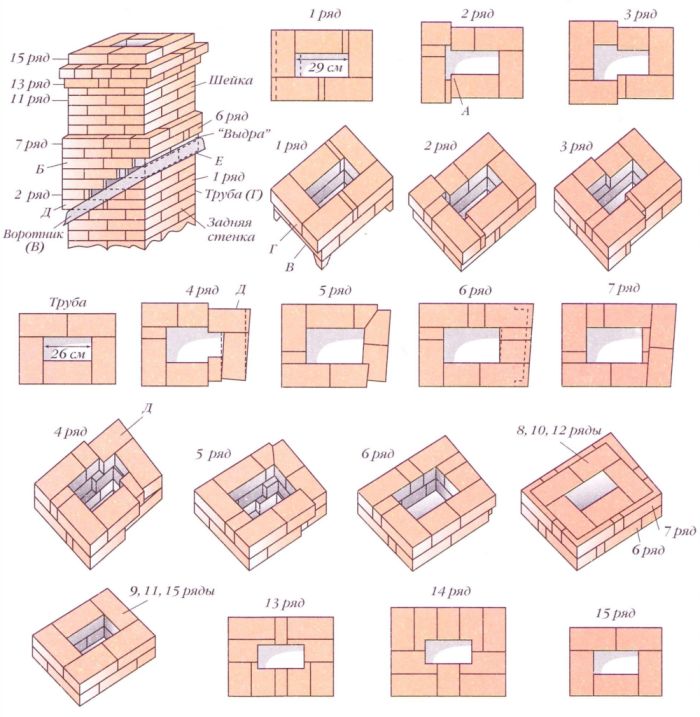
Ordering the pipe above the roof when laying without formwork
At the point where the pipe goes to the roof, it is necessary to gird the pipe with roofing iron to prevent precipitation from entering under the roof. To do this, above the roof on all sides of the riser, pipes are made from the outside of the “otter” - a depression, where the roofing iron - “collar” is brought close to the pipe. The deepening is obtained by overlapping rows of masonry on all sides of the pipe. The overlap is made at least 2.5 cm. Depending on the steepness of the roof slope, overhangs A are made according to the number of rows in the pedestal-fluff. Due to the different steepness of the roof slope, it is impossible to accurately draw a drawing of the orders of the pedestal-fluff, this is the only place in the furnace where it is impossible to give exact orders. In order to lay a curbstone over the roof in a pipe, and under it an otter, you need to make brick gaps near the roof over the void. They can turn out where higher, where lower.
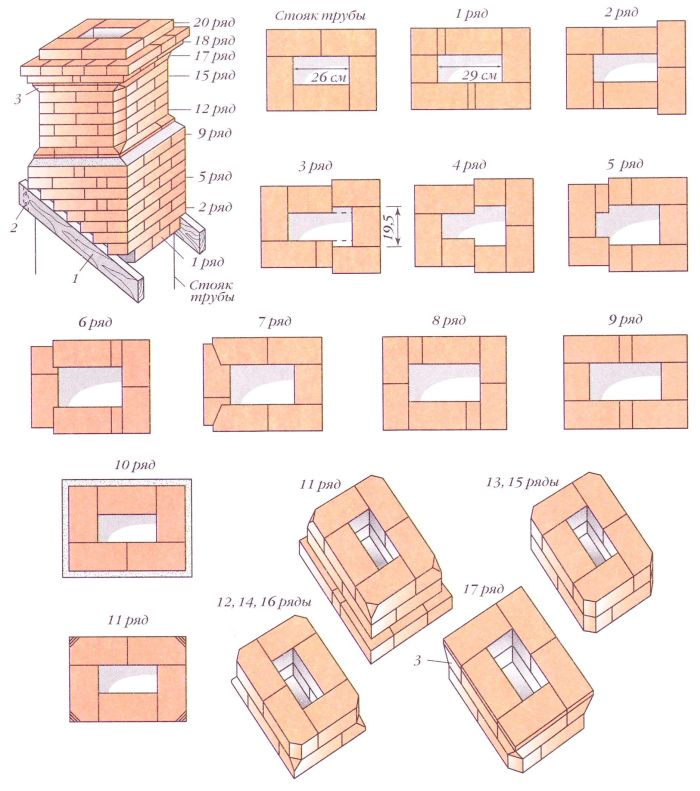
The order of the pipe above the roof when laying along the U-shaped formwork
It is easier to lay the masonry on the U-shaped formwork 1 of three edged boards 7-10 cm wide, knocked down with small nails 2. Usually I put such a formwork on the roof lathing.The entire pipe on top of the roof is laid on a solution that does not lend itself to destruction from precipitation, one row below the roof. If the roof can be raised, then the 1st row is let down on three sides at once, like the 2nd row. The rest of the masonry of the 1st row from the inside is flush with the pipe riser. All overlaps from the pipe are 3 cm each. From the 2nd row, overlaps B above the side walls begin. The height of the gaps above the roof of the roof is at least 5-7 cm.If the height of the collar above the roof is made lower than 10 cm, and the pipe is at the bottom of the roof, then heavy rains will form a water stream on the roof, which can rise above the iron collar B. Water will soak the pipe and gets into the room.
The collar is shown with only one contour line so that the laying of the riser G of the pipe is visible. In the orders of the pedestal above the pipe riser, the 1st row is placed with an overlap D only above the front wall, which is clearly visible from a different angle - in order. I never laid out the 1st row in the middle of the curbstone in quarters, since the gases go in the middle of the pipe, and when a lot of soot settles in the resulting recess in the places of the missing quarters, it will be time to clean the entire pipe. If the pipe is cleaned with a green broom, soot will be removed from all corners. Usually, fours complicate the work, after a few years they usually fall out of the masonry to the bottom of the gas ducts. The 3rd row is placed on the 2nd row with a dressing. The gaps above the side walls are lengthened and internal protrusions are made in the side walls, expanding the flue in this place. So with each row in the place where there are inlets, the size of the gas duct increases. Further, along the board, masonry continues with a constant overlap of incomplete bricks. The 4th and 5th rows are the last before the overlap above the back wall. They are above the roof, where there will be an iron collar at the back of the pipe.
Since debris (dust, leaves, etc.) always accumulates behind the pipe, the iron rusts in this place, forming holes in the collar. To increase the durability of the collar, I suggest making one of the side walls E by 3 cm longer in the 4th and 5th rows. The back wall will be laid obliquely. After laying, at this wall, one corner in the roof will be higher, and a gutter with a slope will turn out around the pipe, from which debris will be washed off by rain. In this case, the laying of the rear wall becomes a little more complicated, since it will be necessary to cut the rectangular parts of the brick into oblique ones. Laying can also be done in the usual way - along the 3rd row without lengthening the wall, then the gutter behind the pipe will be without inclination. In the 6th row, the laying of the gaps above the back wall is finished (shown by the dotted line). The 7th row is placed exactly on the 6th row. The 8th row is allowed inside the pipe above the gas duct. From this row, the laying is done again vertically along the pipe riser. Begin laying the pipe neck to the desired height from five bricks in one row.
The pipe is finished by laying a head from three rows with two laps - 13-15th rows. The head masonry is always exposed to precipitation, frost, gases. Frost freezes wet seams, and warm weather defrosts. Seams and masonry do not withstand temperature extremes and collapse. In the masonry of the head, there are many quarters of bricks with thick seams. The seams get wet and the frost gradually widens them. They become weak and the mortar spills out of the seams. To maximize the life of a pipe, you should always think about how to position the head so that you almost never use fours and the vertical seams are as thin as possible.
After laying on the ledges of the curbstone and the head of the pipe, an inclined packing is made of strong cement mortar, which is good to “gell” - sprinkle on top with dry cement and smooth it with a trowel. It serves for the slope of precipitation. The weak composition quickly collapses. Sharp-angle pipe neck masonry. If desired, you can chamfer at the corners, as when plastering corners. Laying the pipe neck with a chamfer of 3 corners cut off by 4 cm on each side. If you cut less, then the beauty of the masonry will not be clearly visible from the ground. Pipe laying in this variant can be done in order.The corners of the chimney, like the corners of the house, are subject to strong blows of cold winds. The wall thickness of the pipe is 12 cm. In the places where the corners are cut off, the pipe thickness is much greater (even after cutting, it will be at least 14 cm).
Trimming the corner to nothing to the chamfer of the corner begins in the 11th row, retreating from the bottom of the corner by 2 cm.From the 12th to 1bth rows, they perform the same type of brickwork with dressing with bricks with cut corners. In the 17th row, a constriction is made, similar to that which was performed in the 11th row, but stepping back 2 cm from the top of the corner. Remaining intact in this row 2 cm make the corners more beautiful and create better support and strength of the masonry for the head-on row. The neck of the pipe will be eight rows, but for a taller pipe, this laying can be continued. The 18-20th rows in the version with corners are laid in the same way as the 13-1 5th rows in the version without corners. The corners of the pipe are chipped, and there are two admitting rows in the cap-cap. So the pipe looks more beautiful, but if you cover it with a cap made of galvanized iron, and put it on top in the profile of a rooster, it will be even more beautiful.
Different position of the pipe in relation to the ridge of the roof
Since the bricks are of different sizes, then, before laying the pipe head, the 14th row is laid dry on the floor so that the laying of the row is divided into halves of the brick. The seam between the bricks is 5 mm. If we put the last 15th row of five bricks on this row vertically to the pipe riser, then a protrusion of 6 cm will turn out around it. What gaps need to be made in the two rows of the head that are filled? It is necessary to divide these 6 cm into two rows, we get that in each row it is necessary to make gaps of 3 cm.In the upper admitted row, the masonry is divided into whole bricks and halves, which makes it simpler.
Laying pipe gaps are already doing along the laid out row on the floor. If the pipe is located at a distance of up to 1.5 m from the roof ridge, then it must be at least 25 cm higher than it. If the distance is more than 1.5 m, then the pipe may be low. Sometimes a brick falls off from a plastered pipe in layers. This happens when it is plastered with cement mortar. It is dense, no air passes through it. Due to the temperature difference, condensation forms under the plaster, which destroys both the plaster and the brick. Plastering the pipe can only be done with a solution containing slaked lime.
These articles may also be of interest to you:
- Triangular oven masonry
- Heating furnace masonry
- Masonry oven for peat
- General rules for laying the stove