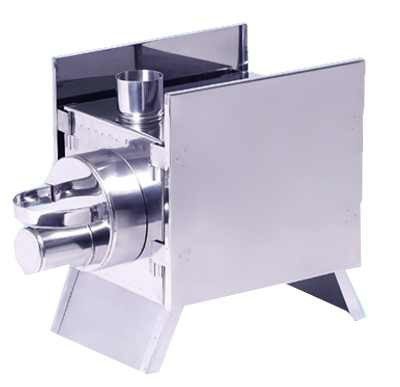
Description of the tourist stove "Smoke"
The camp stove is presented in stores in a wide variety today. You can choose the most suitable model for yourself, which will differ in a certain set of functions and characteristics, suitable for the respective conditions. Before purchasing such a device, it is important to decide whether its dimensions are suitable for the trunk of a car, if the stove is planned to be transported in this way.
Tourist stove "Dymok" has the following dimensions: 440 x 285 x 320 mm. The volume of the pot is four liters, which will be quite enough to feed the whole family with dinner. The described camping stove should be used only in an open area; indoor operation is strictly prohibited. It is important to use the design in conjunction with a spark arrestor and mounting feet. Fuel and lubricants such as kerosene or gasoline are not suitable as fuel. Fire safety will be ensured by installation on a fireproof base.
Advantages and disadvantages
Any camping wood stove, regardless of model or cost, has a number of advantages and disadvantages. They need to be taken into account in order to acquire a design that meets the given parameters and expectations of a person.
Benefits:
- Compactness.
- Ease.
- Availability for self-assembly and installation (minimum number of structural elements).
- Work on all types of wood fuel.
Additional general benefits:
- They are economical (do not require a lot of wood to generate a lot of heat).
- They do not depend on environmental conditions (the combustion process is always smooth and stable, not depending on weather indicators).
- Possibility of installation both outdoors and inside the tent.
- Simplicity and availability of installation and use.
- The presence in the model line of small units of mini-ovens.
- They are easy to transport.
- Low cost of components.
- Smoke and soot are completely absent.
- The strength of the fire can be easily adjusted.
- The design is absolutely safe to use.
- All options have a high performance indicator (efficiency not less than 70%).
Also, the slight heating of the case (if any) avoids burns when it becomes necessary to move the device or touch it.
Disadvantages:
- The wood burns out quickly (a small amount of heat is generated).
- Not all heaters are designed to heat food or water.
- It is recommended to use dry wood to avoid the appearance of smoke or soot (important if the heating will be installed directly in the tent).
Additionally, you need to remember: the service life of some models is short. They can fail after 1-2 seasons, especially if not quite high-quality materials (thin iron) were used.
Operating tips

It is forbidden to put fuel in front of the firebox opening, as well as pour out unstressed coals from the furnace. The camp stove during operation should be removed from combustible materials by 0.5 meters. Above the structure, you need to provide free space within three meters or more. The user must leave a distance of 1.5 meters in front of the door. The hooks are needed to open the door or remove the cover. If the surrounding objects or materials suddenly caught fire, then available materials can be used for extinguishing, namely sand, water, and also earth.If you are traveling by car, then you must have a fire extinguisher in stock, with its help it will be most effective to cope with a fire.
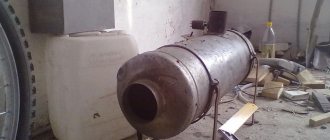
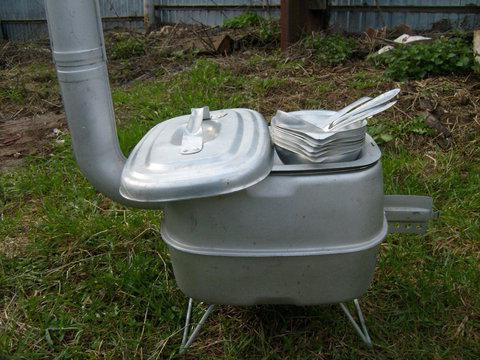
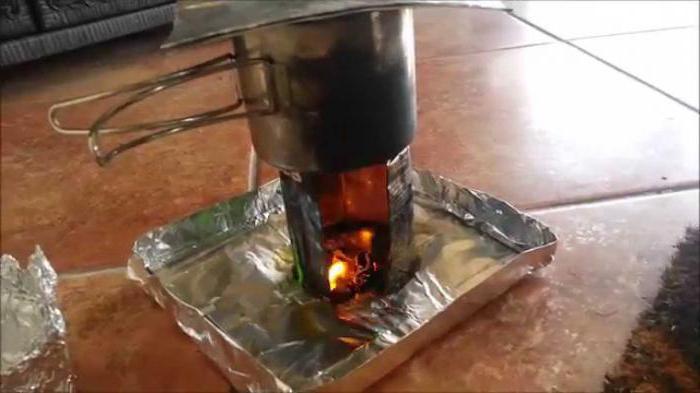
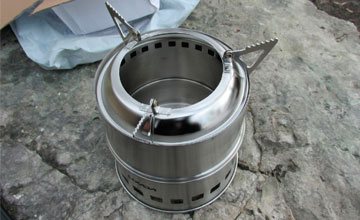
The second is from pots
Two stainless steel pots are used, one size (outer) to be much larger than the second (inner). One is inserted into the other. Holes are cut out in the bottom of the outer one as shown in the photo above. A pallet is made under another pan at a level above the door made. You can do this as in the photo on the left, or you can pick up the dishes for cooking so that it does not fall down, as shown on the right.
If you put it on a stand, then the maximum thrust will be provided there, and the firewood will burn out quickly. At the same time, not dry logs burn well. In order to reduce cravings, they must be put on the ground, they will begin to smolder in the firebox - this mode is well suited at the final stage of cooking.
Varieties of camp stoves
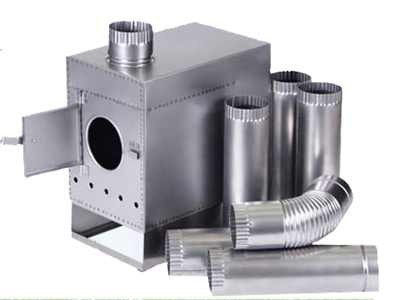
If you need a camping mini-oven, then you can consider the varieties of such equipment presented by modern manufacturers. For example, at a relatively low cost, you can purchase a Vlada brand tourist folding stove. The device is intended for heating and cooking. You can use the structure while hunting, at the dacha, fishing or on a hike. The stove consists of a metal box and a support, which has an opening with a door for loading fuel. There is one more hole with a pipe - for fixing the chimney.
It is quite easy to transport the oven, since the supplier has provided the structure with a collapsible tube that can be laid inside the product. These folding ovens are compact.
Another alternative model is the Housekeeper. The purpose of the structure is the same, but the main advantages are the burning duration, which reaches ten hours. The time will depend on the fuel used. A spark arrester is built into the furnace, which is indispensable for operating the structure in a tent. The flame arrester is also responsible for increasing the efficiency, since the heat does not fly out directly into the pipe. In addition, the spark arrester acts as a stiffening rib in the upper part, due to which the hob quickly heats up over the entire area.
At the heart of the case is stainless steel 0.8 mm, which increases the life of the structure. The furnace is resistant to temperature and mechanical stress.
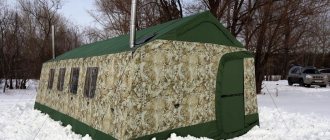
And for those who like to relax in nature, a camping stove for a tent will become indispensable. As an example, consider a small pochekhonka oven. It has the following dimensions: 22 x 22 x 33 centimeters. The weight of the kit is equivalent to 3.5 kilograms, so the structure can be easily taken even on a hike. The set includes five straight pipes, a pipe in the form of a knee, a leg for a stand, a non-separable body, a bag-cover and a metal cutting of a tent installation.
The construction is made of stainless steel. If you want to choose a more voluminous oven, then you should pay attention to the average thirty-liter pochekhonka, which weighs five kilograms. Its dimensions are slightly larger: 25 x 25 x 50 centimeters. This long burning device is intended for heating tents, garages, greenhouses, cars and summer cottages. You can count on eight hours smoldering. In this case, you will have to lay firewood only once. An additional advantage is the possibility of cold and hot smoking.
Description of pyrolysis and gas ovens
Pyrolysis and gas ovens are very convenient for use on hikes and out-of-town recreation. They are characterized by an excellent combustion process, therefore they are quite suitable for quick cooking in the fresh air.But you cannot make such ovens yourself; they are purchased in specialized stores.
The pyrolysis stove is highly efficient, therefore, the models presented from the retail network have a fairly high price. Compared to wood-burning stoves, this option is characterized by higher productivity. Those who decide to make such a device with their own hands need to have special knowledge and material. In addition, it should be borne in mind that a homemade stove in nature does not give the desired effect.
Among the advantages of a pyrolysis oven are safety and environmental friendliness. In such a device, you can burn excess garbage and cook food, the fire in them burns constantly without interruption. For the manufacture of the pyrolysis oven, steel is used, which is resistant to strong heat.
The camping gas stove is also suitable for going out of town or camping with a tent. In the retail network, such devices are presented in a wide range, you can choose an oven of any color and cost. The gas oven is powered by a special cartridge that requires regular replacement. However, cooking with such a device is easy.
Before going out of town on vacation or camping with a tent, you should take care of all the necessary things, including a camping stove. For permanent use, it is best to purchase a good tourism stove from a specialist store. And for casual and very rare trips for outdoor recreation, you can use self-made devices that do not need to spend money, effort and time.
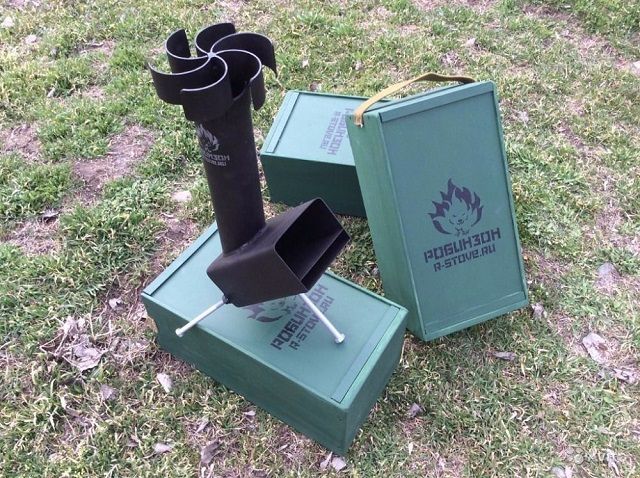
Description of the rocket furnace "Robinson"
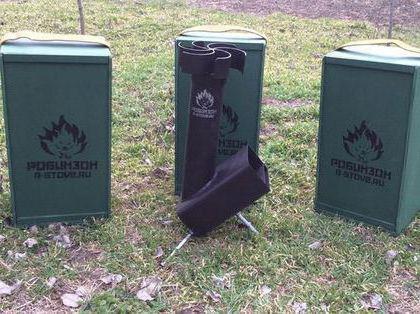
The "Robinson" camping stove is a fairly popular device among fishermen, hunters and hikers. With the help of a small amount of dry wood on such an oven, you can boil water in just seven minutes, even at low ambient temperatures. The design is multifunctional, as it can be used to fry fish, meat and reheat food. The stove does not give off soot and smoke, unlike gas burners, when exposed to wind, the flame does not go out.
Infrared device
Another type is an infrared tent oven. In the construction, the main element is a metal mesh. The principle of operation of such burners is to convert thermal energy into infrared radiation, which is focused by a reflector and directed to the specified zones of the tent. Ceramic or metal plastic is used as a radiator of thermal energy, while thermal energy is quickly transferred to all surrounding objects.
Even models with a minimum power are able to heat the space of small and medium-sized tents in a short period of time. Vacationers near such a heater can feel a temperature rise of 10 degrees when compared with the ambient temperature.
For the safe operation of the gas appliance, ventilation in the tent is required. You need to sleep with this type of heating at a height of at least 25 cm, so that in the event of a violation of the hood, carbon monoxide accumulated near the floor itself does not harm your health. It should be noted that the radiation should not be directed at objects that are easily flammable, and the device itself should be installed at a distance of at least 0.5 m from the walls of the tent. The fuel for the infrared emitter is gas, gasoline, kerosene.
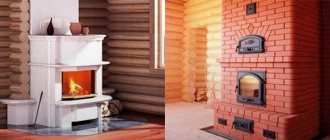
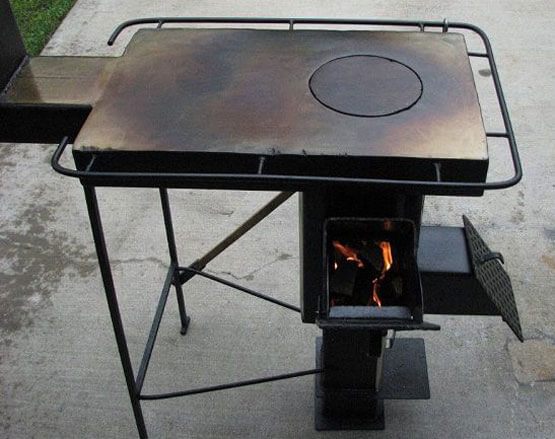
Description of the stove for a camping bath: model "Big housekeeper"
The stove for a camping bath is a real find for some tourists. An excellent example is the "Big Housekeeper" from. This device costs a little more than the analogs described above. The device is intended for cooking, as well as heating. You can install the structure in the bath. The user does not have to fear that difficult conditions will quickly destroy the oven. The manufacturer took care of this using thick high-grade steel as a base.Among other things, plates are installed at the corners at an angle of 45 degrees, which not only contributes to an improvement in intensity, but also a long burning.
Coals in the process of burning wood are shifted to the center of the stove. The described addition acts as a stiffening rib of the side walls and bottom, preventing strong heating of the lower part. This helps to improve fire safety. The dimensions are equal: 300 x 300 x 500 millimeters, while the weight is 13 kilograms. Such a camping design will be an excellent solution. A bathhouse, a stove in this way will be used by you even far from home, and you will enjoy the comfort and coziness in nature.
A simple homemade camping stove. The stove is two in one: a brazier and an Indian candle.

I liked the idea very much ... So I decided to share it with the community - maybe someone will also be interested ...
________________________________________________________________________________________________
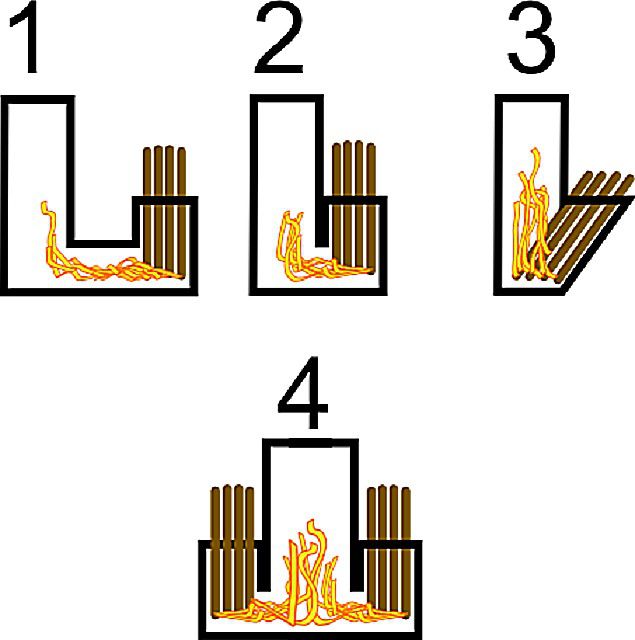
Among the problems that are associated with lovers of hiking, fishing and picnics is the problem of fast cooking or heating with a minimum amount of fuel. You can't make a fire on the ice in a treeless area or in winter. You cannot spread it out in a tent or even in the immediate vicinity of it. The bonfire is gluttonous, not very efficient and is notable for its combustion stability. It blazes, then it barely smolders, firewood "shoots", sparks in all directions. In these cases, it helps out some specific or special methods of burning fuel, especially an improvised one, i.e. firewood. I have already described two options for the so-called. Indian candle, "classic" and modern. (An Indian candle or a wooden stove and an Indian Candle or a bonfire without a fireplace) Alas, both options have some fatal drawbacks. For a classic Indian candle, this is a rather high complexity of manufacturing. Go find a ready-made dead wood with a weak core ... And chopping a block of wood, hollowing out and most importantly - again tightly joining the halves in field conditions is also not very interesting. The second option for its manufacture generally requires a chain saw. Even a hacksaw will not work here - the cuts must be wide so that the air can pass through. Almost carpentry work ... And both options are characterized by low combustion stability, the flame quickly gets out of control. Sometimes you don't have time to cook food. And you can't call them miniature. Such a strong flame is not always required. In general, something more stable and predictable, controlled, possible in different "weight categories" is required. Mankind is already known for several thousands of grills. Conventionally - some kind of vessel in which coals are burning or smoldering. In order for the oxidizer to enter the combustion zone (air, or rather the oxygen available in it), the vessel is either made very flat, or holes are made in its walls. But the grill is also not the best solution for a hike. Requires a specific fuel - coal. And if you just throw firewood there, it turns into a banal fire. Is it possible to find a compromise, I thought, that would not have serious flaws, but would combine the advantages of Indian candles and barbecue? It turned out you can! And the solution turned out to be extremely simple. The brazier has a body, but does not have the stability of burning conventional fuel (wood). Candles have some combustion stability, but the absence of a body makes them fire hazardous, and this stability is worsened. But what if you make a body for an Indian candle? Then the hardest part - we don't need to connect the split block. And the candle itself can be "assembled" from just ordinary poles. In order for the burning of wood to be controlled, stable in intensity and long, it is necessary to limit the access of oxygen to the combustion zone. Its quantity will also determine the intensity of combustion. For the experiment, I selected a tin can in the shape of "taller than wide". Those. like a tall glass. To make it a "barbecue", I punched several holes for air access.Only not from the sides, but in the bottom, and precisely in the center of the bottom, but not over the entire area. It was necessary to make sure that the holes in the bottom coincided with the air channel in the Indian candle. I did not just make a round hole so that the coals would not fall out of the can later. (The capacity of the jar is approximately 350-400 ml. In total!)
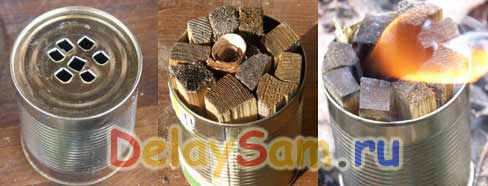
He pushed small chicks into the jar (and you can even call them churochkas with a stretch, in a finger 10 cm thick and 10 cm long), then took out the central one. A channel for air was formed as in a classic Indian candle. I put some birch bark in there, set it on fire ... A few minutes later the "stove - candle" burned with an even flame and burned for about 20-25 minutes! The flame was fairly stable in intensity, practically without smoke, low and even. And so until almost all the firewood burned out and turned first into a handful of coals, and then a pinch of ash. And the time and power was more than enough to warm up a can of canned food and boil a mug of boiling water and brew tea. And the stove can fit in your pocket! And fuel requires "a handful of chips" in the literal sense of the word! Encouraged by the success, I made a bigger stove. I took a 3-liter can and made holes in its bottom as well. After that, he split a small block of wood, hollowed out a core in it, inserted it into the stove and pressed both halves to each other, wedging them apart with other chips. Kindle ...
I was just as surprised by the result as in the first case. "2 liters" of firewood burned with a stable flame for about 50 minutes in the form of an "Indian candle", after which the coals were smoked in the stove, which became a barbecue, for another 10 minutes. During this time, I even managed to bend a rack for dishes out of the wire and boil a kilogram of potatoes in their uniform in a pot! What I would like to note in this stove. First, the extremely economical and efficient burning of firewood. If the wood is dry, it burns practically without smoke. Burning occurs (most of the time) only "inside" the wood, in the channel of an Indian candle, where there is oxygen. The rest of the firewood is, as it were, waiting. Secondly, the power of the stove is determined by its size. It turns out that you can still make a stove - a potbelly stove the size of a can! You need a stove to “boil a mug of tea, warm up canned food” - a half-liter can will be enough. On the "bucket" it will be possible to cook dinner for several people. Thirdly, the stove is quite safe in terms of fire, since its body does not heat up much (it burns somewhere inside the wood, and the tree is a good heat insulator), for the first few minutes you can generally hold it in your hands. If the firewood "fires", then again inside themselves. Coals do not wake up down, everything burns literally without a trace. Although an open flame from above is an open flame, one must be vigilant. Fourthly, the simplicity of "charging" the furnace. No special efforts and special tools are required to bring the fuel for the stove into optimal shape. Although the stove shows the best results on "monolithic" fuel. It is more homogeneous and does not have any slots for "parasitic" air suction. It burns for about an hour (in a 3-liter jar) absolutely stable. Just like a candle, a gas burner or a kerosene stove. This is a particularly valuable quality of the oven. Fifth, the stove is not a fire. It does not leave a fireplace, you can kindle it even in a tent (you just need to open the "window"), even on ice or in deep snow, placing a couple of woods so that the ice does not melt. There are many other advantages to be noted. Well, the price and laboriousness of making this stove is already clear to you. An empty tin can and 5 minutes of "work" - fill the holes in the bottom in the center. Make dish racks out of wire. But the main "secret" of the stove is in the form of a wood-burning bookmark in the form of an Indian candle! This is what determines the specific combustion mode. Although those who are going to seriously operate such a stove can already make it "for an adult", not from a tin can, but from galvanized sheet steel or thin stainless steel.Make a regulator of air access in the "blower", a deflector for suction of air for afterburning gases, which will also be a stand for dishes or a convection screen. The height of the stove should be about 2-3 times its diameter, and the fuel should be loaded up to about half the height of the body. When placing cookware on top, leave enough space for flames and gases to escape. If possible, you can also prepare special firewood for such a stove. The optimal fuel will be in the form of a wooden washer several centimeters thick and with a diameter equal to the diameter of the stove (it is not difficult to pick up a log - a toolbox and cut such washers from it). In the center of the washer, you will need to make a hole 3-5 cm in diameter. At home, this is easiest to do with a drill - a perk. In field conditions - with a punch (a piece of metal pipe with a sharpened edge). Then, as needed, it will be possible to "charge" the oven for the required time. It is necessary to warm up - put 1-2 washers. It is necessary to cook an ear - 5-6 ... Although such "special firewood" of course is no longer necessary at all, this will make the operation of the stove quite comfortable. You never know, heavy rain will wet all the fuel in the area or stopped at the bivouac after dark. Or in the winter on the pond while fishing. In general, a dozen - other such pucks will not be superfluous.
Konstantin Timoshenko © 10.10.2011
https://delaysam.ru/turizm/turizm22.html
Description of the camping wood chip oven
The weight of this multi-fuel stove is only about 500 grams, and the dimensions are: 150 x 122 x1 22 millimeters. The design is based on stainless steel, and the wall thickness is 1 millimeter. The camping wood chip oven can be used to quickly reheat food or water. This design is the leader in compactness, it consists of 5 parts, and the collapsible thickness is 5.2 millimeters. It will be possible to put fuel in a wide window, which has the following dimensions: 59 x 58 millimeters. The device can be heated with dry fuel, small branches, tablet candles, as well as fuel pellets and dry alcohol, which makes it easier to use the device when there is no way to find dry branches.
Principle of operation
It doesn't matter if the stove is made independently according to its original drawing or purchased at a specialized outlet, you need to know the basic laws of heating technology, according to which any heating structure works.
The combustion process consists of heating the fuel, when moisture evaporates and some flammable substances are released, directly igniting and burning the fuel. The efficiency of a heater implies the level of its heat exchange with the surrounding space, that is, the radiated heat and the intensity of convection.
The first factor depends on the degree of heating of the furnace, the area of the heat exchanger and the material of manufacture of the device. Second from the shape of the furnace and the direction of the hot air flows.
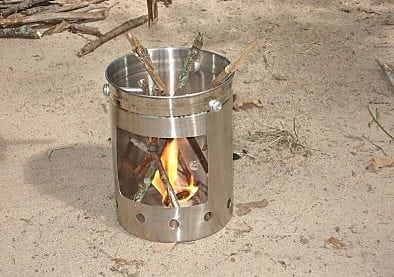
Making a camping stove
The simplest option would be to make a tourist oven from cans. Instead, you can use an iron mug, which should be high enough. Several holes should be made in the bottom, which are necessary for traction. It is important that they align with the internal air path. Alternatively, there would be one large hole in the bottom. The jar is filled with wooden chocks, which should not go over the edges. After that, the element should be removed from the center, which will provide a channel for the passage of air. Paper or dry grass is laid there, which is then set on fire. A do-it-yourself camping stove can be made of other materials, but such a structure is quite simple to make, its volume is about 500 milliliters, and it will burn for about half an hour. At the same time, the territory will not be smoke-filled.
Self-production
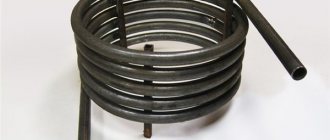
The simplest do-it-yourself tent oven assembly is from wood-fired pipes.The main advantage of such an invention is high efficiency, quick heating of a camping dwelling. To make a homemade stove, you need the following materials:
- chimney pipe with a diameter of 20 cm;
- two clamps for plugs;
- a piece of pipe for bringing the chimney to the outside, the length of which depends on the height of the tent;
- legs from a tourist chair;
- sheet of tin.
For the manufacture of a heater, complex diagrams and drawings are not required, the principle is simple and affordable. The assembly of the structure consists of several stages:
- Prepare a piece of steel pipe for the furnace. The length and section are selected depending on the area of the heated tent, as well as the desired volume of solid fuel for loading.
- A plug is placed at one end of the pipe; fuel will be loaded from the open part.
- A hole is made on the surface of the pipe closer to the plug, where the chimney pipe is welded.
- The product is installed on the legs of a tourist chair.
- When using a heater, a sheet of tin is placed under the legs of the structure.
If you bring the flue gas outlet not vertically, but at an angle of 30 degrees, the efficiency increases by 30%. A simple metal mesh installed in the chimney can serve as a spark arrester.
DIY folding oven
If you are not afraid to spend more time and effort on making the furnace, then you will definitely be able to complete a structure that will be ready to serve for more than one year. To do this, you will need a grinder, a file, bicycle knitting needles, a millimeter sheet of metal, a tape measure, an electric drill, pliers, as well as piano loops. In order to make a folding stove, you can use iron sheets borrowed from the body of a gas stove or refrigerator. The side walls can be formed from the old computer's system unit.
How to choose?
Comfortable tourist wood-fired stoves combine two important indicators:
- ease,
- practicality in use.
Compactness is an important element for trekking gear.
Any of the selected models can be:
- assemble / disassemble by yourself / together,
- put in a backpack / car.
Camping / camping wood burning stoves for indoor tent must be selected with particular attention to detail. The main tips come down to understanding what functions the oven should perform. Features are taken into account:
- If only heating is supposed, then you need to take into account the area of the tent - for a small structure you will need a compact stove (a mini-version can be used), since it will not smoke and smoke inside, and the released heat will be enough for comfort in any weather.
- If the tent has a window, then you can choose the option with a chimney. For cooking, the oven should have a grate on which you can put food or place a container.
Dimensions are also taken into account. In an open space, they can be anything - from a small one to a unit that can heat several tents at once if pipes are laid in them.
Methods of work
Elements of the future structure are marked on sheet metal, after which they have to be cut out using an angle grinder. Holes are made in the future bottom, and after the edges are processed with a file to get rid of burrs. The side walls are connected to each other, for this, piano hinges with rivets are perfect, as a result you should get a kind of box. Along the perimeter of the bottom and on the lower edges of the side walls, it is necessary to provide special ears, which should be bent to one side.
A part is placed under the box, which will act as the bottom, the ears of the two elements are combined on each side and form a tube, pins from the knitting needles should be installed in it. A trick like this will make the oven stable. Additional protrusions are made on the grate, installed in the hole.Another hole is made in the side part, which is necessary for loading fuel. The cutouts at the top of the box will increase traction and can be used to stack skewers.
Models
In order to be able to choose the optimal stove for use on a hike, you should read the information about the 6 most popular models (they are of different sizes, so there will be plenty to choose from):
| Model | Characteristic | The size | Price, rub.) |
| Frontier Stove | Tourist, universal, solid fuel (firewood, wood chips, branches), folding. | 300x300x500 mm | from 15000 |
| BioLite CookStove | Portable heating system with the ability to cook and heat food. The set includes a portable grill and a water container. Fuel - wood chips, branches | 210x114x114 mm | from 10000 |
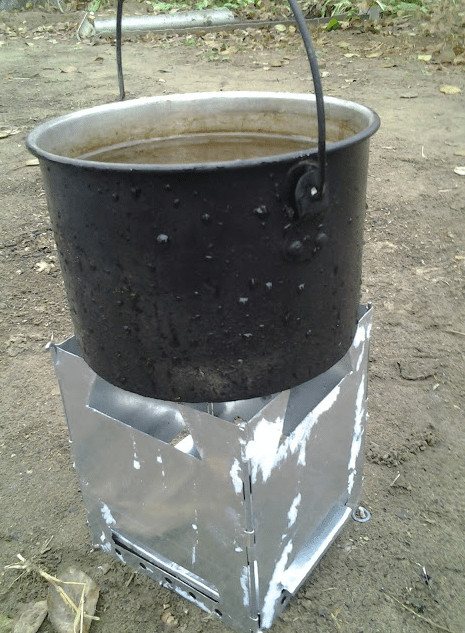
| Grillux Brazier oven for cauldron | Designed for cooking and heating. Works outdoors in any weather | 466Х466Х675 mm | from 5900 |
| BioLite BaseCamp | It is possible to connect a battery to charge mobile equipment | 336x336x381 mm (folded), 336x787x584 mm (in working condition). | from 28000 |
| BOYSCOUT | For heating purposes only. Works on any type of solid fuel | 115Х95Х70 mm | from 250 |
| Doublet 1 INOX | Excellent multifunctional stove. Suitable for heating a tent, as well as for cooking | 345x500x315 mm | from 6000 |
The choice of the manufacturer and model depends on the financial capabilities and functions performed by the device.
Simple solution: pot oven
Those craftsmen who do not want to spend a lot of money on making a stove quite often use pots as a base. In this case, the device will have two layers, for which it is necessary to prepare containers of different sizes, one must fit into the other. In the side wall of the outer of them, an opening and holes in the bottom are cut out. The opening should be at the bottom, its shape should be rectangular. On this we can assume that the budget stove for the hike is ready. To improve traction during use of the stove, it should be placed on stones, so that a space is formed below.
Types of solid fuel stoves
Among lovers of tourism and travel, various types of tent heating in winter are widely used. The most popular solid fuel models:
- "Housekeeper" - long-burning tourist stoves for tents. The device device allows you to maintain the combustion process on one tab of firewood for up to 10 hours. Instead of a door, it has a round hole, which is tightly closed by a cover-cap with a handle in the form of a bracket. In the lower part of the plug there is a built-in blower - a small branch pipe, on the cylindrical surface of which holes are drilled in rows. A cap-cap with a length equal to the branch pipe is tightly put on it. When the position is removed, the maximum thrust is created, the fire becomes more intense, quickly heating the stove. As the cap overlaps the rows of holes on the branch pipe, the traction force is adjusted. If the hood is pushed as far as it will go, all the holes will be closed, the blowing will stop, and the firewood will slowly smolder. Usually, thicker logs are stacked at night, after they burn up, the blower is closed and all night long the space of the tent is provided with pleasant warmth. In the morning, it is enough to put a few logs on non-extinguished coals, move the lid-cap and the fire will ignite again.
- Camping stove for a tent "Volokusha" has a streamlined shape, making it suitable for transporting food or small items needed by a tourist, fisherman or hunter.
- The round collapsible and hinged ovens can be easily disassembled, stored in compact packages that fit in a backpack. They are quickly assembled on site, however, certain skills will be required.
We offer you to familiarize yourself with Equipment for saunas and baths at reasonable prices
Tourist stoves have several types of installation.For example, in the "Blizzard" and "House" tents, heating devices are suspended under the ridge of the tent. Sometimes they are attached to the central post in the tent or simply placed on the legs. But this setup is not very convenient. If the stove is placed directly in the snow, it will constantly melt from the heat.
Making a mini oven from a tin can
First, the bar is inserted into the largest container. A straight line is drawn on a wooden blank at the level of the can lid with a marker. Another line is drawn above it with an indent of 8 mm (parallel to the first).
A part of the bar between the two lines is cut out. You should have a small indentation that easily fits into the edge (top) of the can.
Several ventilation holes are made in the lower part of a large container. The same openings are drilled in the upper half of the second can. And its bottom is turned into a sieve (many holes are punched through).
After that, the smaller jar is inserted into the larger one. As a result, a structure with a gap is obtained, which ensures the movement of air during the operation of a home-made unit.
It remains to make a burner from the third (smallest in size) jars. Its bottom is removed with metal scissors. Sharp edges are leveled using a hammer and then filed down.
Round holes are made on the sides of the container.
Small firewood, dry cones, small branches are loaded into an average jar and set on fire. When the stove is well lit, it is covered with a homemade burner, on which a ladle or kettle is placed.
Pyrolysis camping devices - truth and myths
Often on the websites of online stores selling these products, some of the heating devices are called pyrolysis wood chip ovens, arguing that the fuel goes through the pyrolysis process and releases pyrolysis gas, which then burns in the "pyrolysis" section (afterburner).
Actually pyrolysis is the thermal decomposition of wood with a lack of oxygen and the almost complete absence of open fire.
In these the same heating devices, thermal decomposition of wood occurs with an excess both primary (in the firebox) and secondary (in the "pyrolysis room") oxygenthat comes with air.
therefore name "Pyrolysis" - just a marketing ploy, the purpose of which is to attract the attention of people who are familiar with this term, but do not delve into the peculiarities of the operation of the proposed stove model.
However, most "Pyrolysis" wood chips more efficientthan their simple counterparts.
This is due to the fact that the flame receives secondary air entering through the holes in the housing, due to which hydrocarbons are burned more completely, this leads to an increase in the temperature of the fire with the same amount of fuel.
Often, wood chip ovens, which do not have the definition of "pyrolysis" in the name, are equipped with the same holes, therefore, it is necessary to choose heating devices in which air supply is provided above the combustion zone, that is, in the afterburner zone.
Using unnecessary pots to make a stove
If tourists go out of town on vacation in a large company, installation from cans will not allow them to prepare enough food for all participants in the trip. In this case, it is recommended to make a wood-fired stove with your own hands from two stainless pots that are not used in the household.
In the bottom of the outer container of a larger size, holes or slots are made strictly parallel to each other, and an opening is cut on the side of the tank. It is used for filling wood fuel.
The slots at the bottom are covered with a metal stand. It serves as a grate. Firewood is superimposed on it. Place the second pan on the first. The fuel is ignited and the cooking process begins.
The unit of two pots is compact and lightweight. It can be transported in a car without any problems.It is allowed to transfer the structure from one place to another, even during the cooking process. Such a mini-oven can be used as a heating device in any room in the country, in a tourist tent.
Camping stoves made of pots and cans are not very durable. If a tourist wants to acquire a reusable structure that is more reliable and durable in use, it makes sense to make a folding unit from a metal sheet 1 mm thick, piano hinges and bicycle spokes. To build it, you need the following tools:
- file;
- pliers;
- Bulgarian;
- electric drill;
- roulette.
The manufacture of the stove begins with the preparation of the drawing. It indicates the dimensions of all elements of the structure, the diameter of the required holes. The presence of a sketch ensures that the home craftsman does not make mistakes in the process of assembling the structure.
The process of building the unit itself is long and responsible. But on the other hand, the result of the work will satisfy any tourist. After all, he will have at his disposal a truly efficient and durable oven. The structure manufacturing algorithm is as follows:
- A metal sheet is cut into separate blanks with a grinder. On the latter, outlines are outlined (it is convenient to perform the operation using a stencil) of all parts of the folding stove.
- The elements of the structure are cut with a grinder along the contours made.
- Holes for the grate are made in the workpiece, which will go to the bottom of the unit. Their edges must be leveled (no chipping, sharp irregularities are allowed) and sanded with a file.
- The side pieces are connected to each other by piano hinges. The result is a furnace body.
- In the lower part of the side walls and along the perimeter of the bottom of the future structure, grooves are made. They will allow you to collect all the blanks into a single structure.
- The bottom and the main body of the unit are connected to each other by pins, which are made from bicycle spokes. These parts are inserted into the grooves prepared in the previous stage of work.
They begin to create a combustion compartment. Firewood will be laid in the opening that is cut into the side of the stove body. It is recommended to additionally make cutouts in the upper part of the homemade structure. They will perform two important functions at once:
- Provide blowing of the installation, increasing its productivity.
- Used for laying skewers on the mini-oven when frying kebabs on it.
A camping stove is an excellent alternative to a fire. This design requires much less fuel than an open fire. The stove can work not only on wood, but also on:
- cones;
- bark of trees;
- chips;
- dry branches;
- reeds;
- cooled used coals.
Note that the proportion of fuel consumed and heat received is much greater than that of a fire. This means that with the same amount of fuel, the amount of heat generated is different. Cooking in the oven will be much faster and, as a result, there will be more portions. Forest, fresh air, tents are great, but don't forget about hygiene. If you are going to be outdoors for a week or more, then a stove for a camping bath may come in handy.
In the modern world there are a huge number of smart people who build camp stoves from scrap materials. In general, such devices can be divided into
You can make a stove already at the resting place or make it at home in advance. You might find a blueprint useful. Materials that may come in handy:
- unnecessary saucepan;
- cans;
- Metal sheet.
But keep in mind that a tourist stove should consume a small amount of heat, be small in weight and dimensions, and should also heat dishes rather than air. The design can also be foldable or mini.
When making a stove with two walls, you can use an old unnecessary pan. A stainless steel pot will do. For a hike, this is a great option - it's cheap and easy to perform.Fuel for such a stove can be found in every forest.
A double-walled stove is one pan inserted into another. On the side you need to make a hole for loading firewood. Make slits in the bottom, parallel to each other. A stand is installed on the resulting grate, which is loaded with firewood. Put another smaller container on top, which will heat up from the fire.
Such a device is very light and durable. The mini oven will take up little space during transportation. In addition, it is easy to carry from place to place, even when the fuel is burning. When using the structure in a tent, nothing bad will happen. Of course, such a stove is also not durable, so you should not expect a long service life from it.
A highly efficient outdoor folding stove. For its production, it will take much more time, effort and preparation. First, it is advisable to make a drawing. After that, you can purchase the following materials:
- electric drill;
- piano hinges;
- roulette;
- pliers;
- grinder;
- file;
- bicycle spokes;
- metal sheet in 1 mm.
Folding stove assembly instructions:
- Fabricate all structural details on a sheet of metal. A drawing and a grinder will help you with this.
- Make a hole in the piece of metal. It will be the bottom of the stove.
- Use a file to remove any burrs around the hole.
- Fasten the side walls together. Apply piano loops. You will receive a box.
- Think over and make curved ears along the perimeter of the bottom, below the walls and on the side. The ears are bent to one side.
- We put the bottom under the resulting box. The ears should match and form into a tube into which you need to install the pins from the knitting needles. With their help, you can fold the stove if necessary for transportation. And during storage, it will take up much less space when folded.
- On the grate, make the protrusions cut out on the sides.
- There will be an additional hole on the side, firewood is put in it.
- The skewer can be placed on the cutouts on top of the box. By the way, they also increase traction and the combustion process becomes stable. This means less time is needed to prepare food.
To make a double-walled stove, you will need an old unnecessary pan; an excellent option would be a product made of stainless steel. This version of the stove can be used on a hike due to its light weight, ease of manufacture and affordable fuel for it.
The design of a double-walled tourist wood-fired stove is one container inserted into another. A hole is cut in the lower element where firewood will be laid. The bottom is cut with a sharp knife in several places to make a kind of grate. A small stand is installed at the bottom and firewood is laid on it.
The second container needs to be taken a little smaller so that it fits inside the first pan. The fire in the bottom element will heat the top pan. They also make a bow, with which the resulting kettle can be removed from the fire and not burned. It is very easy and pleasant to cook food in the open air with the help of such a stove.
Both versions of the camp stove are lightweight, do not take up much space and are easy to transport. You can also use the devices in a tent in adverse weather or move them while the fuel is burning. But such stoves cannot boast of a long operating period.
A folding stove for a hike can be called a fairly effective option, but it will take a lot of time and effort to make it. This option implies the mandatory availability of a pre-drawn drawing and a set of necessary tools and materials. In particular, you should prepare the following:
- Electric drill.
- Pliers.
- Roulette.
- Bulgarian.
- File.
- Metal sheet 1 mm thick.
- Piano hinges.
- Bicycle spokes or fine wire.
For self-production of a folding version of a camping wood-burning stove, you can use the following instructions:
- In accordance with the drawing, structural parts are cut out of a metal sheet using a grinder for work.
- A hole is cut out in the part that will serve as the bottom of the product. The burrs around it are cleaned with a file.
- Connect the side parts of the stove with piano loops. The result is a kind of box.
- One-sided bends must be made along the perimeter of the bottom, as well as in the lower and lateral parts of the walls.
- The bottom and the box are combined, while the bends made should create a tube. Bicycle spokes or thin wire are inserted into it.
- On the grate, projections are made with slots on the sides.
- On one side of the stove, a hole is cut out with a grinder for storing fuel.
- Slots are made along the upper edge into which you can insert skewers for frying meat.
A do-it-yourself camp stove made of metal is ready to use.
1 Homemade stoves are a smart alternative to a campfire
Mobile units designed for heating canned food, making rich fish soup or fragrant tea in suburban conditions, are monolithic and collapsible, reusable and disposable. Regardless of the design, any homemade camping stove has the following advantages:
- Minimum financial costs for manufacturing.
- Versatility of use (suitable for a tourist outing into the forest, on the shore of a lake or sea, rest in the country).
- Compact dimensions yet high power and efficiency.
- Duration of fuel burning, which is used as dry grass, leaves, cones, tree branches, firewood prepared in advance.
- Minimum smoke during unit operation.
Fans of wild outdoor recreation, fascinating hiking trips build stoves from a wide variety of materials. The most popular are the designs that operate on wood and other wood fuels. They are made from cans, sheets and scraps of iron, old pots.
Rocket ovens and pyrolysis units are less common. They are built using bricks, concrete, clay, sheet metal.
Not every person can assemble such a structure. But on the other hand, if everything works out, the rocket can be used not only for cooking, but also for heating a tent or summer cottage.