
Sometimes situations arise when it is necessary, without significant material costs, to heat a small room (garage, workshop or warehouse) as efficiently and quickly as possible. An excellent solution to the problem will be a compact do-it-yourself stove, which requires ingenuity, desire, tools and metal to create.
A simple potbelly stove can be built from materials that are at hand. You can use a regular can or a thick-walled barrel. Many years of practice have shown that very thick metal (over 8 mm) is too difficult to warm up. Thus, efficiency decreases and most of the heat is not used for heating.
If the metal turns out to be too thin, under the influence of high temperatures, it will begin to deform and quickly lose its original shape. The best option is walls of about 3-4 mm.
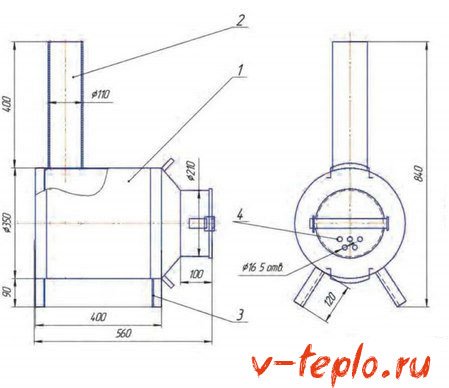
Rectangular potbelly stove with reflector
When deciding what shape and size a finished potbelly stove should take, everyone must independently. A person with engineering education and skills can take any, even the simplest design, and make the desired changes aimed at improving it.
Drawing of a rectangular potbelly stove:
A simple and multifunctional do-it-yourself stove is made from the following materials:
- Outline and simple design drawing showing all basic dimensions
- Sheet metal (its quantity depends on the desired dimensions of the furnace)
- Steel corners (thickness 4-5 mm)
- Metal tube 25-30 mm
- Pipe 180 mm
- Welding machine
- Working hand and electric tool
The furnace body will be made in the form of a rectangle with steel sheets, which are butt-welded to each other. It is necessary to cut the workpieces under five main planes (bottom, top, side and back walls). On the front panel there will be a blower and a door for the furnace, so it will be possible to resolve the issue with it later.
First, the side surfaces are welded to the bottom. It is necessary to ensure that they are located strictly vertically, using a level or square, and docked at a right angle. Having grabbed in 2-3 places, once again we are convinced of the correctness of their location and cook.
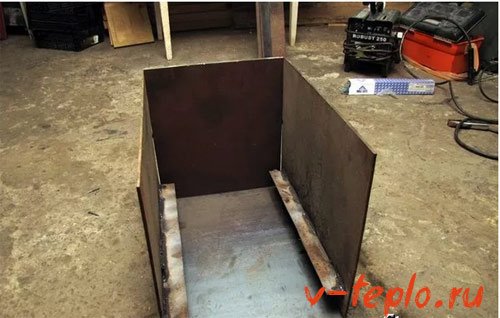
After that, the back wall is welded. All internal space must be divided into three parts:
Recommended reading: an article on how to make a pyrolysis boiler yourself
The last two must be separated by a grate, on which solid fuel (peat, firewood) will be laid. It is done as follows:
- From the inside on the sides at a certain height (10-15 cm), the corners are welded to the entire length
- For the lattice, it is necessary to prepare strips of thick sheet steel with a width of 25-30 mm and a length corresponding to the width of the stove
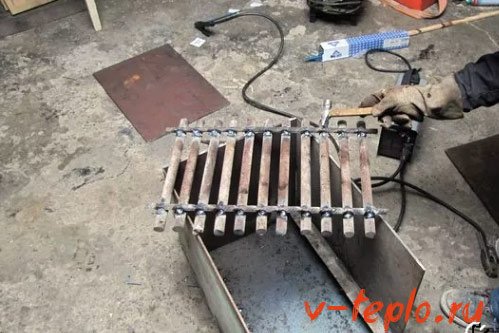
- The distance between the plates is about 5 cm
- Strips are welded to two metal rods with a diameter of 15-20 mm as reliably as possible, since they have another role to play - stiffeners
There is no need to weld the grille to the inner corners. If necessary (cleaning the stove, repair), it can be easily obtained. After some time, some of the plates may burn out and will need to be replaced. There are many more reasons to leave the grille removable.
In the next step, you need to weld two metal rods on top, on which the reflector will be located. The latter is a metal sheet that separates the smoke flow and the firebox. The reflector is removable.
It is necessary to position the reflector so that a channel is formed in front, allowing the smoke to escape.It will warm up inside the most, so it is made of very thick metal (12-16 mm).
It's time to start the final stages of work. First, the future stove cover is welded. It will not be superfluous to provide an opening for the chimney in advance. Then the upper lintel is cut and welded, then a narrower one, placed at the level of the grate and separating the doors of the grate and ash pan.
You should not bother much about the size of the doors. The main thing is that it is convenient to lay firewood through them and remove ash and ash. The door for the firebox is made, as a rule, almost the entire width, so that the reflector and grate can be removed, for the ash pan - narrower.
Next, you need to weld the handles for the doors for the stove, latches and curtains. The latter are recommended to be made by yourself from a thick rod and a steel tube. Such work should not be difficult.
Having collected everything together, it is time to think about how to install the finished structure on the legs. They are recommended to be made of a metal tube 2-3 cm in diameter and 8-10 cm in length with a nut welded at the end and a screwed in bolt. This will allow you to adjust the height. To many, such a step may seem strange, but during the installation process, everything will become clear.
It's time to think about the chimney, which will be made of a pipe with a diameter of 15-18 cm. At the same time, it should be led out through a hole in the wall. Bends are made at an angle of 45 degrees, there should not be any areas located horizontally.
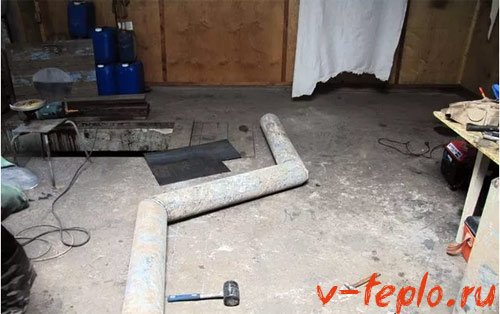
A rotary damper must be provided at the lower end of the chimney. For it, a circle is cut out of sheet metal, with a diameter slightly less than the similar characteristic of the pipe, in which a hole is drilled under the handle for rotation. The latter can be made from a metal bar.
It is necessary to place the chimney on a sleeve 15-20 cm high. It is made from a product with a diameter slightly smaller than the chimney and is welded along the hole to the top cover. It's time to install the stove, adjust the height and that's it - you can heat the room.
Perhaps you will also be interested in an article on how to implement alternative heating of a private house.

Let's compare an industrial furnace with a homemade device
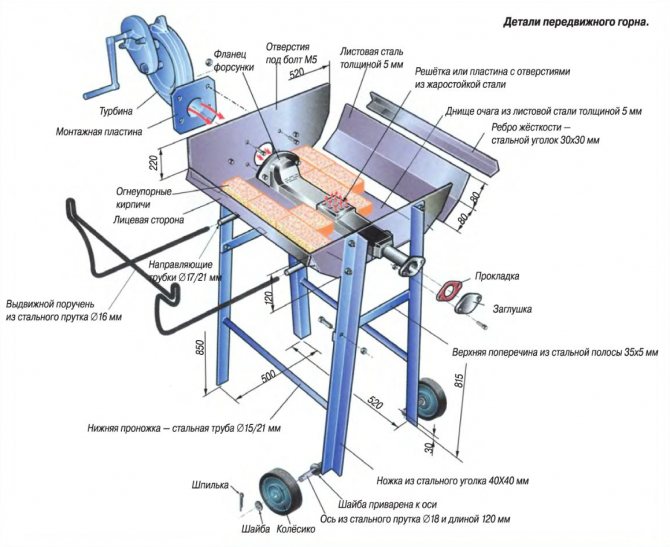
Image 1. Diagram of an industrial furnace.
Industrial forges include (Image 1):
- Air supply nozzle. In our case, its functions are performed by the hose from the vacuum cleaner.
- Refractory bricks that store and hold temperature. In a homemade forge, they can also be present on the desktop.
- The grates that hold the fuel. In a homemade version, they are usually also present.
- Solid fuel loading slot. This device can be equipped with a homemade horn, if it is often used in the work of a home craftsman.
- The bricks that make up the frame. In a homemade device, they are not.
- A fan that supplies air to the furnace. In a homemade version, an old vacuum cleaner plays its role. However, a separate fan can also be adapted.
- Metal frame to support the work table. It is in a homemade version.
- Air chamber. Over time, it can be made for a home forge.
- Ash pan. A useful addition to a homemade furnace for home use if the furnace is used frequently.
- Air duct. To begin with, its functions in a homemade furnace can be successfully performed by a vacuum cleaner hose.
- Casing.
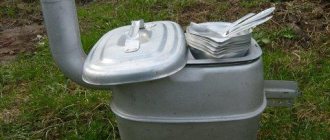
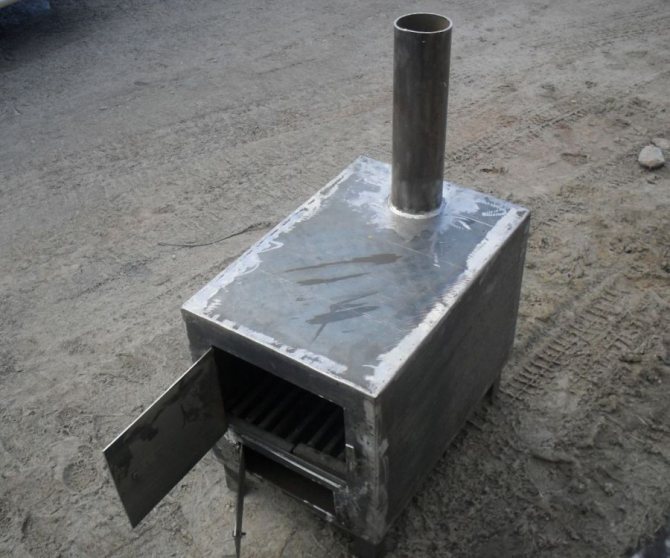
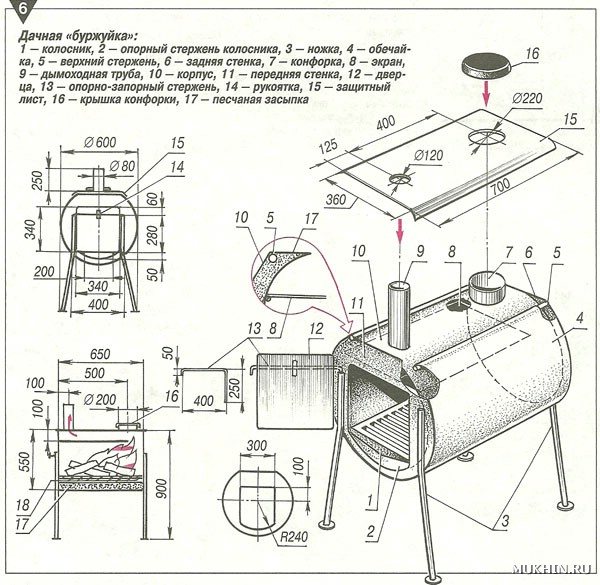
Simple potbelly stove from a can
The simplest do-it-yourself potbelly stove is made from an ordinary can. There is no need to talk about the durability of such a structure, but it is quickly built, easily assembled and gives enough heat.
All work consists in the installation of the legs, the arrangement of the outlet pipe and some cosmetic operations. To work you need:
- Can
- Chimney pipe
- Grate wire
- Welding machine
- Tools
Getting Started
- We set the can horizontally and mark where the blower will be, which has the shape of a rectangle or a sickle. Place it under the lid
- A hole is cut in the wall or bottom of the can, equal to the diameter of the chimney pipe
- To make a grate, you need to stock up on steel wire. It is bent, carried through the lid into the inside and gently unbent so that the zigzag is in the desired position, while it remains convenient to lay chips, firewood, etc.
- The can must be fixed on legs that are cut from tubes or corners and welded
- The chimney is welded
Preparation and assembly
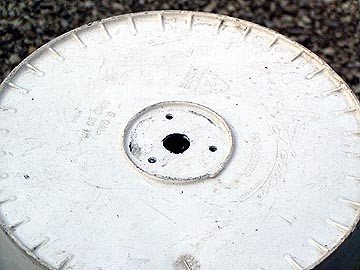
Making a stove from a pipe for a bath with your own hands, you will have to assemble the heating equipment itself. The rear wheel rim is used for this. All holes must be welded, except for the one in the center. Next comes the next rim. The convex top should be trimmed. The 1st rim is inserted into the second, everything must be welded. There should be no slots or holes, the device must be sealed. Slag after welding is beaten off, the weld must be checked. If gaps were allowed somewhere, they must be boiled up, checked again and slag beaten off.
The rim is welded to the pipe, the 2nd rim is put on it and welded so that there are no holes, since this part will become a container for water. The rims welded to each other will form a container. After that, in the second rim, reinforcement in the form of rays should be welded on three sides. They must be attached to the pipe for rigidity. In the first rim, you need to drill a 25 cm hole at the very bottom. Next, a pipe of the same diameter is welded from there; a tap must be screwed into it to drain the water. The first rim, which is completely welded from the bottom, except for the middle, is put on the pipe, otherwise it will not be possible to insert it. The second rim is turned over and welded to the edge of the pipe.
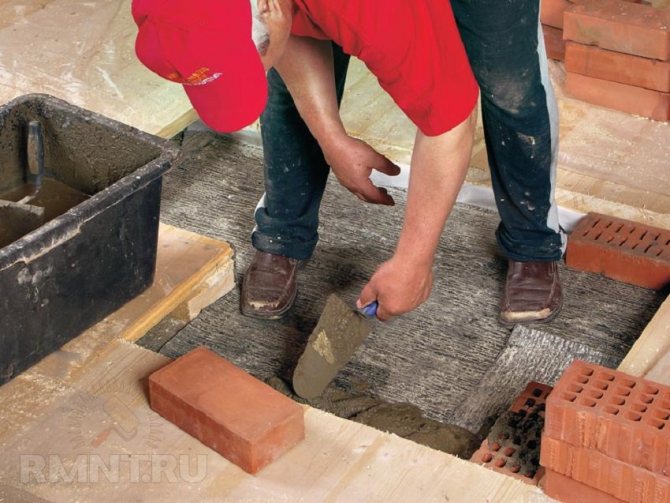
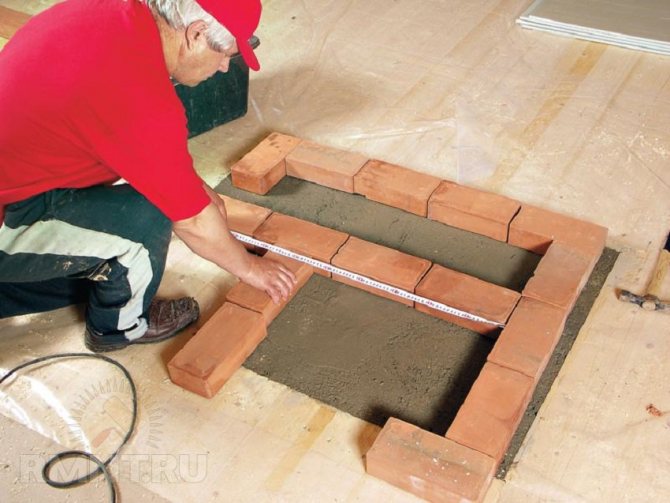
When the foundation is ready, the formwork should be removed and the bricks should be laid. Clay should be used instead of grout. If there is a dressing room, then before installing a new stove, it is necessary to cut a square hole in the wall, because the heater will start from there. This part will become the doors of the blower and firebox, everything else will be located in the bath. If there is no dressing room, then it will need to be built together with the oven. The corner where the structure stands should be bricked, which is necessary for fire safety.
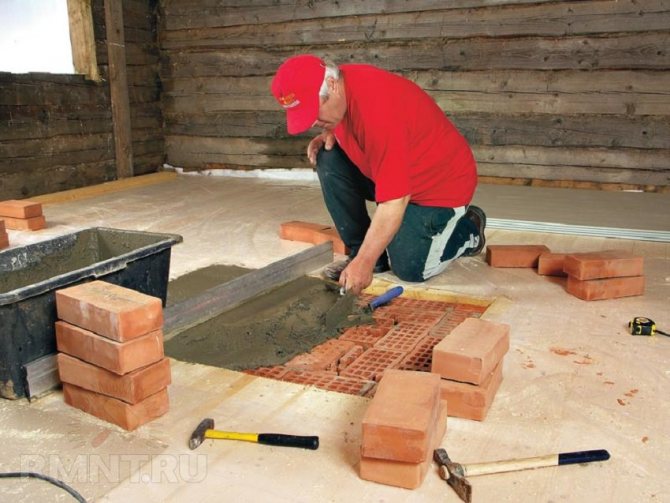
If you are faced with the question of how to make a stove in the bath with your own hands, you should know that the base is laid out of bricks, the second row will become an ash pan. This is the mine through which you will need to select ash. The ash pan is made slightly smaller than the combustion shaft. Next, you can install the blower door by overlapping it with another row of bricks on top. A grate is installed on top of the shaft.
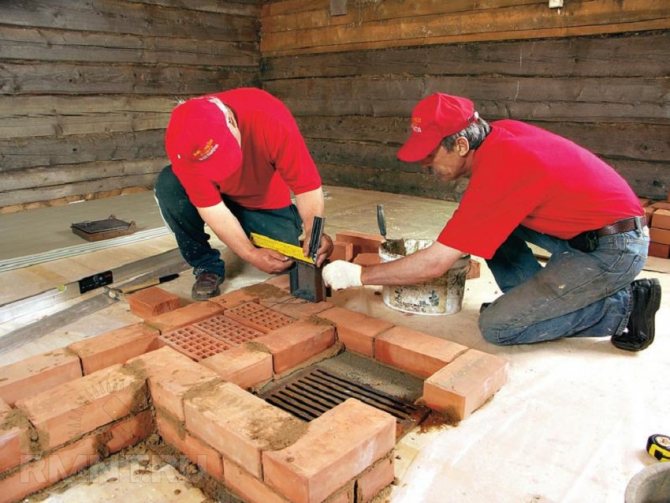
Now you can start laying out the firebox, after the grate, a place is set up under the firebox door. Two more rows need to be laid on top. After laying, the stove dries out within two weeks. If it is flooded immediately, microcracks may appear, which will violate the integrity of the structure. The blower, entrances and exits must be opened in order for the oven to dry. A pipe is installed on the folded structure.
The heater will be located on the body of the iron stove. In this case, it will be located on the pipe, there is also a hot water tank. The structure itself will turn out to be heavy, so it can be divided into separate parts, assembled indoors. The upper part of the chimney must be reinforced with two fittings. For wall mounting, you can use a plate or angle, which is welded to the fittings and drilled from both sides. The brick can be drilled with a 6 cm perforator drill. Anchors are fixed there to obtain the stiffness angle for the stability of the structure.
Materials and tools
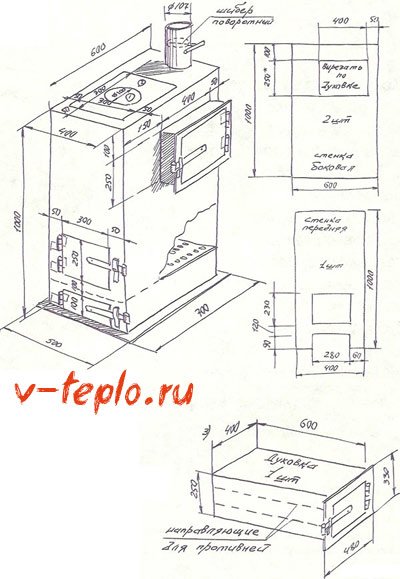
To create a potbelly stove you will need: • metal with a thickness of 3 ± 0.5 mm: thinner sheets will quickly burn out, in addition, under the influence of high temperature they can be driven, and the furnace will become shapeless; thick-walled metal will warm up for a very long time; • chimney pipe; • rods 16 mm; • a sheet of metal with a thickness of 0.3 mm for the installation of a box for collecting ash; • tape measure, ruler, chalk; • welding machine 140-200A; • grinder for metal cutting; it is more convenient to use a gas cutter to make round holes; • metal brush for cleaning welding spots; • emery wheel for adjusting the doors; • drill and drills.
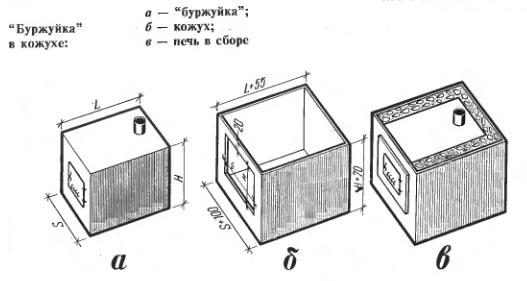
Burzhuik schemes
The main advantage of a rectangular stove
, unlike oval products made of pipes or gas cylinders, it consists in a larger area of the heated surface, so its efficiency will be much higher. The optimal size for a potbelly stove is 800x450x450 mm. A stove of this size does not take up much space and can easily fit even in a small room.
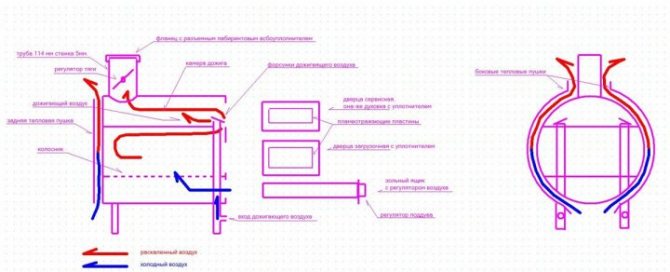
An important distinction Loginov ovens
is the presence of two plates (
reflectors
) at the top of the combustion chamber. Because
gas path
at the same time, it increases, the heat transfer of such a potbelly stove is significantly higher than that of a conventional metal stove.
Advice
... If it is required to reduce the size of the Loginov oven, then it is desirable to change only its width. With a change in the length and height of the structure, its effectiveness can be significantly reduced.
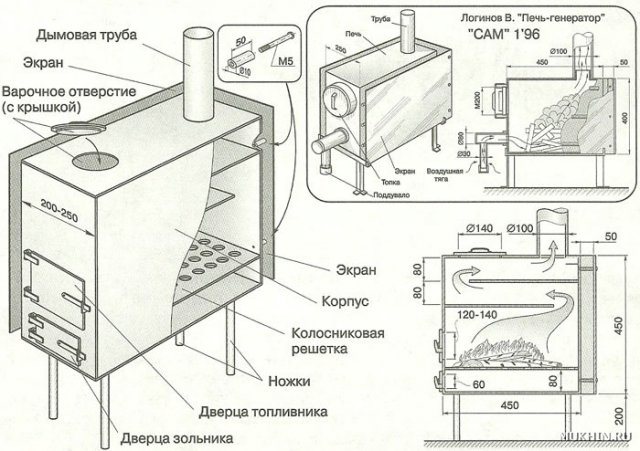
Detailed diagram of Loginov's stove
How to make a water tank
Only stainless steel should be used as material. If there is no suitable material, you can try to adapt a stainless steel container for the tank. The rectangular shape of the tank will be optimal. It is not welded to the oven wall, but simply touches it closely.
If the top of the stove is free of the heater, the tank can be placed on top. If this is not possible, the tank is placed at the side or rear wall - a shelf is welded to the wall, the tank is placed on it, after which it is attracted with a tire and two studs with wing nuts.
The main stages of making a potbelly stove
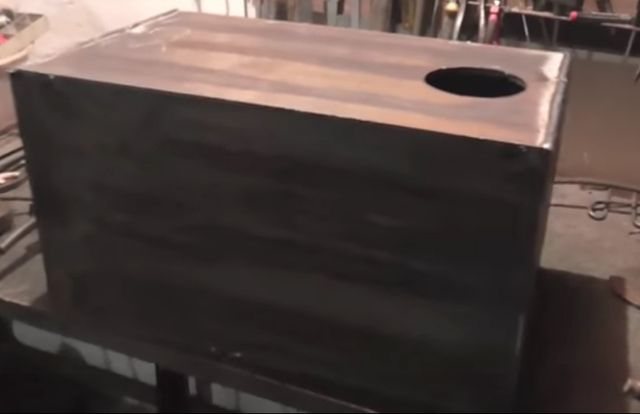
1. All the details are marked on a sheet of metal: 6 steel rectangles for the walls of the furnace, 1 rectangle for creating a smoke reflector, a plate for a grate and a latch for a door. 2. Cut out
a sheet of metal is possible at any metal warehouse. The guillotine, in contrast to the grinder, allows you to cut (chop) it more accurately. In this case, straightening (aligning the sheets) will not have to be done. 3. The furnace body is made in the form of a rectangle. Their sides are joined together at an angle of 90 ° and welded together.
Box welding
4. To avoid mistakes, the box for the furnace is first only tacked by welding in several places, and only then, after checking its horizontal and vertical, its seams are welded.
Important!
All connections in the housing are carefully welded;
to check the seams
for tightness, you can coat the joints with chalk or kerosene.
5. Welding seams are cleaned with a wire brush. 6. The inner space of the stove is divided into three parts: a firebox, a smoke chamber and an ash pan. To separate the firebox from the ash pan, a grate is laid between them, on which the fuel will be placed. To do this, at a height of 10-15 cm from the bottom of the furnace, from the sides and on the back of the box are welded corners 5x5 cm
on which the lattice will be located.
Advice.
It is better to make a grate from 2-3 detachable parts. Otherwise, when replacing a burnt grate, it will be difficult to get it out of the firebox.
7. The grating is welded from thick steel bars or strips 30 mm wide. They are attached to 2 stiffeners - rods with a diameter of 20 mm. Since the grates burn out over time, it is better to make such a grate removable.
Manufacturing of a grate
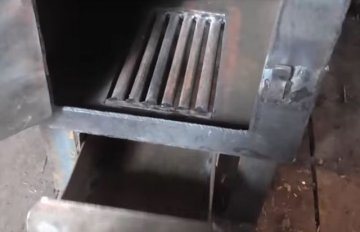
8.At a distance of 15 cm from the top of the box, two strong rods are welded on which it will be stirred one or two removable reflectors
- thick-walled metal sheets, which will trap the flow of hot gases and send them for afterburning. However, they should not completely cover the oven. In order for hot smoke to enter the chimney, an indent of about 8 cm is made from the front (for the first sheet) and the back of the stove.
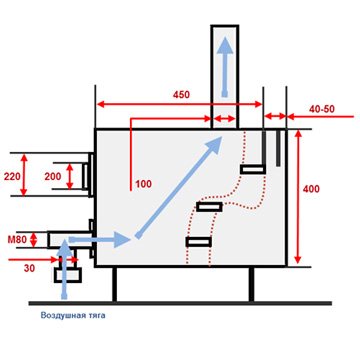
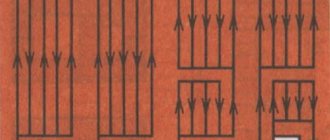
Diagram of the passage of gases in the simplest potbelly stove and oven with a reflector installed
9. Next, the upper part of the box is welded, and then cut out in it pipe hole
.
Pipe hole
10. The front part of the stove with holes cut in it for the doors of the firebox and ash pan is welded last. 11. The size of the door of the firebox must be large enough to be able to load fuel and change the grate without effort. The hole for the ash pan is made slightly smaller. 12. The hinges are welded first to the door and then to the stove body. They can be bought ready-made or welded from two tubes of different diameters. Door handles can be made from a strip of metal or a bar.
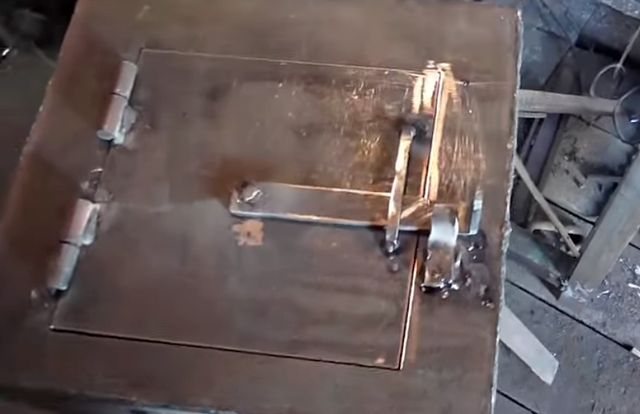
Welding the door
Important!
When attaching the doors,
fit them to the body
as tightly as possible; for this, they are straightened (leveling) and cleaned with an emery wheel. The wedge latches that close the doors fit as tightly as possible to the body.
13. This oven can be used to cook food or warm water. For this, a hole of the required diameter is cut in the upper part of the box. Oven burner
that will fit into this hole can be purchased at any hardware store. 14. For ease of use, the design
installed on legs
or a welded pipe support. 15. The chimney is connected to the stove
using a sleeve
. 16.
For inserting a damper
regulating the smoke outlet, two holes are drilled in the pipe. The metal rod is inserted into the holes and bent 90 °. A "penny" made of metal is grabbed to it in the center of the pipe - a gate, the diameter of which should be slightly less than the diameter of the pipe itself by 3-4 mm.
Housing

This is how the snail blowing looks like in the diagram. To make it, at the bottom of the bucket, we make a hole in the center, which should be slightly larger than the diameter of the motor shaft. Then you need to make mounts, as in the photo or any other mounts that will securely fix the motor so that it does not rotate and does not touch the impeller.
After that, it is necessary to cut the bucket so that it is wider than the impeller. Next, we cut off the cover, the same diameter as the bucket, and in it we make a circle in the center, which will be slightly smaller than the diameter inside the impeller.

Chimney device
• To prevent precious heat from escaping too quickly through the pipe, it must be specially designed. Such a device has two main parts: vertical
height from 1.2 m, installed at an angle of 90 ° above the oven and an inclined part, called
hog
, 2.5-4.5 m long or more, in which the smoke burns out. It is the boar that gives up to 1/4 of the heat of the entire furnace.
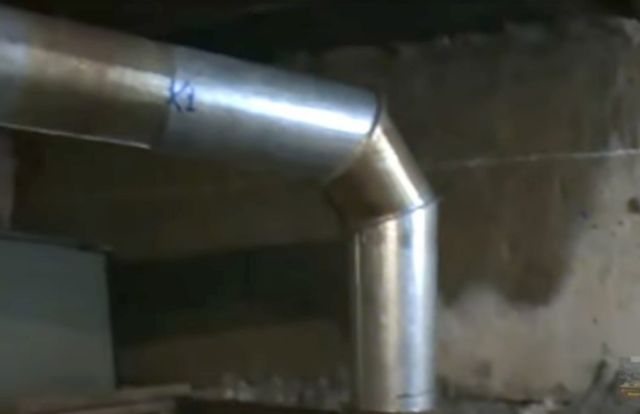
Chimney hogs
• A tall person can touch a heated pipe, so the hog should have a protective cover in the form of a mesh. To avoid burns, the distance from the floor to this pipe should be 2.2 m. The vertical part of the pipe coming from the oven is additionally wrapped with thermal insulation.
Important!
The pipe should be located 1.2 m away from the plastered walls. The distance from wooden structures is 1.5 m.
Advice.
Laying a pipe through a wooden ceiling and roof is a rather laborious process. It is much easier to bring it out through a hole in a wall or window.
Smoke output through the window
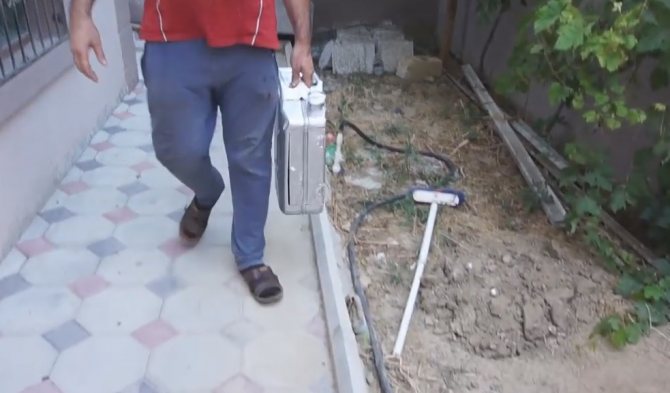
Portable canister oven test

Lighter fluid can be placed
1 The storage compartment for the ignition came in handy - everything in one place.
2 It is convenient to carry. The stove weighs about 3 kilograms.
I went to fry potatoes
3 The firebox is made at an angle, the wood will go down as it burns out - the fire is supported automatically.
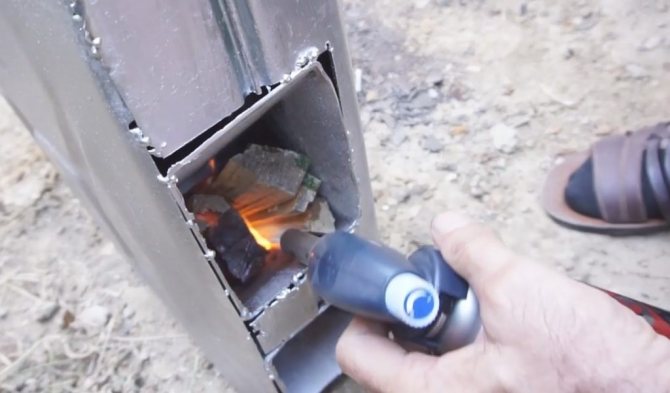
I loaded the firebox with wood chips and made a fire
4 Now you can prepare food in nature in almost any place.
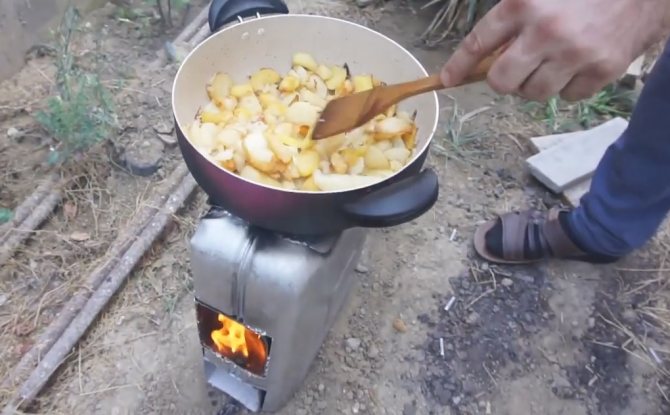
Sufficient for cooking
VIDEO: DIY mobile stove from a fuel canister
Rules for the safe installation of a metal oven
The potbelly stove heats up much more strongly than a brick oven, so all flammable objects should be at a sufficient distance from the oven. If the floor in the room is wooden, it is installed only on bricks or metal sheet. The metal, in turn, is laid on a sheet of asbestos with a removal of it 35 cm or more from the edges of the stove. In front of the firebox, it should protrude 5.5 cm. Asbestos can be replaced with felt soaked in clay. It is also possible to install such a screen to reflect heat on concrete.
Important!
A working oven requires supervision. You should not be away from the room for a long time, where the stove is heated.
Installing a potbelly stove on a brick base
Furnace construction
Before you start building a brick sauna stove with your own hands, you must choose a solution. It includes:
- concrete;
- sand;
- clay.
The rock is cleaned of debris and impurities, leaving it in a container with water for several days. The metal rod is placed under the first row of masonry, and in the bricks, using the grinder's abrasive wheel, it is necessary to make the appropriate slots. Once the door is in place, the resulting gaps can be filled with clay and sand mortar.
Do-it-yourself stove in the bath is laid out of bricks. After completing the laying of the first row, you should install a water tank, which you can make yourself. The grate is adjusted in such a way that a gap remains between it and the combustion chamber, otherwise, when heated, the grate will expand and move the bricks in the wall.
Before laying the sixth row, it is necessary to wrap the door and the part of the container that is in contact with the brick with an asbestos cord. When installing the firebox door, it is fixed in the same way as the sash. The only difference here is the amount of wire. You have to twist 3 rods for each hole, this must be done with pliers.
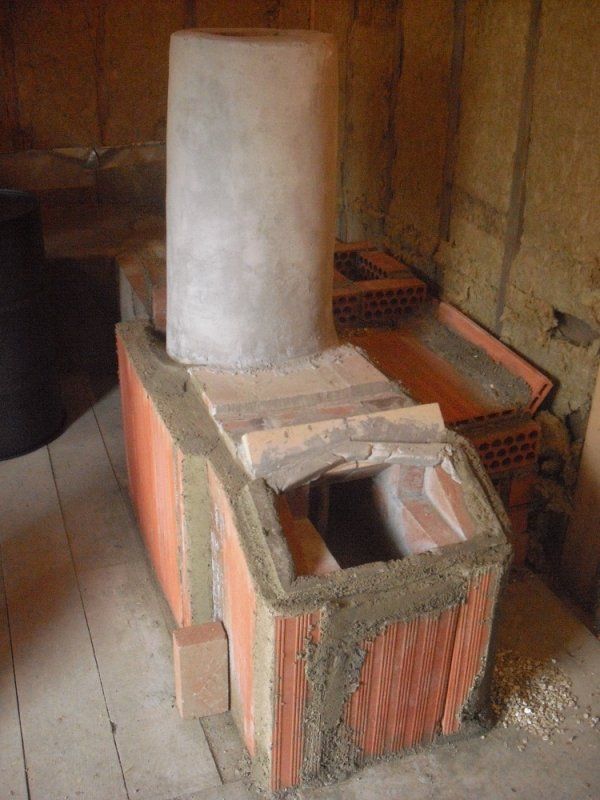
If you are thinking about the question of how to make a stove in a bath with your own hands, you should familiarize yourself more closely with the design features of the chimney. When installing it, you need to take care of fire safety rules. The distance from the pipe to the roof should not be less than 80 cm. As for the wall thickness, it should be one and a half bricks or more. This measure will protect the inner walls from condensation. The oven is overlapped from the 12th to the 19th rows. On the 21st row, two channels can be formed, each one the size of a brick. The resulting voids must be insulated with mineral wool before starting work with the chimney.
Having finished laying on the 22nd row, you should shift the chimney channels to the center. If the order suggests that the core must be covered, another row of bricks should be laid over it. The installation of valves begins after the channels are combined. A distance of one row of masonry must be maintained between them. The dimensions of the chimney duct must correspond to those indicated. If the cross section is increased, this will cause a slow removal of combustion products.
If you want to fold the stove in the bath with your own hands, a step-by-step guide will help you with this. After reviewing it, you can find out that all connections should be processed in order to exclude the formation of gaps. Otherwise, soot will quickly form on the walls and ceiling of the bath. If gaps are found, they are eliminated with a clay and sand mortar. In order for the oven to dry completely, you must leave it for two weeks.After completing the masonry, it is necessary to check the draft by opening all the plugs and doors. The first heating should not be carried out completely. The best fuel for this will be wood chips.
We increase the efficiency of the furnace
The potbelly stove is able to heat the room in just a matter of minutes. Moreover, everything that comes to hand can be thrown into the firebox: since there is no branched network of chimneys in it, and the smoke comes out “directly” in it, there is no need to fear that they will clog up.
But if an ordinary heating stove, installed in premises for permanent residence, has an extensive network of chimneys that trap heat, in a stove it goes directly into the pipe, so its efficiency is not too high. That is why it is too "gluttonous" and requires a lot of fuel.
To reduce fuel consumption, you can use the following tips from experienced stove-makers: • door to the firebox and blew
in such a furnace should be as tight as possible; otherwise, the air supply to the stove will increase, and the fuel will burn out too quickly; • to regulate the output of warm smoke in the chimney
it is desirable to provide a damper
; • near the stove can be provided
side metal screens
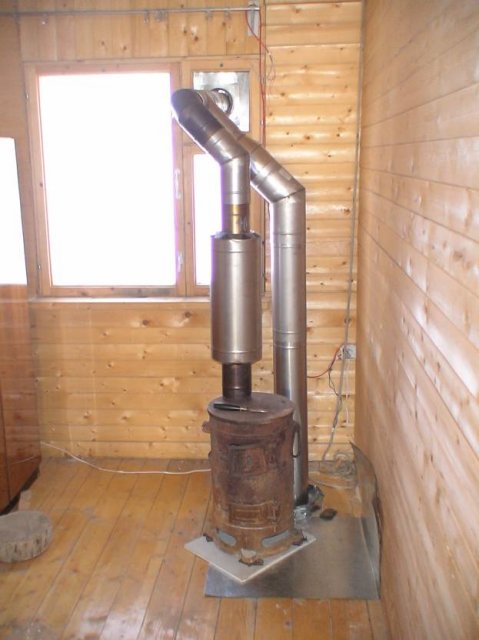
at a distance of 5-6 cm from the stove, in which case it will heat the room not only by radiating heat, but also by convection (circulation of warm air); • a potbelly stove, "dressed" in a metal casing, will help keep the heat much longer;
Potbelly stove in a casing
Round furnace with afterburner and casing with heat gun
• to retain heat in the room, bends should be built up in the pipe; however, at the same time, soot will linger in them, so it is advisable to create a collapsible structure; • the pipe can also be given a stepped shape: arrange the elbows in stages, with each step turning by 30 °; in addition, each of the knees must be securely attached to the wall with rods;

Stove with chimney elbows
• chimney throughput
should be less than the capacity of the furnace itself, in which case the hot gases will not go into the pipe immediately; its diameter should be only 2.7 times larger than the volume of the furnace, for example, with a volume of the furnace of 40 liters, the diameter should be 110 mm; • you can increase the efficiency of the furnace and using
chimney blowing with a fan
- this will turn the oven into a kind of smoke cannon; • to reduce air circulation
firewood in the oven
should fit as tightly as possible; if it is heated by coal, stir up the resulting ash as rarely as possible; • to adjust the air flow, the door to the blower can be made adjustable by equipping it with vertically arranged
slots and latch
which will cover these gaps; • to increase the heating area, it can be ribbed, that is, welded onto its body perpendicular to the furnace
metal stripes
; • if you put steam on the stove
buckets or metal box with sand
, then they will accumulate heat and store it even after the oven goes out;
sand filling or heat accumulator made of stones
can be sewn up inside the metal body of the furnace;
The scheme of a potbelly stove with a sand backfill, the furnace is made of a pipe with a diameter of 500 mm, its length is 650 mm
• bake, lined with 1-2 layers of brick
, will keep warm for much longer;
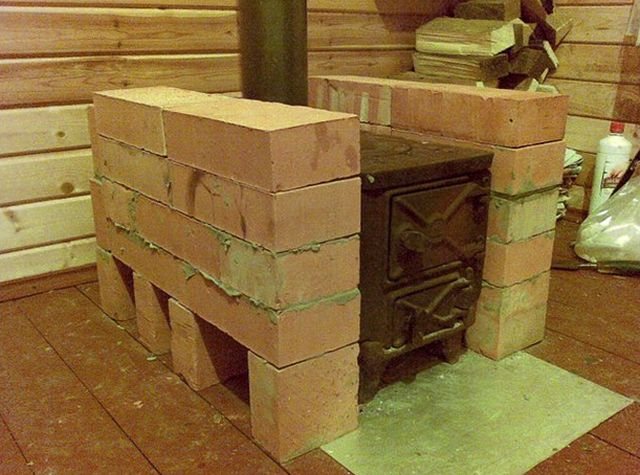
Brick screen
• the volume of the furnace also matters: the more the area of its walls
, the more heat they will give into the room; •
bricks or sheet metal
, on which the stove is installed, will help not only to protect the room from fire, but also to keep warm.
Related video: Do-it-yourself stove stove
From my own experience, I know that buying even the simplest heating stove can deal a serious blow to the budget of an ordinary person. Having studied the many available designs of stoves, I decided to give preference to Buleryan. A homemade modification of a well-known foreign heating stove perfectly took root in my garage.
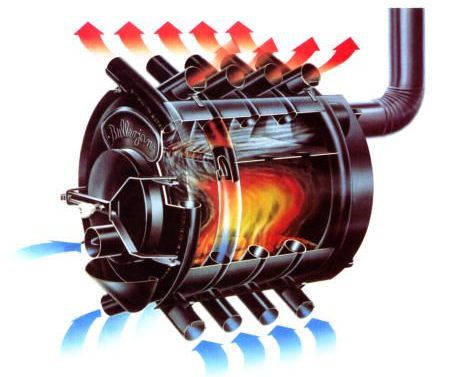
Do-it-yourself buleryan stove - drawings and assembly diagram
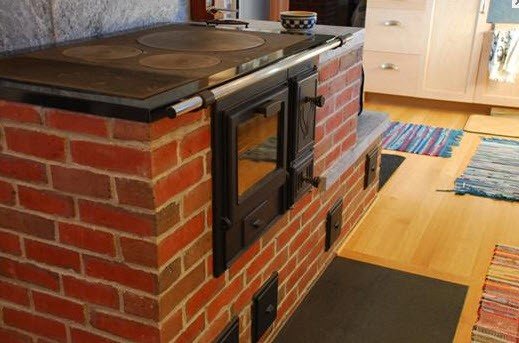
The subtleties of installing a homemade stove for a bath
A number of such tips can be distinguished:
- The approaches to the metal firebox should be covered with thermal insulation and sheet steel.
- It is strictly forbidden to place the stove near wooden walls and ceilings that are prone to fire.
- A homemade stove can be lined with bricks, which will increase the safety of operation, heat transfer and improve the appearance. The wall thickness can be ½ brick.
- Before installing in the bath, the cooked oven must be idle to heat several times so that it takes on its final shape.
- The firebox should open opposite the front door.
- The chimney must be at least 50 cm above the roof. In the place where it goes through the roof, the chimney is plastered and covered with lime.
- In a horizontal firebox, firewood burns without residue, so such a stove gives off more heat.
- It is advisable to use a thick pipe that is not prone to destruction and corrosion for welding the furnace into a bath.
- Recently, two-chamber furnaces for complete combustion of fuel have been quite often made. They are much more efficient and economical.
- The size of the stove must correspond to the dimensions of the sauna room.
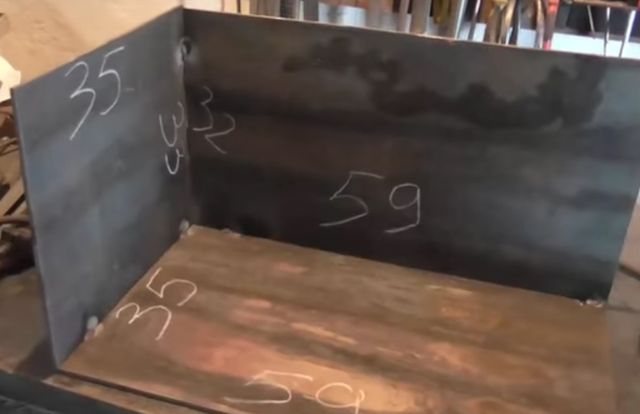
Furnace Crafting Kit
First, I prepared everything I needed to assemble buleryan with my own hands. First of all, I took out a drill from the pantry with a set of drills for all occasions, a grinder with discs from the kit, a welding machine, clamps and other little things.
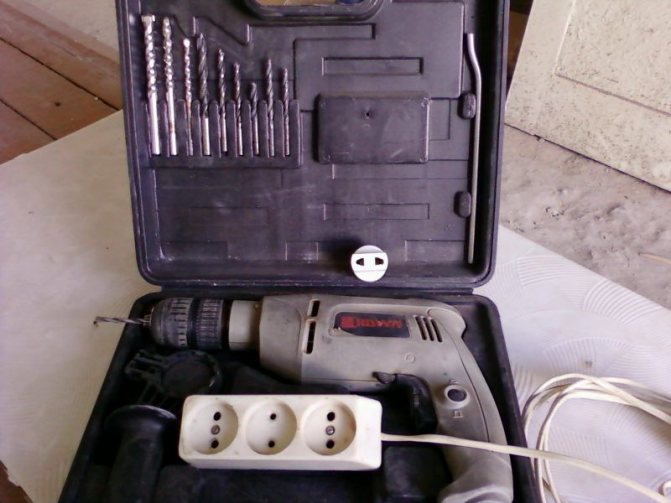
My drill
I had to tinker with the materials. To make Buleryan truly reliable and of high quality, I decided to make it from heat-resistant boiler steel. This material is able to ensure a truly long-term and reliable operation of the heating unit. Find the material mentioned in your household or buy it from a specialized store.
I also used 4mm steel sheet. A sheet with dimensions of 100x200 cm was enough for me. In addition, I needed a little (40x70 cm) of 6 mm steel sheet, about 4 meters of a pipe with a diameter of 11 cm, about 10 m of a profiled pipe with dimensions of 57x4 mm. In addition, I bought handles, hinges and locks for arranging the doors, prepared pieces of a 35-centimeter pipe and, in general, a few metal blanks just in case.
Prices for popular models of welding machines
Preparation of tools and materials for the manufacture of a metal furnace
In order to make a metal stove for a bath with your own hands, you should prepare the following tools:
- welding machine;
- grinder;
- electrodes.
The latter should have a diameter ranging from 3 to 4 mm. If you decide to use a pipe in your work, you will need:
- wheel disks;
- sheet metal;
- pipe 100 mm;
- fittings.
There should be four wheel disks. The run-up of pipe diameters varies from 100 to 150 mm. The sheet metal used should be between 2 and 3 mm thick. As for the reinforcement, its diameter can be equal to the limit from 8 to 10 mm. You can use a metal rod instead. For additional materials, you may need:
- brick;
- sand;
- crushed stone;
- cement.
There should be about 300 bricks. You will need about 3 bags of cement, 50 kg each.
How I modernized Buleryan
The features of the device of the stove in question are such that it can initially qualitatively and evenly distribute oxygen within itself. The tubes draw in cold oxygen from the bottom, and heated air is discharged from the ones installed at the top. If desired, you can provide forced circulation of oxygen.
I took tubes of a suitable diameter and welded adapters from them to the holes in the stove pipe located below. I plugged the adapter off one edge.
I connected the other side with a fan.
I decided to use "snail" fan models. To ensure their work, in my case, a 90-watt engine at 2800 rpm was enough.
The results are excellent - after the modification, Buleryan began to work even more efficiently.
I am also thinking about connecting the corrugation to the upper outlets and spreading it in different directions - you will get a full-fledged heating system.
You can think of the instructions in your own way. I would love to read your suggestions and maybe even put something into practice.
My instructions will help you to assemble a reliable, efficient, durable and productive stove with your own hands.
Video - Do-it-yourself Buleryan oven
Did you like the article? Save so as not to lose!
- 5
- 4
- 3
- 2
- 1
5
Vladimir Pechurin.
Made buleryan according to your recommendations. The result was stunning. To say that this is a good oven is to say nothing. The oven is great. Thank you for the article.
Vladimir Pechurin.
Made the oven according to the recommendations of the author of the article. To say that the oven is good is to say nothing. She's just wonderful! I have never met anything better.
Evgeny
We did not try to consider the profile square pipe.
Furnace dimensions
The heater can be made by hand, the dimensions of the sauna stove are selected individually. You can choose them based on the dimensions and heat dissipation of the factory models. For example, "Ermak Stoker 100" has the following dimensions: 600 x 350 x 670 mm. At the same time, the volume of the heated room can reach 100 m3. But "Professor Butakov" from has the following dimensions: 370 x 520 x 650 mm. The volume of the heated room reaches 150 m3.
How to install a stove in a bath with your own hands, you now know. However, this is not all there is to know. It is also important to inquire about the dimensions of the structure to ensure optimal conditions. You can build a structure with the following dimensions: 700 x 375 x 520 mm. These parameters are possessed by the Teplodar Top Model 200 model, which is capable of heating up to 200 m3 of a room.