The basement of the house why is it needed and what functions it performs
Before talking about what is best to build a basement, you need to figure out why you need it. Being the upper part of the base of the house, the basement is the component of the structure, which is exposed to a significant proportion of the impact of various kinds of precipitation. Thus, the plinth protects the foundation of the house from destruction. This part of the structure is exposed to a significant part of the temperature differences between air and soil. Usually, the basement of the house is exposed to ground and flood waters.
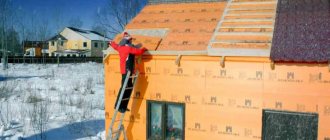
So it is important to understand not only what is best to build a basement from and why it is needed, but also in matters of waterproofing this part of the house. A high-quality insulation device will ensure optimal humidity and temperature directly in the house, and will also increase the service life of the building
Monolithic base scheme.
When building a basement, you need to use exclusively high-quality and durable materials, and for finishing use a good moisture-insulating and heat-shielding material.
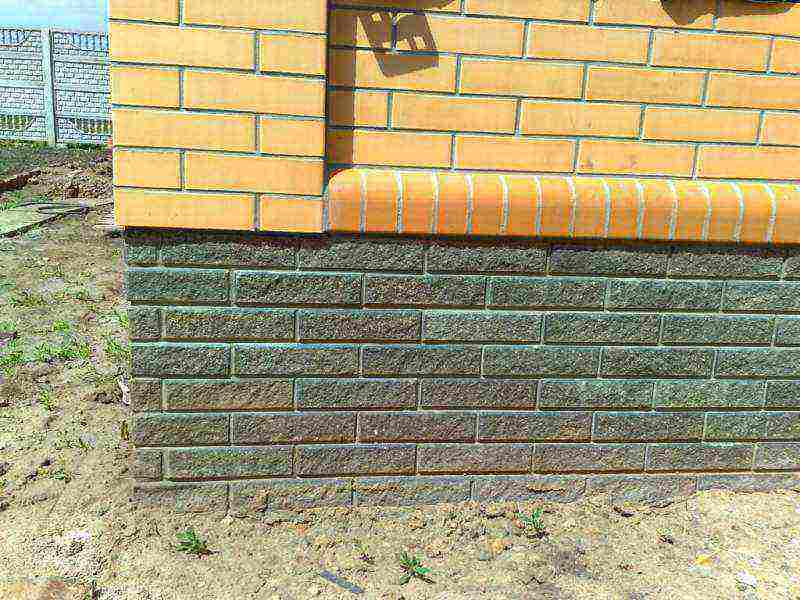
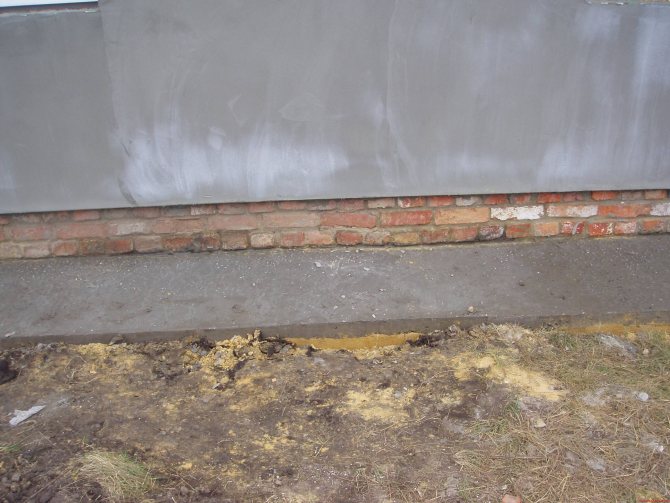
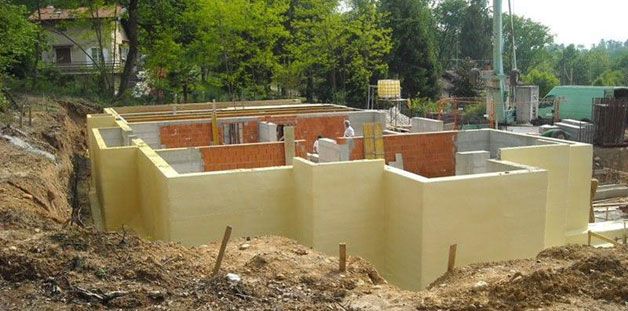
The basement of the house can be made monolithic. In this case, it will be a single whole with the foundation. Also, quite often in construction there are plinths laid out separately from special bricks, natural stone or concrete blocks. The plinth must be made about 50-70 cm above ground level. Sometimes it can be raised even higher - up to 150 cm. This is done in order to provide additional waterproofing of the house. There are no regulatory or technical limitations in this matter.
The choice of thermal insulation material
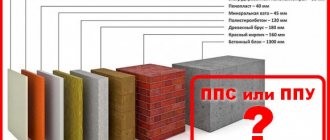
Expanded polystyrene is best suited for independent work. It is a slab that can be glued or screwed to walls. This material is moisture resistant and durable in operation, but you can choose another insulation.
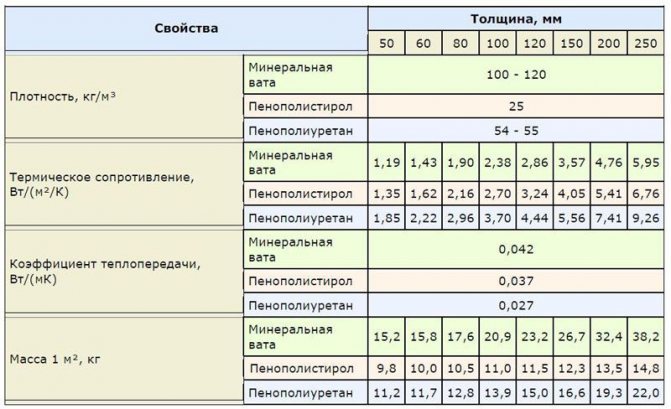
Comparison of the characteristics of mineral wool, expanded polystyrene and polyurethane foam. Click to enlarge.
The following factors influence the choice of insulating material:
- the presence of a basement and its function;
- type of house (brick, wood or monolithic);
- thickness of the foundation and walls;
- type of foundation (tape, slab, block or monolithic);
- climate in the area of residence.
Mineral wool
Fiber insulation has always been very popular due to its low price. This material is presented in several varieties: mineral and basalt wool, as well as glass wool. All of them have excellent insulating properties and can serve for quite a long time.
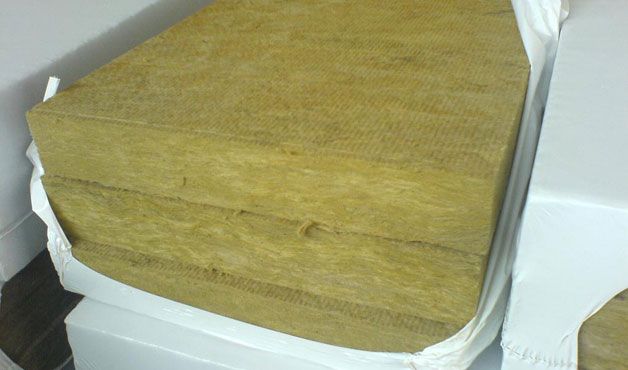
Mineral wool slabs.
Professional builders do not recommend using cotton wool to insulate the basement. It is better suited for indoor home insulation. Its application outside the house will lead to a number of additional work. For example, you have to waterproof all surfaces where you placed the cotton wool. This is due to the fact that if it gets wet, it immediately ceases to perform an insulating function.
In addition, soil pressure and frequent mechanical damage lead to the formation of lumps in the cotton wool. The resulting voids allow cold to enter the building.
Styrofoam
Polyfoam has been produced and used as insulation for many years, so all the pros and cons of this material are well known. Durability is considered its main advantage. While expensive new insulation materials have not been tested by time, it is known for certain that the service life of the foam is quite long.It will surely serve you for several decades and will protect the base from destruction and cold penetration.
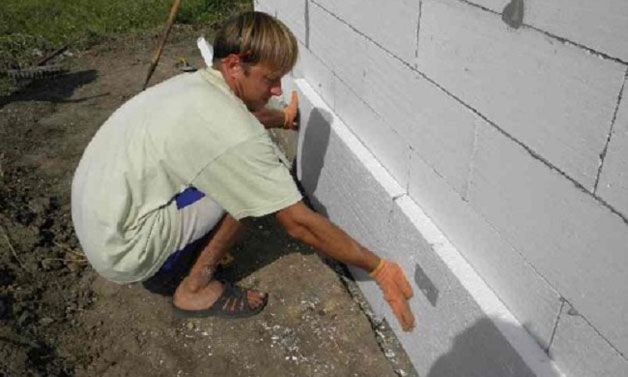
Gluing foam boards on the base.
Another advantage of this material is its prevalence. Polyfoam is produced by many companies, and you can easily find slabs of the required size and thickness, even in a small town.
It is known that polystyrene is used as insulation for the outer walls of multi-storey buildings. Here, the main disadvantage of the material becomes known - its low fire resistance. But manufacturers took this shortcoming into account, and most switched to the production of a special type of foam. Now a substance is added to it that prevents combustion and prevents the fire from spreading quickly. On the packaging of the material, you can often find such designations as "non-combustible" and "self-extinguishing".
Due to the fact that the base is not in contact with the electrical wiring, you can safely use foam plates to insulate your house.
Polyurethane foam
Polyurethane foam is the most versatile of all existing insulation. Using the spray method, they can cover virtually anything. The work is very quick and easy, the composition perfectly covers the walls and fills in small cracks.
Walls covered with polyurethane foam.
After drying, the polyurethane foam forms a thin film to protect the foundation and plinth. It is important to note that this type of insulation is capable of repelling moisture and steam, so you do not have to additionally cover it with film or foil.
Experience shows that the service life of polyurethane foam is several decades. You can purchase a spray attachment or call workers.
Penofol
Penofol is made of polyethylene foam covered with a thin layer of foil. Air bubbles in the penofol capsules retain the heat of the foundation and basement. Foil reinforces the thermal insulation of the material and protects it from moisture.
Penofol is a thin film that is sold in rolls. It can be used alone or in combination with other heat insulators.
Which brick is used and how much
Before you start making a device, you need to take care of the purchase of materials for work.
It is important to correctly calculate the amount of red bricks. To do this, the width and height of the layout are multiplied by the perimeter of the foundation, thus the volume is calculated
Average consumption of material is 400 bricks per 1 m³ of the obtained volume. However, these are approximate figures, the exact number depends on the parameters and type of material used.
To lay a brick base with your own hands, it is not recommended to use silicate material or a concrete block in your work. The use is dangerous in that such a brick absorbs moisture as much as possible and subsequently affects the destruction of the foundation and load-bearing walls. Plus, the surface of the masonry suffers, the plaster does not fit well and holds. The best options instead of using silicate in the construction process is the use of these types of bricks:
For work, clay brick can be used.
- clinker;
- dry or semi-dry pressing;
- porous;
- ceramic;
- clay.
Base insulation technology
Consider the process of insulating the walls of the basement from the outside.
1. If the house has already been built, you need to dig a ditch 0.7 meters deep, about a meter wide at the surface of the basement.
2. Remove the decorative trim, if any.
3. Clean the surface from earth, glue, old plaster, etc.
4. Fill cracks and irregularities, prime the surface and cover with a layer of plaster.
5. Pour concrete on the bottom of the ditch, wait until it hardens.
6. Treat the concrete strip with bitumen-rubber mastic or liquid rubber.
7.The wall can be waterproofed with glass insulation or roofing felt.
8. Glue PPS to the walls of the slab and / or fix it with plastic mushroom dowels.
9. Close the insulation with plastic wrap. Fixation with a stapler.
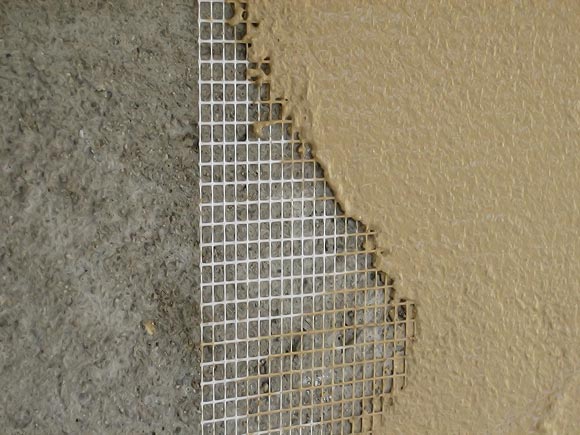
10. Lay the reinforcing fiberglass mesh (on the plaster). Plaster the surface.
11. Wait for solidification, bury the ditch.
12. Cover the outer part with decorative material - natural or artificial stone, porcelain stoneware, clinker, facing bricks, etc.
What to make a basement on a strip foundation
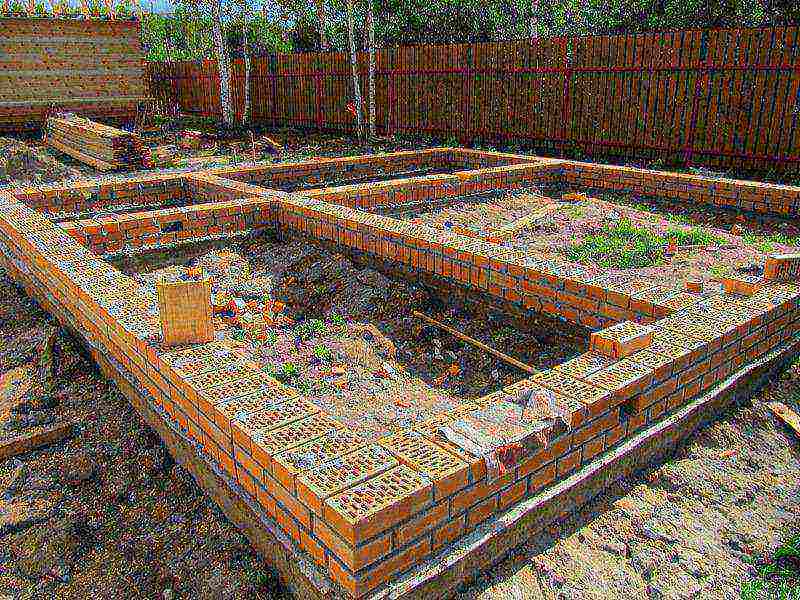
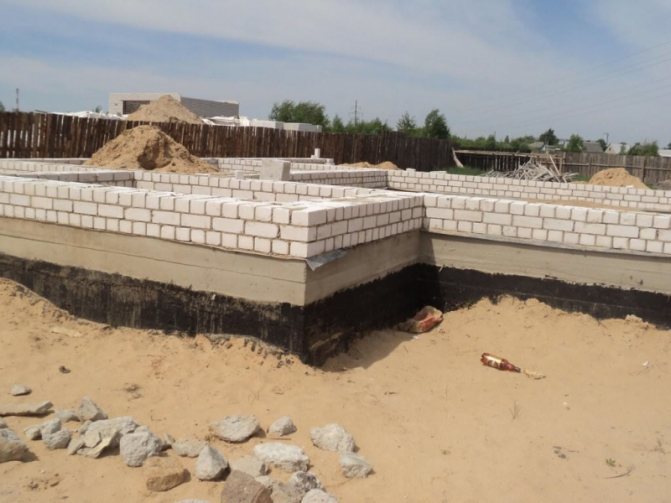
Now that you know why the basement is being built, it's time to figure out what it is better to build it from on foundations of various types. So, when building on a strip foundation, the basement of the house can be made of brick, monolith and concrete buildings.
A concrete block structure is created after the foundation is laid. Rows of building blocks are laid out with bandaging. Concrete mortar is used for luggage. When working with blocks of different standard sizes, non-multiple modules may appear. In this case, the spaces not covered by blocks are filled with monolithic concrete. You can work with any proportions of blocks, but it is better that their height is not less than the size of the base
It is important to avoid horizontal seams. The outer surface of the plinth, built of concrete blocks, is decorated with crushed stone, boulder or ceramic tiles
Strip plinth scheme.
The basement of the house can be made of monolithic concrete. For this, a formwork is created, into which concrete mortar is subsequently poured. To prepare the solution, you need to use cement of the M300 brand, or better - M400. You can strengthen and improve the quality of the base by constructing a reinforcing cage made of corners, wire or pipes. All holes and voids in the structure must be sealed, after which the structure is covered with a liquid cement solution. To reinforce the walls of the basement of the house, a lattice with 5x5 cm cells is used. For the manufacture of the lattice, wire with a diameter of 5-6 mm is used. Such a plinth is recommended to be done immediately along the entire perimeter of the structure, without vertical and horizontal seams.
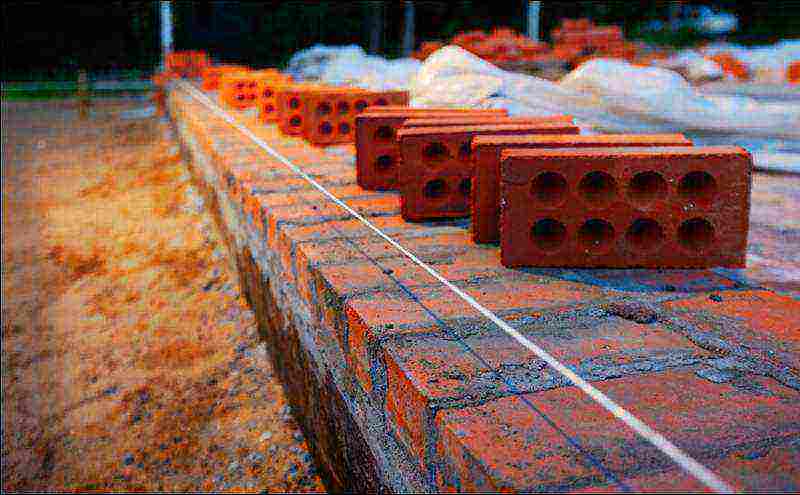
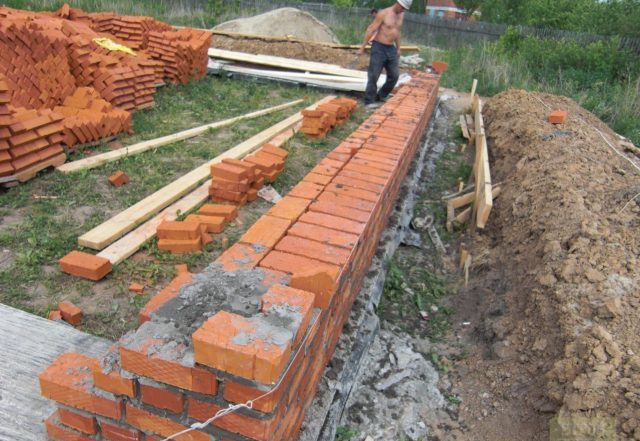
In the case of the construction of a brick basement, M-100 solid brick is used. The use of hollow bricks is excluded, because it may not be able to withstand future horizontal loads. The height of the brick base is at least 4 rows. The thickness, as a rule, is 1 brick (250x120x65). The masonry must necessarily be strong, with jointing and filling in the seams, with a smooth outer surface.
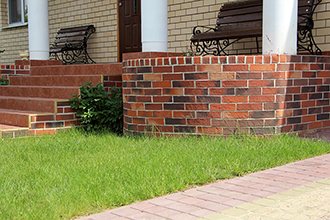
You can decorate the finished brick basement of the house with natural or artificial stone, siding, tiles.
How to insulate the basement of the house from the inside?
As an internal insulation of the basement of the house, you can use:
- sand or earth;
- gravel, expanded clay;
- plates PPS, EPS;
- liquid or sheet polyurethane foam.
When using plate and sheet materials, the thermal insulation layer is covered from the outside with a geotextile fabric to protect against mechanical damage. When using bulk materials, make sure that the ventilation ducts in the foundation remain open.
Example of warming the basement of a house:
1. Treat the surface with soil.
2. Apply waterproofing (liquid mastic, bituminous rubber).
3. Fix the EPS boards (with mastic and / or with mushroom dowels).
4. Cover with polyethylene.
5. Fasten the fiberglass mesh to the plaster. From the inside, you can use both cement plaster and gypsum (the latter sets faster).
6. If you plan to cover the basement with tiles, it is not recommended to putty the surface of the basement (the tiles will not stick). In other cases, the inner wall of the plinth can be putty, then primed and finished.
Brick plinth on strip foundation varieties
The following types of basement are used as a supporting part of the walls of the building:
Going beyond the level of the wall. It perceives climatic and temperature factors and without fail in the upper part is equipped with a slope necessary for water flow. Requires the use of quality materials. This version of the base of the walls is part of the design solutions. It requires increased costs for the arrangement. It is used to provide enhanced insulation of the basement room.
What width to make the foundation is determined by the laying of the basement
- Flush with the outer wall surface. Such a support cushion between the walls and the base of the building is made from high-quality raw materials, and after completing the finishing measures, it significantly improves the appearance of the supporting part of the facade.
- Recessed into the wall of the building by 5-7 centimeters. Allows you to save materials, protect the supporting part of the walls and the waterproofing layer from moisture. The western option is convenient in that precipitation flows down the walls directly into the soil and does not penetrate the joint of the waterproofing layer. With a high-quality finish, this option is not inferior in appearance to other types.
The choice of materials for a ceramic brick base
Silicate blocks can only be used in dry climates
When buying a brick, Vadik asked me which one to take and why. I advised him solid. When the temperature drops, especially in winter, condensation - dew appears in the holes. Moisture accumulates, absorbs into the material and destroys the base. In a few years, repairs will be needed. A practicing economist, Vadik, was interested in a cheaper way to build a brick base. I told him about the opportunity to use used material. When dismantling buildings and demolishing partitions, if major repairs are made, walls are broken. The brick is cleaned of the old mortar and tightly laid in the basement, choosing less damaged for the outer rows. In terms of strength, such a top of the foundation is inferior to that laid out of a new stone, with the correct geometry. The loads are made on it less. Do-it-yourself styling for a beginner is difficult. It is necessary to constantly check the level and select pieces of brick of the right size.
I used M-75 cement mortar as a binder. It was made by my friend in a concrete mixer. Loaded into it:
- cement;
- sand;
- lime milk;
- after stirring, water was added.
The proportions depend on the brand of cement. For example: 0.8 liters of lime diluted in water to the state of milk is added to one bucket of M500 Portland cement. Sand 7 buckets. The first time water is topped up in parts and its proportion in the mixture is determined. The mortar should be held on a trowel with a slide and not slide off an inclined plane.
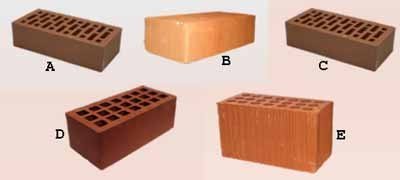
Brick types
Plinth brick is a conventional name that is used to refer to ordinary masonry bricks in the conditions of facing the old and building a new plinth. A number of requirements are imposed on it:
- Resistance to water, snow, temperature changes. This is due to the fact that it is located on the outside of the building, often without additional protection from a plaster layer or siding;
- Unified dimensions. An important parameter that is used at the stage of project creation;
- Environmental safety, no unpleasant odor;
- Affordable price and satisfactory appearance.
Silicate brick
White in color, made from a mixture of lime and sand. Rarely used for lining plinths. It's all about the high rate of water absorption. In silicate bricks, it reaches 16%, which is unacceptable for the construction of structures that will come into contact with water during operation. After saturation with moisture, it darkens, internal connections begin to break down and the brick literally "crumbles".
In rare cases, plinths are faced with sand-lime bricks in areas with a dry climate, with improved waterproofing and a protective layer of cement-based plaster.
Red clay brick
A common building material for arranging a basement. It is made from clay in special ovens. Red bricks have a lower moisture absorption coefficient than silicate bricks.
Saturated with moisture, it freezes in winter and thaws in summer. From this, its structure is gradually changing. The brick begins to collapse, small surface and through cracks appear. There is a high probability that the base / plinth, separated by simple ceramic bricks, will lose its attractive appearance after several years of operation.
To increase the service life, it is necessary to use brick of the M250 brand and above.
Hyper-pressed brick
Durable finishing material with low water absorption coefficient. For its production, the screening of marble, dolomite and shell rock is used. High quality Portland cement acts as a binder. The ingredients are mixed with each other and pressed in special forms.
Hyper-pressed brick is often used for finishing the basement, not only because of its high strength, but also because of its beauty. The outer side of the stone can be smooth or made to look like "torn stone".
Clinker brick
A kind of red ceramic stone. It is made by firing, only clinker clay is used instead of the usual one. As a result, the brick has a very low percentage of water absorption (up to 6%). It is also more durable than simple clay counterparts.
Since the clinker brick practically does not absorb moisture, it does not crack in the cold. The service life of a structure made of it can reach 100 years.
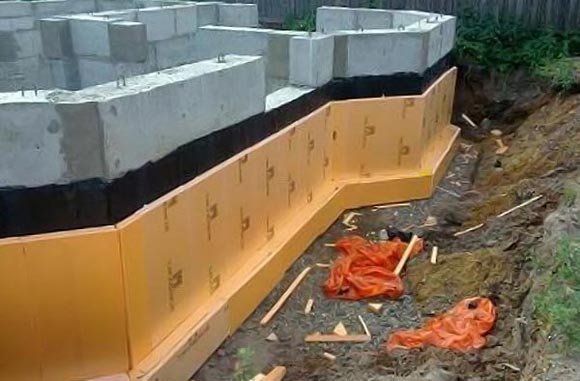
Waterproofing and marking
Waterproofing and marking of the foundation for the basement should be carried out at the initial stage of work. The service life and appearance of the created structure depend on the correctness of these processes.
Foundation waterproofing
Foundation waterproofing scheme
Waterproofing the foundation on a horizontal surface is necessary to prevent the penetration of capillary moisture into the brickwork and wall structure. In this case, experts recommend installing the waterproof layer twice. The first time the waterproofing is laid on the surface of the foundation, the second - on the finished base.
For this purpose, roofing material is most often used. It is best to lay it in two layers, so that the first overlaps the seams of the second by 10-15 cm. The roofing felt can only be installed on a perfectly flat surface, on which there are no dents and bulges.
The maximum allowable height difference should be 1.5 cm. If it exceeds 2 cm, the surface must be leveled. This can be done with a thickened masonry joint or with a thin screed from a conventional cement-sand mortar.
The installation of waterproofing in the form of roofing material is performed in several ways:
- directly on the surface of the foundation without the use of additional adhesives;
- using hot bitumen;
- heating the surface of the roofing material with a burner.
Foundation marking
Foundation marking scheme
Experts lay the brick on a cement-sand mortar, but it is recommended to first spread it dry. This is necessary in order to determine the thickness of the vertical seam. The standard value is 1 cm.If after laying it turns out that the row protrudes or is shorter from the foundation, it is recommended to increase or decrease the joint width by 0.2 cm.
This approach will help to carry out masonry from solid elements without halves or quarters. Such a plinth will look more attractive. If halves and quarters are indispensable, it is necessary to accurately determine their size and location.
After laying out the materials without mortar, it is necessary to mark the location of the vertical joints on the foundation. After that, each element is carefully removed and installed using an adhesive. The bricks are laid in the same order. Otherwise, the vertical seams may shift due to deviations from the standard dimensions of the materials used.
Do-it-yourself thermal insulation
It is easy to insulate the basement part on your own, the main thing is to follow the technology exactly. One of the most important conditions is the high-quality preparation of the base. If the house is new, the basement and the blind area are in good condition, then the work process will not take much time, which cannot be said about old buildings.
Preparation of the base
The work of cleaning the surface from dirt begins. If the plinth is finished with tiles or facade panels, the cover will have to be dismantled. They clean off the old plaster, knock down the protrusions, the dried solution, and thoroughly process the base with a stiff brush.
In a brick plinth, the seams must be carefully cleaned to reveal voids.
Next, they carefully examine the base, embroider the cracks, treat the areas affected by the fungus with special means.
If the blind area is old, covered with deep cracks, it must also be completely removed, otherwise it will not be possible to insulate the basement with high quality. Further, a layer of soil about half a meter wide and 10-15 cm deep is removed along the perimeter of the house. If the blind area is in good condition and fits snugly against the wall, it is enough to clean the joint along the entire length with a metal brush to remove debris and dirt.
For a snug fit of the slabs to the base, the walls of the basement should be as flat as possible. If there are differences of more than 10 mm, the surface should be leveled with plastering. To do this, you can use a conventional cement-sand mortar, but it is better to purchase a dry cement-based mixture.
Factory mixes are more expensive, but they do not shrink and are more resistant to negative effects. The plaster is applied with a trowel to the wall and spread gently over the surface in a thin layer.
After drying, the walls are treated with a float with an emery cloth, dust removed and covered with a waterproof primer with quartz filler.
Tools and materials for work
For insulation you will need:
- EPS boards, for example, Penoplex;
- fiberglass mesh for reinforcement;
- glue for expanded polystyrene (Titan, Ceresit ST 83);
- plastic perforated corners with mesh;
- dowels, fungi;
- assembly knife;
- level and tape measure;
- metal spatulas;
- a drill with a mixer attachment and a set of drills.
It is very simple to calculate the amount of insulation: you need to measure the length of the base around the entire perimeter, multiply by the height and divide by the area of one foam board. The material should be bought with a small margin, since the slabs must be trimmed when joining. In the same way, the amount of reinforcing mesh is calculated, which is necessary when plastering the insulation.
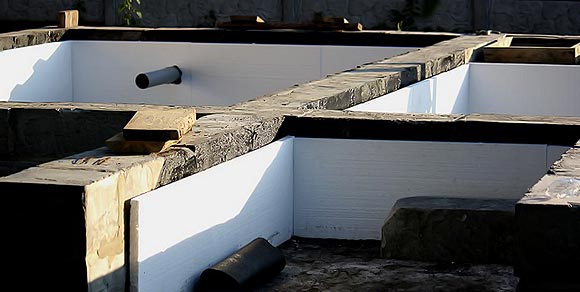
Installation of thermal insulation boards
Step 1. Slabs are tried on to the surface, if necessary, they are trimmed. The lower edge of the insulation should rest on the concrete base of the blind area or on tightly compacted soil covered with a layer of sand.
Step 2. On the back side of the first plate, glue is applied in a continuous line along the perimeter and in the middle.
They begin to glue the insulation from the corner: they apply the plate to the surface, level it vertically, press firmly over the entire area.
Step 3. Take the next slab, apply glue to the back side and the side edge, apply it to the plinth and fit tightly to the first slab. If glue comes out at the joint, it must be removed with a spatula. The rest of the sheets are fixed in the same way, controlling the level of their location.
Advice.If the distance to the corner slightly exceeds the length of the insulation, it is better to fix the last sheet in the row close to the corner of the base, and close the gap formed with a piece of the appropriate size. It is undesirable to fix pieces of insulation in the corner sections due to increased wind loads.
Step 4. After installing the plates, blow out the formed gaps between the insulation and the wall, as well as at the joints of the sheets, with foam. The dried foam is carefully trimmed with an assembly knife so as not to damage the insulation and not to move the plates.
Step 5. When the glue dries (usually it takes from 24 to 48 hours), the insulation is fixed with dowels-fungi.
Unlike the underground part, where the material is firmly pressed by the soil to the foundation, the aboveground one is constantly exposed to wind and mechanical stress, and additional fasteners are simply necessary. Holes for dowels are drilled in the center of each sheet and in the corners, going deep into the wall by at least 40 mm. You need to work very carefully, since the insulation is easy to damage with a drill.
How to lay out a brick base step by step instructions
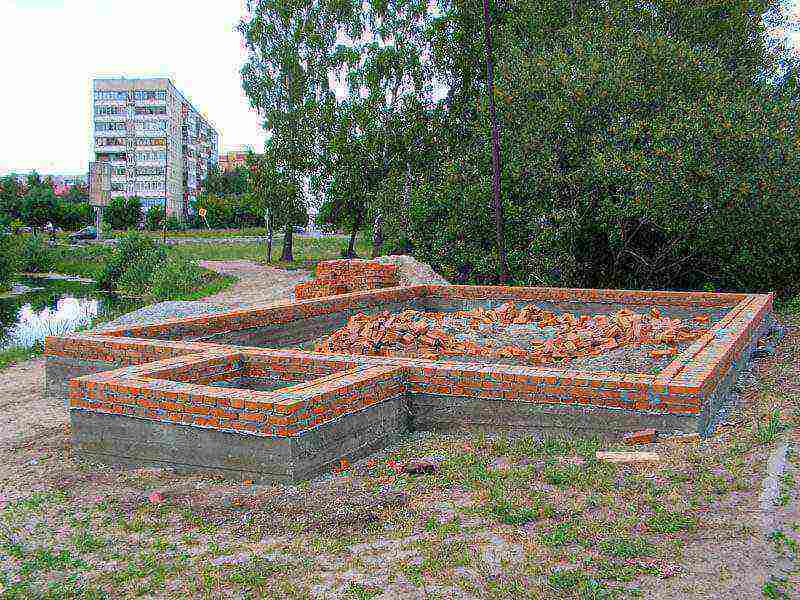
Consider red brick houses. This process is complex and very responsible, so it is recommended to involve only professionals in it, especially if you are not confident in your own abilities. Do only those works that allow your abilities and experience, because the strength and reliability of your entire house depends on the foundation and basement. We offer step-by-step instructions for laying a brick base.
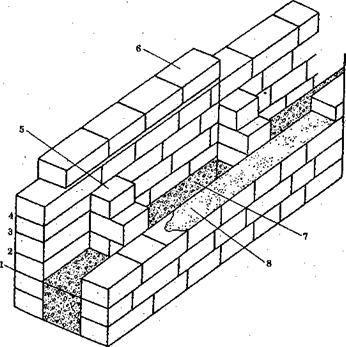
Brick base scheme: 1-4 - Rows of masonry, 5 - Cross wall, 6 - Layout of bricks, 7 - Filling with insulation.
First you need to correctly set the corners at which the base will be laid out further. This preliminary stage is very important, at this time the first row is installed along the width of the base, while the solution is not used. It is necessary to make such a row strictly according to the level, since it will no longer be possible to move the rows further. After that, all sides are measured, two diagonals, to make sure that the future structure is even. The masonry must be perfectly flat.
The maximum allowable discrepancy is 2 cm, since it can still be corrected during further laying, but with large values it is necessary to correct the position immediately so that no problems arise during further work.
Next, the device begins with a red brick base. Immediately after all measurements are completed, the direct installation begins. The basement is laid out using bricks and cement-sand mortar, which has the following proportions: 3 parts of refined sand, 1 part of cement, water, the amount of which should be sufficient to obtain a thick, plastic mortar.
The plinth must have a width of 380 mm, depending on some circumstances:
- if during the construction of the basement wall only brickwork without insulation is used, then the thickness should be 500 mm;
- when using foam for the base as a layer of insulation, the thickness should be 380 mm.
When constructing a basement, it must be remembered that the height of the foundation should be in the range from 30 to 40 cm. Such conditions will make it possible to make a high and beautiful basement, that is, create a fairly spacious room that can serve as a utility room or a boiler room.
Brickwork can be done in different ways, for this, solid bricks or halves are used. There are many masonry options, we must not forget about the correct construction and binding of brick corners. They carry a certain load, so they should be given a lot of attention.
Features of a brick base
The basement is the above-ground part of the building and is located above the foundation. Usually its top mark is the beginning of the first floor.A reliable base / plinth arrangement is a difficult task, but with a little experience, you can do it yourself if you carefully study the instructions.
Brick plinth is used for strip foundations.
To begin with, you need to take into account the weight of the future building in order to correctly calculate the load on the basement. It is important that it is not excessive. Unlike decorative elements, a supporting structure such as a plinth can only be built once. Take the time to do the calculations to avoid many problems later.
Usually the foundation rises above the ground level by 30-90 cm, and the recommended basement height is at least 50 cm. In some cases, for example, if a building is being built on hilly terrain, the height can be much higher. If the building has a basement, its height can be up to 2 m.
The laying of a brick basement has a number of features due to the properties of the material. The main distinguishing feature of a brick in this case is that it cannot be called absolutely moisture resistant. This fact can affect the durability of the foundation, therefore it is necessary to take it into account in work. One of the tasks is to improve the water repellency of the plinth.
However, this disadvantage does not detract from the merits of brickwork. The advantages of using bricks include:
- ease of installation;
- low price;
- warmly;
- no need for time-consuming finishing.
Laying a brick plinth on a strip-type foundation is the most practical and therefore the most common option. This is due to the fact that the plinth becomes practically part of the foundation.
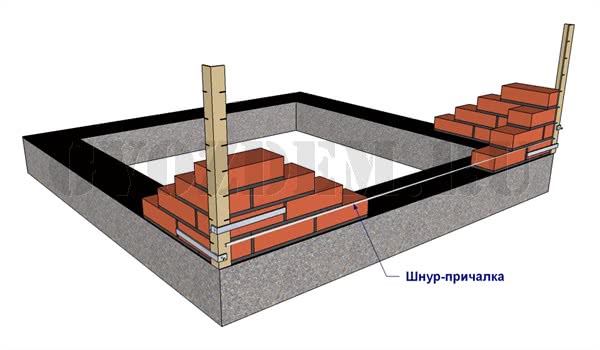
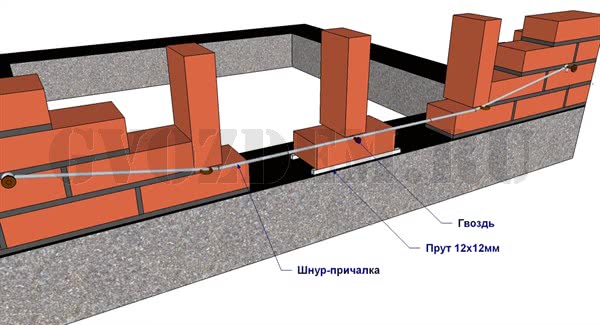
We pull on the mooring cord
After removing the corners, you can proceed directly to laying the wall. In order for the entire row to be at the same level, we pull the mooring cord between two opposite rows, which are displayed in the same horizontal line. For mooring, you can use either a nylon thread, or a fishing line, or an analogue. The main thing is that it is strong and visible to you when laying. The berth can be attached:
- to the order if holes are provided in it;
- with staples and nails.
We have shown both methods in the figures.
The mooring is fixed with a vertical offset of 2-3 mm from the masonry, so that there is no contact between the mooring and the brick along its entire length.
If there are no holes in the dock, then you can follow the simplest and most common way of installing the dock. For this we need 1 nail and 1 bracket for 1 corner. We insert the nail into the finished seam and tie a mooring to it. Then we insert the mooring into the bracket. We put the bracket with a pier threaded into it on the brick, along which we will make a row and press the bracket with a free-lying brick from above (without mortar). A rigid wire bent in half can serve as a bracket. The figure shows in detail how it will look visually.
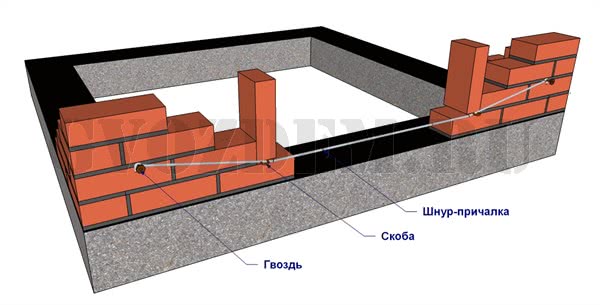
If the dock sags, then you need to install the so-called beacons. For this purpose, 2 bricks are taken. The first is placed, taking into account the thickness of the seam, on the mortar or a rod template (12x12mm), and the second is poked on the first brick. We insert a nail between the bricks, onto which the mooring is wound tightly.
Base / plinth insulation
To protect the foot from temperature extremes, insulation is carried out after the erection of the brickwork. The best thermal insulation material is polystyrene foam. It is mounted on cold mastic or glue, which should not contain acetone, solvent and other solvents.
There is also a less expensive way to insulate a brick base. It consists in plastering the foot. In this case, the insulation is not required to be glued. This insulation technology saves money, but is less effective than using expanded polystyrene.
Features of a brick base
To make a basement out of a brick is a very responsible and difficult business, and you need to comply with various requirements
It is important when laying to ensure the evenness of the rows, do not forget about the correct strapping of all corners
It is worth not only choosing a brick correctly (red ceramic is best suited), but also a solution, which should have the proper plasticity and rigidity. The best option for that is M-75 solution. This will make it possible to make a reliable wall and supports out of bricks. To give additional rigidity, every 4 rows must be reinforced with a special metal mesh, which has cells with dimensions of 50x50 mm. It doesn't matter if it is executed either in brick. The main thing is not to forget about constant checking of evenness, about reinforcement.
The construction of a brick basement is possible in 3 methods:
Basement masonry scheme.
- Westerly plinth. In this case, the thickness of the walls of the basement floor is slightly less than for the walls of the main house. It is recommended to make this type of structure out of bricks when there is a need for additional protection from sedimentary waters from above. Typically, such structures are built in areas where the level of average annual precipitation is very high.
- The bulging plinth has a wall thickness greater than the walls of the house. It is recommended to make this type of structure when the building has thin outer walls, but when building such a basement, it is necessary to provide for protection from precipitation. Usually, special metal visors are used for this, which cover the ledge.
- The walls of the basement and the residential building are at the same level, their thickness is the same.
Determine the height
Until now, construction masters do not have an unambiguous answer to the question of what the height of the basement should be. As the level at which the upper point of the masonry should be located, it is best to take the height of atmospheric precipitation that has fallen over the past few years. This masonry technology is the most reliable and guarantees a future building, erected on a strip brick foundation, a long service life.
But in practice, most often there is a basement masonry with a height equal to the floor of the first floor in the building. This technique also applies to structures with a basement floor. Fashion and style trends in our time imply the presence of a high and massive basement in the house, which are able to highlight the living space, giving it grace and elegance.
The foundation is ready, what's next
Since the invention of brick, this artificial stone is not going to give its palm to any other building material, especially when it comes to suburban and low-rise construction. In theory, all foam blocks, gas silicate products and facing materials are, to one degree or another, derived from classic bricks, complementing and improving its basic functional properties, preserving even the technology of its laying. But before driving in a golden crutch and celebrating a housewarming, you need to start, lay the first stone, the corner, on which, as it is said even in the Scriptures, the whole building is based. How to properly start brickwork or laying bricks on a foundation is the topic of this material.
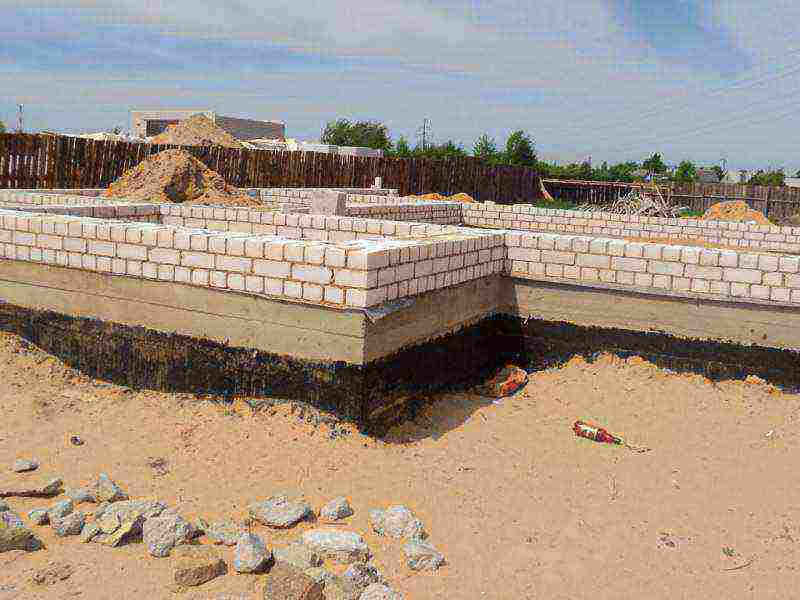
The foundation and walls, in our case brickwork, are in different structures, diametrically opposite operating conditions, the first is submerged in the ground, and the second is above it, which necessitates their mandatory separation with a layer of waterproofing. Even with reliable waterproofing of the foundation itself and a high-quality blind area around the entire perimeter, a small suction of soil moisture is inevitable, therefore, the reliability of this insulating layer should protect the first rows of masonry from this moisture.To do this, the top of the foundation is leveled during its arrangement, and if defects appear during its formation and drying, it is required to apply a new small layer of cement-sand mortar, ensuring uniform laying of waterproofing. The minimum reliable thickness of waterproofing is considered to be the laying of two layers of roofing material without sprinkling and with a reliable overlap and alternating its joints along the length.
But do not rush to pick up a brick, it is advisable to pre-install the corner ordering rulers. Rulers are called wooden planks fixed at the corners, which are set not only in the vertical plane, but also verified for the rectangularity of the masonry. If you put a mortar, then a brick, set it up and align it, then go to the diagonal corner, repeat the corner brick laying there, then measure the diagonal and start adjusting the position of the stones, then you will disturb the brick that is already grasping in place, which is highly undesirable. Placing the next corners, we again check the diagonals and linear dimensions, which entails additional editing, i.e. you have to do what initially weakens the laying of the walls. It is much easier to put the rulers on dry, pushing and shifting them relative to the foundation as needed and achieving the required position. Now, having established the orders, we mark the height of the first brick, taking into account the thickness of the mortar, and in theory, you can mark 10 rows, indicating the position of the stone in advance.
The laying of bricks on the foundation, the base, begins with laying the corners and, with the established orders, it comes down to leveling the mortar - preparing the bed, and exposing the brick along the line on the ruler. A short building level laid on top should confirm the correct laying with its air indicator, and even if the brick is slightly corrected with a pick, this position will no longer have to be disturbed. The corners are laid out according to special schemes, ensuring mutual ligation of both bricks and rows, using for this not only whole bricks, but also specially prepared halves, 3/4, 1/3 parts. Raising one corner by 5-7 rows, they start the next and all the others, then pulling the fishing line in the same orders and filling the piers, leveling the bricks along it, ensuring the horizontality of the masonry along the entire perimeter.
Frost resistance
The first and invariable criterion in choosing a brick for a basement is fullness
But special attention should be focused on the ability to maintain its structure after each thawing of moisture in the spring.
The frost resistance index is measured in cycles. The period of one cycle is measured in freezing and thawing. Figuratively speaking, one year. The more a brick is able to withstand such cycles, the higher its frost resistance. It is known from the general laws of physics that a change in temperature can contract and expand a dense material, but when it comes to water, the opposite is true. You can do a very simple experiment with a plastic water bottle. A bottle full and twisted with a cork will increase in size when the water turns into ice, and the longer you keep it in the freezer, the more voluminous it will become. Hence, the conclusion suggests itself that the ability of a brick to absorb moisture affects the frost resistance indicator. In severe frosts, the moisture inside expands, thereby destroying its structure. And if the strength indicators for ceramic and silicate bricks are the same, then it is better to opt for the minimum water absorption.
Checking the dimensions and geometry of the basement foundation
Bassoon base
Before starting work, I decided to check the strip foundation. After filling it, time has passed. He could shrink, washed away by rainwater. The unevenness of the plane of the base will entail a distortion of the whole house and constant repair of walls and ceilings. Measurements are carried out using a ruler, tape measure and cord.
- I measured the strip foundation using a slatted level up and down in several places. It is better to do this in the corners and every 2 meters in length. By placing the long device down, it is easy to determine if there is a slope. If you only have a corner level with short sides, place a board.
- On the foundation, in the corners, I laid dry bricks along the outer edge. Then, with the help of Vadik, I checked the diagonal. A regular rectangle has the same cord size from corner to corner. If the length is different, then the corners are not right. For a brick basement of a residential building, a difference in the length of the diagonals of up to 2 centimeters is permissible.
- Find the skew, and check the dimensions with a tape measure. Measured in the corners. The foundation was poured without formwork. The outer walls are uneven. Brick makes measurements easy.
Having adjusted the dimensions by offsetting the corners, we checked the diagonal with a cord again. Then I marked the position of the brick base. Now, pulling the cord and securing it to the pegs, I marked the outside of the walls. It remains to lay out the brick base. I was sure of the correctness of the geometry of the frame of the house.
My friend with his own hands smeared the strip foundation from above with glue, laid layers of prepared roofing material, connected together with a bituminous mixture. The bottom waterproofing is ready. The walls will not be damp with moisture from the soil. Under the brick, on the waterproofing, I laid a layer of cement mortar 2 cm thick. It will serve as a pillow and compensate for unevenness. For strength, I drowned a metal mesh with a cell of 50 mm in it, cutting it slightly narrower in width than the base.
Brick plinth on strip foundations
Better to choose fired brick. He has technical indicators for various properties and, in particular, for stability, much higher
On the strip foundation, a support layer is made under the walls from different materials, from pouring reinforced concrete to stone. The red brick for the basement combines:
- the required strength;
- simplicity of brickwork;
- low thermal conductivity;
- budget cost.
With a little skill and patience, you can lay out the base with your own hands in a few days. To protect the walls from moisture, waterproofing is done during the construction of the basement. You can lubricate the surface of the foundation with heated bitumen in several layers. This is long in time, since it is necessary to wait for the applied material to harden and only then spread the next one on the surface.
It is better to use roofing material in 2 layers. The strips are cut along the width of the base, plus 4-5 centimeters. They are held together with bituminous glue and fixed to the surface of the foundation. You can make a mixture with your own hands or use a ready-made one by buying it in a store. I added washed river sand to the heated bitumen. My friend mixed everything well.
Work progress
Before starting work, it is necessary to develop the discipline of laying bricks.
The first choice is the masonry scheme
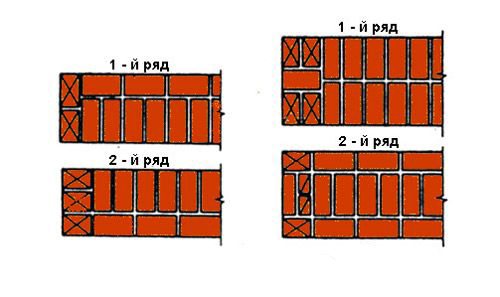
The most common masonry schemes are two chain linking of the corners:
- a - one brick thick;
- b - one and a half bricks thick.

The scheme of laying a basement made of brick using bandaging corners
The diagram also shows the dimensions of the bricks:
- 1 - three-four;
- 2 - half;
- 3 - four.
The second choice is masonry relative to the wall
Here we have three options at our disposal:
- 1 - protruding basement - the wall of the basement protrudes forward, outward;
The instruction also determines the order of masonry relative to the main wall of the building (see description in the text)
- 2 - sinking - the base goes back, inward;
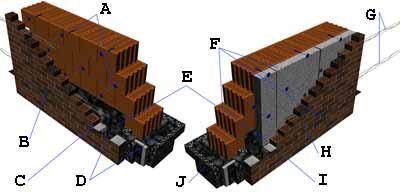
- 3 - base and main wall on the same plane; note, in the diagram, letters indicate: a - waterproofing;
- b - wall.
Places where it is supposed to use moisture-resistant materials must be equipped with waterproofing layers. When it comes to plinths, then there should be two such layers - using one is one of the most common mistakes when building a plinth made of brick.
The diagram shows two options - correct and incorrect:
- on the left - the correct application of waterproofing - two layers, above and below the base of the foundation;
The cost of laying a brick basement is also determined by the correct use of waterproofing - it is imperative to use two layers - above and below the basement
- on the right - only one layer on top is used.
Work progress
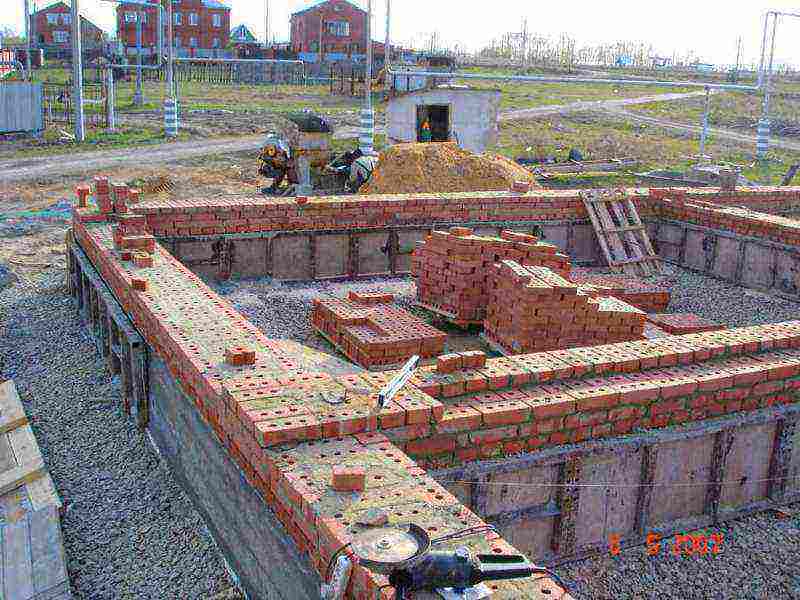
When the installation of the primary strip foundation is completed, we proceed to laying the bricks:
- first, the lower layer of waterproofing of the basement is laid;
- then, the angles are set - the most important stage that determines the success of the whole work; for this: we lay out the brick without mortar along the width of the base;
- to control surfaces we use a level and a plumb line;
- we check the sameness of both diagonals and all four corners - the maximum deviations should not be more than 2 cm.
Useful advice! When carrying out brickwork, a good school is to create orders - layering schemes for placing bricks from the lowest level to the highest. This is always done in the construction of ovens. The laying of the basement, of course, is much easier and if it were not for the need for ventilation and the responsibility of the work, it would not make sense to carry out the orders here. But we advise you to concretize in this way the first four rows, which the loan will be repeated, and the row through which the ventilation passes.
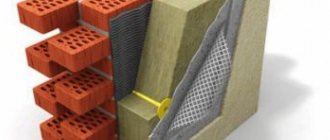
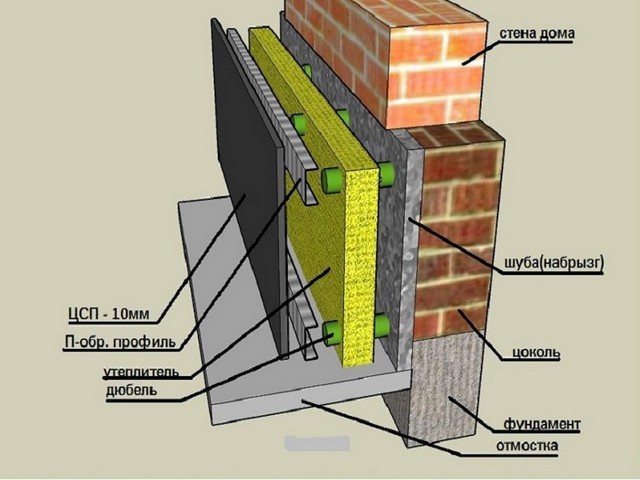
Insulation of brickwork basement
Brick laying must be accompanied by insulation.
The following insulation scheme is most often used:
- A - plaster on the building facade;
- B– brick base;
- C - adhesive layer for insulation;
- D - insulation in the form of slabs made of mineral rolls or expanded polystyrene;
The answer to the question of how much it costs to lay a brick plinth depends not only on the type of brick and work with it - given the strict need for insulation, the price includes many more materials (see the description in the text)
- E - strengthening solution;
- F - fiberglass mesh;
- G - solution for strengthening again;
- H - primer;
- I - finishing plaster on the facade.
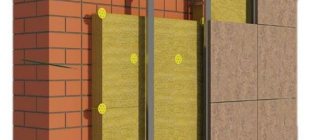
Another way of insulating is especially for clinker masonry
Clinker bricks with cavities make some adjustments to the nature of the insulation.
The diagram focuses on the features that are recommended to be kept in mind:
- A - anchor bolts;
- B - all the mixtures used must strictly correspond to each other in quality, which means they must be quite high in quality;
- C - ventilation, which is required even for hollow clinker bricks;
- D - waterproofing - nowhere without it;
Despite the presence of cavities in the clinker brick, insulation and ventilation are necessary in any case (see the description in the text)
- E - the utmost cleanliness of all surfaces is the key to success, debris and mortar residues are unacceptable in the cavities;
- F - when choosing materials, be sure to agree on the timing of their production and service life;
- G - reinforcement for strengthening the masonry and, at the same time, relieving stress;
- H - one more layer of clinker, but smaller, like a topcoat on the outside;
- I - in this version of the masonry, the seams are not recessed.
Useful advice! When you do your research on the market for clinker bricks, you will be surprised at the abundance of offers. But not every proposal is truly worth considering. Unfortunately, there is a lot of absolutely low-quality material on offer.Therefore, we advise you to require the presentation of a certificate for all purchased products indicating the date of manufacture and warranty obligations for compliance with the manufacturing technology and the achieved characteristics.
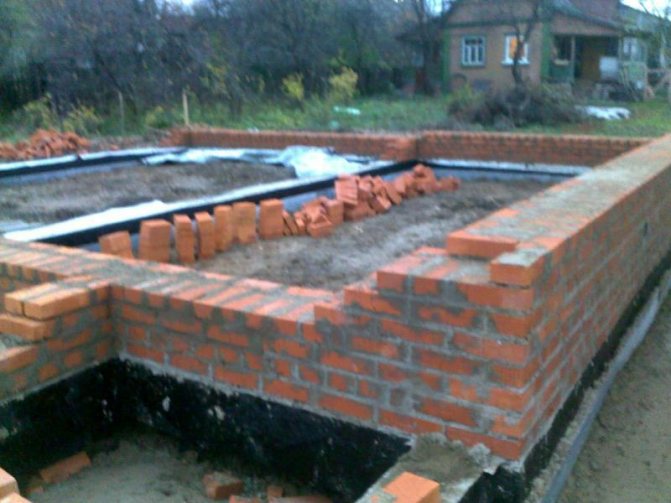
In the photo, the laying of a brick basement with your own hands is carried out on a strip reinforced concrete foundation
Hydro and thermal insulation
The basement insulation deserves special attention in the building. The external soil from the ground, which is located under the structure of the house, differs in that the second does not freeze even at low ambient temperatures. To organize this moment, the foundation is fenced off from the soil with a waterproofing layer of roofing material or other metal.
For a high-quality installation of waterproofing, it is necessary to put two layers of a roll, film or membrane. The side basement wall of concrete is also treated with protection against melt and groundwater. The upper part of the waterproofing on a concrete foundation is applied with an overlap, mainly in the areas of joints and protrudes 2 cm beyond the perimeter.
The work on arranging the basement of the house does not end with one waterproofing. The buildings also need to be insulated.
The best material for laying out is a foam block. The technology of work involves fixing the structure on the outer part of the base device
At the same time, it is important to choose the right bonding material.
To firmly adhere the foam blocks, use glue or mastic. In this case, the material should not contain solvent or acetone, which dissolve surfaces. Often, the basement is erected on aerated concrete.
This material has many advantages.
But it is important to take into account the type of soil (laying on weak soil is not recommended) and the temperature of the area. If the thermometer drops below 10 degrees below zero, it is not recommended to use aerated concrete.
- Date: 21-03-2015Comments: Rating: 21
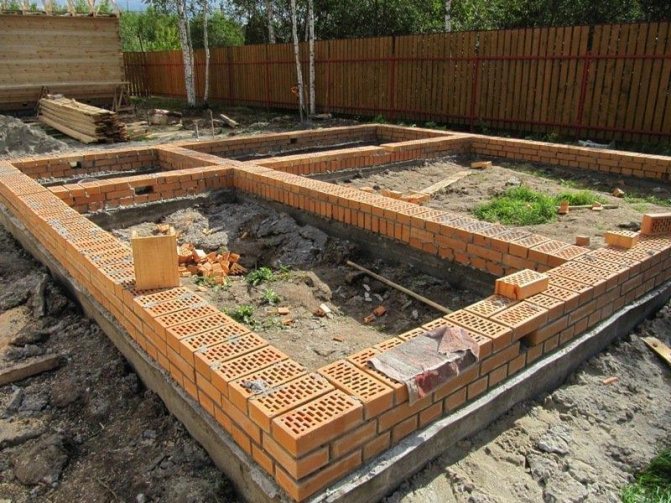
One of the most important components of any structure is its underground part. The foundation is, of course, the foundation of the entire structure, but it is not considered the only part that has a major impact on the successful construction of a building. To build a capital structure that will serve for many years, you need to carefully familiarize yourself with the technology of such a process as laying a brick basement with your own hands.
Types of plinths.
During construction, you will need to use technological methods of influencing water aggression, you will need to take care of protecting the foundations when the blind area is being installed. The very first stage of construction requires reliable protection of the building from moisture, one of the reliable options is the "substrate", that is, the basement.
Basically, the construction of the basement is a kind of "superstructure" on the laid out foundation. It rises above the surface by about 50 cm.
Its main task in contact with the ground is to protect the foundation from excess moisture, temperature surges and other negative phenomena. In addition to protecting the house from atmospheric phenomena, the basement becomes an excellent support for the walls of the house, this is the visible area of the foundation. A brick plinth is the installation of a solid "superstructure", it is a part of the foundation, corresponding to the architectural style of the building.
Insulation of basements and basements
Basic concepts
Let's clarify what a basement, basement and basement are.
Some people think that "basement" is the intelligent name for a basement. However, there is a difference between the two. It is generally accepted that the basement is entirely underground, and the basement is at least a third above ground level.
There is the concept of "basement", which is by no means a short designation for the basement floor. This is not a room. The word comes from the Italian zoccolo (hoof) and in Russian it means a structure (wall), transitioning from the foundation to the wall of the house. In fact, this is a kind of continuation of the foundation above the ground. There may be no basement or basement, but there is always a basement.
Features of basement, basement and basement insulation
In the absence of thermal insulation, the building loses up to 10% of its heat through the underground part, and up to 40% through the outer walls. The need to insulate the basement, basement floor and basement is obvious, especially the last one, which is located at the junction of the outer walls and the underground part.
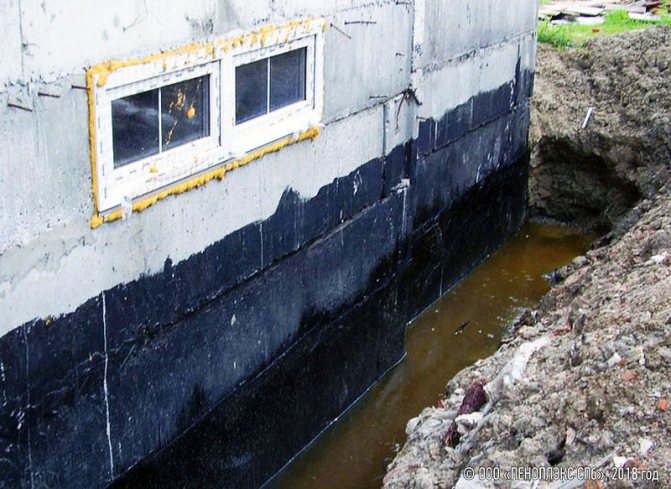
But it's not just about heat loss. For the insulation of these structures, not all heat-insulating materials are suitable, but only moisture-resistant ones. Why? The closer to the ground, the closer to the water. The water element attacks the basement, basement and basement from different sides. From below, groundwater can reach the underground structures of the building, which is introduced into the structure of the building material in two ways: through joints, leaks, gaps, cracks, and also by means of capillary suction. Needless to say, brick, concrete and other materials are destroyed in this way?
With a strong flooding with ground and soil waters, even waterproofing often does not help. From the air, all these structures bombard atmospheric precipitation in the form of rain, snowfall, drizzle, dew, drizzle. "Rare but well-aimed" natural disasters, especially floods, add bright colors to the overall picture. Moisturizes the structure and the snow cover, when it thaws, the wall damp, and again, the process of capillary suction takes place.
Consequences of moisture loads on the lower part of buildings

Capillary suction reduces the strength properties of the structure. Dampness leads to biological effects. After all, water is the source of life. The damp wall of the basement is often covered with fungus, mold, moss, lichens, etc.
All this destroys building structures both mechanically and chemically - by the products of its metabolism. Is it worth mentioning the serious harm to the health of people living on the first floors of a building with a plinth affected by a fungus?
What does the insulation have to do with it?
Thus, both the underground part and the lower above-ground part of the building are in conditions of increased moisture. You say, what does the insulation have to do with it? After all, this requires waterproofing. Right. Insulation is required to protect against low temperatures. And thermal insulation does an excellent job of this task until it gets damp or gets wet. After that, its heat-shielding properties are sharply reduced, because water perfectly conducts heat - an order of magnitude better than classical insulation of building structures.
This is the answer to the question why insulation that does not allow water to pass through is required to insulate the basement, basement and basement floor. In other words, the quality of the insulation of the lower part of the building depends not only on the heat-shielding ability of the material.
Universal insulation
- Only PENOPLEX® can boast of a combination of excellent heat-shielding properties and zero water absorption required for the lower part of buildings. This is a high quality thermal insulation made of extruded polystyrene foam. PENOPLEX® firmly occupies a leading position among the widely used thermal insulation materials for the two above-mentioned parameters. Its thermal conductivity coefficient is 0.034 W / m-K and is one of the lowest among traditional heaters. As for the ability to absorb water, it gains no more than 0.5% by volume in 28 days, and this is a negligible value.
PENOPLEX® has other remarkable qualities as well. Let's return to the conversation about the consequences of wetting building structures, namely, about infection with fungus, mold and other harmful microorganisms. PENOPLEX® will never become a favorable environment for their development and will not undergo biodegradation, because it is characterized by absolute biostability.
PENOPLEX® has been tested for resistance to fungal infection. During mycological tests, it was infected with a suspension of fungi in appropriate media.Then they were kept in conditions of high relative humidity, optimal for their development. Then they were incubated at a temperature of 22-25 ° C for 84 days. At the intermediate examination after 30 days and the final examination after 84 days, the intensity of the development of the fungi was checked. PENOPLEX® samples have confirmed resistance to this effect.
In addition, PENOPLEX® is environmentally friendly. This means that in its composition it does not contain small fibers, dust, phenol-formaldehyde resins, soot, slags, and freons are not used in its production.
The polystyrene from which PENOPLEX® is made is absolutely safe for human health. It is used to make toys for children, medical packaging, disposable tableware, yogurt jars, and even cocktail tubes.
Insulation of the basement, basement, basement floor with PENOPLEX® thermal insulation
All these parts of the building can be insulated from the inside and outside, with the exception of the basement, which can only be insulated from the outside. However, external insulation is preferable for all these structures. The fact is that from the outside, the insulation protects not only the room, but also the wall itself. With good thermal insulation, even in severe frosts, it maintains a positive temperature, which is very important.
With internal insulation, the wall, covered with a layer of thermal insulation only from the inside, absorbs moisture, which, turning into ice in the cold, expands, which aggravates the destructive processes. The transition of the ambient temperature through the zero mark is destructive for building materials, and high-quality external thermal insulation protects them from these sign-changing temperature phenomena and prolongs the life of the building. PENOPLEX® performs these functions well and for a long time. Its durability is estimated at 50 years without loss of thermal properties.
Summary
Thermal insulation of the basement, basement and basement floor is a broader task than just insulation. Here, materials that are not able to absorb water are required, otherwise the insulation will quickly lose its qualities. Reliable thermal insulation of PENOPLEX® with zero water absorption is one of the few solutions suitable in this case.
Insulated brick plinth on a strip foundation
We remind you that all work on the organization of the basement is carried out on the erected strip base.
Outline the corners
One of the most important rules in the construction of not only the basement, but any building as a whole, can be considered the correct definition of the corners of the structure. Negligence in this matter will certainly lead to the curvature of the surface of the walls, which ultimately will lead to their partial or even full bearing capacity.
Several technologies are used to correctly align the angles, but the following technique is considered the simplest:
- A row of bricks is laid in all corners of the building's base without using cement mortar. In this case, the planned width of the future structure must be observed. The corners are inserted using a building level.
- Next, measure the length and width on both sides, as well as the diagonals. All readings must match to the nearest centimeter. Measurements are carried out using a tape measure or twine.
- It does not hurt to check the future walls again for irregularities. To do this, use the same twine.
Waterproofing the base surface
In order to ensure reliable protection of the basement masonry from groundwater, care should be taken to organize the upper part of the foundation with an insulating layer, the functions of which can be performed by roofing material folded in half. It is glued to the surface of the base using bitumen mastic, a burner or heated bitumen. Also, glass insulation, euroruberoid or an improved type of roofing material is used as a waterproofing layer, which is based on cardboard - rubemast.
Bricklaying
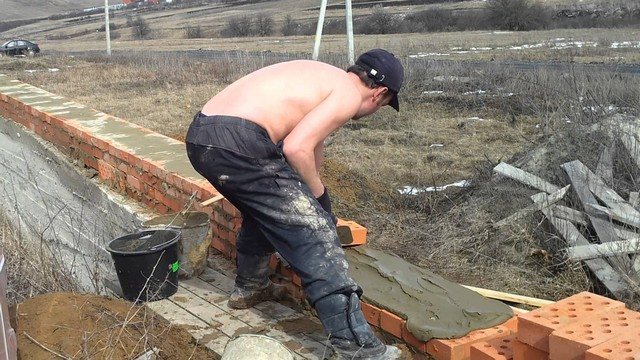
Having provided the surface of the foundation with a waterproofing layer, you can start laying a brick base.For stapling the bars, a solution of cement, sand and water is used. When erecting a basement, only red brick is used without holes and cavities.
To lay out the basement, start from the corners, placing the rows opposite each other, and covering the surface of the material with a solution 2-2.5 cm thick. After laying out several radars, the surface is checked with a level.
Having reached the minimum height of the plinth, which is 4 rows of standard bricks, you can begin to erect the walls. Finish the surface of the basement with decorative stone or siding. They often resort to decorating the basement with finishing tiles. With the help of the basement, the strip foundation is leveled with a brick.
If there is a basement in the room, openings in the basement should be provided for ventilation. They are located at a height of 10-15 cm from the soil. The dimensions depend on the diameter of the vent pipe. From above, the basement is covered with a waterproofing layer, the same as the surface of the foundation was covered earlier.
Operating conditions determine the approach
Brick masonry technology, as a rule, involves the use of one of the five types of clinker presented (see description in the text)
If we talk about the operating conditions of bricks, then they are extremely tough:
- firstly, the brick must be very strong - it must hold the entire building;
- secondly, the brick must have good frost resistance, because it directly forms the outer wall of the building;
- thirdly, the brick should not allow moisture to pass through and not undergo changes under the influence of moisture.
Clinker brick
All these conditions are fully met by clinker bricks, which:
- strength - from M75 to M500 (here silicate is much inferior, but acid-resistant ahead - more than M500);
- frost resistance - from F50 to F100 (according to this indicator, fireclay and acid-resistant ones are much inferior);
- average density (kg per cubic meter) - 1900 - 2100;
- porosity (%) - 5;
- thermal conductivity coefficient (W per meter) - 1.16.
Useful advice! We advise you to pay attention to the special types of bricks that can be found on the market and which have a strength of up to M 500, while having a porosity of 43-45%.
A further choice is to search for the type of clinker brick.
Five of them are mass-produced:
- A - facing;
- B - construction;
- C - single;
- D - one and a half;
- E - double.
Thus, the most optimal choice is the choice of one and a half clinker bricks with a strength of M400 and frost resistance - no worse than F50.
Requirements
In addition, additional requirements are imposed on the brick, taking into account the operating conditions:
- it should not have chips and signs of deformation;
- its dimensions must exactly match the standards;
- the brick should not have any environmental claims;
- cement mortar will be used as a binder, so it must have good adhesion to the mortar.
Brick masonry technology
The laying of bricks on the surface of the foundation must be carried out taking into account some rules, which will ensure the high quality of the created structure.
Preparation of the necessary materials
Brick laying on the base
You need to prepare the solution immediately before performing the main work. It must be used within 3 hours as it hardens quickly and loses its properties. The preparation of the cement-sand mortar can be carried out in a concrete mixer or done by hand.
Take a suitable size basin and fill in sand and cement (4: 1) using a special mortar shovel. After mixing the dry components, water and 2-3 drops of liquid soap are added (this will give the solution additional plasticity). All ingredients are thoroughly mixed to obtain a mixture with a uniform consistency.
Experts recommend pre-soaking the brick in plain water for 15 minutes.The laying of such material will be much easier and will allow you to easily eliminate minor defects that appear during work. After pre-soaking the material, seams are obtained that will be much stronger than usual. This is achieved by the absence of penetration of capillary moisture from the solution into the masonry.