What you can do yourself for a comfortable wash
A mobile bath is an opportunity to take a steam bath with friends directly on a fishing trip or on a break during a hike. With her, a tourist vacation will become simply unforgettable. But if we talk about a hand-made camping bath, then for this you need a frame, special heat-insulating material, and, of course, a stove.
Many people buy a ready-made stove for a hike, but you can make one yourself. There are several options for homemade stoves, each of which has its own advantages and disadvantages. Masters distinguish three types of heating devices.
- Stove with intermittent heating.
- Improved travel heater.
- Camping stoves of long burning.
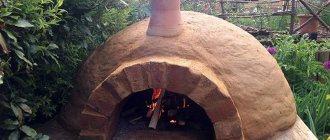
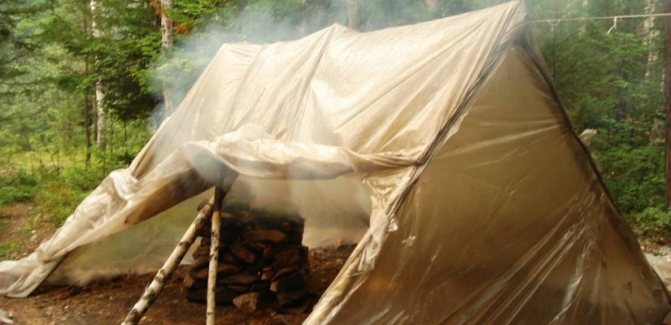
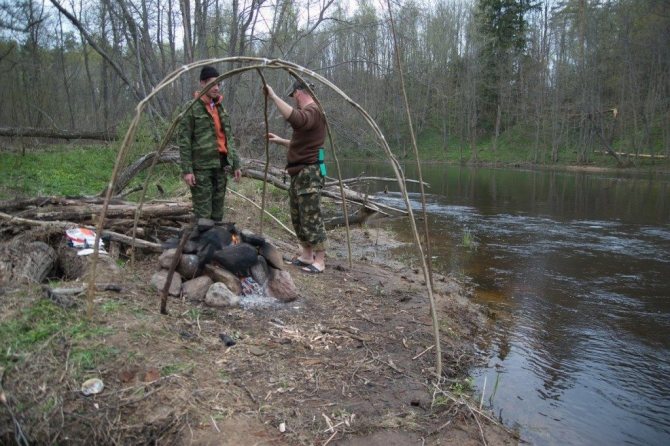
To take a steam bath in nature, a pyramid of stones is erected inside the unfinished frame of the tent. They cover it with wood, which will heat the stacked stones. Only after the wood has burned out, its remains are removed, and the tent is covered with tarpaulin or cellophane wrap. The main disadvantage of such a heater is the one-time heating. If there was enough heat after the firewood, then you had time to steam. To create periodic heating, stones are placed in a metal mesh pipe. It can be set up or pulled out of the fire, maintaining the temperature in the tent, which in this case serves as a camping bath.
The improved camping stove is represented by a small “P” -shaped design. For this, bricks are placed on the sides and covered with a lattice, on which stones are laid out. Wood is placed under the grate and set on fire. Firewood is periodically added to maintain the temperature in the tent. Despite the primitive design, this type of bath is quite effective.
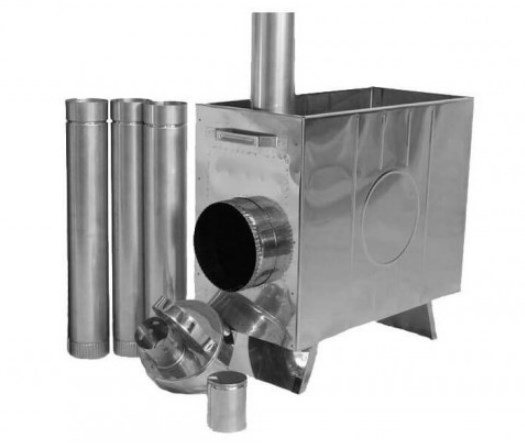
You can also build a device for long burning with your own hands. It is a metal structure made of a profiled pipe. Inside there is a hole for laying firewood, a chimney and even a water tank. This type of oven will give you the opportunity to take a good steam out in nature.
A long-burning stove should be taken on vacation only if you travel by car: it is quite difficult to pull this structure on yourself, but such a structure will easily fit in the luggage compartment.
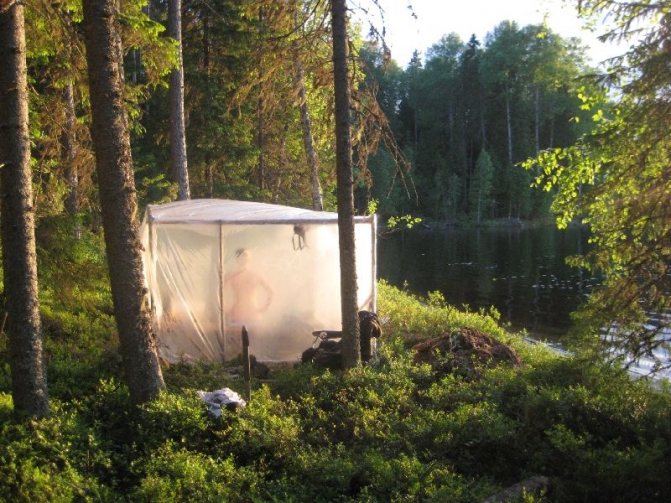
Homemade steam room in nature
Of course, a high-quality factory-made mobile bath is a good thing, we will also talk about it, only a little later. But those who go out into nature once a year and are not going to seriously invest in expensive equipment need simpler solutions and we will start our conversation with just such options.
How it all starts
It is no secret that traditional baths are white and black, and the outdoor bath is no exception. But before we dive into the intricacies of the technology, let's first figure out what tools and raw materials we need.
In principle, almost all such structures, no matter whether they are mobile or stationary, are arranged in the same way. In a closed room, a stove is installed, which heats up and then these heated stones are poured with water.
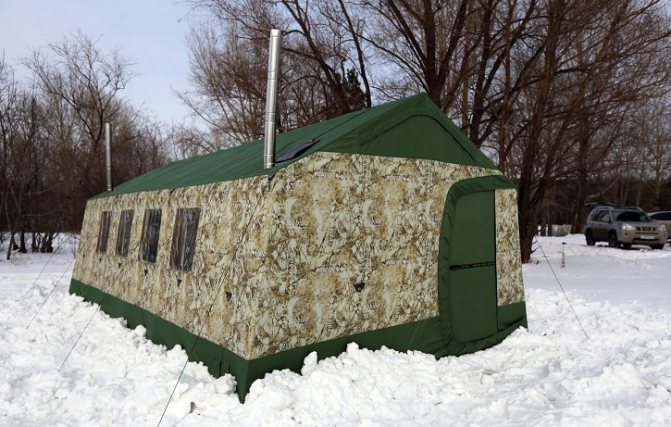
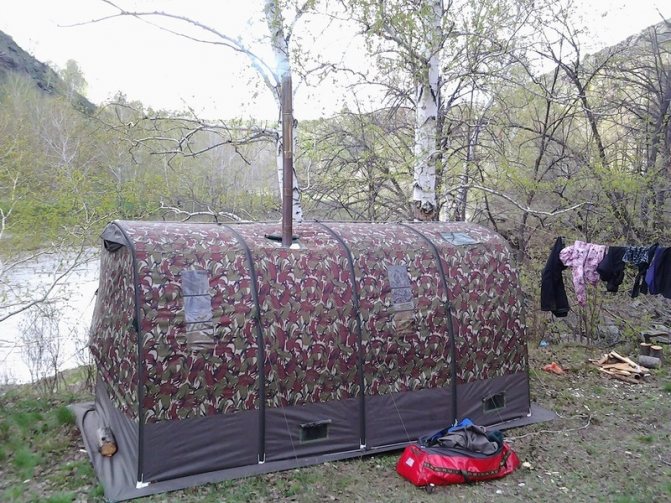
Winter version of a large hiking bath.
You do not need any specialized tool for building a steam room with your own hands in field conditions, it is quite possible to get by with a standard set of a tourist. That is, you must have an ax, a knife, a supply of rope and a shovel.
To build an impromptu room for our steam room, you need a frame.
There are several options here:
- The easiest way is to go to the nearest forest and chop up the young animals there.You should choose straight poles with a thickness of about 3 - 4 cm and a length of up to 3 m;
- A prefabricated metal frame from a tourist or, at worst, a market tent is perfect. Iron pipes are certainly a good thing, but they are heavy, so here it is better to give preference to aluminum stands.
Capital frame made of metal tubes.
Now there are still frames made of carbon fiber and fiberglass, I will not lie myself, I have not personally tested them, but according to experienced tourists, the material is quite worthy of attention.
Naturally, the frame needs to be covered with something, and for these purposes there are also several pretty decent options:
- In the "bins of the Motherland" of almost half of our compatriots, you can find an old canvas tent without a bottom, still of the Soviet model. A tarpaulin tent is a thing that cannot be killed even for an impromptu steam room, it fits perfectly, the only drawback is its weight, the tarpaulin is heavier than modern counterparts;
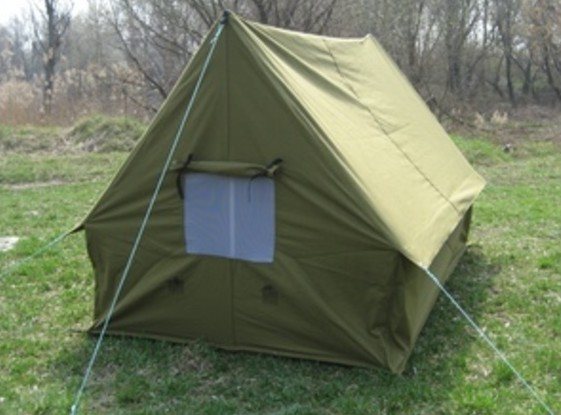
Classic canvas tent.
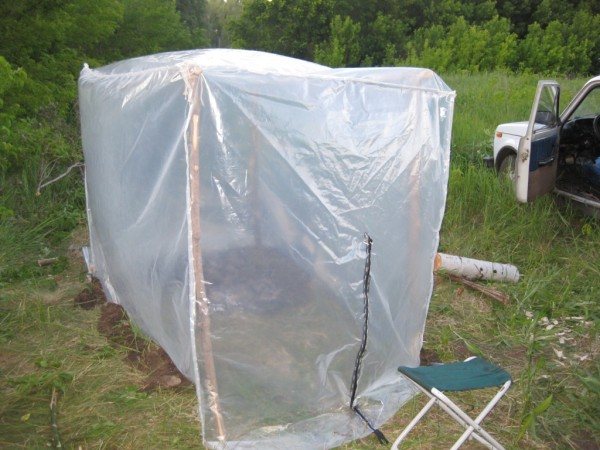
- If you somehow did not work with a tarpaulin tent, then you can buy a two-layer technical polyethylene with a thickness of 100-200 microns. You can take a roll, but there is more fuss with it, I recommend buying a solid canvas. Now in stores they sell pieces of 6x6m in size, such dimensions will be enough for you to build a steam room for 4-6 people;
- An acquaintance of mine adapted an old banner ad for this purpose. Dense polymer fabric, of course, is a durable thing and you can use such an awning for a steam room more than a dozen times, but the banners are heavy, so this option is more suitable for autotourists.
Awning welded from pieces of polyethylene.
Under no circumstances use modern synthetic tents for the construction of a steam room, they will burn out from any small spark. After the first run, such an awning can be thrown away.
Choose a place wisely
When choosing a place, first of all, remember that a camp bath with a stove should be equipped next to the reservoir. This lake or river will not be so important, the main thing is that there is a lot of water, it will not be possible to wash well from the imported tank.
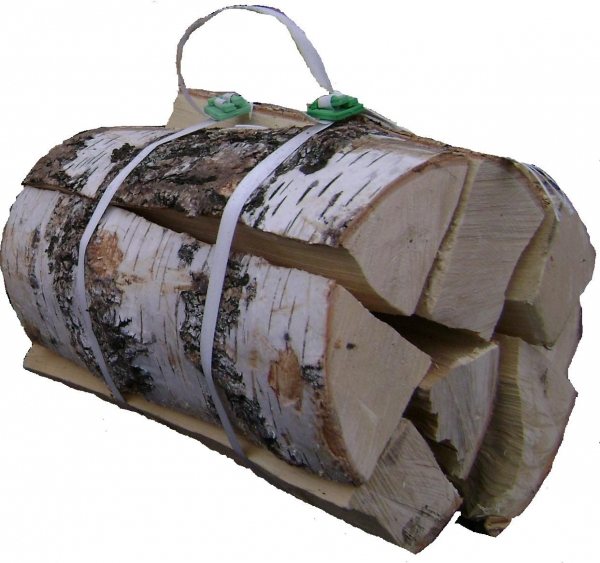
The second no less important point is firewood, and you will need a lot of firewood. When my friends and I organize a steam bath on a fishing trip, it takes two people about 2 hours to collect. Only dead wood should be taken, the logs should be 10 - 15 cm thick. Thick logs will not burn out, and thin ones will not give the required heat.
By the way, advice for motorists, having a chainsaw in the trunk will significantly speed up the process, plus you won't have to sweat so much with an ax in your hands.
And finally, it will take a lot of stones to fold the stove for a camping bath, and the choice should be taken seriously.

Talcochlorite as one of the minerals for the heater.
- The approximate amount of material is 1 bucket of stones per person;
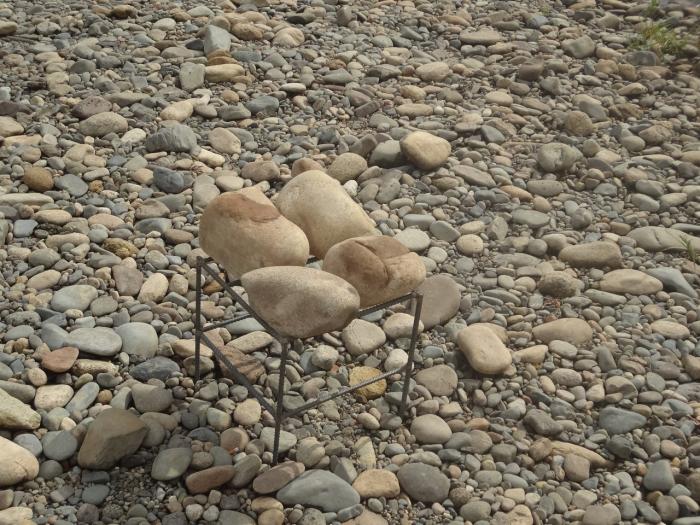
- In addition, you do not need to take all the stones in a row. Only large and medium boulders are suitable for us, preferably rounded;
- You should not take stones with extraneous inclusions and multi-colored stones. When heated, such material will almost certainly crumble or, even worse, start to "shoot";
- Cracked stones will not work for us either;
- In no case try to build a stove for a mobile bath from slate, it is absolutely not suitable for these purposes;
- As a result, we are interested in rounded homogeneous boulders, the diameter of which starts from 10 - 15 cm.
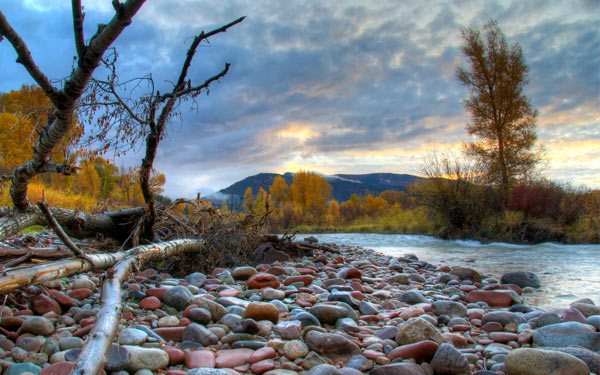
Large pebbles on the river bank.
I will give you a separate secret of the selection of stones from my own experience. I choose stones on a sunny day, preferably in an open area and take only hot boulders. If the stone is heated by the sun, it means that it accumulates heat well and fits perfectly under the stove for a camp bath.
Stove on large boulders.
We organize a white bath
So that you understand, a white bath is a fire with hot stones separately, and an impromptu steam room is separate and only at the very end of heating all this is combined.
We start by heating the stones, and while they are heating up, we are building a steam room. Although if there are enough people, then you can do everything at the same time. In this case, the distance from the fire to the steam room is approximately 1.5 - 2 m, so that heat or sparks do not burn the awning.
The process goes in stages, the first row of the thickest logs is laid on the ground. One layer of stones is poured onto it. Lay out a row of logs on top and cover them with a number of stones. Thus, you should get a "sandwich" of 3 - 4 layers of stones, after which the fire is kindled.
The scheme of the bath in white.
As the wood burns out, you gradually add rows of stones and cover them with dry wood. This continues until all the stones are in the fire. Then they need to be brought to the desired temperature, on average it takes 2 - 3 hours, so the fire should burn all this time.
It is best to organize this action in the afternoon, so until it comes to the procedures themselves, dusk will come, and at dusk you can clearly see the moment when the stones turn red from the heat.
By the time the stones are finally warmed up, you should have a steam room ready. It's easier, of course, to build a hut like an Indian wigwam. But it is bad because the heat will collect in the upper cone, and pitiful crumbs will remain on the lower tier, where the people actually soar.
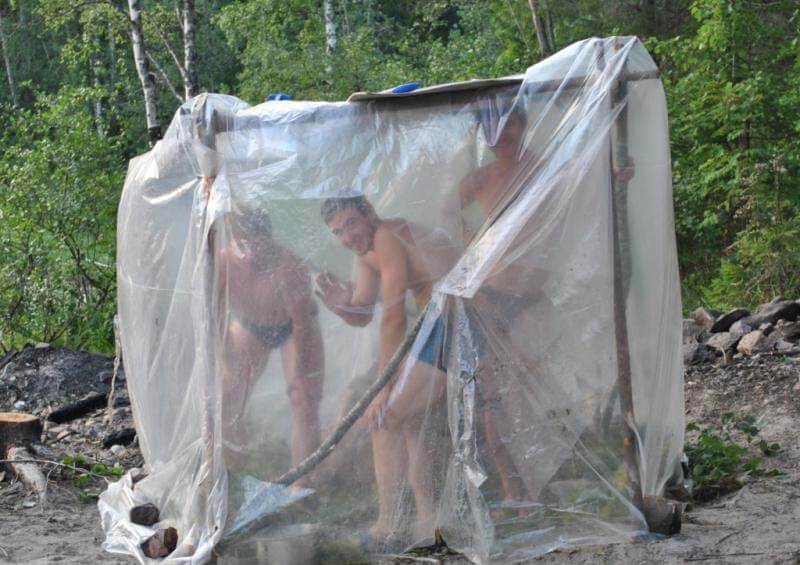
A polyethylene awning on a homemade frame.
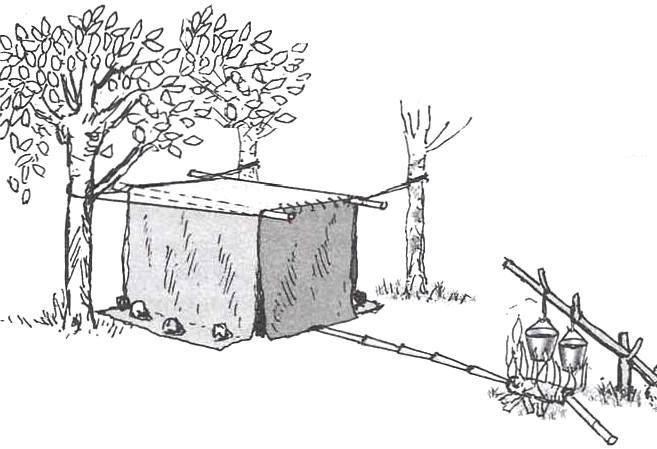
My friends and I always collect a cube, fiddling with it more, but the effect is much better. Although, in principle, there is nothing complicated. Dig in 4 support posts, make a strapping from above and tie diagonals on the walls for stability. On the ceiling, the diagonals must cross.
To prevent the polyethylene from breaking through the sharp corners of the homemade frame, they should be wrapped in some rags in advance. Plus, you need to dig a small pit for laying stones in the far from the entrance corner of the steam room and dig a gutter from this pit to the fire.
Now a couple of people arm themselves with strong sticks, scoop up the heated stones from the fire and push them along the chute into the steam room, unloading them into one common heap in the pit.
Option for a homemade steam room frame.
Some tourists act differently, they build a frame, drag stones there, and only then quickly cover the frame with an awning. The method is acceptable, but in my opinion it is wrong, too much heat goes to the wind.
My friends and I do this:
- The awning is calmly and thoroughly covered in advance and is lined with stones around the perimeter for tightness;
- When the time comes to move stones into it, 2 people push these stones to the entrance to the steam room, while the third, being inside the steam room, quickly picks up the stones on a shovel and stores them in the right place;
- For everything about everything, it takes no more than 10 - 15 minutes, and most importantly, all the heat remains inside the steam room.
Some of the stones can crumble from the heat, so you shouldn't remove these fragments from the fire, they won't make the weather. Plus, at the end of the moving process, the gutter should be poured abundantly with water, small coals will definitely remain in it, which can be burned.
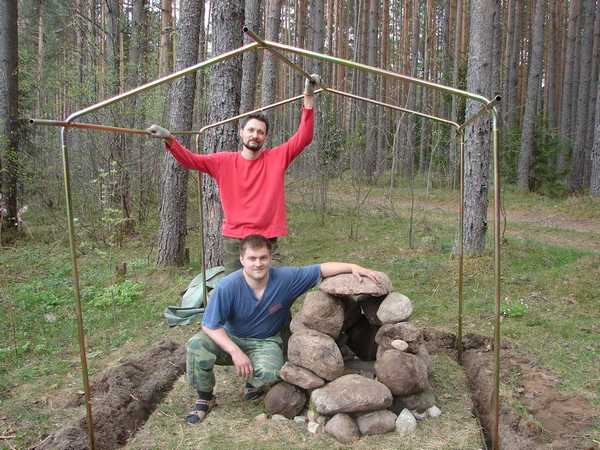
Frame over a homemade stove.
Smoke bath
The smoke sauna is an advantageous option from the point of view of heating the steam room, but at the same time this option is smokier and, if I may say so, dirtier. There are two ways to organize it.
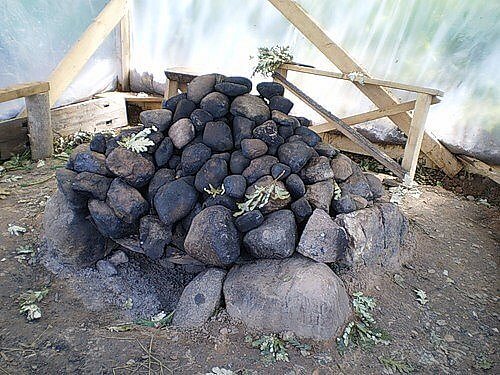
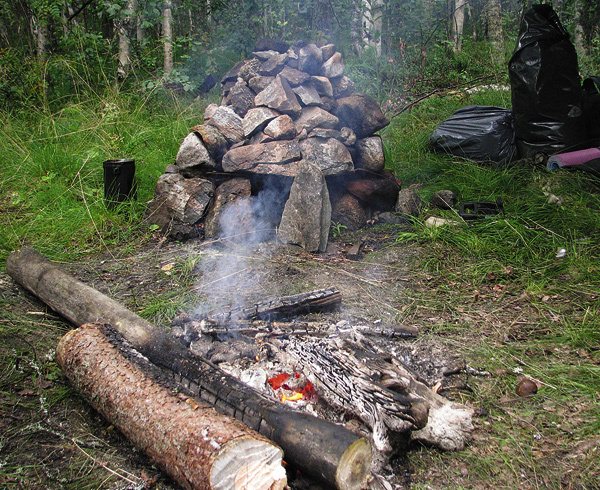
The easiest and least expensive way is to install the largest boulder available in the center, and lay all the other stones around the perimeter and on top in the form of a pyramid.
Then dump all the firewood that you have on this pile of stones, set it on fire and wait until the fire burns out. When the fire begins to fade, proceed to the construction of a steam room frame around this pyramid, but do not immediately cover it.
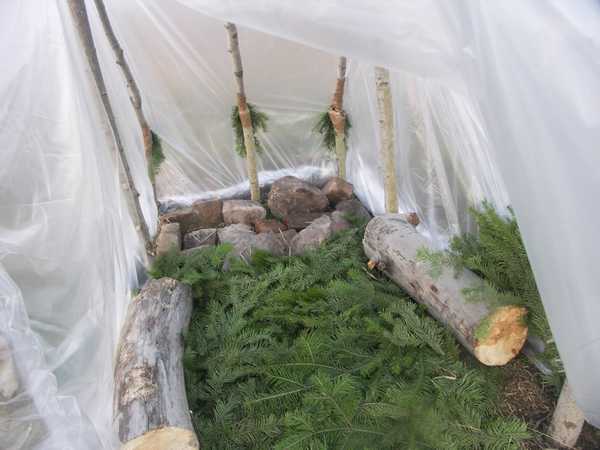
Spruce wood flooring on the floor of a homemade steam room.
The main thing here is not to miss the moment of the highest heating of the stones. When you decide that this moment has come, take a broom from freshly cut branches and sweep the remaining charcoal away from the frame. And inside the frame itself, water the ground with water and lay tree branches, for these purposes, coniferous spruce branches are well suited.
Now the main thing is to quickly wrap the frame with an awning and press it around the perimeter with stones. By the way, that is why I recommended buying a one-piece wide piece of polyethylene, it is the easiest for them to do this.
If you have a prefabricated frame, then you can immediately cover it with an awning and put it aside. When the time comes, a couple of strong men will easily lift this structure and cover it with a pyramid of hot stones.
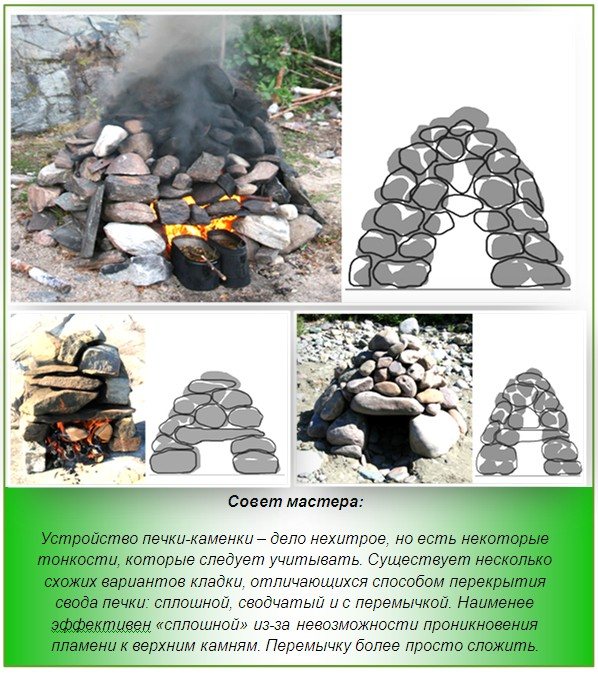
Furnace masonry options.
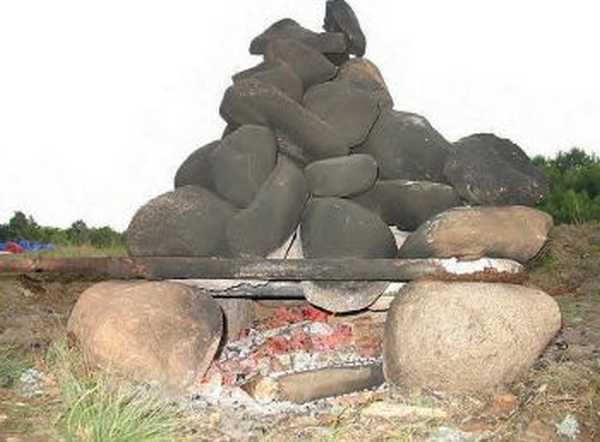
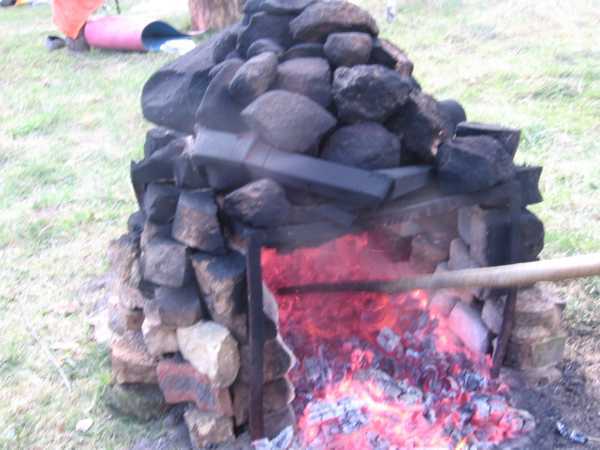
The second method, in my opinion, is more effective, but at the same time it takes more time. Here, initially, a square furnace of large stones was built at the base and a pyramid of smaller stones was built above it.
Further, this makeshift stove for a camping bath is melted and maintained in an active state for about 4-6 hours. Since the dimensions of the firebox itself are often small, a person must constantly be on duty near it in order to throw a fresh portion of firewood into the fire.
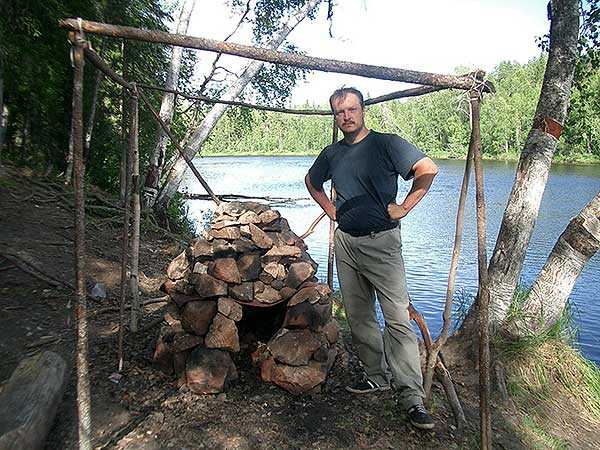
Stone pyramid with a firebox below.
But this method is good because when it comes to an end, you can build a frame right around the stove and even partially cover it. The fire is concentrated in one place and here with a few strokes of the shovel you will completely remove the coals from the furnace.
Moreover, you don't have to scoop up the coal at all, just fill it with plenty of water. Then quickly close the awning and enjoy the bath procedures. By the way, if the roof is made with a hatch or completely removable, then such a stove can be melted several times.
In order not to constantly look for large stones for the construction of the firebox, one of my friends immediately welded a cube from a corner of 35 mm, with dimensions of about half a meter, he installs it in the base of the firebox and lays stones, simply and conveniently.
Furnace based on a metal frame from a corner.
Features of homemade designs
- In any case, a certain amount of stones will crack and crumble, so in order to minimize this percentage, first collect the stones, and then make a fire. There is no need to take a stone from the river and throw it into the fire, believe me it is dangerous;
- Of course, the stones rarely crack after the temperature rises, but in order not to risk it again, you do not need to pour cold water on them. You have enough time, put a bucket of water on the fire in advance, boil it and pour boiling water over the stones;
- Despite the great heat from the fire, the ground near the reservoir is always cool and so that this dissonance does not interfere with your steam, prepare immediately heat-insulating rugs and sit on them;
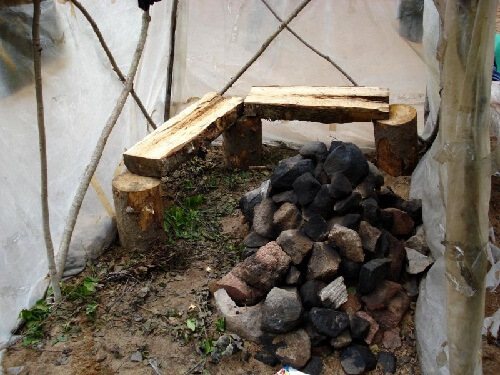
Homemade benches in the steam room.
- Do not expect much from the first call, at the first call the person and the steam room warm up, real relaxation comes only at the second call;
- Experienced sauna lovers know that steam is a kind of temperature indicator. When the stones are well warmed up, the steam from them goes translucent, it quickly rises up and disappears there. If you poured water on the stones and the steam room was filled with a thick fog, this indicates that this call was extreme.
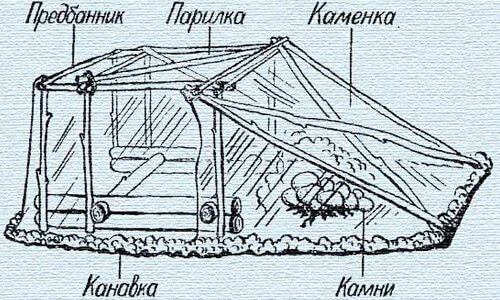
Camping bath scheme
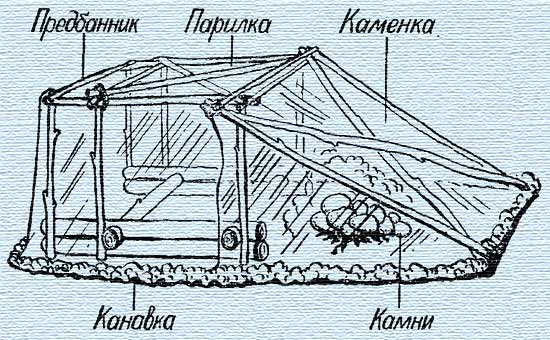
What does the bath consist of?
To equip a portable steam room, you can use a fairly simple design. A primitive heater with periodic heating is installed in it. You will need to make a small drawing of the future structure.
One of the options for a camping structure that tourists or fishermen use to steam in nature necessarily includes a frame made of strong and thick sticks. It should be covered with foil or tarpaulin. Inside the structure, a stove is equipped, which will serve as a heating means.Its size should be smaller than the steam department itself. The steam room itself can be divided into a steam room and a dressing room. For better thermal insulation and creating comfortable conditions inside the structure, logs are laid along the walls.
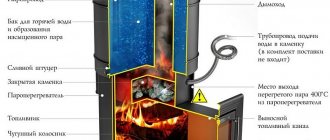
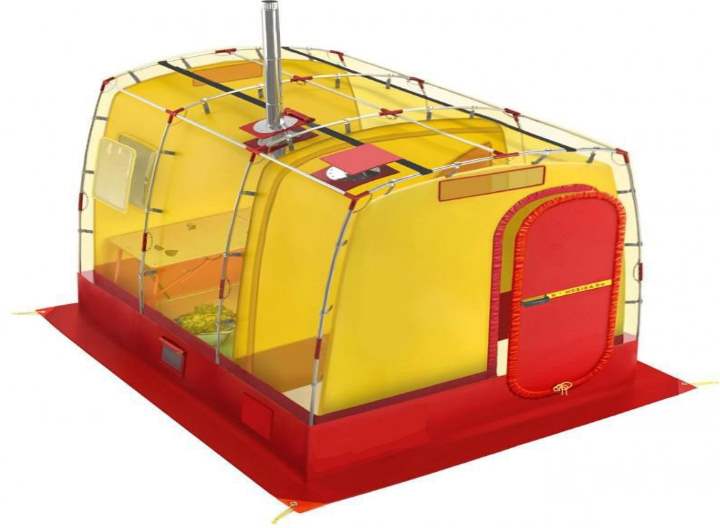
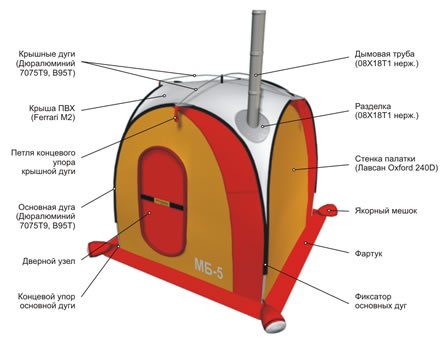
For a homemade long-burning stove, special collapsible tents with a hole for a chimney are used. Particular attention should be paid to the drawing of a homemade metal stove. The dimensions of 550 × 750 mm are excellent dimensions for the construction of a camping furnace. The compartment for laying firewood in height can be made the same as the water tank, but the blower should be half as much.
It is also important for her to make the right foundation. Therefore, before installing the oven, you should dig a small hole 10 cm deep. Its width should be 5 cm larger than the structure itself.
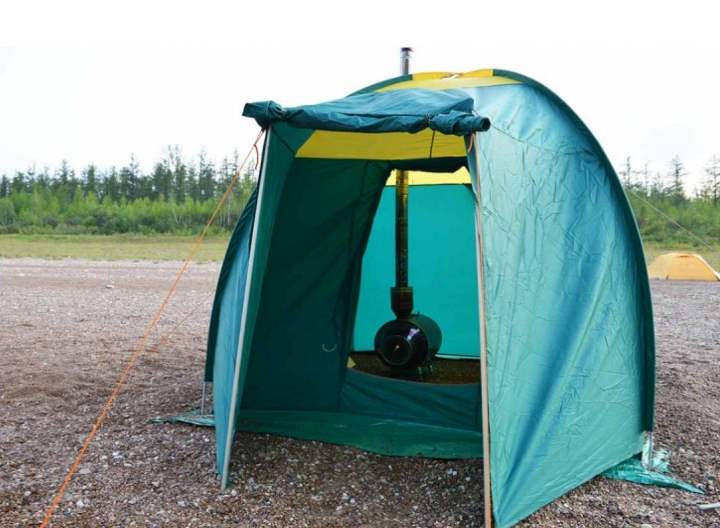
The main feature of such camp stoves is a real sauna atmosphere, which is created by steam and good heating. For this type of baths, you need to purchase a special tent in advance, which has an opening for a chimney. The structure itself easily fits into the trunk of a car and is transported to any place to rest. An improved version of a solid-fuel camping stove for a bath creates quite comfortable conditions for vaping. Even without raising the temperature in the tent much, you can reach a humidity of about 60%.
For the travel option, pyrolysis ovens are also suitable, which are in no way inferior to gas units. You can build it yourself by making a correct and accurate design drawing.
What does a solid fuel stove consist of?
Camping sauna stoves from the store
We present the Top - 3 best models with an indication of their characteristics, prices and advantages.
| Model | Characteristics and dimensions (height, width, depth and size of the chimney pipe in mm). | Dignity | Average price in rubles |
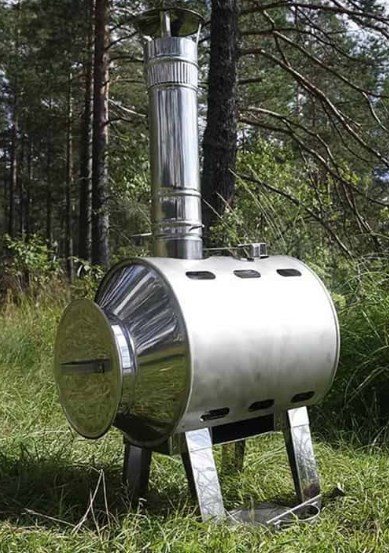
| Stove for a mobile bath from
| Dimensions - 700/280/415/80. The number of chimney pipes, with a length of each segment of 500 mm - 5 pcs. The body is made of heat-resistant steel, 0.8 mm thick, and the protective screens are 0.5 mm. The dimensions of the firebox are 520/195/180. Weight without stones - 13 kg. | The structure has a large margin of safety, which is important for stacking a sufficient amount of stones. Additionally, it can be used for heating the tent, cooking. A special cavity has been made for laying stones. Stiffeners are made to prevent deformation of the thin metal of the furnace parts. | From 10000 |
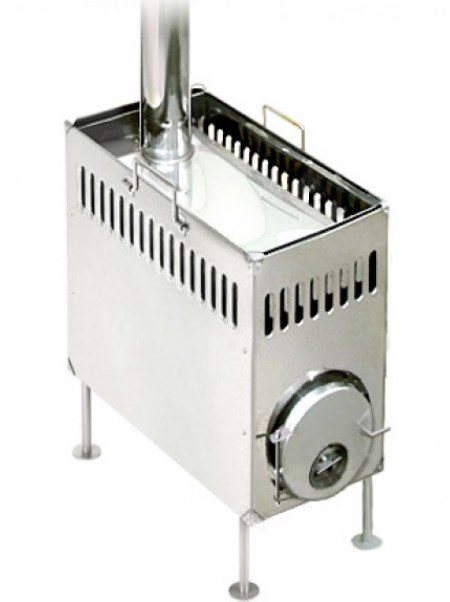
| Kamenka for the mobile bath "Yarilo"
| The operation of the furnace can reliably heat a room with a volume of up to 20 m3. Dimensions - 350/350/400. Weight - 9.5 kg | The multifunctional heater allows you to use it for drying things, heating your tent, preparing food and for installing in a camp bath. Made of heat-resistant steel, stiffening ribs prevent deformation of parts at high temperatures and allow the use of thin steel. The weight of the structure is reduced. Such a stove can be installed on the floor of the bath. If the steam room is very small, you can take the stove outside and heat the bath with a separate air duct. Can be used far from civilization in the absence of gas supply and electricity. | From 13000 |
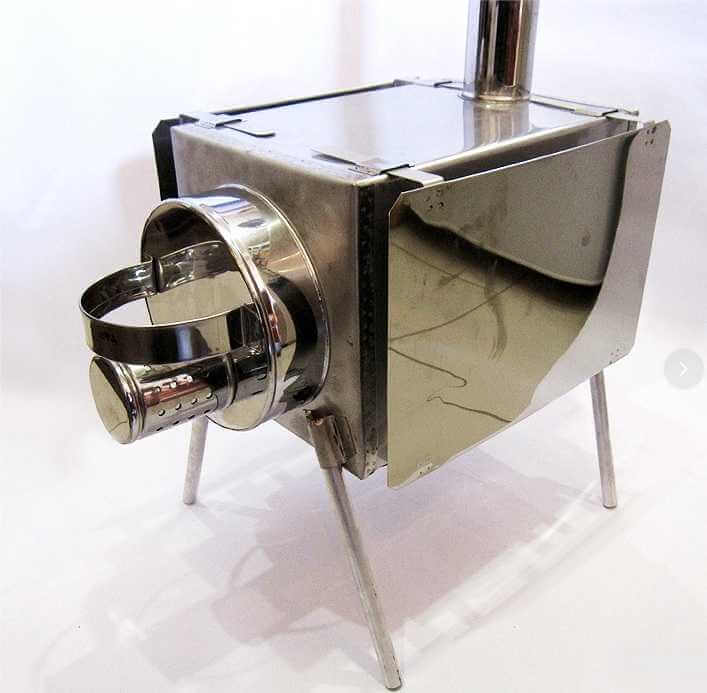
| Mobile oven, model "Sonita". Company
| Dimensions - 650/470/300/90. Weight - 19 kg. The material of the walls and the furnace compartment is heat-resistant steel. The set includes chimney pipes. | The stove is equipped with a slide gate, when it is closed, the combustion time of 1 firewood bookmark increases. It can be installed in home-made and industrial mobile baths. High level of fire safety. The multifunctional design can be used for heating rooms, tents and for drying clothes. | From 14000 |

Material for making a camping bath
For mounting the frame, you can take wooden, aluminum or carbon fiber racks.Better, of course, to use pre-prepared poles made of fire-resistant material. But if we are talking about field conditions, then thick branches are suitable for the construction of a disposable frame.
If you do not plan to install a camping bath in advance, then you can take ordinary plastic wrap to cover the frame. In order for the steam room to be a success, you need to guess with its size or make small calculations before the trip, starting from an area of 6 square meters. This amount will be quite enough to create a good steam room in nature.
It is also worth preparing firewood and stones in advance. Dry wood of medium thickness is suitable for a camping bath. It is better to take different stones - rounded and with sharp edges. To create a heater, you need a lot of them to ensure good heating and sufficient steam. But layered and flat stones should be discarded immediately.
Important conditions
A camping bath can be made only under certain conditions. The resting place must meet the requirements below.
| Photo | Terms | Description |
| The presence of a reservoir is an important factor | First of all, there must be water. | The ideal option is to choose a place on the banks of a river or other body of water. |
| Stove stones | There must also be stones. | Do not use layered cobblestones, as when heated they can fly into pieces, causing serious injuries to the hover. The stones should not be too small or too large, the optimal size is 100-120 mm, the shape is somewhat elongated. If the stones are smaller, they will not be able to accumulate the required amount of heat and will cool down very quickly; large specimens will heat up for a very long time. Although, if you have time, you can build a kind of foundation for a future fire out of large stones. If there are no boulders, then it is quite possible to use pebbles. As for the quantity, for each person who will be steaming, 1 bucket of stones is required. Therefore, each participant is obliged to collect a bucket of boulders for himself. |
| Frame material | There should be thin young trees (or even better dead wood) near the resting place, which will be used for the construction of the frame (if the aluminum posts were not prepared in advance). | From these trees, you need to make poles with a diameter of about 30-40 mm, you should also think over the way of their fastening in advance. |
Firewood | A fire will require firewood, and in large quantities, because it will burn for at least 3-4 hours. | Too thick logs are not suitable for this, since they do not burn well. The maximum diameter of the firewood should be 100-150 mm - so they quickly burn out and transfer all the heat to the stones. |
Features of creating camp stoves
Despite the fact that you can buy heating elements for a mobile bath in a store, many people prefer to create a stove with their own hands. The main feature is the correct choice of materials. This will make the sauna not only practical, but also safe.
How to heat a camp stove
| View | Features of the |
| Special attention should be paid to stones. | If some need to be heated to white, others should be red-hot. And only after that you can start bathing procedures. |
| Be careful what kind of wood you are going to use. | As for firewood, the prohibition here is the use of construction timber or cuttings of sleepers impregnated with special means. Such actions will lead to the release of harmful substances during vaping and, accordingly, poisoning of the body. |
For better heat preservation in the tent, you need to spread a sheet of iron under the stove.
To ensure the most comfortable conditions, you also need to choose a good place in advance. Flat terrain with a high level of soil density is excellent, since soft or loose soil will not make it possible to build a reliable and durable bath frame.
Features of the operation of the field bath
When installing a field bath, you must choose a flat landscape with dense soil. An additional pleasure will be delivered by a reservoir located near the installation site.
If you have decided to organize a field bath with your own hands, then you will need a set of tools: a shovel, an ax, a hammer, scotch tape or rope.
If you have a tent bath from the manufacturer, use the installation instructions. In the instructions, you will find the procedure for a correct and safe installation.
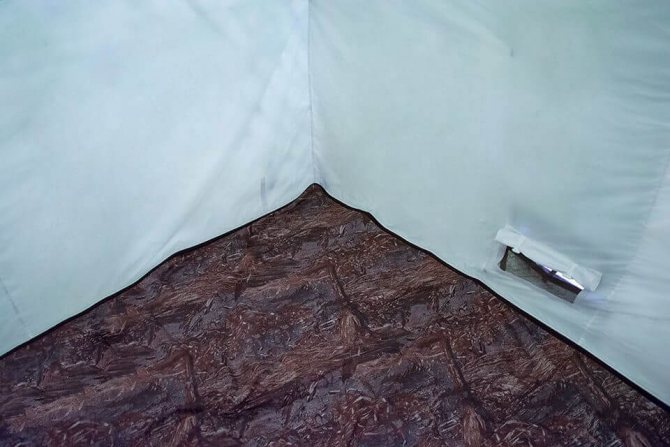
For insulation in the cold season and maintaining a high temperature, it is recommended to use an internal bath tent. When organizing a bath on your own, laying coniferous spruce branches with foliage (birch or oak) on the floor is suitable.
Installing the stove
Depending on what kind of stove you decide to make for the bath, the installation process will depend. If we consider the heaters, then the work should be done as follows.
- Remove the top layer of soil, which will allow you to securely and firmly install the stove.
- Then prepare the stones. They can be laid out in the form of a large slide and overlaid with firewood. Or alternate cobblestones with prepared wood.
- The next step will be the creation of the most marching design of the bath.
Special tents are sold for a homemade metal stove with a chimney. Here it is worth taking care of the safety of people in the bathhouse, since a camping steam room, even in nature, provides for working with fire. Therefore, when melting the stove, it is important not to overdo it with fuel, so that fiery flames do not jump out of it.
To relax in nature, people came up with a camping bath, which has a minimal set of functions and has a completely simple design. Choosing between buying special new equipment and creating a furnace structure on your own, it is worth weighing the pros and cons.
If you are planning a one-time trip to nature, then it will be enough to build a primitive hiking steam room on the spot and not spend money on buying store products.
Option for building a mobile bath from a bar
The most reliable option is a mobile sauna from a bar. You can do it according to the following scheme:
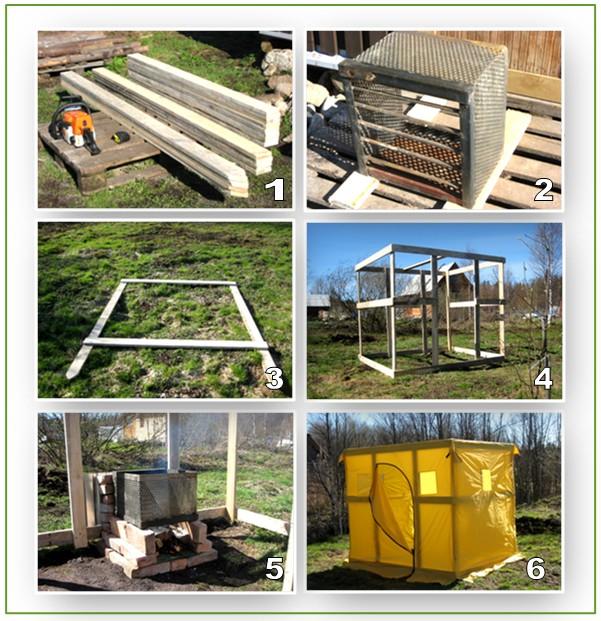
Stages of construction of a camping bathhouse on a solid wooden frame - an ideal low-budget option for a summer residence
But the simplest and most proven option is a strong and comfortable camp bath with a stove. Its cost, together with sewing and accessories, is three times cheaper than the store one, which is also smaller in size. And the money earned can be spent on a good camping stove, high-quality stones and, of course, meat for barbecue.
The bathhouse made according to this project can accommodate 8 people - and there will still be a lot of space due to the inflating of the bath with hot air. And such a bath can even be safely used as a quickly deployable rain canopy, which cannot be done with the store option.
So, its width - 2m, height - 2m, length - 2.5 m, weight - 1.9 and folded dimensions - 40x20x20 cm. But what is needed from the materials:
- Slings 50 mm 0.5 m long and 25 mm 2 m long.
- 2.5 meters of braid 15 mm.
- Reznik (2 cm) - 2 meters.
- Lavsan or nylon threads - 1 spool.
- 7mm zipper with two-way pawl, 2 meters.
- Polyester cord - 16 m.
So, all the pieces of the pattern need to be sewn with nylon threads with a double seam - first the details of the walls, then to them the lower dumps, which are not sewn with themselves in the corners. The latter needs to fit the roof, zipper and connecting tape. To make guy loops, you need to fold in half a 50 cm piece of a 25 mm diameter slings and a 12 cm 5 cm wide slings, as shown in the diagram. A cord should be tied to the most extreme loop, which will stretch and secure the bath awning.
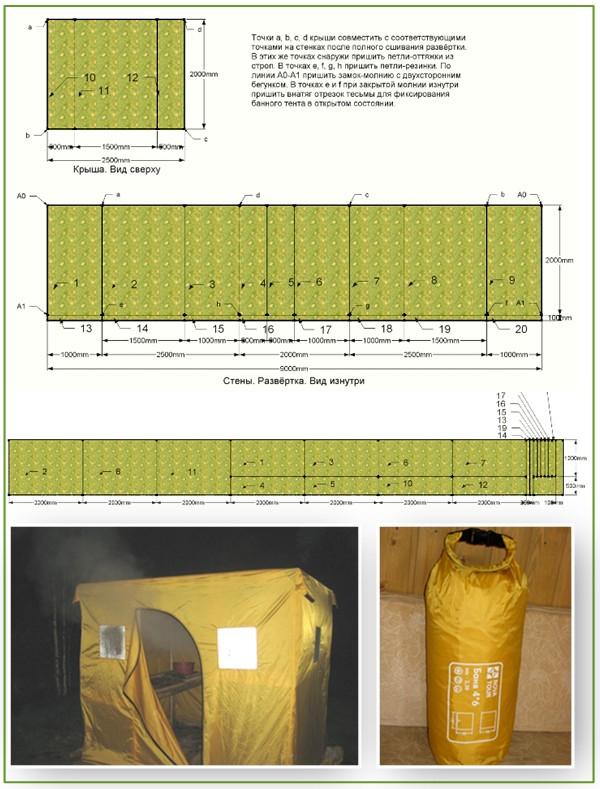
Cutting fabrics for making a camping bath
Now you need to make elastic loops - from a piece of elastic folded in half and sew them in the lower corners of the awning.In the resulting middle upper loop, when installing the bath, the upper ends of the posts will be inserted. In addition, the elastic bands themselves can still be pulled directly onto the pegs, without even threading the columns into them.
It remains to sew a beautiful and comfortable cover for a new camping bath, and you can go on a hike.
The main stages of the device bath from improvised means
This chapter is a kind of instruction on how to make a bathhouse in field conditions, and by completing each of the stages, you can easily take a steam bath even far from the benefits of civilization. The requirements are quite simple, however, the reliability and convenience of the structure depends on their fulfillment.
Seat selection
At this stage, the following factors should be considered:
- The soil at the site of the construction must be sufficiently dense, especially if a frame of stakes driven into the ground is to be erected. It is impossible to build a reliable structure in soft ground.
- It is best to choose a place near the pond - after the steam room, it is pleasant to plunge into the cool water, in addition, in the wild, this is the only way to wash.
- The stove for a camping bath is built of stones, so it is worth examining the area for their presence. Carrying boulders per kilometer is not very reasonable, and even difficult.
The stove requires a lot of weighty stones.
Stove construction
Perhaps the most crucial stage, which determines how good the steam room will be.
To achieve a good result, you should follow a few simple rules:
- In the place where the stove will be located, it is necessary to remove the soil layer and lay out an improvised foundation from the stones.
- The stones should be oblong, the surface should be smooth and uniform without foreign inclusions. The size of stones is from 20 cm and more, as you know, the larger they are, the longer the heat stays.
- The construction of the hearth can be carried out in two ways: alternating layers of stone and firewood and subsequently supporting the flame or laying out a kind of hearth with a diameter of about 70 cm and the same height. Space is left inside for laying firewood, and a flat stone is laid on top. So that you can put a bucket of water on it for heating.
- After finishing the laying, you can make a fire, since an improvised stove for a camping bath heats up for a long time - about 4 hours, until the stones are white-hot or red-hot, depending on their type.

If there are steel pipes or other elements, the hearth is much easier to make.
Frame device
A bathhouse in field conditions is constructed from any available means that provide the necessary reliability of the structure. It's a good idea to have a ready-made metal frame of the right size - this greatly simplifies and speeds up the process.