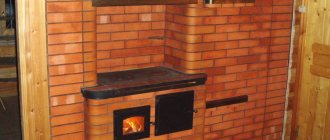
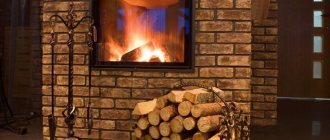
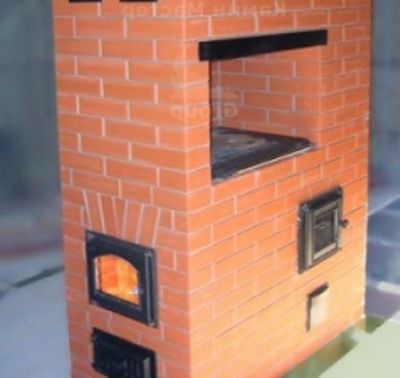
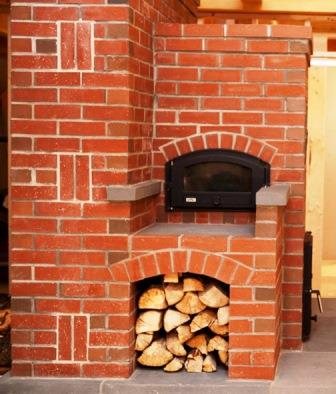
The housekeeper stove is essentially a modified concept, familiar to everyone - Russian. The difference lies in the combustion chambers, if the Russian device has one chamber, then the housekeeper is conventionally divided into two halves: one of them consists of 2 heating chambers of different sizes. The upper part has a hob and vault. From this article, you will learn how you can build with your own hands, relying on the guidance of the drawings and the recommendations of specialists. You will also be informed about the main functions and technical characteristics of the furnaces.
Device and functions

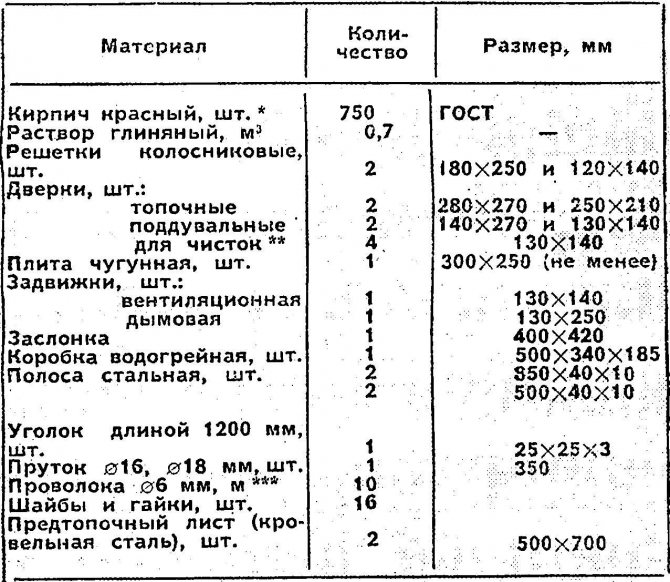
Depending on the thickness of the seams, the dimensions are approximately 1400 * 890 * 2240 mm. The outstanding feature is the ability to warm up over the entire height, starting from the floor. In this case, the temperature spread will be only a few degrees. In addition, an attempt is made to implement several advantages at the same time.
The presence of a cooking chamber, as in an ordinary Russian one, - two fireboxes of different power, a cast-iron stove, ventilation and moderate dimensions. Use the crucible and both fireboxes for cooking. Moreover, the first is used in the summer, avoiding unnecessary heating of the room. The greatest thermal efficiency is achieved when using the main firebox, and the second one can be heated or heated. You can install a hot water box, and the device will change.
Advantages and disadvantages of using
With the help of a housekeeper oven, you can maintain a comfortable temperature in the room at different times of the year. The main advantages of using such a device in private houses are:
- low fuel consumption for space heating;
- complete heating of the air in the room;
- the ability to simultaneously heat the room and cook food;
- the stove can be heated with any type of fuel.
The device is equipped with auxiliary ventilation ducts, due to which the odors emitted during the cooking process do not enter the room.
The disadvantage of using such a furnace is the need for constant cleaning of ash pans, as well as a relatively long heating of the furnace. Logs of the same length are required for kindling the equipment with wood.
The main differences
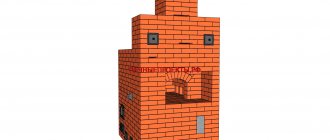
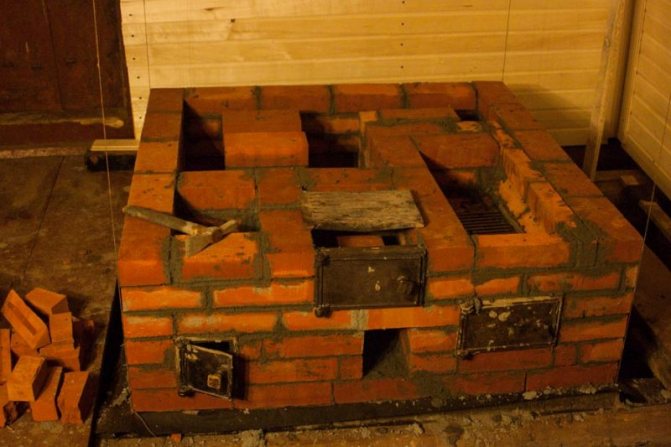
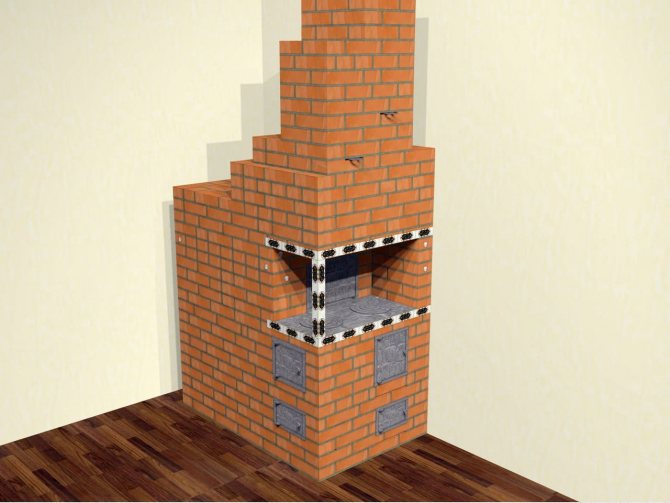
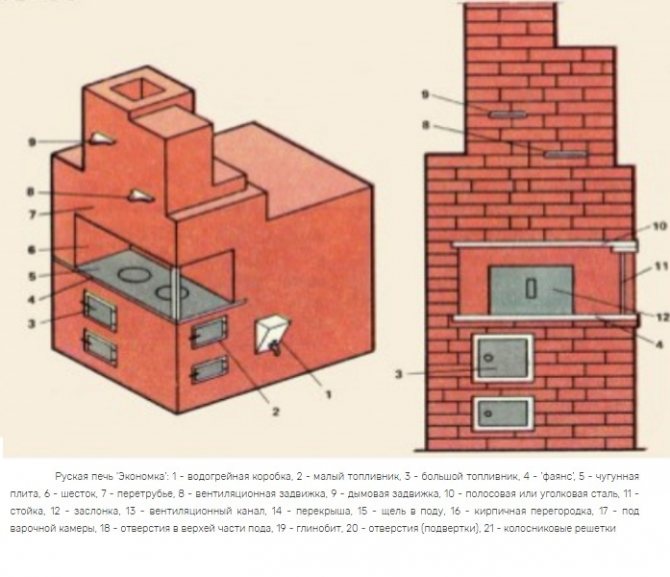
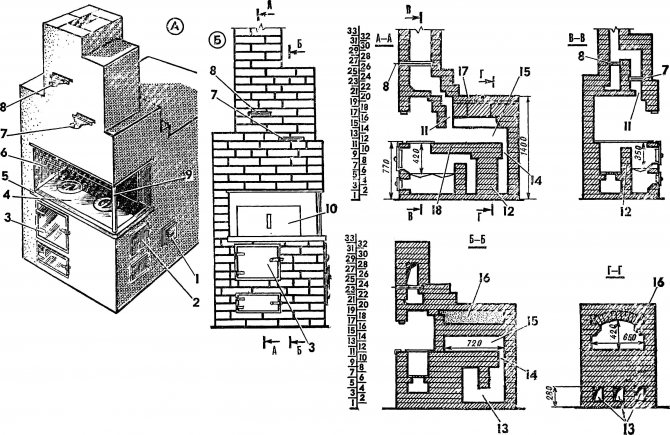
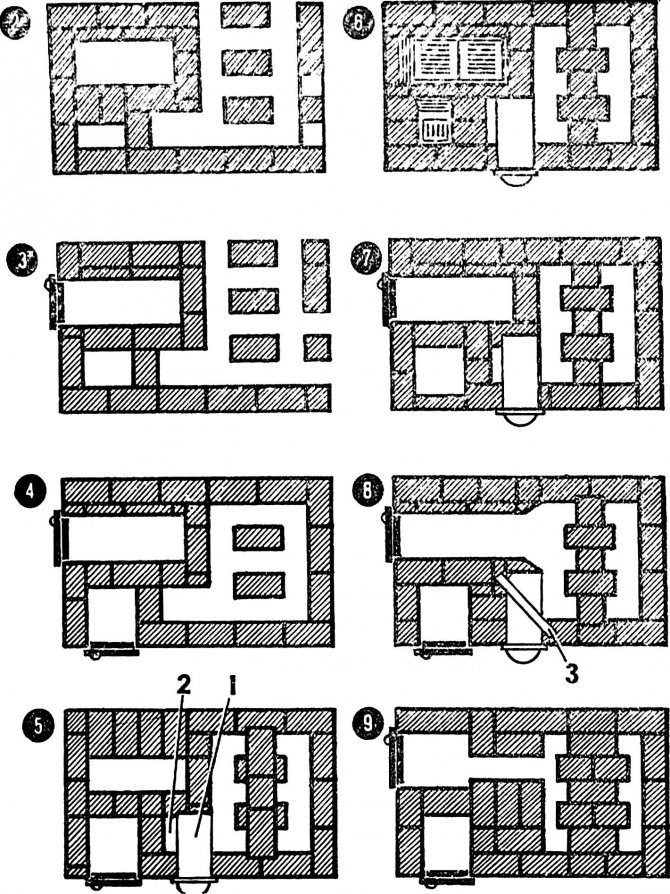
Both lower combustion chambers (2 and 3) have their own grates and doors, above them there is a cast iron plate (5), with concentric rings. Combustion products move along the path: a small firebox, a large one, after the turn of the heating and cooking chambers. Access to the space, called the sixth, is open from two sides. The hanging angle of the overtube is supported on a support from an angle or pipe (11). To strengthen the outermost pole, a metal corner is used, which is called faience (4 and 10). A 25th corner of 3 mm thickness is used, which, like the doors, is desirable to be walled up in the seams with the help of a wire. The cooking space can be closed with a shutter (12) with a handle.
On the front side there are valves for closing the smoke and ventilation ducts in the pipe. The latter begins above the pole, making it possible to remove odors arising above the stove and ventilate the room. The heating cavity is divided into two sections. The partition (16) consists of 3 separate columns, forming the so-called sub-folds (20), measuring 12 by 21 cm and a solid wall. The hot smoke, passing through both sections, cools down and goes out into the hearth slot (15), into the cooking space. Passing and heating it, the gases move to the brow, where they go into the pipe.
Specifications
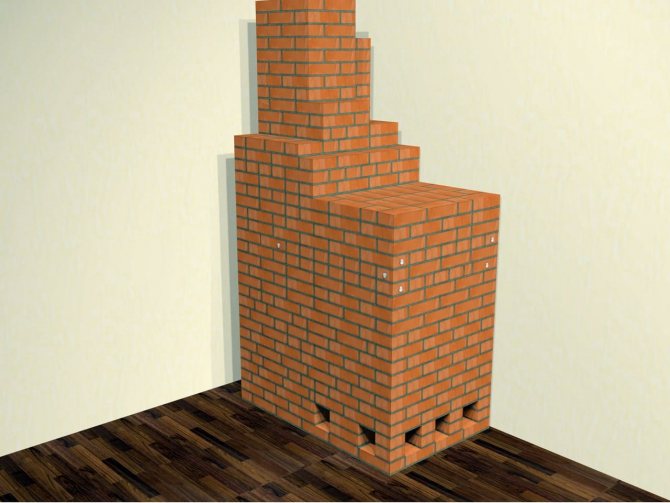
In terms of appearance, the classic and the economical oven are quite similar. The masonry process is also not much different.The secret is in the design and choice of materials that will minimize heat loss. The modified furnace consists of several chambers connected by a common channel. Thanks to this feature, heat is not lost, but concentrated below. The cooking chamber is equipped with a shutter and can be used for cooking. There is a pole open on both sides, along the contour of which a strapping called "faience" is made from a metal corner.
It is placed on the lower and upper parts. To strengthen the structure and provide protection against destruction, it can be reinforced with pipes or a metal frame. As a result, such a furnace efficiently consumes thermal energy and requires a small amount of fuel. Any raw material for heating is suitable - the main thing is that it is solid. Subject to all the rules, heating will occur evenly and smoothly, which will eliminate cracks in bricks and clay burnout.
Ordinary masonry plan
In the first layer, the bricks around the perimeter are taken whole, the middle can be filled with halves and fighting.
In the second, the columns of the partition, cleaning windows and blowing out of the larger of the fireboxes should be laid. The lower edges, at the outlet of the ash pan, are best cut for easy cleaning.
The third layer - the door of the mortgaged ash pan and doors are installed. To increase the volume, you can lay the ash pan of a small furnace, or you can do this in the next row. (cleaning doors are not indicated on the diagram)
Fourth - installation of the small firebox door. We close the cleaning holes. If you decide to replace the doors, leave the windows open until the end of the masonry. At the end of the work, you can finally clean up the remains of clay and lay them in protruding halves. It will be easy to find holes along the protrusions.
Fifth - the barrier from the columns becomes solid and connects to the walls. The door of the large blower is closed, and the perimeter of the large blower is reduced before installing the grate. At the moment, under the partition, twists should form, through which the smoke will flow from the first section to the second. To increase the mass that accumulates heat inside, the partition is lined with bricks lying along and across.
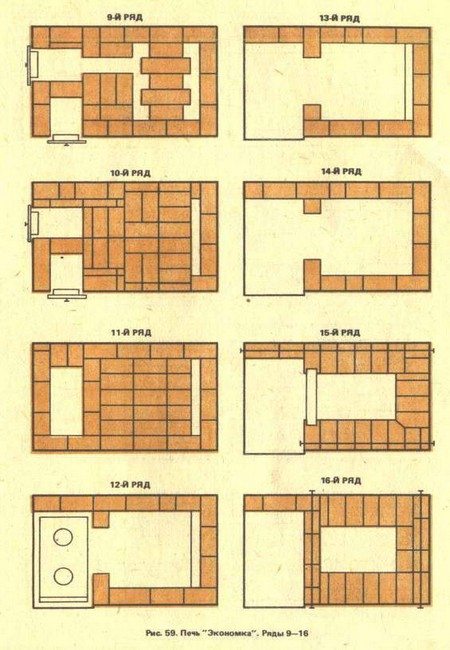
All grates will be laid in the sixth layer, and they will slightly overlap. The front and rear overlap of the small grate, it is desirable to make beveled, this can be seen in the diagram. Thus, the coals will roll towards the center, which will make it easier to burn even damp firewood in a small firebox.
In the seventh, a large door is placed, and the 8th is small and, with the help of cut edges, an expansion of the chimney is formed, towards the heating partition.
In the ninth, the outlet from the firebox narrows, overhanging the previous river.
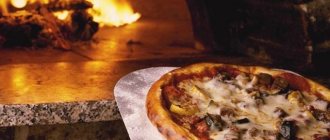
In the next, the outlet path is overlapped from above, along with half of the heating chamber. In fact, this is the first layer of the double bottom of the crucible itself. We leave the gap open through which the smoke will enter the cooking room. It will stretch from one wall to the other, and it will be a quarter wide. On the side cut, you can see that underneath, it consists of two layers laid flat. It is supported by masonry above the folds. When using it for cooking, it should be heated like a Russian, cleaning underneath if necessary. If the main firebox is lit, the cooking chamber and stove can be used. It is noteworthy that a smaller furnace burns fuel more vigorously, while being less demanding on it.
Then you can close the doors of the fireboxes and put a second continuous layer, leaving a gap.
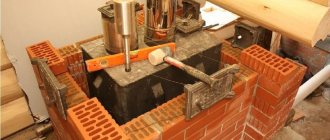
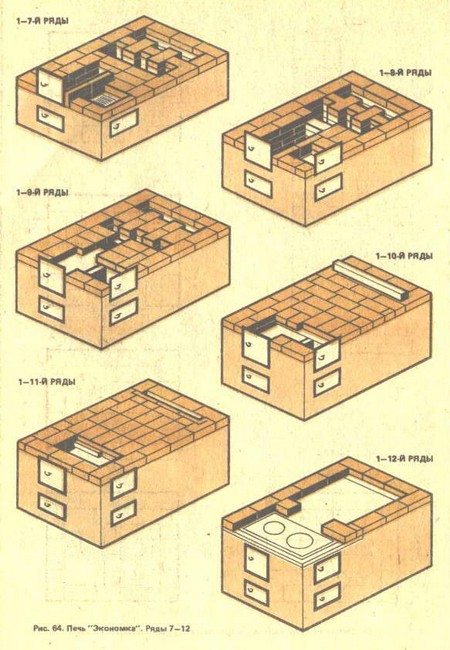
12 - we lay the cast-iron plate on a thin layer of clay, and reinforce both ends of the pole with a metal corner. Conditional "cheeks" are laid.
The 13th and 14th are completely ingenuous, a link is made. In the next one, for reinforcement, in longitudinal layers, along the edge, tapes or wire with washers or threaded ends at the ends are laid. The brow itself is covered with a metal corner, and not an arch for simplicity.The lower ribs forming the taper can be trimmed.
The 16th fits in the same way, but this time the reinforcement is done across, and the forehead is overlapped in metal. The second row of constriction lies uncouth
17 is very similar to 15 and also has a metal bond. The upper "faience" is installed on a pipe or other support. It is easier to start with a slope when starting to create a vault, rather than combing each rib. The shape itself should be chosen domed, in view of the geometric strength. At the same time, it is still advisable to strengthen the supports of the arch by laying additional rods or a tape, like the sixteenth. Fill the voids between the wall and the dome with adobe, which consists of thick clay mixed with debris and sand.
This is how it is advised to lay the 18th row. Under the spoon side of the first stones of the arch, adobe is also laid, and on the metal reinforcement of the overtube, the first units are laid.
In the 19th, the vault is closed, but at the same time four or more holes are preserved, which subsequently flow into the collection path of the 20th. He is the mentioned collecting channel and the narrowing of the overtube. Its width is reduced from 25 cm to 18 cm, and the right corner is locked with a lock.
In the 21st, the prefab takes on a form that unites it with an overtube. A ventilation hole 7 by 25 cm is immediately laid.
In the twenty-second, the section decreases, it is better to cut the ribs. The ventilation duct becomes half a brick.
23 - there is a displacement to the back wall.
24 - a ventilation damper is laid.
25 and 26, prefabricated, narrows and turns into a chimney.
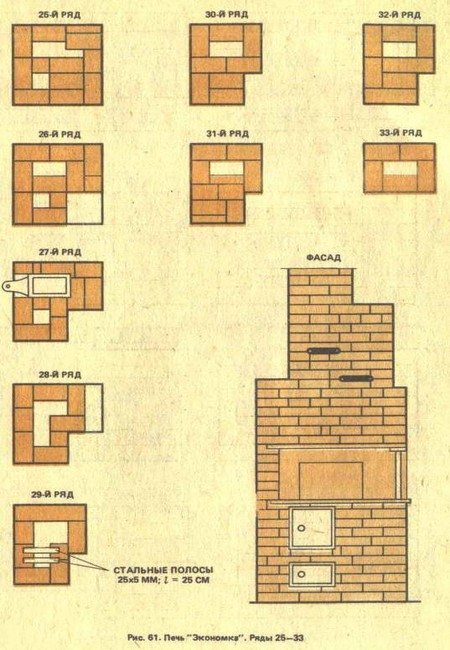
27 - smoke valve.
28 - paths are merged.
29 - the ventilation part is covered with metal strips.
30 - 33, a three-row plug is installed above the ventilation duct, in accordance with the fire safety requirement. The chimney takes on a cross-section the size of a brick.
The profile of the latter goes to the ceiling, after which a fluff is arranged to pass through the ceiling. The thickness of the wall of the fluff can be at least one and a half bricks and rise above the level of the attic floor by 25-30 cm. You can continue the pipe from other materials, however, be sure to use non-combustible insulating materials. I would like to warn about the presence of orders in the network that have errors. You should first comprehend the logical compatibility of the entire masonry.
Preparation for work
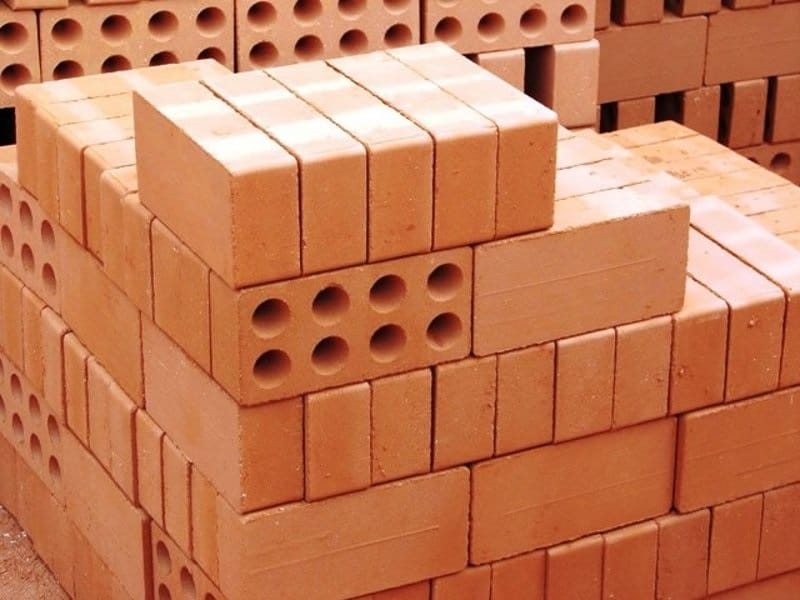
Get started with your own hands by completely re-sorting all the bricks. Set aside the even and smoothest bricks for the hearth, vault and fireboxes. Separately set aside bricks with obvious defects, they will be cut. Bevel all masonry bricks along the face edge.
Start by completely re-sorting all the bricks. Set aside the even and smoothest bricks for the hearth, vault and fireboxes. Separately set aside bricks with obvious defects, they will be cut. Bevel all masonry bricks along the face edge.
Before preparing the solution, you need to soak and grind the clay on a sieve. It is convenient and easy to grind an already liquid consistency, so soak the clay in advance. While the clay is gaining the desired moisture, you will do the rest of the preparations. When preparing the solution with your own hands, you can use a medium power drill, 600W will be enough... ... Install a dedicated mixing attachment into the power tool. Sand for the preparation of a high-quality solution must be sieved. Also prepare several containers for mortar and for pre-soaking the brick: raw brick is placed better and takes moisture from the mortar. As a last resort, simply dip each brick in water for a few seconds so that air bubbles come out of the pores. Ordinary buckets are suitable for carrying the solution and direct work on site, for mixing it - a large tank, trough, bath or something like that.Prepare latches, doors and other glands immediately in place. Examine them for burrs, grind if necessary. Prepare enough asbestos cord to install the valves and doors.
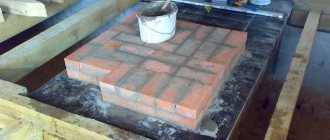
Foundation
It has been said many times that it is imperative to arrange a foundation for any more or less capital heavy structure. The process of installing it with our own hands will also be referred to as preparatory work. Since after pouring or laying out (you will pour or lay it out of stone or brick - it does not matter) enough time must pass for the solution to harden and approach the tensile strength. Under the stoves, an economical foundation is arranged in the same way as under the Russians - solid, with indispensable deepening. You can dig in iron pillars in the corners or pour them separately, but the depth of immersion in the ground should be not less than 50 cm, otherwise the construction may lead. A slab is poured onto the poured pillars from above. from 10 cm, it must be reinforced and ironed with dry cement after leveling the surface. After the foundation has dried, after 8-12 days, you can already start laying the stove with your own hands.
Foundation
The integrity and strength of any structure largely depends on the foundation. As in most cases, it should be laid under it to a depth of about 50 cm. Dimensions are increased by 10-25 cm on each side and standard layers are filled in. Sand, crushed stone and ramming, water spillage. Pouring with cement with rubble stone or other filler. Dry and hard soil will allow the use of more solid brick and battle, provided there is good waterproofing. If the soil is malleable, then a more rigid base is needed, possibly with reinforcement.
Drying
For drying, put a maximum of 2 kg of firewood in the combustion chamber, ignite from and after burning out, remove all the ash and the rest of the firewood from the firebox and ash pan. After the surfaces have completely cooled, we repeat the work. So we make up to 3 drying operations per day for 3-4 days.
The first time you burn the wood, the stove will smoke a lot. Do not be alarmed, this will evaporate moisture from the ceramics and burn out dirt and grease from the surfaces of the hob and other metal parts. All doors and windows in the room must be open.
On the second day, we begin to examine all surfaces for defects and places of passage of smoke. When found, these places are cleaned of mortar and sealed with fire-resistant sealant and chamotte clay solution.
Materials (edit)
The composition of the mortar on which the masonry will be laid should not be underestimated. Naturally, the easiest way is to buy a proven dry masonry mix. But if you are forced to save money, you will have to study ways to determine the fat content of clay and the mixtures necessary for masonry. Don't overlook the fact that you will need three different formulations:
- Durable, heat-resistant with fireclay, in the area of fireboxes.
- Moisture and chemical resistant, limestone for smoke passages and chimneys.
- Strong and elastic at the same time, clay for the base.
Methods for determining the fat content of clay by dried balls, the degree of sticking to a stick or throwing cakes are easy to find on the net. The thickness of the seams should be within 3 - 4mm. The masonry will be more stable, and the chances for the solution to crumble are much less.

Brick should also be given its fair share of attention. Not every clay is suitable. In short, really fit can be identified visually by the way it is produced.
Building
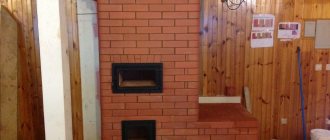
The Russian stove housekeeper is not the simplest device, but it is quite affordable for DIY construction. High-quality ordering with a description of each step will allow even a novice master to complete all the work without any problems. The difficulty lies in understanding how the oven works, the features of the device, the purpose of each node. The Podgorodnikov's 4th generation furnace is complicated only by the fact that a bottom-heated chamber appears on the path of the gases.In other respects, the concept corresponds to the classics. As part of the nodal elements, a small firebox, a large firebox, an ash pan, grate bars, cleaning doors, a hob, a vault of punishment, are distinguished.
The ordering scheme is easy to find in an accessible form. There are ready-made projects in which all the preparatory stages are described, calculations are made, financial costs. It should be noted that there are several options for the construction of a heating plant. They have minor differences, but it is impossible to dismantle the project, since the schemes are not interchangeable.
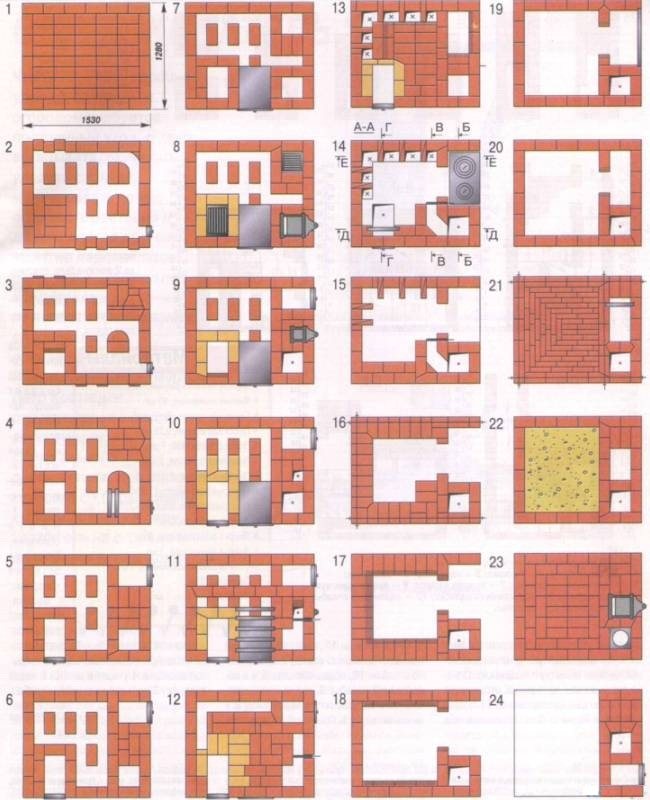
Ordinary laying of the Podgorodnikov stove
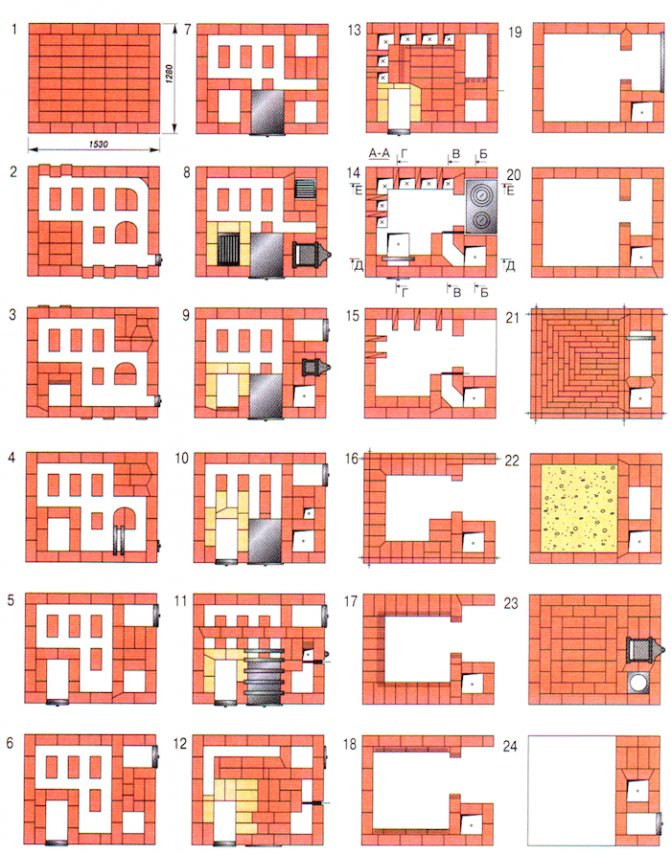
- Row 1 is the base of the future oven. It is enough to cover only the outer perimeter with facing brick. The interior can be filled with halves or smaller pieces of red brick.
- Row 2. The outer walls are made with obligatory dressing. You can observe the appearance of the channels of the lower chamber. The opening formed will be used to install the blower door.
- Row 3-4. Since the project was created on the basis of the author's rich experience, all design features are due to a certain theory. It is not always appropriate to provide this theory in the project. So, for some reason, some corners in the channel of the lower chamber are made rounded. A zone is separated, which will act as an ash pan.
- Row 5-7. Preparations for closing the channel begin. In row 7, it is already covered.
- Row 8. The slope of the wall is performed by cutting off the edges of the bricks located above the blower. The grate is being installed. It is important to take into account the thermal expansion of the metal, therefore, a small gap should be left between the grating and the masonry.
- 9 row. In the back of the firebox, the bricks also have cut edges. This procedure is carried out to distribute the fuel on the grate after loading. Doors are installed.
- Row 10-12. The hot water box overlaps, and the walls of the cooking chamber begin to form, a large firebox is formed.
- Row 13-16. The cooking chamber has a characteristic vault. It is made of bricks laid on the edge. Small brick wedges provide an inward slope.
- Row 17. Construction of the vault is nearing completion. For more convenient work, formwork can be installed before forming the arch. If it cannot be removed after the completion of the work, then it will safely burn out at the first kindling.
Good to know: How to build your own muffle furnace for your home
The formation of the chimney does not require comments, so we will not describe these steps.
Forming technology
- semi-dry pressing
- plastic molding
- slip casting
- raw atmospheric drying, etc.
- We are interested in the second option. You can distinguish it by the expressive traces of cutting raw materials, transverse risks and grooves on the verge called a bed. This molding is similar in appearance to clinker. However, it is heavier and more expensive and therefore less attractive.
- From clinker, you can fold a base for a heavy structure or a mini-oven, which will have good temperature inertia.
- At the stage of preparation, it is worth sorting the stone by quality, smoothness and integrity. Put all rejection on the base and lower layers. Spoon surfaces that will be inside the channels can be additionally processed by cutting off irregularities or protruding small fragments.
- During the installation process, each unit must first be soaked in water for about 20 seconds.
- Of course, places subject to high temperature loads should be lined with fireclay. These can be the walls of the furnace, the beginning of the smoke channel and the partition. Purchasing chamotte will not be a problem now.
Some rules for making a stove
In order for the stove to turn out good and last a long time, before building it, consider:
- the materials you use must be of high quality. Skimping on good-quality components, you run the risk of providing yourself with long and frequent repairs;
- nevertheless, it is better to use the instructions for making the oven. The experience of the master will save you from mistakes and unnecessary expenses during construction;
- the first time after construction, be especially careful - you might not keep track of something during the work. Other malfunctions can only come to light during operation;
- observe safety precautions. You can get injured during construction. Be careful and don't take risks.
In general, the stove is safe enough for the home and its inhabitants. Spontaneous combustion from sparks or fallen out coals is practically excluded, even if the stove is used incorrectly. And even a beginner can cope with kindling - the stove is very simply arranged.
Source: PechnoeDelo.com
Using the "Housekeeper"
For predictable results of use, you should know:
- Do not light both fireboxes at the same time, since the performance of the larger of them can lead to smoke of the smaller one, through the rings of the stove and leaks in the door.
- If a fire is lit in the main firebox, the small door and the blower should be tightly closed. You will avoid the rapid consumption of firewood and will be able to regulate the combustion.
- During combustion, the damper must be closed, and when opening, the ventilation damper must be opened. This minimizes the possibility of smoke and gases entering the room.
- Effective use of the “crucible” is possible after a good warm-up. You can put the dishes on the underneath in 5-10 hours. For baking, you will need to determine the heating of the hearth surface. If a pinch of flour thrown on it turns brown, the temperature is right. White or black will indicate overheating or vice versa.
Rules for the operation of the "Economy" stove with a front firebox
When operating this stove, it is worth remembering that you should not burn fuel at the same time in both fireboxes. When you use one firebox, the second one should have a closed blower and firebox doors. The stove is always fired with a closed damper. If you need to open the damper during the firebox, then you should first open the ventilation damper. It is worth using the upper chamber for cooking only after the firewood has flared up well, that is, this should happen 8-10 minutes after kindling. Boil food in the upper chamber - on the hearth, it is worth for several hours after the furnace is fired - after about 10-12 hours. For baking bread, the stove is heated in winter: fuel should be burned in the main firebox. The view is covered by the end of the firebox, and when only coals remain in the firebox, the view is completely blocked, and the ventilation valve is left open. The oven is left in this position for 15 minutes, after which the bread is put into the oven. The readiness of the hearth is checked by throwing a handful of flour on it. If the flour almost does not change its color, then the heating of the hearth is insufficient. If the flour turns black, then it is overheated, and the chamber should be slightly cooled. The brown color will help the hearth warm up normally.
Similar articles:
- Brick oven with a bread chamber: an interesting building for the house
- Russian stove with a stove bench made of royal brick: step by step construction
- We build a two-story structure of a fireplace stove
- Russian stove "Teplushka": we build in a wooden house