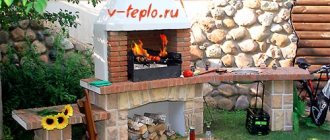
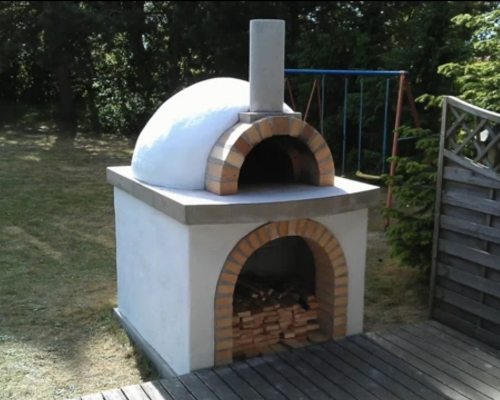
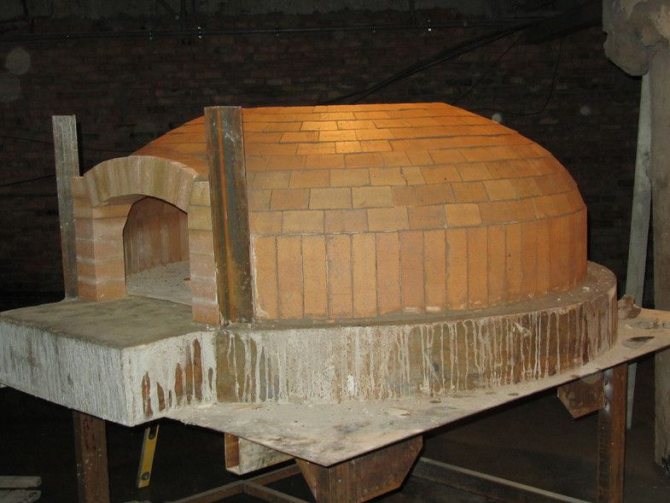
After trying real pizza, my number one task was to build a Pompeian oven with my own hands. I will not say that it is easy and simple, but I will explain in detail to you how to build such an oven on your site and what is needed for this.
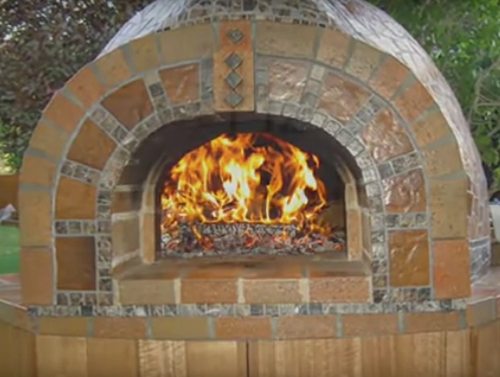
Real pizza can only be made in a wood-fired Pompeian oven.
Preparatory stage
I want to immediately say about several important points:
- A modern pizza oven can be electric, gas, but it is in the wood-burning oven that it works best;
- It is a mistake to think that a Pompeian clay oven is built with one's own hands without special costs. The base of the structure is laid out of refractory bricks, which are quite expensive, and only then coated with clay;
- Building such a furnace with your own hands is a long process, it will take at least 2-3 months. It is better to build in the warm season;
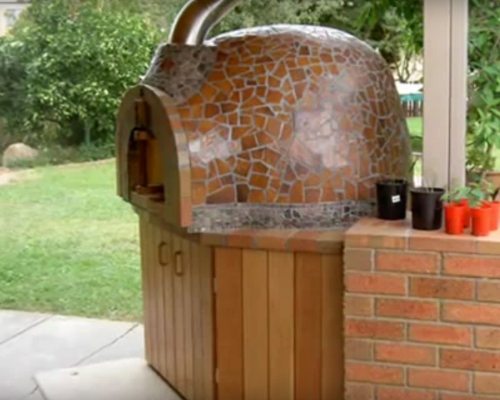
- It is advisable to provide for the oven to stand under a canopy.
Tool
- Tile cutter, preferably with water cooling, the price of the cheapest starts at 3,000 rubles;
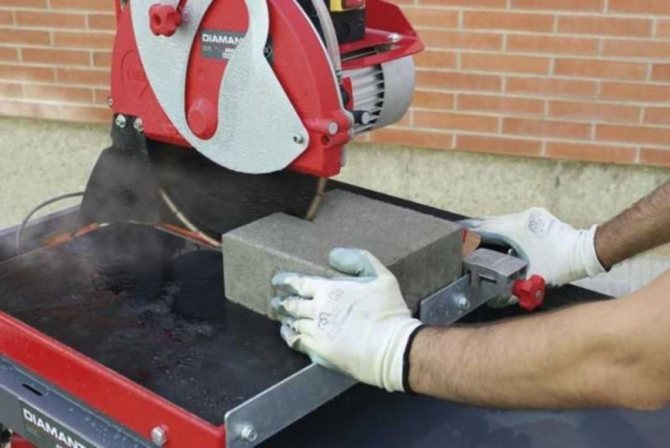
Without a real tile cutter, working with refractory bricks is very difficult.
- Bulgarian with discs for stone and metal;
- Concrete mixer or a trough for mixing the solution;
- Electric drill with a mixing nozzle;
- A hammer rubber and mason's hammer;
- Master OK;
- Remedies - respirator, goggles, gloves.
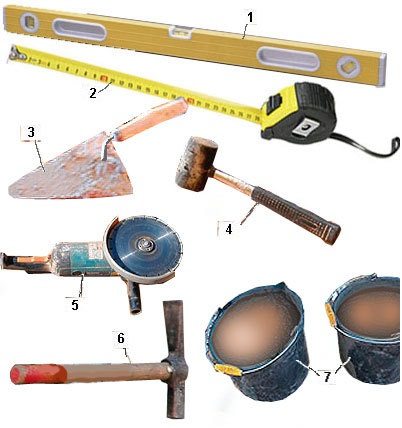
A standard set of mason's tools.
Material
- Fireclay brick (refractory) - 250-300 pieces of fireclay bricks are needed for a home stove with a diameter of up to 1100 mm;
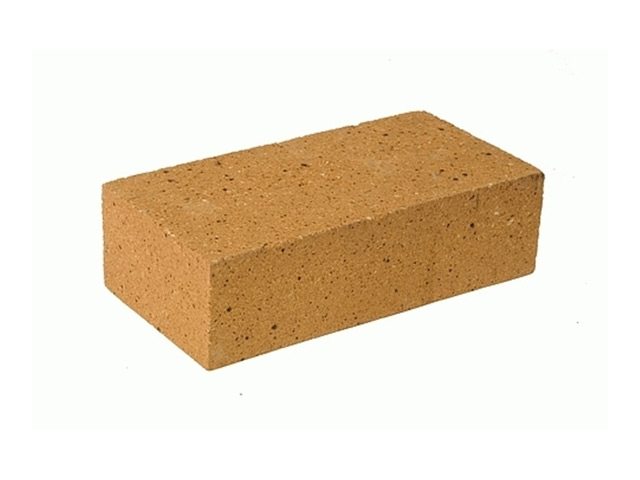
It is unrealistic to fold a Pompeian stove without fireclay bricks.
- Cinder block or an ordinary red brick - needed for laying out a podium for a stove;
- Mortar "SHA-28" - special fire-resistant mortar for masonry ovens;
- Armature - with a diameter of 8 - 10 mm;
- Portland cement - M500 brand;
- Mineral wool - slabs 50 mm thick, medium or high density;
- Calcium silicate plate, for example "Super Isol" or "Silca". Instead, you can use perlite or expanded clay;
- Waterproof plywood or OSB;
- Gravel;
- Sand;
- Chimney pipe - stainless steel or ceramics;
- Planed board - for formwork, approximate section 200x30 mm or 250x30 mm;
- Polyethylene 150-200 microns thick.
It is better for amateurs to work with a ready-made oven solution.
In theory, instead of the factory masonry mortar SHA-28, you can mix a homemade mortar based on chamotte clay, but I do not advise you to do this. An amateur cannot make a high-quality solution, there are too many subtleties. If you make a mistake, then all the work will go to waste, and with it the money spent.
Home oven characteristics
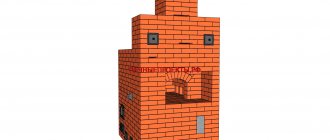
It is not necessary to look for high-precision drawings for such a stove, here it is enough to know the basic parameters and the device: the inner diameter of a brick home stove fluctuates in the region of 800-1100 mm.
There are 2 types of Pompeian ovens "Tuscan" and "Neapolitan":
A small Tuscan oven is sufficient for home use.
- Tuscan oven has a dome of a regular spherical shape, the height of the dome is equal to the radius of the base (hearth). In addition to pizza, you can bake bread in it and cook a whole range of dishes that are familiar to us, so it is better to choose this particular model;
- Neapolitan oven differs from the Tuscan model in the height of the dome, it is 80% of the radius of the hearth. This model is focused specifically on the preparation of pizza.
The Neapolitan oven cooks the pizza faster.
The entrance to the furnace is made arched or semi-arched, the height of the entrance is 0.6 (60%) of the height of the dome.According to the rules, the width of the entrance should be equal to the radius of the dome, but sometimes it is made a little smaller, this does not affect the temperature conditions.
The roof of the Pompeian stove is made of several layers:
- Fireclay brick;
- Fireclay or mortar for laying furnaces - mortar, up to 30 mm thick;
- Thermal insulation - mineral wool, thickness from 50 mm;
- Insulating mortar based on perlite or expanded clay, thickness 50–70 mm;
- Cement-sand plaster or putty for outdoor use, thickness 10–20 mm;
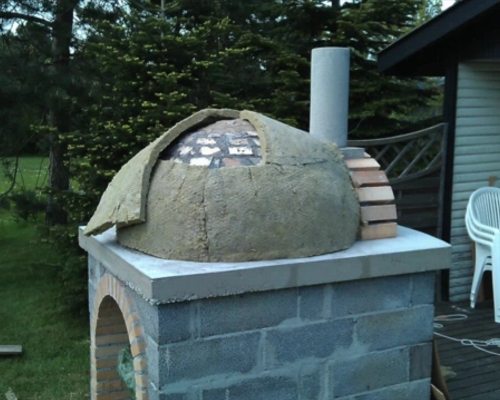
- On top of the protective coating, if desired, you can equip a decorative layer, for example, cover the dome with mosaic tiles.
Under (the bottom) of the Pompeian furnace is laid out of refractory bricks. Bottom layer of brick is necessarily insulated.
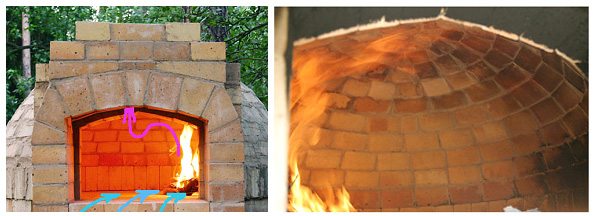
In this type of oven, the air moves in a circle.
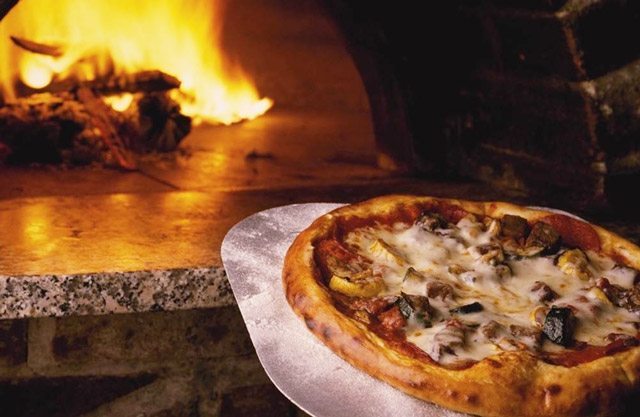
Features of Pompeian furnaces
Cooking pizza and other dishes in such an oven takes minimal time, since the internal temperature in the Neapolitan (this is another name for the Pompeian oven, like the Tuscan) reaches 400 degrees... In such conditions, everyone's favorite pizza is prepared in just one and a half minutes. This version of the oven is most common among the peoples of the Mediterranean, and its “closest relatives” are the Russian oven, bread oven and tandoor oven. In Italian food establishments, the fire is almost never extinguished in the stoves - since those types of wood are used for the firebox that do not smoke and do not emit tar:
- olive Tree,
- cherry,
- alder.
The wood-fired pizza oven is not easy to bake pizza, it can cook an endless variety of dishes at different temperatures. The range of temperatures ranges from 70 to 400 degrees, which allows you to choose the most comfortable cooking mode for any product. A very popular dish is the Tuscan grill - for its preparation, all the coal in the oven is raked to the mouth, a grate is placed on the legs and an incredibly tasty dish is prepared. Furnaces vary by fuel options:
- gas;
- wood-burning;
- electrical.
But only a real wood-fired pizza oven will become the best assistant in preparing delicious and aromatic dishes. It is about the construction of such a furnace that we will talk about today.
We start construction
The construction of the Pompeian furnace is divided into several stages:
- Arrangement of the foundation slab;
- Construction of a podium (supports for the base plate);
- Pouring the base plate under the oven;
- The masonry of the Pompeian stove itself;
- Arrangement of thermal insulation, protective and decorative layer of the dome.
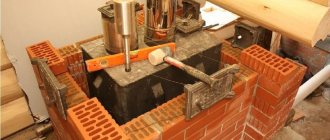
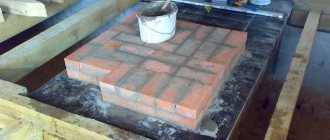
Fill the foundation and lay out the podium
| Illustrations | Work order |
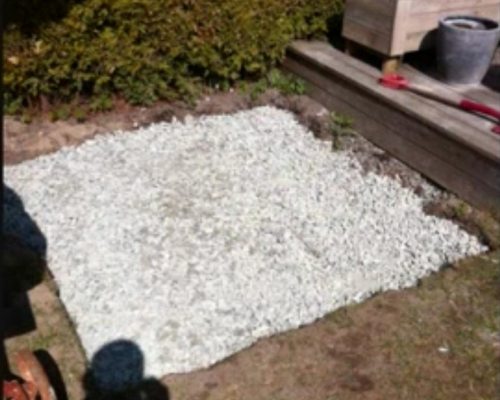
| Blank for foundation. Having chosen a place for construction, we dig a square pit 1.5x1.5 m in size, with a depth of about 300 mm. The first layer is filled with sand and gravel cushion 200 mm thick. It is better to cover the mixture in layers and periodically water and tamp each layer with water. |
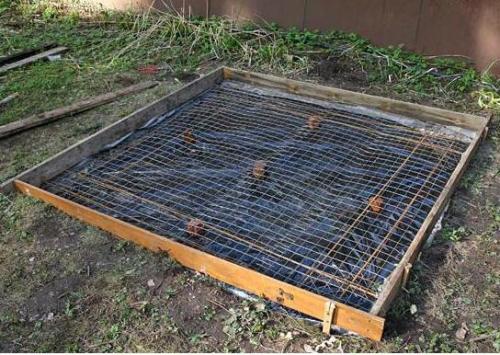
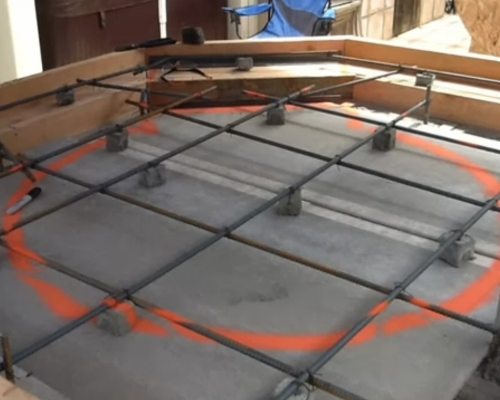
| Reinforcement of the foundation. First, we drive in wooden pegs and mount the formwork. The width of the board is 200 mm, respectively, the box will enter the ground by half. We cover the sand and gravel pillow with polyethylene and put the supports under the reinforcing mesh on it, I used pieces of broken brick. We need to raise the net to a height of about 5-7 cm. Reinforcing mesh is knitted from a rod with a section of 8-10 mm and a mesh size of 50-100 mm. Factory reinforcement mesh is made of wire with a cross section of up to 5 mm, so if you use it, you will need to make 2 reinforcing layers with a gap of 3-4 cm between the layers. |
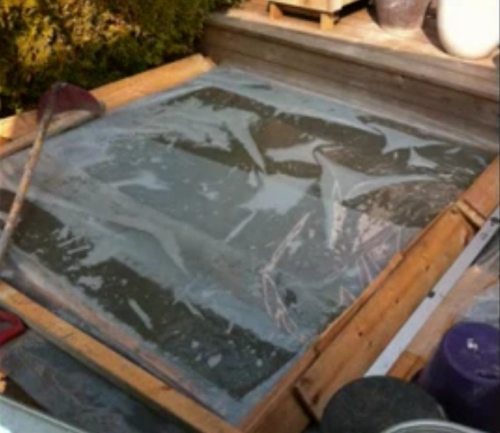
| Pouring concrete. We will have the standard proportions of concrete 1: 3: 4 cement-sand-gravel. The formwork is poured just above the edge of the box, after which you take a two-meter plastering rule and, resting it on the boards of the box, level the plane. Check the horizon at once by level. When concrete sets, it should be constantly damp for the first week. To prevent moisture from evaporating, I just covered the plate with polyethylene and pressed the film around the edges.
|
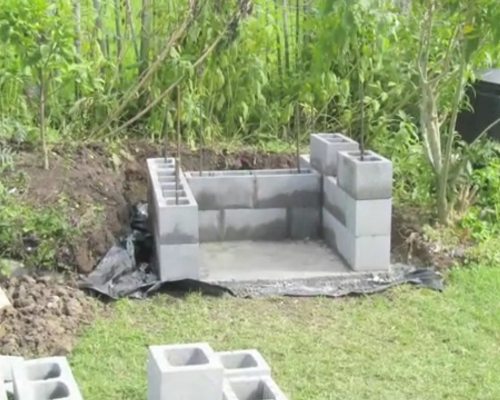
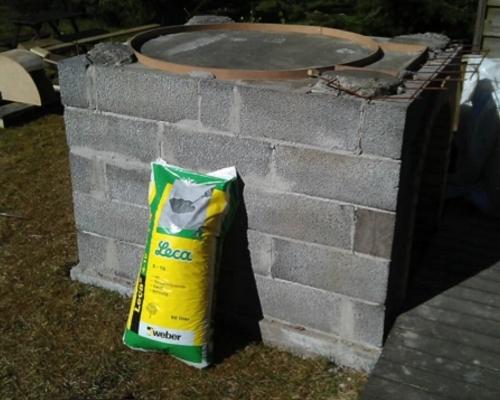
| We start laying the podium. I laid out the podium from a cinder block and made it in the form of the letter "H", This design is more stable, the crossbar in the middle takes on a significant part of the weight of the furnace. You can make a podium of facing bricks, but such masonry will cost 2 times more.
|
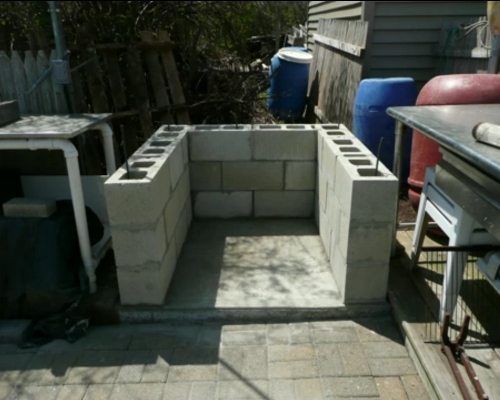
| Laying out the rows. The podium can also be made in the form of the letter "P", it is not important, the main thing is that the correct square of 1.2x1.2 m is obtained in the corners. In the case of a cinder block, this is simple, there the size of the blocks is 200x200x400 mm, I put three blocks and there is already the required size. |
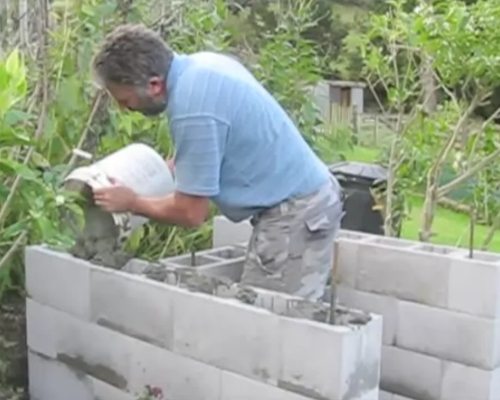
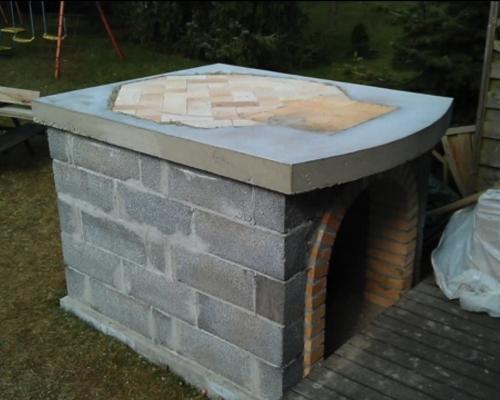
| Reinforcing the podium. I made a podium with a height of 4 cinder blocks, that is, 800 mm, if it seems a little to you, you can make 5 cinder blocks (1 m), but not more, because on top there will also be a base plate 200 mm thick. The cinder block is a hollow material and to increase its strength, I additionally inserted reinforcement into it and poured concrete on top. |
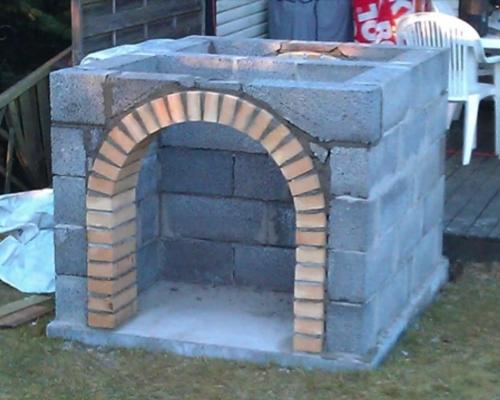
| Arches for the catwalk. The next step is not necessary, but I wanted to practice laying out brick arches. As you can see in the photo, 8 rows of bricks on the sides are laid out exactly, and then a pre-prepared semicircular template is installed and with its help an arch is laid out. Plus, until the mortar sets, temporary wooden wedges are inserted between the arched blocks. |
Three options for arranging the base plate
The durability of the furnace depends on how smoothly and correctly you fill the base plate, because on the ground any structure gives a slight shrinkage. If the stove is slightly driven, then the stove hemisphere may crack.
| Illustration | Work order |
| Base plate reinforcement. The standard thickness of the base plate is 100 mm, but we make the formwork 200 mm high. Initially, a sheet of waterproof plywood or OSB is placed on the podium and a formwork box is already knocked down along it. Then knit a reinforcing cage and lay it inside. This cage rises to a height of 3-4 cm, again using broken brick pads.
|
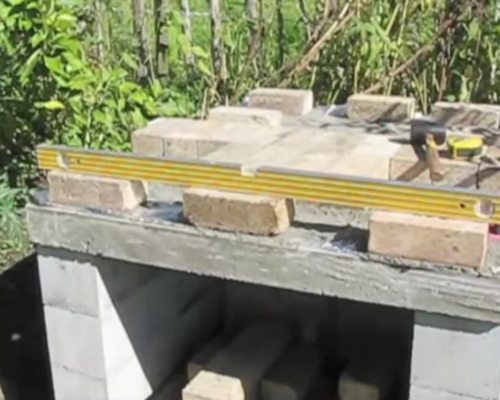
| Plate shape. The stove does not have to be square, it can be rectangular or even polygonal, the main thing is that the oven fits on it and you, then it was convenient to cook. I made the base plate slightly larger than the 1.4x1.2 m podium. I left this 200 mm "visor" on the front side of the oven. |
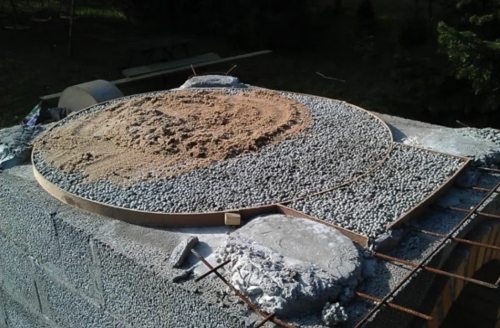
| Pouring the base plate. The base plate is poured in exactly the same way as the foundation, only 100 mm thick. After pouring, cover with polyethylene and periodically moistening, wait until it gets stronger for at least 2, and preferably 3 weeks. At the next stage of creating the base plate, we will equip the thermal insulation for the hearth of the Pompeian oven and here there are 3 installation options. |
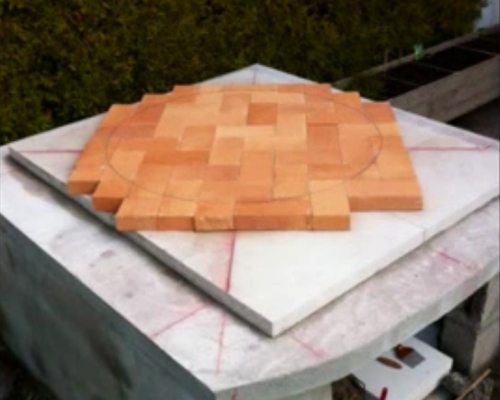
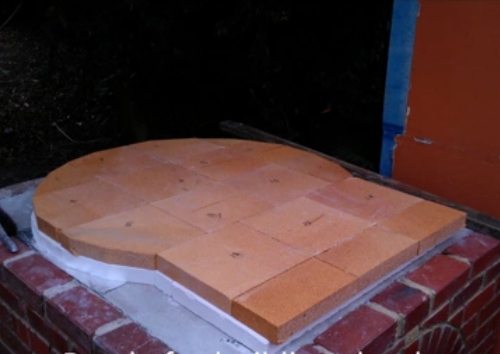
| Option number 1: calcium silicate board. First, put the insulation plate dry in the center and also without mortar spread it under the fireclay brick ovens. It is better to lay it under a herringbone, like parquet, so that later the shovel does not cling to the edges of the bricks when laying the pizza.
|
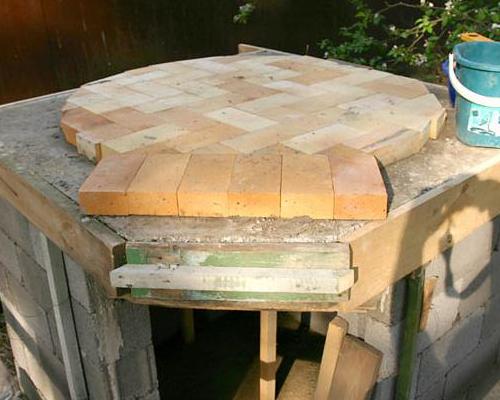
| Try on under. It is tried on under the oven and laid out along the outer edge of the dome. Plus, you need to immediately lay out the basis for the entrance. After laying out, all bricks need to be numbered and it is advisable to sketch for yourself a scheme for laying them. |
| Pruning. After trying on, mark the contour of the masonry and cut off all unnecessary.Moreover, you cut off not only the brick, but also the heat-insulating plate. |
| Finishing layout.
For this, we made the formwork 100 mm higher than the base plate. |
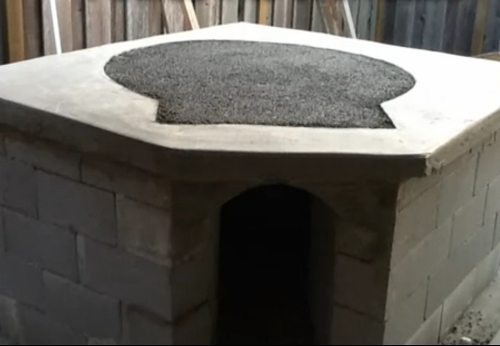
| Option number 2: perlite pillow.
|
| Removing the formwork. We take out the inner formwork under the furnace and we get a clear depression in the concrete. |
| We fall asleep insulation. We mix perlite sand with cement in a ratio of about 7: 1 (perlite-cement) and fill the niche in the base plate with this solution. Instead of perlite, you can take fine expanded clay with granules up to 5 mm. |
| Option number 3: A kind of perlite pillow. This method of arranging a base plate with insulation resembles the previous version, only here the insulation is, as it were, built into the plate. |
| Pouring insulating mortar. First, a reinforcing cage is laid on the scaffold on the lower plywood board. Further, to the height of the cage, concrete is poured and slightly leveled. Just take a plastering rule and remove anything above the reinforcement. After a couple of days, when the concrete gets a little stronger, a formwork is installed on the cage under the insulating mortar and perlite or expanded clay insulation is poured into it. |
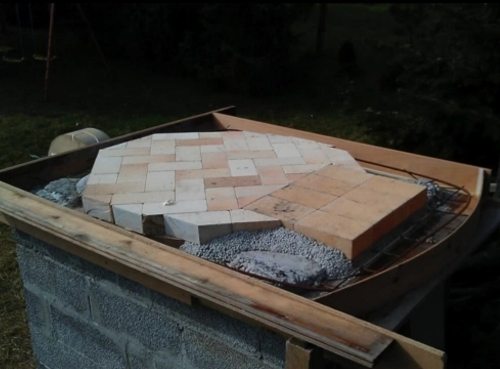
| Pod layout. After the insulating mortar has set, remove the formwork and lay the hearth bricks on it. |
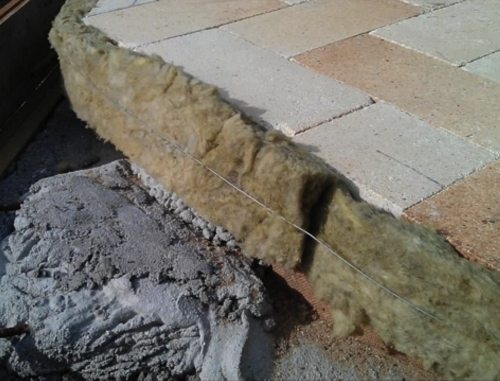
| Thermal insulation. Brick under the perimeter must also be insulated. For this, asbestos cloth, basalt wool or basalt cardboard are used. If you take cotton wool, then it should be of medium or high density. |
| Installation of external formwork. Now the formwork is mounted to the entire height of the slab, from the plywood from the bottom to the upper cut of the oven hearth. |
| Pouring concrete. Concrete is poured along the perimeter of the hearth and leveled with a plastering rule so that the slab is in the same plane with the hearth. When the concrete hardens, the formwork is removed and the oven can be laid.
|


When laying bricks, the mortar is applied only to the "sole", while the side edges are simply joined dry.
Creation of the dome of the Pompeian furnace
| Illustrations | Work order |
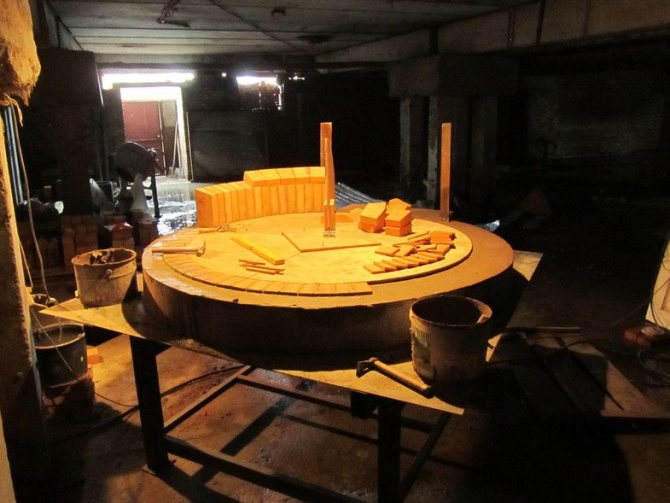
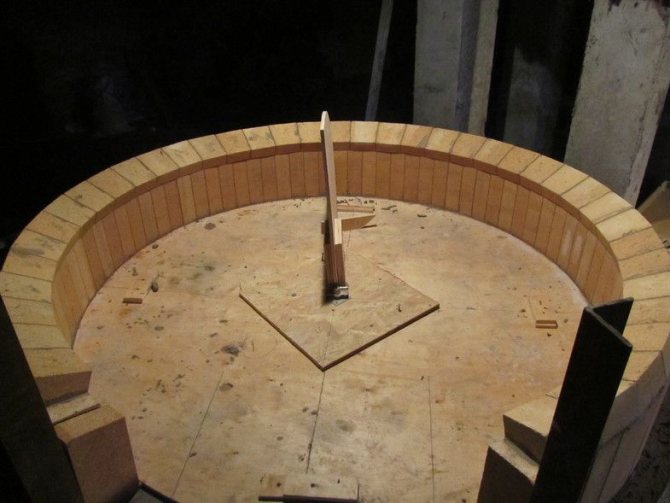
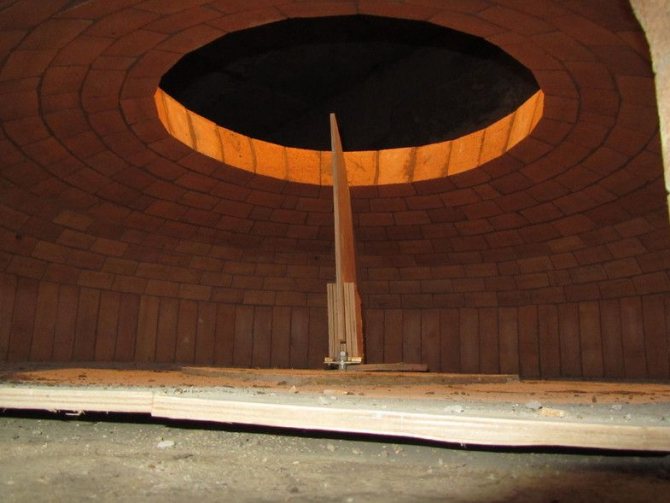
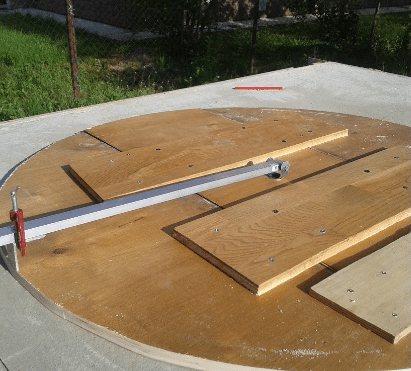
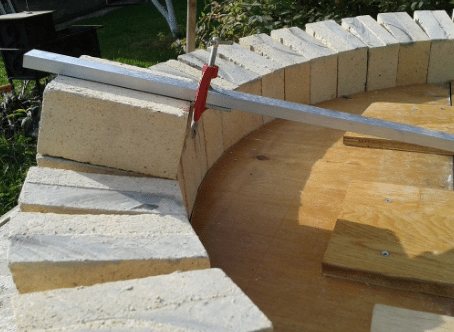
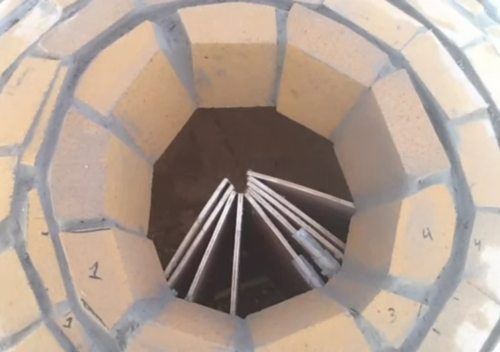
| Installing a template. In order to lay out a brick hemisphere, we need a template. There are several types of such designs, I will show the most common, and you already decide which one suits you. In this photo, the template is a rail attached to a hinge in the center of the circle. The limiting angle is attracted to the rail by a clamp, at the base is a prefabricated plywood sheet.
|
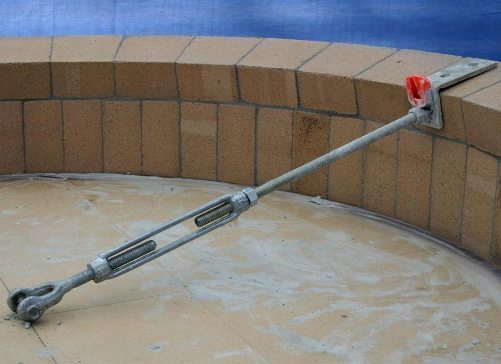
| Fastening the template. The hinge of this template is screwed into a pre-drilled hole in the center of the circle and is adjusted with a metal insert. At the end of the work, the template is removed, the hinge is unscrewed, and the hole is completely covered with mortar. |
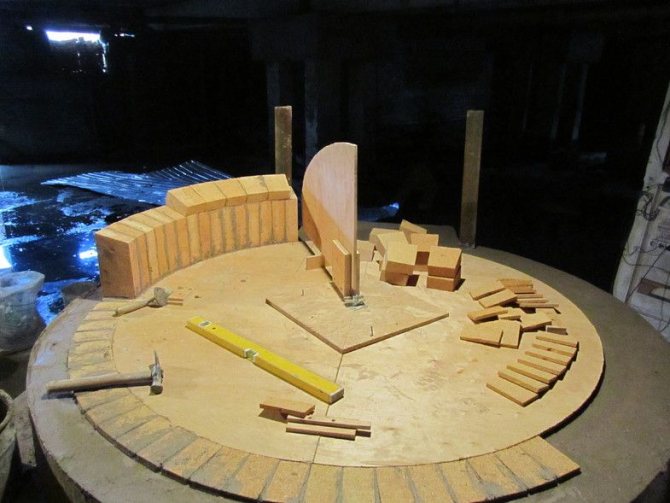
| Installing the pattern. Here, a metal axis is installed in the center and a sector cut from an OSB sheet or plywood is attached to it. The design is quite convenient, since you can fix several of these sectors and calmly move them to the part of the dome that is being laid out at the moment. The axis itself is pulled out through the top, before putting the last round brick closing the dome, and the sectors are easily reached through the exit, the hole in the center is smeared. |
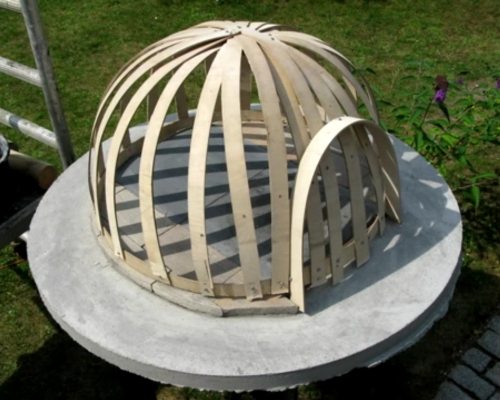
| Formwork option. To create this kind of formwork, strips of thin plywood or fiberboard are used. Collecting it is quite troublesome, but it is convenient to work with. |
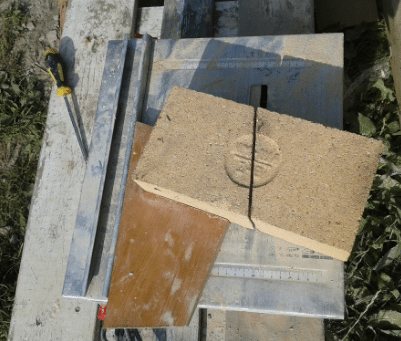
| Brick cutting. While you are building the oven, you will have to cut over 200 pieces of bricks. Fireclay bricks are very durable and difficult to cut. My grinder "sat down" after 20 cuts, so I advise you to take into account my experience and immediately buy a tile cutter, the grinder will also come in handy, but as an auxiliary tool. |
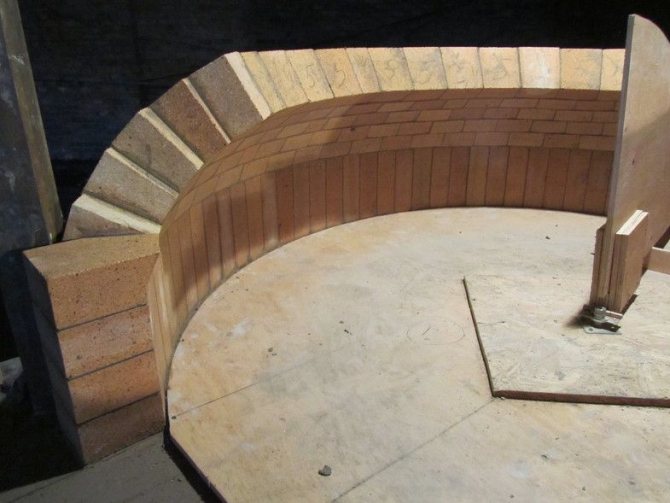
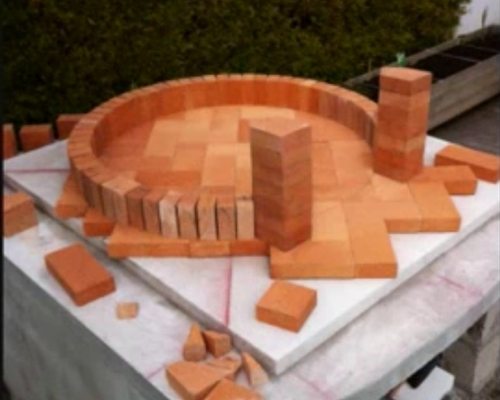
| Pompeian stove ordering, 1 row. The first row is the so-called "soldiers", these are bricks cut in half. If you make them even, then when moving to the second row there will be too much gap, so I cut them obliquely. The corner can be marked by attaching the second row brick to the template bar. |
| 2-5 rows.
|
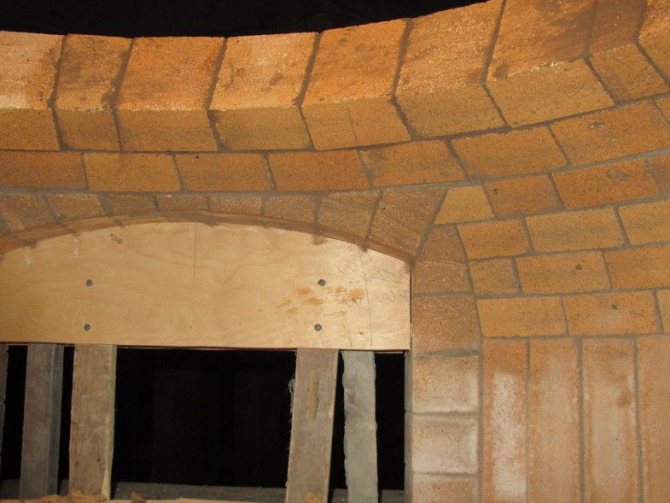
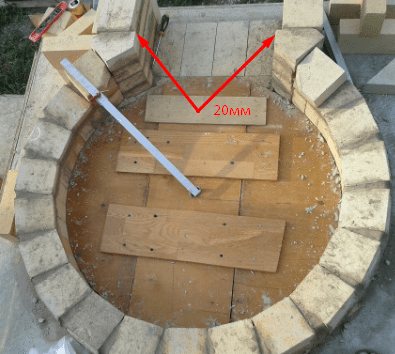
| Entrance masonry. The entrance is laid out simultaneously with the construction of the dome. Blocks at the border of the entrance and the dome are made with a small side of 20 mm. Some dishes need to be cooked in a closed oven and the flap will rest against this side. |
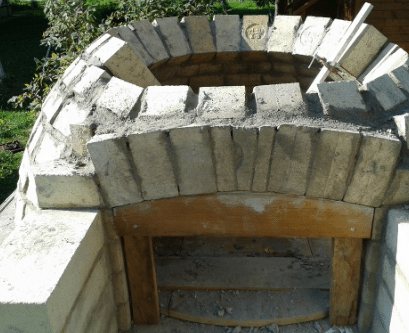
| 6 - 8 rows. Starting from the 6th row, it is much more difficult to lay the dome, the halves end here and up to the 8th row there are thirds. Plus, from the outside, it is already impossible to do with one solution, you will have to insert temporary wooden wedges. |
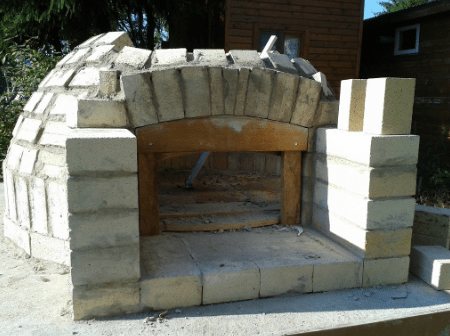
| Finishing the entrance arch. Starting from the 5th row, you need to lay out the arc of the arch. It is more difficult to make a completely semicircular arch, so I raised the entrance to 4 even bricks and then laid out a semicircular arch with a small radius, this turned out to be enough for a normal extraction. On each side of the vault, I had 3 standard bricks per template, and I filled the center with three brick wedges. The height of the arch according to my project is 520 mm, and the height of the arc at the entrance is 330 mm, I practically fit into the prescribed 60%. |
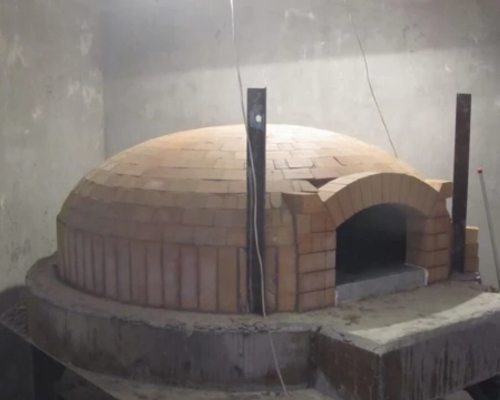
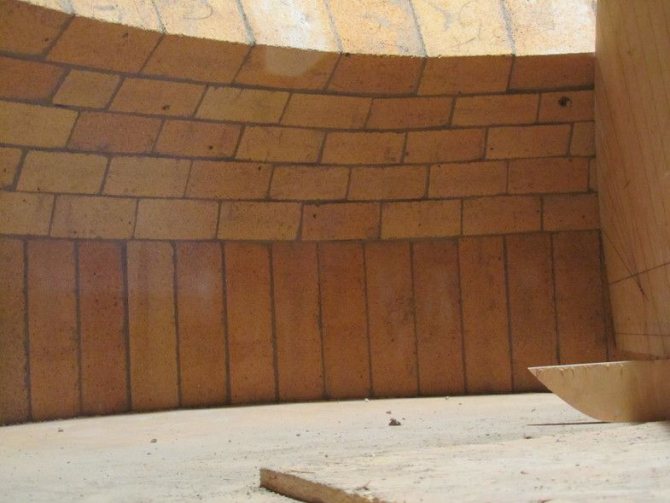
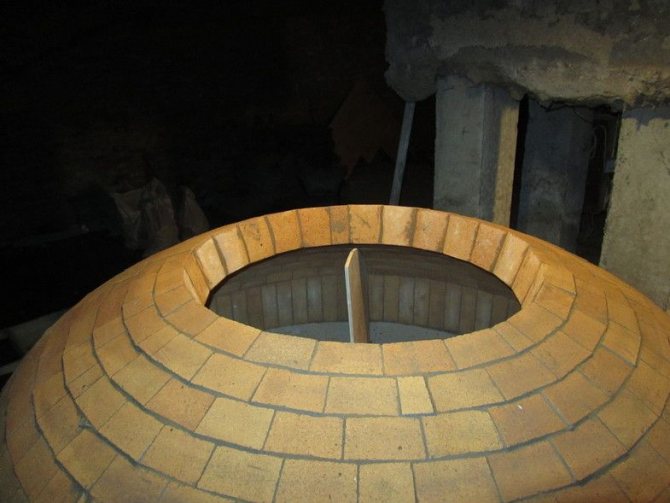
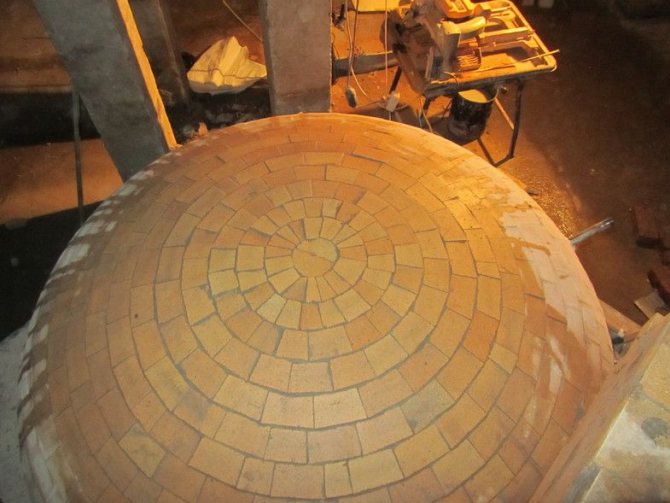
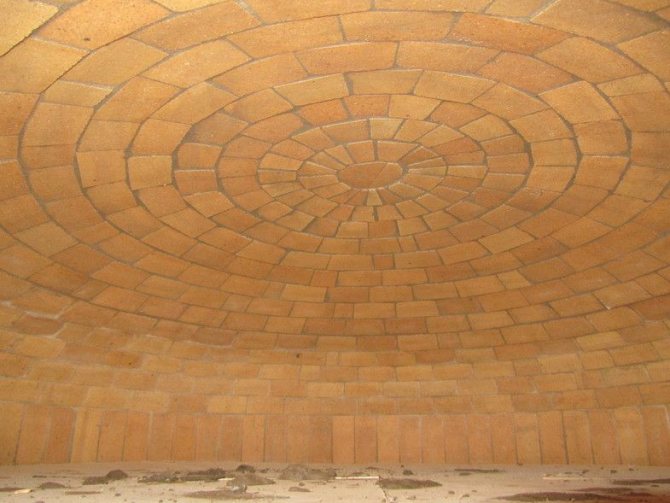
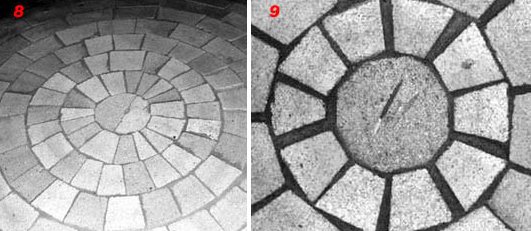
| Finishing the furnace dome. Starting from the 8th row, as we moved towards the center of the dome, the segments had to be cut less and less, so in the tenth row I already used a fifth of the brick, plus each piece needs to be tried on and cut in place. |
| Dome crown. The crown, as a rule, is closed with homemade wedges, but an experienced stove-maker advised me to buy a ready-made fireclay brick disc and insert it (there are such in stores). |
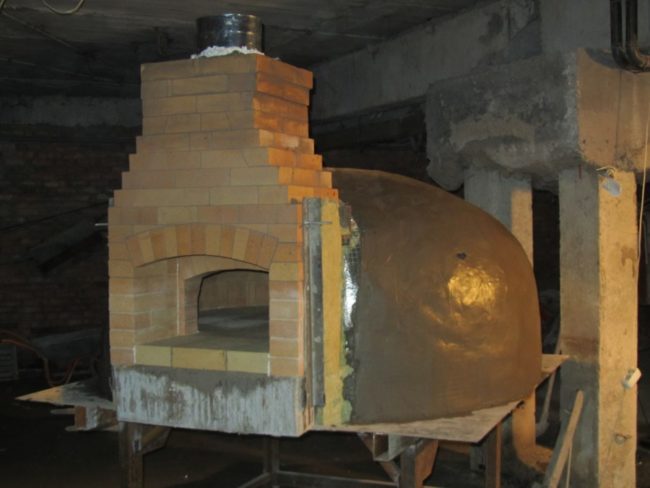
| Chimney. With the chimney, everything is simple, on those 4 even bricks laid at the very beginning, 2 blocks are placed, cut out to the width of the chimney pipe you have prepared, and then we lay out exactly the same entrance arch according to the template.
|
| Pre-heating. Before arranging the thermal insulation, the dome must be heated, but the first light in the stove should light up no earlier than a week after the end of the laying. The heating process itself also lasts about a week.
|


Thermal insulation of the dome and completion of work
| Illustrations | Work order |
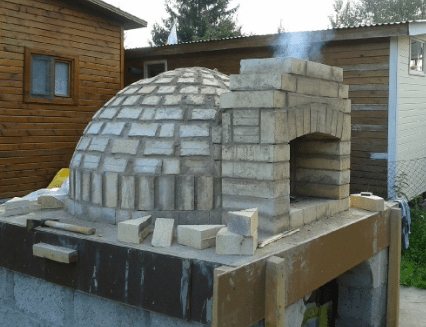
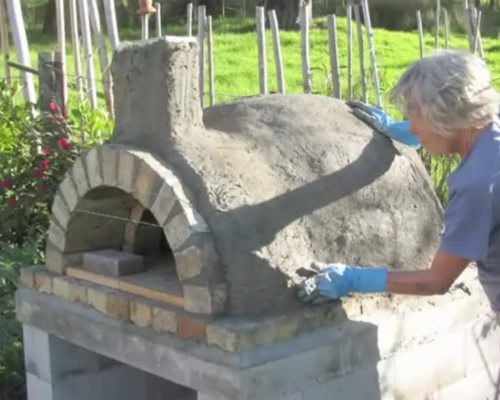
| Primary coating. We need the first layer to smooth out the angular surface of the dome. Here we use the same mortar, the thickness of the coating is 20–30 mm. |
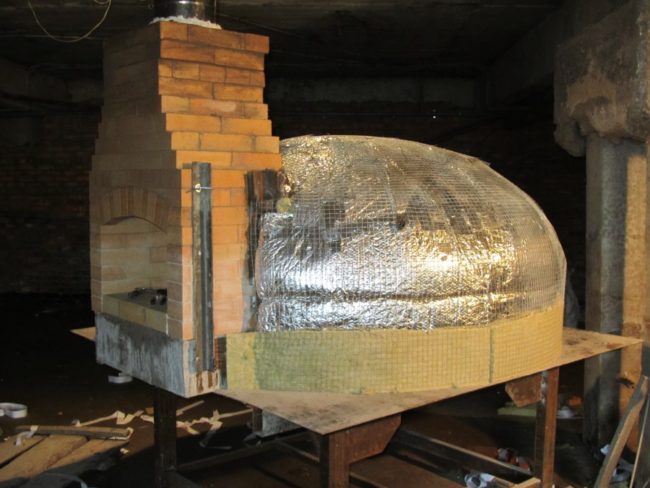
| Mineral wool. When the primary coating dries up, we wrap the dome with slabs of mineral wool from 50 mm thick. The higher the density of the cotton wool, the better. |
| Reinforcement of the dome. Cotton wool is a hygroscopic material and in order to exclude any possibility of getting wet, it is better to wrap the dome with foil, and on top of the foil we have a thin reinforcing mesh. We fasten the mesh with wire. |
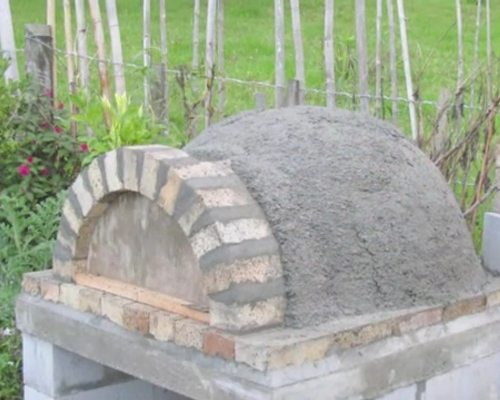
| The second layer of insulation. For the second warming coating, we make a solution of 5 parts of perlite sand and 1 part of cement. The thickness of this layer is 5–7 cm. |
| Extreme protective coating. For this coating, you can take an ordinary cement-sand mortar (1: 3), but it is better to buy a plaster mortar for outdoor use. The thickness of this layer is 10–20 mm. |
| Decorative finishing. As a rule, tiles are used to decorate such stoves. But do not try to lay ordinary tiles, they will quickly crack, here you need tiles for outdoor use and preferably heat-resistant. Alternatively, you can buy a battle of such a tile in the store for a pittance and make an impromptu mosaic. At the end of the work, let the oven dry for a couple of weeks, and then repeat the heating cycle again. |
Oven acceleration
After the oven has dried, it must be dispersed, for which it will be necessary to produce 6-7 fires with an interval per day:
- For the first heating, it is advisable to use 2.5 kilograms of straw.
- The second heating is carried out with the addition of 0.5 kg of chips to the same mass of straw.
- The third is about 4 kg of chips.
- The fourth is an absolutely dry small log.
- Subsequent - add one log at a time.
It is worth noting that it is advisable to install the street structure under a canopy for a longer period of its high-quality operation. Moreover, it can be plaster in two layers:
- heat-resistant plaster with a layer of up to 12 mm;
- moisture-resistant plaster with a layer of up to 4 mm (it can also be decorative).
A high-quality Pompeian oven, made by hand, will give you the opportunity to cook the most magnificent dishes (including, of course, pizza) in compliance with the technology.
A source
Output
Building a Pompeian stove is a troublesome business, but I gave you a detailed description of the full cycle of creating a structure from scratch, and there will be no difficulties. The video in this article shows ovens of different sizes, but the technology is the same everywhere. If you have any questions or if you know a simpler instruction, write in the comments, we will discuss your option.
A well-finished stove will be a true decoration for your yard.