Today, the oven equipment is presented in a wide range, but the Swede with a stove bench is especially popular among consumers. It harmoniously combined Russian and Dutch stoves. Multi-passages, connected to certain elements of the bell-type furnace, made it possible to create an efficient thermal design, which is characterized by small size, high efficiency and versatile operation. If you want to have such a structure at home, then it will not hurt you to find out how the construction of a Swedish stove with a stove bench with your own hands is going on.
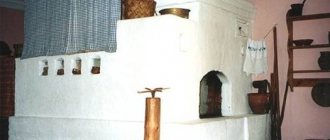
Swede
The characteristic features of the stove
The design was invented by the inhabitants of the Scandinavian countries more than a hundred years ago, but even today they do not stop using it.
The stove is most often placed in the walls. She has:
- equipped hob;
- one or two ovens;
- heated bed.
A stove with a stove bench is best placed between the living quarters and the kitchen. Most often, the kitchen area does not allow to fully make a stove, therefore, only an oven and a hob (VP) are present in it. But the kitchen does not lose anything from this, because when cooking the food, the Swede has time to warm it up.
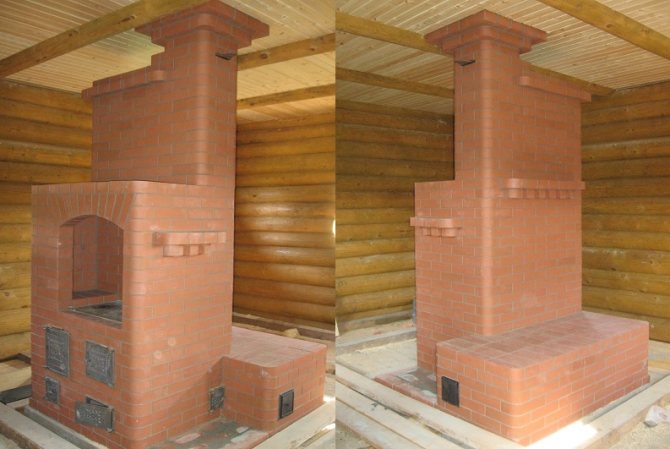
Swedish with a couch
What does the stove consist of?
The Swedish woman is considered compact for a reason. From the firebox to the chimney, gases move through the duct chimney. Heat transfer takes place in the bells.
The design features of the Swedes include:
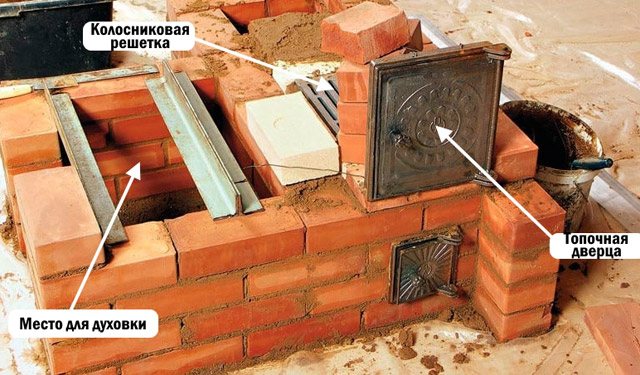
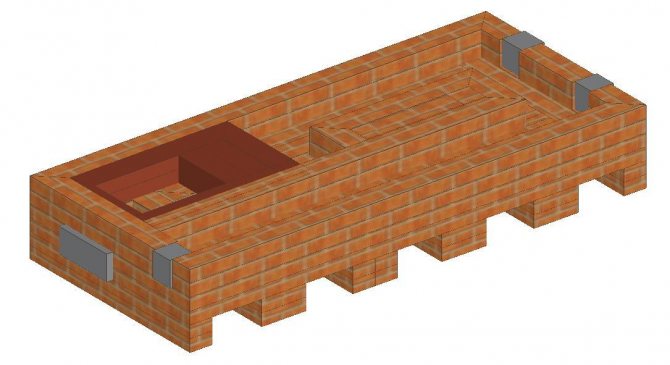
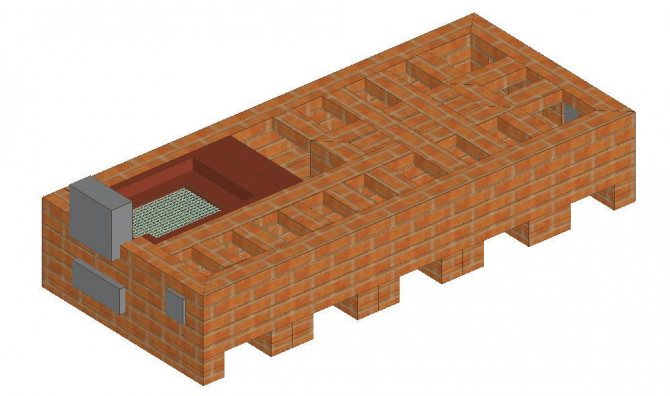
- Large oven. It is better to make it from cast iron. The oven is designed more for heating the room, but you can bake bread in it. Since there is a hood in the stove, during the chemical pyrolysis of firewood, thermal energy is released in a large volume. She immediately approaches the walls of the oven located nearby. With the oven doors wide open, you will feel a strong hot stream coming from below within five minutes.
- An upper niche where you can dry winter shoes and clothes. Completely wet items will dry in five hours. It is heated by the first and secondary heat, so it stays warm even after stopping the fire.
- Lower niche. It is a recess directly on the hob. A kind of thermos. You can put a hot dinner here and it will stay warm until the morning.
Taking into account the movement of gases in Shvedka, after the completion of the firebox, the view must be tightly closed. Otherwise, the stove will cool down in a short time and pump cold air.
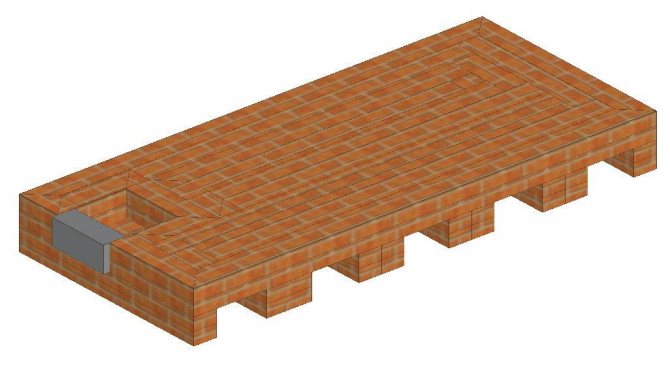
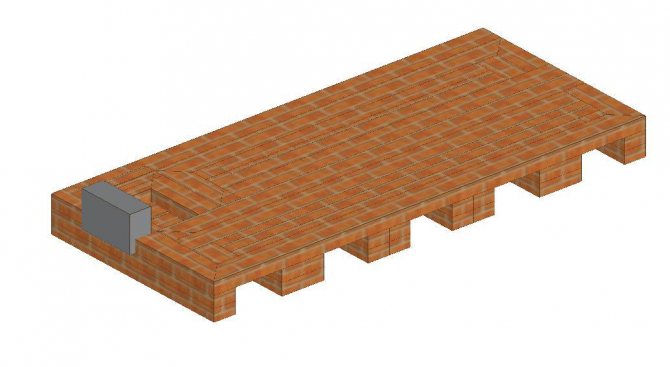
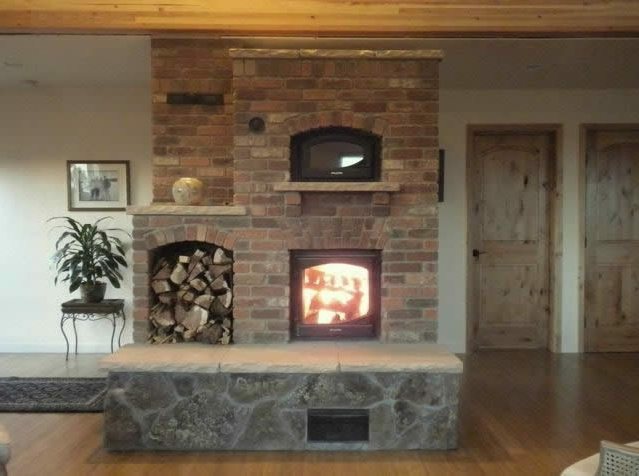
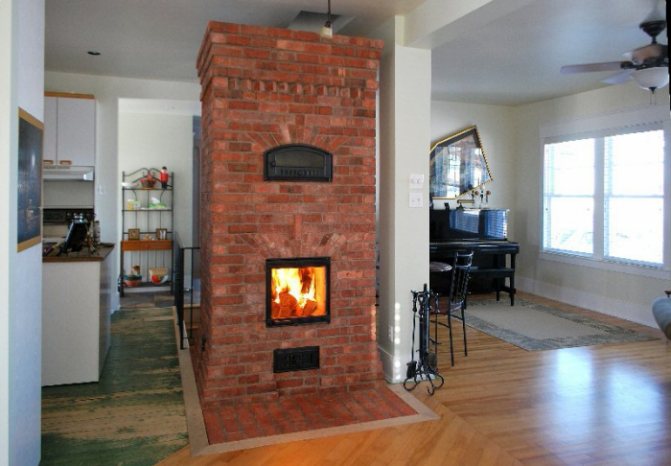
The back of the oven is located in an adjoining room. You can attach a fireplace or a stove bench to it. The traditional size of the couch is 180 centimeters long and 65-70 centimeters wide.
Advantages and disadvantages
The list of advantages of the stove is presented:
- small size;
- multifunctionality: the stove is suitable for cooking, heating the house and for drying damp things;
- high heat transfer coefficient and efficiency;
- the ability to attach additional elements (stove bench);
- uncomplicated laying: you just need to follow the step-by-step instructions;
- high aesthetics: the stove can be a decoration for any interior;
- the presence of a summer and winter regime;
- fast warming up;
- the ability to recycle any solid heating material;
- lack of the need for frequent maintenance: with proper operation, the stove does not cause any trouble.
The disadvantages of the plate include:
- when working, only high-quality materials should be used;
- only fireclay clay is suitable for masonry;
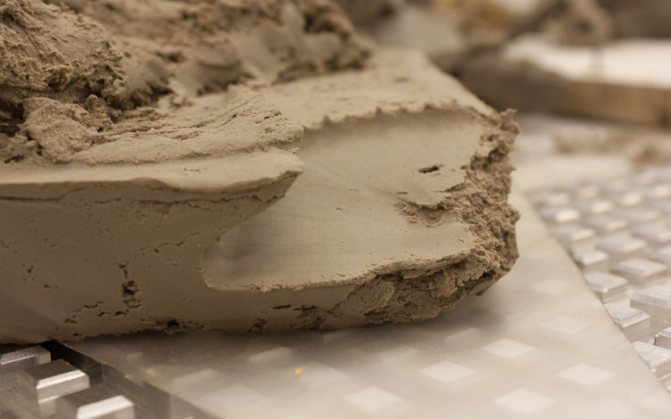
Fireclay
- the door of the combustion chamber (TC) must be made only from cast iron, since other material will not withstand strong thermal loads;
- not suitable only for seasonal use: if you rarely use the stove, it will begin to damp and deteriorate.
But if you use it constantly, then you will not find a more successful heating system.
Device and principle of operation
The Swede has a large oven that does not reach the flame. It is intended not only for baking, since the furnace part in the oven is necessary for the chemical afterburning of fuel. When the first heat appears, a metal oven quickly heats up. After kindling, when you open its door after 3 minutes, you can hear warm air emanating from it, because the stove begins to heat from the floor, and not from above. Flue gases go down from the top of the firebox to heat the oven.
The heating device has a sufficiently large upper niche to accommodate two persons' winter clothes. Niche heating comes from the first heat and the second. Also, the Swede provides a niche above the stove. It is covered with a lid made of wood. And due to this, food left in the oven remains warm for a long time.
The designers did not make the outlet between the smoke circulation and the firebox, as this complicates the product, and its price increases. They got out of the situation by making a crossflow at the bottom under the oven.
When using such a device, if you do not close the view, the stove will cool down quickly. Therefore, it is necessary to monitor the condition of the fuel in the furnace in order to close the view in time, preventing carbon monoxide smoke from entering the room, which can lead to sad results.
Tasteful design
The entire furnace is heated according to the well-known channel scheme. That is, the heating is carried out by the second heat and the warmth of the embers. When using vertical channels, heating from below is worse, but less soot accumulates. And this is quite important when using various fuels. It is also possible to use horizontal channels. In this case, it is better to heat the stove from below, but it is necessary to clean it often.
In the product, the duct smoke circulation is made simply, therefore the order of the furnace can vary depending on the requirements, and the quality of the product does not deteriorate. The heating and cooking stove in the 3rd row lays down as indicated by the order. The back of the stove opens into the living room, where you can add a stove bench. It turns out to be quite large - 180 × 66 cm, and it can accommodate a tall person.
The development of the Swede is a very good solution. It has an efficiency slightly less than in a Russian stove, but exceeds the heat transfer of a Dutch woman. From the material that needs to be spent on the construction of a Dutch woman with a capacity of 2500 Kcal / hour, you can build a Swedish woman with a capacity of 3500 Kcal / hour, and at the same time it is necessary to heat it 2 times a day. It is very convenient to cook food in the Swedish oven. In this case, you do not need to bend over, and you do not need a grip.
For the manufacture of a Swede, it is necessary to use high quality material and do the work carefully, observing the order during the construction, all sizes and rules.
We make the foundation
Before starting to build a heavy structure, you need to fill its foundation. But if you make a stove in an already finished house, then you will create the foundation for it right in it. In this case, it is important to ensure that the base of the house does not come into contact with the stove. The depth of its foundation depends on how large the stove will be: the larger the structure, the deeper the foundation needs to be made.
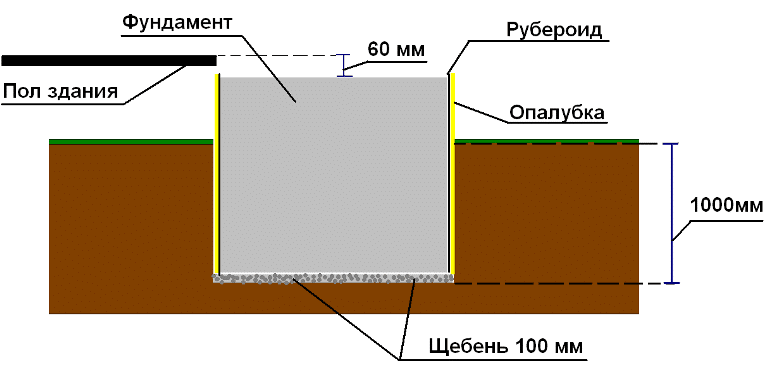
Foundation
Create a pillow
Before pouring the foundation, it is important to carry out preparatory work. First of all, you need to put the markup. After that, you can proceed to digging a pit of the required depth. When you have thoroughly tamped its bottom, pour a little wet sand into it and tamp it again. The thickness of the compacted sand ball should be 10-20 centimeters. Now cover everything with rubble to a height of 15 centimeters. It also needs to be tamped.
We create the formwork
Before pouring the mortar, you need to build and install the formwork. Any wooden slats will work to create the side walls. If there are gaps, cover them with plastic and attach it with a stapler. The formwork must be above the ground and reach the foundation. It can be done right along the edge of the pit.
Fill in the solution
When the formwork is in place, fill the foundation with mortar. For this you need coarse gravel, cement and sand.
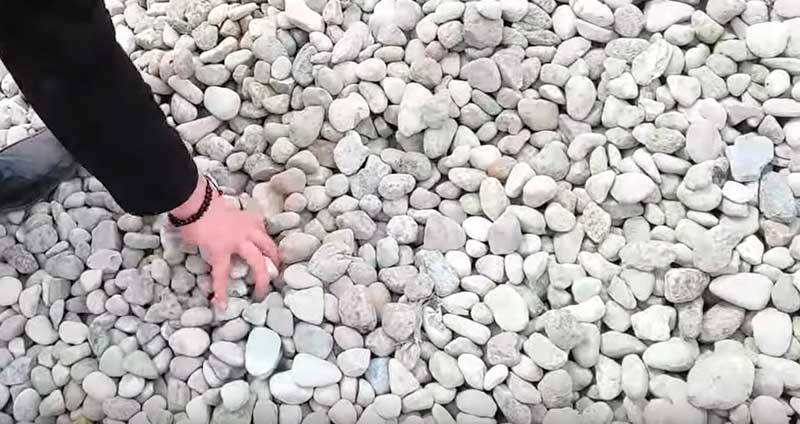
Coarse gravel
The minimum fill height is 15 centimeters. When the first layer is poured, place reinforcing bars in it vertically - this will connect this layer with the concrete mixture.
Fill in a lightweight solution
Fill the reinforcement sheets with lighter concrete, the layer of which should reach the ground. When done, flatten this mixture and wait for it to harden a little. After that, cover it with a steel reinforcing mesh and pour concrete to the thickness of the formwork. Align the poured screed and leave to dry for 27-30 days.
Create a waterproofing surface
When the screed is dry, remove the formwork. Cover the base with a layer of waterproofing made of glued balls of roofing material. When everything is ready, start laying the stove walls.
Erection of the foundation
The calculations take into account the depth of soil freezing and the proximity of groundwater. A pit is being dug at the location of the future structure. Its width and length exceed the dimensions of the sides of the furnace itself by 15 cm. The depth of the pit should be below the freezing point of the soil. The bottom is covered with a sandy pillow. If the groundwater is very close, a waterproofing material is laid on the sand layer.
Wooden formwork is installed on the sand. Its sides are located at a distance of 10-12 cm from the walls of the pit. The next step will be the preparation of the cement slurry. Sand and cement must be diluted in a ratio of 3: 1. This solution is poured into the formwork. After it has hardened, the surface of the foundation is again covered with a waterproofing material. A concrete screed is used to level the surface. The level of the foundation surface should be 5-6 cm below the floor level.
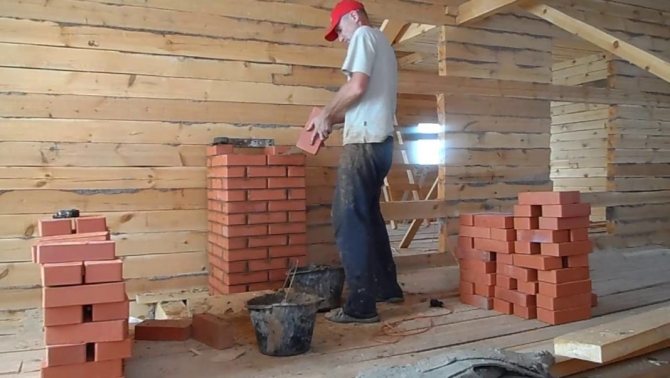
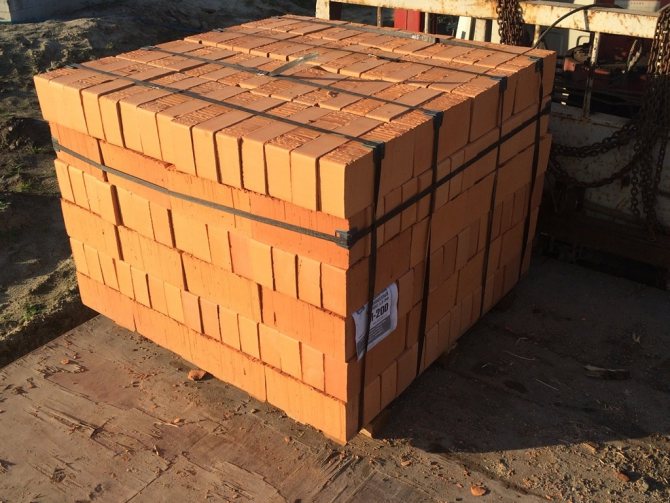
Now it remains to prepare a mortar for brickwork. Sand and clay are mixed in equal parts. You can use 1 part clay for 2 parts sand. It depends on the quality characteristics of the clay. The walls of the stove are erected according to the order. Before starting work, you need to look at the bricks. If material with chips and other defects is found, it is better to immediately remove it to the side.
Attention! The diagonals of the rectangle formed when laying the first row must be equal.
- The solution protruding on the masonry is trimmed after 5-6 hours, and not immediately. The “correct” solution should not fall to the floor.
- In order not to waste time preparing a clay-sand mortar, you can buy prepackaged bags with a ready-made mixture from a hardware store, which will only have to be diluted with water.
- In his work, the stove-maker often uses a board (the craftsmen call it "the rule") with straight, parallel sides. Each new row of bricks should be located strictly on a horizontal surface. The board is placed on the edge and the level is set on it.
- The distance from the back wall of the structure to the wall of the house must be at least 15 cm.
- Before lifting the bricks onto the roof, you need to make a "nest" on it. This is a horizontal platform, standing on which, the stove-maker can easily perform the required work. The site must be stable and durable, since, in addition to the weight of the stove-maker, it must hold about 2 hundred bricks.
- The chimney must be done slowly, observing the ordering conditions. If the traction is poor, all work will go to waste. And no one wants to repeat painstakingly all the stages.
- It is better to use silicate bricks for laying pipes. He is able to withstand any bad weather conditions.The smoke, mixing with water condensate, forms an explosive acid mixture, but the silicate material can easily cope with this load.
Cozy and comfortable
Since ancient times, people have used stoves to heat their homes and prepare food. Over the course of time, their design gradually changed, but the purpose remained the same. A very effective and practical nowadays is a heating and cooking stove with a stove bench called "Swede". For the first time it was developed by the designer G. Reznik and presented in 2010 in the magazine "Dom".
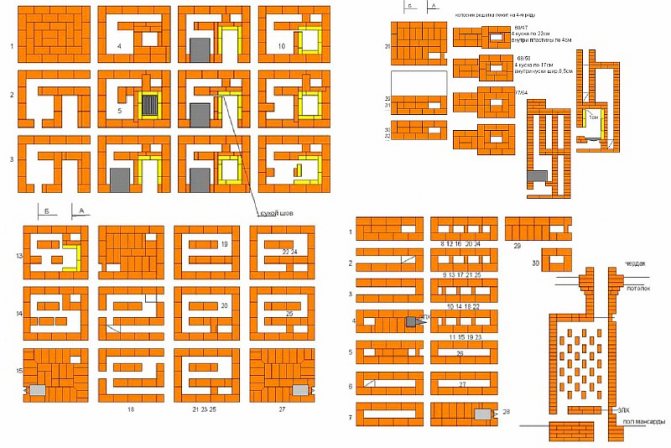
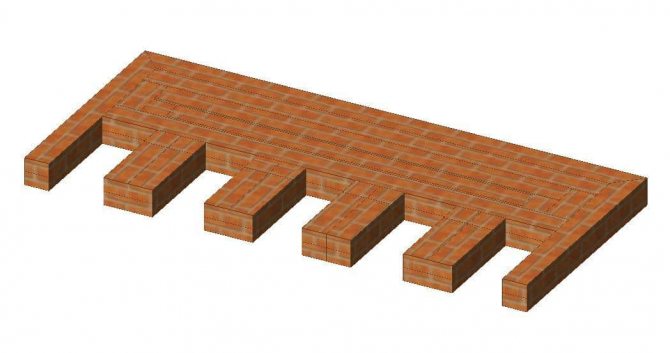
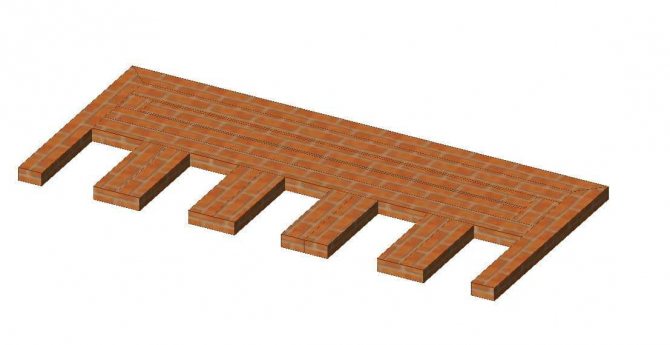
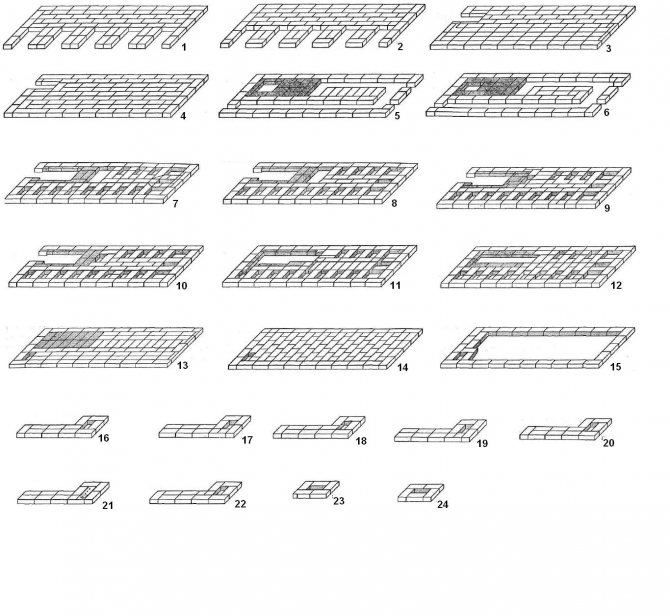
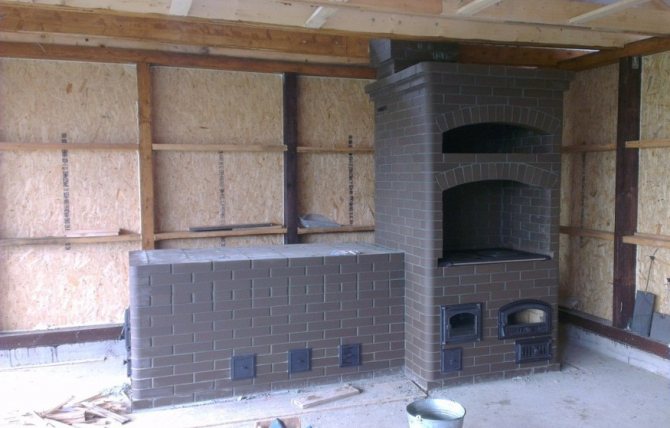
Stove order
For the stove to work properly, you must lay it out according to the diagram below.
- The first 2 are happy because they are the foundation. Lay them horizontally with red brick (KK).
- Row three, you will already lay out the base under the vertical channels, the ash chamber with a door and the bottom heating compartment. Perform KK masonry, use refractory products for laying the blower.
- Row four continues the third. Lay out the blower with fireclay bricks (ШК), red - the rest of the parts. The second and third channels in the 3rd and 4th row must be connected. A similar method is used for laying a stove with a stove bench.
- Do row five from left to right. You complete the ash chamber and close the blower door. When installing the grate, keep in mind that the material will begin to expand under the influence of high temperatures. Leave a small gap (1.2-1.6 centimeters) between it and the masonry and cover it with sand. For the ash pan, use the CC, for everything else, use red.
Creation of the fifth row
- Row six: you are already starting to create the TC and the door for it. Install the oven. Use SHK to separate the TC and the oven. Everything else is done from QC. Create 3 vertical channels from the U-shaped channel.
- When laying out the 7th row of the CC, the firebox is equipped.
Seventh row
- 8 row: close the vertical channel and continue to create TC.
- Row 9 is located at the top of the shopping mall door. The bricks for this row need to be cut off at the top and bottom, so that the gas passes better from the firebox into the chimney pipe.
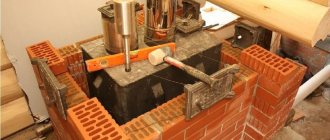
- Row 10 is a little more difficult to create. Bricks need to be chipped in the same way as in the previous case. There is no need to separate the TC and the oven. Constantly adjust the laying out of the row with a level, place the hob on it. Remember to make a reserve (1.2-1.6 cm) as the iron will expand. Lay a metal corner at least 4.5 * 4.5 centimeters flush with the outer wall of the stove.
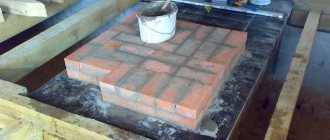
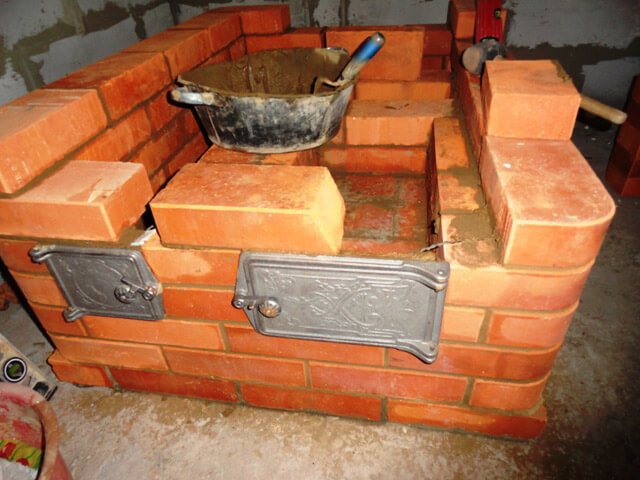
- Laying out the 11th row, you will already begin to form the cooking chamber (VC), therefore, brick the hole that appeared on the right along the entire length. Use QC when creating a series. If you put a removable door, then the VC can act as an oven.
- For row 12, take KK. It will unite 2 left channels. 13 has the same order as the previous one, only the channel needs to be divided into 2 parts. 14 and 15 are laid out according to the same principle as the thirteenth.
- While laying out the 16th row, you need to cover the VC with four corners. The masonry scheme is similar to the previous row.
- Row 17 overlaps VK. In order for the steam to escape, you need to leave a hole equal to half the brick.
- In step 18, lay in the safety corner that will strengthen the drying chambers (CK).
- 19 row - creating an exhaust from the VC and the formation of two SCs.
- Rows 20 and 21 are performed according to the same pattern.
- When performing 22 rows, the scheme of the previous rows is repeated, only the smaller SC needs to be covered with a metal plate.
- The 23rd row creates an SC, preparing a place for a valve on the VK hood.
- The 24th row unites channels 1 and 2, and the 25th row combines the VK hood and channel 3.
- In the 26th row of the SK, cover it with a corner and lay an overlap on it. Cover the top with mesh from the fittings.
- Fulfilling row 27, cover the top of the stove, leaving only the 3rd vertical channel without touching. Increase the perimeter of the masonry by four centimeters. On row 28, form a side and again increase the perimeter by four centimeters.
- Row 29 returns the clutch to its original size.
- Laying out row 30, form a pipe, and in the oven, make a hole for the valve. Then you need to make the pipe of the desired size. Vertical masonry on a plumb line.
- The final stage is laying out the last rows.
Slab order
Features of stoves with a stove bench
A stove with a stove bench and a hob, the ordering of which is done by hand, can operate in one of two modes. Depending on the season, a brick installation on wood can operate in summer or winter mode.
- In summer, the fireplace is equipped with a special valve, due to which only the stove bench, hob and oven are heated. The unit itself does not warm up, which allows you to maintain a comfortable temperature in the house;
- In the winter season, when the room requires particularly intense heating, a special valve is completely removed, which contributes to the heating of the furnace, with all the accompanying elements.
Part of the heating structure with a stove bench is assembled from a simple brick, which is quite profitable and economical
In order for the stove with a stove bench to serve as long as possible, it is best to use fireclay brick for assembly.
In order to prepare the oven for baking, it is also necessary to open two of the three dampers, and after the fuel has completely burned out, they close again. Also, the fuel compartment must be cleaned of the resulting combustion products (ash, soot). The dough is placed in the oven, the third flap also slides in.
In order to build a brick oven with your own hands, you will need:
- Ordering, drawings;
- About 2500 units of fireclay bricks;
- 900 kilograms of clay mortar;
- 1900 kg of sand from the quarry;
- 250-290 kilograms of mortar.
Construction principle:
- The first few rows must be tied well to give the massive structure additional strength and stability;
- On the third and fourth, the door is installed;
- On the fifth and sixth rows, we install the grate;
- From rows 7 to 9, we begin to form the walls of the furnace hole;
- On the 11th and 12th rows, a cast iron hob is installed;
- From the thirteenth to the fourteenth, we mount and arrange the caps, we reinforce the structure with corners, 100x100 in size;
- From 15 to 18 rows, we continue to form the combustion chamber, erect floors;
- At 19 we mount the dampers;
- From 20 to 23 we carry out standard masonry;
- We install dampers on the 24th row;
- For the 25th row, the construction of a smoke circulation is characteristic;
- Rows 26-28 are standard;
- On the twenty-ninth, a steel sheet is fixed;
- From 30 to 32 we carry out standard masonry;
- From 33 to 36 we build a chimney system;
- On the 37th row, we lay a steel sheet, which will act as an overlap;
- Row 38 completes this order.
Furnace finishing
In the process of finishing the structure, you can use any materials. The most common options are:
- whitewash;
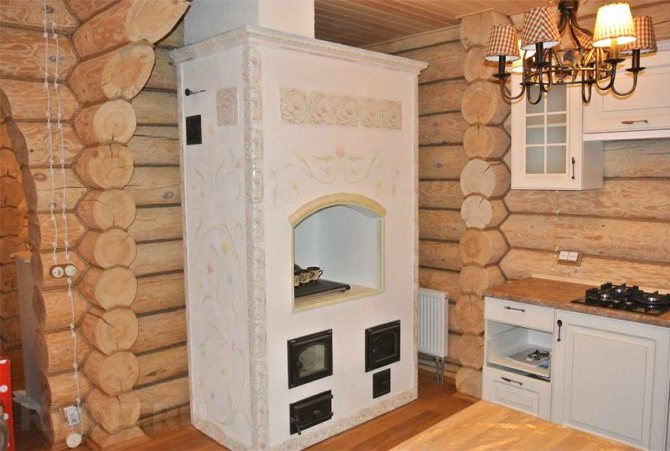
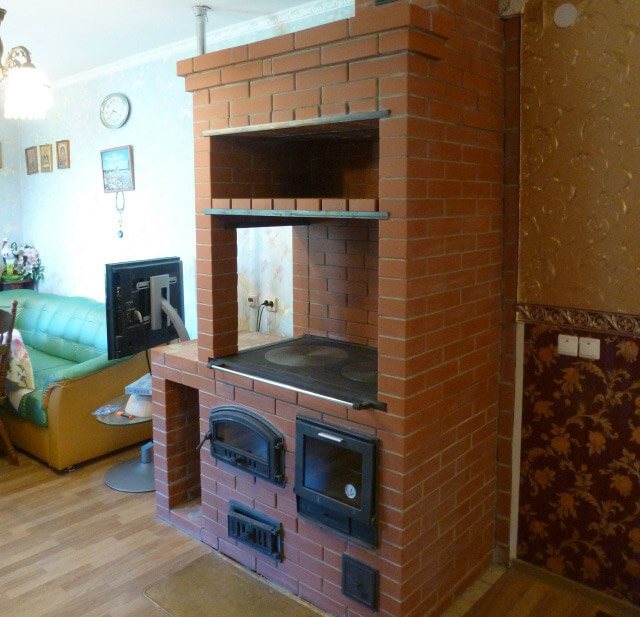
Stove with whitewash and stucco
Whitewashed stove with stove
- decorative rock;
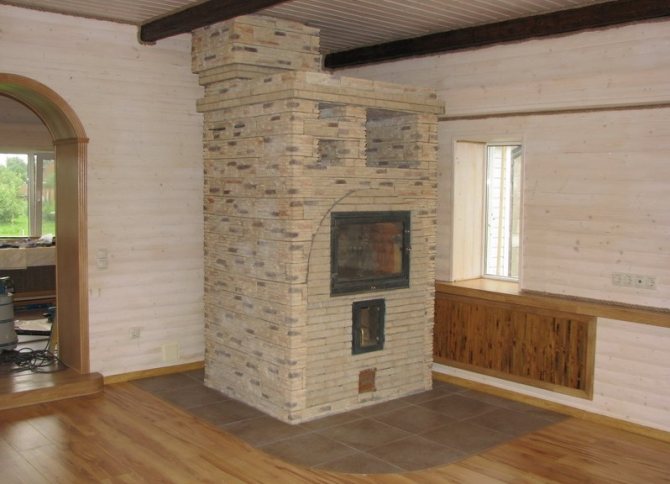
Stove finished with decorative stone
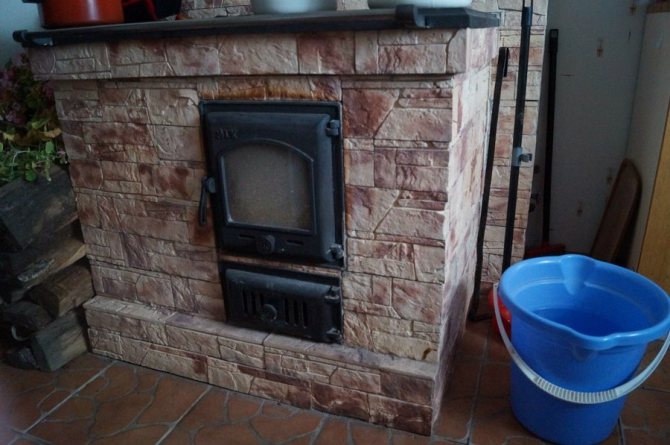
Furnish the stove with a large plaster stone
- tile;
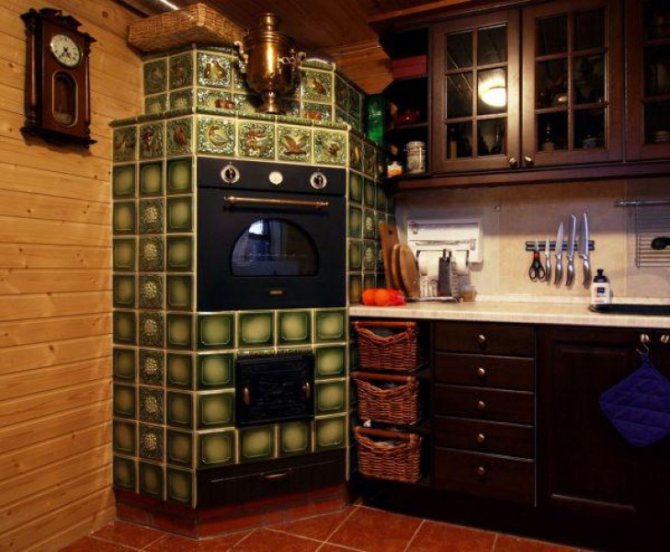
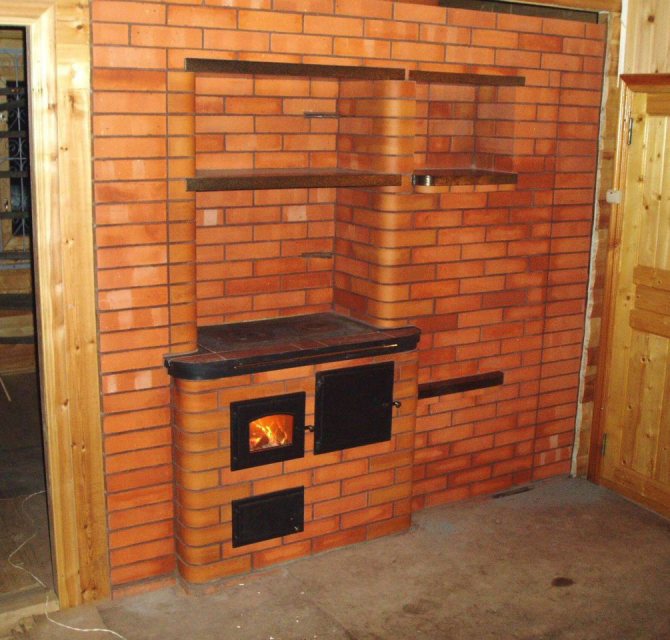
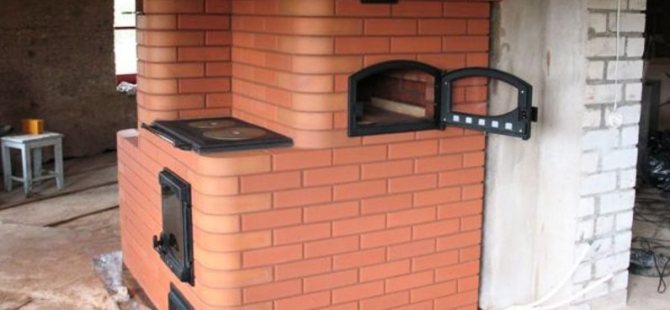
Tiled Swede
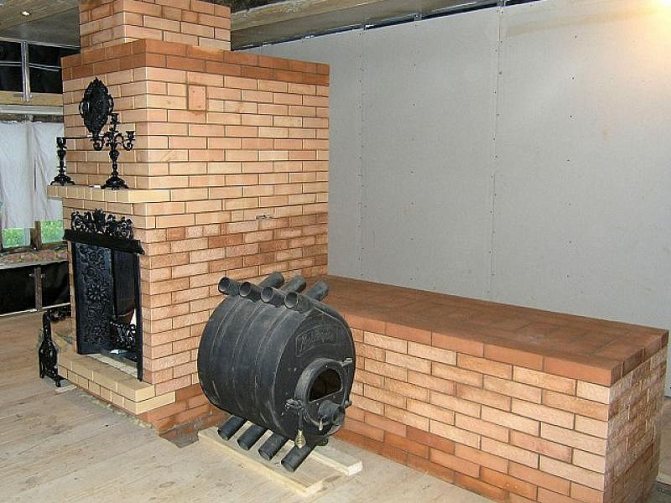
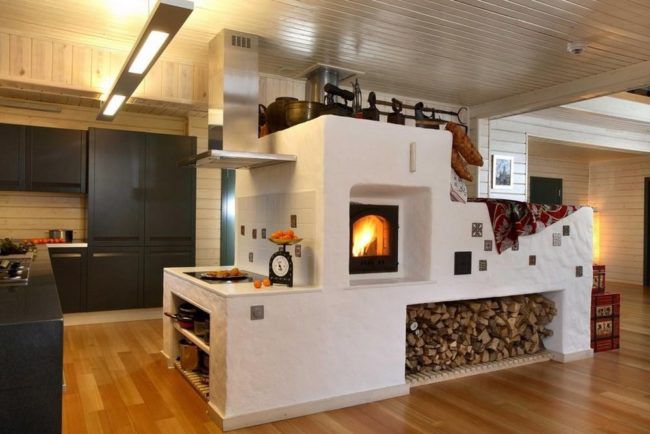
- combination of different materials.
Combined Swedish
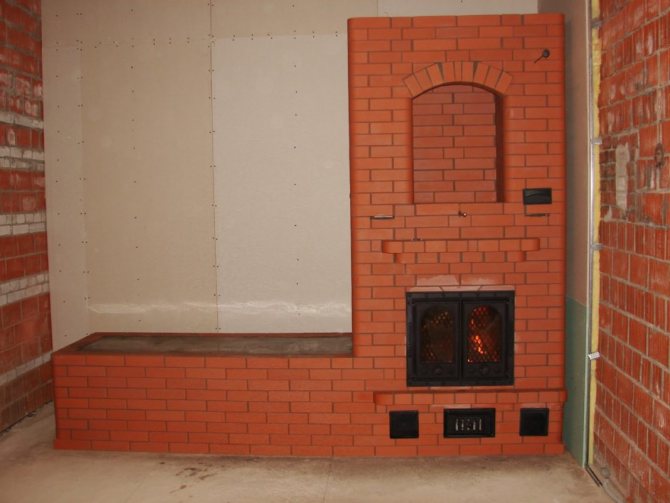
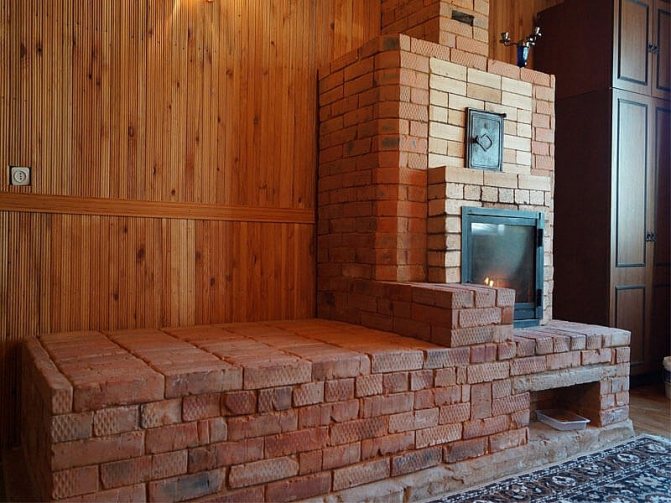
If you are making a furnace out of beautiful new bricks, you can leave it that way.
Brick Swedish
Dark brick swedish
Stove with oven
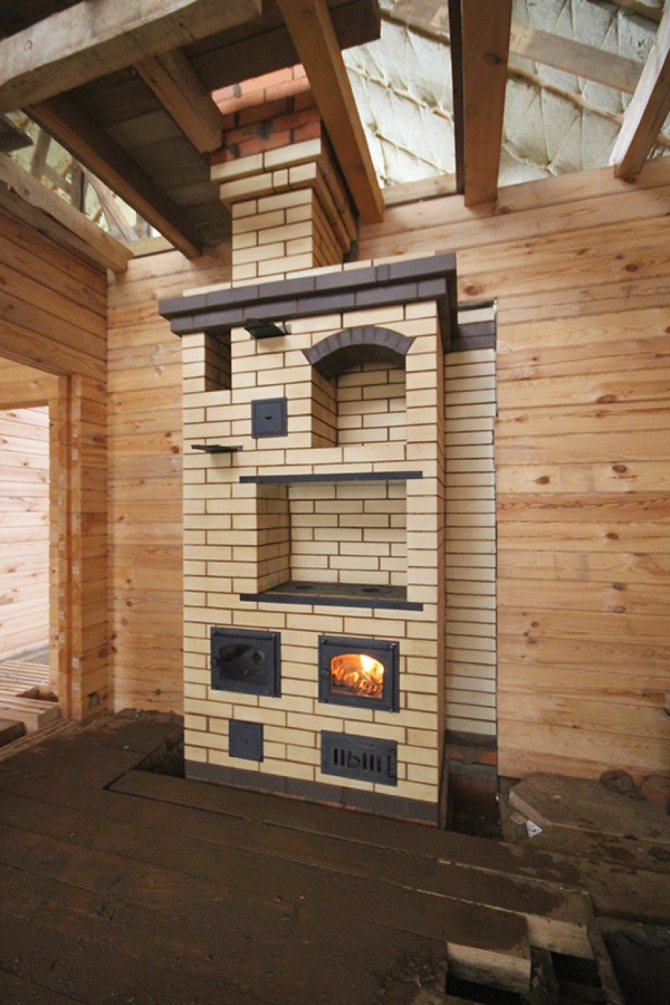
Light Brick Swedish
Swedish woman in a residential building
Construction of a multifunctional furnace
The combined structure is more massive than the compact "Dutch" and requires more bricks for construction, but it is more efficient, in the future you will not have to regret unnecessary expenses and work done. Modern models of hearths with a stove and a stove bench differ from the traditional bulky Russian stoves.
Design features and important rules
Today, multifunctional stoves are economical in fuel consumption, have high heat transfer, look stylish and last a long time.To build a hearth with your own hands, it is enough to have basic knowledge of stove masonry, strictly follow the recommendations and procedures drawn up by professionals.
- The height of the bed should not exceed 90 cm from the floor - this contributes to more efficient heating of the lower part of the room and makes the resting place convenient for people of any height.
- It is recommended not to make a duct chimney under the trestle bed, but to give preference to a hood - this design increases the cooling time of the stove.
- Heating and cooking stoves with a stove bench weigh three tons or more, so they require a powerful foundation - a deep concrete slab reinforced with metal reinforcement.
- To use the stove in the warm season, you need to choose models with a summer mode, in which the design of the chimney is thought out and there are dampers that block the movement of gases.
- When building a stove for a two-story house, a stove bench and a stove are always planned on the lower floor.
Required materials and masonry scheme
The proposed scheme of a heating and cooking stove is suitable for small houses, country houses and summer kitchens with an area of no more than 28 sq. meters. The dimensions of the building are 178 * 128 cm, the area of the bench is 178 * 63 cm. The cast-iron plate is located at a convenient level - you do not need to bend over and use a grab during operation.
Model with winter and summer operation. The summer mode valve is located on the 17th row, in winter it is closed 5-10 minutes after kindling in order to let hot gases through the complete smoke cycle. In cold seasons, two fireboxes are required per day.
It takes about 2.5 hours to heat the trestle bed, it retains heat for a long time and helps to solve the problem of a cold floor. In addition to its direct purpose, the extension is used for drying fruits and mushrooms, shoes, clothes, linen, installing a folding metal dryer on top.
For work, you will need the following materials and stove devices:
- red ceramic single brick - 800 pieces;
- fireclay brick for furnace lining;
- thick-walled furnace door;
- blower door;
- cast iron plate 41 * 71 cm;
- grate;
- oven with a wall thickness of 4-6 mm;
- steel corners 45 * 45, 50 * 50 cm.
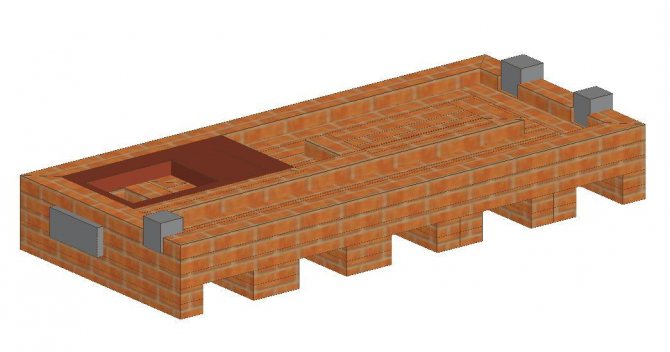
Diagram of a heating and cooking stove with a stove bench
How do you know if the oven is ready for use?
You can only use a completely dry stove. If your stove valves are dry, then the stove is dry. You can also check in another way: put crumpled newspapers in the cleaning for a few days. If after that they are dry, then the oven has dried well.
Wet Swede can't be exploited
If you start using a poorly dried structure, it will begin to collapse after the first firebox.
Important! Even if your oven is well dried, it cannot be used at full power for the first 3-4 days.
To make the stove last as long as possible, heat it daily. The first firebox at the beginning of the heating season should be lightweight.

Newspapers will help you check the dryness of the stove
The subtleties of building a stove
The quality of heating is determined by the proportions of the fuel part. All its dimensions must strictly correspond to the drawings, otherwise there will be violations when using the device. The designers have approved the following dimensions:
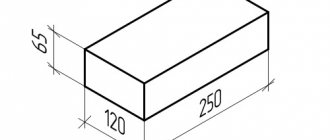
- Slab - 710 × 410 mm.
- Furnace compartment - 330x356x506 mm.
- Oven - 305x381x506 mm.
- The thickness of the metal walls of the oven is within 4–6 mm. This size is of great importance, since when it decreases, the walls will burn out quickly. And thick walls will quickly dissipate heat, and their warm-up time will increase. These moments will lead to underburning of fuel and the deposition of soot, and thus the efficiency will drop. These points also apply to the plate, so cast iron or special steel is the best option for it.
Structural planning
If you want to build such an efficiently working stove with your own hands, then you must observe the recommended proportions. The oven is heated from all sides with hot gases.Therefore, from the rear of it to the wall of the firebox, it is necessary to make a gap of one and a half bricks. It is possible to make the firebox close to the oven by isolating the near wall from the fire with asbestos.
The door is considered an important element of the combustion device. She is also his weak point. If it is made of thin, low-quality material, then it looses from heat loads and may fall out. It is advisable to immediately insert a cast-iron door with a mustache walled into the masonry. If there is no mustache in the purchased door, do not worry - you can make them yourself by welding a wire 60 mm long to the corners of the door. And do not forget to part it in the form of the letter V, and also brick it up. In order for the finished door with a mustache to hold for a long time, it must be reinforced with a steel strip or corner.
It is not so easy to build a Swede. When heated, all the heat goes towards the floor, so it is necessary to make good insulation. Nowadays, there are a lot of high quality materials. We will use one of them - this is basalt cardboard. It is laid in three layers. The resulting insulation is 15 mm. The foil sheet is also placed in the middle and top layers.
The foot of the stove is laid with wide seams - 6-13 mm. Due to this, a protrusion in the form of a pedestal is obtained. All bricks must be soaked in water before laying. This removes dust and increases their adhesion. This is necessary because the stove has a high thermal stress, and the use of dry and dusty material will lead to fragility of the structure. Masonry mortar must also be used of excellent quality on marl clay.
When building a firebox, you must use a yellow brick. It is a chamotte building material that can withstand very high temperatures. The solution is also used using fireclay clay. The smallest joint width between fireclay and ordinary masonry is 6 mm. Only the firebox is laid out of chamotte, although ideally it would be necessary to lay out the entire stove. But this is an expensive material, so they save it.
Comfort in a wooden house
When laying out the structure of the Swedish oven, it is necessary to cut the bricks evenly to the desired size. This can be done with a grinder. In the drawing, you can see that some of the corners are rounded. This must be done, since the corners will weaken the draft due to the resulting swirls of the flue gases.
The use of metal in the furnace is generally undesirable. But the Swedes decided to use it initially to reduce the cost of the product. A 6 mm layer of mortar is applied to metal parts from all sides.
Benefits of a stove stove
Before the advent of modern medicine, our ancestors were treated with decoctions, steaming in a bathhouse and lying on the stove. The latter was always at hand and back during off-hours. Several nights in a warm building, and not only the cold, but also severe joint pains went away.
Sometimes more serious sores receded. But the matter is not only in the healing properties. It is very pleasant to lie on a heated bed. No wonder the hero from the fairy tale stubbornly did not want to get off the stove. Therefore, the popularity of the classic "heating equipment" is returning.
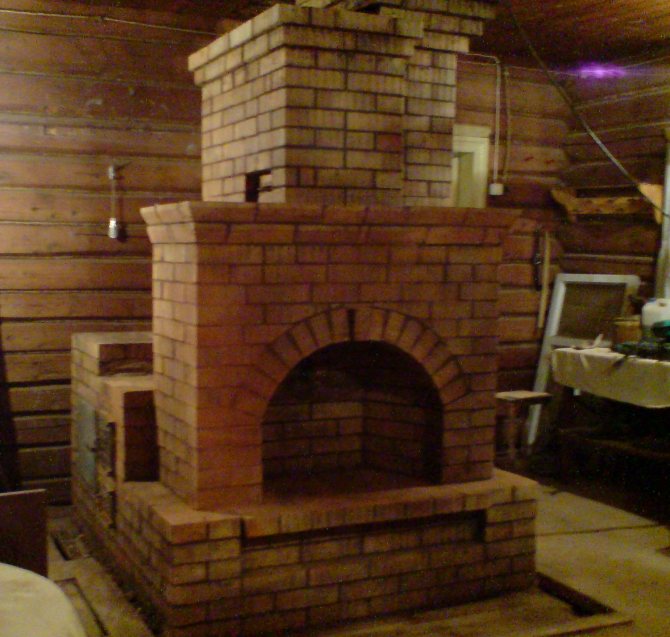
The stove can be ordered by a specialist, or you can do it yourself. And how to make a bell-type oven, follow the link.
We build a Dutch oven
If you want the oven to take up even less space, then you should pay attention to such a device as a Dutch oven. It is the most compact and easy-to-build structure that can be installed in almost any interior. Here we describe how to make a standard type of such a structure, and the bed is completed taking into account the above recommendations, it must first be taken into account in the drawing.
Would need:
- ceramic brick;
- refractory bricks;
- clay;
- sand;
- blower door;
- firebox door;
- grate;
- metal wire;
- asbestos;
- clean door;
- gate valves;
The device of the Russian stove
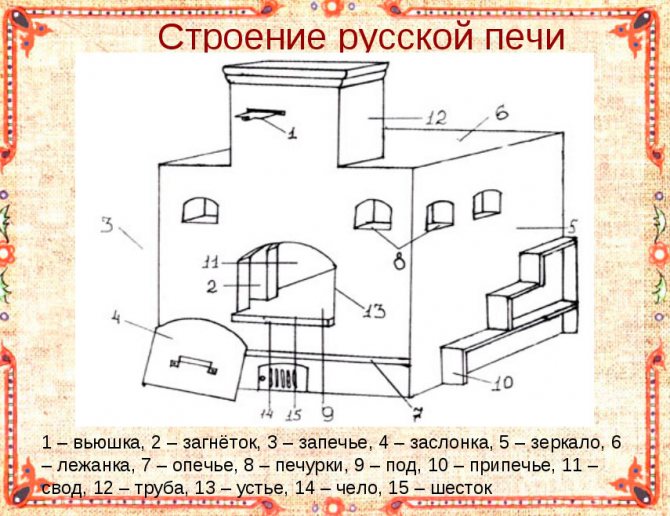
- The main elements, without which the device of the Russian stove is unthinkable:
- foundation (guardianship);
- cooking chamber, it is also a firebox, also called a crucible or firebox. Located under the couch. The air for burning firewood enters through the throat, and after heating it is directed to the overtube, and then into the chimney for removal to the street;
- cheeks - the front wall of the firebox;
- mouth - the gap between the cheeks of the furnace for connecting the furnace with the chimney and the heated room;
Also, an important role of the mouth is the laying of dishes and firewood in the firebox (crucible).
- the arch is the uppermost layer of the firebox. During operation, it is exposed to intense heating, therefore it is prone to the formation of cracks from incandescence. It is necessary to attract the most heat-resistant and heat-consuming materials here;
- under - the bottom of the cooking chamber (crucible). It has a slight slope towards the entrance to the firebox to make it easier for the user to slide in and out heavy dishes with food. Installed directly on the arch support. Provides the strength of bricks that are tapering along a cylindrical surface;
It is recommended that the top surface of the hearth be properly sanded to make it as easy as possible for heavy cast iron and other food containers to move.
- baking (baking) inside the baking under the hearth. The element is designed for storing and drying firewood;
- cooking stove. An independent surface, the basis of which is most often a cast iron, and sometimes a steel part. Located on the back;
- six - a platform in front of the entrance to the crucible. This is where the plate is located, if it is provided in the model;
- "Trough" or semi-circulating vault - covers the heat. Material scatters on the trough, they are able to retain heat (brick chips, sand, pebbles);
- wards (in some regions they say "polati") or overlap. This element is also called a couch - a place where people go to sleep. In classic models, it is located strictly behind the chimney, in some more modern models it is moved to any side. It is at this level that the ordering ends with the topmost layer of brick;
- hailo - smoke outlet above the pole in front of the mouth. It is a bell that widens downward. During the operation of the stove, smoke from burning wood goes there.
More complex projects may include a number of other elements - for improving heat transfer, for retaining heat, for placing cooling ready-made food and cold clean dishes. The higher the user's requirements, the more complex the furnace layout, its construction and brick laying.
The chimney is a significant element in the design of the stove. How to choose and install it correctly, read this article, and you can find instructions for caring for it, including cleaning, here:
On the stove in the night - away sores!
A brick oven with a stove bench is not only comfortable, but also useful. Our ancestors spent most of their time in the field or caring for livestock, sometimes in the wind and damp. Hence, joint disease, rheumatism and sciatica are not uncommon.
Of course, in those days it was customary to treat these diseases mainly with folk remedies: various decoctions and compresses. The Russian steam bath also helped a lot. However, the bathhouse was heated no more than once a week due to their inability to permanently operate: heating a bathhouse is a time-consuming process.
But the stove with a stove bench, in contrast to the bath, has always been the center of the house. With their help, it was possible to simultaneously warm up the hut and treat sore joints.
The nuances of the stove device
It is advisable to make the outer part of the chimney from silicate bricks. It is more resistant to moisture and temperature fluctuations. After laying the chimney, fittings are installed that have not yet been installed (cast-iron hob, etc.).
If the goal is simple brickwork, then simple cleaning and alignment of the joints can be dispensed with. If your plans include decorating a wood-burning stove, you do not need to pay attention to the joints.Typically, such structures are decorated with heat-resistant ceramic tiles. For example, tiles or clinker.
The first option is preferable from the point of view of heat transfer. The tiles are characterized by a box-shaped back shape, which increases the thermal efficiency of the coating.
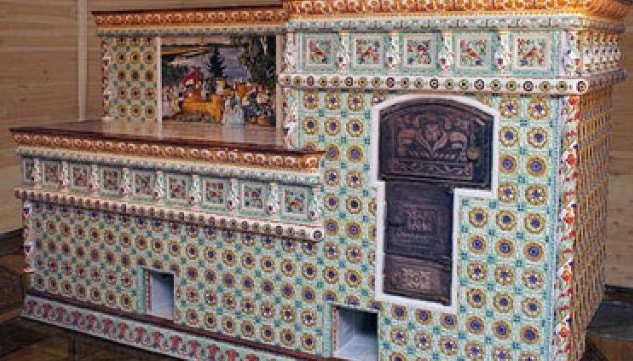
Figure 7. Stove faced with tiles
For those who do not want to mess with tiles, but want to somehow decorate the structure, we recommend painting the oven with heat-resistant paint. Can be decorated in the traditional Russian ornamental style.
A thermal protection device is required between the main structure and the chimney - in the overlap area. It is made, for example, from basalt panels. It is advisable to use slabs up to 100 mm thick. In extreme cases, you can get by with 50 mm. But not thinner.
As a masonry mixture, you can use both a purchased one and a mortar of your own preparation. In the latter case, the composition of clay and sand is used. The ratio of the components is from 1: 1 to 1: 2, respectively. The specifics depend on the quality of the clay. The choice of proportion is determined experimentally. Nevertheless, it is recommended not to be stingy and purchase a ready-made mixture with a verified ratio of components.