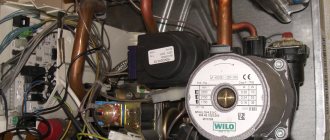
The chimney convector is a good alternative to radiator heating devices. It has a simple structure and many advantages. It is also called an economizer. If you wish, you can make such a device yourself, which is important for stoves with reduced efficiency. But before that, you need to familiarize yourself with their principle of operation.
A similar convector can be made with your own hands
What is an economizer and what is it for
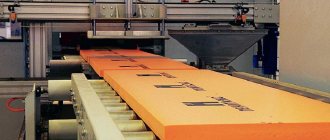
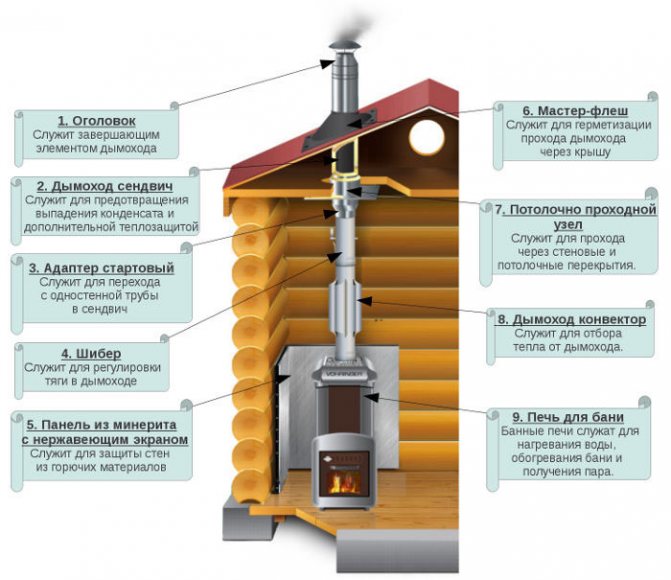
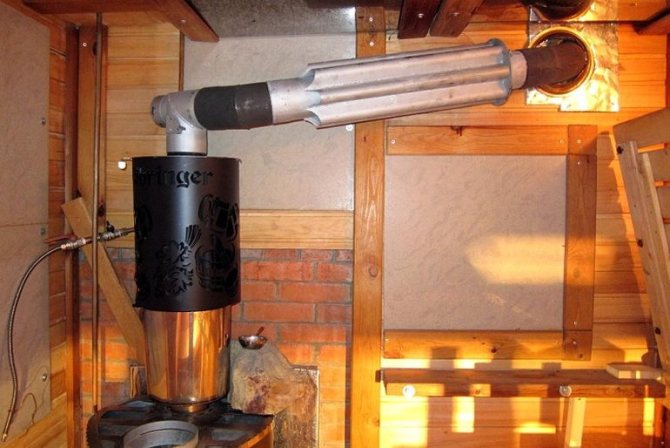
Convection chimney is a heat exchanger made of high-alloy heat-resistant steel, installed directly on the pipe of a heating boiler or sauna stove and used to increase the heating rate of the main space and efficiently supply warm air to adjacent rooms.
The use of an economizer is preferable in the case of regular operation of the hearth as the main heating device. In this case, the device will be able to take over the function of radiator heating, significantly increasing the efficiency of the entire heating system. The maximum efficiency during the operation of the chimney-convector can be achieved when it is installed on the pipe of a solid fuel boiler.
Convector-type chimneys are effective in organizing heating in bath rooms. In such cases, models are used with the possibility of overlapping convection channels in order to direct all the energy generated by the hearth to quickly warm up the steam room.
Installing the convector
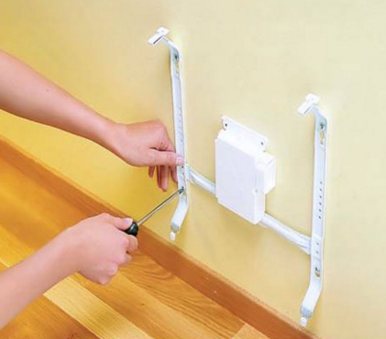
Installing the convector on a wall consists of the following steps:
- First, unpack the device and turn it over to the back.
- Now you need to dismantle the fasteners.
- The bracket that you removed from the device should be leaned against the wall and with a marker, undo the places of future fastenings.
- If your house has a wooden wall, then the wall convector is installed using self-tapping screws. If the house has a concrete wall, it may be necessary to drill holes with a hammer drill. Then it is necessary to drive dowels into these holes and install the frame. Here is a photo where you can find out how to install the convector frame. If you are interested, then you can read how to connect the electrode boiler.
- Now the convector should be put on the installed bracket.
- Plug its power plug into a power outlet.
- Set a suitable temperature. This can be done using a thermostat.
As you can see, the technology for installing an electric convector is quite simple. Even a beginner can complete this process. Below we will provide you with helpful tips to make the installation process easier.
How the convector works
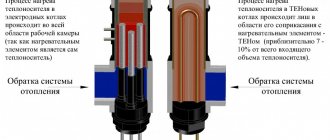
The economizer has a modular design consisting of two steel pipes of different diameters. The outer tube acts as a casing for the heat exchanger and is made of hardened steel sheet 0.5 mm. The internal flue gas module is made of 1 mm thick steel and ensures the passage of incandescent gases.
Some models are equipped with an upper casing made of artificial or natural stone, designed to accumulate and evenly distribute heat in the heated space. The design of such a chimney completely excludes the ingress of carbon monoxide into the room: only heated air circulates in the external module of the convector, other gases remain inside a completely sealed core.
The materials used to create the oven convector have a high degree of heat resistance, corrosion and oxidation resistance.
Homemade heating batteries
Despite the huge range of heating radiators on the market, it is more economical to use home-made heating radiators for summer cottages, garages and in small houses, which will cost much less. Such batteries can be made from round pipes, and from square or rectangular pipes. This design is called a heating register. The principle of operation of the register is similar to the work. The coolant heats the metal of the register, and it heats the air in the room.
There are two types of home-made heating devices - home-made heating radiators made of round or rectangular pipes. Homemade registers made of rectangular pipes are more compact, they are easy to hide in the interior and have proven themselves quite well during operation.
Round pipe registers are divided into two types:
- sectional registers;
- coil registers.
These devices are made of pipes of different diameters and differ in the geometry of the structure. In sectional registers, large-diameter pipes are arranged in parallel and connected to each other by a pipe of a smaller diameter, and in coil registers, a large-diameter pipe can have several bends. After manufacture, the registers must be subjected to high pressure tests. Test pressure - 13 atmospheres.
Principle of operation
During the combustion of fuel in the furnace, a large amount of incandescent gas is emitted, which is discharged outside the heated room by means of a pipe. The economizer allows using the gas discharged from the hearth for the purpose of additional heating.

The chimney convector works on the principle of the simplest heat exchanger with natural convection of air masses. The cooled air is sucked into the convection holes of the outer tube of the product and, being heated from the incandescent chimney, gradually rises upward, spreading throughout the room. Slowly cooling, the air masses descend, and their path repeats again.
How the device works
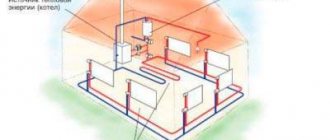
The chimney-convector is a component of the stove or boiler heating system in a house or a bathhouse, operating on the principle of convection.
In fact, it is a coaxial pipe, consisting of two pipes, one of which is located inside the other. The outer tube acts as a convector and a protective cover that absorbs infrared radiation. The inner part of the structure serves to remove exhaust gases and combustion products, while the outer one is designed to supply fresh air to maintain the combustion process in the combustion chamber.
The operation of such a chimney is based on the principle of convection: passing through an internal pipe, hot smoke, gas and water vapor heats up a metal pipe.
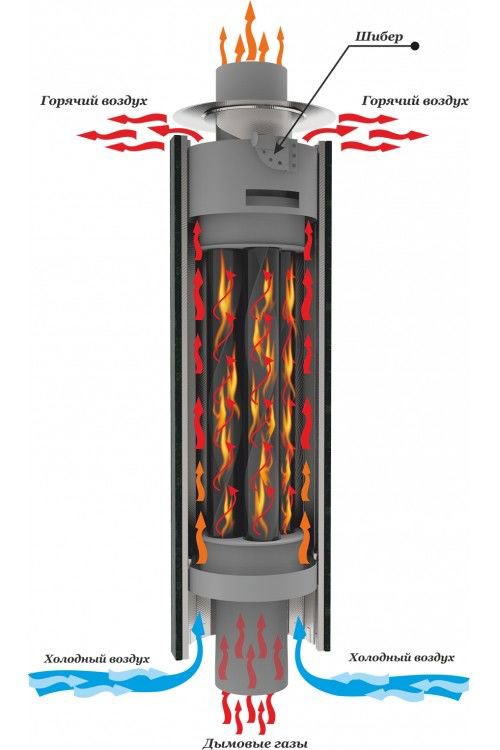
The increased area of the metal casing, like a radiator, promotes heat exchange and heating of the air as it passes through the air pockets. Due to the large surface area of the metal, the convector effectively transfers internal heat to the air, thereby heating the room.
The main purpose of installing a chimney-convector is to increase the productivity of boiler or furnace equipment, as well as to save energy.
Note! Due to the more efficient use of the thermal energy of fuel combustion, the metal structure allows you to double the heating power of one room, as well as additionally heat adjacent rooms on the basis of one source.
Types and designs
The design of the oven convector can be varied depending on its functional purpose:
- With two connections. Used to heat one living space.
- With four or more nozzles.They are used when it is necessary to heat two or more adjacent rooms.
- For baths. They are distinguished by the possibility of blocking ventilation openings in order to increase the heating rate of the steam room and increase the maximum air temperature in the heated space. Some models of sauna economizers are equipped with a special steel mesh for placing stones.
Designs of economizers to ensure uniform heating of living quarters have convection holes on the outer part, which provide cooling of the gas outlet pipe and effective circulation of heated air.
The length of the product can vary from 50 cm to 1 meter, depending on the goals pursued during the installation of the economizer and the design features of a particular heating system.
The longer the convector is, the larger the area of its contact with the main pipe, which means that the air in the heated space heats up faster.
Short convectors are suitable for use in rooms with low ceilings.
Selection of convectors
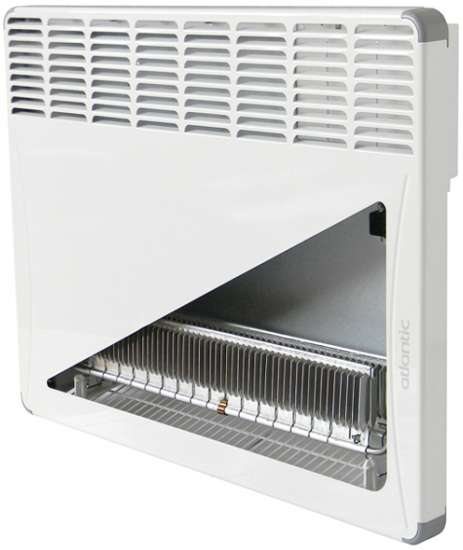
Installing an underfloor convector can seem like a rather complicated process. Therefore, we will describe everything step by step, starting with the choice of equipment. We can install electric or water heaters in front of panoramic windows or in front of the entrance area - it all depends on the type of main heating in the building.
Electric floor convectors operate on a 220 Volt network and are designed to heat households that are not connected to gas mains. In their design, most often, fans of one design or another (axial or tangential) are already provided. The disadvantage of electrical appliances is their high energy consumption, but in some situations they are irreplaceable. But only wires are needed to connect them.
Electric convectors can also be used in gasified buildings, where it is difficult to lay water heating to the place of their installation.
Installation of a water convector installed in the floor.
Water convectors have a similar design - there are heat exchangers that are connected to the heating system. For this, metal or plastic tubes are used, which require a certain skill for their laying. In this regard, electric floor convectors benefit - for their installation and connection, only wires of a suitable cross section are needed.
When planning the installation of a floor convector, pay attention to the choice of a model with forced convection. These devices have the following advantages:
- Higher heating rate;
- Increased efficiency of work in rooms with a ceiling height of 3 meters;
- Effective removal of moisture from the entire glazing surface.
By choosing floor convectors with low-noise fans, you can increase heating efficiency and prevent a source of noise.
Advantages and disadvantages
The convector chimney has a number of significant operational advantages:
- Affordable price.
- Easy assembly and installation.
- Low fire hazard.
- IR and carbon monoxide protection.
- High efficiency of the heating system by reducing the volume of fuel and organizing the retention of heat entering the pipe inside the room.
- Regulation of the degree of heating by blocking the convection openings (possible with the selection of the appropriate economizer models).
- The durability of the product, subject to the correct choice of its design and the high quality of the materials used in the production.
Among the disadvantages of using an economizer when organizing heating systems, it should be noted:
- The need to constantly protect the product pipes from contact with flammable objects.
- Complication of the process of cleaning gas disposal systems in the entire structure of the chimney.
- Increase the space occupied by the heating system.
- The need to provide additional circulation of air masses in adjacent heated rooms.
- The finishing of the walls adjacent to the convection system should be carried out in advance, taking into account the maximum recommended distance from the point of view of fire safety from the economizer to the floors. Otherwise, repairs may require complete dismantling and reinstallation of the convector.
Obviously, if it is necessary to regularly heat one or several rooms with a low-efficiency furnace, the advantages of the economizer will fully cover the inconveniences arising during its installation and operation. The low cost of devices of this type will allow them to be used even in heating projects with a low budget.
Homemade gas convectors
Among the developments of home-made convectors that convert gas into thermal energy, there are not too many different solutions. This is due to the danger of errors in the construction of devices operating on blue fuel. The slightest miscalculation can lead to an explosion, poisoning, fire.
However, there are some interesting constructs worth considering. They can be useful in heating summer cottages, country houses, trailers, tourist tents, garages.
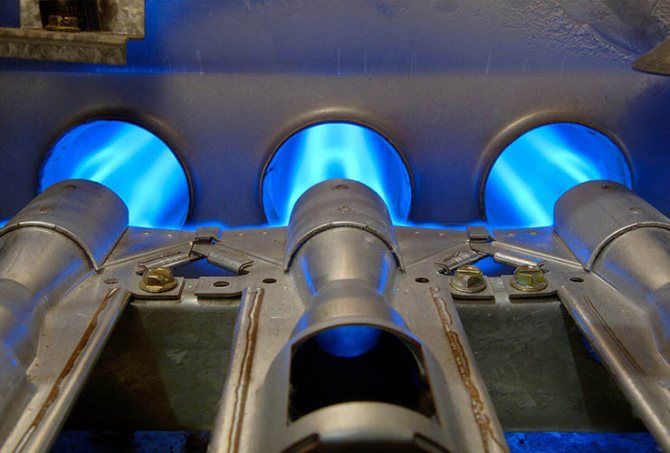
Option 1. Heater based on IR burner
In fact, this is just a modification of a conventional infrared gas burner of the Solyrogaz brand. The device operates on bottled gas. The inventor and performer of the idea was the GII-2,3 model, the working panel of which can be installed horizontally.
The original heat exchanger was simply welded and installed on this working panel, which heats the space in the usual mode by flameless processing of gaseous fuel. It looks like a metal cube with metal tubes laid inside the body.
Image gallery
Photo from
Homemade mobile gas convector
Application of gas infrared burner Salyarogaz
Homemade heater heat exchanger
12-volt computer fans
The heat exchanger has no bottom, it would prevent the passage of heat waves. At the top, there is a branch pipe for connecting a chimney. A pair of computer fans are installed at the back to speed up the flow of air.
Structurally, this model resembles an air heater for air heating systems. By the principle of action - too. The air drawn into the tubes of the device is heated by a gas burner, then it is forced out of the tubes with a fresh portion of cold air.

The mobile gas-fired convection heater is suitable for tourists, fishermen with hunters, and those who like to travel in a camper. It just needs to be connected to the cylinder, and the rigid or corrugated pipe installed on the branch pipe is taken out of the tent.
According to the owner of the invention, the modified burner heats up the tent much faster than it, but without a heat exchanger. All products of gaseous fuel processing are discharged through a pipe connected to a branch pipe. Oxygen does not burn, gas is consumed economically. For fishermen, hunting enthusiasts and tourists, this is a real find.
Option # 2. Using a decommissioned heater
This option is generally extremely simple, it was invented to save money on heating the garage. The whole revision consisted in the repair of the decommissioned convector and in the removal of the casing. The result allowed a significant increase in heat transfer and heating rate, but it has problems with safety.
Image gallery
Photo from
Fixing the convector with anchor bolts
Heating the garage with a gas appliance
Fixing the gas cylinder hose
Installation of anti-vandal devices
First, the tightness is broken. In case of accidental attenuation, the gas valve of the heater will, of course, stop supplying.
However, with constant combustion, oxygen from the air mass in a confined space will be burned out, therefore it will be necessary to regularly ventilate the garage in one gulp or construct forced ventilation.
Secondly, an open heat exchanger can easily cause burns. But where children do not run, this can not be considered a minus. An adult is unlikely to forget that the casing has been removed from the heater and that if you move it carelessly near the device, you can get burned.
A similar solution, but used for heating the trailer, will be introduced by the following video clip:
A 30 m² garage is heated by a convector without a casing in about five minutes. Gas is consumed in the amount of no more than 500 rubles in the winter month. It works less often in autumn and spring, which means that costs are even reduced.
Option # 3. Duct fan retrofit
The essence of the alteration is to install an air duct with an exhaust fan on the front grille. The heat generated by the convector is directed to the owner's working area. There are no special tricks, but there is a significant reduction in heating costs.
Features of the device and operation of the modernized gas convector are presented in the video:
Combustion products are discharged outside the facility as usual - through a coaxial pipe, through which fresh air is supplied to the burner to support the flame. This homemade product is significantly safer than the previous model, but you will still need to periodically ventilate the treated room. After all, without a doubt, she will "drive" clouds of dust.
Convector service life
The service life of a properly selected and installed economizer, while observing all technical requirements, is practically unlimited. Fixtures of this type are made of high-strength materials that are resistant to oxidation, rusting and wear under the influence of high temperatures.
Chimneys-convectors have a simple design and a minimum of working units, therefore, with proper installation and operation in the system, there is simply nothing to break in them.
Nevertheless, manufacturers of convector-type chimneys recommend regular preventive inspection of the flue system in order to prevent possible sealing defects and other technical malfunctions.
Useful tips for installing the convector
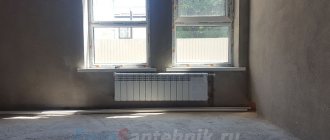
Sometimes, many consumers may need to install an electric convector on the balcony. Usually, on the balcony, the decoration is presented in the form of PVC panels. The convector is lightweight, but the plastic panels will not support it. In this case, you should try to choose a convector that is lightweight. In the photo below, you can see the options for these devices.
The installation of a heating convector contains one more nuance, which you should familiarize yourself with before performing installation. Usually, an instruction is included with the device, in which the manufacturer indicates the optimal distance from the floor. Heating in a wooden house can also be done with a convector. If you have not found or lost this manual, then you need to be guided by the following tips:
- The height from the floor should be 20 cm.
- Leave a 20 cm gap from the wall.
- The distance to the nearest objects that surround it should be at least 20 cm.
- Above and in front, the gap should be half a meter.
- The socket must be at least 30 cm apart.
Special attention should be paid to connecting the convector to the network. Usually the power of this device does not exceed 3 kW
If modern wiring is installed in your home, then it will be able to withstand this stress. If you want to do without cords, then you can connect the electric convector directly. To do this, you will need to lay a separate cable from the shield to your device. Here's a video to help you learn how to follow all the installation processes correctly.
These are all instructions that will help you perform a high-quality installation of the device. As you can see, installing the convector is easy.
3 diagrams for connecting an infrared heater.
Do it yourself or order
An economizer is a device that is simple in design, which can be made independently if you have the necessary materials and tools (welding machine, file or metal scissors).
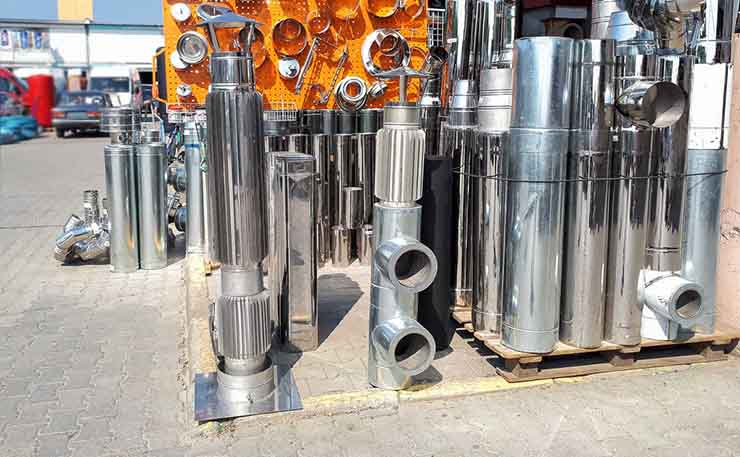
If it is not possible to make a convector pipe on your own, it can be purchased at a hardware store by choosing a model that is suitable for configuration and cost.
Warm floor
Home owners use DIY heated water floors in two versions.
Underfloor heating can be additional heating together with radiators or the main heating of the room.
Underfloor heating evenly warms up the room, increases the level of comfort and does not require additional energy consumption, since the batteries and the floor circuit are powered by one boiler.
Self-assembly of floors is quite accessible to owners who have carefully studied the principle of operation and the procedure for calculating a warm floor. Before installation, you need to decide and purchase the necessary materials and components for the warm floor. In the process of installing the circuit, strictly follow the rules and recommendations of specialists.
Ways to create a warm floor
In principle, a warm floor can be created in an apartment located in a multi-storey building. But usually the connection to the heating system is prohibited. If there is a permit, then the connection will require an examination of the influence of the warm floor on the operation of the system. Typically, this design requires the installation of a separate pump and mixing unit. These additional elements will maintain the outlet pressure of the system. In private houses, underfloor heating and the heating system in a private house are inextricably linked with their own hands.
The most popular ways to install underfloor heating:
Pipes used for underfloor heating
For the organization of a warm floor, mainly three types of pipes are used. The best option is metal-plastic pipes, which are relatively cheap, easy to install and durable. Copper pipes find use, but they are very expensive as well. They are inconvenient in work, because they are tough, but they are not afraid of freezing and are easily repaired.
Selection Tips
If you do not have the desire or ability to make an economizer on your own, you can buy it. When choosing the required product, you should pay attention to the following nuances:
- The quality of welding in the docking points should not be in doubt: the welding line should be even and uniform, and the parts should not dangle relative to each other.
- There should be no stains, discoloration or other defects on the surface of the parts, since their presence indicates the low quality of the material used.
Classification
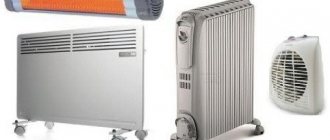
Gas convectors are mainly divided according to two characteristics: power and design. With power more or less clear. You need to choose the device that can heat the room.
Depending on the version, such heaters are distinguished:
- Floor standing - installed on the floor. No special skills are required to mount the floor unit. The appliance can heat fairly large rooms.
Important! Among the disadvantages can be noted a significant mass and the need for a foundation.
- Wall mounted. This is a more compact option. The device fits perfectly into the home interior. Most often, it is mounted above a window to create a thermal curtain from cold air. The power of the devices is low. They are suitable for use in homes up to 100 "squares".
Important! In addition to floor-standing and wall-mounted devices, there are also built-in ones. They have a beautiful design, and not only do not spoil, but also decorate the interior. In terms of their parameters, the convectors do not differ from the wall-mounted version.The downside is the complexity of installation (you need to prepare a niche in advance for installing a gas convector with your own hands.
When choosing a convector, be sure to pay attention to the material from which the heat exchanger is made. It can be steel, copper or cast iron.
Important! The most common option is steel, but a cast iron heat exchanger is more efficient and more durable. The copper heat exchanger is efficient and durable, but the cost of the device is high.
Building regulations
The selection and installation of the economizer must be carried out in compliance with the requirements of the current regulations, in particular:
- SNiPa 23-01-99 "Construction climatology".
- SNiPa 41-01-2003 “Heating, ventilation and air conditioning”.
- SNiPa 42-01-2002 "Gas distribution systems".
- SP 42-101-2003 "General provisions for the design and construction of gas distribution systems from metal and polyethylene pipes."
- PPB 01-03 "Fire safety rules in the Russian Federation", as well as other applicable documents regulating the installation and operation of convector-type chimneys in the type of buildings being equipped.
Heating elements
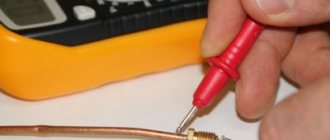
If all the switches are in good working order, the cord is intact, and the convector still does not work, then the fault here may be in the malfunction of the heating element. They are used in modern convectors from one to three at a time.
To check the integrity of such an element, we use an ordinary multimeter: we apply one probe to the mounting point, and the second one alternately touch the other terminals on the elements. Often a layer of scale formed or foreign contamination prevents good contact. We clean all contacts, installation wires to a sparkling shine and repeat the measurements. When the cause of the malfunction is identified, we try to repair the heating element, if this is not possible, it must be replaced.
Heating elements are used in two types - closed and open.
Open heating elements
Heating elements belong to this type:
- spiral stretched between slats made of ceramic;
- nichrome wire, twisted into a spiral with strung ceramic beads;
- a ceramic rod on which a nichrome thread is tightly wound.
Separate blocks are created from open heating elements together with heat shields.
Open heating element
Closed heating elements
Such heating elements consist of a spiral enclosed in a sealed transparent glass tube that perfectly transfers heat, but also serves as a dielectric. These include hermetic tubular electric heating elements (TEN) - in them the spiral is enclosed in a steel shell, and quartz sand, tightly packed inside, serves as a dielectric.
In many imported convectors, you can find heaters that are formed by applying a conductive coating on specially hardened glass or a very thin wire woven into a heat-resistant fabric.
Closed heating element
Such elements are not repaired, but replaced with new ones from the repair kit, if the manufacturer has taken care of this. In the absence of spare ones, you will have to select from domestic ones - here you will already need knowledge of the basics of electrical engineering. It is better to entrust such nuances to specialists from the service center, otherwise you will have to buy a new convector instead of the one that burned out due to your lack of competence.
Making and installing a convector with your own hands
The assembly of the economizer is carried out in several stages:
Drawing and diagrams
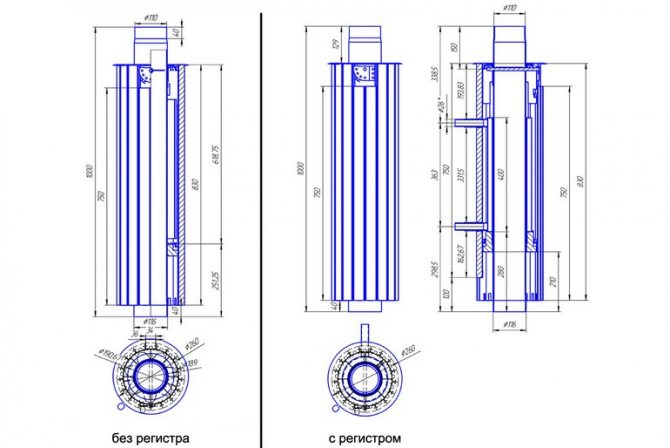
Before starting work, all the necessary measurements should be made to calculate the required dimensions of the product. The parts necessary for the work must be applied to the corresponding drawings and diagrams in order to simplify and increase the accuracy of the upcoming work.
It should be borne in mind that:
- The inner pipe must be at least 1 mm thick and with an outer diameter that matches the diameter of the stationary chimney. You can weld it from a rectangular sheet of metal.
- The prepared billet will be cut according to the length of the existing chimney.
- If one pipe is supposed to be made, its diameter should provide a distance between its inner part and the outer part of the gas outlet channel of several centimeters.
- The length of the outdoor modules should be slightly shorter than the inner flue pipe. The optimum thickness of steel used for these elements is 0.5 mm.
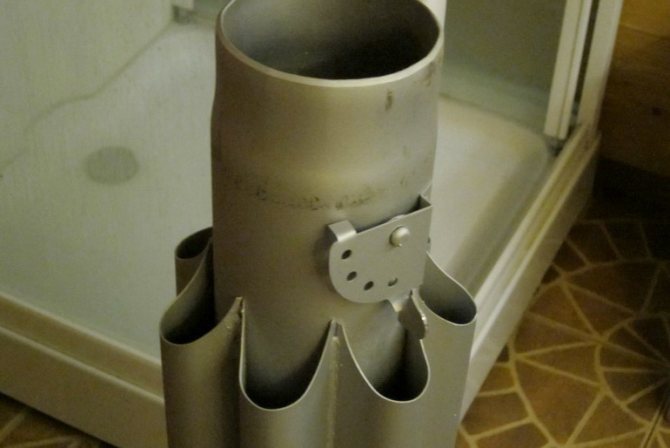
- If several small-diameter tubes are selected as an external module, it is necessary to calculate their number to completely cover the internal gas outlet during the welding process (the tubes are attached to the body of the internal pipe in a circle, like flower petals).
- If one large-diameter pipe will act as an external pipe, it is necessary to cut out 2 blanks for truncated cones from an additional sheet of steel, and evenly cut convector holes in them. These parts will become the top and bottom of the heat exchanger.
Sizing calculation
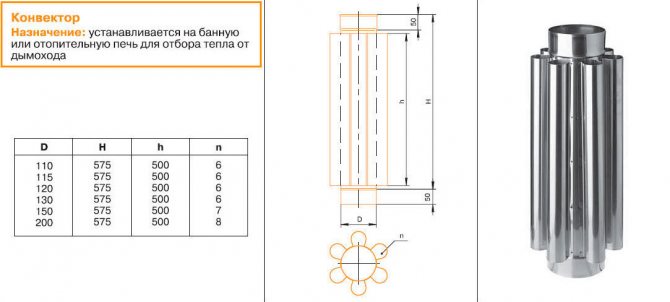
The calculation of the dimensions of all of the above elements must be carried out taking into account the design features of a particular heating system, as well as the dimensions of the heated room or premises. To simplify the work, you can use a special table:
| Convector | |||
| d | H | h | n |
| 110 | 570 | 500 | 5 |
| 115 | 570 | 500 | 5 |
| 120 | 570 | 500 | 5 |
| 130 | 570 | 500 | 6 |
| 150 | 570 | 500 | 6 |
| 200 | 570 | 500 | 8 |
Where d is the diameter of the gas outlet pipe, H is the height of the gas outlet pipe, h is the height of the heat exchanger.
Types of convectors
Chimneys-convectors can be used to heat both one room in which the boiler or stove is located, and adjacent rooms. In accordance with this, two types of equipment can be distinguished:
- chimney-convector-1 - heating device;
- chimney-convector-2 - equipment for heating air in two adjacent rooms.
We recommend that you familiarize yourself with: DIY chimney for solid fuel boilers
Chimney-convector-1 of the first type is used to increase the efficiency of heating one room. It is most often installed in country houses and baths as an alternative to water heating or electric convectors.
The chimney-convector-2 consists of a central pipe, from which two coaxial horizontal pipes extend in different directions. They are led through holes in the walls into adjacent rooms, where they function as heating radiators.
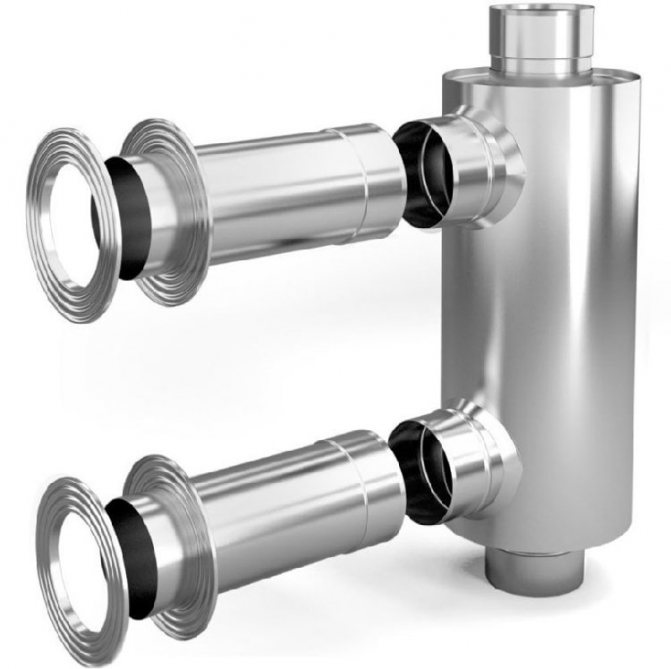
The average height of a single chimney-convector is 65-100 cm, the diameter of the inner pipe is 110-115 mm, and the diameter of the outer metal casing is from 220 to 300 mm.
To increase the area of the convector, stainless steel sheets or metal pipes of a smaller diameter are welded to the outer casing, between which air pockets are formed. The air passing through them heats up and mixes with the cooling air in the room. In this way, there is a constant heat exchange between the chimney and the room.
Installation features
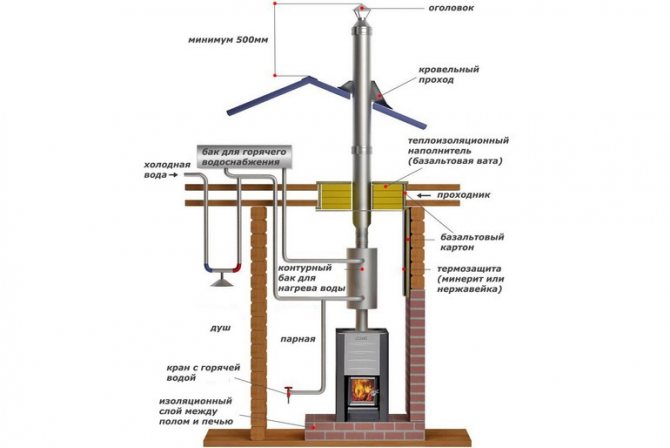
The economizer is installed directly into the bottom of the chimney. The structure leaves the chimney body, and then re-enters it, remaining an intermediate part of the flue system.
The length of the convector is selected based on the height of the room, as well as the required distance of the structure from the wall. The less the economizer is from the wall partition, the greater the heat of the air discharged through it. Most of the factory-made convector pipes are equipped with additional modules to extend their actual length. In the absence of such a part, you can use a corrugated stainless steel pipe.
The lower part of the convector is mounted directly above the floor.During the installation process, it is recommended to strengthen this area with a gasket, and only then process the seams with a specialized sealant.
It is important to tightly dock both ends of the product with the stationary chimney, preventing further ingress of gases from the inner pipe into the room.
After finishing work on the manufacture of a chimney-convector with your own hands, it is recommended to paint it with heat-resistant paint in black: this will ensure an increase in the thermal conductivity of the product.
Appointment of floor convectors
Installation of floor convectors is justified if there are elements in the room that generate heat losses. These include:
- Floor-to-ceiling glass doors;
- Entrance areas to the loggia with windows and thin doors;
- Exits to the terraces;
- Panoramic windows (stained glass).
The decorative grill is the only thing that gives out the floor convection heater.
With a sufficiently small ratio between the area of the windows and the area of the floor, significant heat losses occur. In addition, an unpleasant cold blows from the giant glazing. The problem is partially solved by installing triple glass units, but they are distinguished by their high cost. Therefore, we can safely buy floor convectors and proceed to their installation with our own hands.
These heaters are compact, but require niches of suitable depth for their installation. Metal boxes (bodies) of convectors are installed here, after which they are fixed with special fasteners. From above, all this is closed with a decorative grill - this is just a brief instruction so that you have a general idea of the future do-it-yourself installation.
Frequent errors and problems during installation
The convector chimney is easy to install and operate, so its installation does not require much effort. However, problems may arise due to the wrong choice of the diameter or length of the product.
The main mistakes during the installation of the economizer can be associated with the incorrect height of the location of its nozzles relative to the floor covering (too high or low), as well as with poorly performed sealing of the joints of the product with a stationary pipe.
Difficulties in installing the economizer are caused by the need to build it up with a corrugated pipe, followed by verticalization of the structure relative to the wall ceilings. In this case, you should additionally use a sealant to strengthen the joints, as well as level the structures using a building level.
Installation process
Dimensions of the floor convection heater and niche for it.
If you want to do the installation of the floor convector with your own hands, we recommend that you think over the place for its installation even at the stage of building the building - it will be easier to organize a niche of a suitable depth. Moreover the niche itself should be 1-1.5 cm larger (on each side) than the metal box of the device
... At the same time, you need to make sure that the upper part, where the decorative grille will be located, is on the same level with the future floor covering.
After the niche is ready, you can start installing the equipment. We fix the box for the floor convector using the supplied fasteners. We check the correctness of installation using a building level - the heater should be located in the niche evenly, without distortions. Further installation involves connecting to the heating system or the electrical network - for this, plastic pipes, flexible hoses or metal pipes of a suitable diameter are used.
If you are installing a water convector, consider thin, shallow recesses for piping / hoses. When installing the appliance, we recommend laying the connecting wires in cable ducts or pipes so that they can be replaced without problems.We recommend that the supply pipes with the heating agent be wrapped in thermal insulation.
The radiator pipes will also be screed.
At the next stage, we fill in the concrete screed - our do-it-yourself installation of the floor convector is nearing completion. The result of this stage should be a rough floor, with a metal box slightly protruding from it. Next, we make the final leveling of the floor, proceed to laying the floor covering. At the last stage, we place a decorative lattice above the box - it is best to choose it in the same tone as the color of the floors.
Do-it-yourself installation of floor convectors is complicated by the fact that you need to correctly select the size of the niche - so that the metal case of the device is located at the correct depth. You can find recommendations on this issue in the technical data sheets. Worst of all, if you have to carry out installation in an already finished house, it is not a fact that it will be possible to hollow out a niche in the subfloor, as this can affect its strength. In this case, it will be necessary to increase the height of the subfloor in all rooms.
Caring for the installed floor convectors is very simple - just remove the decorative grille and remove the dust accumulated inside. Do not use aggressive detergents for this.
Using water as a heating medium is a cost-effective idea. Increasingly, instead of the usual batteries, water heating convectors are installed in apartments. Such advantages as: safety, compactness, exclusive design only contribute to the growing popularity of convectors.
Maintenance and cleaning
For the full functioning of the economizer, it is necessary to regularly carry out preventive inspection and repair of all its parts. As a rule, this task comes down to renewing the sealant layer if necessary, as well as cleaning the internal gas outlet pipe.
Cleaning the pipe should be carried out simultaneously with the stationary chimney, if necessary, completely or partially dismantling the convector system, using a mechanical (using special brushes) or chemical (using specialized compounds for cleaning a stainless steel chimney) method.
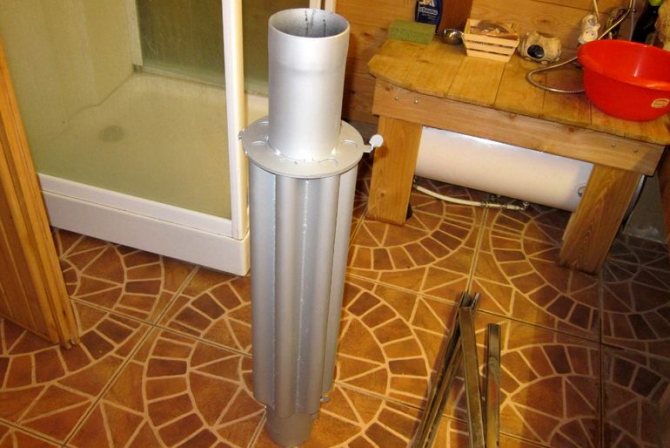
Stainless steel creation
Many people choose this option, since there is no need to have specialized skills. No welding required during installation. It is advisable to take stainless steel food grade, which is resistant to aggressive environments, high temperatures. The material will last a long time. To create a stainless steel chimney, perform the following steps:
- For the chimney, a thick stainless pipe is taken, as well as a sheet of the same material.
- The stainless steel sheet is attached to the central pipe using rivets. It is best to secure in large waves.
- It remains to connect the resulting convector to the chimney. Outside, the finished economizer needs to be treated with an oven varnish.
Chimney convector:
With such a device, air will flow through the central pipe, heating the flows that enter the pocket. Outside, they will come out hot. When installing any economizer, you need to remember about general recommendations:
- The device is always located at the bottom of the chimney.
- There should be no flammable objects nearby.
- In the case of water economizers, sufficient power is required - the water must be heated to 250 ° C, otherwise the heat will not be enough.
If there is no time to engage in creating a device on your own, then you can always find a ready-made suitable option on the market. But it is imperative to pay attention to all the docking nodes - the welding must be reliable, the outgoing pipes must not hang anywhere. If stains and stains are visible on the surface, this indicates the use of low-quality steel.
Do not forget that the chimney must be placed at the bottom.
Expert advice
Specialists in chimneys for heating systems at suburban-type facilities recommend purchasing high-quality economizers from trusted manufacturers - i.e. do not save on the device. According to them, the optimal solution for complementing the stationary gas outlet system with a convector would be the implementation of the professional implementation of the installation, as well as the subsequent maintenance of the device.
A convector chimney is a safe and inexpensive device that can increase the efficiency of a heating system without increasing the financial costs of its operation. Devices of this type are distinguished by their durability and simplicity of design, which allows them to be assembled and installed on their own and for a decade to forget about replacing or major repairs of the gas discharge system.
Now you know how to get your oven to work 100% without a major investment. Subscribe to our articles and share useful information with your friends. Until next time!
(
1 estimates, average: 5,00 out of 5)
Summarizing
The use of water convectors is the cheapest form of heating. a variety of installation installations allows you to unobtrusively warm up the room without drying out the air. Temperature control systems allow you to maintain a constant thermal threshold, saving the family budget.
The video in this article will demonstrate in detail and in an accessible manner the installation process of a water floor convector.
Homemade - this word means that the product is made by hand, but sometimes it is used with some kind of dismissive connotation. And yet this is far from the case. The most expensive hand-built cars in the world are custom-made. What should you call them? Homemade? Everything that ensures the life of mankind is created by human hands.
The topic of this article is homemade products for home heating, but its purpose is not to teach, but to give an overview of those homemade options that talented people are implementing. Of course, self-production requires certain knowledge, experience, tools and materials for work. Only in this case it is possible to manufacture a high-quality and safe heating device, no worse, and in many cases even better than industrial boilers.
Most often, craftsmen begin to create a heating system by determining the type of boiler, creating drawings and the subsequent construction of the boiler. This work is not easy, therefore, without a good knowledge of the device and the principle of operation of the selected type of boiler, experience, the availability of the necessary tools and materials for its installation, it is difficult to perform it.
Most often, the following types of boilers are independently made:
Gas boilers are difficult to manufacture on their own, since this equipment is of increased danger and special technical requirements are imposed on it. Attempts to make a homemade one are limited by the need to obtain a quality certificate and permits from supervisory authorities. Passing all the required checks for compliance with quality parameters is problematic. But do-it-yourself repair of the convector is permissible. Most often, the central pipe of the coaxial output burns out and it can and should be replaced.
Electric boilers
Boilers of this type are characterized by extreme simplicity and low safety requirements during installation. An electric boiler can be compared to ordinary electrical appliances that are used in the house. The only drawback is the high and constantly increasing electricity price. But for a garage or summer cottage, if it turns on sometimes, it is quite suitable.
Oil fired boilers
Liquid fuel boilers are also easy to manufacture. The high price of the injectors can be an obstacle for manufacturing.
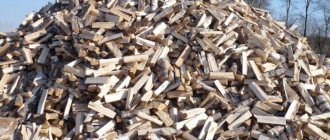
Solid fuel boilers
This class of boilers, and they are divided into wood, pyrolysis and pellet, is the most popular for self-production. Do-it-yourself wood-fired heating boiler is one of the simplest and cheapest, but its efficiency is rather low. There are many drawings and practical advice on the Internet for making this type of boiler. A wood-fired boiler can operate on any type of solid fuel.
Pyrolysis boilers
Two-chamber pyrolysis boilers are quite expensive to manufacture on their own. They have two combustion chambers. One burns fuel with minimal oxygen access. That is, there is a process of pyrolysis or dry distillation of wood. The gas released from the wood is burned in the second chamber, releasing a large amount of energy. The pyrolysis boiler can operate on wood, coal and peat.
Craftsmen have learned how to make a pyrolysis boiler from a gas cylinder with their own hands, economical and perfectly working. The easiest way to make a boiler is from a gas cylinder with a capacity of 50 liters.