How sections are added
After you have empirically determined that the reason for the cool temperature in the house is not a clogged radiator at all, you should find a store that sells heating equipment not far from your house (so that you do not have to travel far away and thereby waste your time). You need to buy the same sections that your radiator is equipped with - made of cast iron, aluminum, or bimetallic.
It shouldn't turn out that you choose unsuitable sections - because of such an error, you simply won't be able to add them, that is, the money spent will be thrown into the wind, so be careful. The procedure for building up sections is carried out in the same sequence of actions for all types of heating radiators.

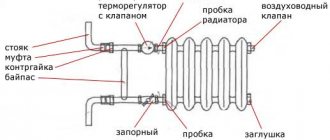
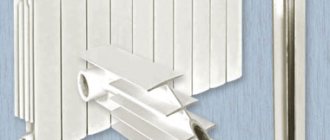
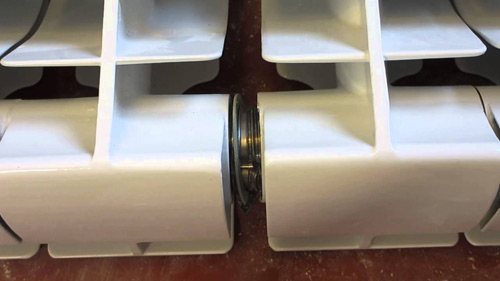
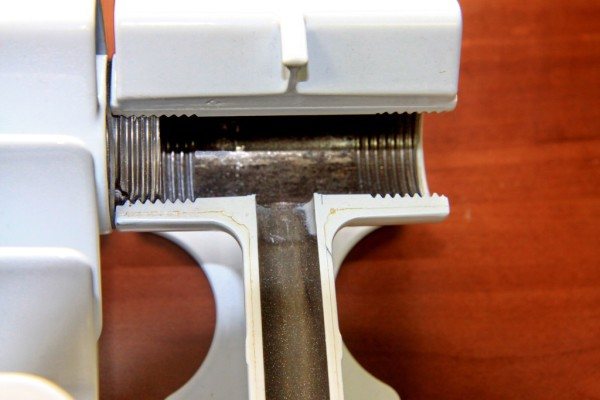
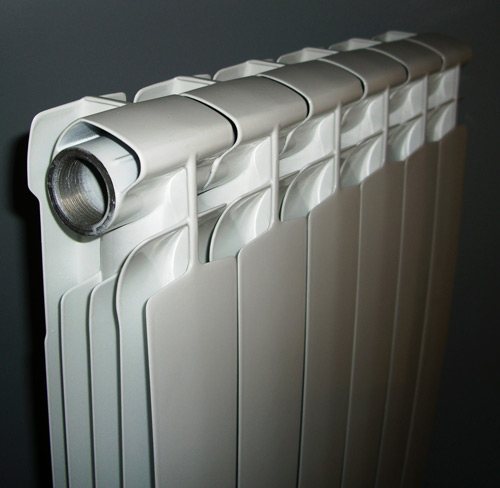
To join the sections, you need a connecting nut - nipple
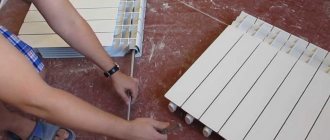
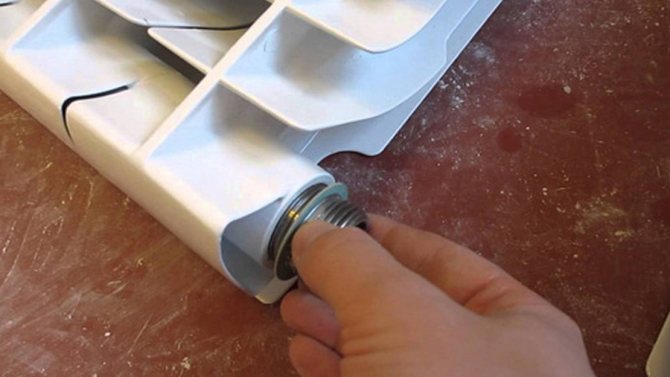
We proceed directly to increasing the number of sections. The first step is to unscrew the footboard using the radiator wrench from the side to which you plan to add one or more elements. After you have unscrewed the futorka, a nipple (connecting nut) is applied to the section where the sections are joined. It is necessary to take into account the following important feature: the threads at different ends of the nipple are different, and in order to correctly install new sections, you must be guided by the following rules:
- The right side of the nipple should be directed towards the side where the connection with the new element will be made;
- Accordingly, the left one is towards the already present sections of the heating radiator.
In order to prevent further battery leakage, you should put on the nipple intersectional gaskets (they can be rubber, parasite, or gel)
At the same time, you need to put them on carefully and carefully - this will serve as a guarantee that the gasket will be located as evenly as possible, without unwanted distortions. Next, you need to tighten the thread
This action should also be carried out without sudden movements, in a leisurely rhythm, and carefully. If you want to build a high-quality heating radiator, then there can be no question of any rush.
To prevent leakage, an intersection gasket is required.
It is highly undesirable to damage the metal thread - because of this, not the most harmless problems may appear, the solution of which will have to spend additional time and financial resources.
The enlarged radiator must be placed back on the bracket and re-connected to the central heating pipe. To do this, you must arm yourself with a wrench of the appropriate diameter and tow, which is necessary for wrapping pipe threads when screwing on the radiator.
It is not difficult to add sections to a heating radiator, for this you do not need to work in a team of heating installers for 10 years. But you cannot do without a serious approach, the availability of elementary tools and the removal of your personal time by this process. However, you can also resort to the second option for solving the problem of insufficient heating of the room - to become a client of a company providing such services, whose employees will do everything themselves, quickly and efficiently.
Calculation of the number of radiators
How much do I need to add? Here you need to move your brains a little and try to calculate the required number of sections, based on the type of radiators, the volume of the heated room, the number of windows, their condition, the material of the walls, the location of the room and other factors.Consider the option with cast iron batteries, the power of one section of which is on average 100 -150 watts.
The power of other types of radiators is usually indicated in the technical data sheet for the product.
We make a calculation for a one-room apartment with an area of 18 sq. m, where the ceiling height is standard and equal to 2.5 m. Windows - plastic double-glazed windows, corner apartment, located in the average climate of our country. The radiators in the apartment are connected through the top wiring.
18 (area) x 100 = 1800 W. The correction factor for the ceiling height in our case is 0.8, since 3 m is taken as a basis. 1800 x 0.8 = 1440 W. Taking into account the angular placement of the apartment, the correction factor will be 1.8. We multiply the received power of 1440 by 1.8 and get the power = 2592 kW. This value should be multiplied again by the factor for the presence of windows. In our case, there are 2 windows and K = 1.8. 2592 x1.8, we get the next power value equal to 4565 kW. Plastic double-glazed windows give K = 0.8, the final power is 4565x0.8 = 3732 Kw. Now you can determine how many cast-iron sections to keep warm in the apartment. 3732: 150 = 24.8 i.e. 25 sections.
Naturally, this calculation is very approximate. The number of sections may vary depending on the temperature of the coolant supplied to the centralized heating network, on how insulated the doors, ceiling and walls and their material, on the area of the windows, on the presence of fencing screens on batteries, curtains and others. But if a significantly smaller number of sections are installed in your apartment, then they should be added in any case.
Installing new radiator sections
You should immediately make a reservation that you need to add sections of exactly the same type and brands that are already in your apartment. Otherwise, the whole venture may fail due to a discrepancy between the dimensions of the cross-section of the inlet and outlet, dimensions in height, and the material of manufacture.
First of all, you need to turn off the water and drain the one that flows out when you unscrew the footwear. After that, connecting elements (nipples) in the form of a nut are applied to the docking place and intersectional gaskets made of rubber, paronite or a special gel are placed on top.
The nipple is threaded on both sides, and on each side it is cut in different directions. The right side of the nipple is inserted when adding new sections is done from the left side. This means that the left side of the nipple must be inserted into the hole of the existing battery. The gaskets must be applied very carefully and, one might say, gently. This will serve as a more reliable connection and prevent further leakage.

After that, the nipple thread is tightened very carefully and slowly. The main thing is not to overtighten or break the thread. The finished radiator is connected to the heating system. At the junction, a cable or modern materials replacing it should be used for better waterproofing.
Advice
- If you decide to add a significant number of sections, then care should be taken to add brackets so that the increased weight of the battery does not break the existing ones and cause an accident.
- Be aware that not all brands of aluminum radiators can be attached to existing ones. Those that are manufactured by an extruded method are not suitable for building up batteries, since all the parts in such radiators are not collapsible. In the best case, you can mount a separate aluminum battery as an independent heating device.
- Bimetallic radiators can be easily extended, since they are made in sections.
- When connecting the newly assembled battery to the line, the length of the lounger will need to be reduced by cutting it off with a grinder to the required amount, as a result of which there will be no thread at the end of the pipeline.Therefore, you should stock up on the necessary connection elements, or cut the threads on your own.
As you can see, adding sections to the heating radiator is not a big deal, and any man, if desired and with the slightest skills in handling locksmith tools, can increase the battery power without unnecessary problems so that his family does not suffer from the cold in the winter. But if this option does not suit you, you can always contact the specialists, but here you will have to pay a certain amount of money.
Installation of aluminum radiators
Assembling and setting up a heating system is a responsible business, professionals will cope with it best of all. But if you wish, you can do the installation of aluminum radiators with your own hands.
First you need to assemble the device:
- Screw in the supplied plugs and plugs.
- Assemble the thermostats and connect the shut-off valves at the inlet and outlet of the device.
- Check the nipples and secure the air valves.
The assembly-disassembly diagram of the device is attached to the kit. It is better if the assembly is carried out by a specialist, then there will be a guarantee that all the taps are installed correctly. It is not allowed to clean aluminum with abrasives when installing adapters or building sections - a coolant leak may begin.
Attention! It is necessary to screw the air valves so that at the end of the process their outlet heads point up. Having marked the installation location of the battery under the window in accordance with the indicated indents, brackets are attached to the wall
To do this, you need to drill holes with a puncher and insert plastic dowels, and screw the brackets into them. While screwing in the fasteners, from time to time it is necessary to hang a radiator on them in order to maintain a distance of 5 cm from the wall
Having marked the location of the battery installation under the window in accordance with the indicated indents, the brackets are attached to the wall. To do this, you need to drill holes with a puncher and insert plastic dowels, and screw the brackets into them. While screwing in the fasteners, from time to time it is necessary to hang a radiator on them in order to maintain a distance of 5 cm from the wall.
Battery Connection Diagrams
The device can be connected in several ways:
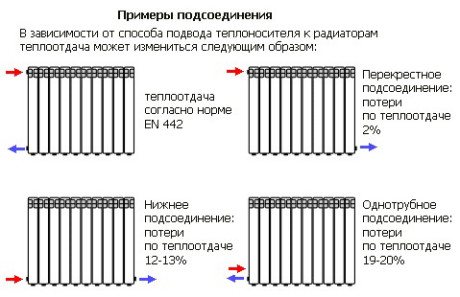
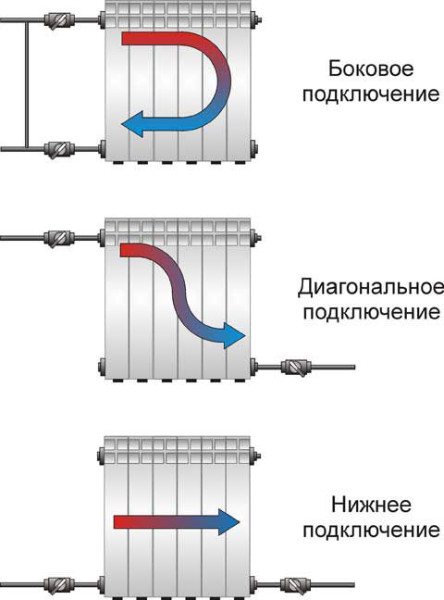
Diagonal. Experts consider it to be the most energy efficient. The supply pipe is connected to the upper pipe, and the outlet pipe is connected to the lower pipe, but on the opposite side of the radiator. With this scheme, the battery gives off the maximum thermal energy received from hot water into the space. The disadvantage of this method is that the pipes running on top do not fit well into the design of the room.
Side. The pipe supplying the coolant is connected to the side fitting (right or left), the return pipe is connected to the parallel lower one. If the pipes are brought in in the reverse order, the heat transfer of the device will drop by 50%. Such a scheme for connecting aluminum heating radiators works ineffectively if the sections are of a non-standard size, or their number exceeds 15.
From a design point of view, aluminum radiators with bottom connections win. With such a layout, pipes are not visible, they are hidden in the floor or in the wall. The batteries are connected to the system through the pipes located at the bottom of the instruments. Typically, bottom-connected radiators are mounted on floor brackets. The battery is attached to the wall with one hook, just to maintain balance.
Wiring diagrams for heating radiators made of aluminum
Important! Aluminum batteries have standard pipe parameters, so you don't need to buy any additional adapters from the radiator to the pipes. The device also comes with a Mayevsky cock, designed to bleed air.
Connection and commissioning
Before installing aluminum devices, the autonomous system is flushed with water. Alkaline solutions cannot be used.
Important! Aluminum is easy to wrinkle and scratch with tools, so it is better to mount the battery in the original plastic packaging. Once connected, the polyethylene can be removed
In an effort to connect aluminum heating radiators at a low cost, some homeowners use deaf, non-collapsible pipe and radiator mating. But heating a house in the northern hemisphere is not a point to save money on. It would be wiser to install "American" - quick-disconnect threaded assemblies, when the pipes are joined and disconnected by means of one union nut.
The procedure for connecting radiators to the heating system:
- Make sure that there is no water in the system or it is shut off at the installation points.
- Hang up the radiator and connect to the pipeline using squeegees.
- Seal all threaded connections with sanitary flax. Enough 4-5 turns in the direction of the thread.
- Pressurize the system.
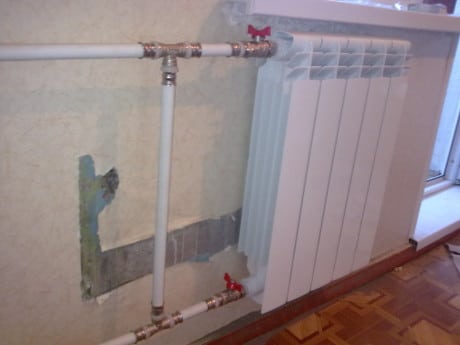
Aluminum battery connected to the heating system
The installation of an aluminum heating radiator can be done independently, but it would be wiser to entrust the matter to specialists who have all the necessary permits to perform such work. The slightest inaccuracy in installation can lead to leaks and ineffective functioning of the heating system.
Which heating system is the best?
Next, let's look at how to choose a heating system. There are two types of heating systems: forced and natural circulation of water.
With natural circulation, the coolant easily moves from radiator to radiator. Temperature control with such a system is fairly easy and independent of any kind of energy. But it is necessary to correctly calculate the slope of the pipes, because if it is wrong, the system will simply stop functioning. When installing this system, you will have to purchase a boiler.
Forced circulation will require a special pump that will maintain the working pressure in the pipes. Such a system is dependent on electricity. However, at present, the forced circulation system is more in demand among homeowners.
When choosing a heating system, a natural question arises: how to choose pipes for heating? First you need to decide what is the main criterion for you when buying: cost, service life or ease of installation - you will find more information in this article.
Technique for performing work on connecting radiator sections
Extending radiators is a useful skill for a home craftsman. Knowing how to join the sections, it will not be difficult to provide your own microclimate in each room.
Before connecting two radiators, the power is calculated. The formula is simple - 1 kW of thermal power is required per 10 m2. The section performance is indicated in the data sheet. This data will be useful for calculations. After that, you need to buy the required number of elements, find tools and assemble a heating device.
Tools and accessories for work
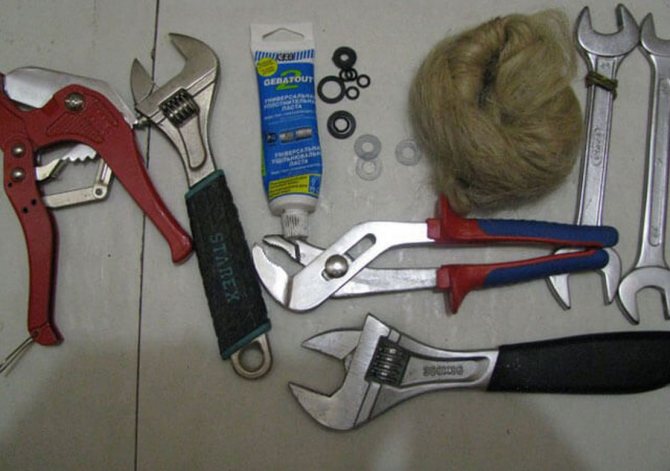
To assemble a heating radiator with your own hands will come in handy:
- wrench or adjustable wrench;
- radiator key;
- plugs with right and left threads - 1 pc .;
- nipples;
- paronite gaskets;
- cross-section spacers made of durable, flexible material;
- battery sections;
- sandpaper of fraction No. 120.
Cotton gloves are useful for protection. It is more convenient to install batteries together, an assistant will not interfere.
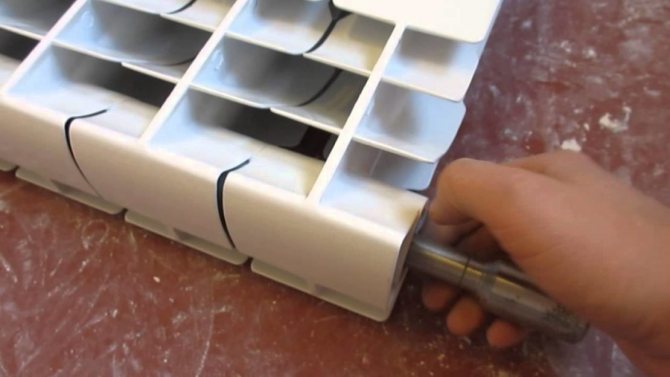
Step-by-step battery build-up process
Do-it-yourself heating radiator assembly is performed at any time. If the heating season has already begun, the network must be shut off, the coolant must be drained from the circuit and the heater must be dismantled.
How to connect the battery:
- Lay the dismantled radiator on a horizontal surface. To avoid scratching the surface of the battery and the table (floor), lay down a cloth. Remove all additional elements - taps, temperature sensors.To flush the battery, take it into a bathtub, open the plugs and rinse with a stream of water.
Check the integrity of the threaded connections, the ends of the heater. If there are build-ups of deposits, process the joints with emery. Place the battery again on a flat, horizontal surface. The area is selected flat to ensure the tightness of the joint. The slightest curvature of the position will lead to an uneven joint. For seals, choose only paronite gaskets. It is a durable, flexible material that can withstand heat without loss of quality. Check the quality of the nipple thread
Smooth and even cutting without chipping is the key to a strong docking. Move the sections by inserting spacers between them. Carefully start tightening the nipple. The part has a left-hand thread on one side and a right-hand thread on the other.
This means that when rotating, both sections are attracted. It is more convenient to carry out work with a special radiator key. The tool may come with a battery, but is also sold separately.
- Grab the sections a little, check the evenness of the joints and tighten until tight. The number of turns of the nipple turns on each section must be equal.
Knowing how to increase the heating battery, it is easy to assemble a system with the required power indicators. After building up the sections, the radiator is checked for tightness.
For a household check you will need:
- a piece of pipe with a cross section of 15 mm;
- automobile pump with a pressure gauge;
- nipple from the tire.
Now solder the nipple to the pipe, and insert it into the radiator. This design is needed for air pressure testing. Install a plug on one of the radiator inlet openings. Connect a car pump with a pressure gauge to the nipple. Pump in air at a pressure of 1 bar. If the tightness of the joints is broken, a whistling of air will appear. You need to find a leak, tighten the nipple or change the gasket. Pressurize again. If there are no leaks, install the radiator into the network.
Water pressure testing is carried out in the same manner. Instead of air, colored water is pumped in. Let the device stand for 5 hours, inspect for leaks. If there is a leaky joint, water will leak out. Tighten the joints, check again, install the battery in the system.
The extended battery increases in weight. Before installing the radiator, it is advisable to strengthen the fasteners, screw in additional brackets. This will save the device from collapse, because the battery will be even heavier with the coolant. The device is built into the network in the selected place taking into account the increase in the length of the battery.
Connection diagrams
The most fail-safe circuit for connecting heating radiators in a private house with a bottling and a boiler is a single-pipe Leningrad. Heating devices are connected in parallel with the filling, which is laid along the perimeter of the room.
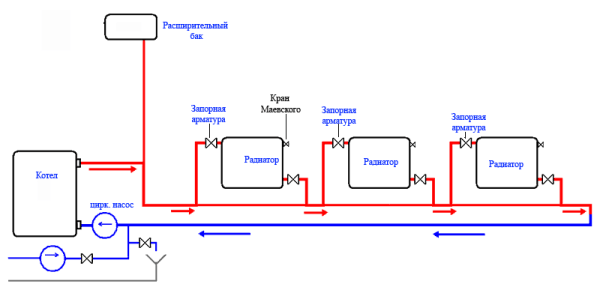
Somewhat cheaper in installation, but much more problematic in operation is a circuit using a series connection of batteries. Suffice it to say that their independent adjustment is impossible in this case.
Single-pipe version with series connection.
Finally, a two-pipe system involves connecting each radiator as a jumper between the supply and return lines. It is inconvenient in that it requires the already mentioned balancing - limiting the passage of heating devices closest to the boiler.
What can be the diagrams for connecting heating radiators to the supply line?
- One-sided. connections are connected to the upper and lower radiator plugs on the right or left. It is compact, but makes the heating of the device uneven: the last sections will always be colder than the first.
- From bottom to bottom. In this case, the battery must be equipped with an air vent. The advantages of the solution are that the radiator, with such a connection, does not require flushing and always heats up along its entire length.
- Diagonal.Heating of the sections is even more uniform; however, the bottom corner of an instrument with a blind plug will gradually silt up.
Connection options for connections.
Which battery connection scheme to choose
Since heating radiators can be connected to each other according to different schemes, we will consider which one is more convenient and efficient.
Serial connection of radiators is used most often. Since it provides a high level of reliability. Requires minimal maintenance. The technical costs are low. Up to four batteries can be connected in this way. The heater is connected to the system from below. When sagging radiators, pipes, it is necessary to put spacers.
The only drawback when connecting batteries according to this scheme is large heat losses. When water enters the top of the system, the battery cools down by about 7 degrees. The last radiators to heat the apartment will be worse. The temperature difference between the near and far batteries can reach 18 degrees. Thus, the room will warm up unevenly. But this problem can be solved by installing an additional electric boiler.
Bimetallic heating radiators
Comparative characteristics with other types of batteries
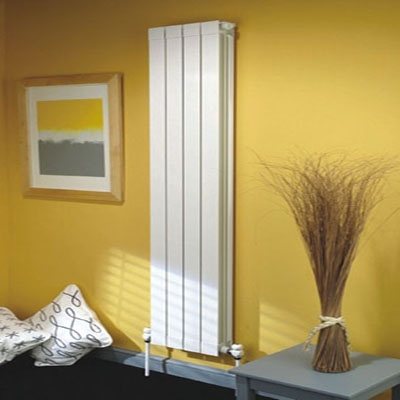
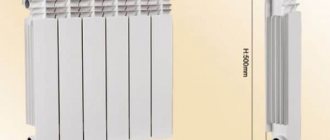
The photo shows a tall, narrow device.
First you need to understand what heating radiators are, and how they differ from each other.
Let's list the main types:
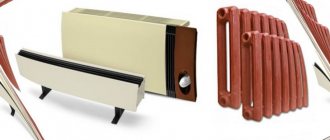
- Cast iron batteries are one of the most common types found in most Soviet-style apartments. It is a system of connected cast iron sections with fairly thick walls and a large mass. It is distinguished by high strength and durability, however, it has low efficiency and heat transfer, and a large thermal inertia can also be noted;
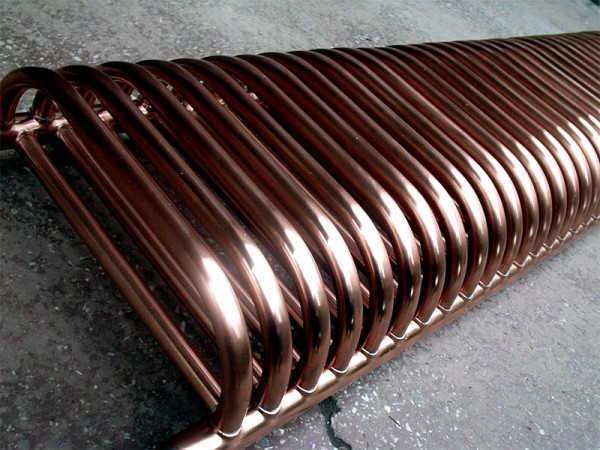
- Steel tubular registers are a system of pipes of a sufficiently large diameter, or one pipe in the form of an S-shaped bend (for example, a heated towel rail). This type of device is usually installed in large rooms - concert halls, cinemas, sports complexes, supermarkets. They are distinguished by high power and large volume of the coolant;
- Steel heating panels. They are welded profiled steel plates, inside of which there are channels for the circulation of the coolant. They have a fairly low resistance to water hammer and low strength, are prone to corrosion and are not very reliable;
- Aluminum radiators are a more modern type of batteries, which are distinguished by increased heat transfer and efficiency, a low volume of coolant and a low weight of the device. Due to their low thermal inertia, they lend themselves well to automatic and manual temperature control. They are demanding on the quality of the coolant and its acidity, have an average strength and service life;
- Copper batteries are a tube system with plate finning. They are distinguished by the highest heat transfer and efficiency, high strength and resistance to water hammer, absence of corrosion and long service life. The only drawback of copper units is the high price;
- Bimetallic radiators, externally and in design, resemble aluminum devices with the difference that the inner walls of the channels are made of steel or copper. Thus, it is possible to increase the efficiency and heat transfer of the battery, but maintain its strength and durability.

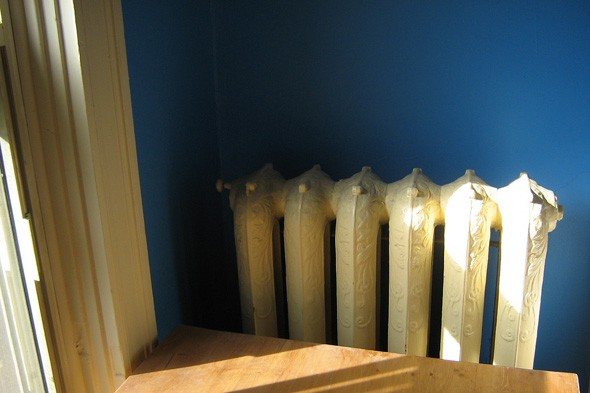
The cast-iron battery familiar to many.
To understand the main distinguishing feature of a bimetallic device, you should better understand its design. The main task of any battery on a liquid coolant is to ensure maximum heat transfer from the coolant to the environment, while having a sufficient margin of mechanical and corrosion resistance for long-term efficient operation.
The degree of heat transfer directly depends on the thermal conductivity of the metal and the thickness of the walls. The most thermally conductive materials are aluminum and copper, so the most efficient appliances are made from non-ferrous metals.
The most efficient heat sinks are made of copper.
On the other hand, steel and ferrous metals show the highest strength. But they are prone to corrosion and have low thermal conductivity. At the same time, steel is much cheaper than copper and aluminum, which is also an advantage.
The design of the bimetallic radiator is distinguished by the fact that the inner walls of the channels are made of durable anti-corrosion steel or pure copper, and the outer walls and fins are made of lightweight and heat-conducting aluminum. This solution made it possible to combine the advantages of steel and non-ferrous metals in one device.
The inner surface of the channels and the collector is made of steel.
Important! Bimetallic radiators have combined the advantages of products made of ferrous and non-ferrous metals, becoming the most progressive and modern type of heating devices.
Advantages and disadvantages

The convector fits perfectly into a modern interior.
Consider the positive and negative aspects of using aggregates with combined metals in the composition. Let's start with the benefits:
Specifications
The strength and heat transfer (and, of course, the price) of a bimetallic section depends on several factors:
- Core shapes and sizes... It can only strengthen the vertical channels of the section or, which will provide much greater resistance to hydrostatic pressure, combine the vertical channels with collectors;
- Core metal thickness... The tensile strength of the section depends on it;
- Finning areas and thicknesses;
Please note that the thicker the fins for a fixed surface area, the more heat they conduct, the more uniform the surface heating.
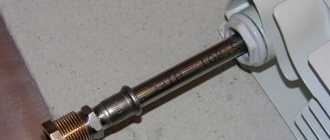
- The presence or absence of nipple connections between sections... The thread, even steel, will always be the weak point of the device.
As an example, we will give the characteristics of one of the best devices in its class - the domestic Rifar Monolith.
| Parameter | Value |
| Operating pressure | 100 kgf / cm (tests are carried out with a pressure of 150 kgf / cm2) |
| Working temperature | 150 C |
| Heat transfer per conventional section | 205 watt |
Radiator Rifar Monolith.
It is curious: the bulk of domestic manufacturers produce bimetallic radiators in accordance with GOST 31311-2005. However, there are no regulatory requirements specifically for bimetallic devices; only the minimum permissible value of the working pressure is stipulated in… 6 kgf / cm2.
The minimum service life of bimetallic heating radiators is estimated at 25 years.
Radiator selection
You should start with the choice of a radiator, and the main criterion for choosing will be the working pressure for which the radiator is designed. For a private house with its own heating system, a radiator with a working pressure of 6-7 atmospheres will be enough, but if you need to connect a radiator to the central heating system of an apartment building, it must withstand a pressure of at least 10 atmospheres.
Currently, the consumer is offered two options for aluminum radiators - standard or European and reinforced. The latter can work under pressure up to 12 atmospheres. When connecting to a central heating system, you must choose exactly among the reinforced radiators.
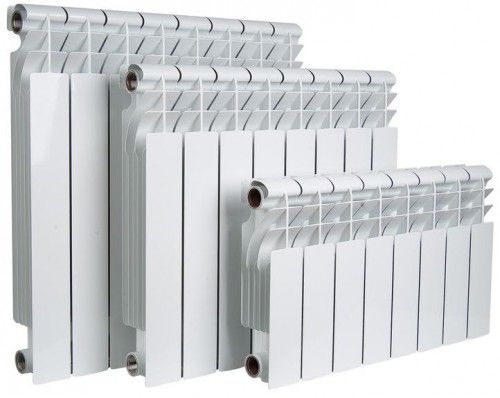
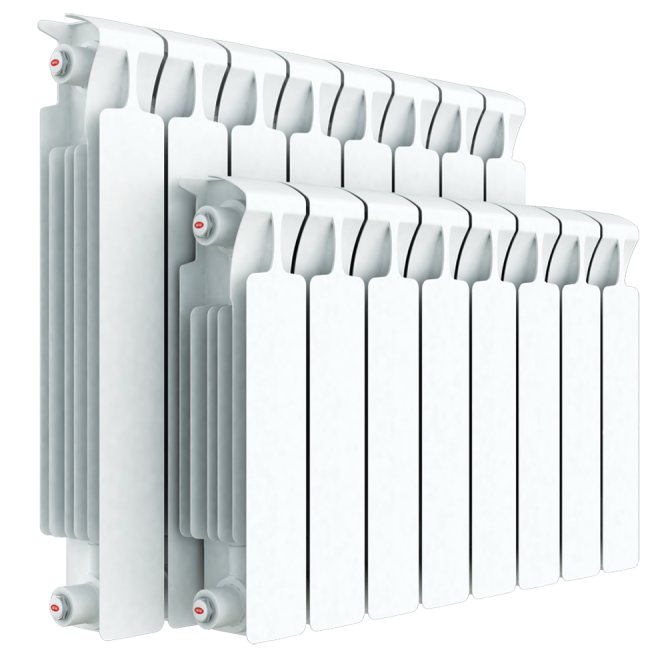
The number of sections plays a big role
Next, you need to decide on the required number of sections. To do this, we determine the amount of heat. Necessary for heating the room and divide by the heat transfer of one section of the selected radiator.
The amount of required heat for a standard room can be taken equal to 1 kW per 10 m2 of the area of the room. For non-standard premises and more accurate calculations, we will use a ready-made table:
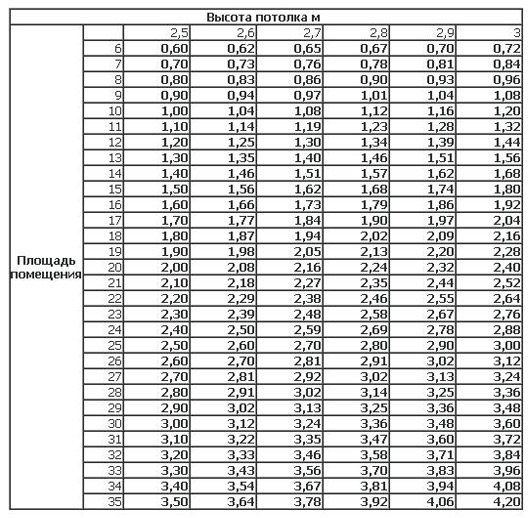
Radiator power table
It should be remembered that the battery connection diagram of more than 12 sections must be double-sided, diagonal or saddle.With a one-sided battery connection scheme from a large number of sections, a "pocket" of cold water will form on the side of the radiator opposite to the pipes. "Extra" sections simply will not work, we get harmful ballast.
Using forced discharge, the battery can be expanded to 24 sections even with one-way supply, but in this case the radiator must be reinforced.
It should be remembered that it is necessary to supply the coolant to reinforced radiators under high pressure only through metal pipes. Metal-plastic may not withstand such pressure, and the consequences will be the most dire.
It should also be taken into account that the heat transfer of the radiator indicated in the documentation is relevant only for one-sided or diagonal supply of the coolant to the radiator. When using the bottom feed, feel free to subtract 10-15 percent.
If the heating system is installed in a private house, then it is possible to choose the general scheme of heating organization yourself - one- or two-pipe.
Cast iron batteries
If we are talking about building up cast-iron batteries, then it is necessary to carry out work to increase the area of the radiator when the heating season is over. The fact is that to add new sections, you will need to completely disassemble the radiator. To do this, it will naturally have to be disconnected from the heating system. If you do this in winter, the entire system will have to be shut down. It is unlikely that any of your neighbors will be delighted to learn that they will have to sit without heat for a couple of hours. This is at its best.
Therefore, as much as you would like to increase the heat transfer from the batteries, try to be patient until the heating season ends. If cast-iron radiators are installed in a private house, then you can decide the question of when to replace them yourself. So, consider step by step how to build up a cast iron battery.
To add additional sections, you need the following tool:
- radiator wrench or adjustable wrench;
- nipples designed specifically for cast iron batteries (their number directly depends on the number of sections you install);
- special gaskets for installation between battery sections;
- Side plugs with gaskets (gaskets are usually made of a material such as paronite).
(See also: How to shut off a radiator)
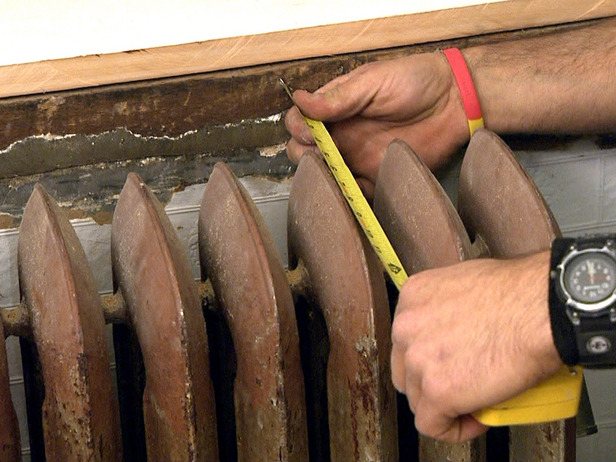
The first step is to remove the battery and disassemble it. Remember to turn off the water. It is quite simple to build up a heating radiator made of cast iron, the most important thing is to try to clean everything thoroughly so that the joints of the connection of the sections do not subsequently leak.
If the batteries are no longer new and have been used for a sufficient amount of time, then a kind of build-up of rust and dirt may form between the sections. In order to put on the gasket and connect the sections, this build-up will have to be removed. The intersection space is cleaned either with coarse sandpaper or with a metal bristle brush.
spread the battery and additional sections on the floor. When attaching the nipple, carefully watch the position of the threads. It is better to make sure once again that you have correctly positioned the element, which you will begin to twist into two sections with different threads. (See also: How to purge a radiator)
We begin to screw in the nipple on the left side, for this it is advisable to initially bait it somewhere in one thread on the left side of the battery. Perform similar actions on the right side.
Make sure that the cross-section gasket is exactly in the middle of the nipple. The sections must fit snugly against the nipple. The next step is to insert the radiator key into the battery, and. using an adjustable wrench, screw the nipple into the battery section.
After tightening the nipple 3-4 turns, go to the other side of the twisted sections. And so, one by one, tighten the sections until they fit very tightly. (Cm.See also: How to properly install a heating battery with your own hands)
Now install the special side plugs for the cast iron battery. Don't forget the paronite gaskets. If the surface on which the gasket will be attached has a build-up of rust, we also clean the surface with sandpaper. And only after that we install the plug with the gasket. Tighten the plugs tightly using a pipe wrench.
That's actually all the stages of work on the installation of additional sections of the cast-iron battery. If you wish, in addition, you can install taps on the radiators.
by the way, the lack of heat in rooms in which cast-iron batteries are used may arise not only due to an insufficient number of sections. Sometimes it also happens that cast-iron batteries that have been used for many years are periodically painted, applying a new layer of paint to the old one. (See also: How to remove a radiator)
Such a "fur coat" subsequently leads to the fact that the heat output of such radiators is reduced to almost zero. Therefore, if you decide to repaint or somehow decorate your battery in a special way, be sure to remove the old layer of paint.
for painting the battery, choose not ordinary enamel, but paint that can interact with high temperatures without changing its qualities. Ordinary enamels, very often turn yellow when heated, so it is imperative to take into account their properties when choosing.
Placement of heating devices
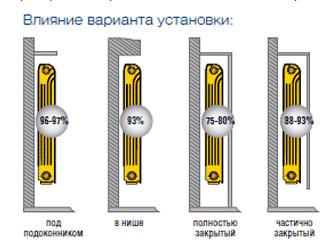
It is of great importance not only how to connect heating radiators to each other, but also their correct location in relation to building structures. Traditionally, heaters are installed along the walls of rooms and locally under windows to reduce the penetration of cold air currents in the most vulnerable place.
There are clear instructions for this in the SNiP for the installation of thermal equipment:
- The gap between the floor and the bottom of the battery must not be less than 120 mm. With a decrease in the distance from the device to the floor, the distribution of the heat flow will be uneven;
- The distance from the back surface to the wall on which the radiator is mounted must be from 30 to 50 mm, otherwise its heat transfer will be disturbed;
- The gap from the upper edge of the heater to the window sill is maintained within 100-120 mm (not less). Otherwise, the movement of thermal masses may be difficult, which will weaken the heating of the room.
Bimetallic heating devices
To understand how to connect bimetallic radiators to each other, you need to know that almost all of them are suitable for any type of connection:
- They have four points of possible connection - two upper and two lower;
- Equipped with plugs and a Mayevsky tap through which the air collected in the heating system can be vented;
Diagonal connection is considered the most effective for bimetallic batteries, especially when it comes to a large number of sections in the device. Although very wide batteries, equipped with ten or more sections, are undesirable to use.
Advice! It is better to ponder the question of how to properly connect two heating radiators 7-8 sectional instead of one device of 14 or 16 sections. It will be much easier to install and easier to maintain.
Another question - how to connect sections of a bimetallic radiator may arise when rearranging sections of a heater in various situations:
The place where you plan to install the heater is also important.
- In the process of creating new heating networks;
- If it is necessary to replace a failed radiator with a new one - bimetallic;
- In case of underheating, you can build up the battery by connecting additional sections.
Aluminum batteries
Interesting! By and large, it should be noted that diagonal connection is an excellent option for any type of battery. Not sure how to connect aluminum radiators together.connect diagonally, you won't go wrong!
For closed-type heating networks in private houses, it is advisable to install aluminum batteries, since it is easier here to ensure proper water treatment before filling the system. And their cost is much lower than that of bimetallic devices.
Of course, over time, moving along the radiators, the coolant cools
Of course, you will have to try before you connect the sections of the aluminum radiator for regrouping.
Advice! Do not rush to remove the factory packaging (film) from the installed heating devices before finishing the finishing work in the room. This will protect the radiator coating from damage and contamination.
https://youtube.com/watch?v=y9a35JHa0TM
The work process itself does not take much time, you do not need any special skill or expensive equipment, you can purchase all the necessary tools at any hardware store. And do not forget, the connection will serve you for a long time and without hassle only if you used high-quality materials in your work and followed all the rules for installing the heating system.
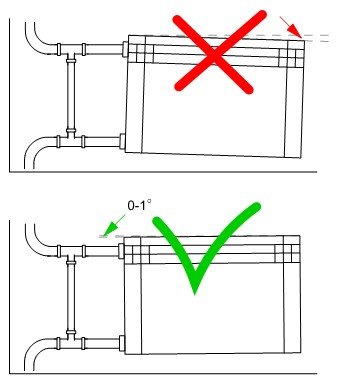
We are talking about exactly what is indicated in this figure.
In the video presented in this article, you will find additional information on this topic.
Choosing a connection diagram for heating batteries
When the choice of the type of heating boiler is completed, the connection diagram of the heating batteries in the house is determined. It can be one-pipe or two-pipe.
The very connection of radiators is done in one of three ways:
If, when deciding how to connect the heating battery, a one-way piping was planned, then the number of sections on one device should not exceed 12 for gravitational heating networks and 24 for systems equipped with a circulation pump.
If it is necessary to install a larger number of sections, you need to use a versatile piping to the heating radiators. When installing heating devices, one should not forget about the throughput of the straight pipe and return pipe, which depends on their diameter and roughness coefficient. Effective heat transfer can be achieved under the condition of optimal placement of the batteries, or rather, while observing the installation distance of the devices in relation to the walls, flooring, window and window sill.
Installation instructions and how to properly connect a heating radiator provide for the following standards:
- the device should be at a distance of 10 - 12 centimeters from the floor;
- it should be installed no closer than 8-10 centimeters to the windowsill;
- the back panel should not be placed closer than 2 centimeters from the wall;
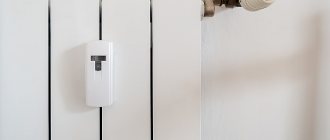
- when installing batteries, it is necessary to provide for the adjustment of the degree of their heating, both in manual and automatic modes. For this, special thermostats are purchased (in more detail: "Control valves for heating radiators, valve installation");
- for the purpose of repairing or replacing the radiator, valves, valves and manual taps should be provided. They will allow you to disconnect the product from the heating system;
- you need to put Mayevsky taps on the devices, such as in the photo. With their help, air trapped in the system is removed.
Types of systems
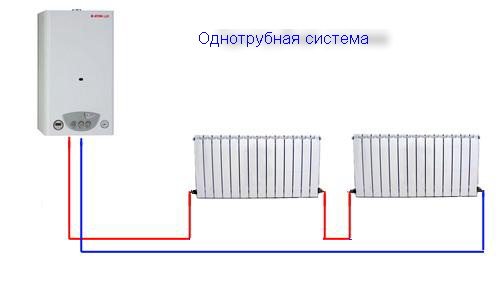
- One-pipe system - one pipeline is mounted, through which the heat source is supplied and the waste fluid is outflowed. Best used when installing a small number of batteries. This is usually done when arranging heating of apartments, where the riser runs in all rooms. With this scheme, each next radiator will be colder than the previous one, but the number of pipes running through the room decreases.
- The two-pipe system is the best method of the device, it makes it possible to maintain a uniform temperature of the heating fluid throughout the entire circuit.When installing such systems, the supply line is usually located under the level of the window sill, and the return line above the baseboard.
How best to connect heating radiators in one case or another, we will consider below, after we analyze each connection method separately.
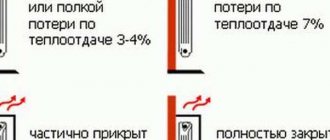
- Lateral - with this method, the supply and return flow are supplied from one side. Works well with heating structures with up to 15 sections;
- Diagonal - best used on long heating elements. The communications are connected to the upper hole on one side and the diagonally opposite outlet.
- The lower one is the least effective option, it requires a high pressure in the coolant along the entire length of the heating structures. To preserve heat transfer, heaters with an increased number of sections are used. To ensure the normal temperature of private houses, it is used only if there is a pump of sufficient power in the heating system.
Choice of coolant
How to fill bimetallic radiators in those rare cases when they are used in an autonomous heating circuit?
In the vast majority of cases, ordinary water is used as a heat carrier. In addition to the fact that the cores of the bimetallic sections have sufficient resistance to corrosion, when the circuit is filled with water, their contact with atmospheric oxygen is completely excluded. Meanwhile, rust is impossible in an oxygen-free environment.
In cases where it is possible to stop the heating circuit at negative temperatures, it is practiced to fill bimetallic radiators with non-freezing coolants:
- An aqueous solution of propylene glycol;

Propylene glycol based heat carrier.
- Antifreeze;
- Transformer oil.