KIV air infiltration valve
The infiltration valve KIV is designed
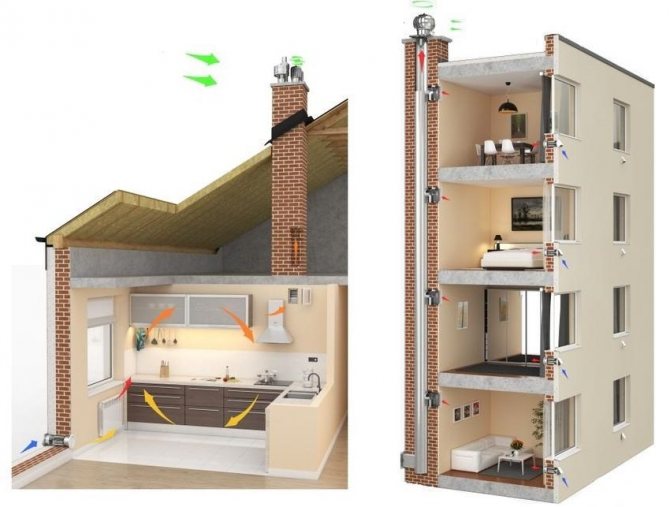
for supplying outdoor air to rooms in ventilation systems, mainly with forced draft (Statvent).
The KIV-125 air infiltration valve is an independent supply ventilation device
and is not intended for installation in window structures. This allows the valve to be installed on almost any object without affecting the window structure and without affecting the heat engineering, soundproofing and other characteristics of the window structures.
Compared to ventilators and dampers installed in windows
KIV has a number of advantages:
- does not violate the design of the glass unit;
- does not complicate the installation of windows and does not increase their cost;
- can be installed at any time, even after repair;
- Phased installation is possible;
- does not impair the appearance of the window;
- does not clutter up translucent surfaces;
- can be located anywhere on the outer wall;
- The KIV valve can be installed in rooms without windows at all.
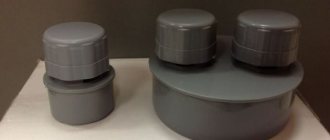
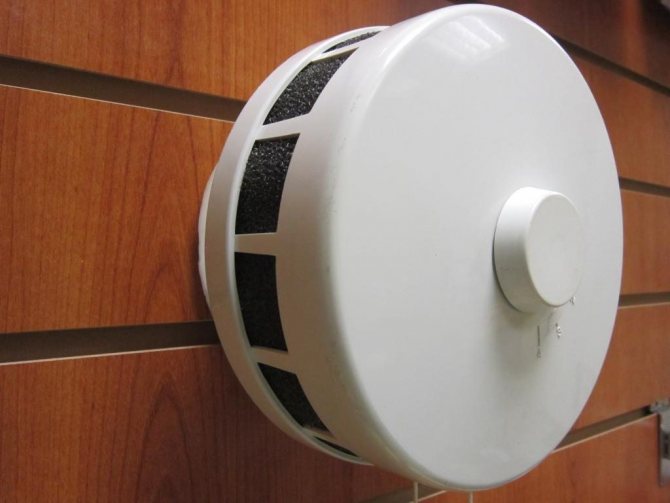
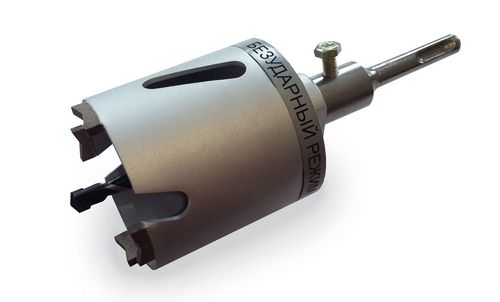
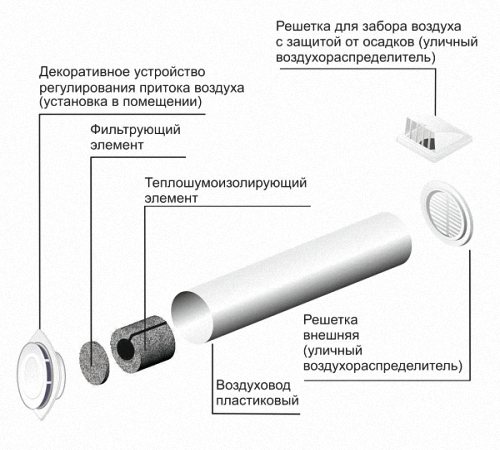
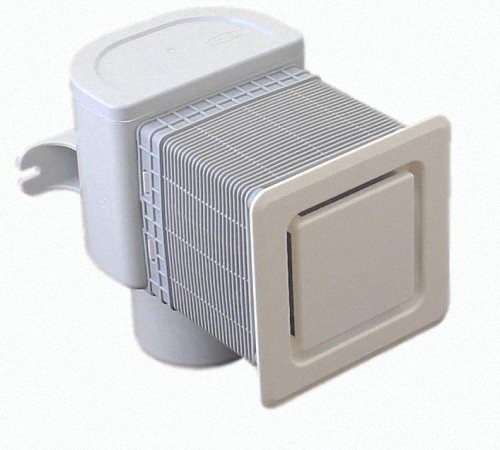
The valve is
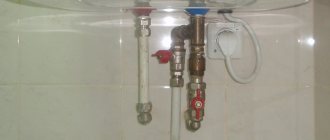
a plastic pipe with an outer diameter of 133 mm and a length of up to 1 m (cut depending on the thickness of the wall). The pipe is inserted into the outer wall of the building and closed from the street side with a cast aluminum grating with mesh. Heat and noise insulation is located in the pipe. Inside the room, a special head made of white plastic is installed with a filter and a damper that allows you to regulate the air flow. The damper can be opened and closed using the handle on the head or a special cord if the valve is located high. During the operation of the KIV supply valves during the winter period, condensation does not form on them due to the special design and the presence of good thermal insulation in the valve elements.
We can say that the KIV 125 is a version of the modernized window. The outer grill with mesh traps foliage, poplar fluff, insects. Thermal and noise insulation prevents the "spreading" of cold in the thickness of the wall and reduces street noise. A flap in the valve head controls the amount of air supplied.


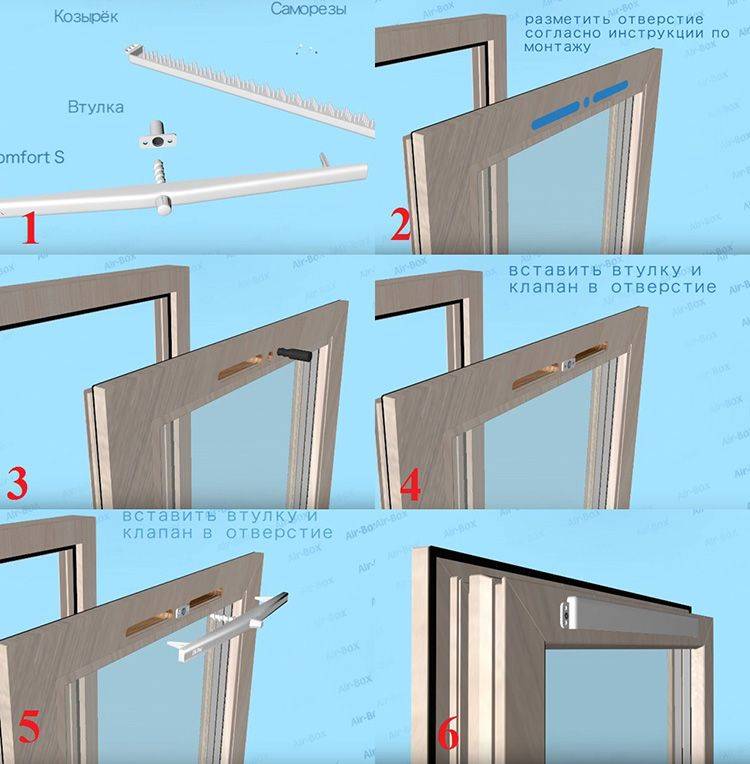
Installation technology
Choosing a valve
To choose a device that will be used in an apartment, you need to pay attention to its functional parameters. For wall supply units, the main ones will be:
For a house, you will need at least two valves, or even more - it all depends on the area and configuration of the premises
- Performance... For different models, this figure ranges from 50 to 150 m3 / h. It is better to purchase a structure with a margin of volume, focusing on the area of \ u200b \ u200bthe room.
The air exchange rate for the residential area is at least 3 m 3 / h per square meter of the apartment area. So the second valve usually has to be bought if the apartment has three or more rooms.
- Adjustability air flow. Most models have a manual regulator, so that we ourselves can control the intensity of the ventilation. But there are also fully automatic devices in which the damper is opened by a drive that reacts to the humidity in the room.
The inside of the device can be used to adjust the air flow rate
- Noise isolation. This option is highly desirable, especially when recessed into a thick wall.
- Thermal insulation. All devices have basic insulation, but if your house is located in the northern region, then it is advisable to purchase a model with an additional heat-insulating casing.
Sleeves with additional thermal insulation reduce the risk of freezing to almost zero
- Price... The simpler the model, the cheaper it is. That is why for basic ventilation you can find a device for 2-3.5 thousand rubles. More modern models cost from 5 to 12 thousand, but in addition to the intake of air, they can also regulate its flow and provide effective cleaning.
What do you need for installation?
When installing the supply valve into the wall, we will bear the costs not only for the purchase of the ventilator itself. Installation using specialized equipment will cost about 3 to 5 thousand rubles, depending on the region and the complexity of the work. If you have access to the equipment, then you can save money by installing the structure yourself.

The hardest part of the job is finding the right drill bit
For installation we need:
- High power rock drill or stationary wall drill.
- Drill rod with a bit the same diameter as the valve mounting hole.
To ensure that the edges of the hole are even, diamond core bits are used for starting drilling.
- Industrial vacuum cleaner (especially if the installation is carried out in a clean area, that is, where repairs have already been made).
Using a vacuum cleaner removes a large amount of dust flying in the air
- Screwdriver.
- Crosshead screwdriver.
- Measuring instruments - level, tape measure, plumb line.
- Knife for cutting insulation.
You also need to take into account that installing a wall valve with your own hands is a noisy and dusty job. Therefore, for protection, we acquire:
- Glasses.
- Gloves.
- Mask or respirator with a dust filter.
- Construction headphones.
Headphones and a respirator will definitely not interfere with drilling!
It will not be superfluous to warn the neighbors - in order to avoid!
Hole preparation, installation and connection of valves
The instructions for installing a wall valve are quite simple - it is almost impossible to confuse anything. It is important to choose the right installation location (under the windowsill above the heating radiator or on the side of the window) and strictly follow the work algorithm.
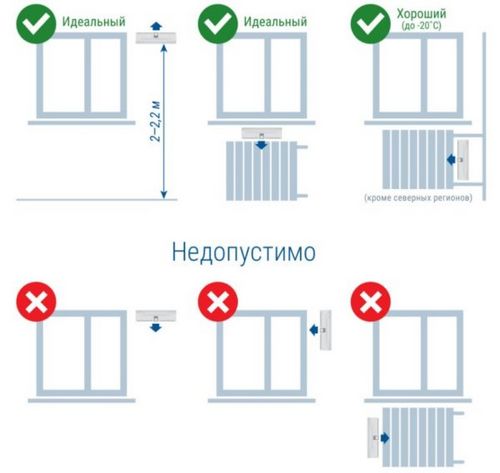
Correct and incorrect installation options for ventilation devices
The valve is mounted as follows:
| Illustration | Installation stage |
| Removing the outer skin.If the facade of the building is finished with hinged panels, then the trim element opposite the valve installation site is temporarily dismantled. In the future, it can be installed in place - the air intake will be carried out from the gap between the wall and the cladding. |
| Markup.We apply the valve base to the selected area and apply markings on the wall, which we will orient ourselves to when drilling. |
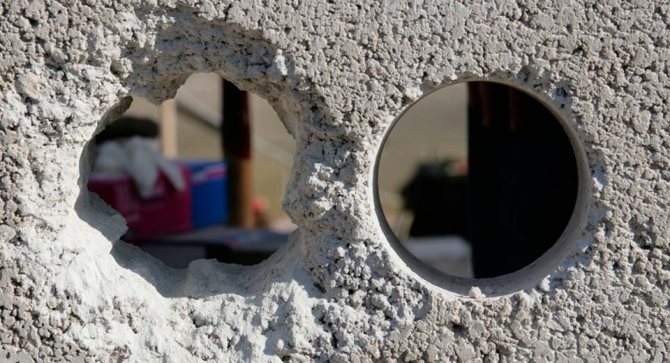
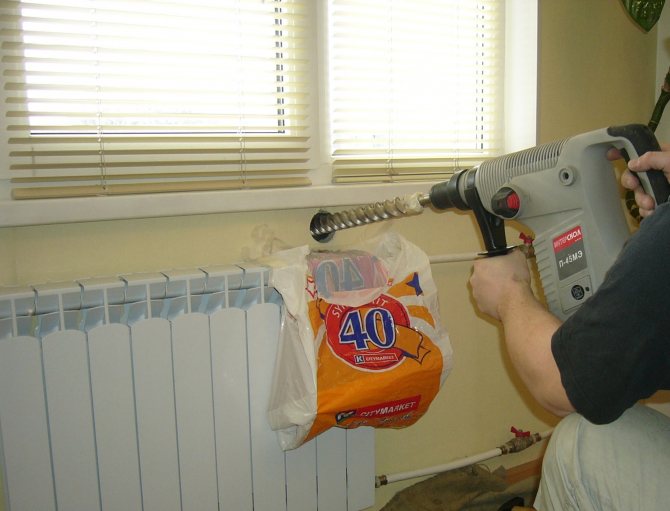
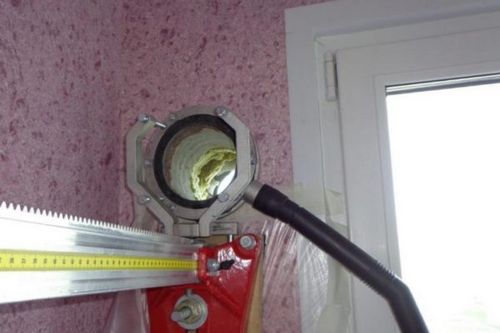
| Garbage trap.We glue a plastic bag under the hole, into which pieces of concrete will fall. We fix the hose of an industrial vacuum cleaner from above or from the side, which will catch the dust generated during drilling. |
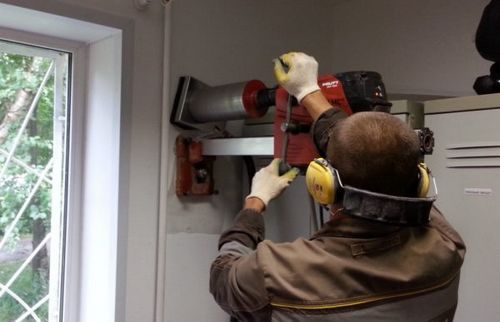
| Start-up drilling.Using a diamond core bit, we drill a starting hole with a depth of 70-100 mm. Remove the broken concrete fragments from the hole. We insert a chisel into the hole and knock out a shallow notch in the center, which will facilitate the positioning of the drill. It is advisable to make both the starting hole and the entire channel with a slight outward slope - this way we will protect ourselves from moisture leakage. | |
| Drilling holes for installation.Using a concrete drill, we form a hole for the ventilation valve sleeve. To reduce overheating of the tool, we periodically moisten the working area. When drilling, do not turn off the vacuum cleaner to avoid large amounts of dust entering the air. In order not to knock out a part of the outer wall, we pass the last few centimeters at reduced speed. To do this, mark the length on the storm. |
| Hole cleaning.We insert the vacuum cleaner into the drilled groove and remove all dust and concrete fragments from there. |
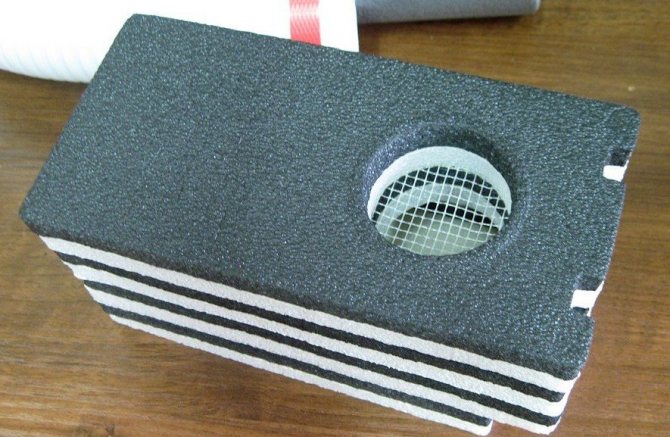
| Installation of thermal insulation.The casing made of polyurethane or polyethylene foam is inserted into the drilled hole. We cut off the excess material close to the wall. |
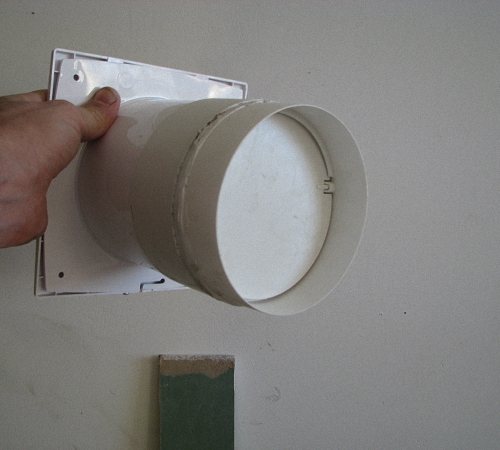
| Installing the sleeve.Insert the duct tube of the ventilation valve into the hole with the heat-insulating casing. We advance the duct with screwing movements until it comes out from the outside of the wall. |
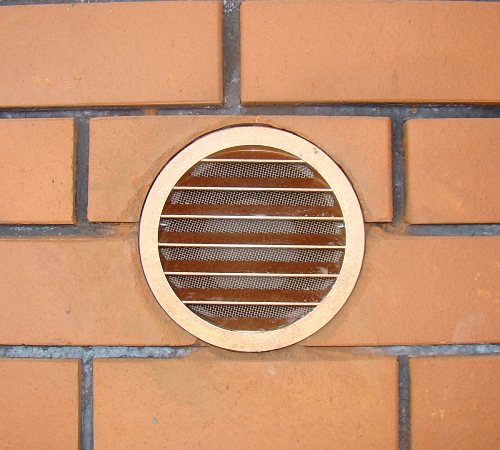
| Installation of the outer hood.Outside, we install a ventilation grill with a hood and a mosquito net on the sleeve. The structure should be located close to the wall. When installing the external parts of the ventilation above the second floor, we must use insurance! |
| Marking for fasteners.We attach the valve body to the installed sleeve, level it and mark the attachment points on the wall. |
| Installation of fasteners.According to the marking, we drill holes in the wall with a minimum diameter of 6 mm and a depth of 40 mm. We drive plastic dowels into the holes. |
| Fastening the case.We fix the body on the wall by screwing screws with wide heads into the dowels. For greater reliability, a wide washer can be placed under each cap. |
| Installation of the main part of the device.We install a damper to regulate the air flow and a dust filter in the body and sleeve. We close the structure with a lid. |


This completes the installation of the wall inlet valve. It is very simple to check the system's operability - it is enough to bring a burning candle to the ventilation hole. The flow of air will either deflect the flame or blow it out altogether.
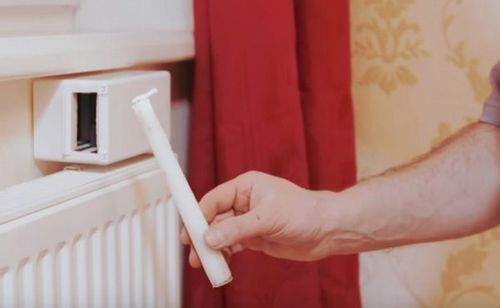
This is how the efficiency of the wall ventilation valve is checked.
Valve installation
Where is the KIV valve installed?
- In living rooms;
- In rooms with a constant presence of people;
- In rooms with a fireplace;
- In boiler rooms;
- In other rooms where an outside air supply is required.
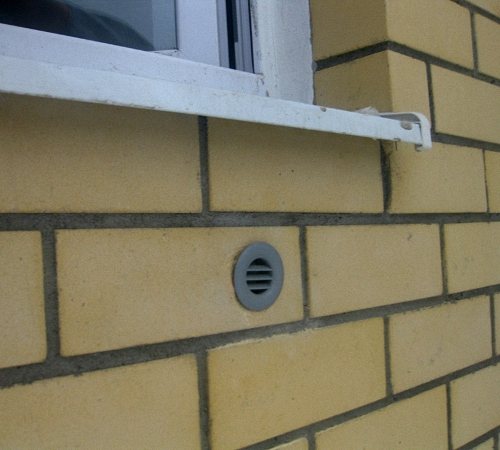
Where to locate the KIV valve.
The KIV valve should be installed in the wall. Preferably above a window or next to a window at the level of the upper third of the window. So, how is the valve:
- falls into the range of the heater;
- not visible behind the curtain;
- air circulation in the room is improved due to air convection during the operation of the heater;
- it is convenient to service the external grille through the window.
Where KIV should not be installed.
KIV should not be installed in rooms where odors, moisture and other hazards are emitted. An exhaust hood should be made from these rooms:
- kitchen;
- bathroom;
- smoking room;
- the corridor;
- premises where harmfulness is formed.
If you still need to install KIV in a room where odors or moisture are emitted
, then it is necessary to ensure the excess of the exhaust over the supply in this room and the valve should be located as far as possible from the exhaust grilles to avoid "looping" the flow.


Purpose of the wall supply valve
An effective device for ensuring a comfortable indoor climate, wall valve KIV - 125,
- relieves stuffiness in the room
- prevents high humidity
- supplies the room with fresh air continuously.
At the same time, the device has a fairly simple design, is mounted in a convenient place and does not require special maintenance. Ease of control and efficiency in operation have made this valve one of the most sought after.
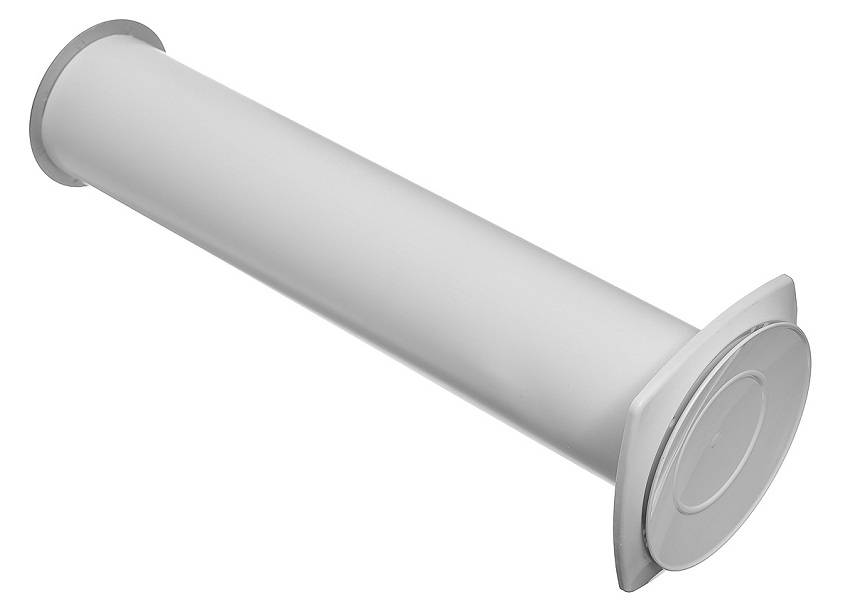
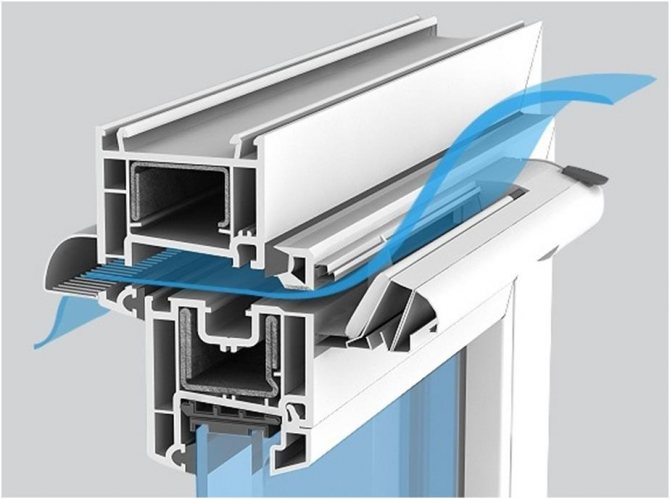
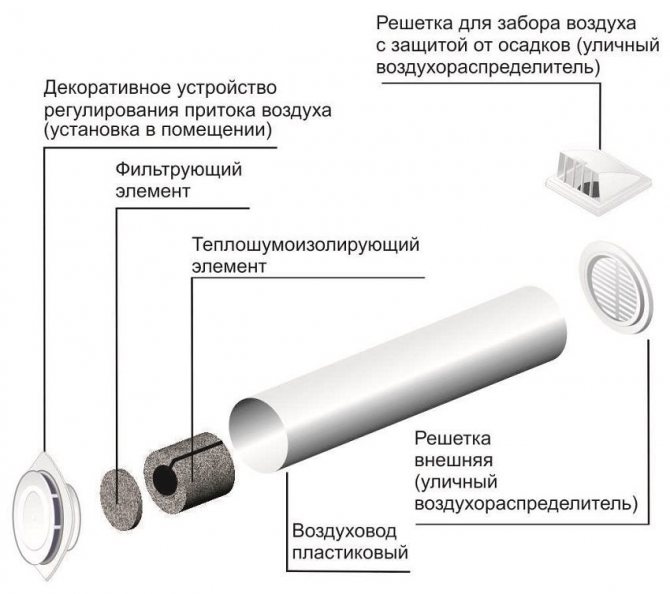
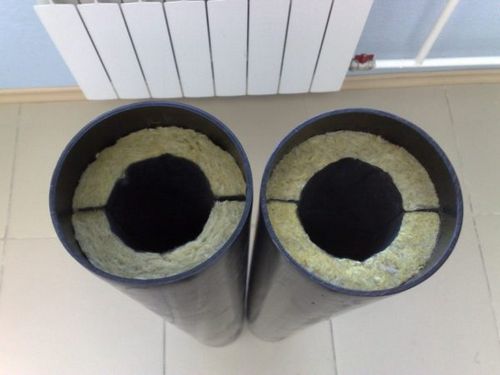
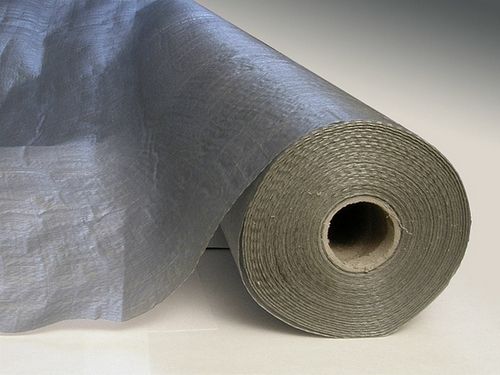
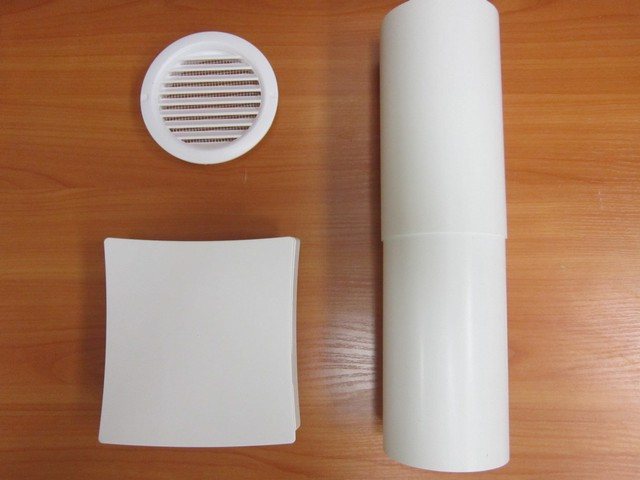
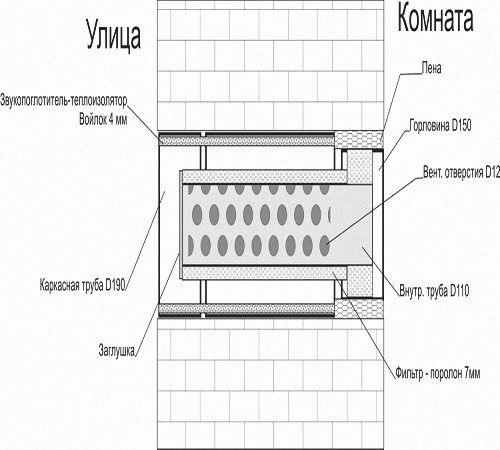
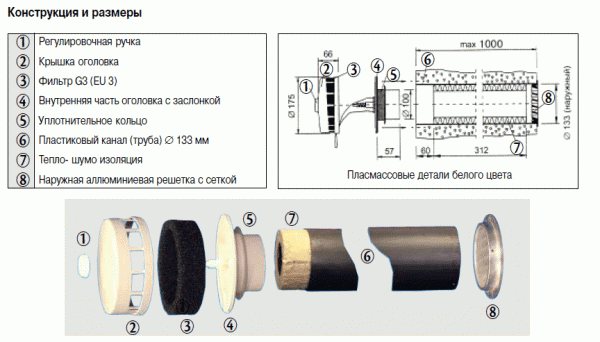
Plastic channel (pipe)
The plastic channel (pipe) is intended
for the passage of air from the outer grille to the inner head. Inside the pipe there is heat and noise insulation, which performs two functions:
- preventing the "spread of cold" from the plastic channel to the inner surface of the wall;
- absorption of noise passing through the channel.When installing KIV valves in living rooms, thermal insulation absorbs most of the street noise that enters the plastic channel. When installed in a boiler room of a country house, thermal and noise insulation absorbs the noise of a working boiler and maintains silence around the house.
The standard length of the plastic channel is 1000 mm.
The channel can be cut depending on the thickness of the wall into which it is installed.
The standard length of heat and sound insulation is 312 mm.
If the length of the channel allows, then it is possible to increase the length of the heat-and-noise insulation, which will additionally increase the noise-absorbing properties.
When installing the KIV valve, heat insulation should be placed
from the inner side of the wall close to the KIV head or (60 mm from the channel edge).
The principle of operation of the ventilation valve
A wall-mounted ventilation device is installed to supply air flow in the absence of other devices. This is an inexpensive way to reduce humidity and avoid fogging windows and fungus on the walls. It is not always possible to provide ventilation with only one valve, but it helps to maintain a minimum air exchange.
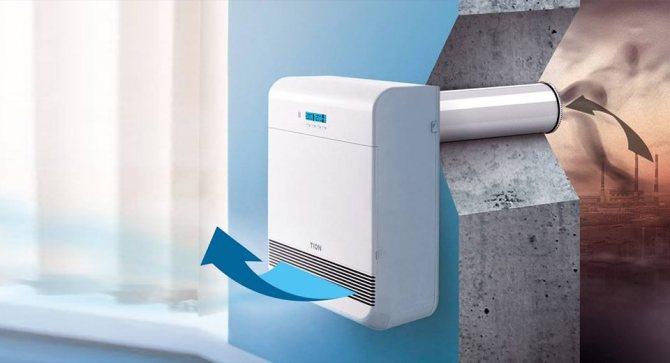
Ventilation device Vents.
The damper is installed in an external wall so that the air flow passes through the living quarters and leaves the building through ventilation ducts or an exhaust system. It does not have an electric drive, the movement occurs due to the difference in atmospheric and internal pressure. The performance of the product depends on the weather conditions, the floor, the condition of the exhaust system. Each model is equipped with intake and dispensing devices, filters, resistances in which reduce performance.
The pressure drop is individual for each building and climate, and it is difficult to determine the exact value of the performance of natural ventilation devices. With a good exhaust system and normal atmospheric conditions, the devices are selected taking into account a pressure drop of 10 Pa. Under the same conditions, we compare the operation of different ventilation valves. The indicators of the device are determined according to the performance graph.
Note: some manufacturers may indicate air flow rates at pressure differences that are rarely achievable in a home.
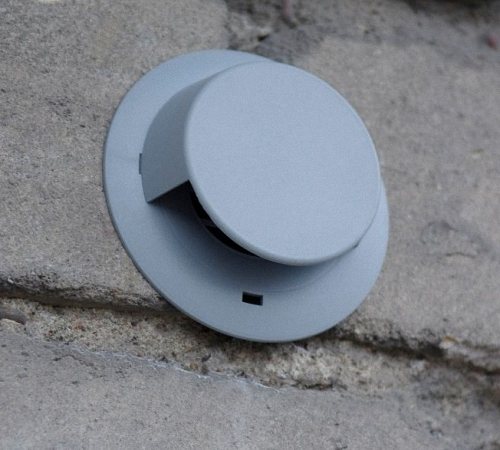
Internal head
The inner head of the KIV valve is designed
for air distribution and regulation. It is made of shockproof ABS plastic, resistant to temperature extremes and UV radiation.
The inner head consists of:
- inner part with flap and sealing ring;
- adjustment unit;
- filter;
- head covers;
- adjusting knob.
The inner part of the head is tightly inserted into the plastic channel and is screwed to the wall through a sealing gasket.
The adjustment knot allows the shutter to be opened and closed using a handle or cord.
The filter class EU3 (G3) is a porous washable synthetic material that effectively cleans the incoming air from dust.
The removable head cover has a scale indicating the degree of opening of the damper.
Using the adjusting handle, you can easily open and close the KIV damper.
Output
Valves are an important element of ventilation systems, allowing them to regulate their work. Ventilation valves can be installed on both inlet and outlet openings. Moreover, the non-return ventilation valve and the exhaust valve perform different functions, therefore they work together in the system.
From the video in this article, you can gather some additional information on this topic.
Did you like the article? Subscribe to our channel Yandex.Zen
Noise reduction by KIV valve
| Distance from KIV head, m | Decrease in sound pressure level (dL, dB) in 1/3 octave frequency bands, Hz | |||||||||||||||||||||||
| 50 | 63 | 80 | 100 | 125 | 160 | 200 | 250 | 315 | 400 | 500 | 630 | |||||||||||||
| 0,1 | 14,1 | 18,7 | 22,0 | 26,9 | 27,9 | 28,7 | 30,9 | 31,7 | 28,8 | 29,8 | 30,6 | 32,5 | ||||||||||||
| 2,0 | 26,2 | 31,3 | 34,4 | 39,7 | 41,6 | 41,9 | 45,5 | 46,2 | 44,8 | 45,1 | 46,4 | 48,7 | ||||||||||||
| Distance from KIV head, m | Decrease in sound pressure level (dL, dB) in 1/3 octave frequency bands, Hz | |||||||||||||||||||||||
| 800 | 1000 | 1250 | 1600 | 2000 | 2500 | 3150 | 4000 | 5000 | 6300 | 8000 | 10000 | |||||||||||||
| 0,1 | 34,5 | 36,2 | 36,3 | 36,1 | 37,7 | 39,3 | 40,3 | 39,7 | 39,6 | 41,6 | 41,6 | 41,8 | ||||||||||||
| 2,0 | 50,3 | 49,0 | 50,0 | 49,7 | 50,9 | 54,0 | 56,8 | 55,2 | 54,8 | 55,4 | 55,5 | 55,1 | ||||||||||||
The studies were carried out with an open flap in the valve head. Reduction of the white noise level dL, dBA is 38.9 at a distance of 0.1 m and 53.3 at a distance of 2 m from the KIV. Reduction of the level of reference traffic noise dL, dBA is 33.6 at a distance of 0.1 m and 48.6 at a distance of 2 m from the KIV.
Climate
26 votes
+
Voice for!
—
Against!
If there is a lack of fresh air in the house, the microclimate is oversaturated with vapors and odors from the kitchen, and excess dampness condenses on metal products and window panes, then ventilation must be added. To do this, you will need to additionally mount a ventilation inlet valve into the wall. This simplest device, working autonomously, has a number of advantages, providing additional portions of fresh air even in a house where windows and doors are closed.
Table of contents:
- Additional ventilation system properties
- Equipment selection
- Preparing the room for the installation of the ventilation valve
- Supply valve selection
- Features of installation of supply ventilation valves
Additional ventilation system properties
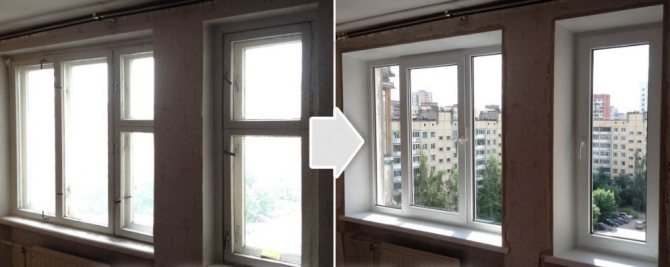
People with good health do not always pay attention to the fact that the house is stuffy and there is not enough oxygen, and an excess of moisture does not allow breathing normally. Children and weakened people suffer the most from a lack of oxygen, but stale air is of no use to anyone. And if in the summer most people use open vents or transoms, then the minimum winter ventilation provided for plastic windows is not enough.
A vent valve in the wall is usually installed in the kitchen, especially if there is no hood above the stove. If the window is opened periodically, and other ventilation is not enough, then the air is "heavy" or musty, everything is saturated with kitchen smells, condensation on the glass. In such conditions, dampness starts in the house, and even clean woolen clothes seem damp in the morning, and synthetics are saturated with smoke, fumes and house odors.
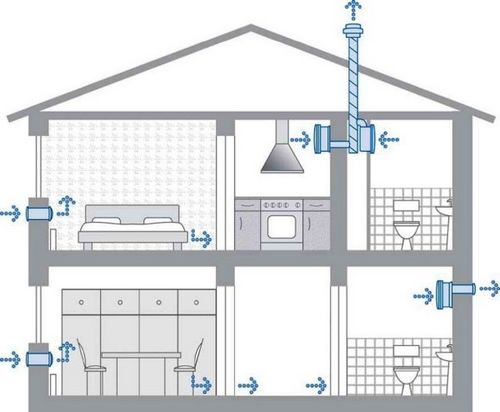
Keeping the window open all the time is also not always convenient - cold air and noise from the window penetrates, especially when the house is on the highway. General ventilation is provided in apartment buildings, and in private houses it can be successfully replaced by local ventilation, supplemented by a plastic ventilation valve. A good ventilation system will provide:
- oxygen supply;
- increased air circulation;
- air flow adjustment;
- will bring the musty air out.
Today, several types of ventilation valves are on sale for an additional flow of fresh air, which is easy to install in the house with your own hands. A supply ventilation valve (from the word "inflow" of air) can be installed in an apartment or in a house. This device functions autonomously, without electricity, allowing slightly heated air from outside to enter the dwelling, but does not allow precipitation and environmental pollution, insects, allergens and noise from the street to pass through. The valve is installed using common household tools - during construction, renovation or completion. You can mount it:
- directly at the heating system;
- at the ceiling;
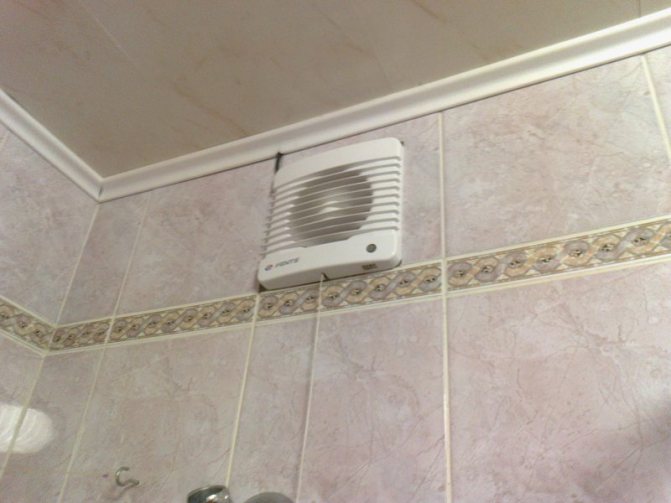
- in a space where the most stagnant air (pantry, bathroom, corridor near the kitchen).

Tip: Apartment buildings are usually equipped with ventilation. But if there is high humidity in the apartment or offices on the ground floor, then it is worth installing a supply valve in the room farthest from the ventilation shaft near the central heating battery. It will not be visible behind a window shade or under blinds, but it will significantly change the situation for the better. It is also worth monitoring the temperature in an apartment with high humidity - the colder it is, the more dampness is felt, the more likely it is for mold and mildew to appear.
Equipment selection
A plastic vent is the easiest way to provide additional air circulation. There are valves for installation in the wall of the house under the window at the radiator and a valve for winter ventilation for windows.
Attention: The tightness of the window can easily be broken if the window valve is incorrectly installed, at the same time losing the right to the manufacturer's warranty service. It is difficult to mount a KMV or KPV valve into the wall - because of the drilling of a hole, but for self-arrangement of supply ventilation this is the most acceptable option.
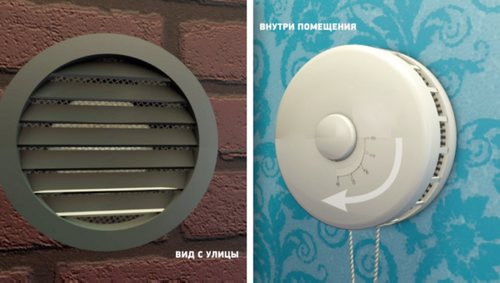
Valve device:
- decorative cover for indoor installation, which regulates the air flow;
- filter washer;
- soundproofing unit;
- plastic cylinder-air duct;
- external diffuser grille;
- closed external valve with protection against precipitation.
When choosing a model of a supply valve, it is imperative to find out the temperature range that is permissible for its full functioning, the dimensions of the cylinder and outer covers. It is imperative to clarify whether the length of the cylinder (internal block) is enough to pierce the outer wall of the house through and through. And the size of the vent valve cover must be suitable for placement between the heating radiator and the window sill.
If the heating is weak, then in cold climates the volume of fresh air entering through the wide valve may be too much, and it will not have time to warm up. On the other hand, if there is too little air coming from the forced ventilation, then sometimes 2 valves have to be installed.
Advice: With a large equipment capacity and without a control system for valves with a switch, it is undesirable to place them on opposite walls. This can lead to drafts in winter, when the difference between indoor and outdoor temperatures makes the ventilation to function most actively.
It is also important to think about cost issues in advance. If you buy a domestic ventilation valve, the price ranges from 1.5 to 3 thousand rubles. The price of an imported device for forced ventilation can be offered 1.5 - 2 times more expensive. If you hire a foreman with a tool, he will deliver it in 30-45 minutes, but for this you will have to pay extra for installation work at least half of its cost. If you decided to buy a ventilation valve in the wall in an imported version, you should try to save money when you install it yourself.
Preparing the room for the installation of the ventilation valve
For the full functioning of ventilation in the house, an additional flow of air is required, for example, through a special valve or other means of ventilation (open transoms, vents). Before installing the supply ventilation valve, it is important to check in the building how the general ventilation system works, it must be provided. To check the ventilation, the windows are opened and a sheet of paper is brought to the ventilation grill - it must "stick", that is, it must be pulled into the niche. When dealing with the arrangement of ventilation at home, first of all, it is worth cleaning the general ventilation.
Caution: It is not recommended to check ventilation with a candle or a match, although it is effective. If the house uses gas heating, then an open flame provokes an emergency! This is especially facilitated by gas leakage during strong gusts of wind and open fire near the ventilation shaft!
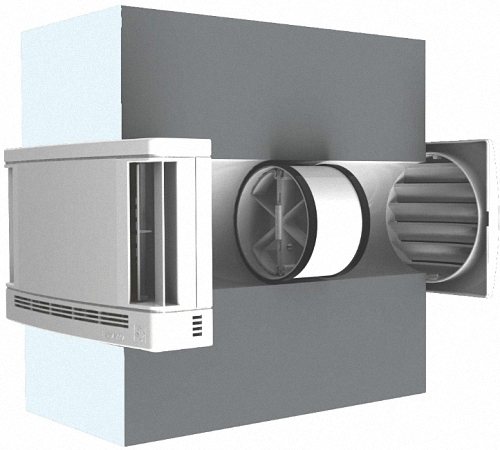
It is most convenient to install supply ventilation in an apartment on the upper floors on the balcony. A ventilation valve or monoblock is a compact way of providing ventilation, which is complemented by an internal soundproofing pad, filter and mosquito net. The outer part is equipped with a device (rain protector) so that precipitation does not fall through it.
Attention: During installation, you must correctly mount the system - with the socket downwards, moisture should not accumulate there.
1. Individual valve installation is applicable for one room, because it has a small flow capacity. The main advantage is ease of installation.
2. The duct installation assumes an air supply network with the installation of ventilation grilles. The main disadvantage is that it is important to think over the location so as not to spoil the interior design without compromising the full functioning of the system.
For the installation of additional ventilation, 2 types of supply valves are used with the same function - starting fresh air into the room. The KPV 125 damper differs from the KIV 125 only by the marking and some details of the external plugs.
Supply valve selection
KIV 125 (air infiltration valve) or KPV 125 (forced ventilation valve) are installed in the wall. Both models are similar in functionality. The design is cylindrical, which is selected slightly wider than the wall in order to fix the covers at both ends. Visually, only the head with a traction regulator inside and a rain damper outside will be noticeable. Inside there is a soundproofing seal with air holes and filters with grilles. The switch is designed to regulate the intensity of the outside air entering the room. It can be opened completely or completely shut off the air supply for a while.
The main advantages of the infiltration valve:
- works autonomously, control is not required;
- does not spoil the look of the interior;
- do-it-yourself installation of the checkpoint is available;
- installation is possible both before and after repair;
- the air from the valve is warmed up near the radiator (battery);
- effective for filtering air coming from outside;
- does not let insects through;
- retains dust, fumes and other fine suspension from the street.
KIV is most often used in a house where a general forced ventilation system is already provided, and the valve is used to supply fresh air. It does not have a significant effect on temperature reduction in heated rooms if it is installed directly next to central heating radiators. The valve is somewhat similar to a mini-window with filters and a grill, but without glasses. It can also be installed in rooms without windows or radiators, such as a storeroom or hallway.
If the cylinder valve is too long, it is trimmed from the outside and closed with a grid with a mesh. The part that goes into the room should have heat and sound insulation, as well as a filter, which is covered by an aesthetic plastic head with a damper and a regulator.
The outer funnel contains a grill and inclined louvers for protection from atmospheric precipitation, and a fine mosquito net protects against the penetration of all types of insects. Nets and grates keep flies, spiders and mosquitoes, as well as poplar fluff, pollen and other allergens, which usually enter the apartment through open windows, without hindrance. The valve has also been successfully tested for noise protection and temperature threshold reduction.
The base of the valve can be cut, depending on the thickness of the walls where it will be inserted, but the standard format of the plastic cylinder of the supply valve is in the range from 40 cm to 1 mm.
The soundproofing layer is placed on the inside of the wall, always close to the external regulator. The internal air flow regulator or cap is made of impact-resistant white plastic. It is resistant to temperature extremes and consists of:
- regulating unit;
- washable replaceable filter;
- outer cover;
- knobs-regulator;
- gaskets and gaskets for thermal insulation.
This head in the design of the cylinder is quite tight, and the valve is fixed by means of screws to the wall - for the holes of the seal. Details can be found in the instructions supplied with the valve upon purchase. The intensity regulator can be closed with a handle or with a cord.
Features of installation of supply ventilation valves
Before installing the ventilation valve, it is important to choose the right place:
- it should not be conspicuous;
- it is desirable that the air entering from the outside has additional heating along the way;
- usually mounted in a load-bearing wall;
- it is undesirable to install with access to a zone with an unfavorable environmental situation and in the direction of the industrial zone;
- in a multi-storey building, it is most convenient to mount a valve with access to a loggia or balcony.
1. Drill a hole of the required diameter in the wall along the outlined contour - slightly wider than the throughput cylinder so that it passes freely and takes a horizontal position. We select the length of the valve according to the thickness of the bearing wall - from 0.4 to 1 meter.
2. The location of the valve does not have to be strictly horizontal, it can be slightly tilted outward. And it is better to additionally wrap it in an insulating material.
3. After placing the damper duct, fill all the cracks around the main structural part with polyurethane foam.
4. We close the outer end with a rain protector - the socket downwards so that atmospheric precipitation and condensation do not penetrate into the ventilation cylinder.
Tip: If there is no ready-made valve and its analogue is made independently, then a hole is drilled under the plastic pipe at an angle - outward downward, and apart from an anti-mosquito net, nothing is placed outside. This makes sense when installing supply ventilation with access to a balcony or loggia, protected from precipitation. But at the same time, the inner part is equipped with a porous filter and a lid.
The maintenance of the external air supply valve is minimal - the filter is washed with water 1-2 times a year. If the general ventilation is not working properly, then the operation of the valve is minimal - air movement is possible only due to the temperature difference in the house and outside.
Internal structure
functional elements of the supply valve
You can find many models of supply valves in the modern construction market. However, the device they all have in common.
Components:
- Air duct. Through this pipe, air masses enter the room from the outside. Most often, there are air ducts made of plastic.
- Ventilation grill (can be seen from the outside of the wall). It prevents various debris from entering the room.
- Noise insulating composition.
- Ring and flap with sealing function. They are located on the inside wall of the house. These parts are able to resist strong gusts of wind.
- A filter in which the supply air is purified.
- Ventilation adjustment knob.
Installation of the supply and exhaust valve can be performed independently and at any stage of construction or repair. No electricity connection required.
What are the products
Ventilation valves are divided into the following types:
- Slotted... These devices are subdivided into automatic and mechanical. Air enters the room through a channel measuring 170-400 * 12-16 mm. The advantage of the device is ease of installation, which does not require removing the window frames;
- Fold-type valves... The flow of outside air into the room is ensured by means of special fold-type cuts. The advantages of the device are its low cost and ease of installation, which does not require removing the window frame. The disadvantage is due to: low bandwidth;
- Overhead... Clamp-on valves have the advantage of providing a high volume of air flow. In this regard, the following disadvantages arise: low rates of heat and sound insulation, as well as the inability to install the valve on an existing plastic window.