The principle of connecting a self-regulating heating cable is very simple. It is enough to simply connect its conductive cores to the 220 network. And be sure to insulate the second end of the heating cable so that there is no contact between the conductive cores. Braid for grounding, if any.
Exactly how to connect the self-regulating cable depends on where you will use it, what tools you have, what consumables you have in stock.
But the scheme is the same everywhere.
If you bought a heating cable for roofs and gutters and will connect it yourself, then remember that you need to sand and degrease the insulation at the termination point, this greatly increases reliability.
Follow the link for a detailed article with a photo: how to connect a heating cable.
And here we will briefly consider the basic principles.
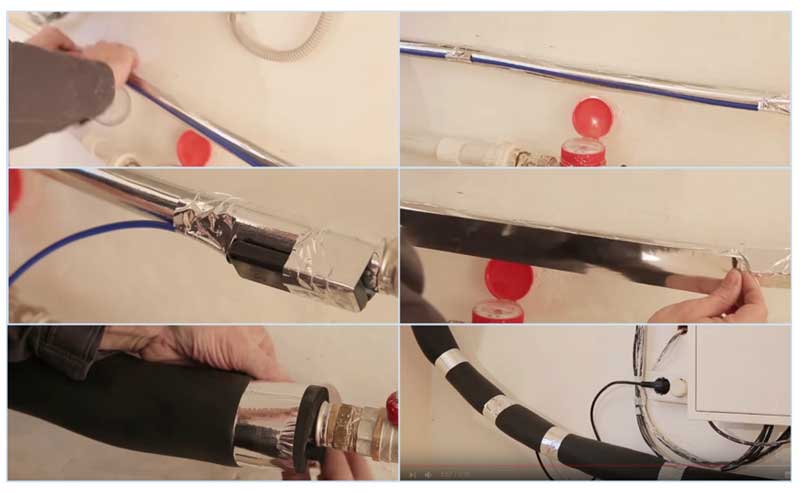
A short video and a series of photos about the self-regulating cable connection diagram:
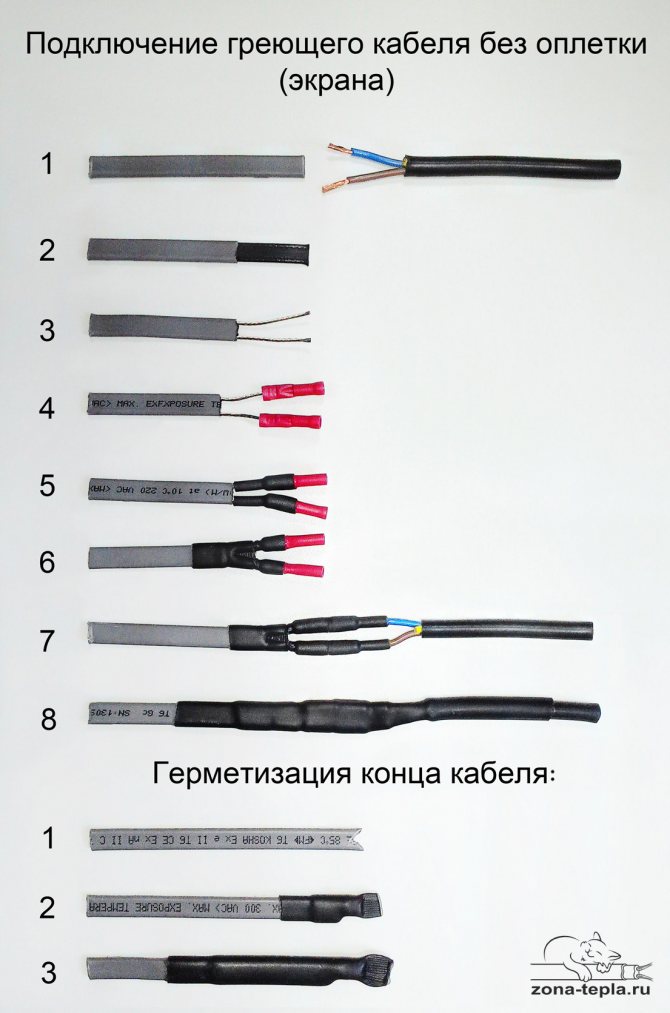
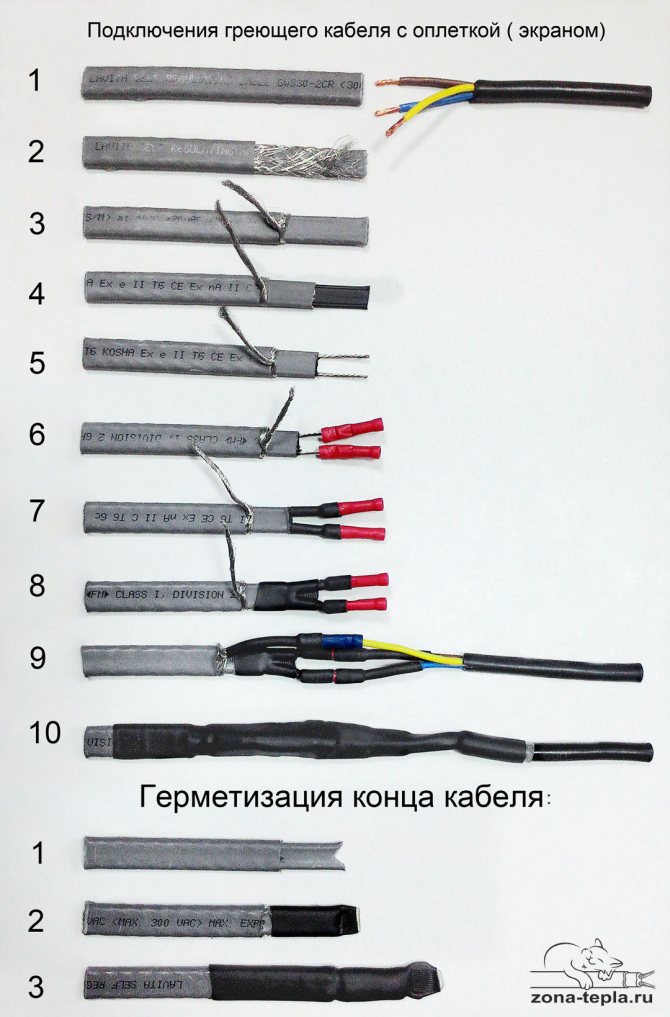
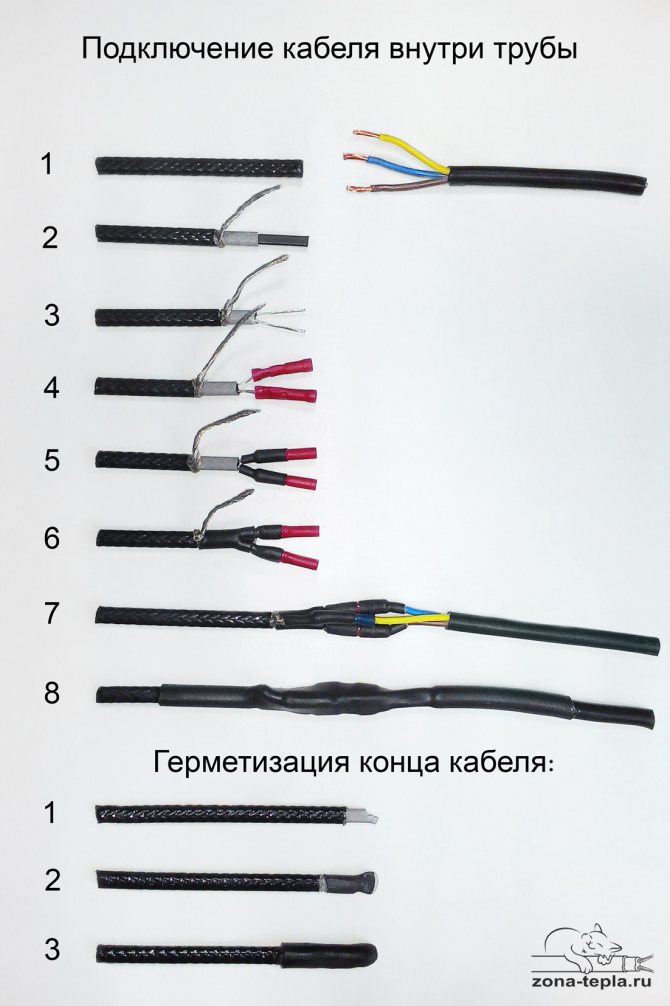
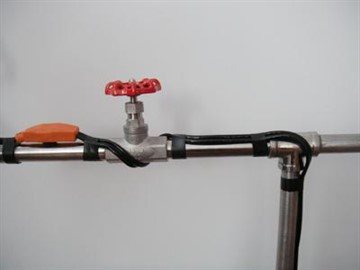
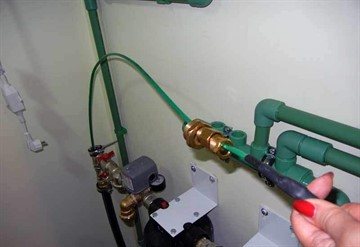
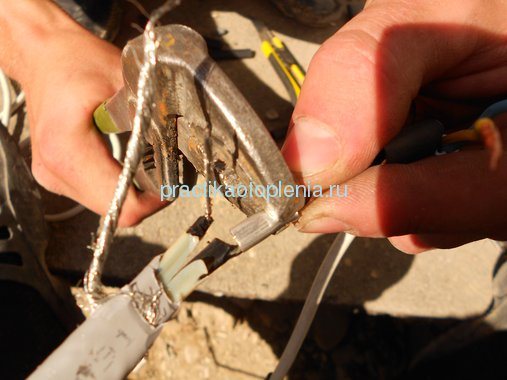
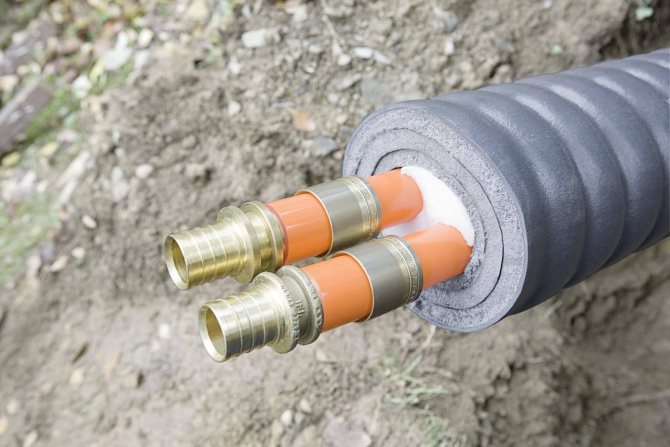
Below, in three photographs, the stages of connecting a self-regulating heating cable without a screen, with a screen and a heating cable inside the pipe with an adhesive set of couplings are briefly shown (the latter is distinguished by an end cap). Detailed articles on the relevant links.
Everything is very simple. It is necessary to power the heating cable from the mains, if the cable is shielded, connect the ground and seal the end of the self-regulating cable.
Self-regulating heating cable connection without braid (screen):
Connection of a shielded self-regulating heating cable (grounded). Detailed article >> Heating cable connection:
Connection of a self-regulating heating cable for entering the inside of the drinking water pipe. (remember to put on the gland before "sealing" the coupling!) detailed article: >> Heating cable inside the pipe connection:
—
If the cable is without braid, then you just need to power it from the network:
And be sure to insulate the other end of the heating cable. There must be no contact between the two conductors:
If our heating cable has a grounding shield, then we connect the shield to ground:
If we don't want to ground or there is nowhere, but there is a screen, then you can simply cut it off:
Self-regulating heating cable made easy. Here is the whole scheme:
The answers to the questions: how to cut the cable, how many centimeters of insulation to remove, how long to strip the conductive cores, how to insulate depends on how we will connect.
How to mount a heating cable on a pipe. Prices for self-regulating cable for plumbing. Prices for heating cable for sewerage. Prices for the heating cable inside the pipe. Heating cable for roofs and gutters.
Is it worth heating the drain
In the winter months, frost and heavy rainfall prevail in most regions of our country. As a result, large masses of snow accumulate on the roof. An increase in temperature first provokes their thawing, and later, active thawing. During the day, the melted water runs to the edges of the roof and into the gutters. At night, it freezes, which leads to the gradual destruction of roof elements and gutters.
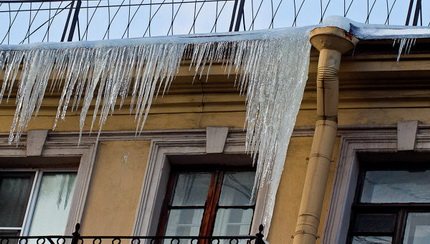
This pattern is typical for the off-season. If you don't take action, ice and snow will fall to the ground.This may damage the facade, gutters parked at the bottom of the car.
Icicles and a conglomerate of frozen snow and ice accumulate at the edges of the roof. From time to time, they break down, threatening the safety of the people below and their property, the integrity of the drainage system and elements of the facade decor. All these troubles can be prevented only by ensuring the unhindered drainage of the melted water. This is possible only if the edges of the roof and the drainage system are heated.
It happens that in order to reduce the cost of the heating system, it is laid only on the surface of the roof. The owner is fully confident that this will be enough.
However, it is not. Water will flow into gutters and pipes, where it will freeze at the end of the day, since there is no heating there. The drains will be clogged with ice, so they will not be able to receive melt water. In addition, there is a risk of mechanical damage.
Thus, in order to obtain a good result, it is necessary to equip the heating of the roof and the surrounding drains. In most cases, the heating cable is installed on roof eaves, inside gutters and in funnels, at joints of roof fragments, along valley lines. In addition, heating must be present along the entire length of downpipes, in water collectors and drainage trays.
Installation diagrams
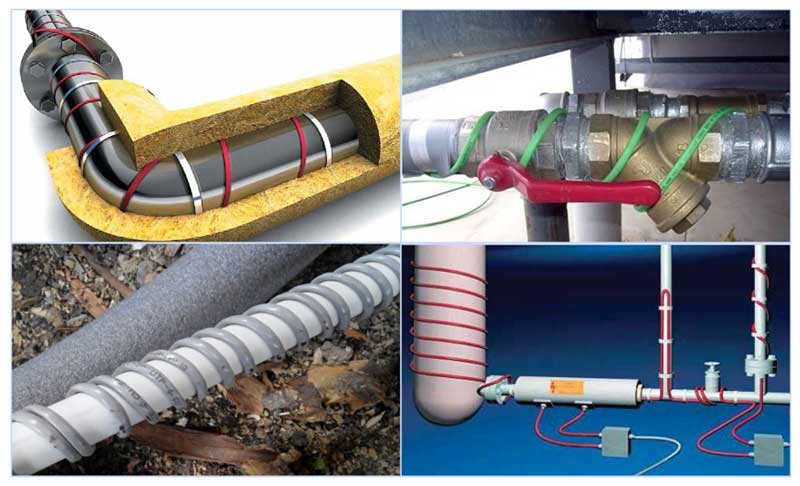
The decision on how to properly lay the cable in the pipeline is based on its purpose, heater power, and location. When laying, use a spiral, linear or internal installation.
Linear mounting
The main type of connection between the heater and the pipeline, in which the wire is placed on the surface and fixed with adhesive tape.
The installation process is as follows:
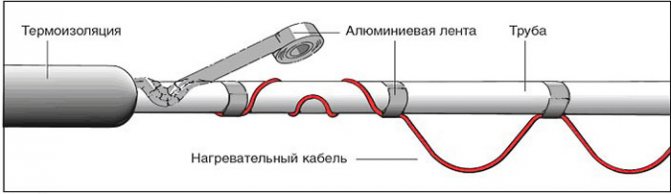
- A strip of aluminum foil is glued along the entire length of the pipeline to increase heat transfer to polymer pipes.
- The cable is wound with transverse tape segments with a pitch of 300 mm.
- An aluminum tape is glued on top along the entire length, ensuring its tight contact with the surface of the heat conductor.
- Additionally secured with nylon ties.
- Upon completion of the work, put on a heat insulator, fix it with ties or glue.
Spiral mounting
This type of installation allows you to increase the heating power along the entire length or in certain sections of the pipes.
Winding on an underground plastic pipeline is carried out in the following order:
- Wrap the pipe along its entire length with foil tape.
- The cable is spirally wound and secured with adhesive tape along its entire length. If necessary, you can additionally fix it with plastic ties with a step of 300 mm.
- They put on the insulation upstairs, connecting its segments with a spike in a groove.
- From above, the entire structure is fixed with tape.
Internal installation
Internal laying in pipelines is an economical and effective way to prevent frost penetration. For installation, only a self-regulating cable is used that does not have a temperature sensor that interferes with the flow of liquid in the pipes; it is lowered inside without fixing in a free position. The cable can only be placed in pipelines with a diameter of 1 ”and above in short sections in the direction of flow.
For entry into the pipeline, fittings with sealed gaskets are used through which the wire is passed.
The use of a heating cable is the most effective method of anti-icing, because any other thermal insulation will not heat the pipeline, but will only increase its freezing time.
Features of the arrangement of the heating system
Heating methods for different types of roofs may vary. We are talking about the so-called "cold" and "warm" roofs. Let's analyze the features of each option.
Cold roof heating
This is the name of an insulated roof with good ventilation.Most often, such roofs are located above non-residential attic spaces. They do not allow heat to pass outside, so the snow cover on them does not melt throughout the winter.
For such structures, it will be sufficient to install a heating system for gutters. The linear power of the laid cable should be gradually increased. They start with 20-30 W per r / m and finish with 60-70 W for each meter of the drain.
How to heat a warm roof
A roof with insufficient thermal insulation is considered warm. They allow heat to pass outside, so that even at negative temperatures on the surface of a warm roof, the snow cover can melt. The resulting water flows onto the cold roof fragments and freezes, forming ice. For this reason, it is necessary to arrange the heating of the roof edge.
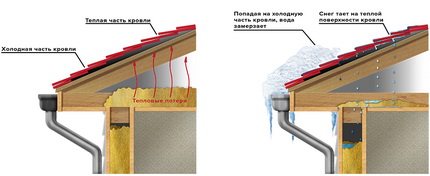
The so-called warm roof allows heat to pass through to the outside. Therefore, the snow melts over the "warm" areas, melt water falls on the "cold" fragments and freezes
It is realized in the form of heating sections laid along the edge of the roof. They are laid in the form of loops 0.3-0.5 m wide. In this case, the specific power of the resulting heating system should be from 200 to 250 W per square meter. Arrangement of heating drains is implemented in the same way that is used for a cold roof.
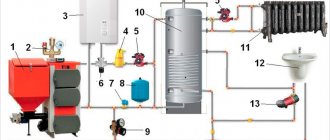
Heating for the gutter: what it consists of
For heating roofs and gutters, a heating cable system is most often used. Let's consider its main elements.
Distribution block
Designed for switching power (cold) and heating cables. The node includes the following elements:
- signal cable that connects the sensors to the control unit;
- power cable;
- special couplings used to ensure the tightness of the system;
- mounting box.
The unit can be installed directly on the roof, therefore it must be well protected from moisture.
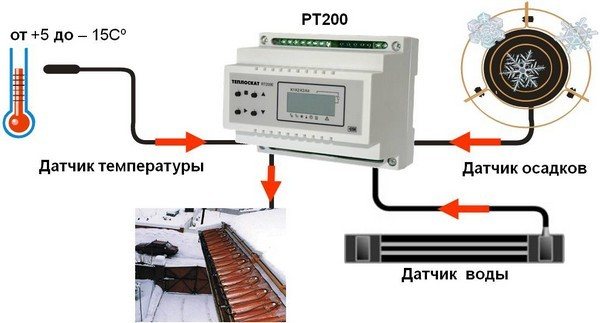
Sensors of various types
The system can use three types of detectors: water, precipitation and temperature. They are located on the roof, in gutters and gutters. Their main task is to collect information for automatic heating control.
The collected data is sent to the controller, which analyzes them, decides to turn off / turn on the equipment and selects the optimal operating mode.
Controller
The "brain" of the entire system, which is responsible for its work. In the most simplified version, it can be some kind of thermoregulatory device. In this case, the minimum operating range of the device should be in the range from +3 to -8 degrees C. In this case, the control and switching of the system cannot be fully automated, human intervention will be required.

To fully automate the operation of the heating system, you will need a controller. This device collects and analyzes the information coming from the sensors, and not based on it corrects the system's operation.
A more convenient option for operation is the use of a complex electronic control device with the ability to program. Such equipment is able to independently control the process of melting precipitation, their amount, and monitor the temperature. The controller quickly responds to changes and makes optimal decisions, choosing the best operating mode for heating equipment in existing conditions.
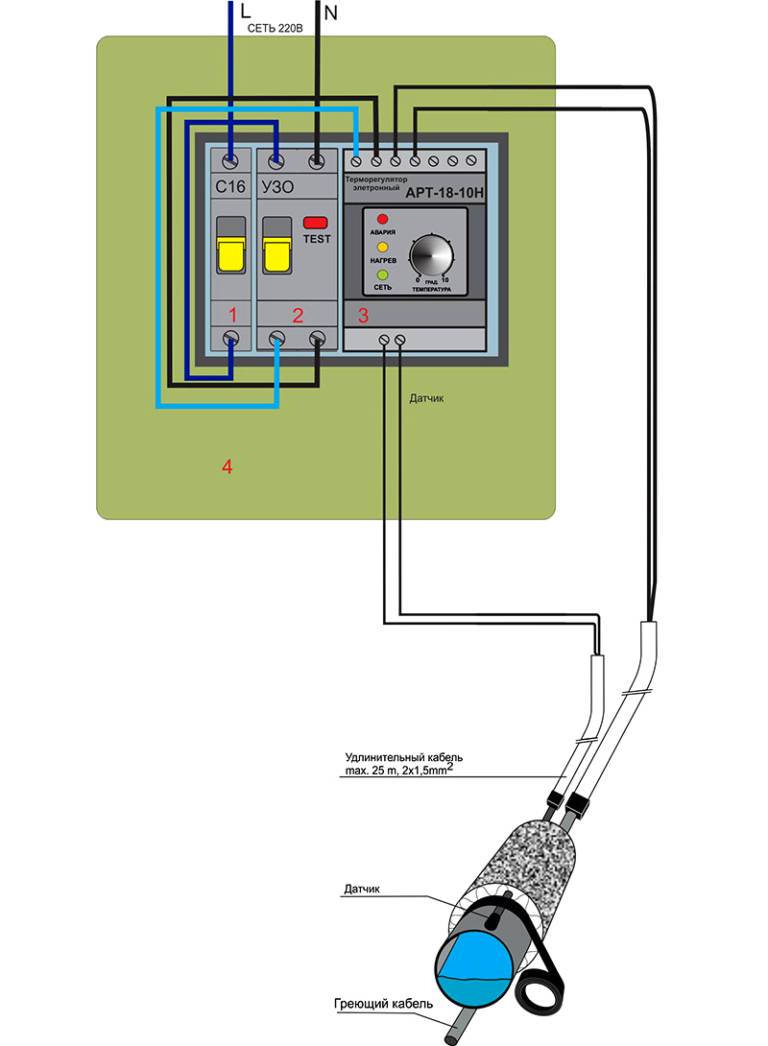
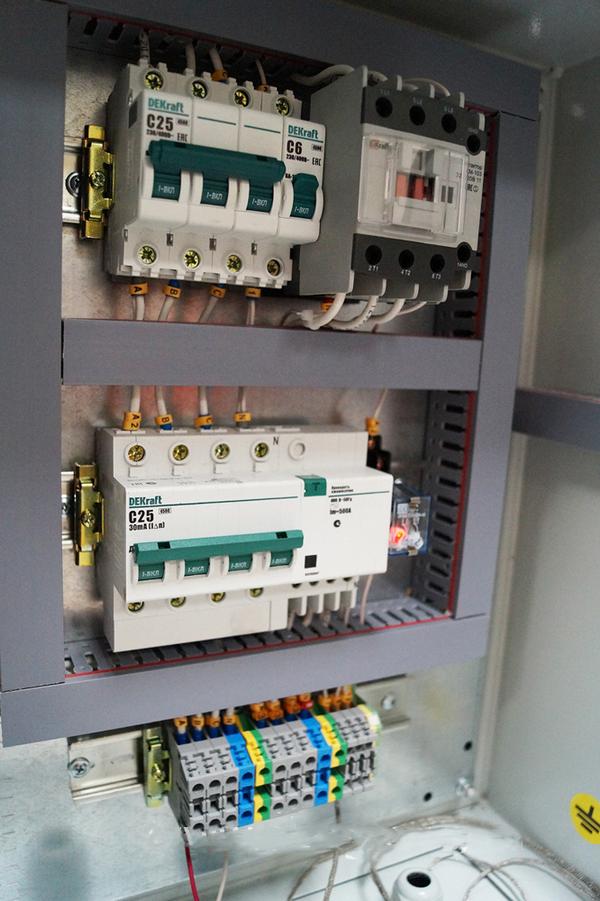
Switchboard
Designed to control the entire system and ensure safety during its operation. For the arrangement of the node, the following elements are usually used:
- three-phase input circuit breaker;
- RCD (it is also a residual current device);
- four-pole contactor;
- signal lamp.
In addition, it will be necessary to install single-pole circuit breakers for each phase, as well as protection of the thermostat circuit.
In addition, during the installation process, you will need fastening parts: roofing nails, screws, rivets.You will need heat shrink tubing and special mounting tape.
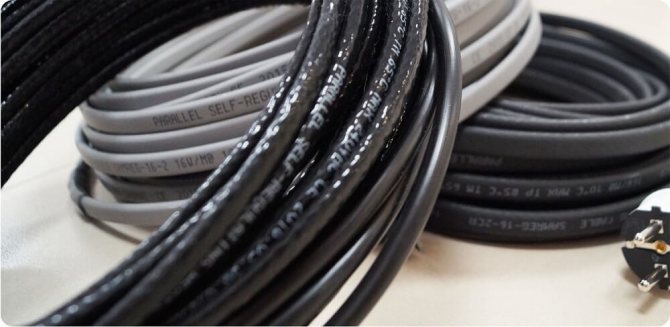
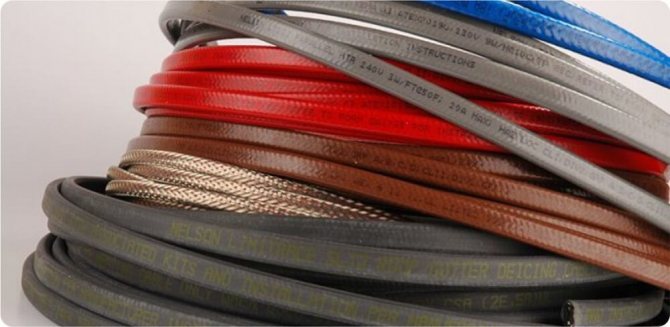
The type of outer sheath of the heating cable depends on the application.
- The polyolefin sheath is used in self-regulating heating cables for household use for laying under thermal insulation.
- The fluoropolymer sheath is used in cables that are approved for use in chemically aggressive environments, as well as inside pipelines and drinking water tanks.
- The casing with protection from UV radiation contains UV absorbers, usually particles of fine soot (at least 2%), which protect the polyolefin from decomposition under the influence of solar radiation. More details
Polyolefin sheathed cable
Fluoropolymer sheathed cable
UV protected cable
Heating cable: how to choose the right one
Perhaps the most important element of the system is the heating cable. In practice, they choose between two types of devices: self-regulating and resistive cables. Let's consider all the pros and cons of using both options.
Features of resistive cable
Differs in the simplicity of the principle of operation. Inside such a cable is a high-resistance metal conductor. When electricity is supplied, it begins to quickly heat up and gives off heat to the heated object. The resistive cable system is very easy to operate and inexpensive.

The design of a resistive heating cable is very simple. The main "working" element is a heating core. When a current passes through it, it heats up very quickly.
The main advantages of using this type of cable are considered to be the absence of starting currents when starting, the low cost of the resistive wire and the presence of constant power.
The last statement can be classified as controversial. Because in some cases, constant power is likely to be a disadvantage. This will happen if sections of the system need different amounts of heat. Some of them may overheat, while the rest, on the contrary, will receive less heat.
To regulate the degree of heating of a system with a resistive cable, thermostats or other devices are necessarily used. The efficiency and economy of the functioning of such a system depends on the correctness of their settings, so the reality is often far from what is desired. In this respect, a resistive cable is significantly inferior to a self-regulating cable.
Experts recommend laying a zoned resistive cable whenever possible. This variety is distinguished by the presence of a heating filament made of nichrome. Its linear power does not depend on the size; if necessary, the cable can be cut. Also, the advantages of the heating cable include the ease of installation and long-term operation.
Self-regulating cable and the nuances of its work
Differs in a more complex device. Inside such a cable there are two heating cores, around which there is a special matrix. It "adjusts" the resistance of the cable depending on what the ambient temperature is. The higher it is, the less the cable heats up, and vice versa, the colder it is around, the better it heats up.
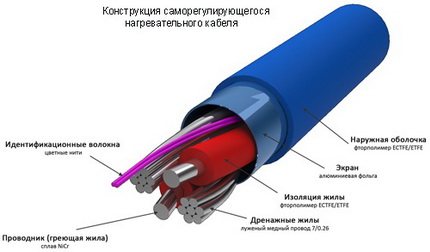
Inside the self-regulating cable there is a special matrix that can change the resistance of the heating core depending on the ambient temperature
The self-regulating cable has many advantages. First of all, for its normal operation, it is not required to install a set of control devices: detectors and thermostats. The system will configure itself, and overheating or insufficient heating, as can happen with a resistive cable, will not occur.
Self-adjusting wire can be cut. The minimum length of a segment is 20 cm, its performance will not change with the length. During the installation process, the cables can be crossed and even twisted, if necessary, they will work as usual.The installation and operation of the self-regulating cable is very easy. It can be mounted outside or inside the heated object.
The system also has disadvantages. First of all, it is cost. A self-regulating cable costs about 2-3 times more than a resistive cable. It should be borne in mind that it will be cheaper to operate. Another disadvantage is the gradual aging of the self-regulating matrix, as a result of which, over time, the self-regulating cable fails.
Types of heating cables
How to connect a heating cable to the network
Tubular heating cables are resistive and self-regulating. The first type of products is single-core and two-core, located in a pipe and divided into:
- Linear.
Products also consist of one or more spiral strands of a metal conductor, emit thermal energy passing through the conductors of electric current.
- Zonal.
The self-regulating cable is similar in principle to the resistive type. It is located inside or outside the pipes. A distinctive feature of the product is its ability to independently reduce the power of thermal energy. It also lacks an insulating coating. It can be installed on any pipe system, including small areas. Self-regulation of heat generation in different sections of the cable structure eliminates combustion or overheating of the installation.
IMPORTANT! Resistive cables cannot be cut; it is advisable to purchase them ready-made (in size). Self-regulating products can be cut to the size required.
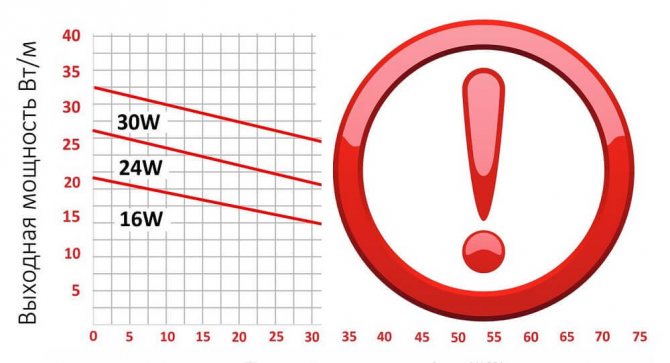
How to calculate the heating system
Experts advise choosing cables with a capacity of at least 25-30 W per meter for the roof and gutter heating system. Be aware that both types of heating cables are used for other purposes. For arranging underfloor heating, for example, but their power is much lower.
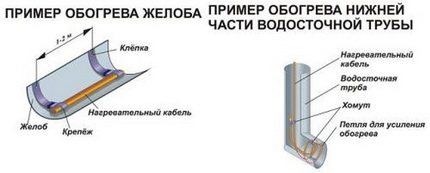
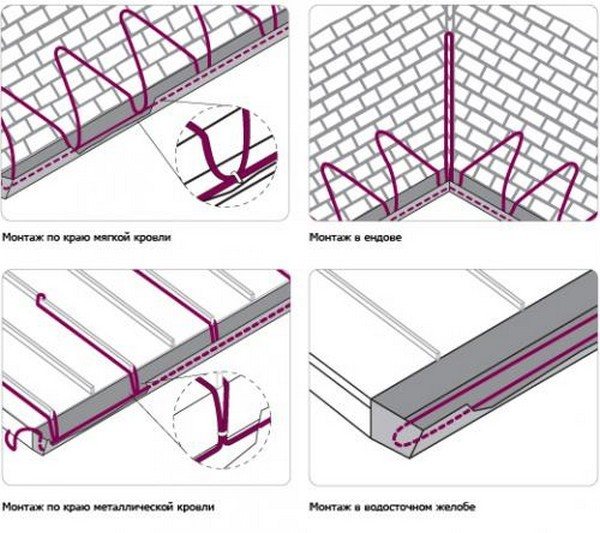
Before proceeding with the power calculations, you need to decide how all the elements of the system will be heated. The figure shows examples of the possible organization of heating gutters and gutters.
Power consumption is estimated in active mode. This is the period when the system is operating at maximum load. It lasts a total of 11 to 33% of the entire cold season, which conventionally lasts from mid-November to mid-March. These are average values, they are different for each location. The power of the system needs to be calculated.
To determine it, you need to know the parameters of the drainage system. Let's give an example of calculations for a standard structure with a vertical drainage section of 80-100 mm, a gutter pipe diameter of 120-150 mm.
- It is necessary to accurately measure the lengths of all the gutters for the water drain and add up the resulting values.
- The result must be multiplied by two. This is the length of the cable that will be laid along the horizontal section of the heating system.
- The length of all vertical gutters is measured. The resulting values are added.
- The length of the vertical section of the system is equal to the total length of the gutters, since in this case one cable line will suffice.
- The calculated lengths of both sections of the heating system are added.
- The result is multiplied by 25. The result is the active heat tracing power.
Such calculations are considered approximate. More precisely, everything can be calculated if you use a special calculator on one of the Internet sites. If independent calculations are difficult, it is worth inviting a specialist.
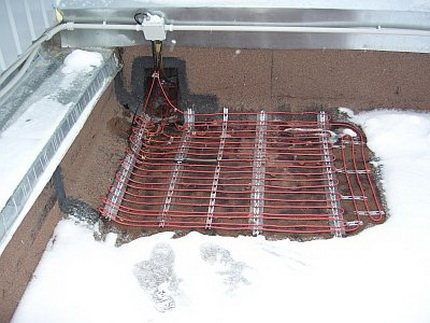
Installation
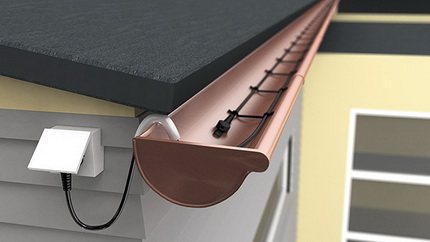
On the cornice, the cable is laid in a zigzag and fixed with special clips glued to the roofing. To heat the gutter, the heater is placed inside and secured with special plastic clips held at one end by the edge of the tray.
The section passed into the drainpipe is fixed in its upper part.If the building has several floors, the heater is attached to a steel wire, otherwise it will break off under its own weight. On the path, porch or floor in the house, the cable is laid out in a zigzag, fixed with clips with dowels and poured with a screed. On pipelines, the cable heater is placed outside or inside.
With external heating, the line is laid over the pipe in one of the following ways:
- in the form of one or more straight sections under the pipe;
- zigzag under the pipe;
- spirally wound around the pipe with equal pitch.
The cable is fixed with plastic clamps or fiberglass self-adhesive, then the pipe is insulated with a heat insulator in the form of flexible mats or shells. Some manufacturers indicate the specific material of the heat insulator and if this point is not observed, the instructions will refuse warranty service.
When using rigid insulation, for example, expanded polystyrene, the place where the cable passes through the insulation is sealed with special bushings. Aluminum tape is wound over the insulation - protection against mechanical damage. If the surface of the pipe to be insulated is rough, it is recommended to wrap aluminum tape on it before installing the heater.
Internal heating is used on short pipe sections with a diameter of more than 40 mm - in the absence of access from the outside. A special type of cable is used - in food-grade plastic insulation.
To enter the heater, a tee is cut into the pipeline. The cable is passed through the hole in the plug provided with O-rings. After installation, the pipe is also insulated.
Where to lay the heating cable
Actually, the heating system for gutters is not so complicated, however, in order for it to work as efficiently as possible, the cable should be laid in all areas where ice forms, and in places where melted snow melts. In roof valleys, the cable is mounted up and down, two-thirds of the valley length. Minimum - 1 m from the beginning of the overhang. Each square meter of the valley should have 250-300 watts of power.
On flat sections of the roof, they equip the heating of the roof fragment located directly in front of the catchment. So the melt water will easily enter the pipe.
Along the edge of the cornice, the wire is laid in the form of a snake. The step of the snake for soft roofs is 35-40 cm, on hard roofs it is made a multiple of the pattern. The length of the loops is chosen so that no cold zones appear on the heated surface, otherwise ice will form here. The cable is laid on the line of separation of water through a drip. This can be 1-3 threads, the choice is made based on the design of the system.
The heating cable is installed inside the gutters. Usually two threads are laid here, the power is selected depending on the diameter of the gutter. One heating vein is laid inside the gutters. Particular attention should be paid to pipe outlets and funnels. Additional heating is usually required here.
How to install
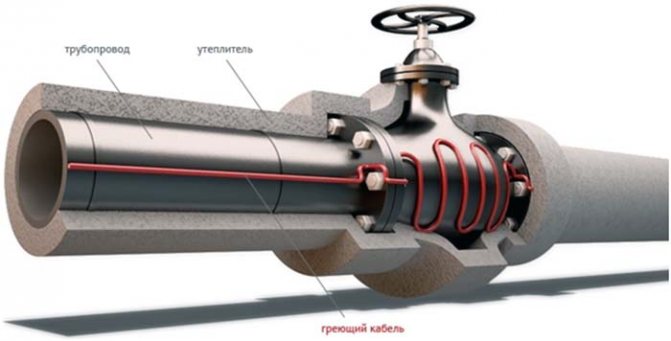
Thermal insulation of a water supply system is a difficult task, but it does not tolerate delay. For this purpose, a heating cable is used. The temperature of the heating cable can be changed by varying the resistance value of the device. The heating cable can be installed both inside the pipe and outside. In any case, it is selected in such a way that the heat loss of the water supply network does not exceed the amount of heat generated by the system.
The cable can be laid in parallel rows or in a spiral. Fastening is provided by tightening metal mesh or adhesive tape. For better retention of heat from the outside, the pipe with the heating cable is wrapped with foil. The task of installing a heating cable is, of course, best handled by specialists.
Heating system arrangement technology
We offer you to study the detailed instructions for installing a roof and gutter heating system with your own hands.We carry out the work in stages.
We mark sections of the future system
We outline the places where the cable will be laid. It is important to consider all the turns and their difficulty. If the angle of rotation is too steep, it is recommended to cut the cable into parts of the required length and then connect them using couplings. When marking, we carefully examine the base. There should be no sharp protrusions or corners here, otherwise the integrity of the cable will be at risk.
Fixing the heating cable
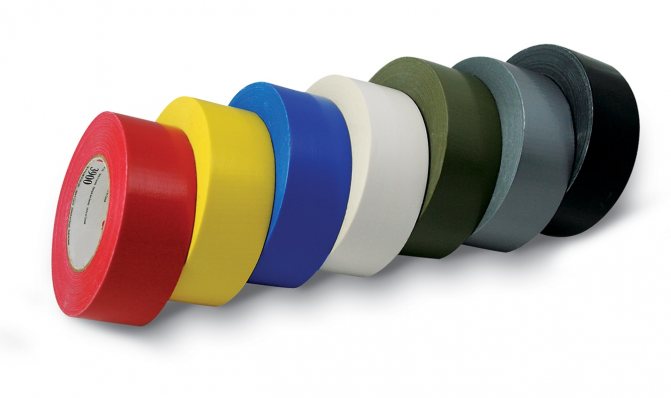
Inside the gutters, the cable is fixed with a special mounting tape. It is fixed across the wire. It is advisable to choose the most durable tape. The resistive cable is fixed with a tape every 0.25 m, self-adjusting - every 0.5 m. Each strip of tape is additionally fixed with rivets. The places of their installation are treated with a sealant.
For cable installation, use a special mounting tape. It is not recommended to use any other fasteners. Rivets, sealant or polyurethane foam are used to fix the tape.
Inside the gutters, the same mounting tape or heat shrink tubing is used to secure the cable. For parts longer than 6 m, a metal cable is additionally used. A cable is attached to it to remove the bearing load from the latter. Inside the roof outlets, the heating cable is fixed with tape and rivets. On the roof - on the mounting tape glued to the sealant, or on the mounting foam.
An important note from experts. It may seem that the adhesion of the roofing material to the sealant or foam is not sufficient for a secure connection. However, it is absolutely impossible to make holes for rivets on the roofing material. Over time, this will inevitably lead to leaks, and the roof will become unusable.
We install mounting boxes and sensors
We choose a place for the junction boxes and install them. Then we call and accurately measure the insulation resistance of all the resulting sections. We put the thermostat sensors in place, put the power and signal wires. Each sensor is a small device with a wire, the length of the latter can be adjusted. The detectors are placed in strictly defined places.
In some areas of the system, increased heating is required. More cables are installed here. These areas include a drain funnel where ice can accumulate.
For example, a place on the roof of a house is selected for a snow sensor, and a water detector is selected at the lowest point of the gutter. All work is carried out according to the manufacturer's instructions. We connect the detectors to the controller. If the building is large, the sensors can be combined into groups, which are subsequently connected one by one to a common controller.
We mount the automation in the dashboard
First, we prepare the place where the automatic control system will be installed. Most often this is a distribution board located inside the building. The controller and protection group are installed here. Depending on the type of controller, the nuances of its installation may differ slightly. However, in any case, it will have terminals for connecting detectors, heating cables and for supplying power.
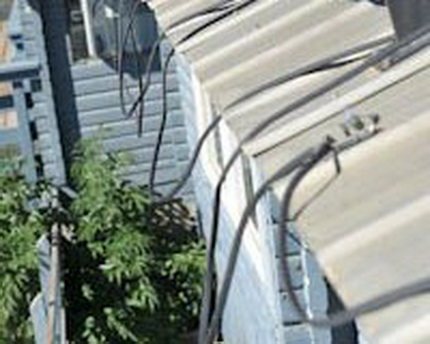
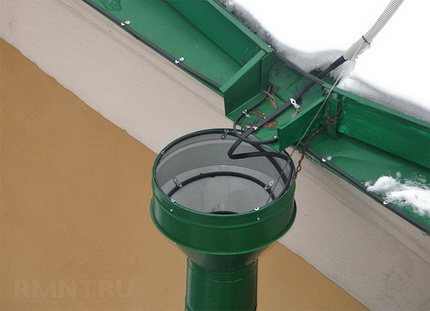
The picture shows that the cable is fixed in a "suspended" state. Over time, a violation of the installation will inevitably lead to its breakage and breakdown of the heating system
We install the protective group, after which we measure the resistance of the previously installed cables. Now we need to test the automatic safety shutdown to find out how well it does its job.
If everything is in order, we program the thermostat and put the system into operation.
Self-regulating heating cable for water supply: how to connect it yourself?
Let's consider the properties of heating cables using the example of two of their varieties.
Resistive
A constant resistance cable, the heat transfer of which depends on the voltage applied to it, which leads to the need to purchase and connect additional equipment (thermal sensors and a control device).
The price of such cables is less than self-regulating ones.
Self-regulating
The cable is a variable resistance electric heater with a laminated structure. The current conductors are separated internally by a heat-generating polymer semiconductor, the so-called matrix, which regulates the heating individually for each point along the entire line.
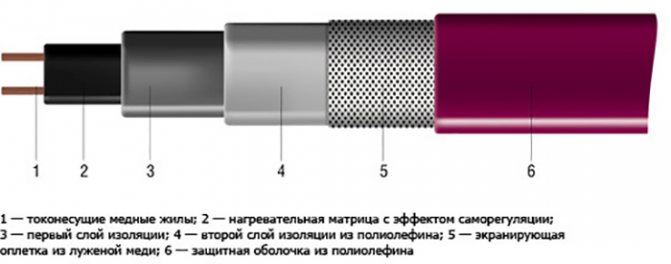
The name "self-regulating cable" is quite consistent with the principle of its operation, since the amount of heat generated by it is regulated in accordance with the change in the ambient temperature. The essence of this phenomenon is a change in the resistance of the matrix depending on its temperature and, as a consequence, a change in the amount of heat energy released.
Such cables provide ease of connection, are reliable, easily assembled with your own hands, save energy, and therefore the price for them is higher than for resistive cables.
They are used to prevent freezing of water supply and sewer pipes laid in unheated rooms, inside the ground in shallow places, for heating roof decks and gutters.
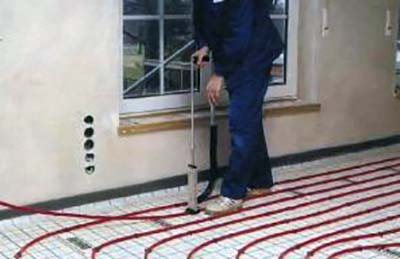
Installation of such products is also available when installing underfloor heating due to ease of installation, reliability and economy, in comparison with other heating wires.
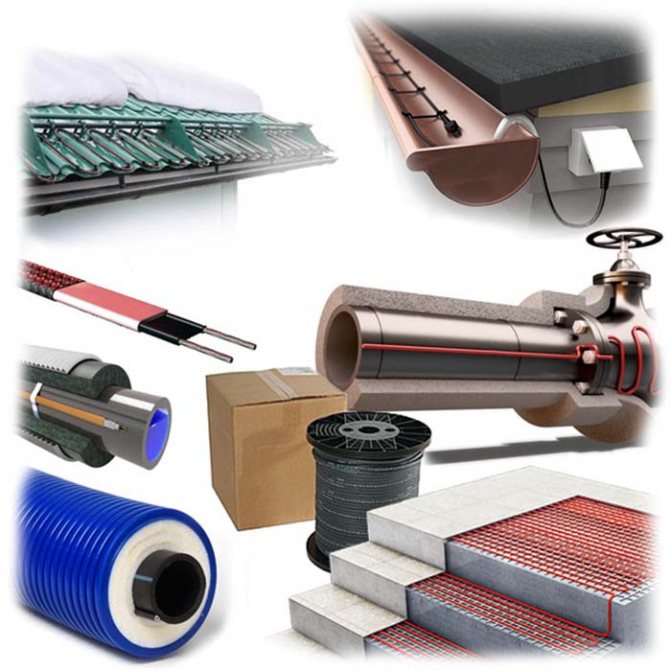
Choice
Manufacturers offer many different options for each specific application. For plumbing, sewerage, roofing, underfloor heating. There are special samples for installation inside the pipe.
In this case, it is imperative (before connecting) to pay attention to the composition of the insulation, it must comply with sanitary standards.
If you are assembling the system with your own hands, special tables provided by each manufacturer will help you to choose the right type of cable.
They indicate the types of products, their area of application, the method of installation (connection inside or outside) and the main technical characteristics (power output per 1 running meter at certain temperatures, length, etc.).
The correct choice should be based on the amount of required electrical power supplied to the conductor. Based on this power, the number of meters of cable will be determined.
The value of this power directly depends on the heat losses, that is, on the operating conditions of the system, which are very diverse and in each case individual.
We give a formula for calculating heat losses with our own hands.
- Q = 2p * k * L * ((t int - t nap.) + 273.15) / ln (D / d)
- Q - heat loss, Watt;

K - coefficient of thermal conductivity of thermal insulation W / m2 * K;- P - = 3.14;
- L - pipe length, meter;
- t c. - the required temperature of the liquid in the pipeline;
- t s. - outside temperature in winter,
- ln - logarithm
- d is the inner diameter of the pipe, meter; D - the diameter of the dressed thermal insulation, m

Calculation of heat losses is just the beginning of the "fascinating process" of immersion into the physics section called thermodynamics, so we strongly recommend that an ordinary layman establish contact with a qualified specialist who will take into account all the features and individualities of your system.
With this (correct) approach, your choice will come down to determining the best manufacturer and matching the quality to the thickness of your wallet.
Installation
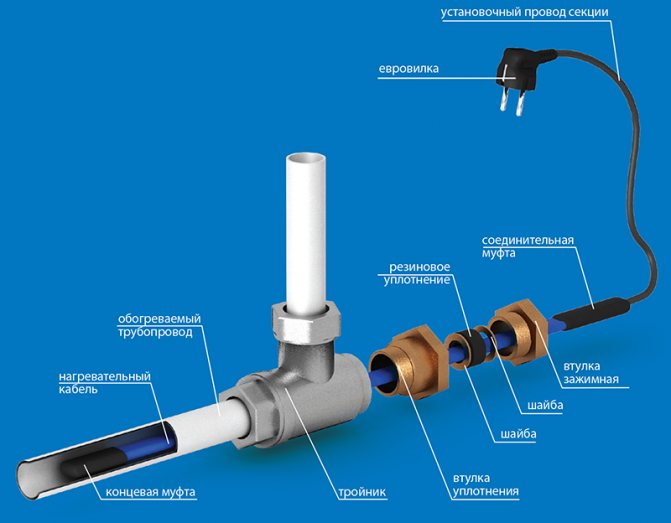
The system, based on a self-regulating cable, is available for DIY installation, is very simple and consists of a heating element (cable) and an electrical network. To start work, we mount a connecting sleeve on a heated pipe, connect an electrical wire to it that goes to the outlet and a self-regulating cable, after which we begin the installation of the system.
For heating a water pipe or sewerage, we place the cable in parallel longitudinal strips or, much better, in the form of a spiral wrap.
Next, we fix it with a special adhesive tape made of aluminum foil. When fastening with your own hands, this must be done carefully, since if the insulation of the conductor is damaged, moisture will get inside and the product will become unusable.
When installing on plastic pipes, we advise you to pre-cover their surface with aluminum tape to increase the area and enhance heat transfer from the heating cable to the inside of the pipe.
Aluminum, is an excellent conductor of heat, instantly heats up and begins to give off heat to the system, thus contributing to a faster heating of the surface. After winding the heating cable, be sure to wind the same aluminum tape from above, this will reduce inappropriate heat losses.
After that, we close all this with special pipe heaters and fix them to prevent slipping. This completes the installation, it remains only to connect the system to the mains.
There is a variant of laying the cable inside the pipe, in which case some difficulties arise.
Such a scheme requires the use of cables coated with so-called food-grade materials, since they will come into contact with drinking water. To enter the cable into the pipe, special sealing glands are required, which must be installed somewhere. This means that you need to arrange additional connections.
In addition, in large areas, problems arise associated with the complexity of the passage of shut-off valves (you cannot pass a cable through them), while a scheme with several connection points is calculated. You can do all this with your own hands, but it is quite problematic.
Based on the above, we can conclude that internal cable laying is advisable if it is necessary to warm up small pipe sections, if there is comfortable access to them, or if construction is being carried out from scratch.
In this case, all the nuances are taken into account initially in the overall project. For acquaintance, we present the prices for a South Korean self-regulating heating cable for a water supply system.
Presence of shield Presence of grounding Sheath
Laying depth, meter.
Laying type.
Power, W. Per running meter. Price, p. Per running meter.
| SRL 16 - 2 | — | — | Plasticate Below 1.00 Outside | 16,00 | 160,00 |
| SRF 16 - 2CR | + | + | Plasticate Below 1.00 Outside | 16,00 | 240,00 |
| SRL 24 - 2 | — | — | Plasticate Below 0.3 Outside | 24,00 | 170,00 |
| SRL 24 - 2CR | + | + | Plasticate Below 1.00 Outside | 24,00 | 275,00 |
| SRL 30 - 2 | — | — | Plasticate —————- Air | 30,00 | 180,00 |
| SRF 30 - 2 CR | + | + | Plasticate —————- Air | 30,00 | 290,00 |
| 15 Se DS 2 - CF (food grade). | + | + | Fluoroplastic Any Inside and outside | 10,00 | 370,00 |
Of course, do-it-yourself installation will save your budget, but nevertheless, due to the complexity of carrying out high-quality calculations of the necessary system parameters, we advise you to contact specialized enterprises to entrust them with installation work.
Among other things, such firms provide a passport of the work performed with the provision of a quality guarantee. The price of the installation work will pay off with the quality.
In conclusion, we note that a heating installation of this type presupposes a mandatory connection to the electric power "RCD" (residual current device). RCD ratings should take into account some 1.5 times increase in starting currents.
Oleg Kuznetsov
Expert of the StrojVanuu.ru project
Did the article help you?
Let us know - rate
strojvannu.ru
Typical mistakes when installing the system
Experienced installers highlight the typical mistakes that are often made by those who for the first time independently install the heating of gutters:
- Errors in design. The most common is to ignore the features of a particular roof. Design ignores cold edges, warm areas, spillway areas, etc. As a result, ice continues to form in some areas of the roof.
- Errors in fixing the heating cable: a movable wire "hanging" on the mounting tape, holes in the roof for fasteners, the use of tape, which is designed for installing a warm floor, on the roof.
- Installation of plastic clamps intended for indoor use as fasteners. Under the influence of ultraviolet light, they will become brittle and disintegrate in less than a year.
- Hanging the heating cable into the drain without additional fastening to the cable. Leads to wire breakage due to thermal expansion and ice weight.
- Installation of power cables that are not intended for installation on the roof. As a result, a breakdown of the insulation occurs, which threatens with electric shock.
Errors include laying the cable in areas where its use is not required. His work will be useless, and the owner will have to pay for it.
How to connect a heating cable for a water supply. Terminals on the supply side of the cable
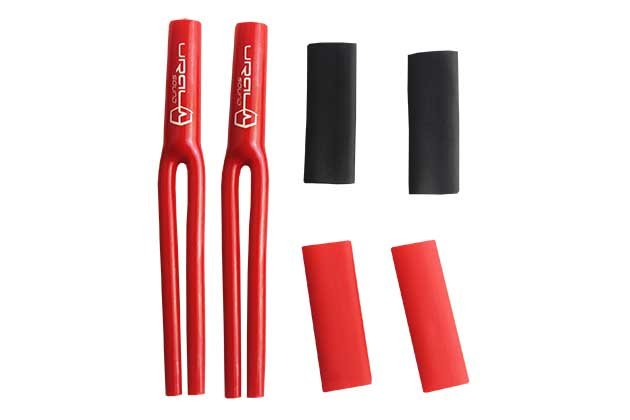
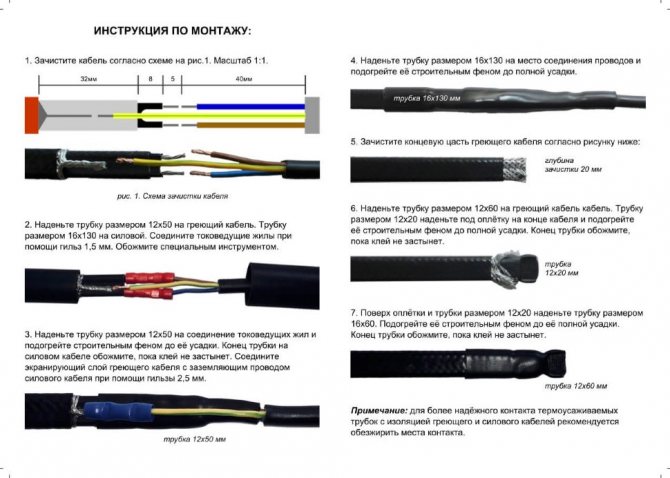
To connect the heating cable to the electrical network, it is necessary to prepare a connecting wire of sufficient length, with a cross-section of at least 1.5 sq. Mm, a power plug, metal connecting sleeves (tubes) and heat-shrinkable tubes.
The connecting wire, electrical plug and connection sleeves are needed to connect the self-regulating cable to the supply wire - to supply voltage to the household power supply, and heat-shrinkable tubes are needed to insulate bare wires.
The sequence of work how to connect the heating cable to the outlet.
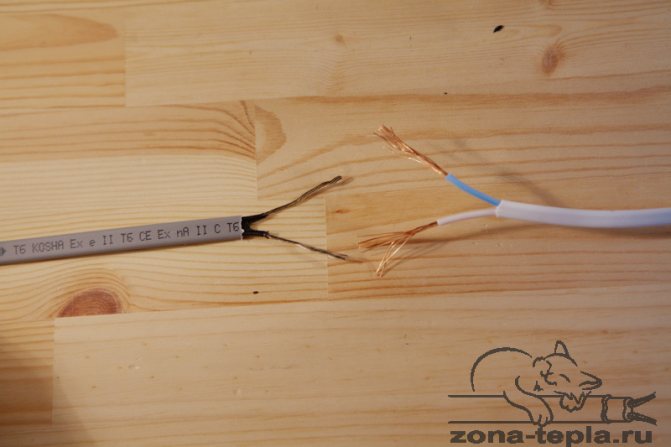
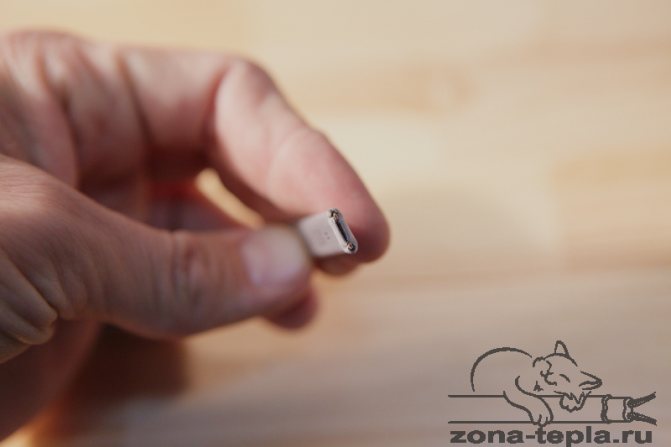
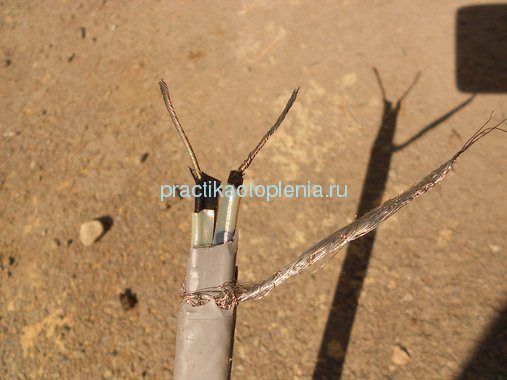
The work can be started by sealing the supply side of the heating cable, that is, its beginning. To do this, carefully remove the outer insulation of the cable with a knife and unbraid the cable sheath at a distance of about 6-8 cm.
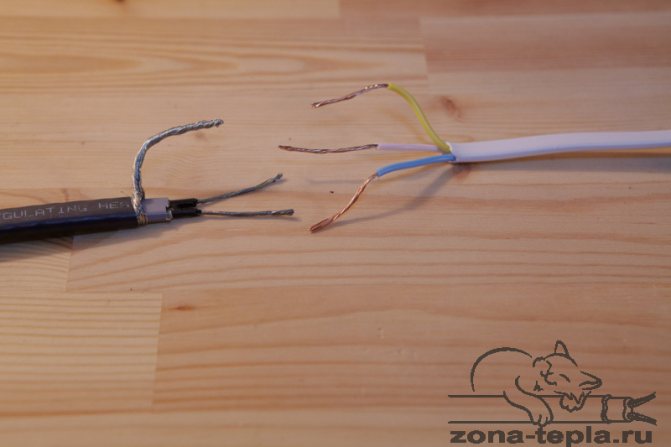
Then we remove the insulation under the braid, exposing the black polymer matrix, with a knife we divide the conductors in it at a distance of 3-4 cm and expose the conductors at a distance of 1-2 cm, cleaning the matrix from the wires.
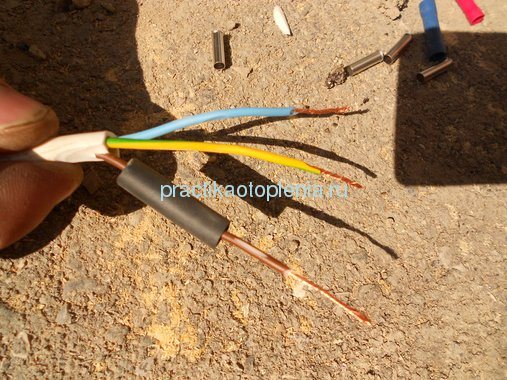
Now you need to prepare the supply wire, cleaning the ends of the wires from insulation. It is best to use a three-wire multi-wire cable with a cross section of 1.5 sq. Mm as a supply wire.
We use two conductors for voltage supply and the third for grounding using a Euro plug. In such cables, the ground wire is usually two-colored, which makes it easier to identify.

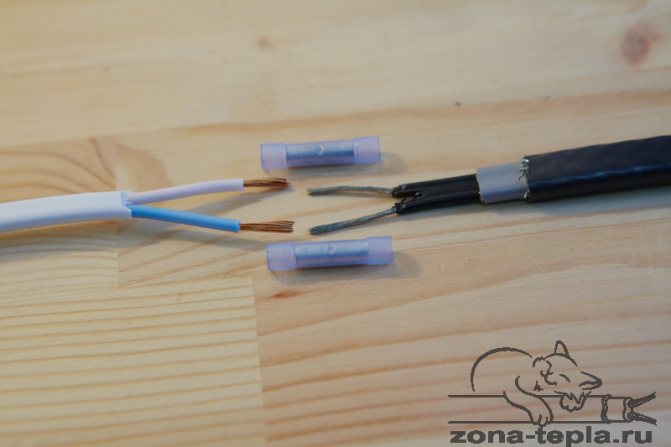
Then we put heat-shrinkable tubes on the supply cable - first with a larger diameter, then with a smaller one. This is necessary to insulate the junction of wires and cables, after connecting them.
We put on the thermotube and the connecting sleeve on separate terminals and twist the wires. After twisting, we move the sleeve to the place of twisting, with force we squeeze it with tongs or pliers and push the heat-shrinkable tube onto the joint.
We carry out twisting, crimping and insulation with other leads in the same way.
We have the electrical contact of the wires, now we need to insulate these contacts using heat-shrinkable tubes.
These tubes have an interesting property that will make it possible to insulate an uneven surface: when heated, they sharply decrease in diameter, sealing the edge of the joint.
The manufacturers of these products recommend using a building hair dryer for such purposes, which gives a high outlet temperature. But not everyone has a hairdryer, so you can use a regular lighter or matches.
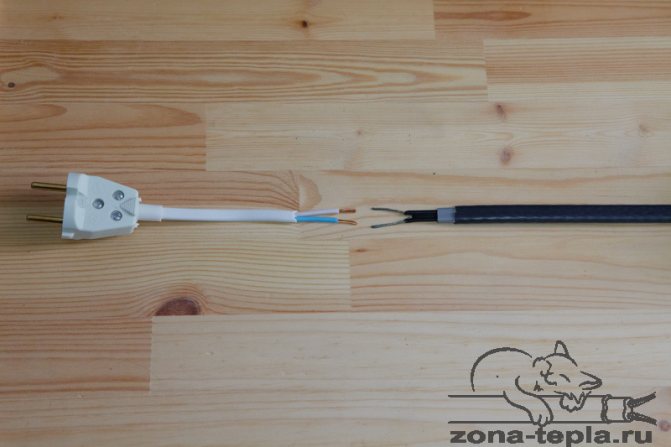
Thoroughly warming up the thermotube, we get a sealed joint and you can put the power cable in a protective cover, which will prevent the cable from mechanical damage. A plastic pipe of a suitable diameter can be used as a cover.
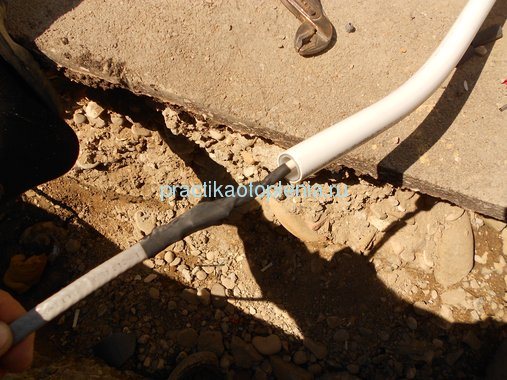
We attach the plastic cover (pipe) to the vertical guides and connect the euro plug to the cable, taking into account that the ground wire is two-color.
Now you can plug the heating cable into the socket, you are ready to do this. But take your time.In the second part of the article, we will tell you how to connect a self-regulating heating cable, terminating the end parts of the tape.
Save
Save
practikaotoplenia.ru
Heating zones for drainage systems
In winter, due to the effects of low temperatures, a number of zones on the roof find themselves in extreme conditions:
- The joint between the wall and the roof. In this zone, the highest temperature is observed due to the rising heat from the windows of the house and its leakage through the walls and ceiling. The snow is actively melting here, and the resulting moisture can flow under the roof and accelerate the decay of the rafter system and the upper part of the walls.
- Roof overhang or roof canopy. Heat does not spread to the hanging part of the roof, but the cold does its job. The flowing water turns into ice. As a result, ice forms on the edge of the roof and icicles grow. Walking under such a roof is simply dangerous for humans.
- The drain. Moisture remains in the downpipe. When freezing, water expands sharply, which leads to deformation of the metal and even to its rupture.
- Stagnant areas of a non-standard roof. The presence of valleys, towers and other complex elements create areas where snow accumulates, and it gradually melts into the attic.
- Roof window. They are often subject to icing, and the problem can be eliminated by heating the nearby downpipes and the edge of the roof.
Thus, on the roofing part of the house there are characteristic zones where in winter there is an increased danger to the structure and people.
A de-icing system is needed at the edge of the roof, roof gutters and in dead zones of complex roofs.
Features of mounting the device
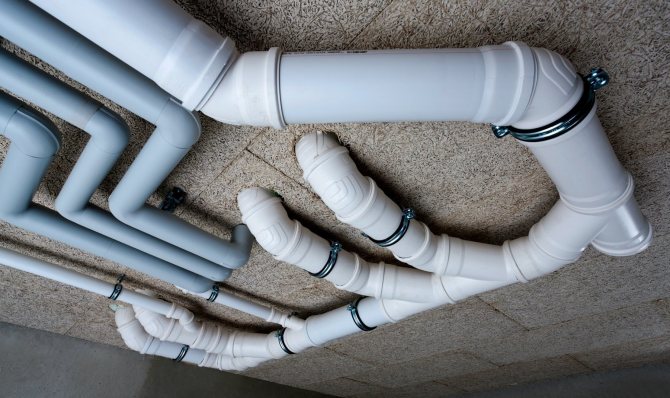
Heating cable for plastic pipes and its installation
A protective agent aimed at maintaining a constant temperature in the water supply system is mounted with your own hands both inside and outside the pipe.
Special wires are designed for these tasks. The heating cable is laid in the pipe when the water supply system is completely ready for operation, but not protected from the negative effects of low temperatures.
To protect it from freezing, you must use a device with a fluorinated polymer.
The heating cable can be inserted into the pipe with your own hands from above without using any tools.
You will have to arm yourself with a special retainer only when you bring the device from below, otherwise the heater may slide. Internal installation of the device is carried out in stages.
The first thing to do is to find out the length of the water pipe that needs to be protected from the cold.
Further, in order to properly perform the internal installation of the heating cable with your own hands, you need to dissolve one of its edges and attach a sleeve with oil seals there, which will ensure the water resistance of the device.
The other end of the device must be well insulated and lowered into the pipe with care so as not to break the insulation of the device. ... Then the edge where the coupling is located must be connected to the electrical network
Then the edge where the coupling is located must be connected to the electrical network.
The connection can be made either directly to the device in which the cable twists are hidden, or by means of a plug.
The section of the pipeline with the device inside must be marked by making some mark on it with a marker.
External installation of a device that maintains the desired temperature in the water supply system is elementary. The heating cable can be attached to the pipe with your own hands using aluminum tape or special adhesive tape.
But it is important to perform this task correctly, acting according to one of the following schemes:
- one row of the device is located along the water supply in a straight line;
- there are many rows of devices, and they run parallel to each other;
- the elements of the device are placed along a wavy line;
- the cable wraps around the water pipe in a spiral, while it should be 2 times longer than the pipe.
When the pipeline has shut-off valves or distribution nodes, a mixed fixture stacking pattern is used.
In general, weather conditions and the method of pipe laying affect the installation of a device for heating a water supply system.
After the cable is installed with your own hands, the water supply is insulated. Foil is suitable as a material for thermal insulation of pipes.
External installation of the device for heating the water supply system ends with a connection to the electrical network.
List of main elements
An anti-icing system is a device designed to warm up a specific area of a structure, allowing controlled snow melting and preventing ice formation. For the roof, systems are used consisting of the following elements:
- A heating element. Heating cables or heating cables are used as a heater. They are able to convert electricity into thermal energy due to the high resistance of electrically conductive elements.
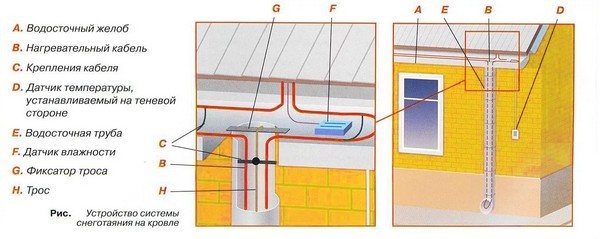
- Control block. It includes starting, regulating and protective devices: controller (weather station, thermostat), temperature and humidity sensors, control cabinet with automatic switches, starters and RCDs. Temperature sensors are mounted on the roof and walls, and it is recommended to install a humidity sensor in the gutter. Automatic and manual control modes are provided in the control cabinet.
- Distribution system. It includes power cables for power supply, control cables for transmitting signals from sensors, junction boxes and terminal connectors.
The de-icing system works quite simply. Heating of the problem area is provided by heating the conductors or a special element of the heating cable when current passes through them.
The cable is switched on and off automatically when a signal is received from the sensors. The temperature sensor gives such a signal at a temperature of the order of plus 2 or minus 3 degrees.
The corresponding information also comes from the drain when moisture accumulates in it, which can create an ice plug.
How to connect the cable to the network
After installation, any self-regulating heating cable is connected to the thermostatic block, on which the contacts are marked, in order to connect the temperature sensor and the wire to each other. Connection to the thermostat is not particularly difficult due to the available self-regulating heating cable connection diagram.
The task of connecting is facilitated by knowing the color coding: the blue, brown wires are connected to the electrical network, the yellow-green wire is connected to the grounding or zero bus. Now this type of designation is used in almost all heating wires.
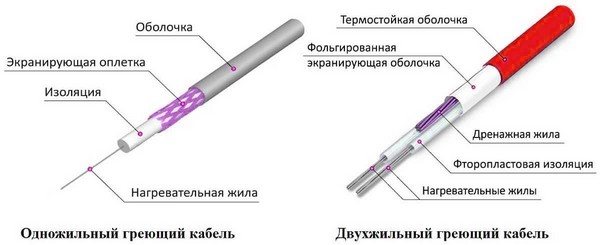
Cable types: pros and cons
The main element of the de-icing system is the heating cable. They differ in terms of the heating element, the number of conductive conductors, performance characteristics and degree of protection.
In the systems under consideration, one- and two-core options can be used. There are 2 types of heating element - resistive and self-regulating cable.
Resistive cable
Its principle of operation is based on the heating of the conductive cores during the passage of current. The greater their electrical resistance, the more heat energy is released.
In the simplest designs, such conductors are made of steel. Special resistive alloys are used in modern, high performance cables.
Examples include the Elektra VCDR and Elektra TuffTec cables.
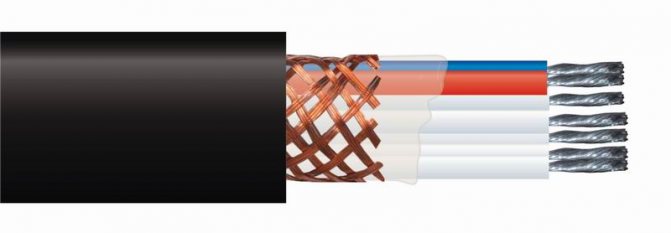
Resistive cables have several design options:
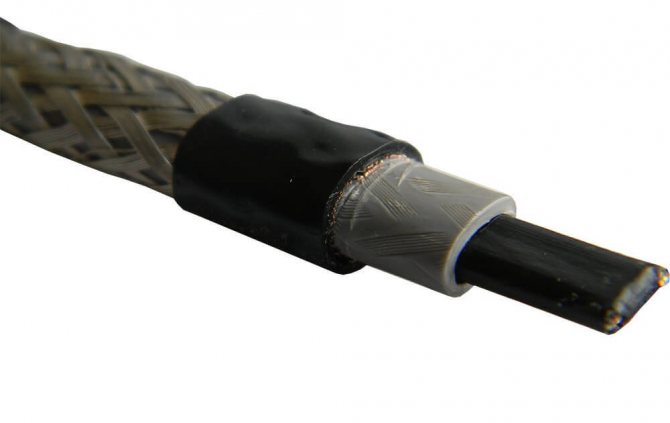
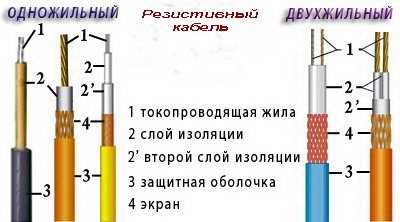
- Single-core type.In it, a high-resistance current-carrying conductor is covered with heat-resistant insulation (fluorolones, in particular, fluoropolyester), a metal braid for mechanical protection and grounding of the system, and a hermetically sealed PVC sheath. An electric current is supplied to such a cable from both ends.
- Two-core type. The cable has 2 different conductors. One of them is a resistive, heating conductor, the other is an ordinary conductive conductor, for supplying current to the first conductor from the other end of the cable. In this design, the connection to the network is made from one end, and a jumper is installed between the cores at the other end.
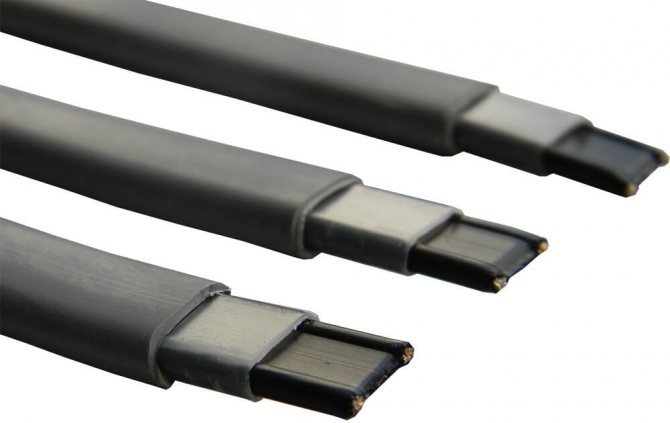
- Flat type. This is an improved single-core cable in which the core is made in the form of a flat tape. This design makes it possible to reduce the radial size and increase the heating area.
The main advantages of a resistive cable are: simplicity and reduced price (about 700-900 rubles / m), stability of characteristics, high heat generation, sufficient protection against damage and moisture.
The disadvantages of the design include the following disadvantages: the risk of local overheating when the resistive core is bent, the need to use only a strictly defined cable length, and increased sensitivity to overheating.
Self-regulating cable
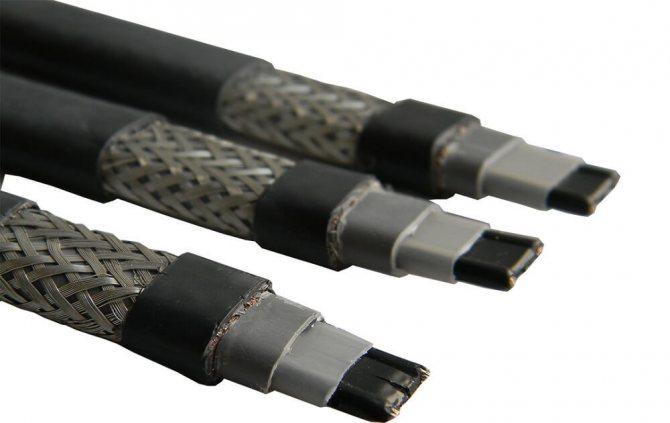
The modern version of the heating element is a self-regulating cable. In it, heating occurs using a special semiconductor matrix, which is superimposed in the form of a shell over the resistive cores.

Such an element has a specific property - the power of heat release increases with decreasing temperature, while it does not depend on the bends of the veins. The models Elektra SelfTec and Elektra SelfTec PRO are popular.
The advantages of such cables: optimal power consumption, elimination of the risk of local overheating, system reliability.
However, you should pay attention to the disadvantages:
- significant starting currents;
- lack of the possibility of preliminary assessment of effectiveness;
- limited service life (up to 5 years);
- increased price (more than 1100 rubles / m).
Due to its high cost, this cable is usually used only in locations where the resistive cable is likely to bend.
Connecting the heating cable - how to fix the breakage yourself, connect the heating cable
A heating cable is a special cable that prevents water pipes from freezing. The use of a self-regulating heating cable also prevents damage to heating systems. As a general rule of thumb, self-regulating cables are attached to pipes on both sides. The heating cable is connected to the electrical network.
Application of heating cables
First of all, the use of a heating cable is relevant for water supply and sewerage systems. It is almost impossible to remove ice and icicles from hard-to-reach areas. And various heaters will still not save you in very severe frosts. Using a self-regulating cable will help maintain the required temperature, ensure reliable heating of the water supply and prevent condensation.
Recently, the use of heating cables for underfloor heating structures has become widespread.
Types of heating cables
Currently, there are the following types of similar cables:
- resistive
- self-regulating
How self-regulating heating cable works
Self-regulating cable is made of a special material that can change its thermal conductivity during operation. The lower the ambient temperature drops, the lower the resistance of the heating cable becomes. The main feature in the operation of this heating element is that its resistance does not change along its entire length at the same time. At present, such a process can be maintained even without the use of automata.
With a self-regulating cable, you can reduce your electricity bills. Also, the advantages of this device include the fact that it can be cut anywhere.
When connecting the heating cable, a large number of insulating materials must be used. Otherwise, spontaneous combustion cannot be ruled out.
How a resistive cable works
Resistive cable is a wire with one or two cores. The metal cores act as heating elements. They are isolated. The electric current passing through the veins is converted into heat due to the resistance of the metal, as a result of which heating occurs.
The resistor cable must not be cut.
Moreover, its use is quite energy-consuming.
Despite the reliability, there are malfunctions in the operation of heating devices, and also breaks are possible due to improper operation.
Eliminate broken heating cable
Damage can occur due to overheating or failure of the temperature sensor. If the device stops working inside or outside the water supply, you need to disconnect from the mains and carefully remove the cable. Since self-regulating wires can be cut, strip and connect the wires taking into account grounding. Use a heat shrink sleeve for insulation. You can warm up the heat shrink sleeve using a building hair dryer. After carrying out all the manipulations, reinstall the heating device.
How to install a self-regulating cable inside a pipe after repairing a break
Work on laying a self-regulating cable in a pipe is carried out if the air temperature is not lower than five degrees. The connection of the conductors is done using soldering. The use of insulation avoids moisture ingress and protects the heater from high temperatures. The device operates over a temperature range of five to fifteen.
After eliminating the break, the following types of work must be performed:
- install the tee where you will enter the cable
- then screw the adapter
- enter cable
Calculation of self-regulating wire and accessories
The need for heating cable and accessories is determined by a preliminary calculation. It depends on the required capacity of the system, which is influenced by such basic factors as the type of roof and the climatic conditions of the area.
The roof is conventionally divided into 2 types:
- Cold. Such a roof has good thermal insulation, and snow melting occurs only due to sunlight and air temperature (0-minus 2 degrees). In this case, the greatest attention is paid to the gutters.
- Warm. Thermal insulation is insufficient and there is significant heat loss from the house. Due to this, the melting of snow begins already at a temperature of minus 10 degrees.
The calculation of the required roof heating power is carried out on the basis that the minimum value of the specific indicator should be 27-28 W / m2 for the central regions of Russia with moderate snow load. In colder regions, the average value is taken as 300 W / m2.
For heating drain pipes with a diameter of up to 10 cm, the power is calculated based on the condition of 18-25 W for each meter of length, with a diameter of up to 16 cm - 30-45 W / m, with a diameter of up to 22 cm - 50-90 W / m for cold roofs.
When heating warm roofs, the required power increases by 40-50 percent. For gutter, the average values are 55-58 W / m and 85-92 W / m for cold and warm roofs, respectively.
Self-regulating cable starting current
Learn more
Inrush current is the maximum current that occurs when the cable is plugged into the system. It depends on the line power of the cable and the ambient temperature at the moment the system is switched on, the so-called "cold start". A feature of self-regulating heating tapes is significant ST, sometimes 4-5 times higher than the nominal value.The value of the starting current determines the rating of the automation, as well as the power consumption of the system. The longer the heating cable section, the higher the starting current at the moment of switching on. More details
System installation
Laying the heating cable and installing the system can be done by hand.
This requires the following tool:
- puncher;
- electric drill;
- screwdriver;
- hacksaw for metal;
- a hammer; assembly knife;
- scissors for metal; pliers;
- nippers;
- screwdrivers;
- tester;
- roulette;
- metal ruler;
- square.
Markup
A strip is marked on the edge of the roof, on which the cable "snake" will be located. The lower border is set at a distance of 2-3 cm from the edge.
The upper border depends on the length of the roof overhang and should be at least 10-15 cm above the junction of the wall with the roof. Usually the width of the strip is 42-45 cm, but in some cases it increases to 60-65 cm.
The location of the brackets for the junction box, control unit and sensors is indicated.
Cable fixing
The cable is neatly, without sharp bends, is laid in a "snake" within the marked strip. From below and from above it is fixed with longitudinal mounting tape with an adhesive layer.
The cable loops are fixed to the roof surface with aluminum tape. When using a single core cable, attach the power cable along the heating cable strip.
Installing sensors and junction boxes
A bracket is fixed at the point of power supply, on which the junction box is mounted. The temperature sensor is also installed here.
The moisture sensor is lowered into the drain and secured. In the box, the resistive and power cores are connected using terminal clamps.
At the other end of the cable, a second box is installed, in which the power cable is connected to a resistive core or two cable cores are connected to each other.
Installation of automation in the dashboard
The anti-icing system must have an individual shield, to which the 220 V power grid is suitable. An automatic machine of the corresponding power, a switch for a visible circuit break, and an RCD are installed in the shield.
Further, in the junction box, the power and control circuits are separated.
Typical installation errors
When installing an anti-icing system, the following errors are most often observed:
- Excessive kinking of the resistive cable during snake installation. With such an error, local overheating occurs, which interferes with the operation of the entire system. The minimum permissible bending radius specified in the instructions must be strictly observed.
- RCD tripping. The protection shuts down the system in the event of a leakage current. They are caused by poor contact at the cable junction or by moisture getting inside the junction box.
- Water drips all over the edge of the roof. This phenomenon occurs when there is no heating of the longitudinal gutter and the water in it freezes.
Problems with the operation of the de-icing system can occur if the length of the heating cable is incorrectly calculated.
If its capacity is not enough to prevent water freezing, then icicles may form in places. The uneven distribution of the cable snake loops can lead to the same effect.
Installation conditions
The scope of application of heating pipes for pipes is extensive. They can be used in all places where it is necessary to heat adjacent surfaces, materials. Basically, their purpose depends on the species. Some types of cable are specifically designed for floor heating equipment.

Heating of cables is especially common in sewerage, water supply and heating systems. Utilities buried in the ground are at risk of freezing completely for six months.
It turns out that the heating cable can be laid on various materials to warm up their surfaces. But not everything is as simple as it seems.Although the self-regulating heating cable has a wide range of applications, certain conditions must be met during installation:
- When laying, use linear and spiral installation.
- The tensile load should be no more than 15-25 kg, depending on the modification.
- The cable is placed inside or outside the water supply.
- The diameter of the bend should not be less than its 6 diameters.
- The air temperature during installation should not fall below −5 degrees Celsius (in most cases, at such temperature indicators, working with a cold wire is difficult due to the fact that it becomes rigid and bends poorly, does not adhere tightly to the heated surface).
The main condition for installation is the prohibition on the use of materials made of metal and polymer adhesive tapes for fastening the cable; its intersection with contacting surfaces is also unacceptable.
Installation We propose to further understand in detail how to personally install the heating cable of a self-regulating heating cable for heating pipes so that it is efficient and does not cause problems in the future.
Preparatory work
The first step is to carefully examine the section of the pipeline that needs insulation. All problems, such as rust, rot, damage to the integrity of the outer surface of the pipe, must be eliminated immediately.
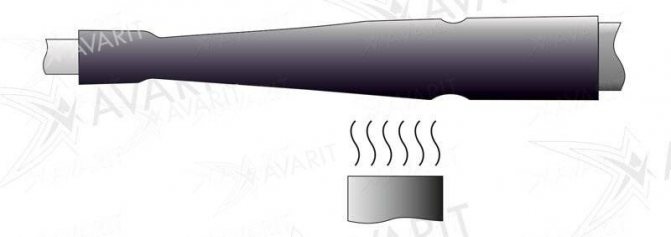
After examining the future work site, you need to immediately cut the heating wire - to complete its termination. To do this, take the free end of the conductor, to which nothing needs to be connected, cut it off with a "step", removing the protective layer.
The resulting "step" is firmly and reliably insulated using heat-shrinkable cutting tubes. There is also an easier option - to purchase a ready-made system in which all the preparatory work has already been completed.
Note! This option will cost several hundred rubles more, but will greatly facilitate the fate of an electrician who has no experience in performing such work.
Preparation of all materials and tools
Then you need to prepare materials and tools that will come in handy during the installation of a heating cable system:
- Self-adhesive glass cloth or metal tape (plastic clips can be used).
- Self-regulating cable with end trim.
- Nippers.
- Crimper.
- Pliers.
- Aluminum tape.
- Heat shrink tubing.
- Building hair dryer.
- Connecting sleeves.
- Assembly knife.
- Heat-insulating material for pipes, which is fixed with clamps or tape.
Important! When installing the self-heating cable, depending on the situation, not all tools may be needed.
How to properly insulate pipes
Whichever method of connecting the cable to the network the electrician did not choose, first of all he needs to ensure the insulation of the pipe with the heating element in order to minimize heat loss and increase the service life of the heating cable system.
When choosing the thickness of the insulation, it is necessary to take into account the conditions and place of laying the pipe. When insulated pipes are underground or in a building, the layer should be thin. If the pipes are outside, a thicker layer is needed. The thickness ranges from 20 to 50 mm. For insulation, expanded polystyrene or expanded polyethylene is perfect. These materials are resistant to moisture, erosion, and durable.
Note! If the owner wants to protect the thermal insulation layer itself from damage, he should place the pipeline in a protective sleeve, which will serve as a pipe with a large diameter.
How to install and connect a heating cable
Installing the heating cable and securing it in the desired position on the pipe is the most important step. First you need to read the instructions supplied by the manufacturer in the kit.
Then you have to choose the optimal mounting method:
- Coiling, wrapping the wire around the pipe, keeping an equal distance between the turns.
- In a straight line, placing the conductor parallel to the pipe.
- In a straight line, with 2 to 4 conductor strands parallel to the pipe or to each other.
Note! When using the "winding" fastening method, it should be borne in mind that the cable consumption will be higher. And the step determined between the turns must be sustained so as not to break the resistance in the conductor.
Operation of electrical heating systems
With proper installation, the operation of the system does not cause any special problems.
Automation provides switching on and off when the temperature changes, which excludes icing of the roof and drain.
In cases where the need arises, you can switch to manual mode.
Expert advice
To keep the system in working order, experts give the following advice:
- Before the start of the winter season, it is necessary to thoroughly clean all problem areas and drainage from dirt and fallen leaves. Use a soft brush when cleaning cables.
- It is necessary to carry out a preventive examination. All connections are subject to inspection, as well as the condition of the cables, especially for the presence of reflow of the sheath.
- The condition of the sensors is carefully monitored. Any contamination leads to loss of their sensitivity.
When using a de-icing system, the most important thing is safety. Installation and operation should be carried out taking into account the specifics of the maintenance of electrical installations. It is necessary to completely exclude the person getting under the influence of electric voltage.