Greg West
The material was prepared based on the translation of the PDF file.
This solar collector uses recycled aluminum soda cans as an absorber. Cans with cut tops and bottoms are collected in vertical pipes through which air passes. The black-painted cans heat up more in the sun, and the sun's heat is transferred through the air that rises through the pipes.
I drilled holes with a cutter using a vertical drilling machine, which in itself was a rewarding experience. It took me a while to fill my hand, and several cans almost hit me.
You will be surprised how quickly a saw can rip a thing right out of your hands. therefore safety comes first
... Wear safety goggles and leather gloves with a few cloth gloves underneath. The jars heat up quickly when the tops and bottoms are cut from them.
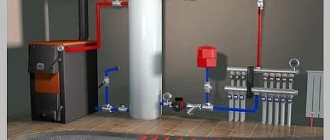
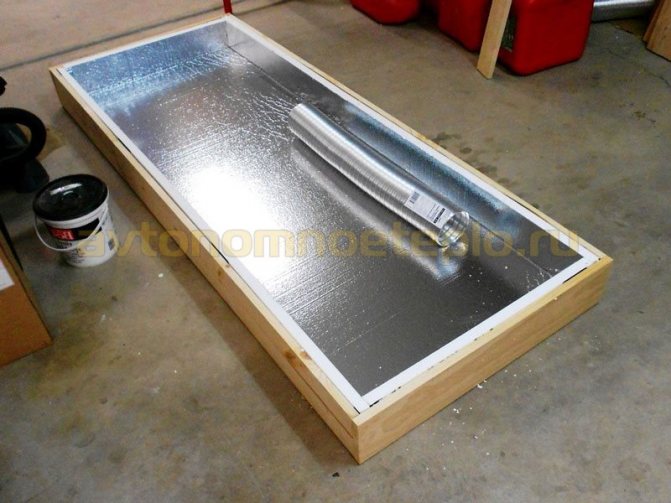
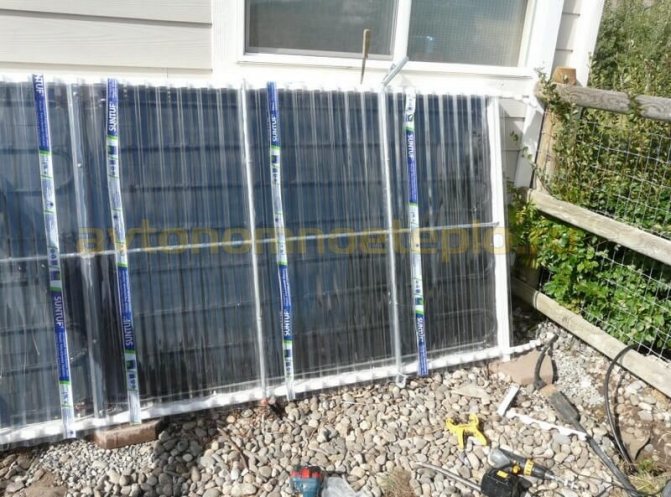
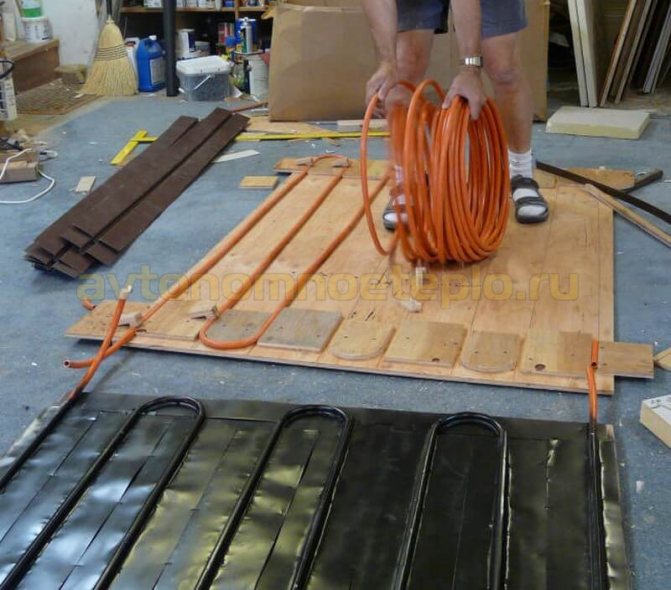
Through the intake manifold at the bottom of the air heater, air from the room enters all the pipes from the cans. The heated air collects in the exhaust manifold at the top and flows back into the room. The combination of the uniform air flow into the collector and the large heat transfer surface that the cans form contribute to the efficiency of the solar air heater. In addition, my manifold has a Twinwall polycarbonate coating - a type of double coating that reduces heat loss and thus increases the efficiency of the appliance.
So let's start from the very beginning. First of all, I would like to thank the guy who is registered on YouTube under the nickname "my2cents0". He directed me to a Hungarian Internet resource, where I found an engineer whom I only know as Zoli. In general, Zoli speaks better French than Hungarian. I thank this man for his incredible patience with me. I got him to death for almost three months working on this project until I was convinced that I did everything right.
Types of solar collectors and the principle of operation
A solar collector is a device that converts the sun's energy into heat.

Devices differ in many ways:
- by the type of coolant for air and liquid, where water, antifreeze, ethylene glycol, and other substances are used as a liquid;
- by design, the devices can be flat and vacuum.
Any types of units are used to heat a house, since the principle of operation does not change and is based on the ability of materials to absorb solar energy in any range. When energy is consumed, the physical properties of materials are manifested in an increase in the speed of movement of molecules, heating of the substance, and this heat is then transferred to heat the house.
In accordance with the design features, solar collectors are:
- Flat. These are rectangular systems made of durable material. Inside the body there is an insulating pad, the surface of which is covered with a heat-absorbing plate. Copper pipes are mounted in the recesses of the plate, transmitting the coolant. The body is closed with a sun-absorbing shell and protective glass.
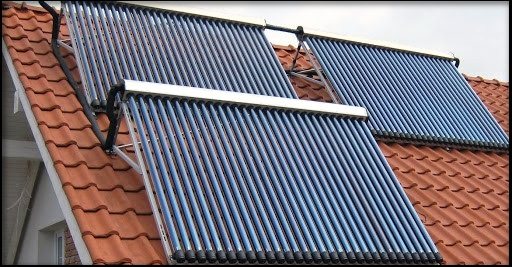
- Vacuum. These are tubular systems, also closed with a special casing. A coolant circulates inside the vacuum tubes, transferring thermal energy to the coolant of the external circuit.
Collectors differ in the way of using the heat carrier:
- passive systems are units used in a construction with a storage tank, used for hot water supply to a house without arranging other engineering structures of the network;
- active systems - units where, in addition to the collector, the structure is supplemented with a pump, safety valves and is used not only to provide hot water supply, but also to heat the house.
The units differ in terms of heat transfer:
- Indirect action, in which the heating and water supply system is supplemented with a storage tank. This tank transfers the heat energy received externally to the internal circuit, that is, heating, hot water supply.
- Direct acting or once-through, used for hot water supply systems. The transportation of water in the collector circuit occurs due to the temperature difference and with the help of additionally installed taps and valves.
Short description
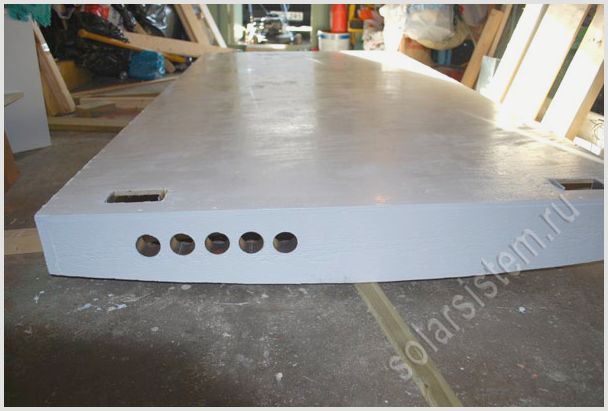
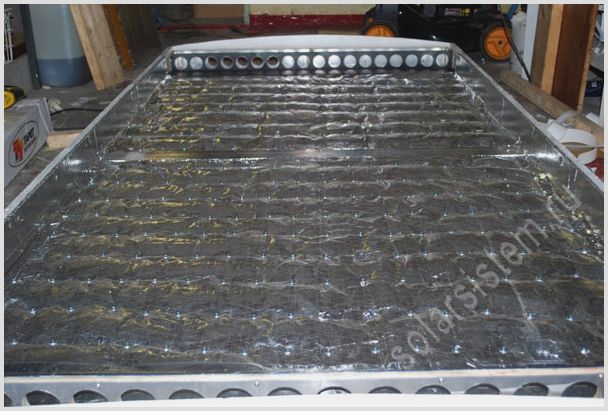
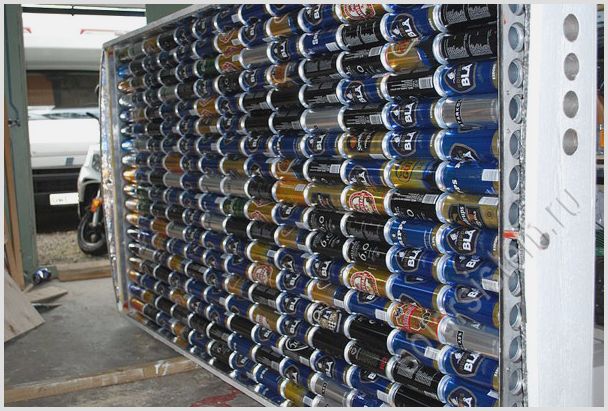
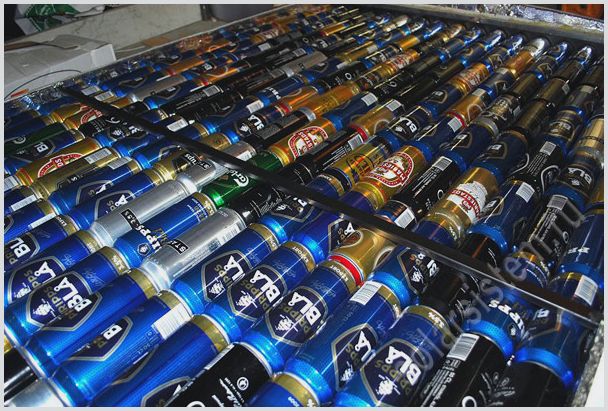
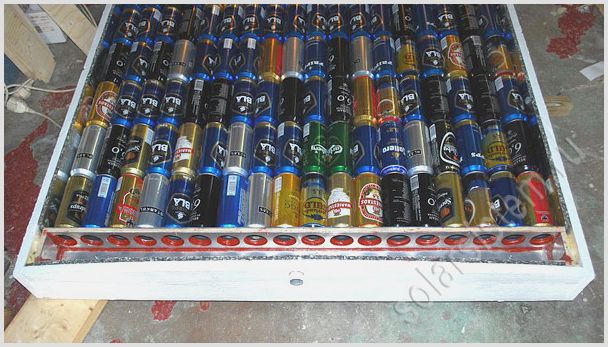
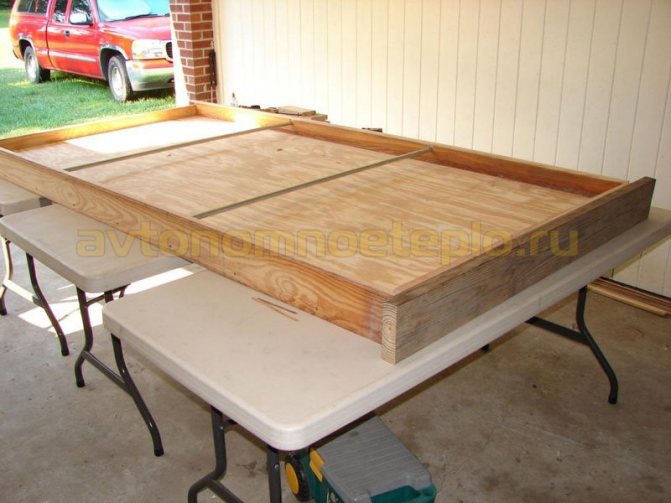
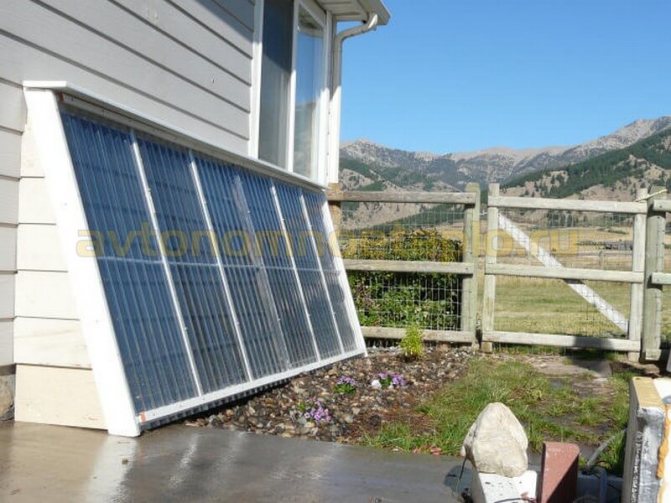
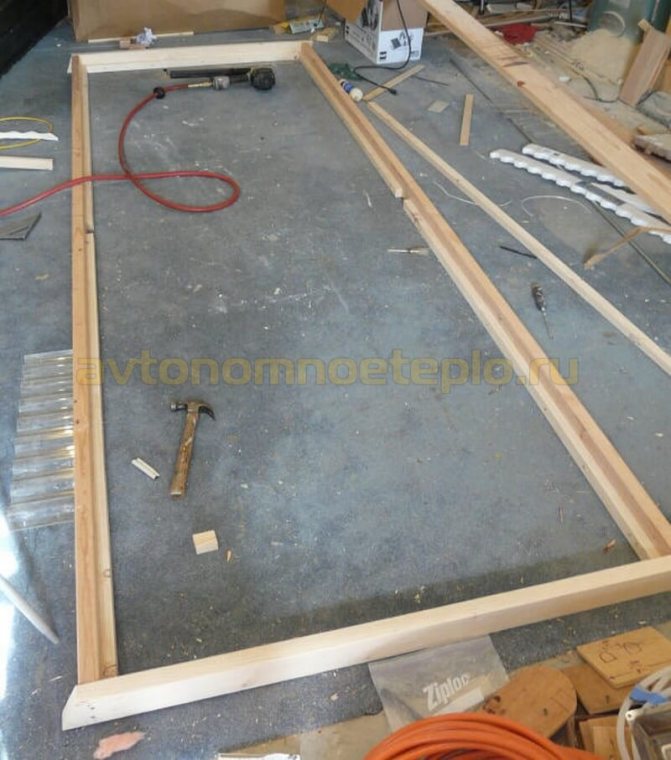
On the table you can see my cans, hermetically glued together and connected to the top and bottom manifolds. The dimensions of my heat exchanger panel are 17 cans wide and 17 cans high. That's how much I managed to squeeze into a 4 x 8 ft (1.21 x 2.43 m) polyisocyanurate insulation board (polyiso) insulated box. This will be the outer size of the air heater.
The manifold covers are 44.5 inches (about 1.11 m) long and 0.5 inches (1 cm) at the edges.
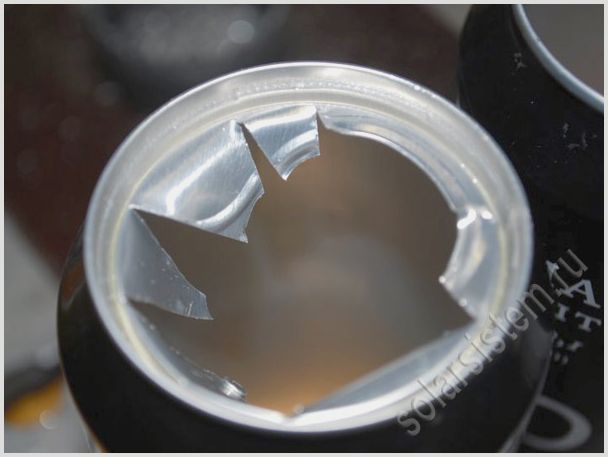
I drilled holes in the comb with a diameter of 54 mm with a distance between their centers 66 mm. In the end, I found that the pipes from the cans were pressed too tightly against each other. Perhaps, with a 67 mm distance between the centers of the holes, this difficulty would not arise. In this case, the gap between the edges of the holes will be 11-12 mm - so, I think, the pipes will be placed more freely. In the next manifold, I will make a 67mm spacing between the centers of the holes. Step 10 mm from the rim on the top of the can, mark out and drill a hole. I made holes in the bottoms with a diameter of 44 mm, and in the tops - 51 mm. You need to be very careful with the tops - the cutter is almost the same diameter as the holes should be, and there is no room for error.
DIY solar collector assembly process
Before starting work, you should decide on the dimensions of the future water heating device. It is not easy to make an accurate calculation of the heat exchange area, much depends on the intensity of solar radiation in a given region, the location of the house, the material of the heating circuit, and so on. It would be correct to say that the larger the heat collector, the better. However, its size is probably limited by the place where it is planned to be installed. Hence, we must proceed from the area of this place.
The easiest way to make the body is from wood, by laying a layer of foam or mineral wool on the bottom. Also for this purpose it is convenient to use the sashes of old wooden windows, where at least one glass has been preserved. The choice of material for the heat sink is unexpectedly wide, which only craftsmen do not use to assemble the collector. Here is a list of popular options:
- thin-walled copper tubes;
- various plastic pipes with thin walls, preferably black. A polyethylene PEX pipe is well suited for a water supply;
- external heat exchanger of an old refrigerator;
- aluminum tubes. True, it is more difficult to connect them than copper ones;
- steel panel radiators;
- black garden hose.
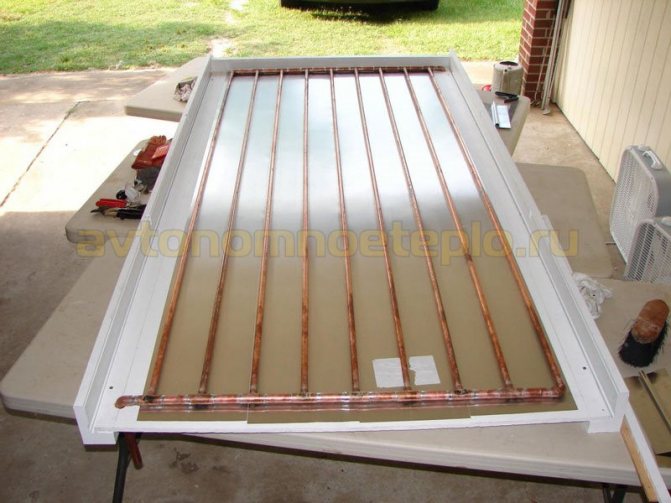
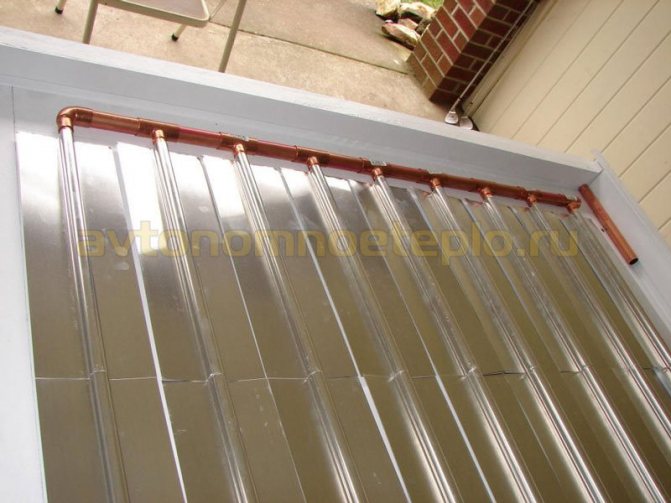
A metal sheet covering the entire area of the future heater must be placed in an assembled wooden case or an old window sash with an attached bottom and installed insulation. It is good to have a sheet of aluminum, but thin steel will do. It must be painted black, and then the pipes must be laid in the form of a coil.
Without a doubt, the collector for heating water is best made of copper pipes, they transfer heat well and will last for many years. The coil is tightly attached to the metal screen with staples or any other available method, 2 fittings for water supply are brought out.
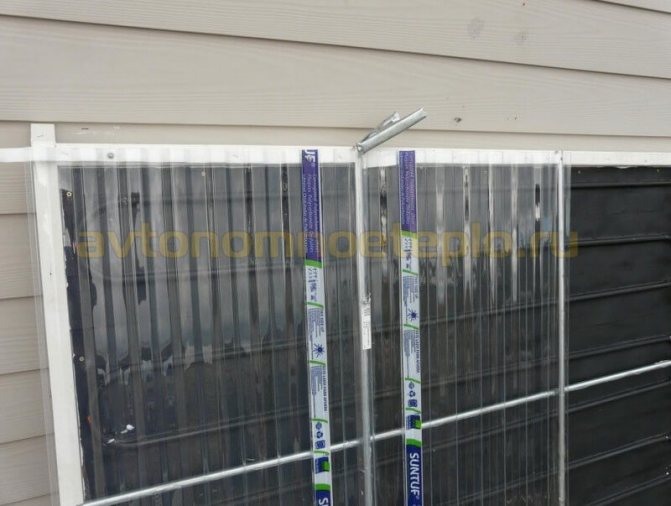
Since this is a flat, and not a vacuum, collector, the heat absorber must be closed on top with a translucent structure - glass or polycarbonate. The latter is easier to handle and more reliable in operation, will not break from hail blows.
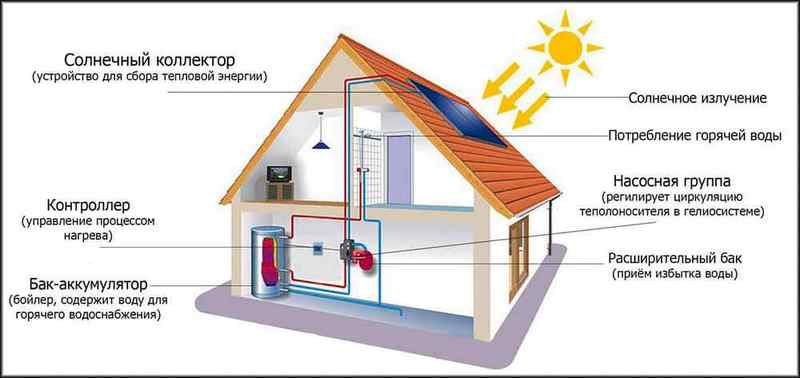
After assembly, the solar collector must be replaced and connected to the water storage tank. When the installation conditions permit, it is possible to organize the natural circulation of water between the tank and the heater, otherwise a circulation pump is included in the system.
Due to the low efficiency of air collectors, home craftsmen prefer water devices, which are vacuum or flat, with a closed or open heat exchange system.
A flat collector is a fairly simple device for self-production. It consists of a rectangular metal casing, inside which a heat sink is integrated, most often in the form of a copper or aluminum tubular coil.
For better absorption of sunlight (absorption), it is coated with a selective black paint. A layer of heat-insulating material or rubber must be laid below, and on top the structure is covered with a lid, for the manufacture of which glass or, for example, polycarbonate is used, although other light-transmitting materials can also be used.
The principle of operation of a flat collector is quite simple: the absorbed heat is transferred to the coolant (in this case, liquid) circulating through the coil.
The transparent cover performs several functions at the same time: it protects the heat exchanger from negative natural phenomena (precipitation, wind), as well as dirt and dust, while allowing the sun's rays to pass freely.
The tightness of the structure excludes the possibility of dirt getting under the glass on the heat receiver and does not allow the accumulated heat to escape through natural cracks.
This type of collector is most effective when operating in warm or off-season seasons; in winter, its efficiency is significantly reduced.
The heat loss problem is solved in the vacuum manifold. In it, the tubes are placed in translucent glass flasks, from which air is first pumped out. The pipes in this design must have an absorption coating and are additionally filled with refrigerant.
The tubes are directly connected by their ends to the line along which the coolant moves. Under the influence of sunlight, the refrigerant boils and turns into steam, which, according to the laws of physics, rises up the tube and cools when in contact with the coolant, giving off the accumulated heat.
It should be noted: a vacuum solar collector is more efficient in comparison with flat solar collectors due to the fact that the specific heat of a substance in a vapor state is higher than in a liquid one.
It is because of this feature that vacuum collectors are effective in winter, at subzero temperatures, although their efficiency may decrease slightly due to a decrease in daylight hours and an increase in cloudiness.
A variant of the vacuum manifold can also be considered constructions in which the tubes are immediately filled with a coolant. But they have one significant drawback - the complexity of the repair work. In this case, if any of the tubes is out of order, a complete replacement of the entire structure will be required.
It seems to the average man in the street that it is incredibly difficult to make a solar-powered absorber for heating your home on your own, having carried out your own production of every detail that makes up the device. However, in order to make such an absorber, which will act as a device for heating water in the heating system of a house, you do not need to purchase or search for some exotic materials.
Flat radiator manifold
A homemade Selective Coated Flat Air Absorber can be made from common HDPE materials and components. Polycarbonate vacuum tubes and other parts can be purchased at low prices at any hardware store or supermarket. The assembly scheme is quite simple; for training purposes, you can watch a video on the World Wide Web (there are more than enough such videos).
The main difficulty in the assembly process is how exactly to make the coil (this is a tube in a sinuous shape through which fluid circulates, carrying out the accumulation of energy). There are several options based on which the assembly diagram will be drawn up. The easiest option is to assemble an absorber based on a ready-made coil (you can try to look for something suitable for these purposes, it is important that it is vacuum).
Alternatively, the circulation system located on the back of the refrigerator may be suitable. The second option is to pick up the necessary vacuum tubes, two or three hoses, a couple of plastic bottles of water (from which the coolant is collected). Watch the tutorial video again for more confidence. It is better to use copper pipes for heating water. Next, you need to do the soldering of the coil itself.
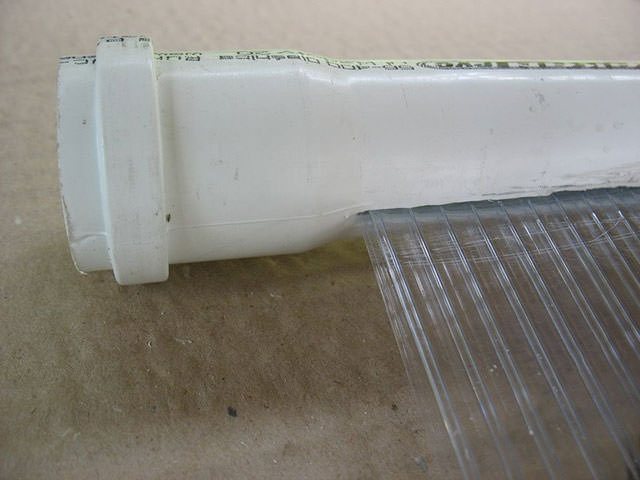
Coil made of plastic pipe
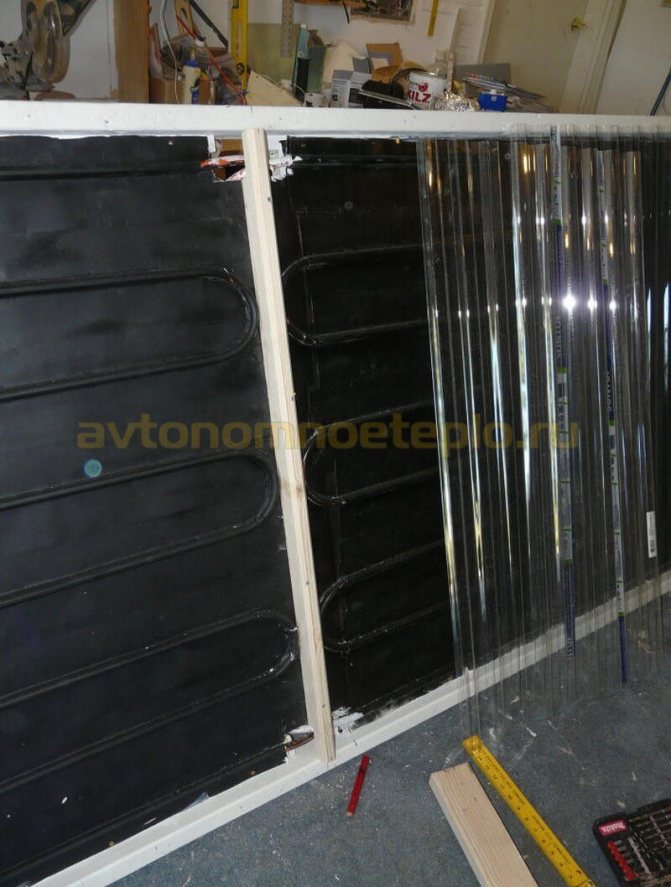
The second very important element that goes into the absorber is the upper side made of transparent polycarbonate. In industrial conditions, polycarbonate coating is not used, the front coating is cast from a tempered glass alloy. However, in our case, a homemade air manifold is considered, the thermal circuit and the required efficiency of which allows the use of polycarbonate, since we will assemble the device from available inexpensive materials. It is worth noting that there are assembly schemes where materials are used from beer cans to the use of plastic bottles.
Polycarbonate manifold
So, in assembling your device, you'd better resort to using cellular transparent polycarbonate. The use of this type of polycarbonate will allow you to achieve maximum heating efficiency from the device being created. It is also worth making a choice in favor of this polycarbonate because it is very durable.
Read more: How to choose the right insulation for heating pipes
This is important, considering possible weather disasters, such as large hail, hurricane air flow that rips branches from trees - these accidents must be taken into account, since they can damage a weak coating. The honeycomb structure of the coating will help you create an airy greenhouse effect, resulting in an enhanced moment of heating the water in the tubes. Simply put, by using this material and in addition to selective coating, you will significantly increase the efficiency of the product.
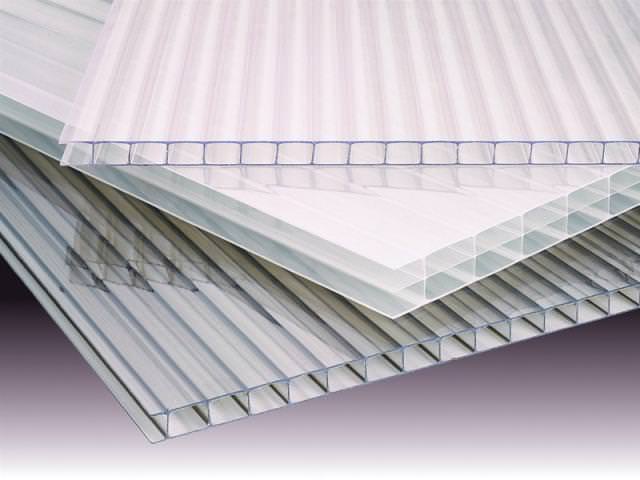
Cellular polycarbonate
For an absorbent panel, you will need a sheet of metal that is about 0.8 millimeters thick (copper is better, however). In principle, a steel sheet will do. The outer surface will need to be coated with a so-called selective coating (paint with matte black paint, the paint must be resistant to high temperatures). If you do not follow these recommendations (black coating is also meant), the device will not function properly.
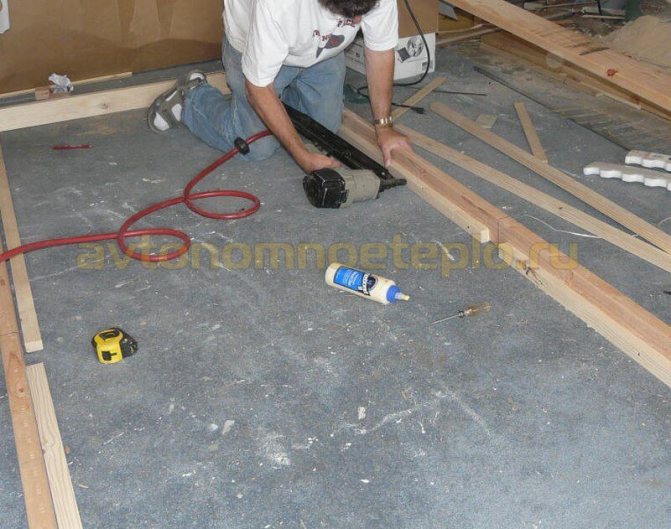
You can also assemble the body of the device yourself, for this you need to use aluminum materials or use a less durable, but easier to process wood material. Working with wood, you will spend significantly less time creating a heater, and plywood is even easier to work with. But still, it is better to use an aluminum frame, its durability, in comparison with wood, cannot be compared.
Making pipes from cans
First, I made some wooden blocks in order to hold the cans in place while working on the vertical drilling machine.
I used a small cutter to start making a hole that should fit into one of the can's edges in diameter. After that, believe it or not, I inserted a small router bit with straight cutting edges into a vertical drilling machine and expanded the holes to the desired size.
If you have a steady hand, press-cut with a vertical drill - it's very easy to do. Notice my extension arm - the pressure is generated by a spring from the grille door. My God, need really teach everything! I cut the pads out of a huge blank - two 1 "x 4" (25.4mm x 101.6mm) wood planks glued together. I then cut these pads to a size that is convenient to use.
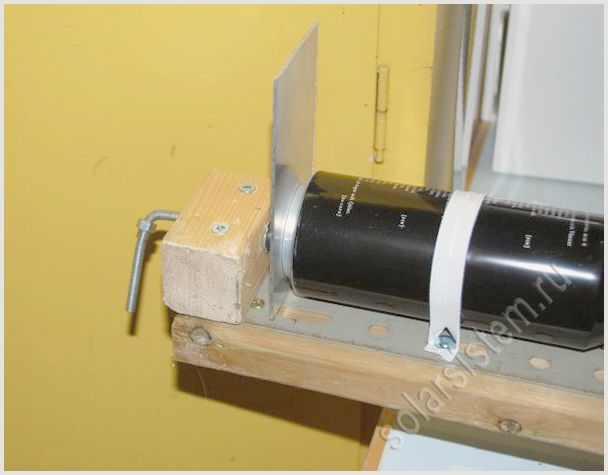
Here is the jar topping block. The inner edge should be flatter and have a deep notch to hold the can tightly where it expands from the rim to the body. I made the same holder for the bottoms of the cans.
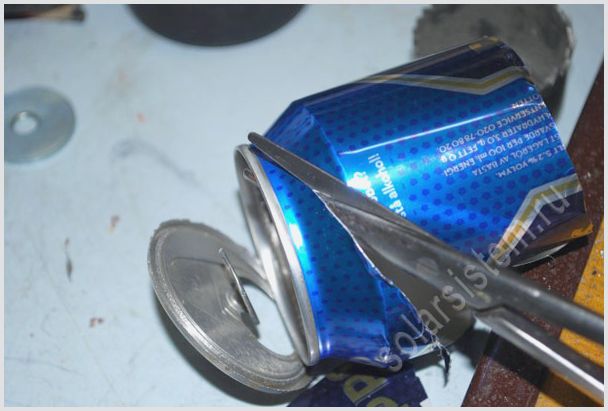
After all these difficulties, I found that it is easier to drill the tops and bottoms of the cans by simply placing them in the convenient holder, as shown in the picture, and doing the work by hand. This is where leather and cloth gloves come in handy. As I said, the 51mm cutter fits snugly into the space inside the rim of the can. This is where you need to be very careful - this is where you are most likely to miss. I set the machine to medium speed and used Lenox saws. The can can rotate slightly, it does not interfere with the work. With one finger, press the top of the jar close to the saw, while the rest hold onto the block. The jars will heat up quickly.
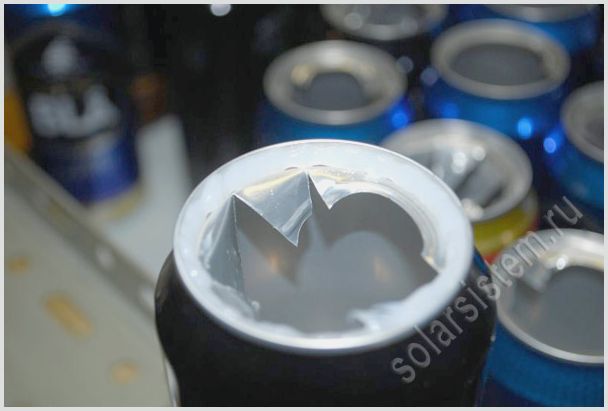
Cut the bottoms of the cans with a 44mm cutter. After the first few cans, it will come out light. Remember that if the jar spins a little, it doesn't need to be in the way. If you press down on the can too much, the saw will sweep it inside the block. In this case, the bank will deteriorate - the metal will bend, and the smallest cracks will certainly appear on it, although they may not be seen. For example, I primed one of the cans.
The ring that you see around the can will crack when using an air heater due to the expansion and contraction of the metal under the influence of temperature changes. Soda cans are only 10 microns thick and can crack very quickly.
Several jars with the tops and bottoms removed.
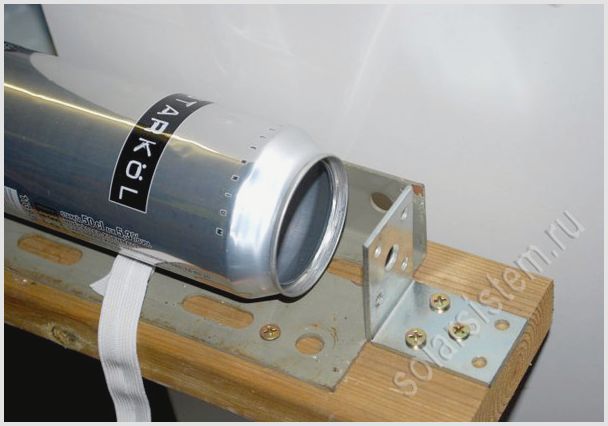
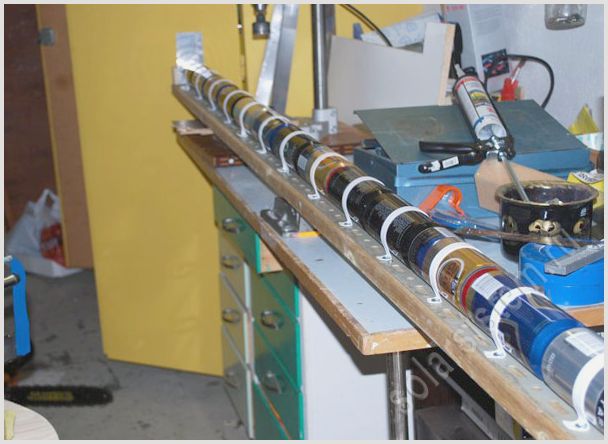
I used 3 "(76mm) PVC pipe cut in half lengthwise to hold the can pipes while the sealant hardens. I advise you to buy an end cap, cut it in half and glue it to the pipe. Next time I will. I think 3 "x 4" (76mm x 101.6mm) nailed planks will work just as well, but haven't tried it myself yet.
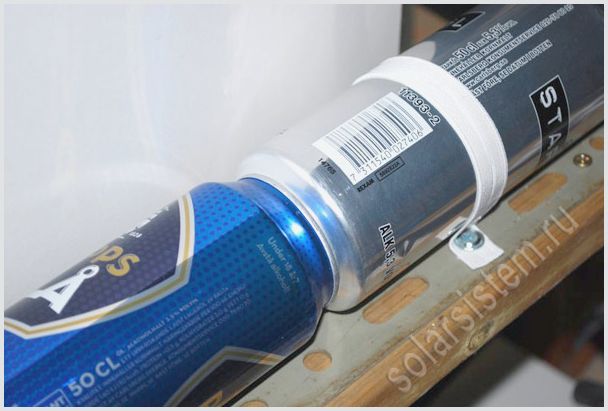
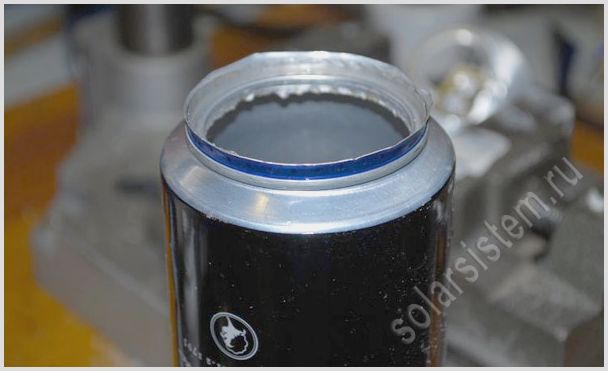
Here is a photo of how I made a pipe from cans. I simply applied silicone sealant around the bottom opening of the can and pressed the glued cans into the PVC pipe. With one finger, I smoothed out the glue, and with my free hand I turned the pipe from the cans.
On the left you can see a nearly finished pipe in a PVC holder. One of your hands rests calmly on the penultimate can in the row, while the other turns the glued cans with your thumb and forefinger.
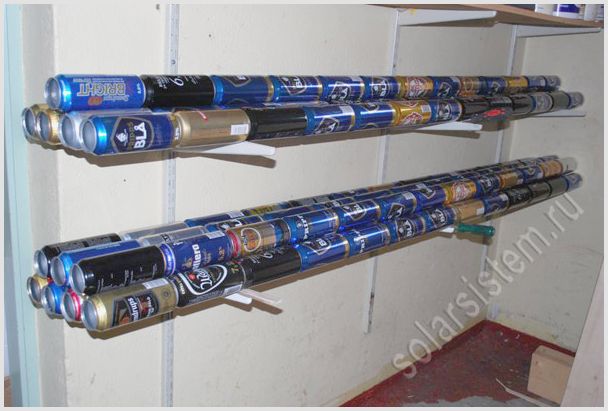
The bricks are used to press down on the silicone coated cans. I was working in my living room because it was too cold in my store. If you tilt the pipe slightly, the brick will press down with enough force to hold everything in place until the sealant sets. I used this method until I ended up with a battery of 17 cans high and 17 wide. So you have made bundles of pipes. If your heater is not 4 x 8 ft (1.21 mx 2.43 m), determine the appropriate number and length of canned tubing.
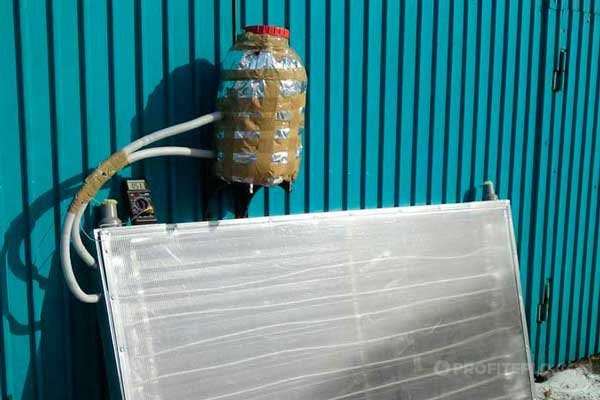
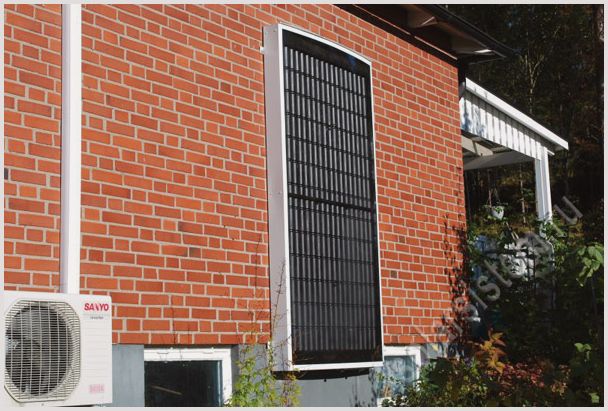
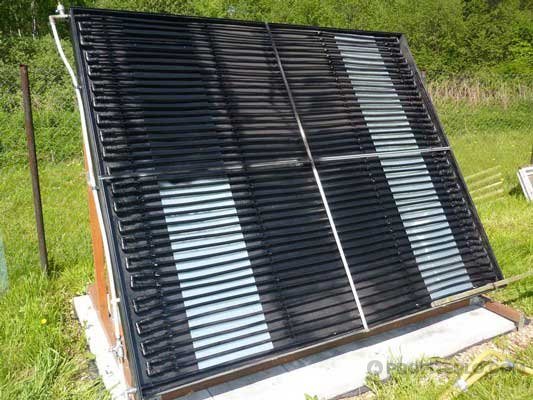
Solar air collector (heat generator) from beer metal cans
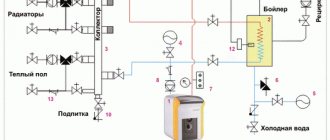
Solar air collector (hot (warm) air generator) is used to heat a room with warm air in the autumn - spring period. It is located from the south of the house, on the roof or specifically on the surface of the wall. You will need to cut two holes in the wall for the inlet and outlet of the air flow. Using a fan, we supply air pressure to one hole, and from the second hole we get warm air with a temperature of up to 80 degrees.
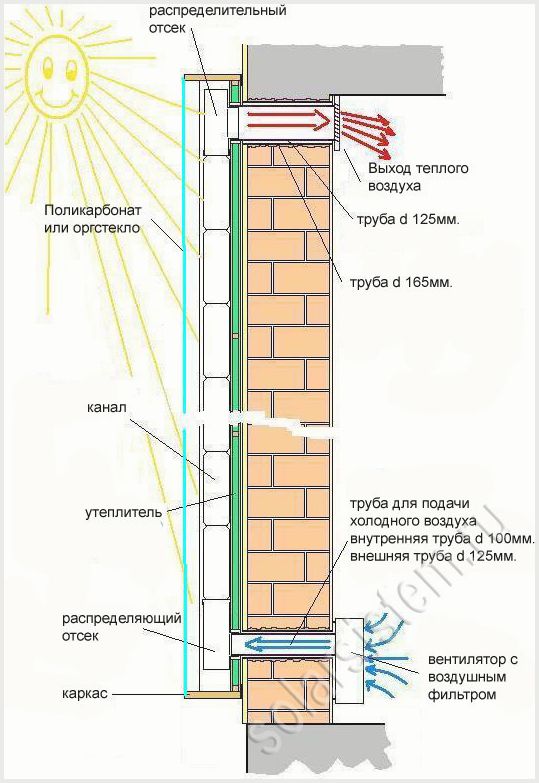
Structurally, an air "heat generator" can be created of 2 types:
1. Air supply from below, discharge from above (as in the upper picture)
2. Bottom feed and discharge (as shown below). In terms of heat supply to the room, this option will be much better, because as we know from physics lessons, warm air rises to the top and cold air descends.
Materials for the production of a solar air collector (heat generator) can be very different, but the most inexpensive and successful option is the use of metal cans from beer or drinks.
An alternative option is to use iron drain pipes, but in this case we lose heat at the outlet, because iron is less heat conductive than aluminum.
Positive qualities of manufacturing a collector from metal cans
1. Free material for construction.
2. Leaves a lightweight construction
3. Due to the roundness of the cans, the collector area in this case becomes larger from 2.55 sq. M., Approximately up to 3.6 sq. M.
Let's start making an air collector (heat generator) from beer cans:
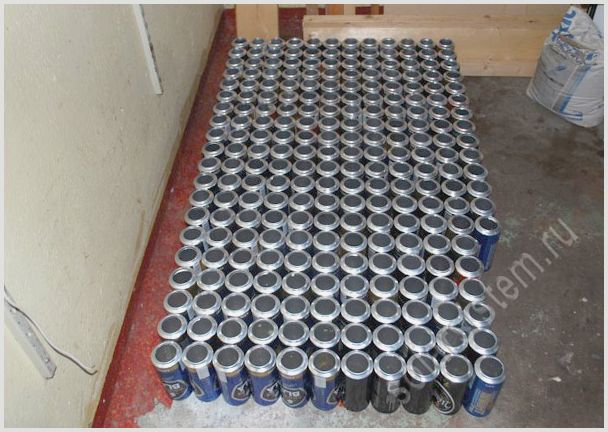
Dimensions of this solar heat generator 2400 x 1265 mm and counts in itself 234 metal cans, the same size.
Once all banking institutions are collected, let's start processing them. To do this, cut a hole in the bottom using a metal crown with a diameter of 44 mm. It is quite convenient to use a drilling machine at the same time. It is quite difficult to hold the jar so that it does not scroll, and at the same time does not crush it, for this, a second crown of d 51 mm was fixed from the bottom of the drilling machine.
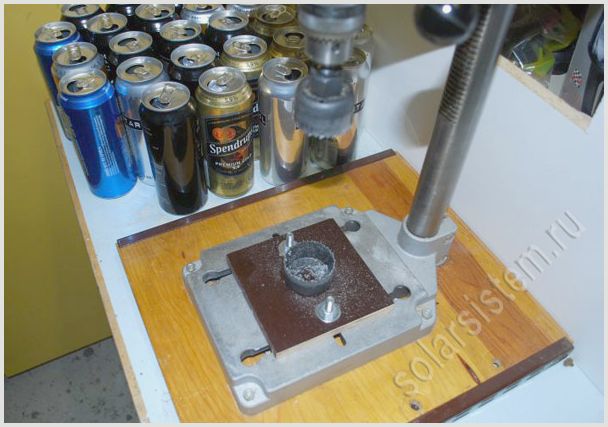
Similarly, we get the perfect hole. If there is no drilling machine, then you can use an ordinary drill at low speeds. But it would be nice to fix it in advance or work with an assistant, so that one holds the drill, and the other substitutes the cans. It is worth considering that in this case, be extremely careful not to injure yourself.
The upper part of the can is cut into strips and folded inward. This is done to create turbulence from within the system. In this case, the air will hit the walls of the cans so it will be best to absorb heat.
Holes were cut in 18 cans on both sides.
Now all 234 cans are ready, and we will proceed to diligent rinsing and degreasing. Any detergent can be used to remove dirt and grease, especially you need to pay attention to the aroma!
When the cans are dry, we proceed to gluing into a single channel (pipe), where each pipe will consist of 13 cans and a total length of 2150 mm. There will be 18 channels in total.
To make the channels perfect, you have to use a guide (conductor). To do this, use a metal corner or put together a guide from 2 boards. And at one end of the rail there will be a stop, and at the other end there is a clamping screw.
The first will be a jar with 2 holes, in the direction of the neck towards the stop.
For gluing cans, a sealant for aluminum was used, with a temperature from -50 to +250 degrees. You can use any other, non-poisonous, refractory adhesive composition that can keep temperatures above 200 degrees
The sealant is applied to the inside of the neck of the can, in an even layer.
When gluing, each can is fastened with a wide elastic band.
We glue the last can and squeeze the entire structure with a clamping screw.
We leave the structure in a similar state for a day until the adhesive dries out.
Let's start manufacturing the hot (warm) air generator box.
The frame of the box is made of wood, moisture-resistant plywood or OSB board. The outer dimensions of the box are 2400 x 1265 mm. The thickness of the box in the smaller part is 120 mm at the top of the bend 160 mm. The back wall is made of 12 mm plywood. The walls on the sides are made of 20 mm wood board. The corners are reinforced with steel corners. A rail is placed in the middle to support the pipes.
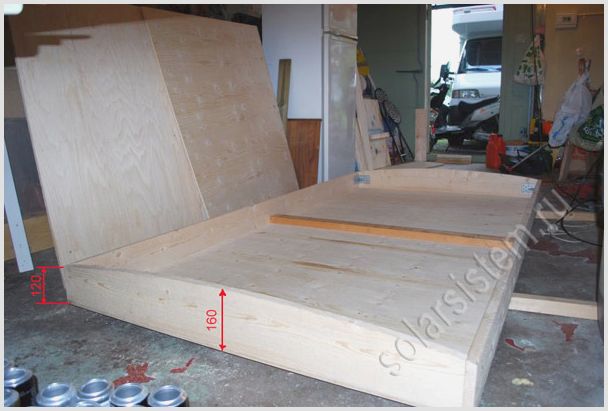
The convex outer side gives the collector not only a luxurious look, but also has a good effect on the angle of incidence of the sun's rays. In order to outline a good radius on the workpiece, tie a rope to the pencil, and tie the other end of the rope at a distance of 4.75 m from the workpiece.
First of all, make a bevel on the side walls so that the polycarbonate plastic fits snugly along the entire plane of the collector.
Manufacturing of air ducts.
Air ducts on both sides are built locally. Made from 12 mm. plywood upholstered with a thin layer of aluminum 1 mm .. All joints are first lubricated with sealant so that there are no air leaks.
The holes in the air channel were drilled 54 mm. crown. All 18 holes must be equally spaced across the full width of the manifold and symmetrical with the bottom air channel.
Before the air channel is closed, the space between the air channel and the back wall should be insulated with mineral wool.
During final assembly, make sure all gaps are sealed with sealant.
For the comfort of the process of installing air ducts from cans, you need to make a support for cans from plywood and glue it with aluminum foil. In a similar way upper the air duct is ready.
Making the lower air channel, occurs in the same way as the top one, except that there will be additional ventilation holes. This makes it possible to get clean air (under conditions that it is not very cool outside).
Here you can see how the air channel is divided into two halves. Cold air is drawn in from the far hole (shown in the figure below), and hot air will be ejected from the near hole (shown in the figure below). All seams are sealed with high-temperature sealant, just in case of fire, to ensure the impermeability of the system.
For good fixing of the cans on the lower air duct. You need to do the following procedure: take 18 cans (you can crumpled), and cut off the top part (rings) with scissors.
the appearance of the finished ring.
The rings are placed in the air channel, with the obligatory sealing with sealant.
The lower air duct is ready, it is sealed and painted black. it is located at a distance that will ensure a snug fit of the pipes. We use several pipes to control the density.
We make a complete painting of the collector frame in order to protect it from external atmospheric influences. It would be nice to additionally use antiseptic agents.
The wall mount is made of a strip 4 mm thick and 40 mm wide, and is made in the form of a hook.
The cover with a mosquito will be placed at the final moment (so as not to be crumpled during the construction of the collector) on the ventilation holes. The mesh is fixed with a stapler.
Insulation
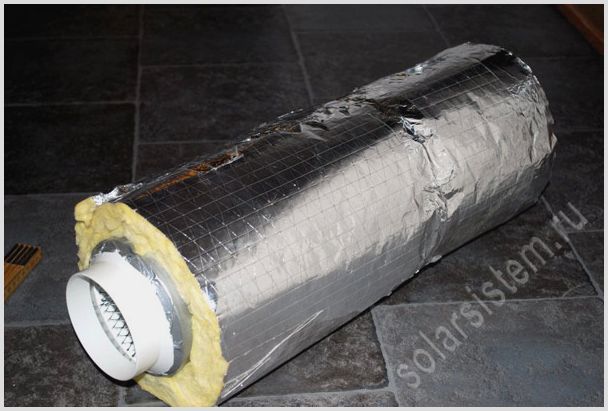
Insulation of the collector plays a special role, because the heat escapes through the sides to the sides and the back cover. You need to insulate it at the last stage, when the frame is absolutely ready and painted. The walls on the sides were insulated with a foil-based insulation that will withstand a temperature of 120 degrees (it is used to insulate chimneys).
The rear wall was insulated with mineral wool with a layer of aluminum-based foil applied to it.
Ventilation system
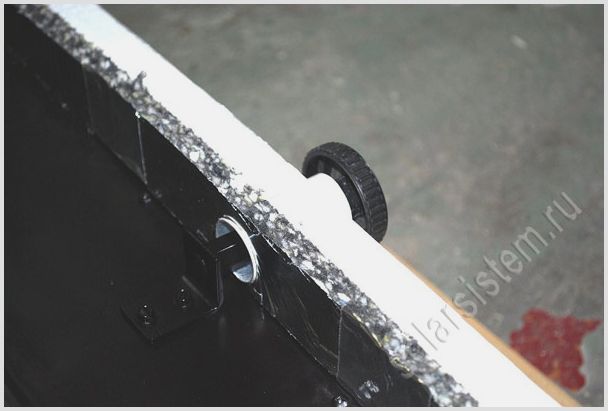
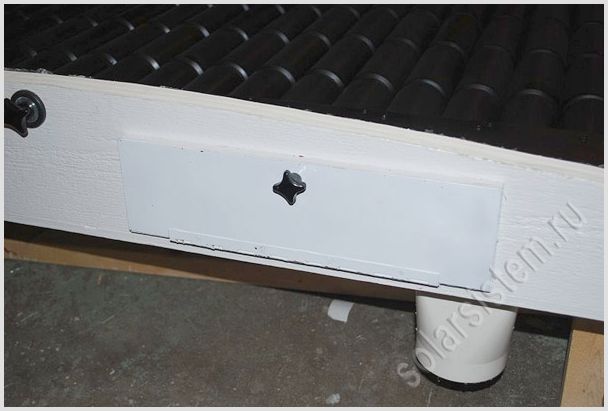
Because the box will be completely sealed, I advise you to make ventilation holes in advance, in case of condensation. Ventilation openings must have a chance to close. In this case, bolts with a large plastic head were used. To do this, a hole is drilled in the side of the frame for a 1/2 ″ or 3/4 ″ pipe, and a squeeze is pressed into this hole.
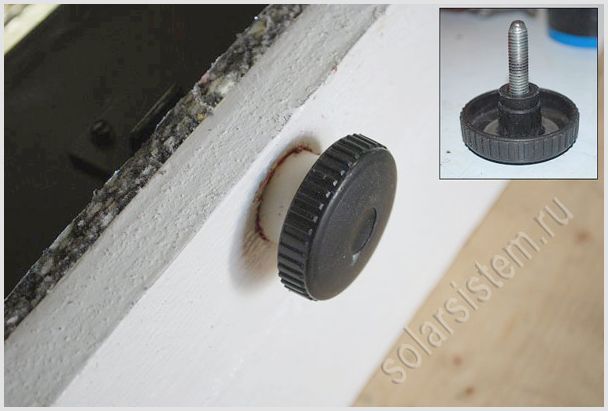
Inside view. An axle box (threaded) is fixed in the corner, into which the bolt is screwed. It comes out when the bolt is fully screwed in, the head of the bolt covers the hole in the tube. And by unscrewing the bolt, you open the ventilation holes.
Everything is ready, now, finally, let's start joining the pipes, it is especially important that all pipes are parallel to each other. The pipes are placed in the direction of the neck towards the upper air channel.
We adjust the pipe joint with the rail of the lower air channel, while we smear all joints with a sealant. then close the cover of the air channel.
In the middle, for fidelity, we collect a persistent rail.
In the upper duct, we also smear all the joints inside.
We close the upper air channel.

Everything is ready, now you can start painting work. For painting, you have to use matte black heat-resistant paint, which is used to paint the mufflers of cars and barbecues. It is sold in spray cans in the automotive market.
For connections of ventilation openings, transitions from a quadrangular to a rounded shape were used.
Along the perimeter of the collector frame, we glue a rubber seal so that heat does not escape through the gaps between the transparent coating and the wood.
We collect the cover of the ventilation hole.
We tighten the furniture bolts (with a round head) into the stop rail to support the transparent coating.

I advise you to use honeycomb or molded plastic as glazing. Screw on 4 mm. molded plastic to the frame, for this in advance along the edge, holes were drilled with a step of 10 - 15 cm for screws. When screwing in the screws, the main thing is not to overdo it so that the polycarbonate plastic does not crack.
For decorative cladding, panels were made of thin metal on a listogib, and painted with powder paint. Anyone who does not have a listogib available should contact companies that make skates and visors.
We install a hot (warm) air generator on the wall.
Let's start installing the fan.
For these purposes, I advise you to use a fan with a working capacity of 200 - 270 cubic meters / h. If you use a fan with less operability, then in this way you reduce the efficiency of the collector, because due to resistance from the inside of the pipes, the productivity is almost halved.
In this design, the fan must be placed on the exhaust pipe in order to be able to use the ventilation holes (provided that it is not very cool outside). In other words, we opened the lid and in the middle of the room you get a warm fresh air.
Start.
First froze on October 15 at 14.00 with a slight wind. Outside temperature + 4.6 ° С.The temperature was measured at a distance of 50 cm from the exhaust pipe and was 78 ° C
Second the measurement was carried out on October 17 at 14.00. Outside temperature +7.8 C °. Cloudy and windy. The measurements were taken as before. Discharge temperature 69.2 ° C
3rd the measurement was made in a cloudy environment (see photo published below). Outside, the temperature was 5.9 ° C, the discharge temperature was + 23.3 ° C

Fourth froze on February 12 with an outside air temperature of -4.2 ° C and a bright sun. The ambient temperature produced by the collector was 55 ° C (under conditions that the temperature of the intake air was 12 ° C, i.e. the temperature difference between the air at the inlet and outlet was 43 ° C).
Muffler
The big fan noise was a serious problem. However, this kind of problem was quickly solved by making a muffler.For this, two plastic adapters and a metal mesh were purchased.
We twist the mesh into a tube and place it inside the adapter. The length of the muffler was 60 cm.
We wrap the top with a thin layer of padding polyester, which will act as a filter. Securely mark on both sides with tape. The filter will prevent dust from entering the room from min. cotton wool.
The last step is to wrap with mineral wool with applied foil for sound absorption.
The muffler is ready. The result was well above expectations. Almost silent air blowing while keeping the fan productive.
To automate the heat supply process, a thermostatic valve with a remote sensor should be installed. On which to set the fan to turn off if the discharge temperature is, for example, below 22 ° C
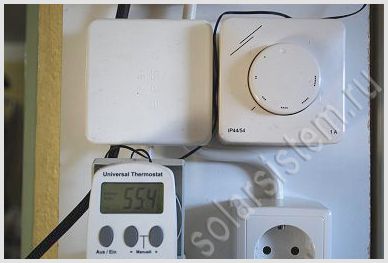
In this way, you do not need to observe the sun regularly.
Finally, I want to emphasize:
To reduce the use of email. energy by a fan (in this case 75 W), you can use a photovoltaic battery. Moreover, when the sun is there, the fan does not stop working, there is no sunlight naturally and electricity is not needed.
If you have a desire to deliver hot air to another room, then use insulated ventilation ducts. Otherwise, all the heat will dissipate along the way.
share with a group of friends >>>
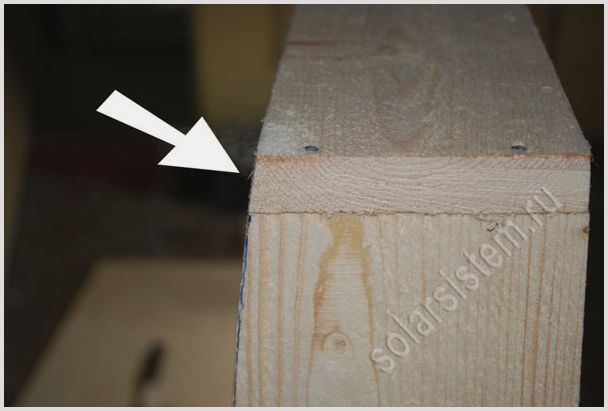
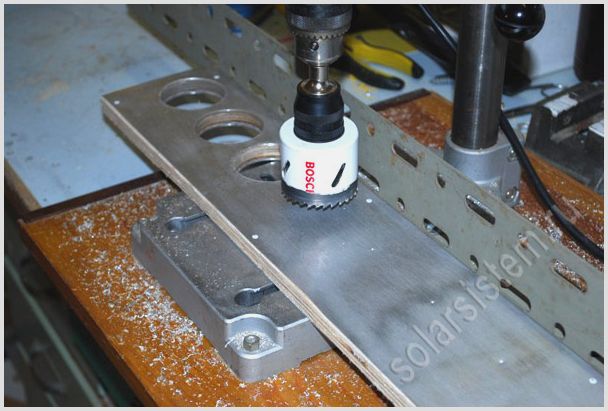
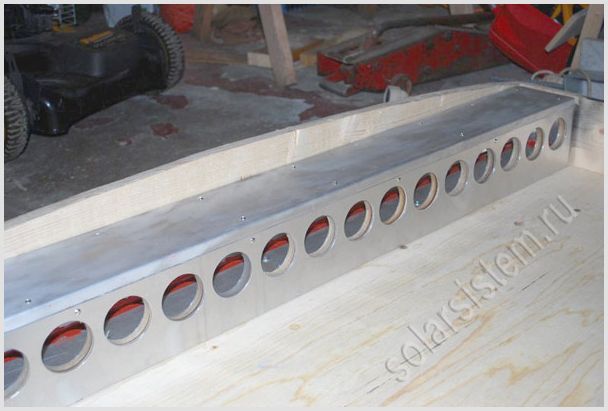
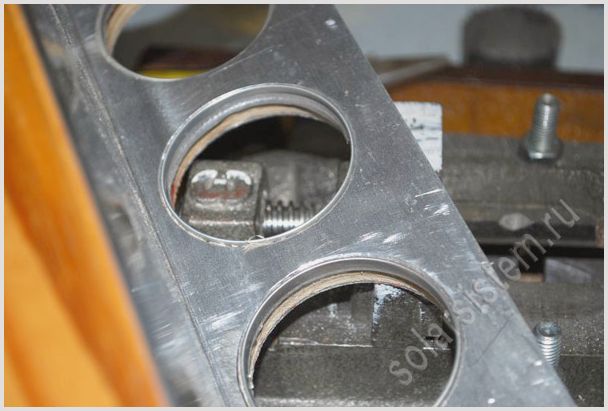
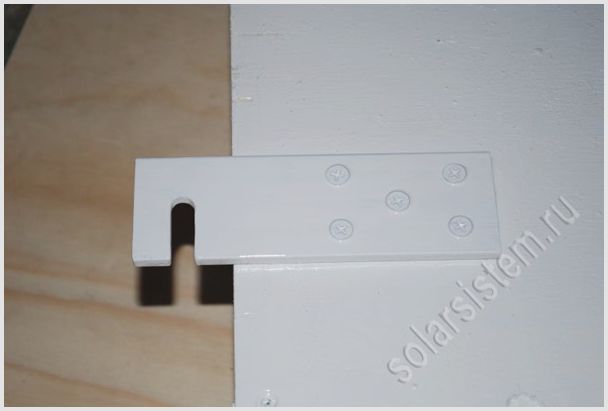
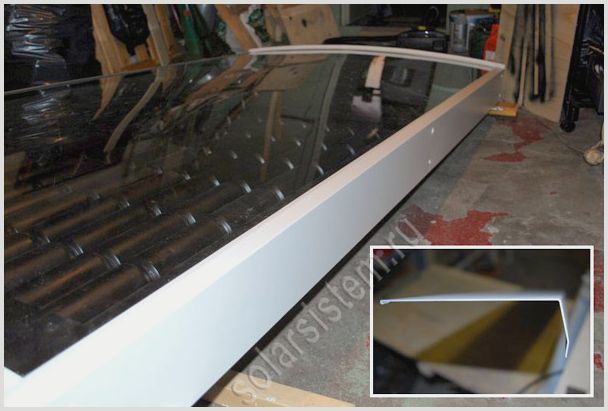
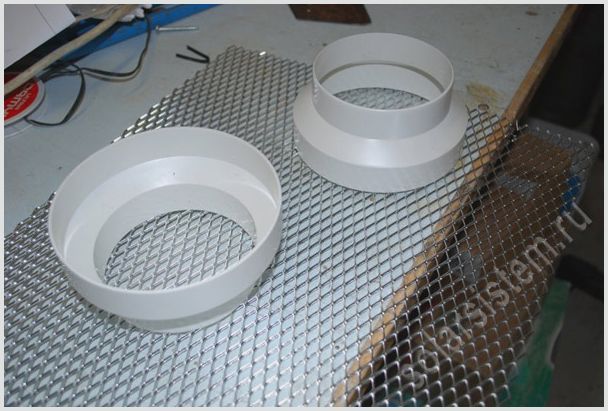
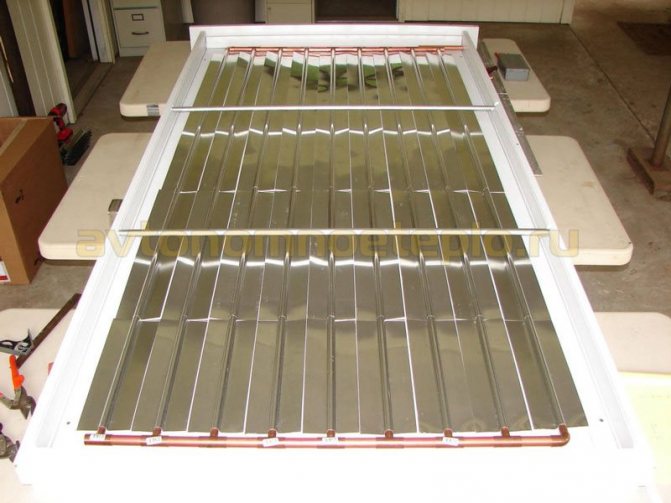
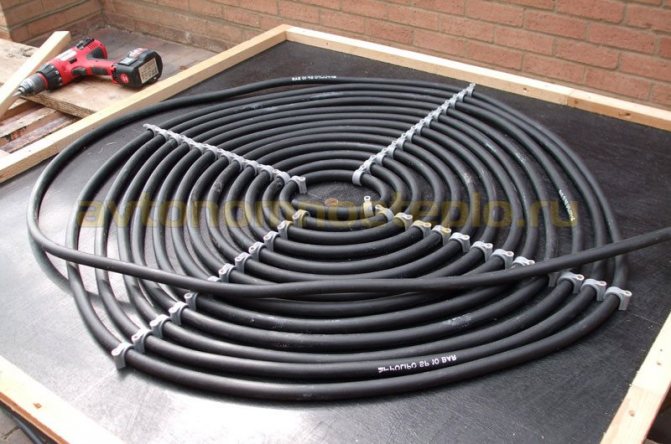
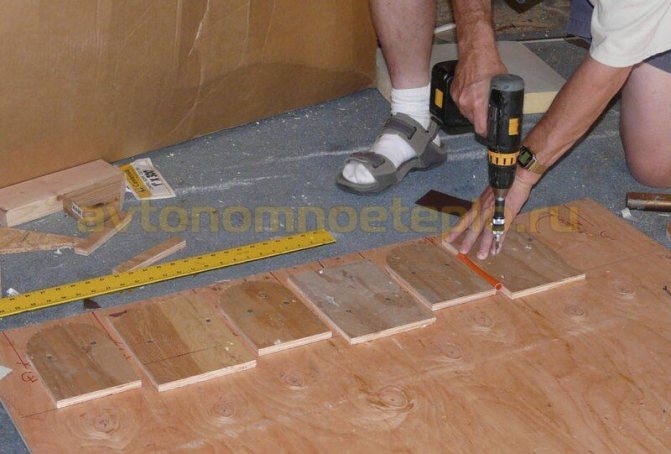
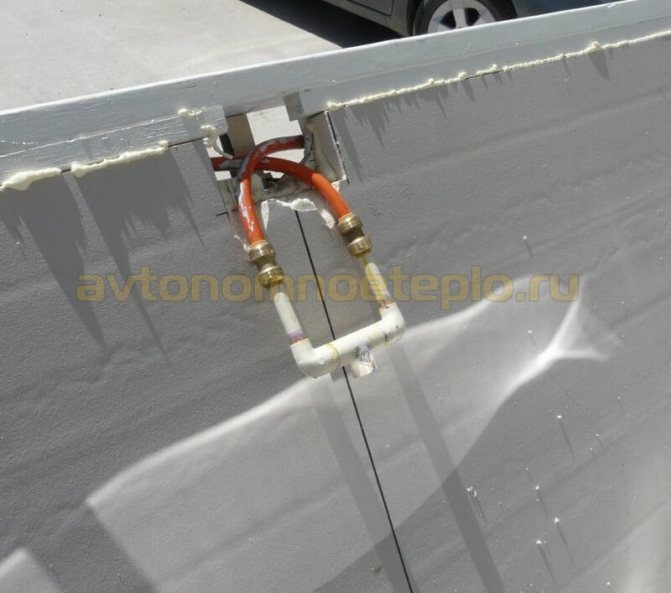
We make intake and exhaust manifolds
Figure 1 Intake manifold directs air evenly into pipes from cans (Zoli drawing)
First, I took a 1 "x 4" (25.4mm x 101.6mm) comb material and measured out the dimensions that Zoli specified in his model in SketchUp. I made a test comb to make sure the parts fit together. It turned out to be narrow. Since everything in the UK is measured in metric units, I went the same way. The most can-sized cutter I could find is the 54mm. According to the drawings, the holes should be 55 mm in diameter, and the distance between their centers should be 66 mm. I stepped back 10 mm from the edge of the comb and made the markings. I think that increasing the distance between the centers of the holes to 67 mm will not damage the drawing of the combs, because there is quite enough space for this.
I secured 1 x 4 ft (30.5 cm x 1 m 22 cm) unnecessary material under the comb and cut the holes by hand. It worked out well. The photo shows how it is cut by hand. Be very careful.
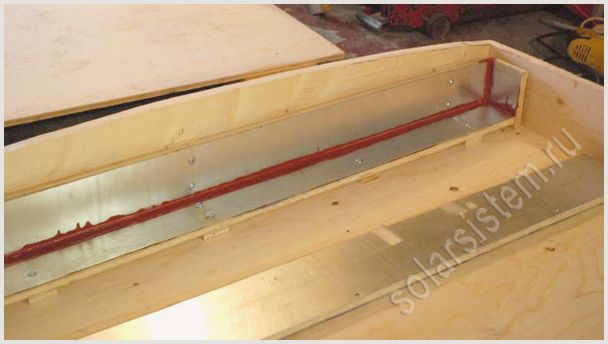
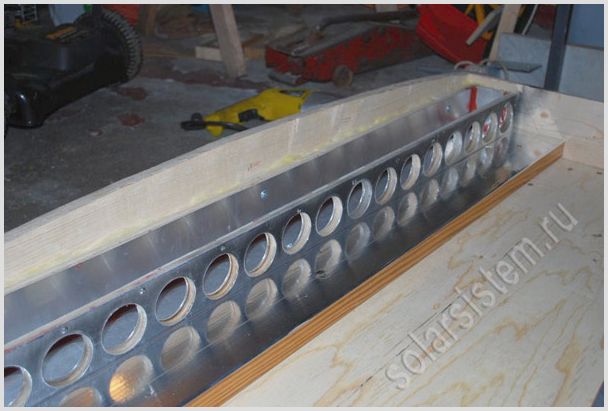
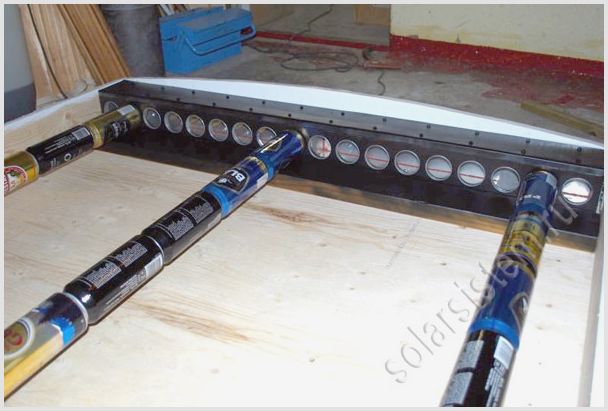
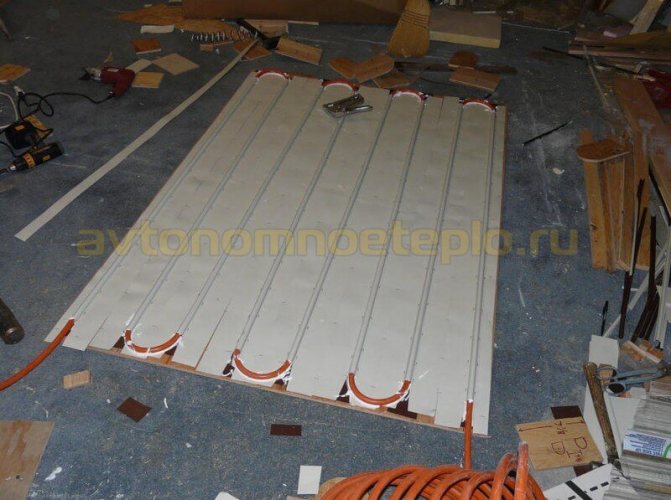
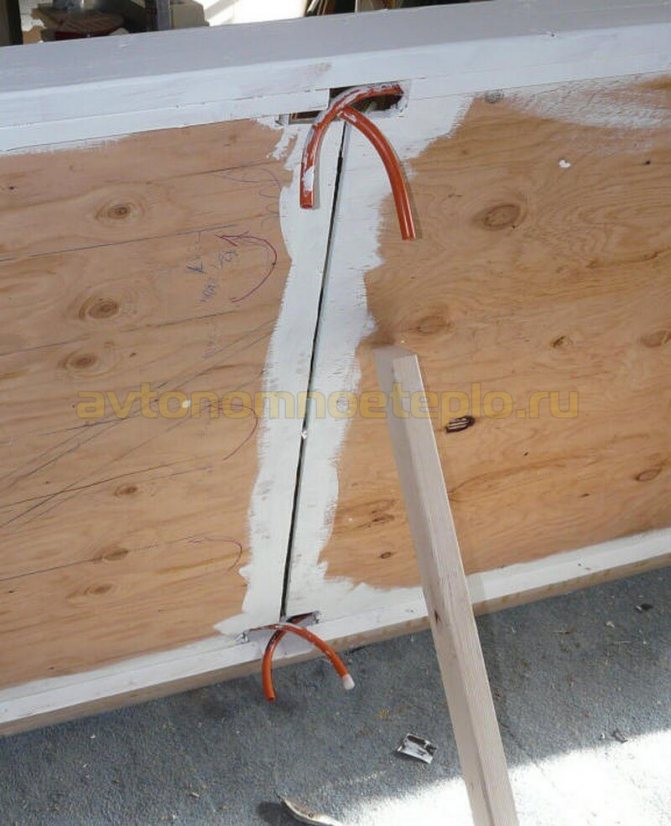
After all this was done, I connected the canned piping system to the top and bottom dies and sealed the connections with sealant.
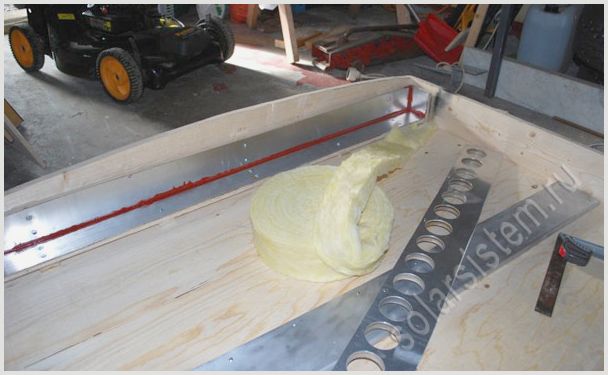
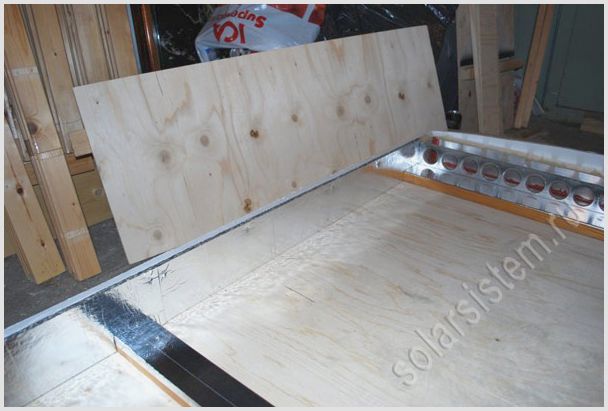
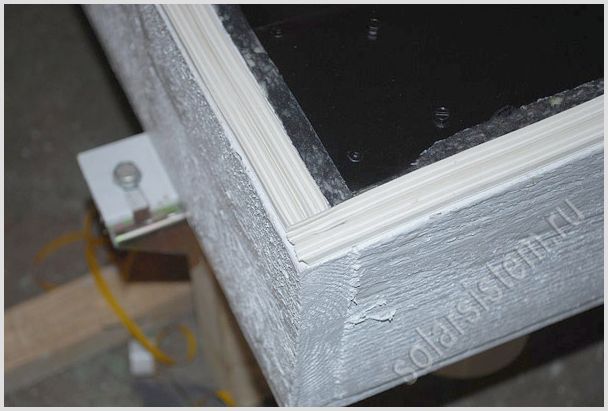
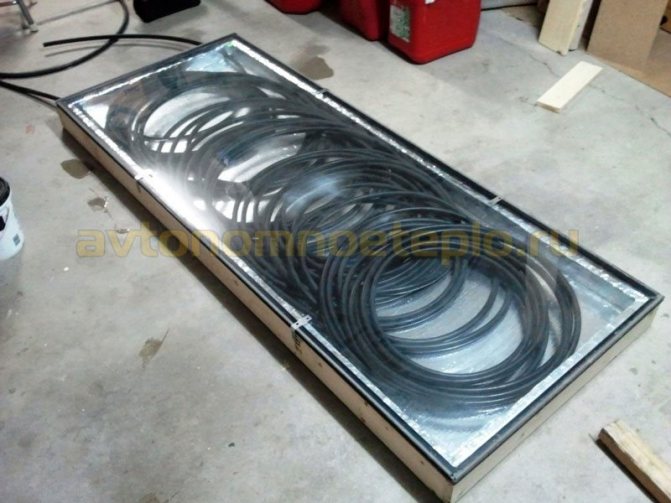
Feel free to apply a lot of sealant, but make sure it doesn't block the airways. Measure your product and cut out the flat aluminum plates that will make up the front, back and bottom of the intake manifold. Its body should be approximately 6.75 inches (171.4 mm) high, 44.5 inches (1.11 m) wide and 3.5 inches (89 mm) deep. The overall structure - can tubing and manifolds - must fit snugly in a 4 x 8 ft (1.22 mx 2.44 m) polyisocyanurate housing.
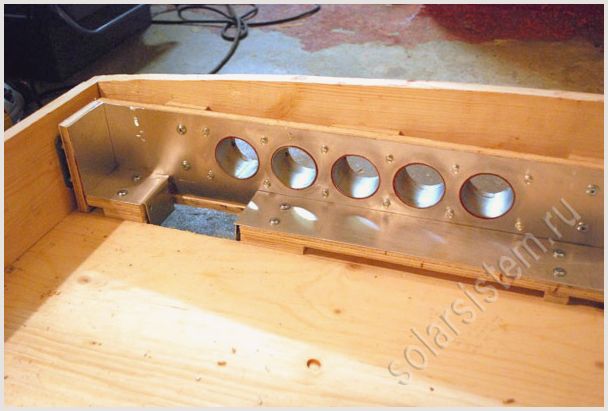
The photo above is a new model of the intake manifold with air separators and end plugs, which I had to make myself.
I made these parts from rolls of aluminum frames. Semicircular cutouts should be made along the edges so that they fit the edges of the collectors.
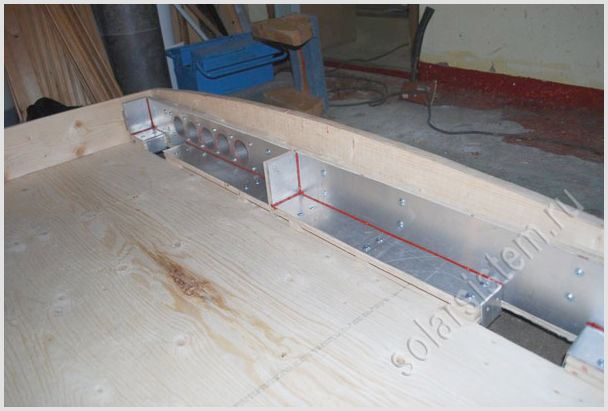
Making End Caps
I did this on a saw table and used clamps and a rule. Bend the sheet and tap the edge with a hammer and it will align.
Choice of pipes
With collector heating of any private house, it is necessary to say separately about the choice of pipes. To decide, you need to understand the specifics of the wiring. The main points that can influence the choice:
- Better to give preference to pipes in coils. This allows wiring in the screed without any connections.
- In no case should they be afraid of corrosion. In addition, to ensure that these elements have a long service life. And there is only one reason: an unplanned replacement of pipes and major repairs will not please the owner of the house in the future.
- The strength is selected depending on the heating parameters. Usually in a private house, the optimal temperature is from 50 to 75 degrees and pressure up to 2 atmospheres. But for warm floors, heating can be less: from 30 to 40.
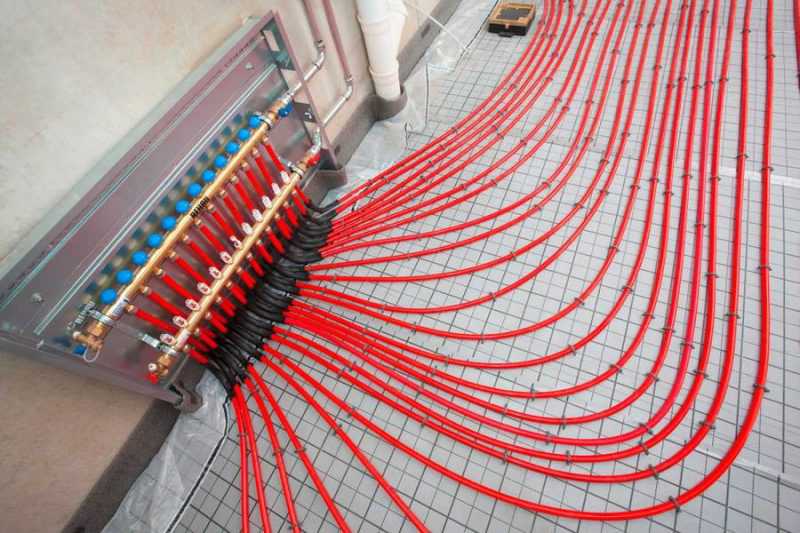
Correctly installed heating manifolds guarantee efficiency and safety during use of the system. Due to the minimum number of connections, the leakage rate is reduced to a minimum. In addition, the option of hidden wiring looks attractive, which will not violate the overall aesthetics. Also, one cannot but agree that in this way it is much more convenient to control the temperature in each room. A system like this will really appeal to people who value personal comfort.
Painting and final assembly
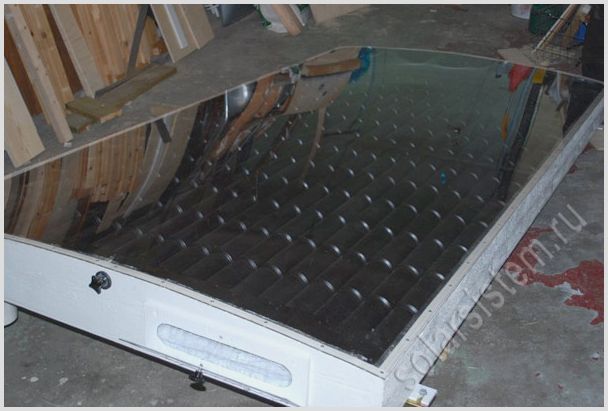
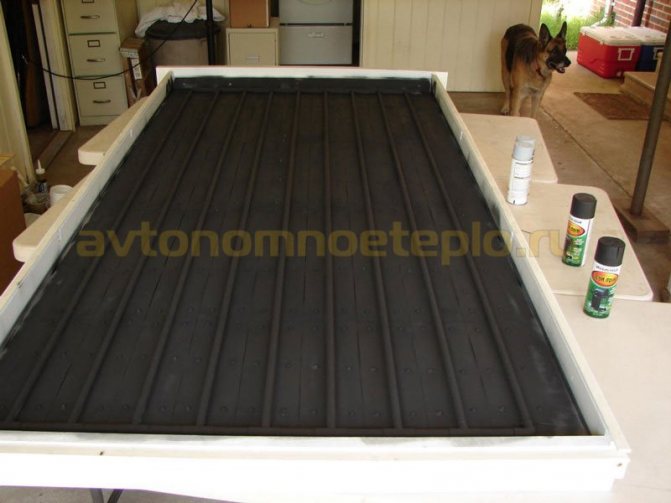
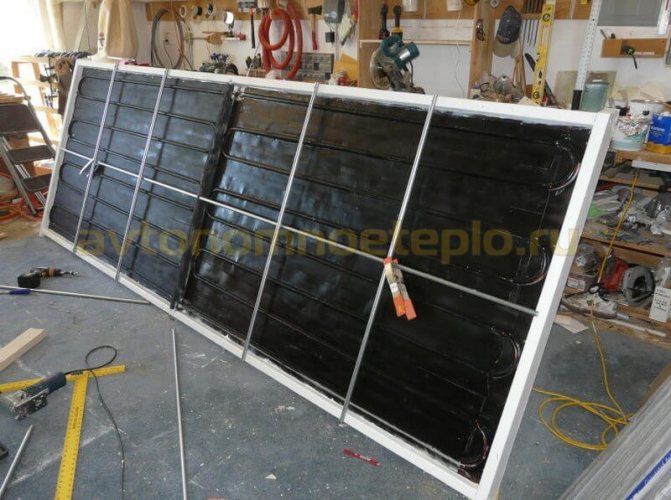
Here is a photo of the painted heat transfer panel. Paint outside the home or store you work in.
The heat exchanger housing must be reflective in order to cast all incoming sunlight onto the heat exchanger.
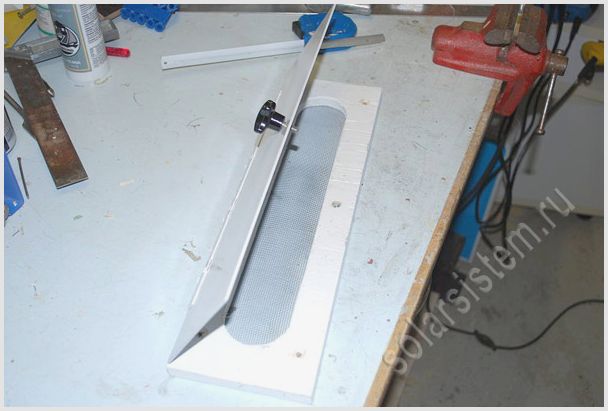
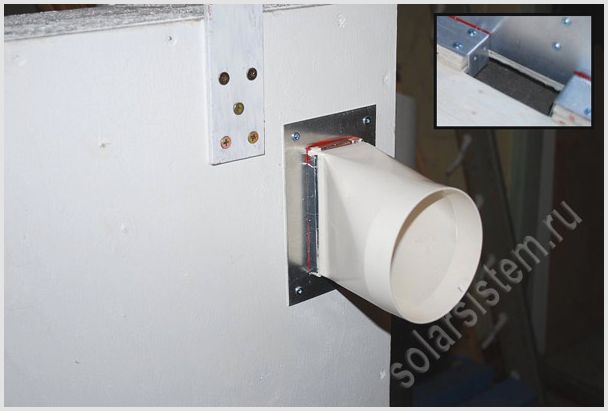
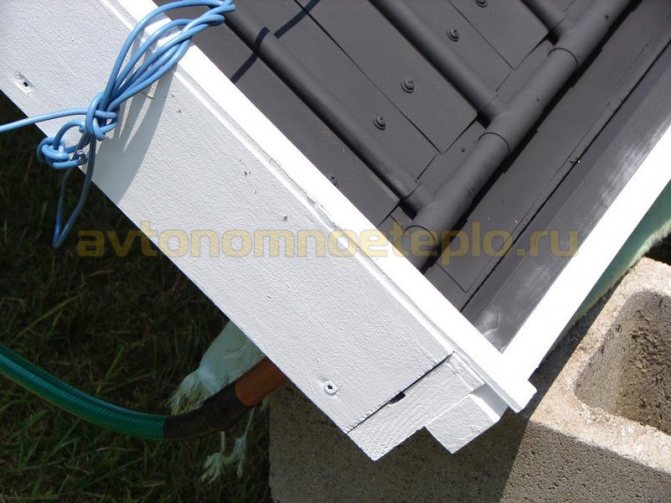
Photo of an inlet with a cover, which I made out of aluminum, and a 6-inch (152.4 mm) duct connection (fitting) attached to it.
Photo of the outlet. As you can see, I only had drawing (photograph)
simple air baffles. Zoli said he liked my work.
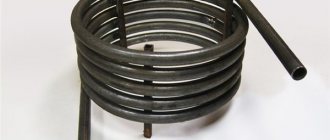
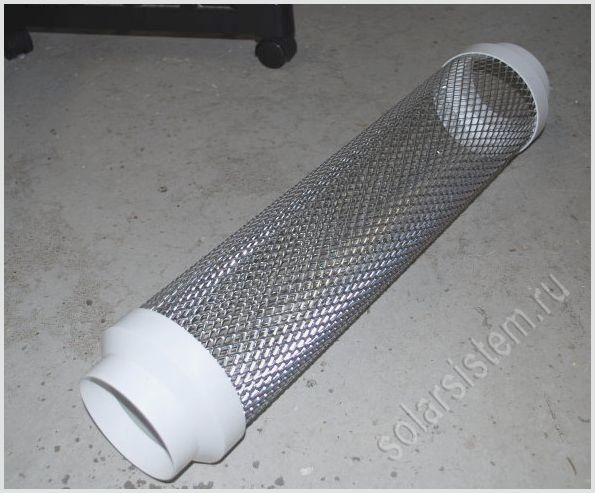
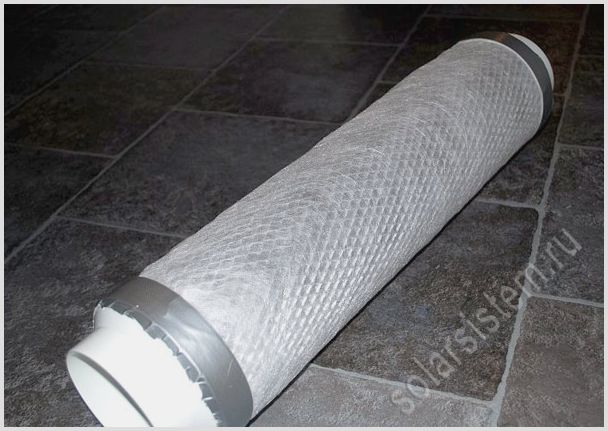
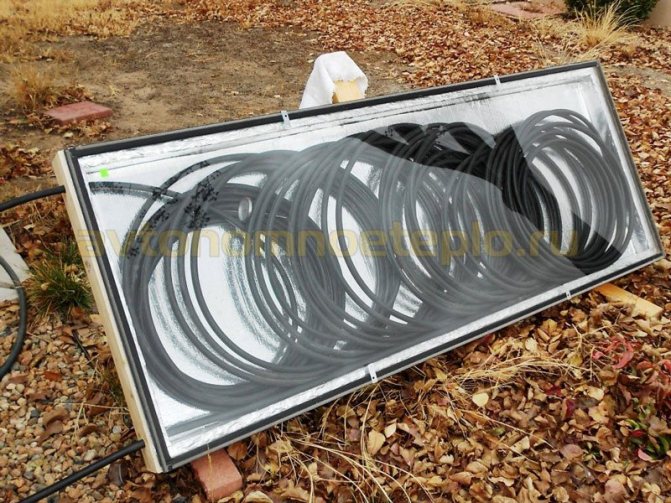
Photo heat exchanger, 3-inch (76.2 mm) tubes and cans.
The use of a copper heating collector in communications
Over the past decades, copper heating collectors have found their application in communications systems that always require close attention. All complex options for plumbing work are not carried out without massive installations of copper pipes, collectors, fittings, and heating systems in apartments and private houses cannot work at all without them in a full-fledged mode. The use of copper gave a new impetus to the development of the construction industry.
Now in the markets for goods and services, copper products are incredibly popular with buyers for heating their homes. A well-known and easily applied material like copper in our country is widely used in the laying of water supply systems, installation of pipes and collectors for sewers and heating systems. Copper products are used for their intended purpose by builders and plumbers for carrying out special pipes, installing copper collectors or soldering fittings. The provision of services is possible by contacting our company Design Prestige.
Find out the cost of heating
Summer design option
The black plate absorbs heat and transfers it to the coolant moving through the tubes (water or antifreeze). Glass has 2 functions: it allows solar radiation to pass to the heat exchanger and serves as protection from precipitation and wind, which reduce the heater's performance. All connections are made hermetically so that dust does not get inside and the glass does not lose transparency. Again, the heat of the sun's rays should not be vented by the outside air through the cracks; the efficient operation of the solar collector depends on this.
Getting Started
Before constructing a solar collector, it is necessary to make the appropriate calculations and determine how much energy it must generate. But you should not expect high efficiency from a self-made installation. Finding out that it will be enough - you can proceed.
The work can be divided into several main stages:
- Make a box
- Make a radiator or heat exchanger
- Make an advance chamber and drive
- Assemble the collector
To make a box for a solar collector with your own hands, you should prepare an edged board 25-35 mm thick and 100-130 mm wide.Its bottom should be made of textolite, equipped with ribs. It should also be well insulated with foam (but mineral wool is preferred), covered with a galvanized sheet.
Having prepared the box, it's time to tinker with the heat exchanger. Follow the instructions:
- You need to prepare 15 thin-walled metal tubes with a length of 160 cm and two inch pipes with a length of 70 cm
- In both thickened tubes, holes of the diameter of the smaller tubes are drilled into which they will be installed. In this case, you need to ensure that they are coaxial on one side, the maximum step between them is 4.5 cm
- The next stage - all pipes must be assembled into a single structure and welded securely
- The heat exchanger is mounted on a galvanized sheet (previously attached to the box) and fixed with steel clamps (metal clamps can be made)
- It is recommended to paint the bottom of the box in a dark color (for example, black) - it will better absorb solar heat, but in order to reduce heat losses, the external elements are painted white
- It is necessary to complete the installation of the collector by installing a cover glass near the walls, while not forgetting about reliable sealing of the joints
- A distance of 10-12 mm is left between the tubes and the glass.
Read more: Gas meter warranty period, equipment service life and subtleties of its replacement
It remains to build a storage device for the solar collector. Its role can be played by a sealed container, the volume of which varies about 150-400 liters. If you cannot find one such barrel, you can weld several small ones together.
Like the collector, the storage tank is thoroughly insulated against heat loss. It remains to make an advance chamber - a small vessel with a volume of 35-40 liters. It must be equipped with a water-falling device (articulated faucet).
The most crucial and important stage remains - to put the collector together. You can do it this way:
- First, you need to install an advance camera and a drive. It is necessary to ensure that the liquid level in the latter is 0.8 m lower than in the front chamber. Since water in such devices can collect a lot, it is necessary to think about how they will reliably overlap
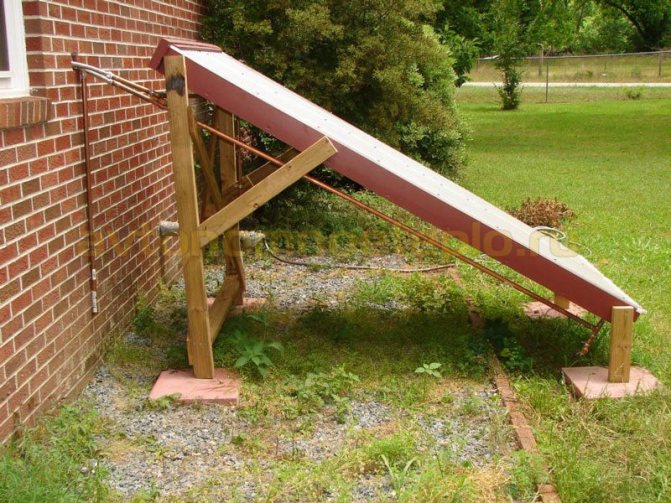
- The collector is located on the roof of the house. Based on practice, it is recommended to do this on the south side, tilting the unit at an angle of 35-40 degrees to the horizon.
- But it must be borne in mind that the distance between the storage and the heat exchanger should not exceed 0.5-0.7 m, otherwise the losses will be too significant
- At the end, the following sequence should turn out: the avancamera must be located above the drive, the last one - above the collector
The most crucial stage comes - it is necessary to connect all the components together and connect the water supply network to the finished system. To do this, you will need to visit a plumbing store and purchase the necessary fittings, adapters, squeegees and other shut-off valves. High-pressure sections are recommended to be connected with a pipe with a diameter of 0.5 ", low-pressure - 1".
Commissioning is carried out as follows:
- The unit is filled with water through the bottom drain hole
- An avancamera is connected and liquid levels are regulated
- It is necessary to walk along the system and check that there are no leaks
- Everything is ready for daily use
You can make a solar collector with your own hands quickly enough, this is not a very difficult job. To use it in the country, in the summer, you do not need complex circuits and special equipment:
- If water is needed only outside (outdoor shower, hot water for washing, swimming pool, washing dishes, other household needs), the tank is also installed outside.
- When water is needed in the house, the tank will be installed inside.
- In such a system, there is a natural circulation of liquid, so the tank must be installed 8-10 centimeters above the battery level.
- To connect the tank to the battery (absorber), you need pipes of a certain diameter.
- With a large length of the system, it is better to install a pump that will enhance the movement of the coolant.
Solar collector made of metal-plastic pipes
What can be used to make a solar system
First, you need to understand what principle of operation a solar water heater uses. The following components are present in the internal structure of the unit:
- body;
- absorber;
- heat exchanger, inside which the coolant will circulate;
- reflectors for focusing the sun's rays.
The factory solar collector works as follows:
- Heat absorption - the sun's rays pass through the glass located on top of the case, or through vacuum tubes. The inner absorbent layer in contact with the heat exchanger is painted with a selective paint. When exposed to sunlight, a large amount of heat is generated on the absorber, which is collected and used to heat the water.
- Heat transfer - the absorber is in close contact with the heat exchanger. The heat accumulated by the absorber and transferred to the heat exchanger heats the liquid moving through the tubes to the coil inside the heat storage tank. The circulation of water in the water heater is carried out forcibly or naturally.
- DHW - two principles of hot water heating are used:
- Direct heating - hot water after heating is simply discharged into an insulated container. In a monoblock solar system, ordinary household water is used as a heat carrier.
- The second option is to provide DHW with a passive water heater based on the indirect heating principle. The heat carrier (often antifreeze) is directed under pressure to the heat exchanger of the solar collector. After heating, the heated liquid is fed into the storage tank, inside which there is a built-in coil (playing the role of a heating element), surrounded by water for the hot water supply system. The coolant heats up the coil, whereby it transfers heat to the water in the tank. When the tap is opened, the heated water from the heat storage tank is supplied to the draw-off point. A feature of a solar system with indirect heating is the ability to work throughout the year.
The principle of operation used in expensive factory solar systems is copied and repeated in self-made collectors.
The working structures of solar water heaters have a similar design. Only made from scrap materials. There are schemes for the production of collectors from:
- polycarbonate;
- vacuum tubes;
- PET bottles;
- beer cans;
- refrigerator radiator;
- copper tubes;
- HDPE and PVC pipes.
Judging by the schemes, modern "Kulibins" give preference to home-made systems with natural circulation, thermosyphon type. The peculiarity of the solution is that the storage tank is located at the upper point of the hot water supply. Water circulates by gravity in the system and is supplied to the consumer.
Polycarbonate manifold
To make a solar system yourself, in particular a homemade polycarbonate solar water heater, you will need the following materials:
- two threaded rods;
- propylene corners, the fittings must have an external threaded connection;
- PVC plastic pipes: 2 pieces, length 1.5 m, diameter 32;
- 2 plugs.
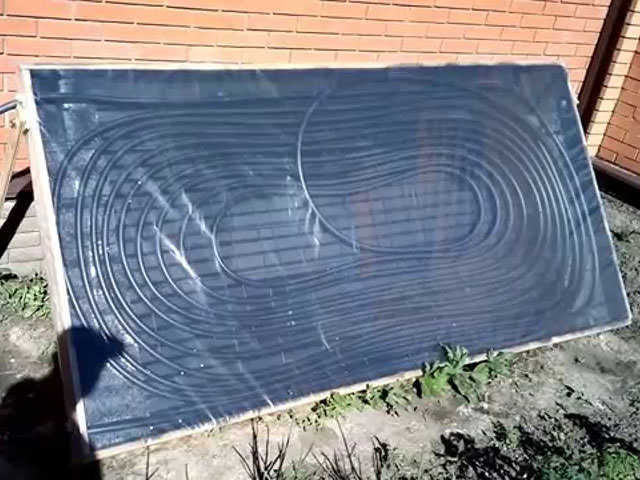
The pipes are laid in the body in parallel. They are connected to the hot water supply through shut-off valves. A thin incision is made along the pipe, into which a sheet of polycarbonate can be inserted. Thanks to the thermosyphon principle, water will independently flow into the grooves (cells) of the sheet, heat up and go into the accumulator located at the top of the entire heating system. Heat-resistant silicone is used to seal and fix the sheets inserted into the pipe.
To increase the thermal efficiency of a cellular polycarbonate collector, the sheet is coated with any selective paint. The heating of the water after the selective coating is applied is approximately twice as fast.
Vacuum tube manifold
In this case, it will not be possible to do only with improvised means. To make a solar collector, you will have to buy vacuum tubes. They are sold by solar service companies and solar water heater manufacturers directly.
For self-production, it is better to choose flasks with feather rods and a heat-pipe heat channel. Tubes are easier to install and change as needed.
You also need to purchase a concentrator unit for a vacuum solar collector. When choosing, pay attention to the performance of the node (determined by the number of pipes that can be simultaneously connected to the device). The frame is made independently by assembling a wooden frame. The savings in making at home, taking into account the purchase of ready-made vacuum tubes, will be at least 50%.
Solar system made of plastic bottles
For cooking, you need about 30 pcs. PET bottles. When assembling, it is more convenient to use containers of the same size for 1 or 1.5 liters. At the preparatory stage, labels are removed from the bottles, the surface is thoroughly washed. In addition to plastic containers, you will need the following:
- 12 m of a hose for watering plants, 20 mm in diameter;
- 8 T-shaped adapters;
- 2 knees;
- a roll of teflon film;
- 2 ball valves.
When making solar collectors from plastic bottles, a hole is made at the bottom of the base, equal to the diameter of the neck, where a rubber hose or PVC pipe is inserted. The collector is assembled in 5 rows of 6 bottles on each line.
On a clear day, after 15 minutes. the water will be heated to a temperature of 45 ° C. Considering the high performance, it makes sense to connect a solar water heater made of plastic bottles to a storage tank of 200 liters. The latter is well insulated to prevent heat loss.
Collector of aluminum beer cans
Aluminum has good thermal performance. It is not surprising that the metal is used to make heating radiators.
Aluminum cans can be used in the manufacture of homemade solar systems. Tins made of tin or any other metal are not suitable for production.
One solar panel will require the following components:
- cans, about 15 pcs. per line, 10-15 rows fit into the body;
- heat exchanger - a collector made of a rubber hose, or plastic pipes is used;
- glue for gluing cans together;
- selective paint.
The surface of the cans is colored dark. The box is covered with thick glass or polycarbonate.
A solar collector made of aluminum cans is often made for air heating. When water is used, the thermal efficiency of the device is reduced.
Solar system from the refrigerator
Another popular solution that requires a minimum investment of time and money. The solar collector is made from the radiator of an old refrigerator. The coil is already painted black. It is enough just to put the grating in a wooden case with insulation and connect it to the hot water supply using soldering.
There is an option of making an air conditioner from a condenser. For this, several radiators are connected into a single network. If there is an opportunity to purchase about 8 pieces cheaply. capacitors, the manufacture of a collector is quite possible.
Copper tube collector
Copper has good thermal properties. In the manufacture of a copper solar collector, the following are used:
- pipes with a diameter of 1 1/4 ″ used in the installation of heating and hot water supply systems;
- 1/4 ″ pipes used in air conditioning systems;
- gas-burner;
- solder and flux.
The radiator grille housing is assembled from copper pipes with a large diameter. 1/4 ″ holes are drilled into the surface. Pipes of the corresponding diameter are inserted into the grooves obtained. The radiator is covered with glass or polycarbonate. Copper is colored with selective dyes.
Solar boiler made of HDPE pipes and PVC hoses
Almost any material at hand is used in the production of solar systems. There are solutions that allow you to make a collector from a corrugated hose, a rubber hose used for watering plants.
There is a possibility of manufacturing a solar collector from a corrugated stainless pipe. The popularity of the solution is due to the speed and ease of installation. A stainless steel corrugated pipe is laid in rings or a snake. Disadvantage, the relative high cost of stainless corrugated pipe.
Making a solar water collector from a PEX pipe:
All the pipes described are used with varying efficiency as a core in the manufacture of a homemade solar collector from plastic bottles and aluminum cans.
Advantages and Disadvantages of Vacuum Collectors
The main advantage of this class of devices is minimal operational heat loss due to vacuum, an ideal natural insulator. Among other pluses:
- efficient operation of heaters at temperatures down to -30 degrees and below, which makes them suitable for winter operation;
- collection of heat with heating up to 300 degrees inclusive (for large industrial designs);
- reliability and durability;
- absorption of both light energy and invisible thermal radiation;
- resistance to adverse weather factors;
- low windage and the ability to pass air masses almost freely (thanks to which the systems are almost not afraid of the wind);
- even in areas with a small number of clear days and a cold climate, they are able to show high efficiency of work;
- maintainability of common heat pipe solutions at a high level;
- the solar battery remains operational even without the controller (or when it is turned off).
The installation of one or several such devices makes it possible to significantly save on heating and hot water supply of any objects and buildings that need it. On average, water heating costs are reduced by 60% and heating costs by 30%. Optimization and reduction of operating and communication support costs are also achieved. The vacuum solar collector acts as an autonomous heat source and provides consumers with hot water even in case of gas or power interruptions.
Another plus is the extension of the service life of the existing heating systems. The load on them is reduced, and the boiler, for example, can last up to two times longer: the solar collector reduces the load on it to 97% of the usual. The same goes for gas boilers. At the same time, vacuum solar modules can be easily integrated into existing communications. You can plan their installation at the planning stage of the facility being built.
An important bonus is environmental friendliness. The considered class of devices does not produce harmful emissions, does not pollute the environment and uses a virtually inexhaustible source of energy - sunlight. In this case, each joule entering the system is used in an optimal way.
Interesting: it is believed that by 2020 about 20% of the world's electricity demand will be met by the Sun. This is especially true for regions with intense solar radiation and a large number of clear days. On average, about 3 million solar energy systems are commissioned per year.
We also note the disinfecting properties: under heating, many harmful microorganisms die, the vacuum also makes it difficult for them to reproduce.

But there are also disadvantages.These include the high cost of purchasing components and tools for self-assembly, as well as the inability of inexpensive tubular assemblies to self-clean from snow, ice and other contaminants adhered to / frozen in winter. Although there are options with anti-freezing modes, and samples with other additional capabilities.