The kitchen along the window is not scary!
The eternal problem is the lack of space. Especially in the kitchens of old houses, where this room did not have enough space and most of them today are from 6 to 9 squares, which is very small. One has only to look at the photo of such a room, you immediately wonder how to arrange it correctly so as not to reduce the space and accommodate everything you need.
Some people solve this problem with quadrature by combining several rooms or making a studio kitchen, that is, a separate corner for cooking and a living or dining area. This is a good enough option, but not everyone agrees, especially if the apartment is one-room. On the one hand, the kitchen automatically becomes visually larger, and on the other, you get the feeling of sleep in the dining room.
Alternative
Of course, you can save space with furniture. For example, put a kitchen island with everything you need for cooking or a small corner equipped with everything you need. However, this will not particularly solve the problem, especially if there is a large window and you want a wide window sill, which will also take up part of the space. There is a good option - to combine business with pleasure.
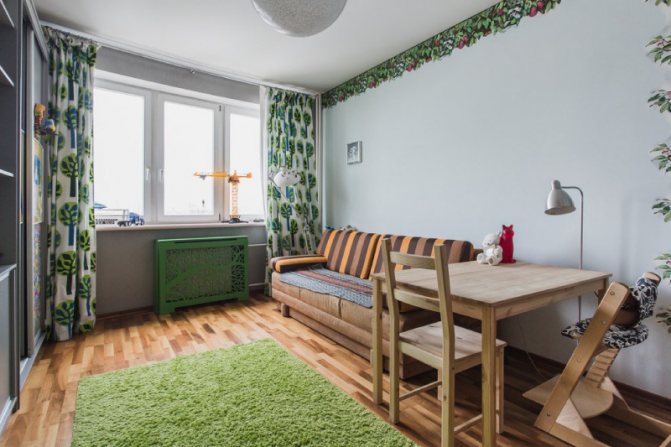
Placing the kitchen along the window is not a new design solution, but it is very popular. Especially when it comes to small spaces. Usually, the entire wall along the window is empty if furniture is placed on other walls. And it turns out not quite rational use of space. If furniture and interior items are placed on the wall with a window, then on the other two you can organize a rest corner and a dining area.
This option has one more plus - light and air. That is, it turns out, in the case of a strong child, in addition to the hood, you can open a window and quickly ventilate the room, getting rid of heavy odors. However, there is another side to the coin. In the case of the sunny side, bright light can interfere with cooking, therefore, if the decision to install the kitchen along the window is solid, you can close the window with special blinds or shutters to protect from the bright sun. Also an important detail in this arrangement of the room is the absence of curtains and curtains. They will not only be inappropriate, but also dangerous, because there must be a stove or hob nearby.
Battery
Another seeming obstacle to space conquest is the battery. It is far from a secret that in most rooms the battery is located strictly under the window. When installing furniture there, you need to come up with a good way out of the situation. Basically, you can go in two ways: difficult and simpler.
Battery transfer
It is rather a very difficult path. After all, it is impossible to do this independently, without skills, and most importantly, special equipment. More precisely, it is possible, of course, but the one who does it will be responsible for the consequences. In this situation, the old fittings along with the pipes are cut off. From the remaining ends of the pipes, special polypropylene or other polymeric products intended for this product are drawn to the right place where the battery will be located. Then everything is welded back.
Decorating
The furniture can be placed under the windowsill, leaving a gap for the battery. You can cover it with a decorative screen or decorate it yourself a little. For example, paint in an original way.If, for example, the color of the furniture is black or white, you can paint it in the spirit of a piano with keys, but if the kitchen is multi-colored and assumes the presence of bright colors, then it would be appropriate to paint the battery in a rainbow order.
Hide and forget
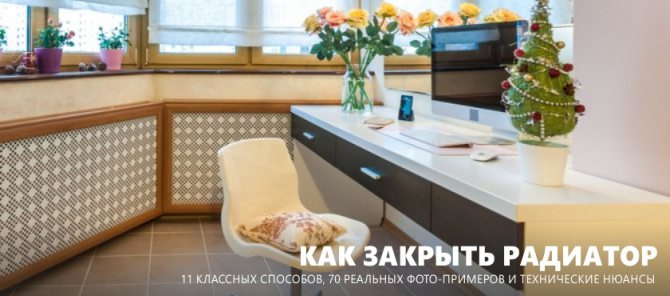
Another uncomplicated way can be disguising the battery, for example, under a false wall. To do this, it is enough to make a crate from a metal profile, and then tighten everything with drywall, leaving special ventilation or vents with doors. In this case, the wall will look pretty neat along with the furniture.
Conclusion
The placement of furniture is an important issue, especially with small rooms, so it is worth planning and thinking things over several times before proceeding.
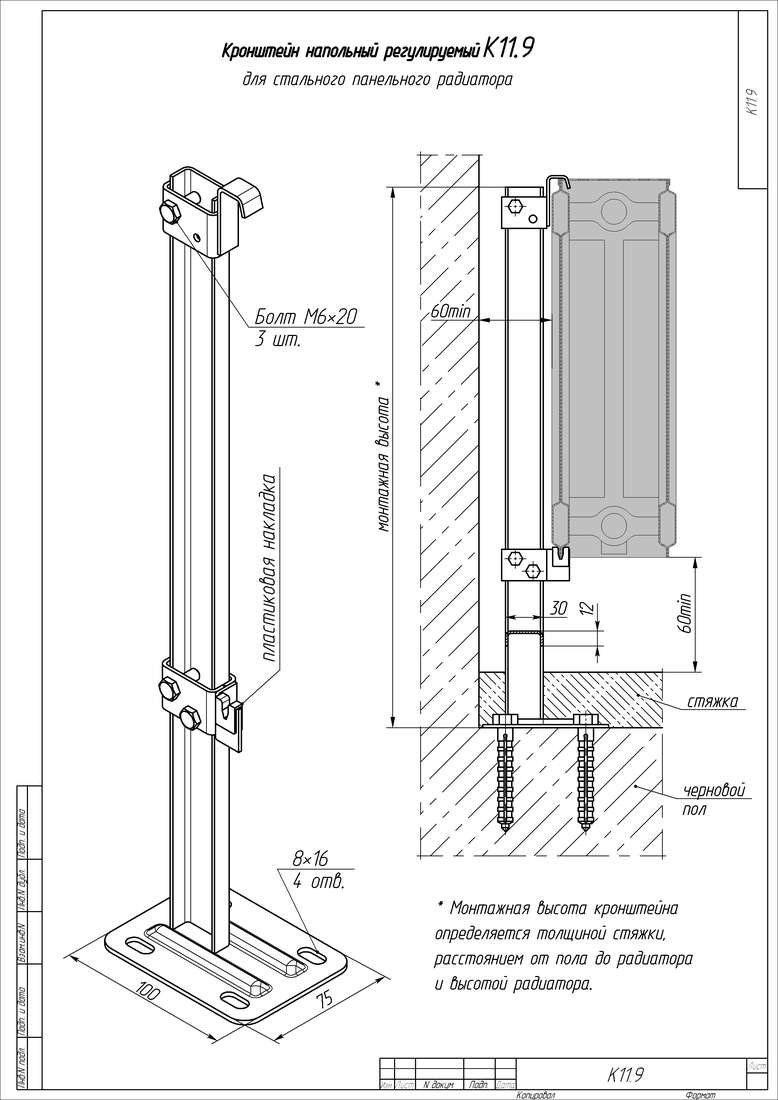
Heating radiator installation
The main way to adjust the required distance to the walls is a high-quality and competent installation of heating devices with your own hands or with the help of specialists. Let's dwell on this aspect in more detail.
Installation of floor views
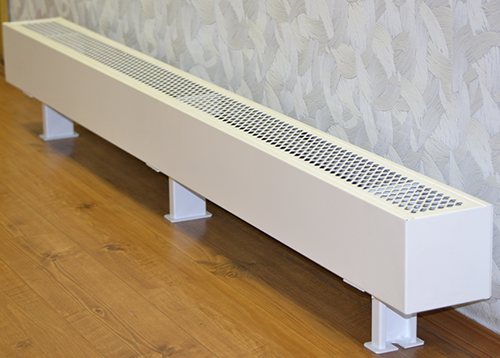
This mounting option is optimal for products with a high weight and made mostly of cast iron. Such batteries are equipped with removable or stationary legs, which are fixed to the floor. Depending on the base material, fastening can be carried out with self-tapping screws for wood, self-tapping screws and plastic dowels, dowel-nails.
Simplest installation option
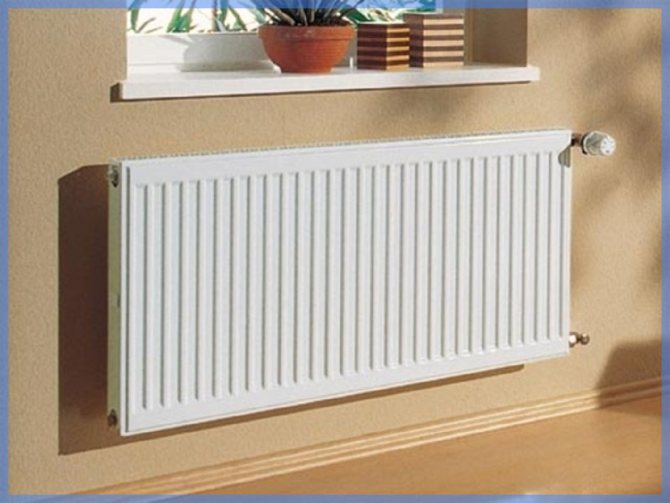
The wall bracket is also a necessary element of the floor heating installation. It is set to the required height, which is defined as the desired distance from the floor to the upper longitudinal radiator pipe, taking into account the gap. With the help of fasteners and marking the places of their installation, the optimal distance to the floor, wall and window sill is achieved.
We hang a wall radiator
Each heating device is completed with one or another type of hangers used for installation on walls. The material and strength characteristics of the brackets must correspond to the mass of the heating battery, taking into account its filling with a coolant. Otherwise, the system may leak.
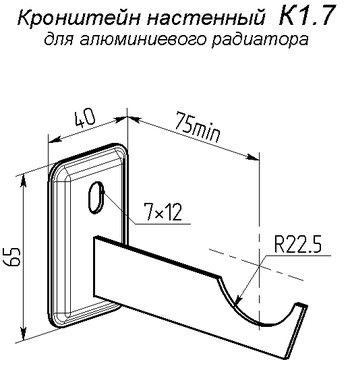
One type of wall mount
Before direct installation, it is necessary to determine the installation location and the required distances to the main surfaces.
To do this, follow these steps:
- We will define the center of the window and apply the markings on the wall for subsequent alignment with the center of the radiator.
- We measure the distance from the bottom edge of the batteries to the upper pipe and add 12 cm. We set this size off the floor in the places where the brackets are installed, checking the horizontalness of the attachment points along the level.
- In the places where the suspensions are installed, we drill holes with a victorious drill, install dowels in them and fix the brackets with self-tapping screws.
Note! A similar instruction is attached to each package of sold radiators. Differences may lie in the specific type of suspensions and the features of their installation.
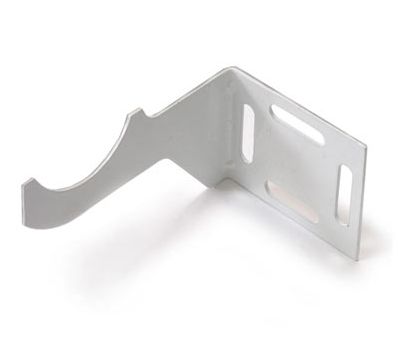
Photo of a simple bracket
Washing under the window
This layout option allows the hostess to admire the view from the window, and also disguises the radiators in the room. When placing the sink next to the window, you need to carefully consider the details before starting the installation.
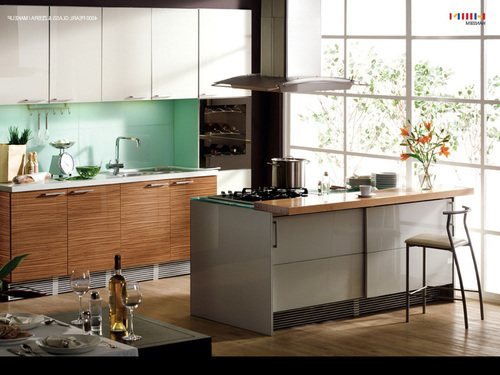
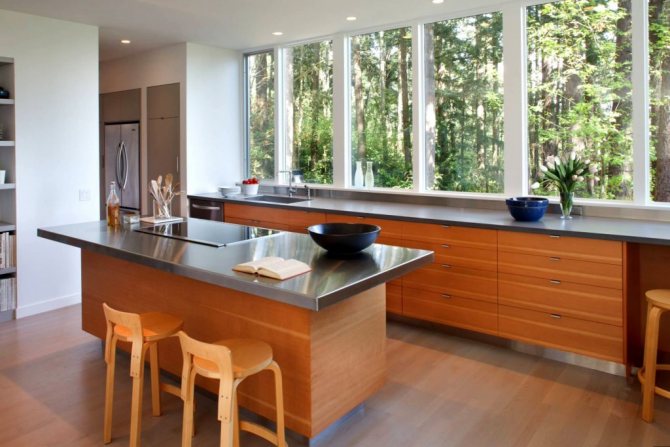
On the island part there is a hob and a cooking zone. The right overhang of the furniture structure can be used as a small bar counter.
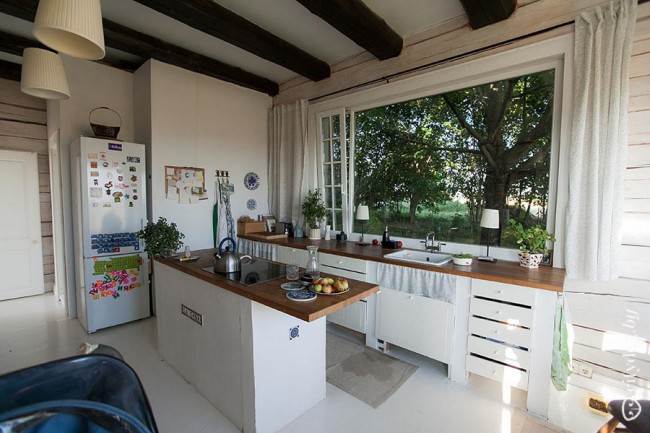
Country style kitchen with an island and a work area near the window
Choose a compact mixer, otherwise the crane will interfere with the opening of the frames. It is better to purchase a model in which the water flow is directed downward so that moisture does not get on the windowsill.
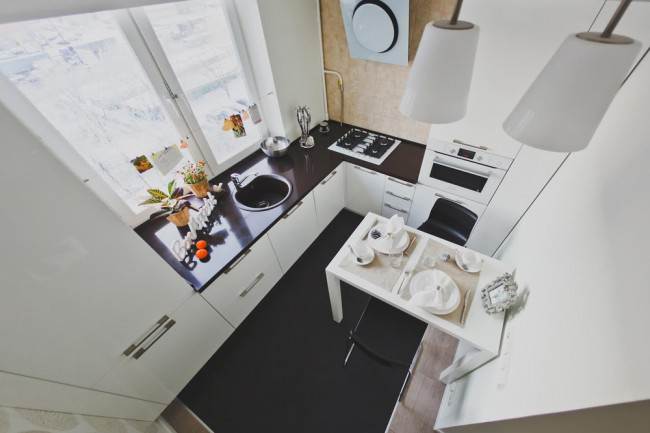
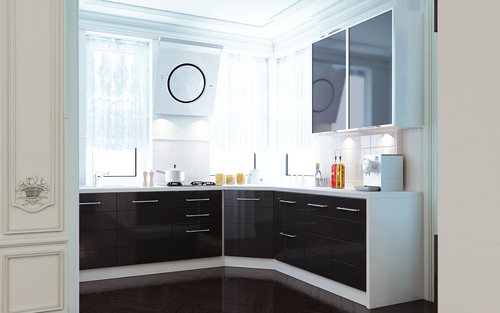
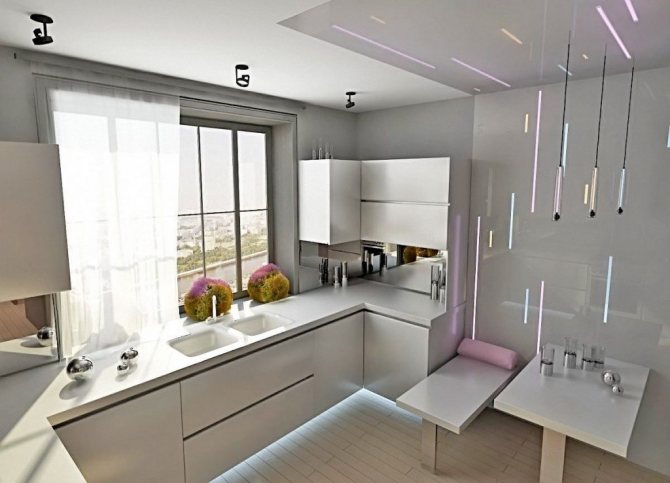
Minimalist corner kitchen with black countertop
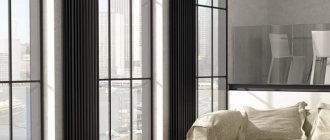
Roller blinds are a color accent in this interior. They do not take up much space and close the opening from the sun, if necessary.
Bright roller blinds in the country style kitchen
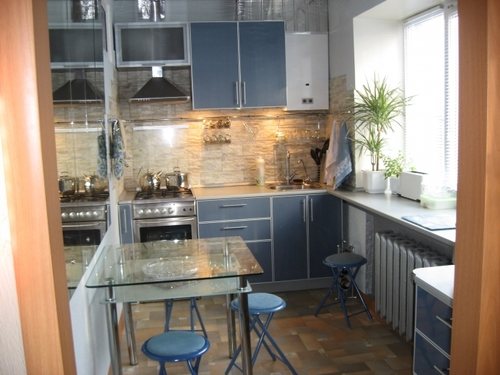
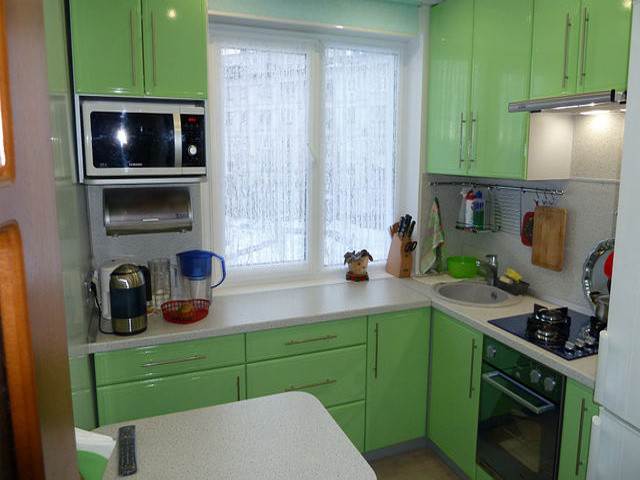
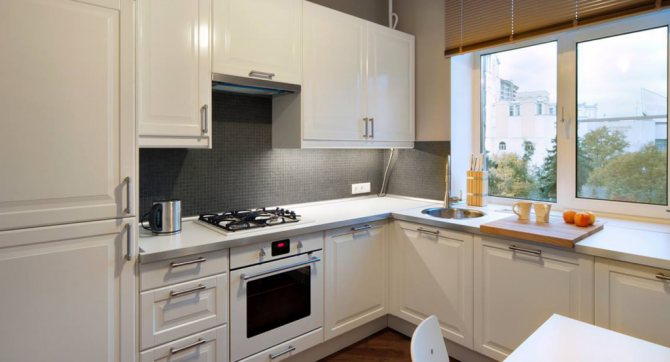
U-shaped set with a sink near the window opening. In order to wash the dishes with comfort, a recess for the legs was made in the basement part. The crane with a high spout does not interfere with the opening of the frame, due to the sliding glass unit system.
White u-shaped kitchen with a sink near the window
An additional lamp was made above the sink, which is useful only in the dark.
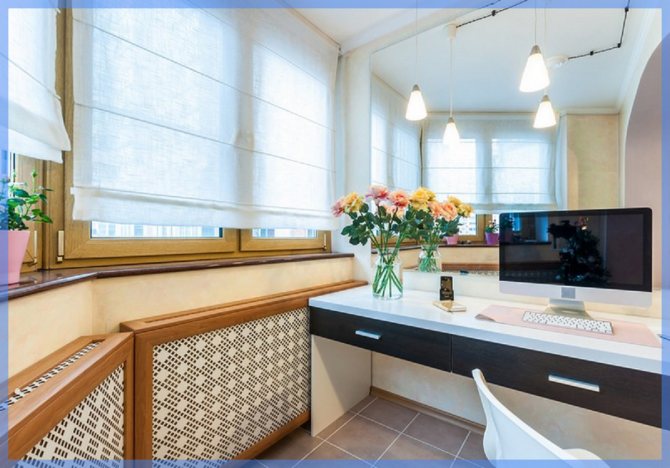
Work surface along the window
If the battery under the window is closed, the ideal option for heating in this case is the "Warm floor" system, or a compact convector installed under the countertop. Thus, the cabinets will not impede the flow of heat into the room.
The depth of the cabinets, in the part of the window opening, can be made less than the standard 600 mm. In order to place the dishes, 400 mm is enough.
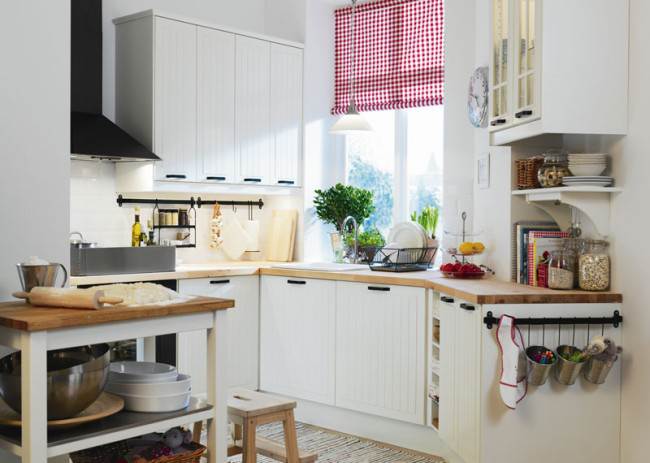
Working area next to the window in the country-style kitchen
If you want to complement the country-style with an elongated curtain, give up the piles of textiles. It is better to choose a small tulle in combination with one long curtain, as in the example of the realized interior.

Window decoration with textiles next to the work area
For a miniature room in a Khrushchev, using the area near the window opening is an excellent option to accommodate all the necessary functions and make a full-fledged kitchen.
A wood-like countertop is used as a work surface; you can also make a dining area here. Since there are no lower modules in this part, it will be quite comfortable to sit at the bar counter.
Bar counter under the window in the kitchen
The spacious work surface allows the whole family to cook in the same kitchen without interfering with each other.
Dark wood texture in interior decoration
U-shaped set with a large working area near the window.
Continuation of the working area of the kitchen flush with the windowsill
Practical blinds in the design of the U-shaped kitchen with a bar counter.
White and green set with a working area instead of a window sill
Classic curtains take up a lot of space and will get in the way in the work area. Better to choose blinds, pleated blinds, roman or roller blinds. This design can be combined with any style in the interior by choosing the right material and shade.
Eco-style kitchen with spacious work area
In a narrow room, it is better to refuse swing doors. For convenience, construct the lower tier from modules with drawers. This option will allow you to sort all the items into different departments.
Preparatory work and the choice of a radiator
Heating technology stores have such a wide range of equipment that they just dazzle. It is worth saying that the entire range is designed for different buyers, and therefore has a different cost, but everyone who wants to buy has the same question: how to install a heating radiator? We will help you to understand this issue.
It is wrong to build the process of selecting heating devices according to the principle: the more expensive, the better.
It must be selected individually based on:
- Place of residence;
- Heating system wiring;
- From what method the installation of heating radiators will be done;
- Temperature regime in the heating system;
- Accounting for what material was taken for the production of pipes;
- The need for regulating elements and fittings;
- The location of the premises in the building.
Only after the analysis of all information has been carried out, the selection of batteries is performed. If you are interested in the characteristics of devices, then on the Internet there are many photo and video materials that reveal their properties. We would advise you to consult with professional installers.
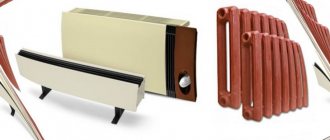
As we have already said, the market for heating equipment is large, it is able to offer you the following heating devices:
- Steel;
- Vacuum;
- Aluminum;
- Cast iron;
- Bimetallic.
Advice! In order to make the right choice, we advise you to familiarize yourself with the descriptions and reviews of all models, and then form your point of view about the need for a certain type of device. Then use the advice of competent specialists and compare your opinion and a specialist. Now you can safely draw a conclusion.
How many sections to put
The installation of cast iron heating radiators and other types begins with the process of calculating the required number of sections. This information can be provided by the seller depending on the volume of your premises, but it will be quite approximate.
You can make a small calculation with your own hands, this is exactly what the sellers think. Often people are guided in the following way.
In an apartment with ceilings with a height not exceeding three meters, one section is equated to two square meters. The resulting number of sections is rounded up to a larger whole number.
You can say that heating one room in an old "Khrushchev" or a well-insulated room in a new house are two completely different tasks. And you will be right, since the selection of the number of sections for any room is an individual process, and it is not entirely correct to take a guideline on the method of selection of sections based on the area of the room.
If we talk about heating the old "Khrushchev" and new buildings, then the price of these two options will differ significantly.
Work before start
A lot of people ask how to install heating radiators correctly? We answer: first, you need to carry out such measures and have in stock:
- Sets with tools that will be needed during installation;
- Necessary calculations and measurements, for example, selection of the number of sections;
- Study of auxiliary mechanisms for future repairs;
- You will need a diagram of the installation of heating radiators (diagonal, one-sided, etc.), as well as the installation standards for heating radiators (gaps, distances, etc.);
- Have all of the above, plus patience for everything, since removing and installing a heater radiator, although an easy, but time-consuming process.
Assembly tool
Correct installation of heating devices is impossible without such tools:
- Box with sets of open-end wrenches;
- Pliers;
- A set of drills with victorious tips and a hammer drill;
- Screwdriver;
- Hydraulic level;
- Roulette;
- Pencil.
Kitchen along the window [15 ergonomic options for the home]
Interior in modern style
The working area located along the window can be found infrequently, for which there are several reasons in the form of a battery and the lack of the necessary access to the window. However, in some situations, such a design is the only way to get the most optimal solution for organizing space. In what cases is the location of the kitchen set along the window justified and does such a kitchen layout have its own characteristics?
Large windows fill the kitchen with natural light
Layout advantages
Owners of a small area of 6-9 sq. m every centimeter of space is important, in such a situation it is simply not possible to leave a corner unused. And for the owners of a narrow kitchen to put a set along the wall means making it even narrower. In this case, the location of the working area along the window will help balance the elongated size. In addition to the forced necessity, this design has some advantages:
- Functionality.
In a small room, the use of space along the window makes it possible to increase the area of the headset without cluttering the space. - Stylishness.
Abroad, the layout of the kitchen under the window is very popular. This design meets all modern trends and looks super stylish. - Window
can also be used by enlarging the worktop with the window sill and thus expanding the working area. - Lighting.
By working next to a window during the daytime, you get natural light in the kitchen and a great view from the window at the same time. Isn't it more pleasant to look at trees than at a blank wall? - Originality.
How often can you find such a layout? The use of a window will make the interior more modern and unusual.
The use of space by the window will make the kitchen visually larger
Spectacular idea with mirrored inserts
Advice! Do not place under a window
hob.Install the hoodand it will be difficult to comply with all safety rules in this case. There are more interesting ideas for using the window.
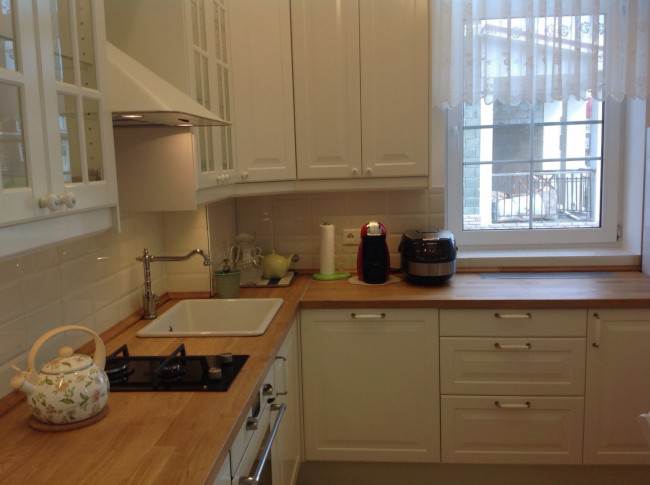
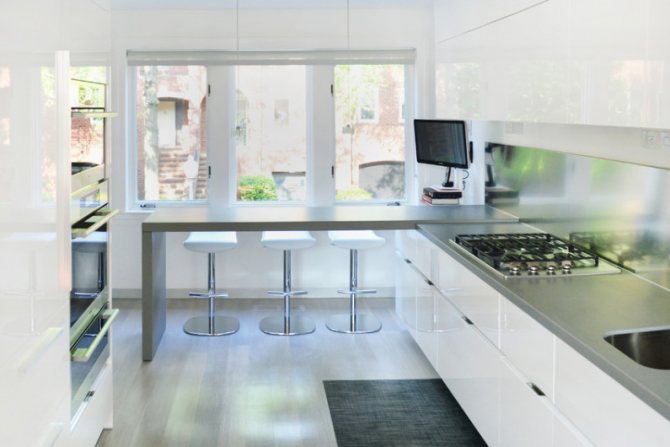
Table top
In a small kitchen, worktops a, located along the window, is convenient, functional and beautiful. Such a design requires adherence to a certain rule: the work surface must be flush with the windowsill.
Advice! When planning to use a window, make sure that the continuation of the countertop looks harmonious. Before proceeding with the repair, you need
calculate the dimensions of the headset
.
The window sill can be used as part of the work surface
The standard layout involves placing the battery under a windowsill. If this is your option, then when installing the countertop under the window, the radiators will have to be moved. There are usually cabinets under the work surface that store kitchen utensils. When choosing a headset, it is always worth starting from the area of \ u200b \ u200bthe kitchen.
For example, a small room is great for a worktop that transitions into
bar counter... And the medium size allows you to make it a separate work area without combining withdining room
.
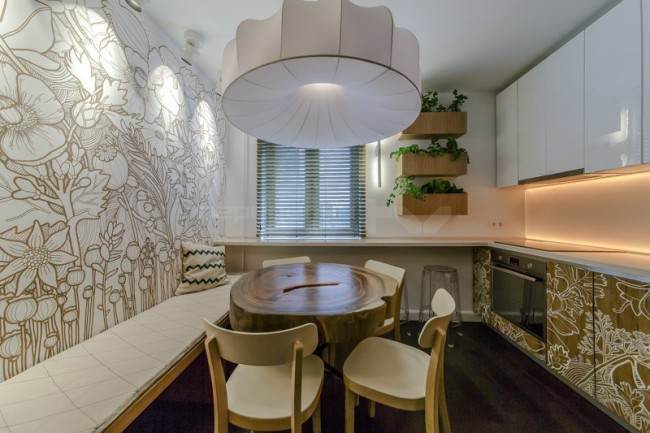
Table top that turns into a dining table: convenient and practical
When implementing such a design project, it is required to leave free space so that the window sashes can be easily opened. It is enough not to clutter the surface with tall objects and accessories. If this is not possible, install sliding doors that open in the same way as a wardrobe.
Advice! For very small spaces, they are often used
folding tabletops- they are conveniently adjustable and allow you to free up space
.
Delicate decoration in pastel colors
Advice! If the kitchen area allows, you can install
corner setalong the window. Such a solution is notable for its beauty and convenience, especially if there is not only one window in the kitchen.
Features of installing heating radiators for different types of window structures
The correct installation of a radiator depends on the type and construction of the windows. For window units of different designs, batteries are used, the dimensions of which correspond to the dimensions of the space under them.
Based on this, there are several main options for how to place the convector under the window:
- Standard placement relative to the battery window.
- Installation of convectors against walls in balcony blocks with a doorway.
- Flat plate convectors for panoramic windows.
- Convector in the floor under the stained-glass window.
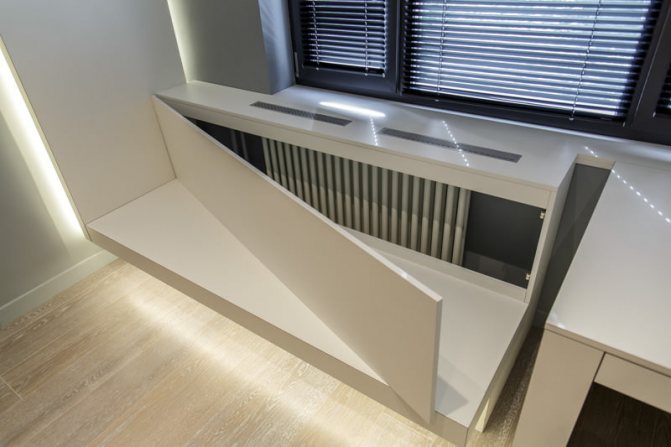
- Concealed installation of the radiator under the windowsill.
- Floor standing batteries under the panoramic unit.
Most of these methods do not have clear regulation in SNiP, therefore, in order to hang the heating battery correctly, it is necessary to take into account the recommendations of manufacturers and builders.
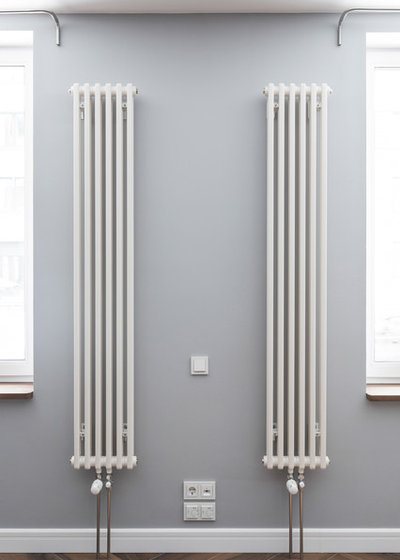
Standard battery placement
The correct location in relation to the battery window is determined by building codes. However, professionals recommend hanging the radiator so that it protrudes ¼ of its width beyond the window sill. This will create the most efficient heat shield around the window.
In addition, it is recommended to choose a convector for a large window opening with internal ribbing to maximize the convection process.
In balcony blocks
It is recommended to install the convector under the glass unit of the balcony block over the entire width of the window sill. It is recommended to place the edge of the battery facing the block door at a distance of 3-4 cm from it.It is not recommended to install shut-off valves or temperature regulators in this place. For installation, a device is selected whose power is 10-15% more than the calculated one for this room.
Special convectors for panoramic windows
Heating radiators for panoramic windows are selected based on the size of the space under the window. It often happens that a panoramic window starts at floor level, without a window sill. In this case, it is recommended to install a battery in a floor-standing version near the window. If the floor location of the radiator does not fit into the interior concept, you can install the convector under the floor, covering it with a decorative grille.
Convector in the floor under the stained-glass windows
Stained glass windows have recently become more and more popular not only for decorating staircases and winter gardens, but also for offices and living rooms. And if there is such a window in the room, then it is recommended to install radiators for stained-glass windows so that they do not distract attention and harmoniously fit into the interior. The specificity of the installation of such devices is to provide the most effective direction of warm air to the stained glass window.
A traditional stained glass window with a lead or tin border of glass allows much more cold to pass through than a regular glass unit. Therefore, in the niche under the windowsill, in addition to the usual radiator, an additional electric heater is often installed.
Concealed installation of radiators under the windowsill
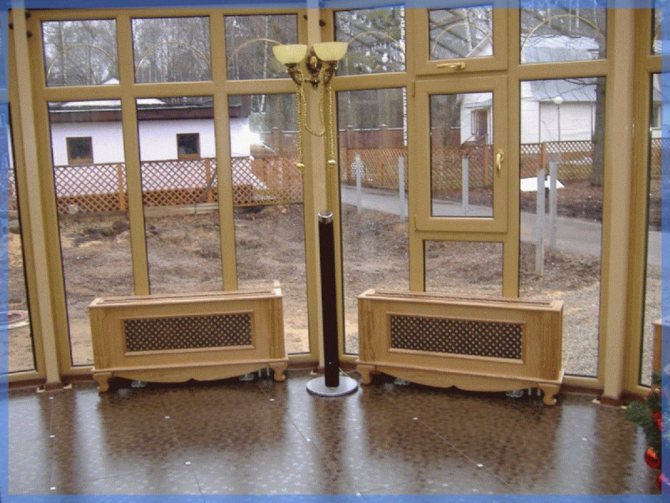
The pleasure of having a wide window-sill and looking at the falling snow is not permissible for many. Usually such wide window sills are found in old houses with wide walls. Therefore, in order for the bed to be not only comfortable, but also warm under the windowsill, there must be a massive radiator capable of heating a large area of the windowsill. And in order for the heat to penetrate into the room, holes are made in the body of the window sill.
Battery under the window
If the radiator gets in the way and prevents you from achieving the desired design, there are several solutions to consider.
- Replace the battery withwarm floorcompletely removing it.
The advantage of this solution is the ability to use different headsets without adjusting them to the installed heating. But not any floor covering can be insulated, besides, costs will increase. - Move to another wall.
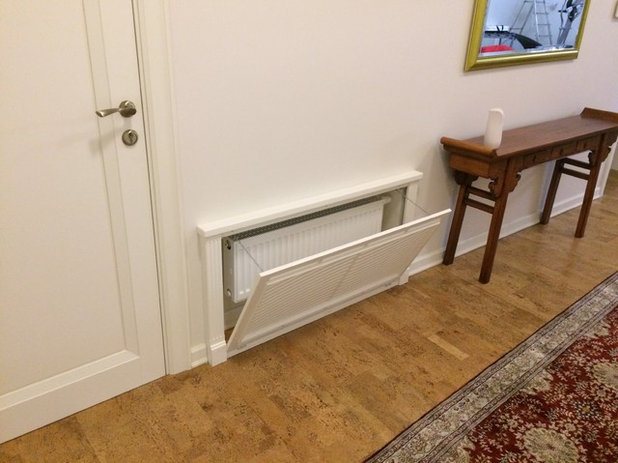
Moving the battery will also require additional costs, but access will be open and the headset will fit without any difficulty. - Make a box under the battery.
This option is suitable if a sink is planned to be installed under the window. Drawers can be tricky, but as a last resort, opening doors can be used. - Sink the radiator deep into the wall.
This will require partial demolition to free up space. At first glance, the option seems laborious, but a specialist will do everything in a few hours, and the cost will be lower.
Small stylish kitchen
Choose the best option, taking into account all the features of your kitchen, layout and wishes. If in the apartment the battery is already located in the wall, then it will be easier to create a kitchen design to your liking.
batteries on the windows - is that right? : Mechanics and Technique
And in my opinion, it is wrong to heat a cold window, arranging convection near it. The thermal conductivity of the air is very low and convection is needed to cool the room from the window. And the batteries were placed under the window so that there was where to arrange the furniture, and then they just came up with different excuses. I have a room at home with a door to the balcony, the battery is located on the wall and is half the size. This room is no colder and the window (balcony door) never cries. Plus: infrared radiation heats up the cold wall under the window. Compare with the palm of your hand with other (unheated) sections of the outer wall. In this regard, it is best to put the battery on the thickest and most insulated outer wall, the presence of a window is a minus, but not essential.
- Thu Mar 17, 2011 13:23:58 -
In general, modern double-glazed windows are not inferior to, or even surpass, brick walls in terms of thermal insulation properties. So modern architects and designers are given much more leeway.
In practice, this is not the case. The window is always the coldest place. Although, if the walls are in the floor of a brick, then maybe so.
- Thu Mar 17, 2011 13:35:33 -
Which of the two effects is stronger, I don't know. But there is also a third effect - try, when it is minus 30 outside, turn off the tap on the battery and sit near the window. IMHO this effect is the most important - even if it is due to heat loss. After all, IMHO, the main purpose of heating in the house is our comfort. And only then - heat savings.
Drafts blow from the cracks around the window and, in addition, there is a convection flow of cold air downward. If you plug all the cracks and make a sealed frame, then there will be no draft and at the same time ventilation in the room. If you hang the curtains, the convection will stop. You can put the battery (convector) under the window and blow the convection flow of warm air from the bottom of the window. Then half of the fuel will be used to heat the window. At the same time, the heating of the glass from the bottom generates convection inside the glass unit and, as a result, the thermal conductivity of the window, as a system, increases. In short, the result is complete mismanagement.
In addition, placing the battery under the window increases the overall convection, the flow of dust from the floor and thus degrades the air in the house.
- Thu Mar 17, 2011 13:40:37 -
There is an opinion that for heating it is necessary to heat the air. I used to think so myself. This opinion arose due to the fact that convection systems, as simpler and cheaper, are used everywhere. But it turns out the opposite is true: for comfortable heating it is necessary to heat objects with high thermal radiation. Convection heating, a 19th century invention, is a cheap replacement for traditional radiant heating.
- Thu Mar 17, 2011 13:52:43 -
By the way - a double-glazed window is a wrong invention, because the frame transfers heat very well.
This means that the inner glass is poorly insulated from the outer one; heat transfer goes along the frame. In order to better insulate the inner glass, it is necessary to increase the distance between the glasses. Better to make double frames with a long distance.
dxdy.ru
Rest zone
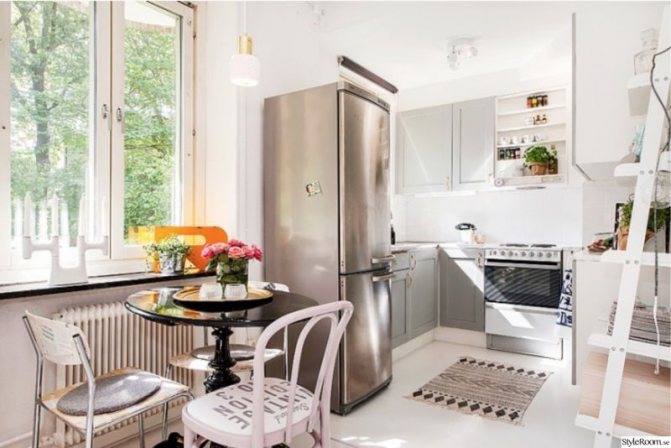
Placing a dining table or a small sofa by the window is a great option for a medium-sized kitchen of 9-15 square meters. m. If the area does not allow combining the kitchen with the living room, then you can create a dining area in the kitchen. As a rule, it is better to place a table with chairs by the window. Also, this design project is suitable for a small kitchen with two windows. So, on the one hand, there is a working area, and on the other, a dining area.
Great option for placing a dining table
There are a little more opportunities in the design of the window in the recreation area, because beautiful curtains to the floor are quite suitable for tea drinking, indoor plants will look great on the windowsill. It can be done in the same style as the work area, or become a bright spot.
For example, for
scandinavian stylethe addition of blue, gray or cherry shades is characteristic to make the white kitchen even more contrasting and light
.
This option is especially relevant if there is no loggia where you could spend time, relax and eat. If necessary, in such a kitchen, you can even install a table by making a mini-cabinet.
Advice! Consider an option
L-shaped layoutby placing all the furniture along the blank wall and capturing part of the wall with a window. Such a design will help save space and visually expand the space.
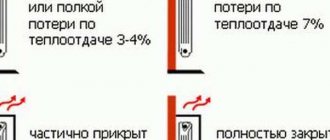
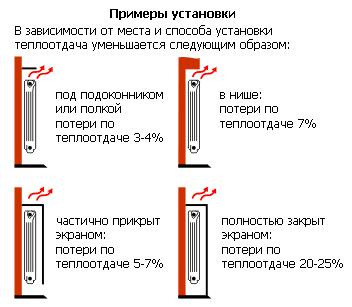
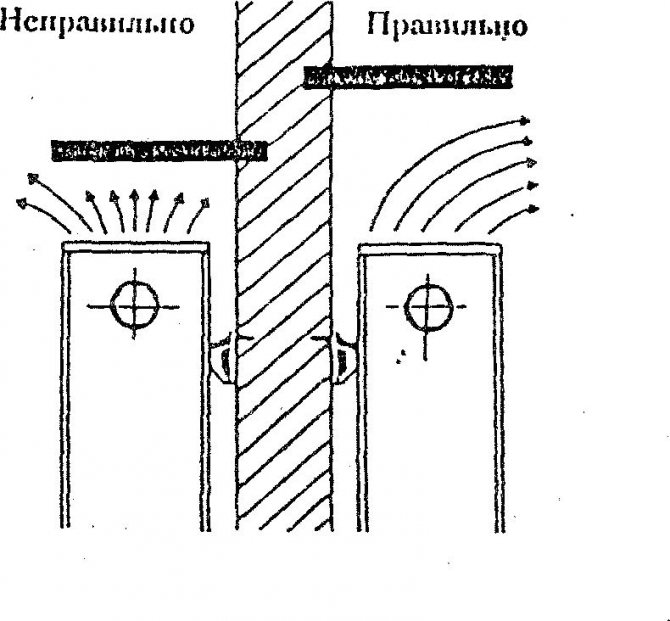
If the indent is correct
When the heating appliance is in close proximity to a wall, a significant part of the heat radiation is absorbed.Therefore, experts began to think about how far from the wall to hang the radiator in order to improve the efficiency of heating the room.
With an increase in the gap, heat loss decreases, since the side surface heats up less. However, too much indentation will necessarily affect the aesthetic characteristics.
Taking into account the above circumstances, it is recommended to leave a space within 3-5 cm.
- With such a distance, the heat output of heating devices is significantly improved.
- Such a gap makes it possible to clean behind the radiators in a comfortable environment.
- The space from 3 to 5 cm allows you to save usable space without disturbing the aesthetic perception of the structures.
- The radiator of the home heating system will work as efficiently as possible if there is a gap of at least 7 cm from the floor. Thanks to this gap, cleaning the lower part of the room is also easier.
- It is recommended to leave at least 10 cm of free space from the window sill to the device. Then the heat losses will be minimal, which means that it will be possible to save on heating the dwelling.
- If the walls of the building are made of materials with a small margin of safety, then it is advisable to install the batteries on the floor using special brackets.
- For maximum efficiency, use a diagonal circuit when connecting to a common system. With this option, the inlet pipeline is connected to the upper part, and the outlet pipeline to the lower one.
- It is not recommended to use decorative screens for heating devices if the level of heat loss of the building is very high. It is also necessary to avoid the device of hidden eyeliner.
- Reflective insulation should not be fixed with small staples or nails, so as not to violate the integrity of the canvas. It is best to use a variety of adhesives that have reliable adhesion to the surface.
- When installing brackets and hooks on a concrete base, anchor plugs must be used. The elements of the system can be mounted to walls and floors made of wood using self-tapping screws.
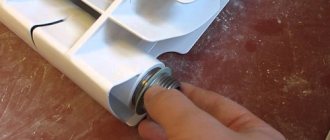
- If necessary, sections are built up before installation. In this case, a heatsink key is used to connect the modules. There is always a gasket between the component parts.
- Docking of radiators with polypropylene pipelines is carried out with preliminary installation of the coupling. Conductive elements are inserted into it and fixed by soldering.
Kitchen design along the window [10 photos] ✅️ Super ideas and recommendations for the interior!
It is not so easy to decorate a small kitchen, but then a horizon of fantasies and interesting ideas opens up in order to use all the space as advantageously as possible. Therefore, the place near the window also has to be taken into account. How, then, is the correct arrangement of furniture?
What can and cannot be placed along the window? Let's take a look at a few ways that will help you and push you to come up with interesting ideas for the use of space of your own.
Kitchen with sink by the window
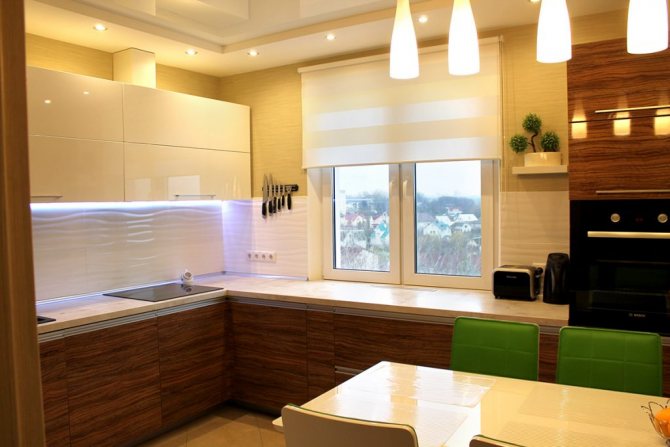
How can you diversify the routine of washing dishes? Of course, install a sink under the window, then you can admire the surroundings, and besides, save on electricity, since you will have enough light during the day.
Of course, if you do not live in a private house, but in an apartment, then some effort will be required, since it will be necessary to lengthen the water communications from the drain riser and build it into the window sill-countertop connected to the headset.

When choosing such a design solution, keep in mind that walls and slopes must be treated with an antiseptic primer so that mold does not appear. In the worktop, arrange a ventilation grill to circulate air from the radiator to the glass.
And why moving a radiator can disrupt the heating system
The quality of heating directly depends on the location of the heating devices.
It would seem, well, what problems could be here: the builders decided everything for us long ago. The trouble is that not all builders "hang" radiators correctly. And to live with these batteries - you.
An example to prove my thesis is this radiator at the entrance to the apartment. The heating device appeared here clearly not as a result of the work of professionals. And the project designer had to mask it out of despair - the transfer was hardly possible.
Do you think an isolated case? - Oh, how wrong you are!
Why are batteries placed under windows
And not next to them, not at a distance of a meter, not in the back of the room? To answer, it is enough to open a school physics textbook.
The plane of the window is much colder than the inner surface of the outer wall of the building. For example, in modern buildings, the heat transfer resistance of the outer walls, as a rule, is 3.0 ... 3.5 m2 deg / W, and for windows it is only 0.6 ... 0.7 m2 deg / W. That is, the windows are several times colder than the walls.
Recommendations

- Choose deep sinks for your design, otherwise your window will be constantly splashed by water.
- Decorate the space between the window and the sink with indoor flowers, they will have enough light, and most importantly, you will not forget to water them.
- Although daylight will be enough for you, make sure that the sink is illuminated.
- When choosing curtains for such a window, it is best to stop at those that have a lifting function.
Dining area by the window
If for you the most important thing in the space of a room is not a working area, but where you can sit with the whole family and have a meal, fly away with your thoughts somewhere in your cherished dreams and, plus, get aesthetic pleasure from beautiful curtains, then be sure to organize a cozy dining area.
If your space allows, then you can put just a table by the window, and if not, then a folding table will be your saving and convenient option. The bench along the window will look beautiful, moreover, it will provide more seating than chairs and under the seats it can be equipped with drawers for storing kitchen utensils.
possible problems, step-by-step instructions, calculations, alternative
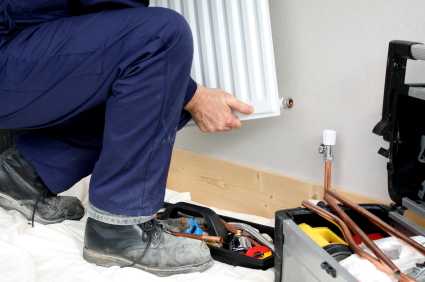
Very often in our life there are situations that you have to do everything yourself, sometimes even realizing that the result may be far from ideal. This also applies to the topic of our today's article - fixing radiators to the wall yourself. As you understand, in order to make the heating wiring in your private household, you need to know a lot, be able to and do everything accurately and clearly according to the instructions.
Carelessness is not safe
For those who are not fully aware of the responsibility that they assume, we list the possible problems that arise with improper installation:
- Batteries in the wrong position can become suffocated and not warm at all.

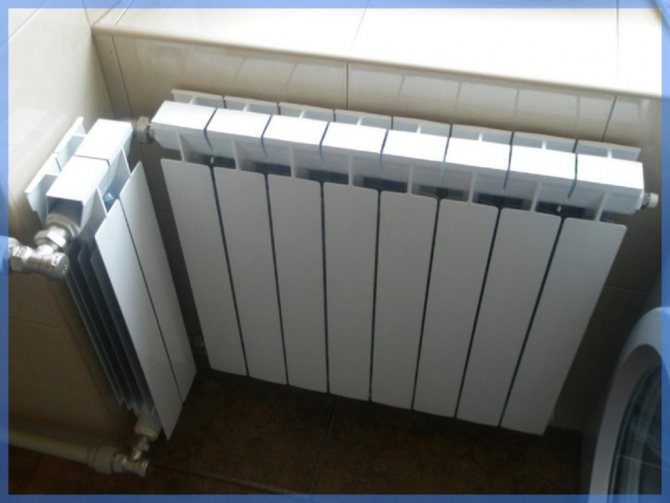
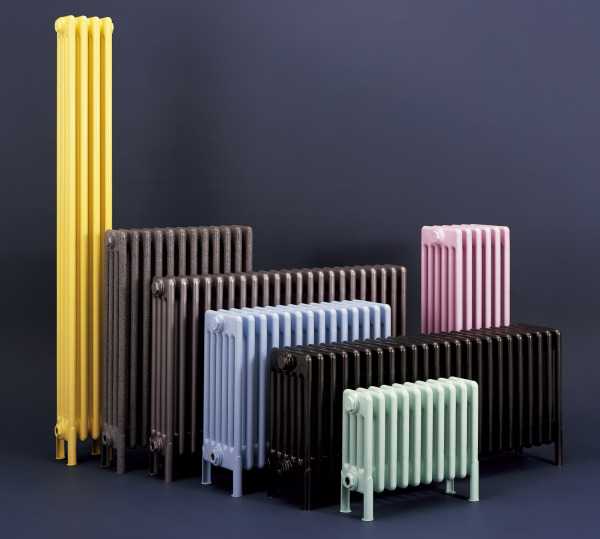
Batteries of different types and sizes
- An improperly planned system can have too much water and poorly heat the premises.
- Regular leakage from the system can lead to boiling of the remaining water, damage to equipment, pipes, property. An example of negligence is the case when there was a wood and gas boilers in the same bundle, the water leaked out, the solid fuel boiler boiled and miraculously there was no explosion that could have caused a gas explosion. Therefore, it is better to install the installation together with experienced specialists, and if you have suspicions about problems with the heating system, do not hesitate to call professionals!
Stages of work
It's a completely different matter if you just decided to change the battery on squeegees for another, more economical or productive one, or have the skills to communicate with similar systems.
A brief instruction for step-by-step work, what and how you should do in order to install batteries at home with your own hands, is as follows:
- Prepare materials, equipment.
- Calculate your location.
- Install the brackets.
- Carry out the actual installation.
- Solder or seal the joints.
- Check the system.
Read more about each action below.
Heating system installation
Training
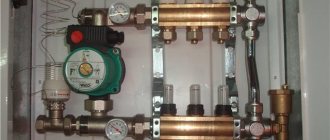
Of course, before proceeding with the fastening of the heating radiator sections, you need to carefully prepare. You will need to find out which heating system you have - one or two pipes. If the first option, then in addition to the mandatory set listed by us below, a bypass should be added. It serves so that in case of something you can not turn off the entire system, but only block this radiator. In cold weather, it is better not to do such manipulations, especially on your own. The standard kit for installing a heating system battery includes:
- Corners.
- Valves.
- Couplings.
- Drivens.
- Bushings.
- Adapters.
- Brackets.
- Nipples.
- Mayevsky's cranes. If you do not know, then this is a special valve designed to bleed air from the system. Most often, modern radiators are already equipped with them, but if not, then be sure to purchase, this will improve the performance and protect your heating system from airing, which you assemble with your own hands.
Location calculation
As mentioned above, correct calculation is very important in order for the batteries to operate at their full capacity, and not to collect air flowing through the system.
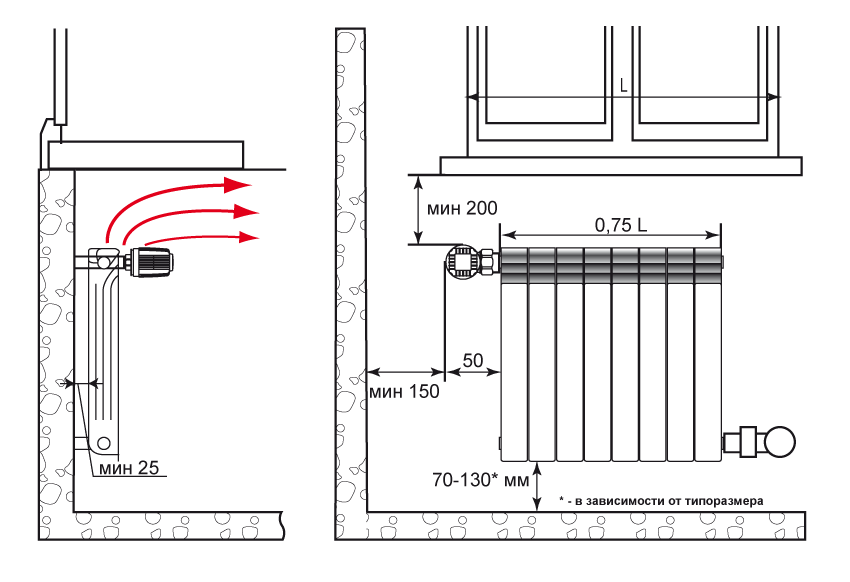
In order to ensure the normal operation of all radiators, the sections of the supply pipes must be placed at a slight slope along the movement. The minimum slope of a meter pipe should be half a centimeter. Also, the battery should be located at a distance:
- About 10 centimeters from the floor.
- From the windowsill from 5 to 10 centimeters.
- 3-5 centimeters from the wall.
If you are afraid of insufficient heat generation, or want to reduce your heating costs, then a heat-reflecting screen is installed behind the battery. It can be a heater with a heat reflector or a special heat-reflecting compound that is simply applied to the wall.
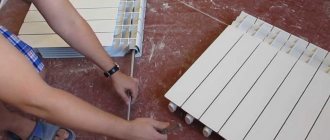
Installing Brackets and Installing the Battery
Have you calculated the number of brackets required? Not sure how to do this? The calculation is simple: the minimum number of brackets is 1 per 1 square meter of the radiator. If you have a total battery area of 1 square meter, then you still need 2 brackets. The number is always rounded up to ensure system safety. The volume of sections required to heat a room is calculated from the area and technical characteristics of the battery that you plan to install in the system.
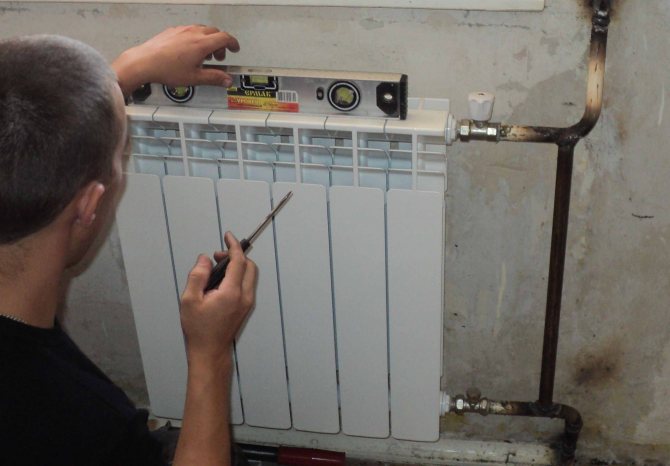
With the materials sorted out, now the installation of the brackets. We mark their location, once again we double-check with a level and a tape measure the correctness of the marking, if we drill everything correctly, insert the dowels, screw in the fasteners. Now you need to hang up the battery. If you did everything correctly, you will immediately notice how tightly and evenly the battery lay on the mounts. The load should be evenly distributed, the battery firmly fixed. Overpowered? Great!
Connecting the radiator to the heating
Now you need to connect the radiator to the heating system. Do not forget that in order to achieve the necessary tightness at the joints, special materials are laid to ensure its optimal level. If you have not tightened or twisted, then a leak is guaranteed under pressure, which cannot lead to anything good! For installation, you will need tow with paint, sealant or sealant. For insurance purposes, recall that before starting the installation, you need to either turn off the section of the system where work will be done to replace the battery, or drain the entire system if you do not have shut-off valves.
Once again, we check with the level the correctness of fastening the heating batteries to the wall, unscrew all the plugs, connect the bypass with a valve, squeegees, carefully wrapping them with sealing material or resorting to welding. Without removing the protective shell, carry out the pressure test. It is advisable that you have a plumber with you at this stage. He will additionally check the correctness of the attachment, correct possible shortcomings, and bring the work to its logical conclusion. This is what concerns modern radiators - steel, aluminum, bimetallic.
Cast iron radiators differ from the above, so we will focus on their installation. They are installed by those who want to achieve the longest possible heat transfer and slow cooling of the system. In order to install such a radiator, you need to unscrew it, adjust the nipples and reassemble. Such a battery is disassembled together on a workbench using keys and a crowbar, unscrewing both nipples at once - the upper and lower ones.
Heating radiator installation
Now you assemble the battery in reverse order, press it. Before installing cast iron batteries, consider whether your walls will support a lot of weight. If the walls, for example, are made of wood, and you have purchased cast-iron sections, then you will additionally need special support stands. Do not forget about the bypass with a one-pipe system and the mandatory installation of a Mayevsky crane. Welding is not required, installation is carried out using squeegees and sealing materials.
Alternative heating methods
If you do not want to do heating the old fashioned way, with batteries, then you can easily resort to installing a warm floor. Also, such an innovation is used as an addition to a conventional heating system in rooms where floor heating is needed, for example, in a bathroom or a nursery. The beauty of this technology lies in the fact that you heat the area in which you are often located, and not heat the ceiling. The economy of this type of heating is due to the maintenance of the temperature much lower than that which must be in the radiator to ensure normal life. For example, 30 degrees in the underfloor heating pipes will be quite enough for you, at 65 in the radiator. This is practically a double benefit, and then the comfort is much higher, since you do not step on a cold surface, but walk on a warm floor.
There are two types of underfloor heating - electric and water. In the first case, a special cable provides heat, in the second - a water tube. The second option is more economical, both in terms of installation costs and operation, especially if you have a good heating system and you use a warm floor as an additional one. When calculating the area, do not count the places where furniture or appliances will stand.
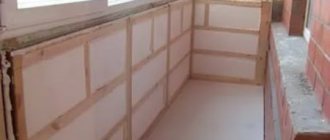
In order to carry out the installation, you will need to lay insulating material, for example expanded polystyrene, spread the foil, lay the reinforcing mesh, fix the pipe every 75 centimeters. The layout of the underfloor heating must be strictly followed and carefully preserved in order to facilitate repair work in the event of a malfunction. The warm floor is poured with concrete mortar with a thickness of about 6 - 10 centimeters. Temperature control is carried out using valves or a special device that is part of the system. The distance between the loops of the warm water floor is 15-25 centimeters. For walls free from furniture and appliances, it can be smaller and be only 8-10 centimeters. When pouring concrete, one should not forget about the buffer space for the expansion of concrete when heated, it is achieved by laying a damper tape, taking into account the following parameters: when heated by 25 degrees, 1 meter of concrete expands by 0.3 millimeters. The maximum heating temperature of the warm floor is 45 degrees.
Regardless of which heating system you prefer, which radiators you choose, remember that the entire installation process must be carefully thought out, each stage is checked several times, and the final result is examined by a specialist. Remember, precautions are never overkill! We hope our tips help you! Warmth to your home!
remvizor.ru
How do I hide the battery?
When buying a kitchen, almost everyone thinks about: what to do with the battery? There are several solutions, let's look at them.
- The most expensive way is to dismantle the battery and install a warm floor. But, this option replaces a lot of problems associated with the connection and installation of heating.
- Installing the battery in a special recess, for example, a tabletop. In this case, do not forget about the heat transfer grill.
- You can close it with a cabinet with a sink, which just does not have a back wall.
No need to be upset if the size of your kitchen is not what you would like, it is the window that will help you find a solution in the arrangement of furniture. For advice, you can contact the designers, or you can plan everything yourself by reviewing the ready-made photos of the interiors.
Correct installation
The rules for installing heating radiators are the same for all types of heating devices, be they vacuum, aluminum or steel batteries. The requirements below are also confirmed by SNIP.
Compliance with these rules will help you create high-quality circulation and heating of premises:
- For good air circulation, it is required to build a gap of about five to ten centimeters from the top of the device to the window sill;
- There must be at least ten centimeters between the bottom of the battery and the floor;
- The distance from the wall to the device should be at least two centimeters and no more than five. If the wall is equipped with reflective insulation, then special brackets are purchased that have a longer length than conventional ones.