Description of the heat exchanger with a floating head "TP"
The floating head heat exchanger is one of the demanded types of shell and tube heat exchangers and is widely used in refineries and various other industrial enterprises.
The main feature of this device is the presence of a temperature compensator in the form of a so-called "Floating head".
Below are 2 options "Floating head":
- The upper figure is a design with the possibility of removing the tube bundle without dismantling the head itself, characterized by a reduced thermal efficiency due to the presence of bypass flows (TEMA designation).
- The bottom figure is a design that requires dismantling of the head to extract the tube bundle (TEMA designation S). The most common in domestic refineries.
In both cases, the presence of a floating head makes it possible to use the heat exchanger at a large temperature difference between the process media in the tube and shell cavity of the apparatus.
Thus, this type of apparatus is more versatile in comparison with heat exchangers of a rigid-tube structure and can be used in a wide range of combinations of various media with a large temperature difference. However, due to the presence of floating. head heat exchanger cost also increases. Therefore, the use of this equipment must be technically justified. When specifying the code of the device, the abbreviation “TP”- heat exchangers with floating head according to TU 3612-023-00220302-01 VNIINeftemasha.
By the way, read this article too: U-tube heat exchangers
The need for regular flushing of heat exchangers for efficient equipment operation
Why does the heat exchanger need to be cleaned?
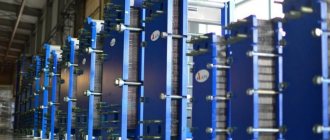
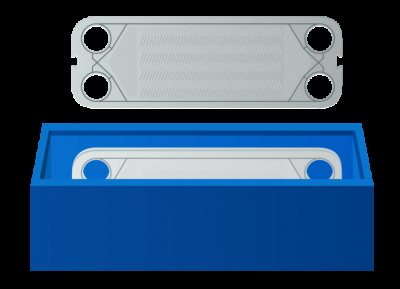
The principle of operation of a plate heat exchanger is to transfer heat energy from hot to cold heat carrier through a heat exchange surface made of corrugated metal plates.
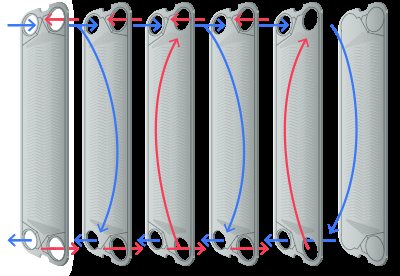
In a gasketed plate heat exchanger, the plates are tightly compressed into a package between the pressure plate and the fixed plate. In this case, the plates are separated by sealing gaskets made of special rubber. The two media that take part in heat exchange move along sealed channels formed by the plates. The streams of two heat carriers are always on opposite sides of one plate, this eliminates the mixing of media.
In the case of a brazed plate heat exchanger, the steel plates are brazed together using copper solder, which also eliminates the mixing of media during the heat exchange process.
When the heat exchanger is just started up, the channels through which the media move are absolutely clean. In this case, the heat exchanger works as efficiently as possible. However, gradually various impurities begin to settle on the plates, contaminating the channels. Mineral contaminants have low thermal conductivity, the heat transfer characteristics of the apparatus decrease, and the hydraulic resistance increases, therefore, heating a cold medium requires more and more energy.
The rate of contamination of the heat exchanger largely depends on the purity of the media and temperatures, for example, the harder water is used in the heat exchange process, the more often the heat exchanger needs to be flushed.
How often is the heat exchanger flushed?
The required frequency of cleaning the heat exchanger differs depending on the following factors:
- The scope of application of the heat exchanger. For example, in a number of technological processes in the food industry, heat exchangers are subject to daily cleaning, and in the municipal energy sector, correctly selected heat exchangers are cleaned on average once a year;
- Water treatment level. It is logical that the more various impurities there are in the water, the faster the channels of the apparatus will become dirty, and the more often the heat exchanger will have to be flushed.
In general, it makes sense to flush the heat exchanger when the actual parameters do not correspond to the calculated ones, which is expressed in a decrease in the productivity of the apparatus and an increase in hydraulic resistance. A decrease in the value of the heat transfer coefficient relative to the calculated indicator by 33-35%, as well as a significant increase in the pressure drop compared to the calculated one, is a sure sign that it is time to clean the heat exchanger.
Heat exchanger flushing methods
There are three main methods for flushing a heat exchanger:
| 1. CIP chemical washing. Suitable for all types of heat exchangers, including brazed and welded. A washing installation is connected to the heat exchanger and through it a special washing solution is supplied to the circuits of the apparatus, which circulates inside through the channels of the heat exchanger until the contaminants are removed. The advantages of this method include the extended service life of the gaskets (the less often the heat exchanger is disassembled, the longer the seals will last), as well as the convenience of cleaning in narrow rooms of boiler rooms and heating points. However, this method of flushing the heat exchanger is only effective when contaminated with soluble deposits. In addition, using the CIP method, it is impossible to visually assess the quality of cleaning. |
|
| 2. Dismountable mechanical cleaning. After disassembling the apparatus, impurities from the plates are removed either manually or using special equipment that supplies water under high pressure. This method is, for obvious reasons, only used for heat exchangers of a split design. It requires more skill and labor than CIP, since flushing requires first disassembling and then assembling the heat exchanger in the correct order. |
|
| 3. Dismountable chemical-mechanical cleaning. First, the plates are mechanically cleaned in accordance with the second method. Then the plates are kept in a container with a cleaning solution and subsequently rinsed with clean water. This cleaning method is the most effective, as it allows you to completely remove all contaminants and control the quality of cleaning. |
|
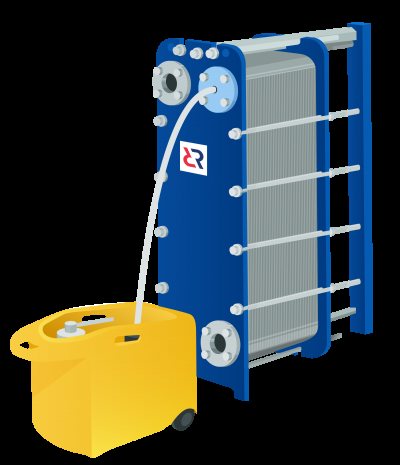

For all cleaning methods of the heat exchanger, it is important to use detergents that do not damage the surface of the plates and gaskets. Using aggressive detergents can damage the protective passivating film formed on the steel from which the appliance plates are made. Therefore, when cleaning plates and other stainless steel components, do not use chlorine-containing liquids such as hydrochloric acid (HCl) as cleaning agents. When choosing means for flushing the heat exchanger "Ridan" recommends to be guided by the list specified in the operation manual.
The heat exchanger is flushed by employees of certified Ridan Service Partners, or by specially trained personnel of the operating organization in accordance with the operating manual supplied with the device.
Why shouldn't rinsing the heat exchanger be postponed?
If you ignore the fact that the heat exchanger does not provide the design parameters for too long, this leads to the following consequences:
- Increased fuel consumption (more heat energy is required to heat the medium);
- Increase in hydraulic resistance (contamination in the heat exchanger channels slows down the movement of the coolant, which creates an additional load on the pump and can lead to its breakdown);
- Failure to issue the required parameters for the temperature of the coolant, "Underheating", which leads to a decrease in the quality of heat supply to consumers or a decrease in the efficiency of cooling the primary circuit coolant;
- Overestimation of the temperature of the primary circuit coolant, leaving the heat exchanger.
With regular cleaning and maintenance of the heat exchanger, your equipment will last a long time and will operate at maximum efficiency throughout its entire life cycle.
Design

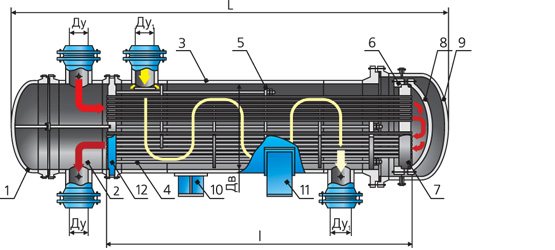
1 - anterior chamber; 2 - rear camera; 3 - outer flange of the head; 4 - head cover; 5 - inlet / outlet branch pipe of the head; 6 - stationary tube sheet; 7 - pipes; 8 - casing; 9 - casing cover; 10 - casing flange from the side of the stationary head; 11 - casing flange from the collapsible side - either a floating head or a tube plate; 12 - inlet / outlet pipe of the casing; 13 - flange of the casing cover; 14 - stress compensator; 15 - floating tube sheet; 16 - floating head cover; 17 - flange of the floating head cover; 18 - separate annular flange of the rear floating head; 19 - separate annular flange of the rear head; 20 - guide supporting flange; 21 - rear head cover; 22 - tubular rear head (mixing chamber); 23 - oil seals; 24 - seal; 25 - rear cover flange; 26 - bolts; 27 - connecting rods and struts; 28 - supporting partitions; 29 - spreading plates; 30 - longitudinal partition; 31 - partition-rib or dividing plate in the head; 32 - inspection fitting; 33 - drainage fitting; 34 - fitting for measuring instruments; 35 - mounting posts; 36 - eyebolt for installation work;
3 Procedure for the repair of heat exchangers
Repair of heat exchangers has a strictly defined sequence and should take place according to a clearly established order. Let's analyze the procedure for repair operations in stages:
- The valves and piping are dismantled, threaded connections are disassembled, covers, hatches, and tube sheets are removed.
- Check the tightness and strength of the pipes and their fastening in the tube sheets using pneumatic or hydraulic tests.
- Killing and flaring (welding) of pipes in the tube sheets is carried out, when replacing the pipes, they are removed from the body, the holes in the heat exchanger grates are cleaned, new pipes are installed, and their ends are cleaned.
- Further, the body parts are repaired, the cutting and cutting of the gaskets and the preparation of the fasteners are carried out, after which the apparatus is assembled.
- The last stage is density and strength tests and commissioning.
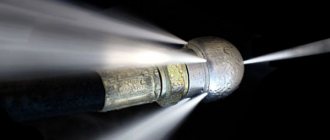
Fig. 1. Hydrodynamic (a) and hydromechanical (b) cleaning of heat exchangers, installation of transducers for ultrasonic cleaning (c) and the scheme of operation of a "self-cleaning" condenser - a condenser with a pseudo-boiling sand flow (d):
1- engine; 2 - pump; 3 - pressure regulator; 4 - hose reel; 5 - water supply; 6 - flexible high pressure hose; 7 - shield; 8 - control panel ("pistol"); 9 - hollow bar; 10 - sprayer with nozzles; 11 - drill; 12 - bearing; 13 - cuff; 14 - drill; 15 - converter; 16 - generator; 17 - partitions; 18 - drain tray; 19 - viewing windows
Principle of operation
The principle of operation of a heat exchanger with a floating head - hot and cold liquid enters the corresponding cavities of the apparatus. As a rule, hot liquid is supplied to the annular space, and cold to pipes, but there may be opposite cases, depending on a number of factors: operating pressure, contamination of the medium and the need for cleaning, hazard class of flows and some others.
By the way, read this article too: Shell and tube refrigerator
When the pipe walls are heated, linear expansion occurs and the tube bundle lengthens. The floating head device makes it possible to compensate for this elongation due to the free movement of the head in the rear chamber of the heat exchanger when the pipes are lengthened or shortened when they are heated or cooled, respectively. This design of the floating head is widely used in refineries due to its reliability and prostate.
As a rule, in factories, these devices, of the same size, are often assembled into groups forming horizontally located pairs - double heat exchangers. This arrangement allows you to reduce the necessary:
- Place required for installation;
- The amount of strapping required;
- Improves service access.
How to clean the boiler heat exchanger
As described above, to clean the outer part of the heat exchanger, it is enough to add some household chemical agent to clean water for washing and cleaning various surfaces. Stronger agents may be needed to clean the inside of the heat exchanger walls.
Watch the video for an example of cleaning the heat exchanger of a double-circuit boiler:
First, you can use a plumbing cleaner to remove plaque. Then you should rinse the tube several times with a descaler designed for coffee machines, irons and other similar equipment. You can do with citric acid diluted in water. Then, with a powerful jet of water supplied to both holes, the heat exchanger should be rinsed, removing the remaining cleaning agents from it.
Free passage of water will be an indication that the inside of the tube is clean. After finishing the "bath" procedures, collect everything in the reverse order, remembering to remove all accumulated dirt from the inside of the boiler. Having turned it on at full power, you should make sure that there are no leaks and that the boiler is working correctly.
You will need only about two hours to complete all the work.
Floating Head Heat Exchanger Repair
The floating head heat exchanger has the ability to remove the tube bundle from the body. To do this, it is necessary to relieve the pressure and disconnect the device from the piping by plugging the inlet and outlet pipes of the process media.
Repair of a floating head heat exchanger consists of the following stages:
- Cleaning the surface of the tubes from external and internal pollution and corrosion;
- Checking the integrity of the tubes, flaring, replacing or plugging the tubes if necessary;
- Checking the tightness of flange connections and replacing gaskets;
- Hydraulic testing of the apparatus;
- Checking threaded connections.
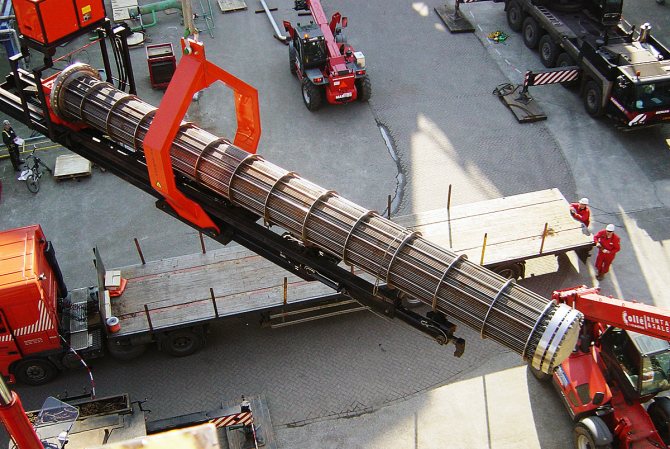
Extraction of a tube bundle is one of the most difficult operations and requires heavy lifting equipment, usually a winch in combination with a crane.
By the way, read this article too: Shell and tube heat exchanger designs
Cleaning plate heat exchangers
The heat exchanger disconnected from the system should be cleaned from the outside and inside of the formed dirt, rust and scale. It will be most convenient to start cleaning the outer part of it.
First, fill the heat exchanger with warm water, adding a household product to remove rust, scale and other contaminants. After a while, rinse everything off the metal with clean water. It will be easier to carry out this procedure on the street using a high-pressure car wash. If you don't have one at home, you can ask any car wash to clean the part, but you should make sure that the thin plates are not crushed by a powerful jet of water (about
Removing the heat exchanger from the boiler
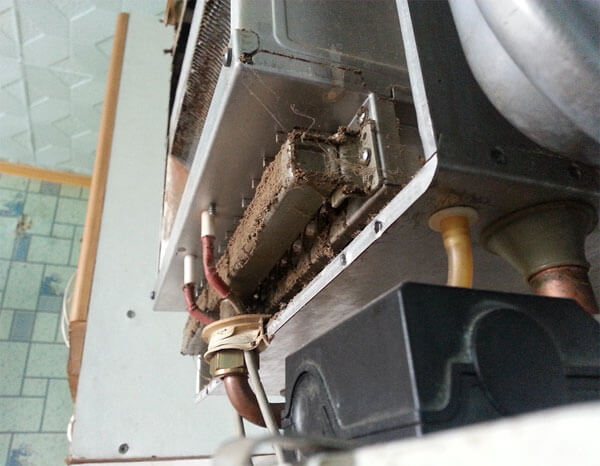
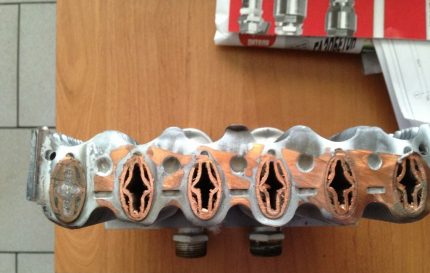
Gas boilers are equipped with heat exchangers, sometimes they are called boiler radiators, in which some sources transfer thermal energy to others. Most boilers have primary and secondary heat exchangers, while others have combined or bithermal heat exchangers.
All types of exchangers are affected by unfavorable factors. The quality of the metal deteriorates, the permeability of the channels decreases, the water pressure hits the walls. The primary and bithermal are affected by the flame of the main burner.
In bithermic heat exchangers, the water supply channel is located inside the heating line - if it were the other way around, the heat exchangers would more often fail
Worn-out exchangers may have holes. Given the cost of this part, it makes sense to repair them rather than replace them immediately. Moreover, it is not always possible to find an analogue.
If the heat exchanger is leaking in a gas boiler, you will notice leaks next to household appliances or an error on the display. Remove the problematic part, if necessary.
First, do this:
- Disconnect the boiler from electricity and gas.
- Shut off the flow of heating medium into and out of the heating system. Turn on the tap to supply tap water to the boiler.
- Drain the remaining water in the device.
- Remove the boiler lid.
- Bleed air through the vent.
- Check the inside of the appliance. See if there is moisture somewhere and wipe it off.
To access the primary or bithermal heat exchanger, free the combustion chamber from the elements that fit it. Remove the pipe that supplies gas to the burner. Disconnect the electrical wires from the combustion chamber. If you forget this nuance, then due to carelessness you can damage them.
Disconnect the sensors, pipes of the heating circuit, remove the pipes of both circuits from the bithermal exchanger. Remove the components that prevent the device from being pulled out of the boiler.
Disconnect and pull out the combustion chamber. Remove the top and front covers. Remove the hardware under the heat exchanger and pull it out.
Due to water leakage from the heat exchanger, deposits form and the condition of the boiler elements deteriorates, sensors may fail, after which the furnace will not start
To get the secondary heat exchanger, remove the board and other electronic elements, unscrew and remove anything that would prevent the unit from being pulled out of the boiler. Isolate the contents of the device from the ingress of water from the exchanger and from the channels that fit to it.
But a malfunction of the heat exchanger is not the only reason why the boiler can leak. We described in detail in this article about other possible causes of a leak and how to eliminate them.
How to clean the heat exchanger?
The heat exchanger is cleaned at the end of the heating season. To carry out the work, it is enough to have a standard set of tools available. Before starting work, it is necessary to disconnect the boiler unit from the gas network (main or local) and electricity.
Consider how to clean a floor standing gas boiler
:
- the first step is to dismantle the burner device;
- all wires must be disconnected from the gas valve;
- a thermocouple is removed from the combustion chamber, which is connected to the gas valve by a capillary tube;
- the fuel supply pipe is disconnected;
- bolts or nuts (4 pcs) fixing the plate with the burner are unscrewed, the assembly is removed outside.
It is convenient to clean the gas boiler burner with an old toothbrush. Soot must also be removed from the flame control sensor, igniter, piezoelectric device for automatic ignition.
To get to the boiler heat exchanger, remove the top cover of the unit, disconnect the draft sensor and chimney, remove the insulation, dismantle the casing fasteners and the casing itself. Having gained access to the heat exchanger, it is necessary to remove the turbulators from it.
A soft metal brush is suitable for cleaning the turbulators, and the heat exchanger itself is freed from soot deposits with a miniature scraper made of thin metal. A long-handled brush is also used. First of all, the smoke tubes are cleaned and swept, then the soot that has crumbled on the bottom should be removed.
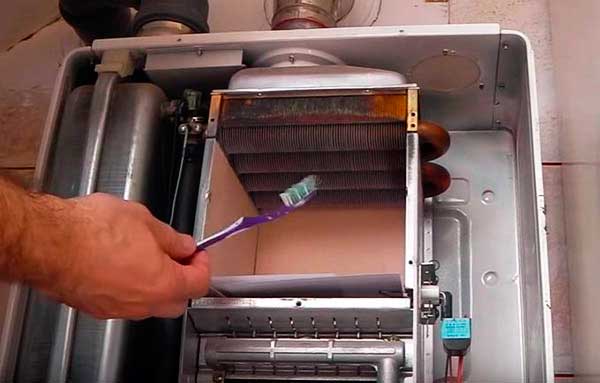
The wall-mounted boiler is cleaned with a toothbrush
Cleaning the wall-mounted heat generator. After shutting off the gas supply, it is necessary to dismantle the front panel of the boiler. Then the front cover is unscrewed, which closes the combustion chamber. It is recommended to cover the nozzles with a piece of heavy paper to prevent the burner from clogging up with falling soot. Do-it-yourself cleaning of the heat exchanger of a double-circuit boiler is carried out using an old toothbrush or a brush with metal bristles. After cleaning is complete, brush around the heat exchanger and carefully remove the paper with the collected soot. How the procedure is performed, see the video below.
Flushing of a single-circuit and double-circuit gas boiler
Flushing the heat exchanger of a gas boiler is necessary to remove internal deposits that can disrupt the normal circulation of the coolant in the heating system and cause problems with the supply of hot water to the local DHW system. Also, the sediments may contain substances that destroy the metal.
How often this activity is required to be performed depends on the type of coolant. If purified water circulates in the system, it is enough to do prophylaxis every four years, removing deposits. The system with antifreeze should be flushed every two years and the coolant should be changed regularly - under the influence of high temperatures, it changes its properties over time and can become dangerous for the metal elements of the system.