CROSS OVEN, version N3 improved
HOME IDEAS> PROJECTS OF STOVES, FIREPLACES, MANGALS
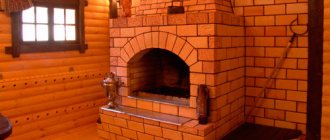
This heating and cooking
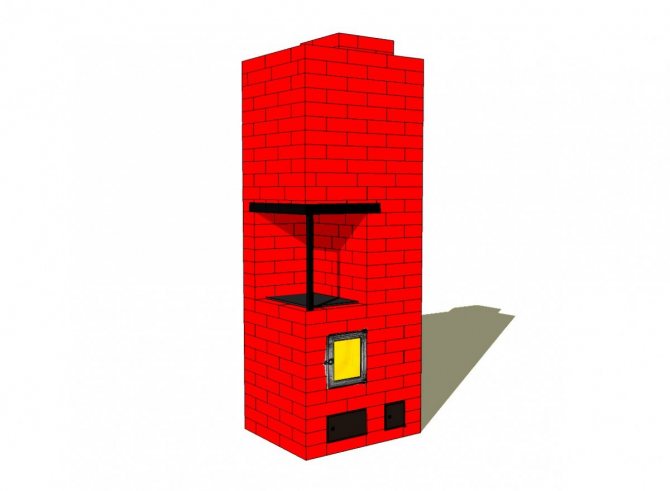
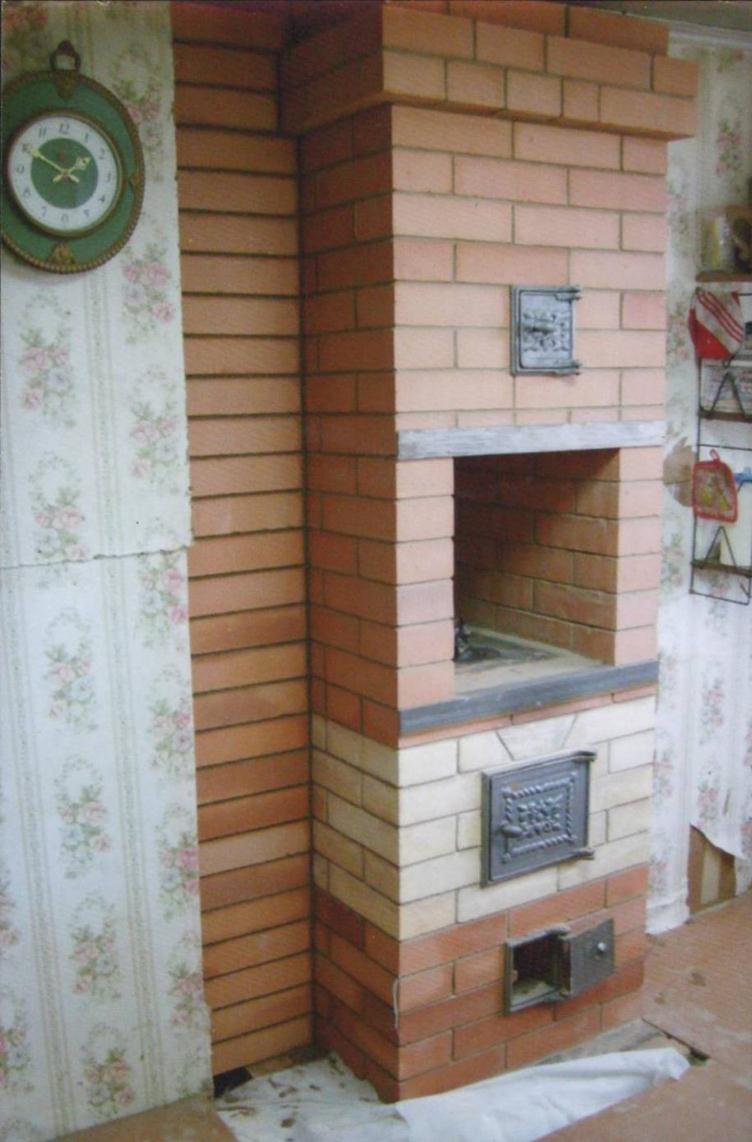
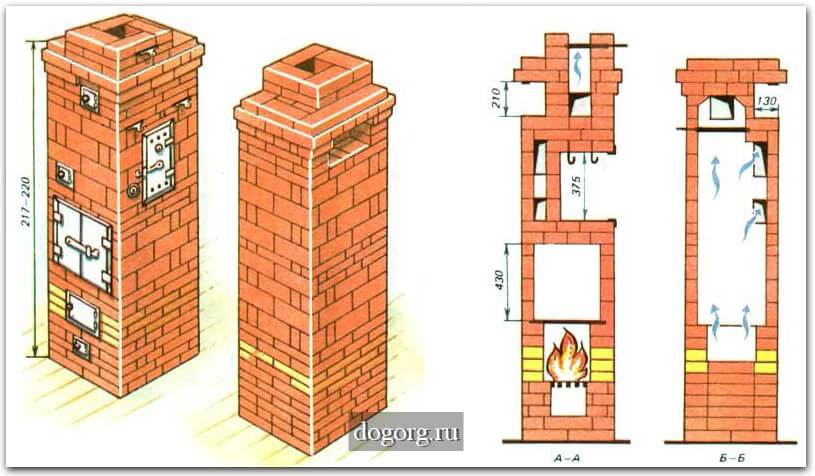
Ptiny bitch, option 3 (improved).
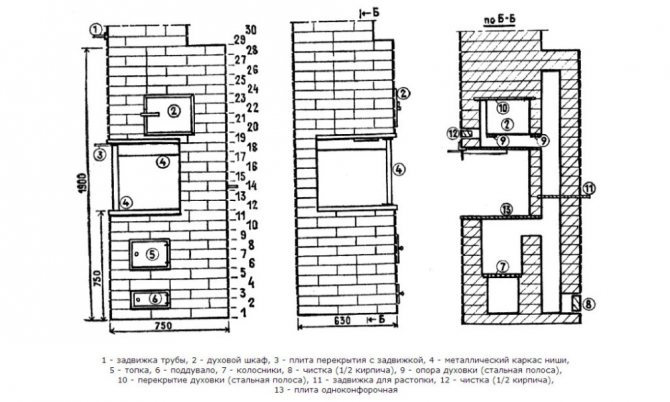
was published in the magazine "Dom" # 10 for 2008. The author of the article is A. Sushkov from St. Petersburg. The furnace has a good heating of the lower part, and in the upper part there is a “bell”, which slows down the cooling of the furnace mass after the furnace has been carried out. Among other things, the design provides for a "summer" course, which facilitates the kindling of the stove, and allows you to use the stove for cooking without heating the room. The stove is equipped with a single-burner cast iron stove. The firebox and cooking chamber in this variant of the stove are located on the wide side of the stove. The depth of the firebox is 50 cm. During the construction of the stove, the best brick available should be selected for the firebox, since there is no additional lining here. This is understandable, because this stove will not be heated every day, but only from time to time, when you visit the cottage and in appropriate weather. The stove has dimensions at the base of 64x77 cm or 2.5x3 bricks, and its height is only 203 cm. the height can be either reduced or increased, depending on how much the ceiling in your home allows. At the same time, one should not forget that at least 35 cm should remain from the top of the stove to the ceiling. With the indicated dimensions, the heat transfer will be approximately 1760 W with a one-time firebox, and 2940 W with a two-time one. The size of the heated room at this capacity will be 18-22 m2.
MENU
×
- PROJECTS: FIREPLACES, STOVES, MANGALS, BBQ
- Brick oven for a bath
- Simple stove sauna heater
- Kamenka stove with water boiler
- Do-it-yourself barbecue in the gazebo
- BBQ complex for summer cottages part 1
- BBQ complex for summer cottages part 2
- BBQ complex for summer cottages part 3
- We make a brazier with a stove
- How to calculate the heat loss of a room
- How to calculate the heat dissipation of a stove
- Chimney schemes
- Mini fireplace for a country house
- Corner fireplace "Annushka"
- Double bell oven
- Two-bell oven with oven
- Heating and cooking stove 2.5 x 6 bricks
- Heating and cooking stove 1020 x 770
- Heating and cooking stove for 65 70 m2
- Stove with water heating boiler
- Oven with drying chamber
- Heating and cooking stove "Shvedka"
- Stove "Shvedka" on 2 floors
- Stove "Shvedka" with a stove bench
- Stove "Shvedka" with three combustion modes
- Stove "Shvedka" with fireplace
- Oven crumbs options 1 and 2
- Oven crumb option 3
- Small-sized heating stove 2х3
- Heating stove 1880х640 "Ya.G. Porfiriev "
- Heating stove 51x89 cm "V. Bykov "
- Heating stove 51 x 140 cm "V. Bykov "
- Heat-consuming furnace
- Compact stove with fireplace
- Small stove with fireplace
- Stove with fireplace "E. Doctorov "
- Fireplace stove for summer cottages
- Homemade long burning stove
LIKED THE OVEN PROJECT?
YOU CAN BUY ITS DRAWING IN WORD and PDF FORMAT FOR ONLY
75 RUBLES
!OR
ALL 35
PROJECTS OF STOVES, FIREPLACES, MANGALS AND BBQ, DRAWINGS + ORDERAL LAYOUT FOR JUST
490 RUBLES
!
BUY FULL SET - 490 RUBLES (click - buy, then place an order)
BUY THIS PROJECT FOR 75 RUBLES (click - buy, then place an order)
Still have questions? Ask them boldly, we will decide!
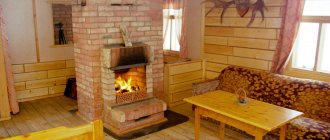
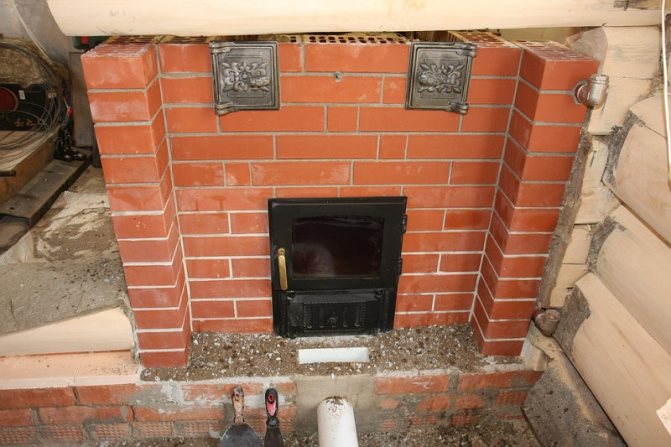
Option for novice stove makers: a stove with a cast iron firebox
A brick mini-oven can be built with your own hands on the basis of a finished cast-iron firebox. Cast iron fireboxes are durable - they do not crack or burn out. This option is more suitable for beginners, since all the main elements are already provided for in the design.The combined oven heats up quickly and cools down for a long time, due to which the efficiency of the hearth is significantly increased. If you wish, you can choose a fireplace-type hearth with a fire-resistant glass door - such a model will not only warm, but also decorate the room.
Before starting work, prepare a solid and even base. To do this, you can fill in a small concrete podium. The lining of the cast-iron firebox is made in half a brick, leaving an air cushion with a thickness of 1 to 10 cm between the walls and the cladding.In addition, it is necessary to provide small ventilation holes in the lower part of the building - they will provide the outlet of heated air and improve heat transfer.
You can start building a mini-oven with your own hands only with firm confidence in your knowledge and skills. Any doubts are a good reason to postpone independent work and entrust the construction to a professional stove-maker.
teploguru.ru
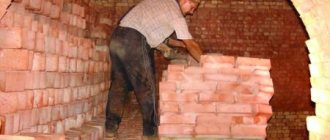
How to build yourself
Do-it-yourself baby oven is built in stages. First you need to determine the location of the furnace and start forming the foundation. To do this, a litter is spread at the selected place, polyethylene or another oilcloth base can act as it. It is necessary to pour a centimeter layer of ordinary sand on it. Then you can start laying.
Ordering
1 row. Put 12 pieces of bricks on the prepared sand, no bonding is required. The bricks are covered with a layer of mortar, immediately fix the door for blowing in asbestos.
2 row. It is laid out on top of the first layer.
3 row. Fireclay bricks are used. A grill is placed on top, it should subsequently be located above the blower.
4 row. The laying is done with an edge, and a partition is left in the chimney. When laying the back wall, you do not need to use mortar, the bricks should protrude slightly to the outside. You can start installing the firebox door, previously wrapped in several layers of asbestos. It is necessary to wrap it taking into account that the door should open freely.
5 row. This row must be laid flat along the contour of the previous one.
6 row. Edge laying. The chimney must be wiped with a damp cloth.
7 row. Like the 5th row, it fits flat, you need to start with a three-quarter.
8 row. Two bricks are placed on top to close the door. For this row, you will need a beveled brick, it will serve as a kind of canopy.
9 row. Should be offset to support the open state of the door. Moistened asbestos must be pre-laid.
10 row. The formation of the chimney begins with it. It builds up expanding backwards. Taking into account the design of the crumbs furnace, it must be remembered that the installation of a brick overhead pipe is impossible due to the shifted center of gravity of the entire furnace.
11 row. We proceed to the installation of the valve, sealed with asbestos, greased with clay.
The next step is to remove the kick bricks and clean the bottom of the chimney from debris.
The baby's oven with his own hands is almost ready to whitewash. To prevent the oven from turning yellow later, it is necessary to add blue and milk to the mixture.
Without a well-organized heating, comfortable living in a private house is out of the question. However, it is often necessary to arrange heating in other secondary rooms. In such situations, compact heating and cooking stoves of the "Baby" type will be an excellent solution.
A similar unit will be able to heat a small country house, workshop and other premises with an area of up to 25-35 m2. The baby oven is being built in the shortest possible time from available materials. After reading the further recommendations, you can lay out the furnace unit yourself without any problems.
What materials are needed
To build a brick oven with your own hands for heating a summer cottage or other room, you need to stock up on such a set of materials and tools.
- Kiln red brick - it is durable and easy to cut with a grinder will be used as a base, but not suitable as a front material. You will need 60 pcs.
- Fireclay brick is a refractory brick and is the only type of brick that will be required for masonry in the furnace, as it will be directly exposed to fire. Quantity - 37 pcs.
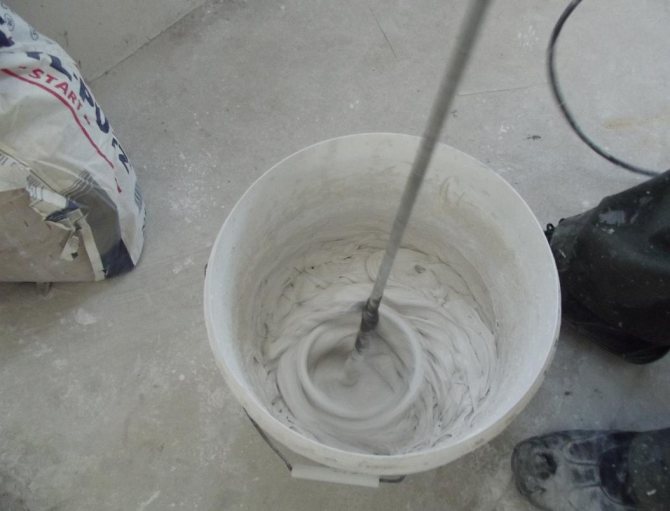
- Clay mortar - will be used to bond the masonry. 20 l.
- Blower door.
- The door for the firebox can be either metal or glass.
- Grate - Will support the solid fuel layer.
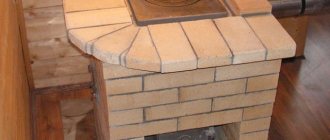
- Cast iron burner stove.
- One metal gate.
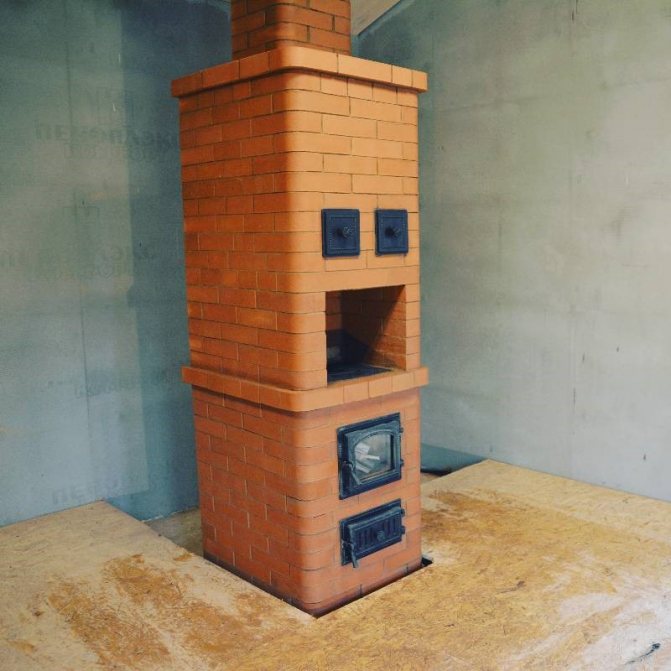
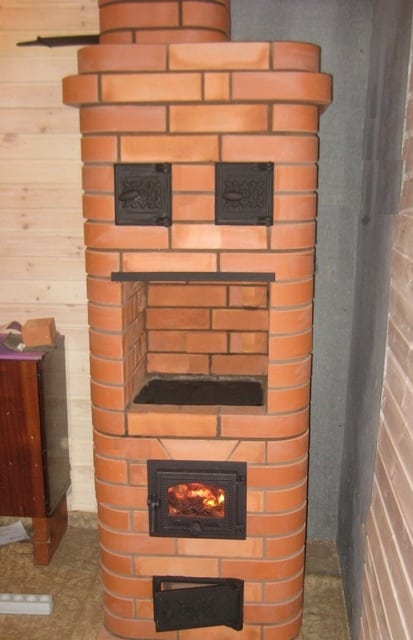
Heating and cooking oven baby
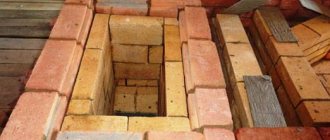
Stove masonry order
First, choose a place for the oven.
Oven laying scheme - babies
In the place where the oven is supposed to be located, a plastic film, roofing material, waterproofing or glassine (780x530mm) is placed. After the litter is laid, a layer of dry sand 1 cm thick is poured onto it and leveled. The first row, consisting of 12 bricks, is laid on this sand without fastening. The row must be leveled to ensure correct horizontal alignment. On top it is necessary to apply a thin layer of clay mortar and put a blower door. The door should be wrapped in wet asbestos cardboard or with a cord. Next, the door is fixed, after which the laying out of the second row begins.
Fireclay brick is used for laying out the third row. A grate must be installed on top of the third row. It should be above the blower after the row has been formed.
To lay out the fourth row, a brick is placed on the edge, a support for the internal partition is placed inside the chimney. The back wall of the furnace is laid without clay mortar so that the brick protrudes slightly outward.
Now you need to start installing the fire door. Before installing it, it is wrapped in several turns of asbestos cord, and it should be possible to open it both from above and from below. The door must be secured with wire and fixed for a while with two bricks (one at the back, the other on it, and the door on top).
The brick of the fifth row is laid flat along the contour of the previous row.
Option for laying a baby oven
The sixth row of bricks must be laid with an edge. Then wipe the chimney with a wet rag.
The seventh is laid flat again, starting with the three-quarter, to ensure a bond with the next row. The back should consist of two bricks, lined with an edge.
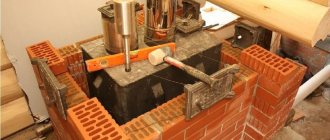
The eighth row closes the furnace door, it is completed by two bricks laid on top. This row is laid out using beveled bricks, which should hang over the firebox. This is necessary in order for the flame to move to the center of the hob burner when using the stove as a fireplace with an open fire door.
The ninth row slides back to keep the door open. Before laying out the brick, you need to put a dampened asbestos cord to ensure the tightness of the joints between the cast-iron hob and the brick. The slab should not be laid directly on clay, since there is a difference in the coefficients of thermal expansion of the materials in contact (clay and cast iron).
On the tenth row, a chimney is formed, it should have a gradual expansion back. Consideration should be given to the design of the furnace, which does not allow the installation of a packed brick tube due to upward expansion. When installing such a pipe, the center of gravity of the entire structure shifts. Therefore, an attachment or a nozzle pipe made of light iron is installed.
On the eleventh row, you need to install a valve sealed with an asbestos cord lubricated with clay.
Layout of brick rows for a baby oven
Now a chimney is placed in the four, which must be joined with a light metal pipe.When the pipe is shifted to the side, an overlap of 3 rows of bricks is made.
The knock-out bricks are taken out and the lower part of the chimney is cleaned from debris and moisture that got in the process of work.
Now you can start whitewashing the oven. Milk and blue are added to the whitewash so that the oven does not turn yellow over time.
Next, a plinth is nailed for edging the bottom of the stove and to avoid sand spilling out from under the stove.
So the baby brick oven is ready. The doors are left open for a couple of weeks to dry.
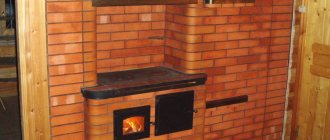
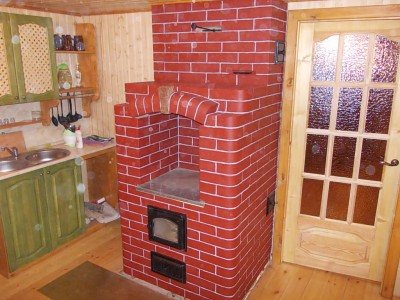
Heating and cooking stove with a shield at the end
The simplest oven, suitable for a summer kitchen, according to the principle of which a number of similar ones can be folded. Oven without blower. There are openings in the door for air access. The gases from the firebox go directly to the nozzle tube-1, which can be made of any height, gradually narrowing it. The stove can be connected to a flue in a brick wall or to a free-standing pipe. The oven can be placed directly on a solid floor. For fire-fighting purposes, it is necessary to install through holes-trenches-2 from below, from which warm air emitted from the bottom of the furnace will come out. The slab is pushed into the brick.
red brick - 240 pieces,
furnace door with holes 21 × 25 cm - one,
cast iron plate 41 × 71 cm - one,
gate valve 12 × 21 cm or 13 × 13 cm - one.
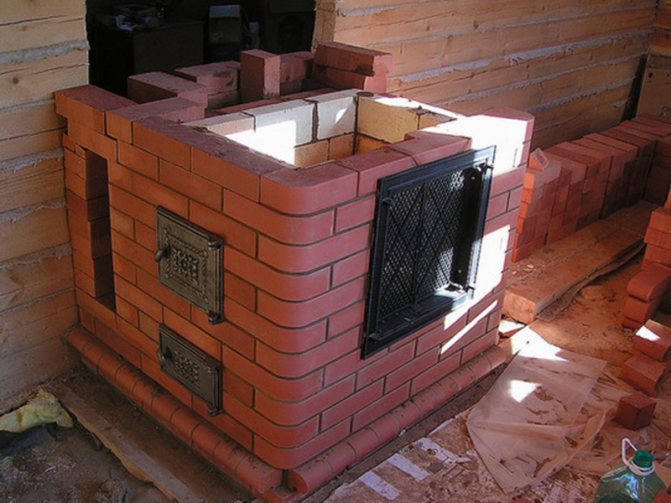
Construction of a brick country oven
Layout drawings for masonry with explanations.
We need a clay-sand mortar, a building brick (double silicate brick M 150 will not work, you need a clay brick), a trowel, a bucket, a mixing trough, a plumb line, a level, an asbestos cord, fireclay bricks, doors, latches and other stove accessories, steel galvanized wire, hammer with a pickaxe, grinder with a disc for concrete.
The stove will take up 0.4 m², while its weight will be insignificant, so you can do without a foundation. If you have a weak floor, then it is better to make a screed under the masonry.
So, laying a small country stove in steps:
- On the place chosen for the stove, we put roofing material or glassine with a size of 530 × 780 mm for waterproofing;
- Pour one centimeter thick sand on top and level it;
- According to scheme No. 1 (picture at the beginning of the paragraph) we lay out the first row of bricks, without fastening, and level it with a level;
We line the first row.
- Apply a thin layer of clay mortar. We take the blower door, wrap it with a double layer of asbestos cord and fix it with twisted wire.
- We spread the second row of bricks.
Second row with a door.
We take fireclay bricks and lay out the third row. After its formation, we install the grate. We observe the gaps for thermal expansion of materials up to 1 cm.
From fireclay bricks we lay out a row with a place under the lattice.
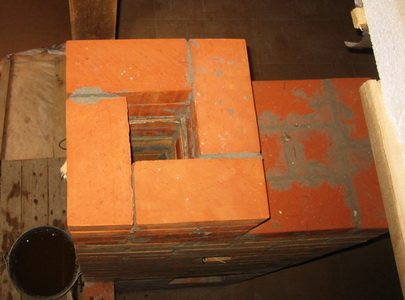
- With a brick installed on the edge, lay out the fourth row. Inside the chimney, we make supports for the internal partition. We put the "knock-out bricks" of the back wall without clay with a slight protrusion outward.
- We install a furnace door, pre-wrapped with asbestos. We fix it with twisted wire and temporarily fix it with two bricks: we put one on the back of the priest, the other on it and the door on top.
We install the furnace door.
We spread the fifth row flat along the contour of the fourth, and the sixth on the edge. We wipe the chimney walls with a wet rag.
We fasten the door with wire.
We put the seventh row flat from the three-quarters (we cut off 3/4 of the whole brick with a grinder) for a bundle with the eighth row. The back wall is back to the edge.
We cut the bricks with a grinder.
In the eighth row we close the furnace door with two bricks above it. We install a beveled brick above the firebox to center the flame under the burner.
We cover the furnace door.
- We put the ninth row with a backward shift (small) to keep the door open. Before laying, lay out a wet asbestos cord to seal the joints between the brick and the hob.
- With the tenth row, we begin the formation of a chimney, which will gradually expand backward. We will make the pipe attached so as not to shift the center of gravity of the structure, or a mounted one made of light iron.
We start forming the pipe.
In the eleventh row, we lay the valve, seal it with an asbestos cord coated with clay.
There will be a catch here.
Next comes the chimney into a quadrangle, which is joined with a light metal pipe.
We continue the chimney to the docking point.
Now we take out the knockout bricks and clean the lower part of the chimney from debris.
We take out the chimney under the pipe.
- We close the gap between the first row of bricks and the floor of the metal L-shaped sleeve and nail the plinth.
- We whitewash the stove or cover it with stove varnish, seal all joints between metal and brick. Metal parts can be painted with black fireproof paint.
We whitewash and decorate the stove.
We make a test furnace with paper and small branches, then give it 2 weeks to dry.
As you can see, all the manipulations are not so difficult to do on your own. Material and labor costs are relatively small, the construction does not take up so much space.
At the same time, we received a heating and cooking device that will perfectly heat a small country house, give your cooking a unique taste and aroma of smoke, create a pleasant atmosphere and comfort.
Advice! If there is an opportunity to invite a person who is more or less experienced in the furnace business, at least as a consultant, be sure to use it, since it is quite difficult to build stoves from a book, it is better to see it once.
Brick stoves are considered bulky, expensive, and difficult to build. However, it is easy to make sure with specific examples that these opinions are somewhat exaggerated, and you can build an inexpensive compact country stove made of bricks, and on your own.
In the video presented in this article, you will find additional information on this topic.
Heating and cooking stove with a shield
Furnace for coal. For heating with wood, the masonry is made of red brick, in this case the door is lowered one row lower, and two rows of masonry are placed above it. If the oven does not warm up well from below, then you need to lay a hole in the ninth row behind the cabinet with a piece of iron.
You can install one latch, but then you need to close all the doors after heating the stove.
A plate and a corner are placed on the tenth row. If there is no corner, then the slab is inserted into the brick.
For better heating of the partition, it is more convenient to install it flush with the shield-1, or the shield should protrude 25 cm.
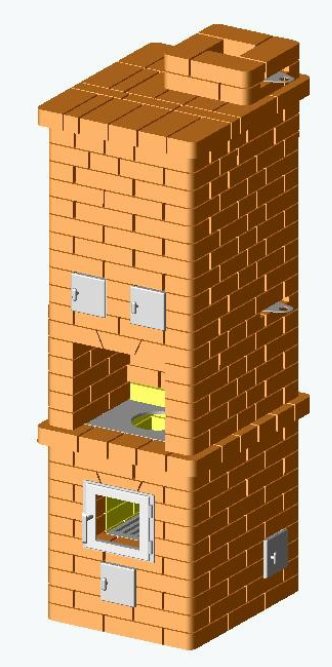
Furnace design Malyutka
Inside there is a cooking chamber and two drying compartments, one above the other. One of them, the lower one, is on the right just above the slab overlap. This chamber is closed, it is used for vertical drying of stringed mushrooms or fruits. Therefore, during the construction of Potapov's heating furnace, hooks made of thick wire are inserted into the ceilings on the sides of the lower chamber, on which it is convenient to hang food for drying. Another design option for the drying chamber is to make shelves for trays.
The temperature in the drying chamber can be kept at the same level for a long time. To monitor temperature fluctuations, a special thermometer with heat-resistant glass can be placed on the door. The drying chamber door is attached to a metal frame. If desired, the hinged door can be replaced with an L-shaped flap.
The upper drying chamber is assumed without a door, although a damper is installed on it if necessary. This should be thought out in advance and a metal plate should be inserted to secure the shutter between the side bricks. It is not recommended to cover the walls of the drying chambers with plaster - it is enough to cover the seams. You can make the Potapov furnace higher if you lay 2 additional rows of bricks after the 18th and 19th rows.
The design of the Malyutka stove is simple enough that it can be folded up independently at home. Initial construction skills will be needed for this, but usually, even for novice craftsmen, this small-sized oven is obtained the first time and without flaws. "Baby" is adapted for any solid fuel, but if you intend to heat with coal, peat or dung, be prepared for annual cleaning of the gas ducts clogged with soot. Such a stove can only be heated in winter.
It is quite simple to repair the structure, because there are no horizontal channels in it, and there is a cleaning door in the vertical channel.

Additional requirements for the selection of the furnace
Since we suggest doing everything yourself, and not buying a ready-made stove in a store, when choosing the required design, we recommend paying attention to the following parameters:
- Ease of operation... The heating process should be a pleasant and uncomplicated activity that every family member can handle.
- Profitability... This point is especially important if it is planned to use only this stove to heat the house on an ongoing basis (in winter). In this case, one unit of fuel will provide maximum heat transfer.
- Simplicity of design... If a person who has no experience in masonry takes up the construction of a complex model of the device, then difficulties may arise that will subsequently lead to incorrect operation of the furnace.
- Appearance... The design of the structure should be pleasing to the eye and create coziness in the room, so it is worth paying special attention to the quality of the brick.
- Presence of a water circuit... It is known that even a small heating stove with a built-in heat exchanger for heating the coolant is much more efficient than other models without this device.
When choosing a heating stove, you should consult with a qualified stove-operator. He will tell you which configuration to choose and what to pay special attention to.
Heating equipment formation
First of all, it is necessary to decide on the place where the Malyutka stove will be installed, as well as to prepare an accurate diagram with dimensions and order. The general principles of the stoves are also suitable for the baby hearth. Installation is carried out at a safe distance from the walls (about 25 cm), the stove should not stand in a draft, and the chimney should not touch the ceiling beams. The safety principles must be fully respected - walls, ceiling and floor are insulated with fire-resistant materials.
For the construction we need:
- red oven brick (corpulent);
- fireclay brick (for the firebox);
- clay or cement mortar M300;
- reinforcing rod;
- blower door;
- grate;
- furnace door (if you choose a glass door, then the baby can function as a fireplace);
- cast iron hob;
- gate valve.
Of the tools you need:
- trowel (leveling mortar, cutting seams);
- hammer and pickaxe (for bricks);
- level;
- Master OK;
- plumb line (weight with a cord) to check angles;
- a rule (a wooden ruler with a cross section of 1.5 x 6 cm and a length of 1-1.5 m, having parallel planes) for the evenness of the masonry;
- roulette.
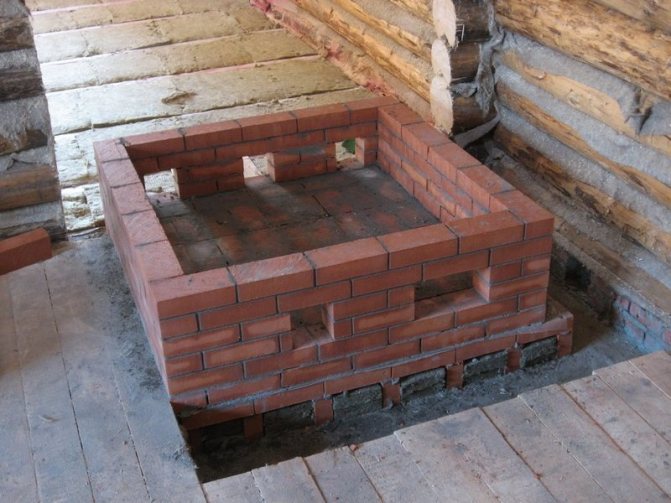
Foundation

For a solid multifunctional stove, a foundation will be required; rubble concrete will be more economical. The pit must be at least 80x65 cm, formwork from boards is installed in it, covered with plywood or roofing material and poured with concrete. Next, a brick fight and a rubble stone are laid out, everything is poured with cement (ratio 1 to 3). The last step is to cover with insulation in several layers of roofing material.
It is recommended to use M300 concrete as a filling, it is strong and durable. Its solidification time is about 25 days.
If a brick oven is planned to be light, without a constant intensive firebox, then the first row of bricks should be laid on a layer of insulation:
- polyethylene film;
- roofing material;
- hydroisil, glassine;
- dry sand 1cm.

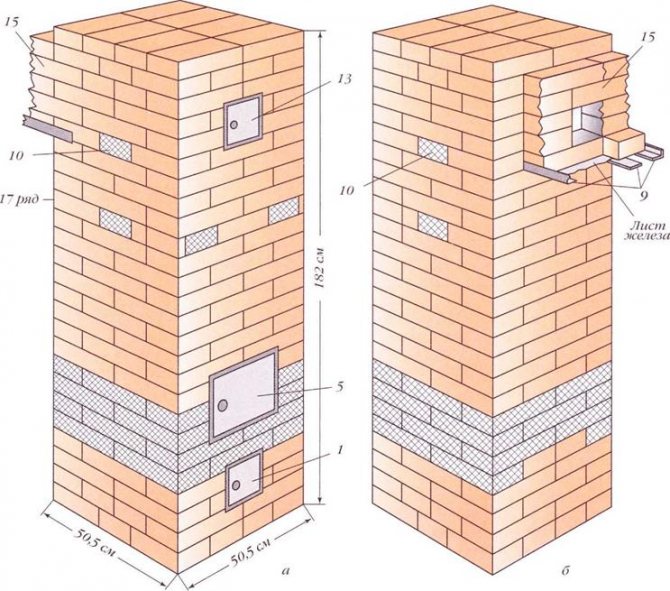
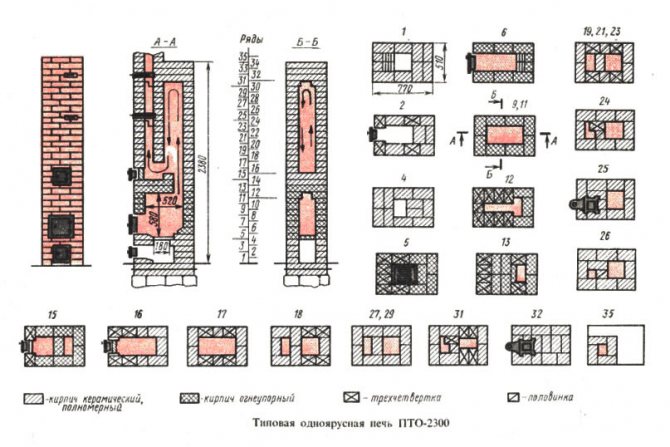
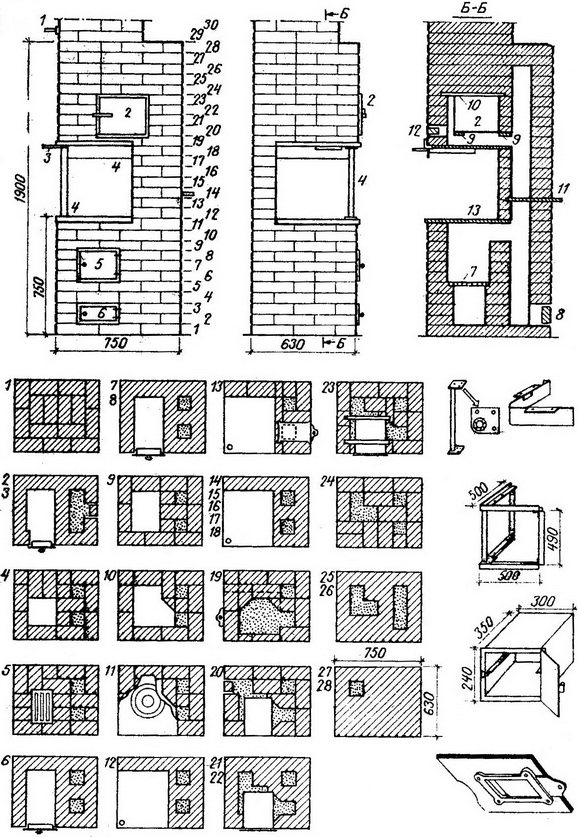
Furnace ordering
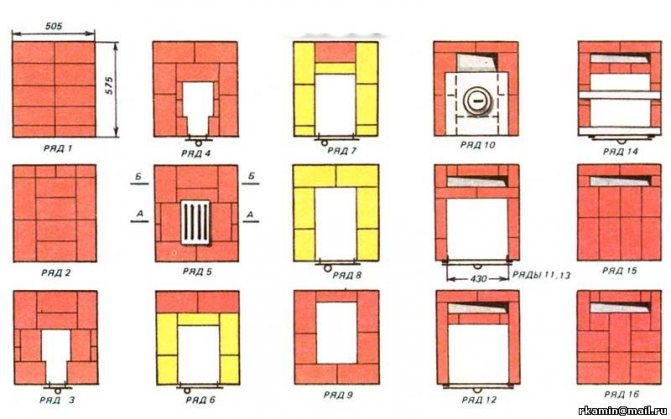
The first and second rows are alignment, each row is checked with a level.
The third - a blower is laid out on the front part, its dimensions are half the size of the firebox.
Fourth - installation of a steel window in the blower, from above it is covered by a grate.
Fifth - fixing the grate, circular masonry.
The sixth is the beginning of laying out the firebox. The window is slightly narrowed for convenience.
Seventh - installation of the firebox door. The firebox must hold tightly in the masonry; for this, the fasteners are wrapped with an asbestos cord.
Eighth - a strip of sheet steel is installed on top of the firebox.
From the ninth to the eleventh - circular masonry.
Twelfth, thirteenth - the formation of the back wall, it fits on the dock, and two small grooves are formed.
Fourteenth - the grooves are increased by half a brick, the rest of the space is laid out with bricks.
Fifteenth - a place for a canal, an oblong canal is left near the back and side walls. In the main masonry, a compartment is made with a supporting brick in the center (under the column).
Sixteenth - strips of steel are laid on the column, they also form a channel.
Seventeenth - the channels are divided and form four channels under the walls and one in the center.
From the eighteenth to the twenty-second - the continuation of the channels.
Twenty-third and twenty-fourth - channels, except for the central one, are connected and form an L-shaped.
Twenty-fifth - the channels, except for the central one, are covered with bricks.
From twenty-sixth to twenty-eighth - the dimensions of the masonry are narrowed to the size of the pipe (chimney).
Twenty-ninth - damper installation.
From the thirtieth - the formation of a chimney and its output to the street.
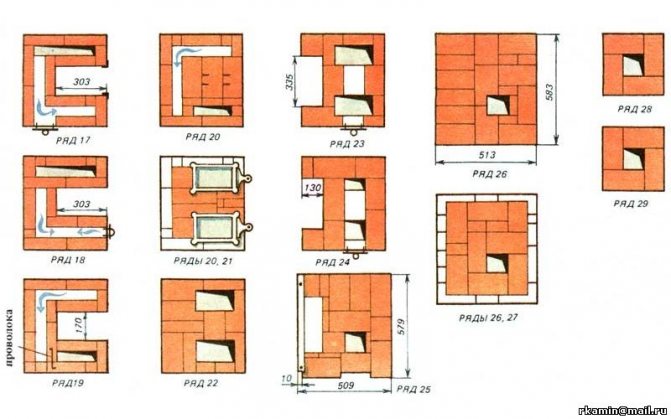
In the process of laying, it is necessary to make bandages one second or one fourth of the brick. Every six rows, the masonry must be wiped with a damp cloth. And in order for the corners to be even, it is better to install plumb lines on the ceiling (temporarily on nails). The brick during laying should be installed flat and on the edge for the stability of the structure.
Heating and cooking stove without doors and furnace hole
The stove is suitable for a summer kitchen; fuel is loaded through a large hole in stove-1, in which the mugs can be replaced with a lid from an old saucepan. You can only heat such a stove with wood. The furnace has a blowing hole without a door-2. For better combustion, there are grate bars made of whole bricks-3 in the firebox, which are installed on the fourth row. The gases from the furnace go through the pass wall-4, go down, heating the furnace walls, and rise up into the riser-pipe. There is a soot cleaning window-5, which is laid with a brick on the edge. A homemade sheet metal-6 valve can be installed where it is convenient for the owners. For the valve at the base of the 27th row, a slot with a depth of 0.3-0.5 cm is pushed out. The height of the slot is made according to the thickness of the iron valve so that there is no more than 0.2 cm of clearance above the valve and the valve moves freely. The slab is laid on the 11th row. The stove is heated to the floor and has a minimum of stove appliances.
How to do it yourself
Preparatory stage of construction
At the stage of preparation, you must have the following tools available:
- welding machine;
- roulette;
- bayonet shovel;
- grinder;
- waterproofing;
- scrap;
- rod;
- water and sand;
- solution.
After determining the place for the building, you need to lay the foundation for it.
The first thing that begins the preparatory stage is to determine the location of the future fireplace
It is important to correctly position the brick stove in order to eliminate energy losses. The walls of the structure are not placed near the outer walls of the room, but it is also not recommended to place the fireplace in the center of the room
Not in all cases the "baby" brick oven is built simultaneously with the building. Sometimes you have to lay the foundation on finished floors.If a "warm floor" system is used in the house, the entire screed must be lifted. After the place for the stove has been prepared, a hole is dug up to a depth of 35 cm, completely covered with waterproofing. Next, the fittings are laid, and the solution is poured.
Step-by-step instructions for carrying out work
Brick is the priority material for laying stoves. A small or large "crumb" oven, although it has simple construction drawings, but a detailed diagram of the sequence of work will come in handy in any case. Step-by-step instruction:
Before the start of ordering, the foundation is waterproofed with roofing material.
- A layer of waterproofing is applied to the foundation. It is recommended to use roofing material.
- The ordering starts from the corners, three rows each.
- The verticality and horizontalness of the plumb line are measured.
- The first row (solid layer) should be perfectly accurate.
- A thin layer of clay is applied to a row of bricks and three rows are placed around the perimeter. At the same time, the door is installed. Everything is done quickly and accurately.
- A steel wire is brought into the attachment area, the ends of which are twisted and wound up in order.
- Visible defects are eliminated using a grinder.
- The grates are being installed.
- The next row includes the use of fireclay refractory bricks and the installation of a firebox door wrapped in an asbestos cord.
- All subsequent rows are laid flat. The ordering is completed with the expectation that there is room for a slight offset back.
- The already installed door is overlaid and the stove is placed. It is recommended to buy the cast-iron version for cooking.
- The last step is to finish the outer walls of the oven. Whitewashing is most often used in such cases. Before starting work, it is recommended to protect all walls in the house from dirt, since it is problematic to remove whitewash stains.
Drawings and diagrams
A sufficient amount of material is available on the network for study. Therefore, a detailed layout of the stove is not a shortage, and variations in masonry allow each user to choose the most suitable layout. First you need to figure out what basic provisions the step-by-step instructions contain, and then make your own adjustments. The improved model is applied directly to work. Do-it-yourself "baby" oven is not a sky-high fantasy, but a very realistic plan. Thanks to the clarity and clarity of the drawings, each summer resident can independently equip a similar structure at home.
Advantages of this type of oven
The baby, which is, in fact, a mini-fireplace, occupies the minimum territory for a heating stove - only 0.4 square meters. meters. It has a simple design, which any beginner can assemble, and instead of a whole system of heating ducts, it has a fuel cap.
Baby ovens have a number of undeniable advantages
A furnace of this type does not require a powerful additional foundation for itself., but can easily heat a room up to 35 sq. meters. To achieve this effect, in the off-season it can be heated only once a day, and in the cold season - 2 times a day.
The Malyutka stove is economical and can use both firewood and anthracite, coal and other types of filling for its work.
In the event that the future Malyutka brick stove is heated exclusively with firewood, red brick can be used in its construction, however, only building and refractory bricks are suitable for the construction of a firebox chamber and a firebox.
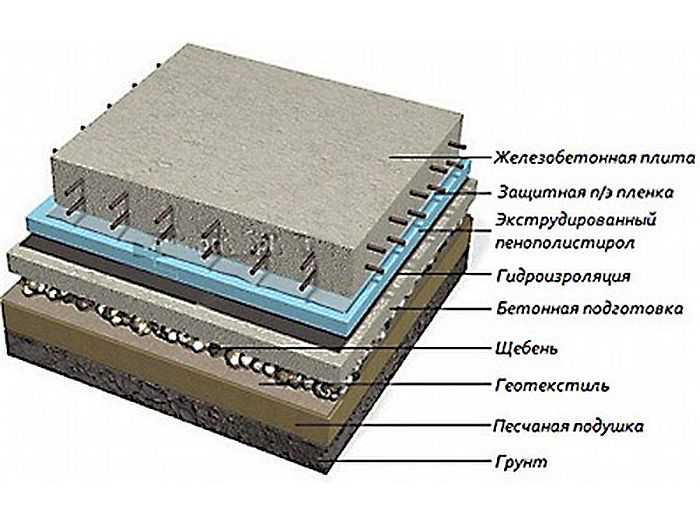
Foundation device
Despite its modest size and low weight, the baby oven requires arrangement of the foundation. You can make it not buried - it is enough to remove the fertile soil layer.
But, be sure to bring the plane of the cement pouring into the "horizontal". This is important because the support area of the oven is very small: from 0.47 to 1 m2. At a height of 2000-2200 mm, the slightest distortion of the base can lead to the collapse of the stove.
The sequence of arrangement is extremely simple:
- A pit is dug, 300 = 450 mm deep. The perimeter of the pit should exceed the perimeter of the furnace by 100-150 mm.
- A layer of sand 100–150 mm thick is poured onto the bottom.
- The sand is moistened and rammed.
- The next layer - broken brick or construction waste (stone) - 200–250 mm.
- The top layer is fine crushed stone (fraction 5–20 mm).
- After that, formwork is arranged (plywood, boards, slate, drywall trim, metal sheets) - whatever is available. The height of the formwork should be 50 mm higher than the level of the clean floor to prevent cold air from sucking in from the underground
- Pre-cut reinforcement bars are laid out on the crushed stone and fastened with annealed steel wire or welding.
- The solution for pouring is prepared from a cement-sand-crushed stone mixture in the proportion: 1: 1.6: 3.2. After pouring, the foundation slab is allowed to "mature". In the first week after pouring, the surface is moistened by covering it with sackcloth or burlap, and sprinkling with water as the fabric dries. At the end of the first week, the fabric can be removed, and the surface of the foundation slab can be covered with polyethylene or roofing material.
The full set of strength occurs 30 days after pouring.
The foundation is the basis for the reliability of the furnace
The foundation pit should be made at least 80 x 65 cm. Formwork is installed in the pit, the bottom is covered with roofing material, after which concrete is poured. For the strength of the foundation, it is better to additionally install a reinforcing mesh before pouring. The foundation should be 30 cm below the floor level. To improve the heating qualities, the foundation is covered with waterproofing, as well as with foil facing the mirror side up. Before continuing with the construction of the baby, the foundation must be given about 25 days to completely dry and get stronger.
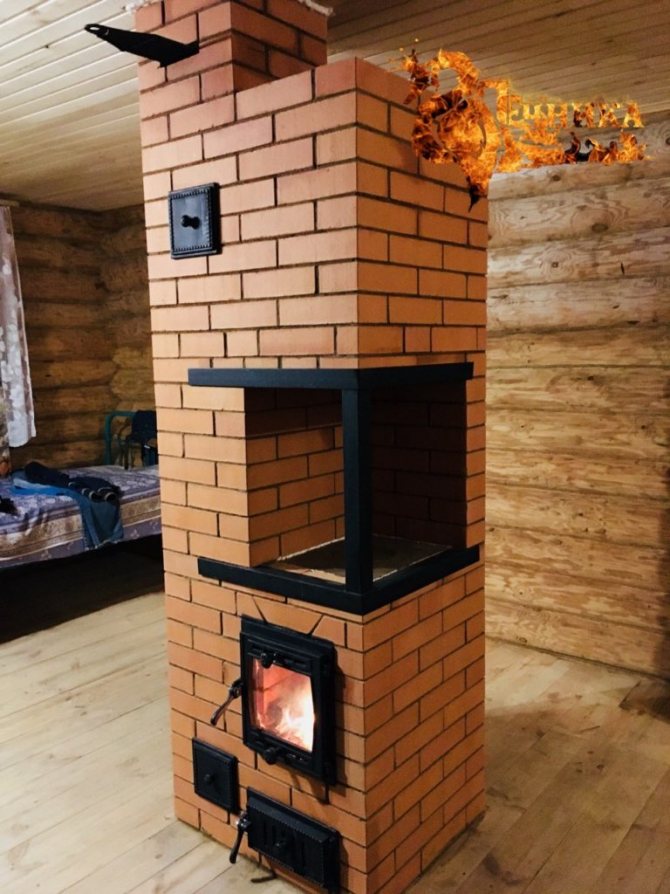
Ordering drawing
The combined heating and cooking stove designed by the famous stove master of the last century V. Volodin, with a minimum occupied space of 0.47 m2, allows not only to fully heat a room of 30 m2, but also:
- Cook ;
- Dry vegetables, berries, mushrooms, herbs;
- Use to dry clothes and shoes.
A distinctive feature of the design is a separate hood for the brewing compartment. The smell of food being cooked or drying clothes does not penetrate the room.
The stove is not very economical in terms of fuel consumption (based on firewood) - 4–5 kg per one firebox. Able to keep warm and maintain a comfortable temperature in the room for 6-8 hours.
The finished oven looks like this:
Where is it more efficient and safer to place a small oven
To heating the stove effectively gave off heat, it is placed in the middle one-room dwelling or built in in interior partitions. Heating and cooking small stoves place in the center of the kitchen or against the wall.
The heating facility will safe, if the groove is correctly arranged in the ceiling. A spark arrester is put on the chimney.
The combustion chamber is a source of increased danger. The oven is positioned so that embers and sparks did not hit the walls, in doorways, on furniture. Walls protect if necessary non-combustible materials (flat slate, ceramic tiles).
ogon.guru