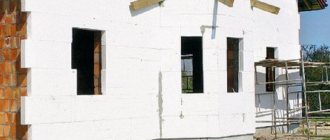
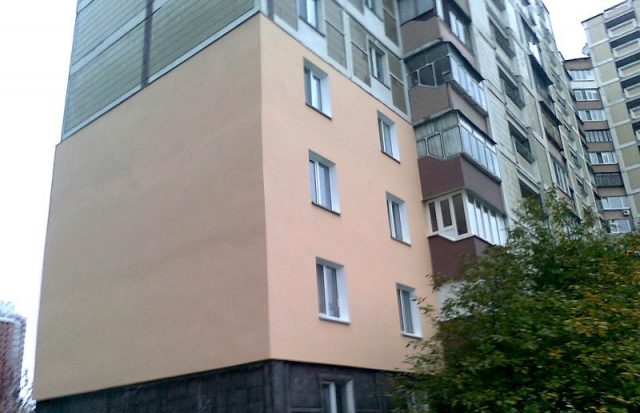
Much depends on how well the house is insulated: the microclimate and air temperature in winter and summer indoors, saving money during the heating season. That is why close attention is paid to wall insulation during the construction and restoration of the building.
Do-it-yourself home insulation with foam plastic
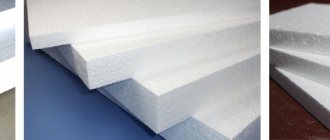
You can insulate the walls inside and outside with different materials: mineral wool, isolon, glass wool, foam. The last option is the most profitable and technically available.
Do-it-yourself home insulation with foam plastic
Why is styrofoam most commonly used?
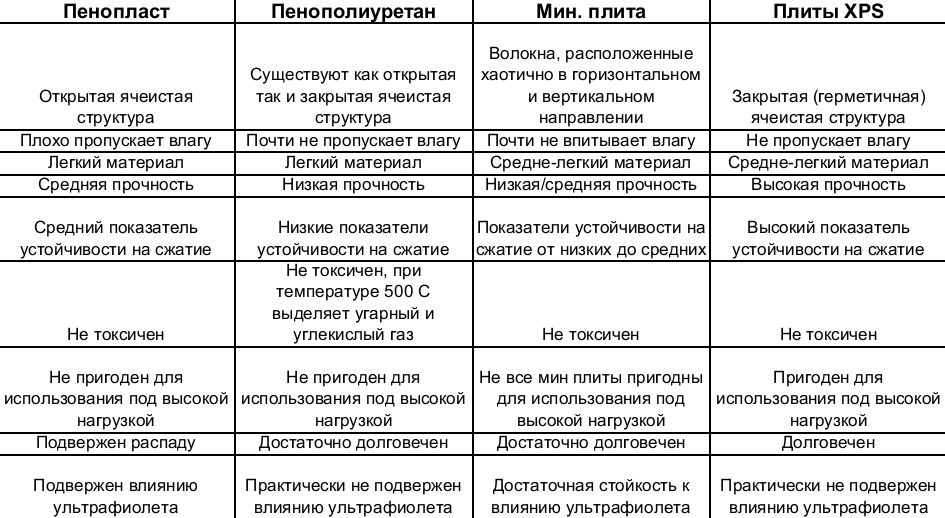
Comparative characteristics of insulation materials
- Material weight. Polyfoam is a very light material, with its help you can insulate various buildings: frame, panel board, brick, block. Lightweight foam does not carry additional stress on walls and foundations.
- Ease and simplicity of installation. When working with foam, special tools are not required, the material does not need additional processing and is easily cut into fragments of any size.
- Resistance to moisture. Styrofoam does not accumulate moisture, does not absorb water when wet. The material will not rot, mold or insect pests will not start in it.
- Air permeability and heat saving properties. Due to its porous structure and the presence of air bubbles in the structure, the foam perfectly retains heat and "breathes". Thanks to the material, a healthy microclimate is maintained in the house, there is no "greenhouse effect".
- Affordable price. Despite its undeniable advantages, foam is an "economy class" material and has a low price.
- Easy to transport. Lightweight material does not require special conditions for loading, transporting and unloading.

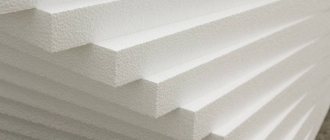
Styrofoam characteristics
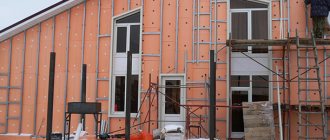
Advantages of external wall insulation with foam plastic
The outside of the house can be insulated in two ways: outside and inside the building. Experts advise to carry out work from the street side, in this case:
- the useful space of the house is preserved;
- there is no need for an additional layer of vapor barrier;
- a multilayer type structure is provided that prevents moisture from entering the room;
- the properties of the house to save heat increase, which saves finances by reducing heating costs.
We recommend to read: Insulation of the balcony from the inside
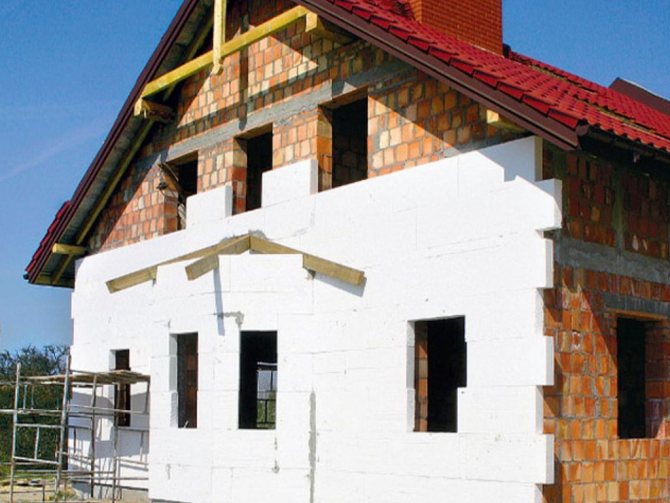
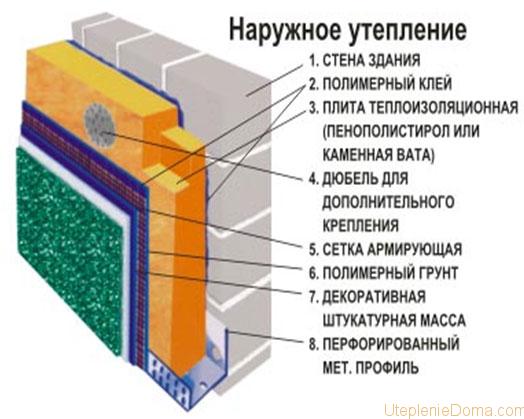
Thermal insulation of the outer walls of the house using polystyrene foam
Since polystyrene is a rather dimensional material in thickness, it is best to insulate the outer walls of the house with it. With internal insulation, the useful area of the room is lost.
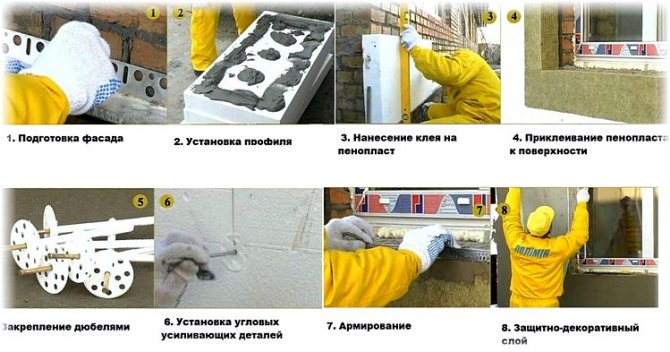
External insulation of the walls of the house can be divided into several stages.
- Acquisition of the necessary material and tools.
- Preparing the walls.
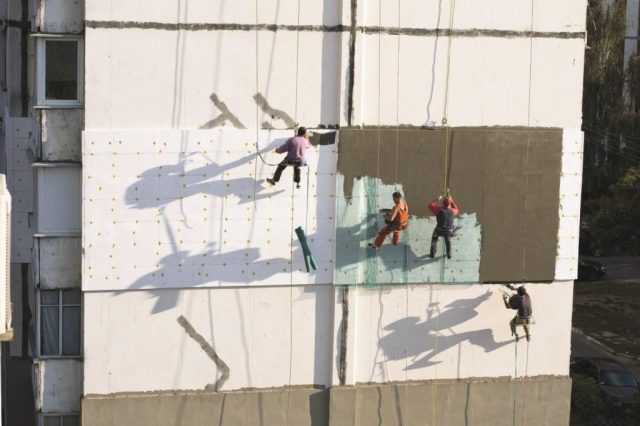
- Erection of scaffolding or scaffolding for the installation of insulation.
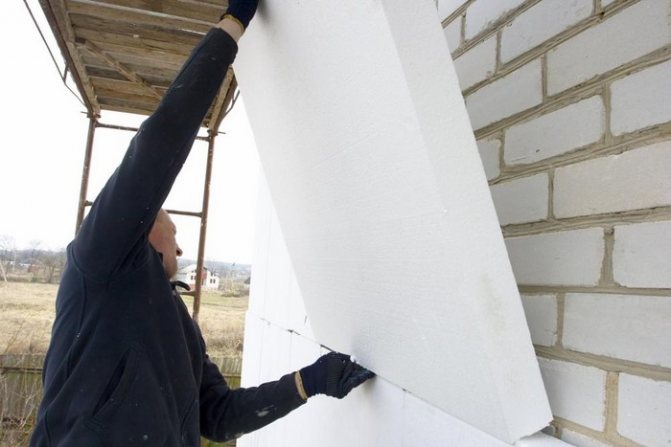
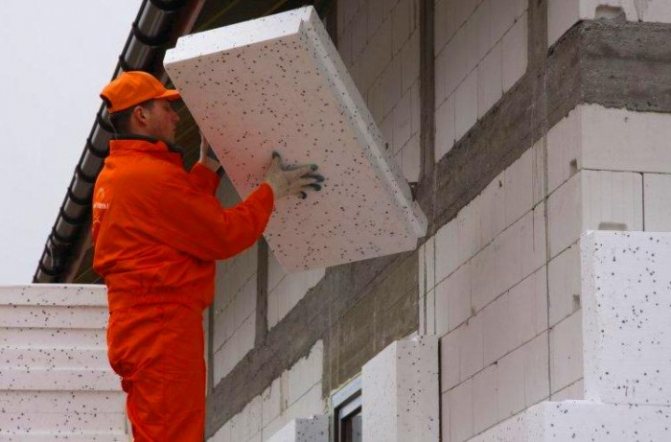
- Installation of polystyrene.
- Finishing the walls of the house.
Thermal insulation of the outer walls of the house using polystyrene foam
Materials and tools
- Marking beacons.
- Chopping cords.
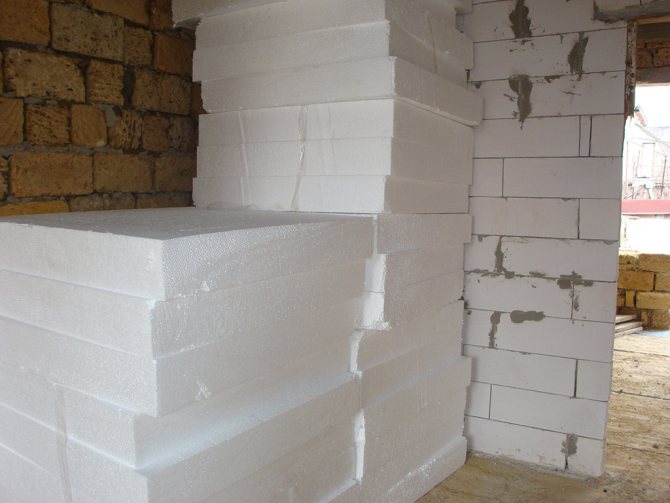
- Styrofoam plates.
- Adhesive for fixing foam.
- Comb for applying glue.
- Dowels with large umbrella hats.
- Reinforcing mesh.
- Adhesive for mesh mounting.
- Primer for wall treatment.
- Foam for sealing wide gaps.
- Sandpaper.
- Rotary hammer with a set of long drills.
- Roller for applying primer.
- Special foam trowel for grouting irregularities.
- Spatula for applying glue.
- Level and tape measure.
- Basic set of locksmith tools.

Useful tips for insulating the facade with foam
In order to properly insulate the facade of the house with foam plastic with your own hands, you should adhere to the recommendations below:
- All work on the facade insulation should be carried out at a positive temperature from +5 to +25 degrees, while the air humidity should not exceed 80%.
- The scaffolding should be installed at a distance of 0.2-0.3 m from the walls of the house.
- Before finishing, the working surfaces of the facade should be protected from the effects of precipitation, wind and sunlight with continuous curtains made of dense fine-mesh material.
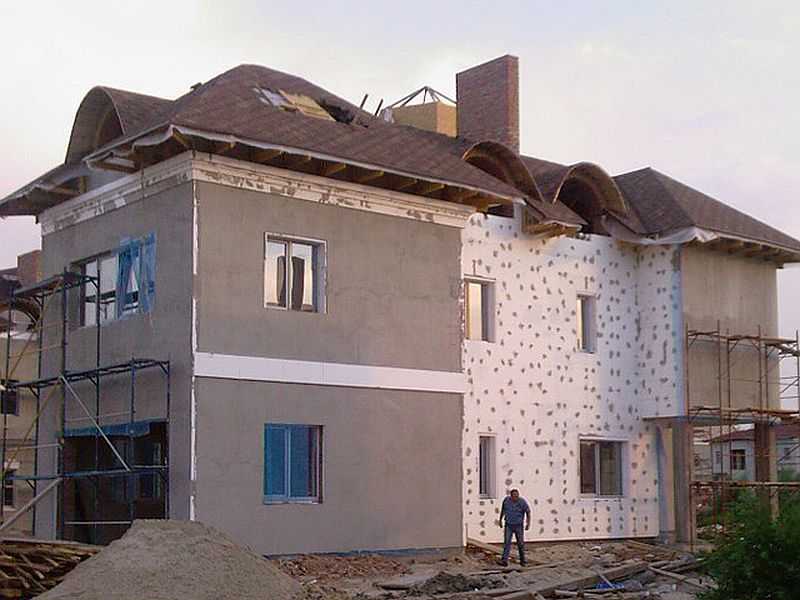
- It is recommended to start insulation of the facade from the most inconspicuous wall. This will make it possible to hide work defects that often arise at its initial stage. In addition, you should not interrupt all work on one wall. As a last resort, all its "wet" processes should be brought to an end.
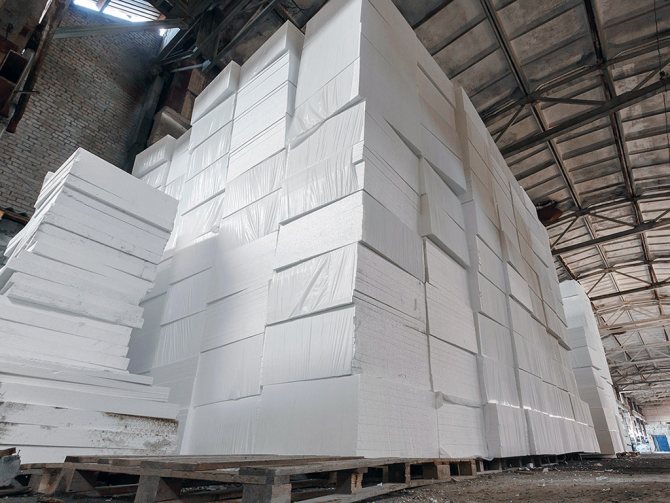
- The purchased insulation should not be stored in the sun; getting the material under rain or snow is also highly undesirable.
- After the exterior finish has dried, it is recommended to protect the façade surface by painting. A paint roller with a telescopic handle is suitable as a working tool for this purpose.
How to insulate a facade with foam - watch the video: Having studied the details of the technology for insulating the facade and having all the necessary materials, you can do this work yourself. At the same time, you can get not only significant savings when paying for heating the house, but also save funds for carrying out insulation with the help of a construction organization, whose services are not cheap.
Preparing the walls of the house for insulation
The walls on which the insulation will be attached must be carefully prepared. All cracks and voids need to be repaired; damaged sections of the wall are best restored. In the presence of large differences - more than 5 cm, it is advisable to level the plane of the wall, otherwise it will be difficult to properly fix the insulating material.
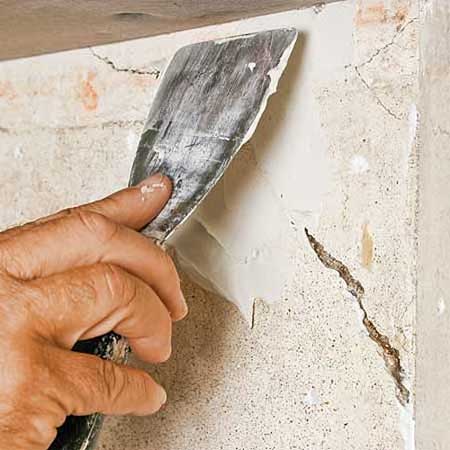
Crack repair
It is not advisable to start work on a rainy day or mount the material on wet walls. If the house is being renovated, it is recommended to install the insulation after replacing windows and doors.
It is recommended to thoroughly prime clean walls before fixing the foam. Deep impregnation liquid can be applied by roller or spray. The primer will protect the wall from corrosion and moisture, improve the adhesion of the adhesive solution to the foam.
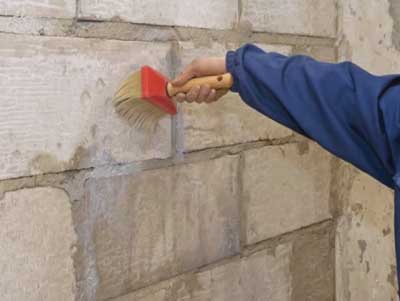
Preparing the walls of the house for insulation
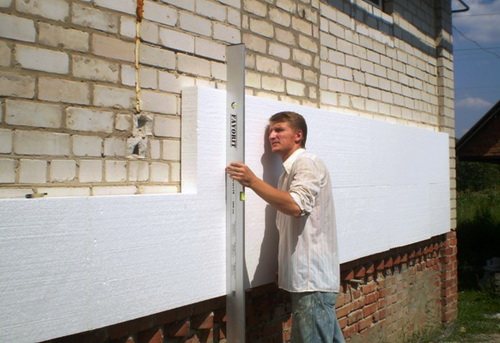
Before attaching the material to the wall, it is advisable to expose beacons. Chopping cords are pulled between the beacons. This will allow the foam to be attached with minimal deviation.
Insulation installation
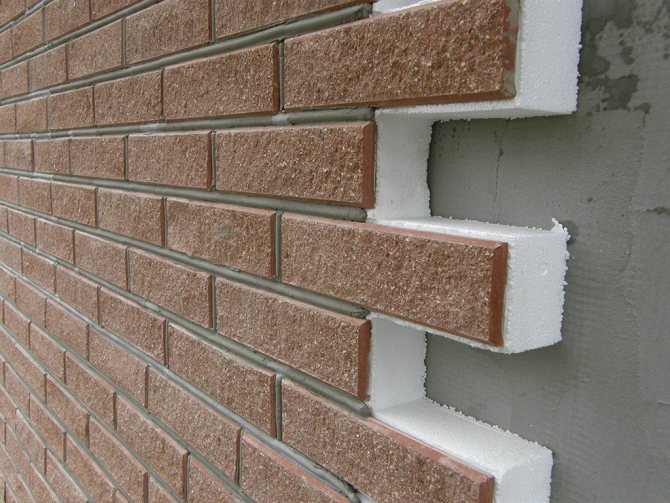
The basic rule of installation is that after insulation outside the walls with foam plastic, a flat plane must be maintained. No cavities are left in the joints. Warming of wooden surfaces is carried out in a similar way to the process of finishing brick walls or aerated concrete blocks. Slate nails are used only as fasteners.
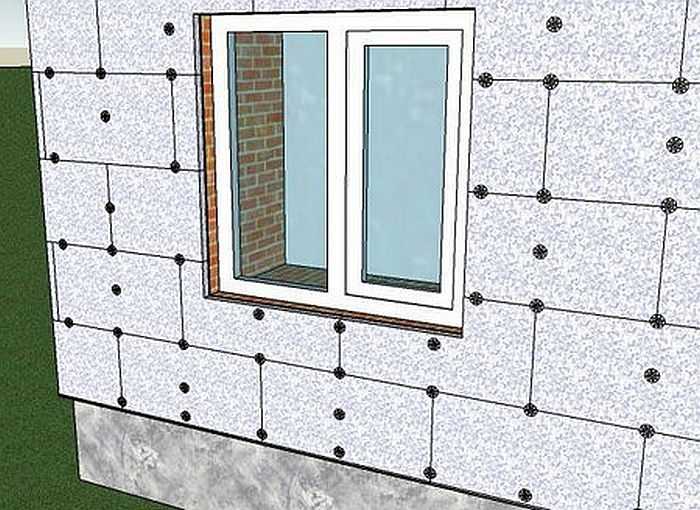
To exclude the appearance of cold bridges when insulating the wall with foam outside the outside of the wall, fastening by the type of classical brickwork will help. The joints of the next level of sheets should fall on the middle of the previous level.
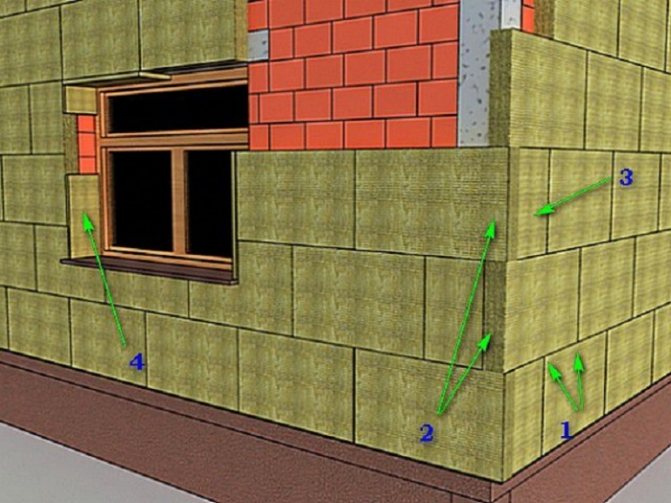
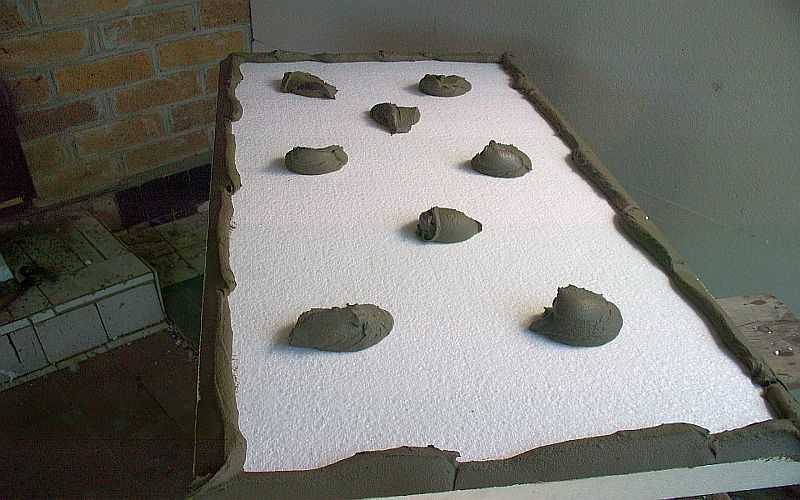
Initially, the gaps on the walls are filled with fibrous insulation, then the main insulation of the facade is started. In addition to applying the adhesive solution, it is recommended to fix the foam sheet at 5 points with plastic parachutes. Four fasteners are distributed in the corners, one in the center.
The main points of attaching foam plastic for wall insulation from the outside:
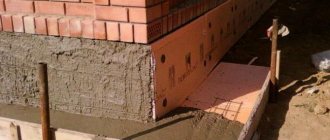
- Insulation of the facade starts from the foundation.
- Before fixing the heat-insulating material on the wall, the starting bar is preliminarily fixed. Its function is performed by a metal corner or a wooden lath.The absence of a starting bar complicates the insulation and can lead to a shift in the foam.
- It is convenient to use two spatulas for applying the adhesive base - a narrow one and a wide one.
- The mortar is applied to the wall, paying particular attention to the small indentations.
- Where there is a bulge on the wall, the composition for insulation is distributed in a thin layer. The corners of the foam sheets must be additionally fixed with dowel caps.
- All voids between the sheets are eliminated with glue or other filler according to the principle of decorating ceramic tiles with inter-joint grouting.
After the initial insulation on the outside of the walls, the slabs are allowed to settle for 2-3 days. They switch to the design with a reinforcing mesh after the foam has shrunk. The work is organized in two ways. It is more convenient to insulate one wall, while it is defended, to deal with the second. Or to install polystyrene sheets around the perimeter of the house.
Comment! Prolonged overheating of the foam in the sun or soaking the material in the rain is undesirable. Therefore, it is recommended to choose suitable weather conditions for organizing wall insulation from the outside.
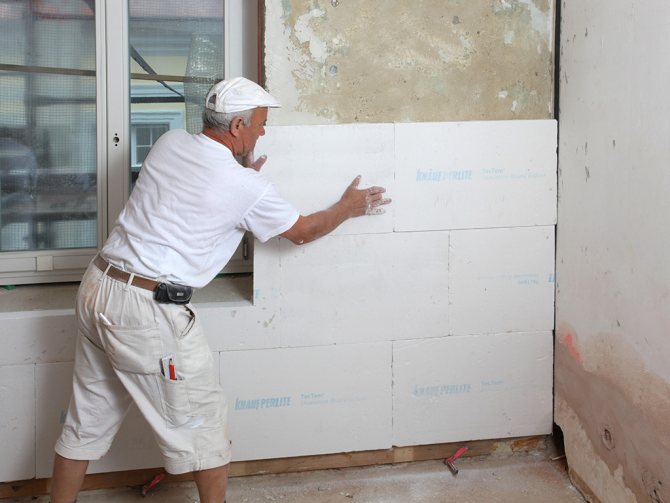
Installation of foam on walls
After pre-processing the walls and installing beacons, you can start installing the foam.
Step 1. Dilution of the glue. The dry mixture must be diluted with water. The consistency of the glue should be creamy, without lumps and other impurities. It is best to dilute the glue in portions.
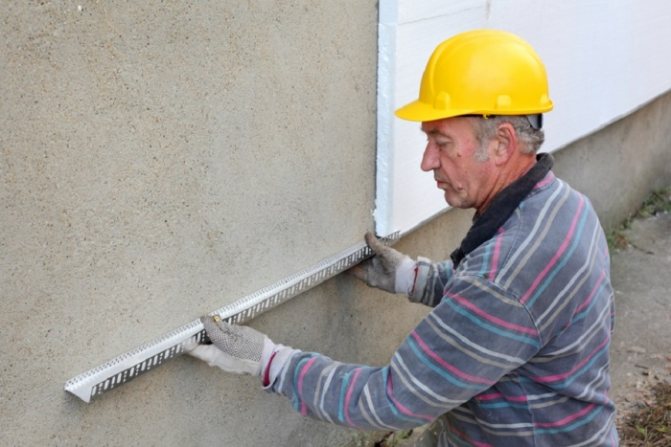
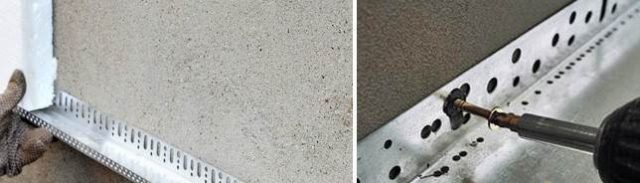
Step 2. In order for the first row of foam to be even, it is recommended to start attaching the insulation to the metal profile. Using a tape measure and a level, you need to mark the line along which the first row of insulation will be attached. Then, along this line, a metal profile is required to be drilled to the wall. It additionally contributes to better fixing of the insulation to the wall.

We fix the basement profile
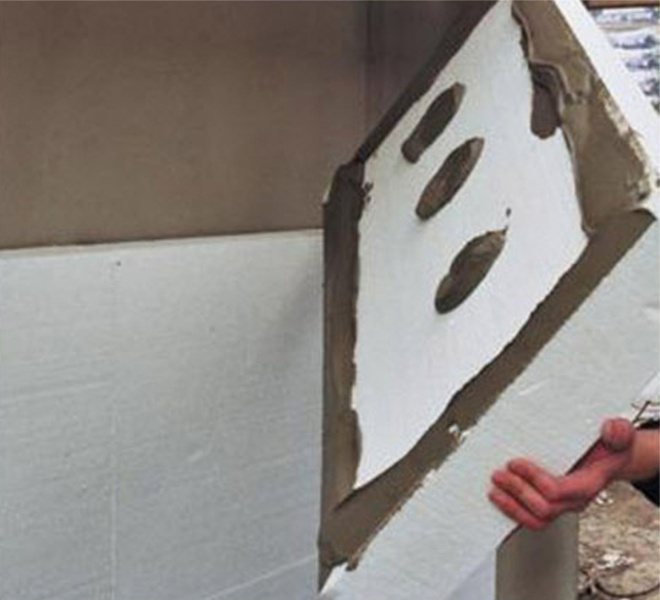
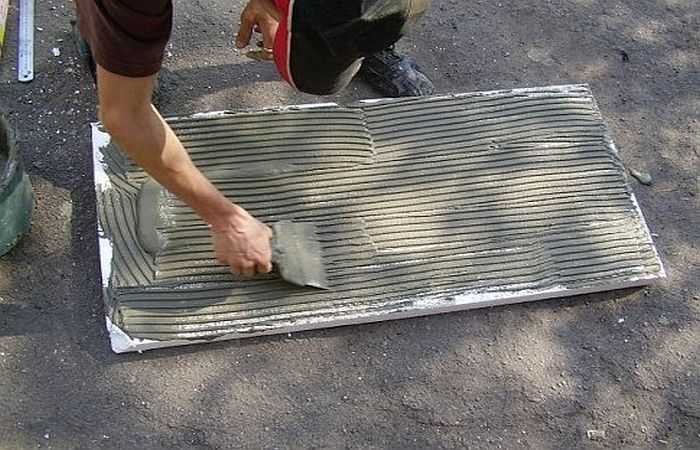
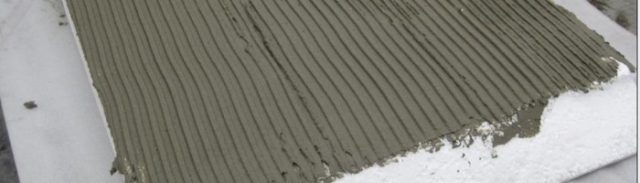
Step 3. Glue is evenly applied to the surface of the foam with a comb. If the surface of the wall is not too flat, then more adhesive can be applied to the insulation to maximize the adhesion.
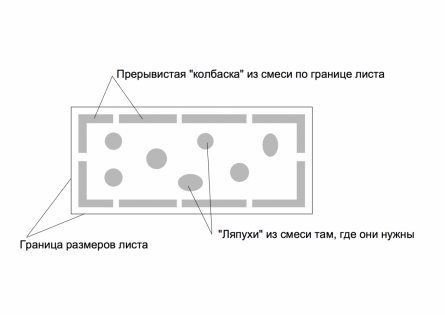
Scheme of applying glue under a sheet of insulation on the wall
Apply glue
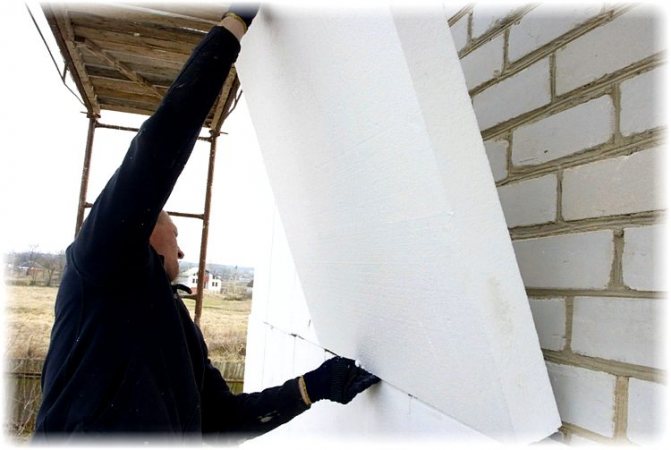
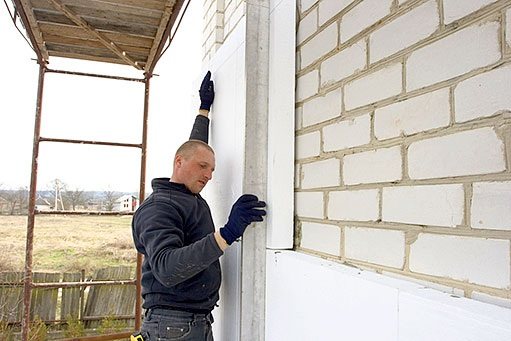
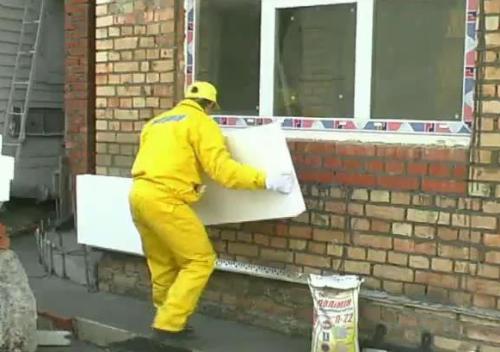
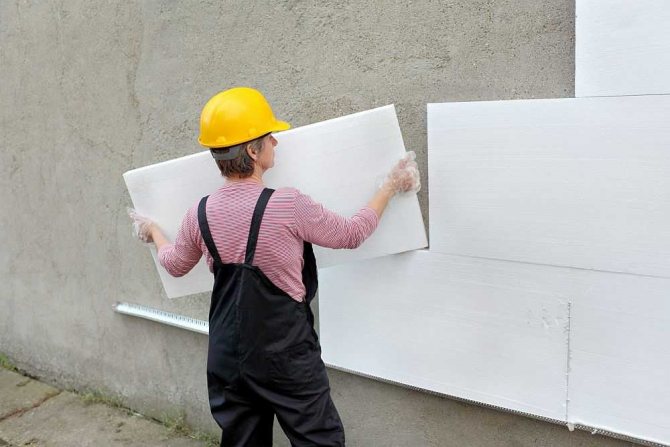
Step 4. The first row of foam is laid out. It is recommended to glue the material on the wall from the bottom up. It is also recommended to apply glue between the insulation boards so that there are no gaps.
Installation of foam on the facade
Step 5. The second row of foam is glued offset from the first row. This will provide a better bond of the material and minimize gaps between the slabs. Do not forget about applying glue to the abutting ends of the plates for better sealing. If there are too large gaps between the foam plates, polyurethane foam can be used to seal them.
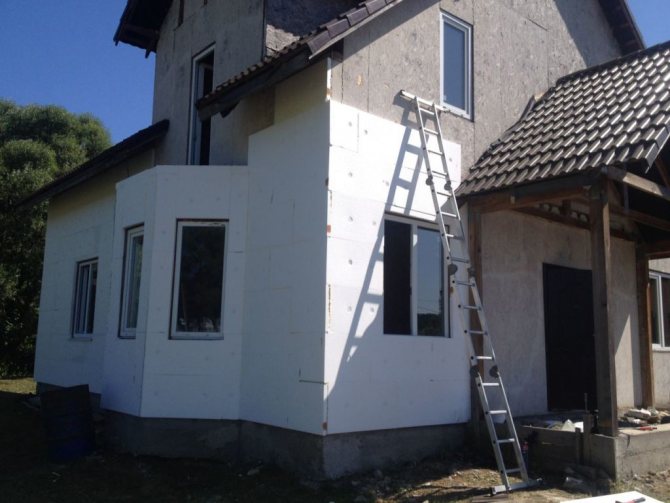
Step 6. At the corners of the house, the foam must be fastened with such an allowance to completely cover the protruding areas.
Step 7. Before installing the next row, do not forget about putting up beacons.
Step 8. In this way, all rows of insulation are glued.

How to effectively insulate a house with Styrofoam? We insulate the walls of the house outside with our own hands
Styrofoam is lightweight, easy to install, well plastered.
Often during the construction of a private house, we forget about its insulation, naively believing that the thickness of the walls of a brick house, walls of a log house, a frame house or walls made of concrete blocks is sufficient for our comfortable living. However, the first serious wintering puts all the dots above the "I" - it is cold in the house, the walls are covered with frost outside, and wet spots treacherously darken inside. This is condensation from warm air from inside the room that comes into contact with a cold wall.
Now you need to think in hindsight about insulation, but what material to choose for this in order to avoid mistakes? Many people decide to insulate a private house with foam.Of course, it is better to do everything at the construction stage, however, such insulation is quite possible.
Insulation materials you need to know
Meet, before you two categories of heaters that you can work with at home - modern and old-fashioned. Modern, as a rule, synthetic, are presented in the form of rolls or slabs, old-fashioned - from natural materials such as clay / expanded clay, sawdust / straw, wood chips. Combinations are possible, for example, from the outside you insulate the house with foam plates, and from the inside you make clay plaster. Sheathing the house with polystyrene foam, and with your own hands, is a very economical option.
So, the types of modern heaters, presented in the form:
1. Plates:
- Polyfoam - everyone is familiar, cheap, lightweight, convenient for self-assembly, it is easy to cut and glue;
- Penoplex (extruded foam) is almost the same foam, only with a fine-mesh, homogeneous structure. It's also easy to cut, mount, carry and glue;
- Mineral wool (stone / basalt). Like any cotton wool, it absorbs moisture from the air, despite the hydrophobic impregnation;
2. Spraying:
- penoizol (urea foam) - either sprayed or poured insulation;
- polyurethane foam adheres perfectly to any substrate, does not rot, does not absorb water, does not chew on mice.
Polyfoam and penoplex are the cheapest insulation materials. Varieties of mineral wool Penoizol and polyurethane foam are professional thermal insulation, self-assembly is not recommended.
Of all the above, the cheapest and most often applicable in the external insulation of a house with your own hands is polystyrene foam. At home, usually, there is not much choice, moreover, there is always a lack of time and money. Therefore, decorating a house with foam plastic is suitable for people who are completely unfamiliar with construction, with a minimum of free time.
We calculate the amount and cost of insulation
Before starting insulation, questions always arise - how much material to buy, how much money does it take? And in general, how much time do you need to spend on all this? You can do all this yourself - calculate the cost and number of insulation plates, as well as the approximate amount of time it will take to insulate the house with your own hands.
An example of calculating foam plates for cladding a house outside:
- we calculate the area of one foam plate by multiplying the width and length;
- we calculate the area of each of the walls of the house, for which we multiply the width and height of each of the walls, and then add the obtained values;
- the result is divided by the area of one slab. As a result, we get the number of whole foam plates for decorating the house from the outside.
Similarly, you can calculate how many foam plates you need to insulate a house from the inside, if you still dare to insulate your premises with this fire-safe material.
Important. When insulating the roof, remember that the best option is to insulate the roof from the outside during the construction phase. Of course, it is possible and necessary to make thermal insulation from the attic, but this is applicable if at the construction stage they completely forgot about the insulation and waterproofing of the roof.
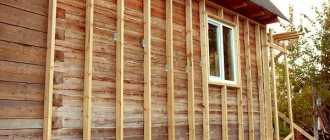
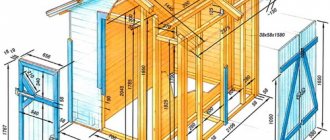
Timber frame house. How to insulate?
A wooden frame house also needs insulation.
For a timber frame house, it is better to use mineral (basalt wool) slabs. But also the insulation of a frame house with foam is an acceptable option for cheap external thermal insulation. To do everything right with your own hands, you need not forget about special anti-fungal primers, which are imperatively impregnated with the surface of a wooden frame house.
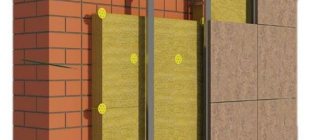
The technology of insulating a wooden frame house from the outside includes:
- cleaning the surface from dust, drying it and priming, followed by drying;
- installation of a counter lattice on which the vapor barrier will be attached. you can use penofol with the foil side to the wall of the house;
- then the installation of the crate for insulation boards (foam or mineral wool);
- further, depending on the type of insulation, waterproofing is attached (for mineral wool) or not attached (for foam);
- another counter-lattice is made and the topcoat is installed.
Mineral wool is a suitable insulation for a timber frame house.
These are general points on which work is carried out on insulation from the outside. This system is called a curtain wall. Further cladding of a wooden house can include any coating. It all depends on the owner's imagination.
If you prefer to work with your own hands, then the option with foam is quite within your reach. If you want to call the masters, then warm yourself with penoizol. The design will be approximately the same, only penoizol will be poured between the vapor barrier and the waterproofing membrane. Best suited for timber houses.
The thickness of the insulation for a wooden house must be calculated correctly. Typically, mineral wool slabs, like foam slabs, are available in various thicknesses. The thermal conductivity of the thermal insulation layer depends on this parameter. The thickness of the foam slabs varies from 2 to 10 centimeters. At the same time, a slab thickness of 2 centimeters is not suitable for insulating a frame house, it is too small, but a thickness of 10 centimeters is just right. It remains only to cover the surface of the foam with decorative trim, and the house will take on a completely new look.
To do everything right with your own hands at home, follow our simple instructions. Now you know how to sheathe a house with Styrofoam is easy and hassle-free.
Important. It is not always possible to use a whole number of foam boards. In this case, it is better to cut it on a perfectly flat surface. Despite its impressive thickness, the foam is fragile and, if you cut it anywhere, the plate can simply be broken.
Brick house. Warming options
For a brick private house, insulation can be performed both outside and inside. Moreover, some of the work can be done by hand, and some can be entrusted to professionals. Remember, foam insulation, which is light in all respects, is not recommended for indoor work. The material is fire hazardous, burns with the release of toxic substances.
The technology of insulating a brick house from the outside are two common options. In addition to them, one can also call insulation with ordinary plaster, arrangement of a ventilated facade, insulation with mineral wool slabs and others.
To insulate a brick house with polyurethane foam. will have to call the masters.
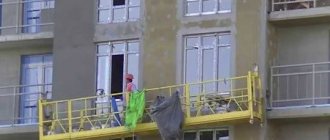
Option number 1, expensive. Sprayed thermal insulation.
To insulate a brick house outside with polyurethane foam, it is necessary to perform the usual surface preparation work - cleaning the walls from dust and dirt, old paint or plaster. Then, within half an hour, professionals will process the house with insulation, which will harden in a maximum of a day (at least after 3 hours). Now all that remains is to close the material from UV radiation harmful to it.
Insulating a brick house with polystyrene foam is quick, cheap, but not safe.
Option number 2, cheap. Thermal insulation with polystyrene / polystyrene foam.
It is possible to mount polystyrene / polystyrene plates directly on the surface of the walls, previously cleaned and treated with antifungal and antibacterial primers.
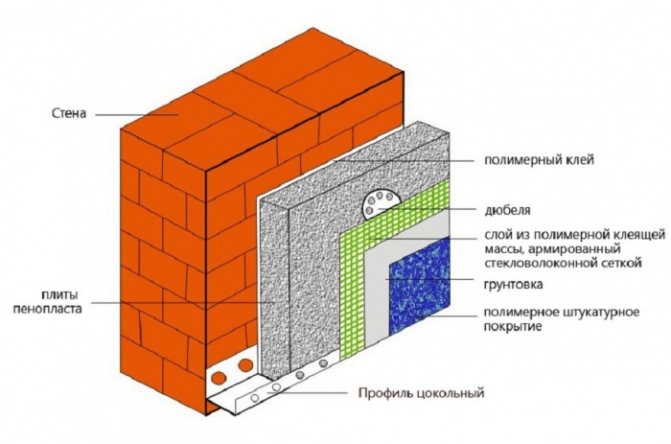
The surface of the slabs is rolled with a needle roller, then a special glue or bitumen mastic is applied (in blobs, about 8 blots on the entire surface of the slab) and the insulation is gently pressed against the wall. The special fastening of the foam plastic plates to each other, which must also be coated with glue / mastic, excludes the occurrence of cold bridges. At the end of the work, the surface of the foam / foam can be plastered or finished in the same way as the polyurethane foam.
Advice.Be careful with insulating a brick house with foam plates or other insulation only from the inside, especially if the masonry is constantly wet. Such insulation will shift the dew point, it will be inside the brick space (masonry), which will contribute to its rapid destruction.
When insulating a private house, do not forget about the roof and floor. The insulation system will only work together. Another point is complex insulation, outside and inside. If you decide to make thermal insulation inside, use liquid glass to protect the walls from mold and mildew, and then apply an anti-fungal primer. Coating with liquid glass is a kind of waterproofing that works great indoors.
A warm house is coziness and comfort. however, do not skimp on insulation. Use foam for insulation only as a last resort.
Which insulation is better? No one will give an exact answer to this question. Everyone chooses material for themselves according to different criteria. Someone is ready to pay a rather large amount so that in the end the dwelling becomes comfortable for living, someone is used to doing everything with their own hands, respectively, the insulation will be chosen cheaper. When doing thermal insulation work, do not forget to insulate the roof as best as possible. Up to 40% of the heat escapes through the roof. The most common mistakes in home insulation with your own hands are negligence in the insulation of the roof, floor and ceiling (attic floor).
For a wooden house outside, a curtain facade system is quite applicable. Sheathing a wooden house with slabs of mineral wool or foam is quite a budget option, available for self-insulation. Insulation of a house, brick or concrete blocks, can be carried out with polyurethane foam, mineral wool, and foam plates.
Like?
izollab.ru
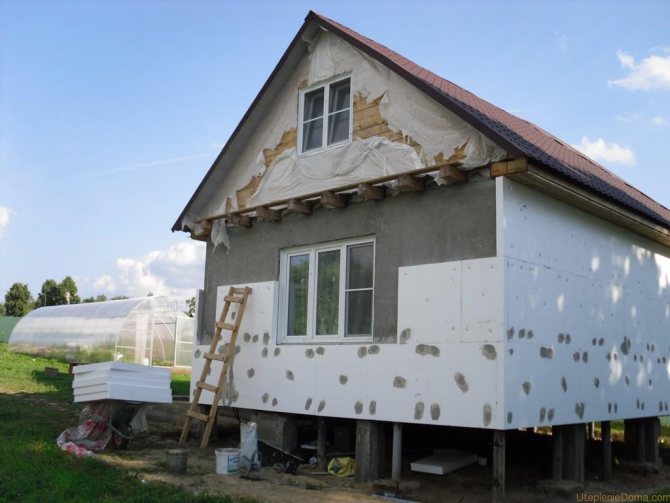
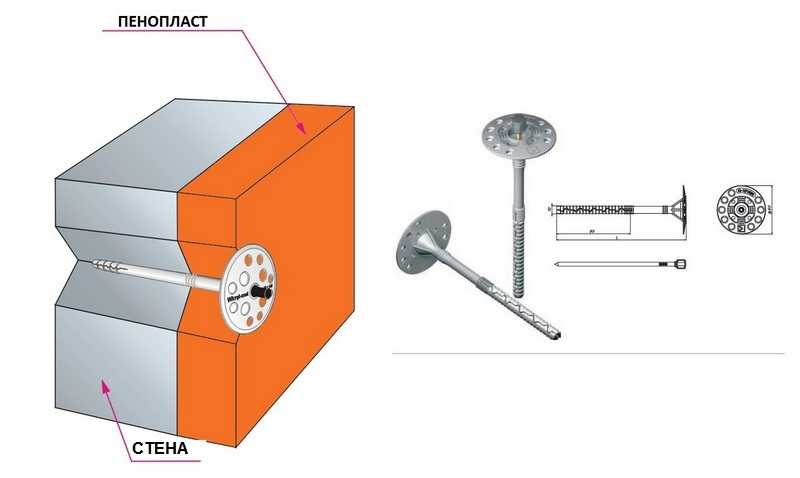
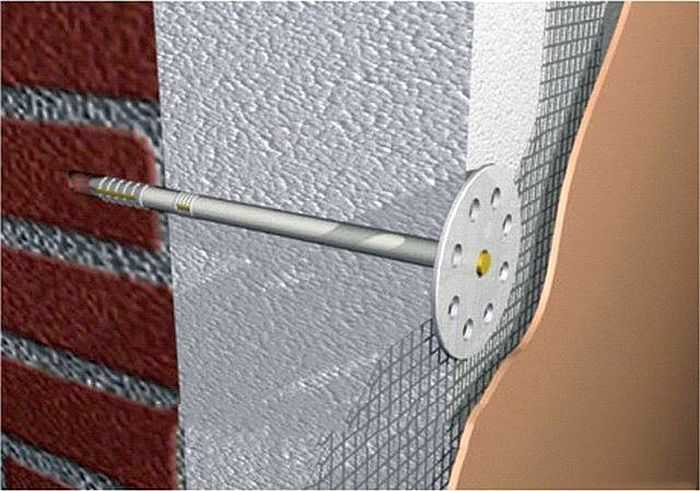
Additional fixation of the foam
After the walls of the house have already been insulated, it is recommended to further strengthen the fixation of the material. For these purposes, a perforator and special fastening accessories are used - anchors with wide plastic caps, inside which a metal hairpin is driven.
When choosing the size of the fittings, you need to know that for high-quality fixation, the anchor is recommended to be recessed into the wall by 40 mm. If the thickness of the foam is 40 mm, the thickness of the adhesive layer is 10 mm, the length of the anchor should be 90 mm.
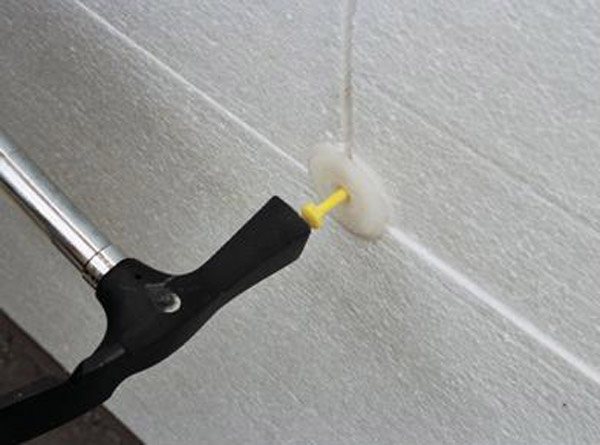
Step 1. It is desirable to fix the foam sheet with 4-5 anchors. For these purposes, holes are drilled in the insulation and the wall. The length and width of the drill should be equal to the dimensions of the fastening hardware.
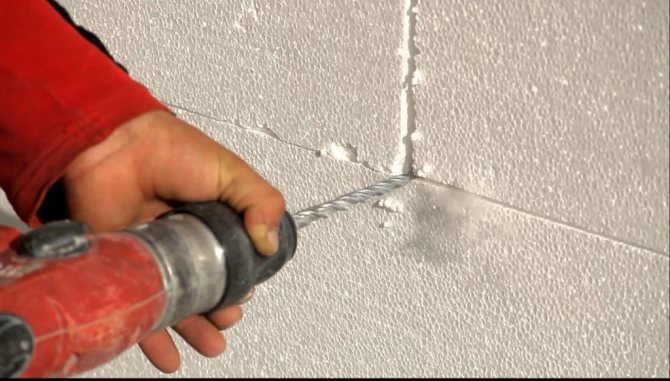
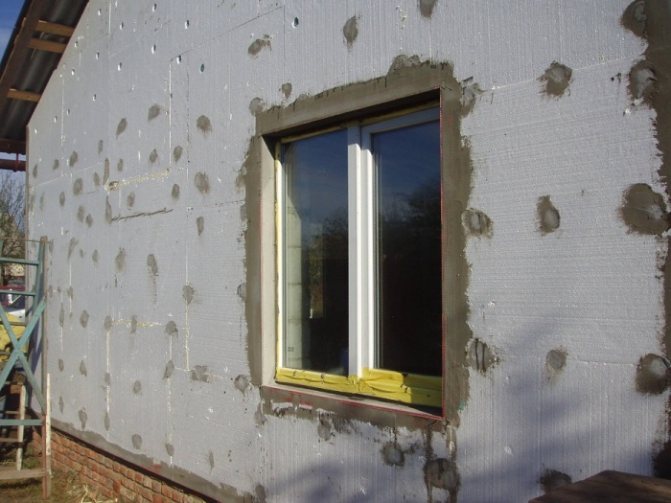
Preparing the foam for the installation of the umbrella dowel
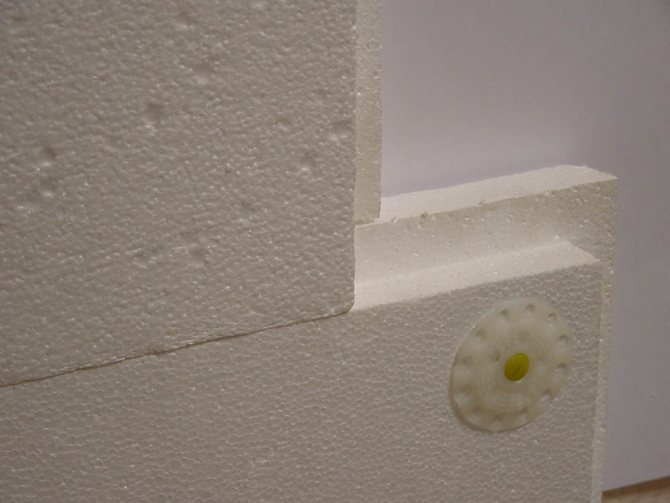
Step 2. After drilling, plastic fittings are inserted into the holes. The caps of the anchors need to be slightly drowned in the foam in order to hide them later with a layer of plaster.
We fix the dowel
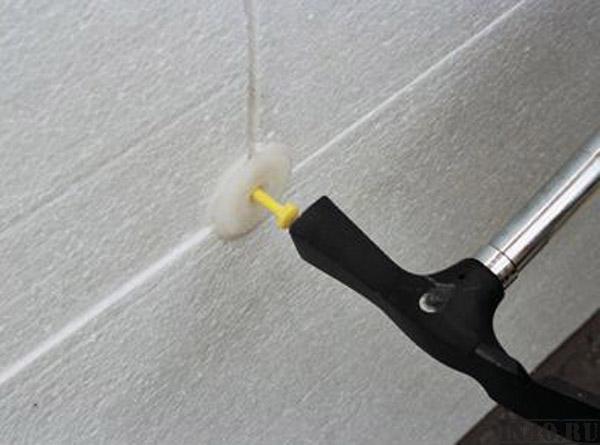
Step 3. Metal studs are inserted inside the plastic anchors and hammered with force until they stop.
Step 4. In this way, all sheets of foam glued to the walls are fixed.
Styrofoam plates
Foam insulation technology: a practical stage
Preparation for the installation of sheet PPS
With some building skills and a small set of tools, it will not be difficult to radically improve the thermal efficiency of the walls of your house or apartment. When performing work, one should be guided by the requirements of SP 50.13330.2012 on thermal protection of buildings (updated edition of SNiP 23-02-2003), adhere to a number of simple practical rules, and follow a certain sequence of actions. Only in this case the insulation of the house with foam plastic from the outside will be done correctly, and the materials used will last a long time.
Blanks
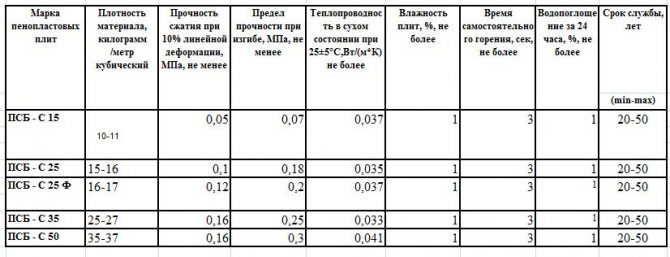
Preparation for practical events begins with simple calculations and procurement of everything you need:
- sheet PPS (recommended thickness is not less than 40-50 mm). The brands PSB-S-15 and PSB-S-25 are suitable.The first option is cheaper and slightly "warmer", however, the second is noticeably stronger - it is easier to work with it, and insulation of the facade with such foam is more reliable and durable;
- adhesive suitable for the type of thermal insulation. You can choose between cement-polymer mixtures, which can be sealed before application, or ready-made adhesives-foams in cylinders. If you give preference to extrusion PPP (extruded, EPS), then be sure to purchase an assembly composition designed specifically for this product;
- alkali-resistant plaster mesh with a density of at least 140-160 g / m2. A low-quality or low-density mesh, purchased on the cheap, is one of the reasons for cracking decorative finishes for facade insulation with foam;
- special dowels with wide caps - fungi, umbrellas. Their length is calculated by summing the size of the thickness of the heat shield and the required for reliable fixation of the entry of the anchor into the wall. So, in concrete, the minimum depth should be at least 40 mm, and in brick at least 70 mm;
- basement profiles and fasteners for them, perforated corners with a reinforcing mesh, primers, decorative plaster, polyurethane foam, and other materials, depending on the local characteristics of the facade.
We also do not forget about the fire-prevention requirements for foam insulation outside the building, for the fulfillment of which a certain amount of high-density mineral wool sheets and, accordingly, glue for them will be required. The total amount of all thermal insulation can be taken immediately with a small margin of area (no more than 5%) or bribed later after production. They do the same with all the rest of the auxiliary products - they are not in short supply, and assembly technologies, apart from finishing, allow work breaks.
Surface
In order to qualitatively insulate the house from the outside with foam, one should not neglect the stage of bringing the supporting base (facade walls) to the proper form. Their surfaces must be strong, leveled, free of extraneous coatings that reduce the adhesion of adhesives. For this:
- knock down any loose, exfoliating areas of the solution, cut down thawed fragments of structures;
- clean the surface of the walls from oil, bituminous, paint and varnish stains. Mold and moss must also be cleaned;
- potholes are primed and leveled with a suitable cement mortar. In general, the surface should turn out to be quite flat (drops of up to 1-2 cm are allowed), which may require its complete plastering;
- before starting the foam insulation of the outer walls, they are treated with a primer corresponding to the base material.
If EPS is purchased for installation, then its inner surface, on which the glue will be applied, should also be prepared, that is, made rough or perforated. The easiest way to do this is with a needle roller, an iron textured float (rasp) or a metal bristle brush.
Installation of sheet insulation
Support profile
To obtain an even first row, foam insulation technology provides for the installation of a basement (starting) profile on the facade. It will also help protect the ends of the sheets from rodents and will serve as a support for thermal insulation at the initial stage of its gluing.
The width of the starting bar is selected according to the thickness of the PSP or its two layers with a two-layer heat shield. It is allowed to use UW-50 (100) gypsum plasterboard profiles as a supporting element. They are fixed to the supporting base (strictly horizontally) using a perforator or an impact drill and dowels. It is convenient to draw a reference line under it before fixing the basement element using a building level or a chopping thread and a laser level.
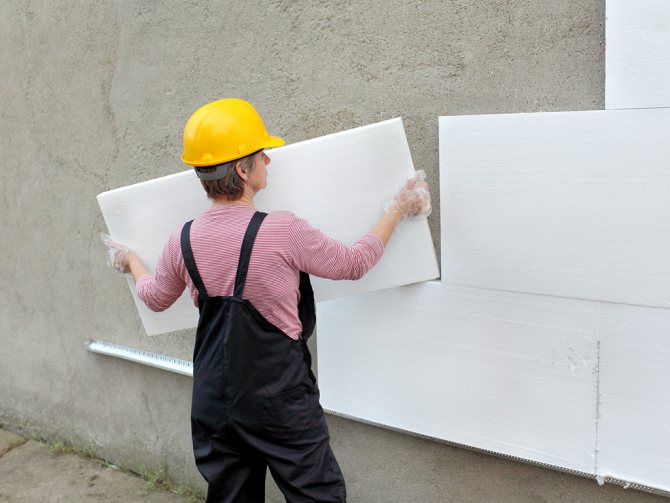
Sticking sheets
You should start with the design of door and window slopes, then move on to the first row.We remember the creation of fire-fighting belts made of non-combustible material, therefore, mineral wool slabs are among the first to be used.
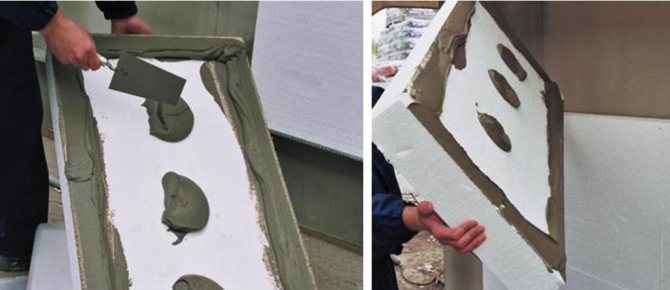
Carrying out wall insulation with foam plastic with your own hands, you can give preference to any method convenient for you to work with adhesives:
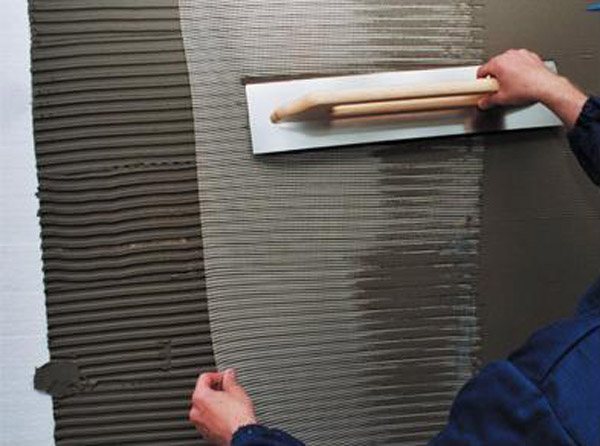
- distributing the cement-polymer mixture around the perimeter and with several cakes in a checkerboard pattern or leveling it evenly along the plane of the sheet with a notched trowel;
- applying glue-foam from a balloon around the perimeter and 2-3 strips along the surface of the sheet.
A point fixation option (with flat cakes) will help out on a poorly aligned wall. However, it should be borne in mind that significant voids under the expanded polystyrene can cause condensation to form under it. In addition, soft PPP is easy to break - to push over a pit in the substrate.
Important! Each subsequent row of insulation of the facade of the house with foam is glued with an offset of the vertical seams. This is a prerequisite, failure to comply with which leads to the appearance of cracks in the finish.
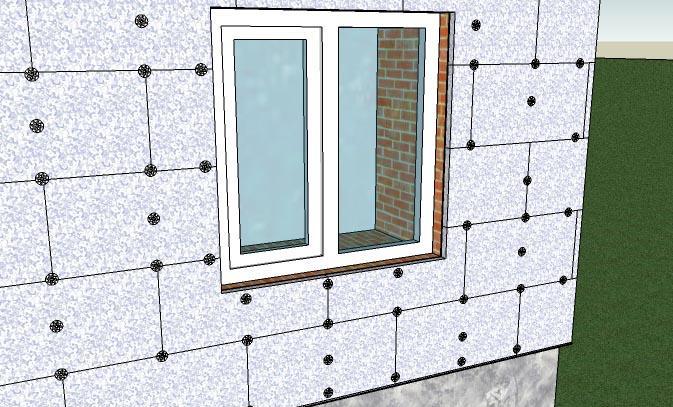
Additional fixation and sealing of seams
As soon as all the plates are glued, they are given 2-3 days (depending on the weather) to dry, after which additional fastening of the material with umbrella dowels is carried out. It is possible to drive dowels in the center of the sheet and in the corners at the joints with adjacent ones. So it is possible to fix up to 3 plates at the same time with a set of umbrellas of 5 pieces, which helps to use fasteners more economically.
The gaps between the elements of the heat shield are filled with polyurethane foam, and if they are wide enough, they are sealed with scraps of foam. Do not clog the seams with mineral solutions, such actions impair the quality of heat protection, contributing to the formation of cold bridges. In addition, if the estimated thickness of the foam for insulation allows you to accommodate two sheets, then it is preferable to choose a two-layer coating method with an offset of the joints. It also helps seal seams securely.
Finishing the expanded polystyrene surface
Before the beginning of the finishing stage, the protruding sections of foam, thermal insulation at the corners are cut off, then, the planes are carefully rubbed (sanded) with a foam trowel.
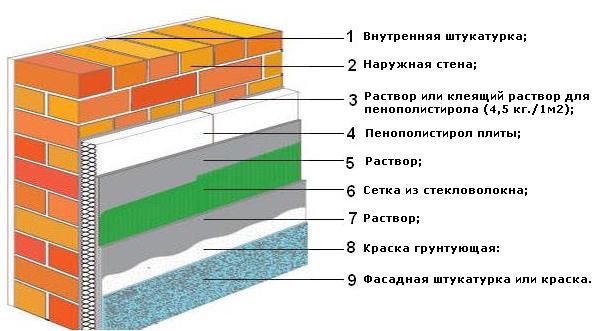
Plastering is carried out in layers with the laying of reinforcing material. First, the first layer of cement-polymer glue is applied, into which the plaster mesh is embedded. It will help the composition adhere to the smooth surface of the expanded polystyrene and protect the finish from cracking. The mesh fabrics are overlapped with each other by 5-10 cm and wrapped at the corners (a strip indicating the amount of overlap should be present on a high-quality mesh for external foam insulation). The corners of walls, slopes of doors and windows for mechanical protection are additionally glued with a perforated front corner.
Further, until completely dry, the surface of the first layer should be smoothed with a smooth float, with a slight addition of glue, so that the mesh remains practically inside it. The next layer is applied (putty) to smooth out the blemish of the first, but only after the base has dried.
At this stage, a pause of three to four days is again made. The plastered surface of the facade insulated with foam plastic must gain strength and dry out. Then, it is primed and covered with a third coat to give the exterior aesthetic appeal. In some cases, decorative plaster "bark beetle" or other similar materials is used for this. They are applied with small covers in order to have time to finish grouting before the mortar begins to set. The joints of individual sections of the applied mixture and the joints of the reinforcing mesh should not coincide.
Important! It is necessary to strive to decorate the entire plane from corner to corner during the day - so the transitions between the old and new mortar are less noticeable.
After the textured surface has completely dried, they start painting the facades, for which any paint for outdoor work is suitable. It is best to paint with a soft foam roller or spray. The painting step can be avoided if the finishing materials with pigment additives are used initially.
Insulation with foam outside allows you to get the so-called "thermos effect" in the house - it is warm even in the cold season with problematic heating. At the same time, one should not forget that the walls lose their ability to "breathe", therefore, in order to normalize the microclimate in the premises, they should be provided with good ventilation.
Wall decoration, insulated with foam
After the insulation of the walls is completed, you can proceed with the finishing and beautification of the facades of the house.
How to glue polystyrene correctly
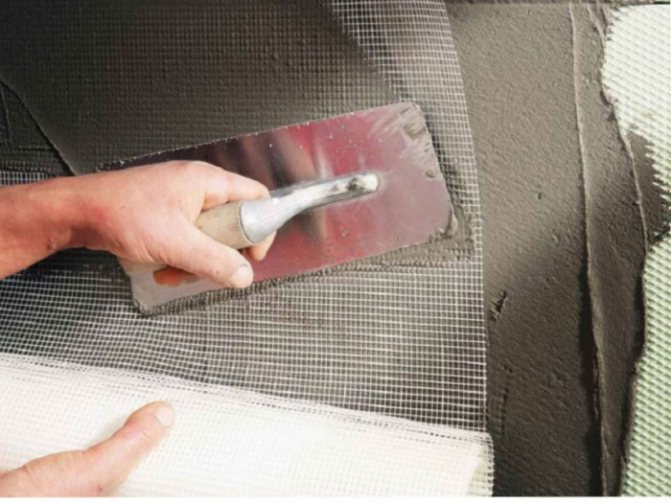
Step 1: Use a foam trowel to smooth out all the bumps at the joints of the foam sheets. The grater removes the excess glue layer.
Step 2. Walls insulated with foam must be primed.
Step 3. After the primer is dry, you can start applying the putty. Spread the putty evenly over the surface of the foam. The optimal layer is 2-3 mm.
Step 4. While the putty has not dried, a reinforcing mesh is attached on top of the layer. The material must be sunk into the mortar with a spatula. It is advisable to reinforce small sections of the wall - 1-2 meters. The mesh is overlapped. When working with a spatula, it is required to carefully smooth out all irregularities. Ideally, the mesh should be hidden under a layer of putty.
Step 5. After the walls have been reinforced, you need to wait until the solution is completely dry. Then the wall is treated with coarse sandpaper. The abrasive removes all irregularities, drops and sagging on the wall surface.
Step 6. The wall cleaned from defects is once again treated with a primer.
Step 7. Using a wide spatula, apply the leveling compound to the wall. With its help, you can achieve perfect surface smoothness.

Wall decoration, insulated with foam
Step 8. Finishing the facades. For these purposes, various materials are used: paint, decorative plaster. You can also refine the facade of the house with mosaics, natural or decorative stone, facing bricks. If you plan to use these materials, you do not need to use leveling compounds.

Application of plaster to polystyrene
If all the required materials and tools are available, it is not difficult to insulate the house with foam on your own. The main thing is to wait for good weather and observe safety precautions when working at height.
Surface preparation
Before insulation, all additional wall elements are dismantled - cornices, window sills, drain pipes, etc. When all organizational issues are resolved, you can proceed to consider the topic of how to insulate a house with foam. The work begins with the preparation of the walls, the main goal is to achieve their even surface. Minor depressions can be left by smoothing them in the future with an adhesive when insulating with foam. Large voids are sealed, otherwise, under mechanical stress, the insulation layer can deform.
Particularly noteworthy are the bulges on the wall, which must be eliminated. If you leave them, the foam will soon flake off and will not perform the function of wall insulation. The maximum allowable difference on the wall is 1-2 cm. In addition to working with irregularities, they simultaneously deal with other defects: they cover up cracks, remove old finishes or simply unreliable fragments.
Attention! A wall that is well prepared for insulation from the outside should not contain dust, crumble or be separated by fragments of finishing when applying glue under the foam.
Before starting the primer, it is enough to run your palm along the wall.If it is flat, dry and clean, you can start priming. Treatment of the outer wall with a bonding mixture containing PVA from a spray gun will help prevent shedding of small fractions on a brick surface.
PPS or EPS (foam or extruded polystyrene foam)
Insulation of the facade with foam begins with the solution of the question: what is better to use, foam plastic (PPS) or extruded polystyrene foam (EPS). Both materials are made from the same starting material (polystyrene), but they are used by different technologies. It is hardly worth going into the intricacies of the processes; it is important to know the main differences between these two materials. So, in short:
- Polyfoam is softer, absorbs moisture, insects and rodents like to force in it. With good characteristics, it has a low cost.
- EPS is more rigid and dense, practically does not absorb water, insects and rodents do not like it. Its main drawback is its high price. In the case of wall insulation from the outside, there is one more disadvantage - its preliminary processing is necessary (you need to scratch the surface), and this is time.
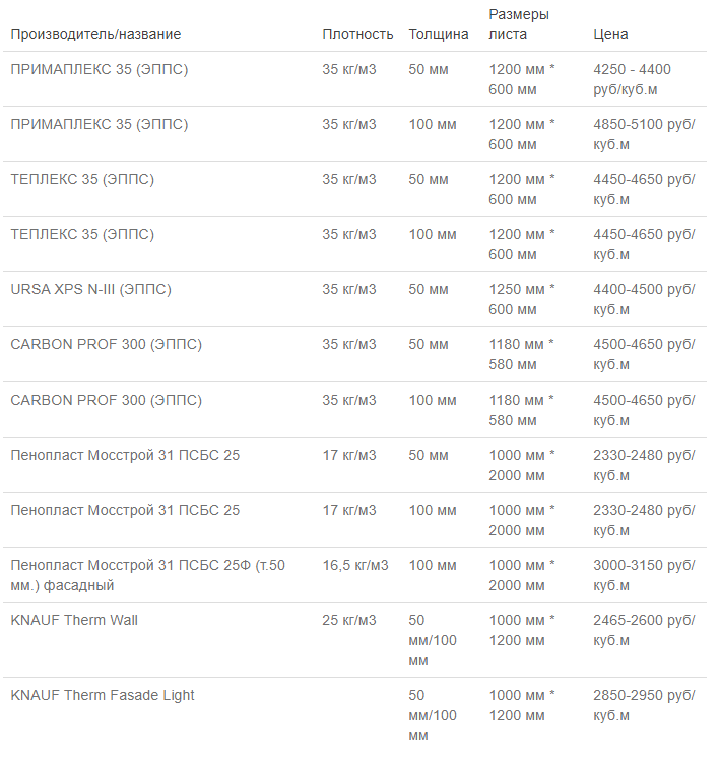
There is one more plus of EPS - usually the plates are made with a quarter, that is, there will be much less direct joints during insulation, which means there are fewer cold bridges. The choice is not easy, especially considering that the difference in price is substantial - 2 times. To make it easier to decide, several positions at the prices of EPS and PPP are shown in the table.
Styrofoam prices
Having decided on the type of material, you can proceed with the installation.
How to choose foam for home insulation
Before you go to the store, decide which model you should buy. Here are a few basic characteristics that must be observed when choosing a product for your own home:
- The composition must contain neoprene! At the end of the product name abbreviation will be the letter "C".
- The thickness of the slab should not be less than 5 cm
- The density of the product should be 15-45 units
- Try to choose only trusted manufacturers, reviews of which can be easily found on the Internet
Otherwise, everything is limited only by your budget, as well as personal preferences.
Why is it worth using foam for home insulation
The characteristics of the foam are as follows:
- Low price This indicator is largely decisive for domestic buyers, so you can evaluate this item by making a choice in the direction of the material.
- Durability Styrofoam is an incredibly durable material that will definitely serve your home for decades.
- Resistance to external influences Over time, the plates are completely resistant to deformation, and also do not have the ability to absorb moisture
- Ease of installation An equally attractive item due to this material is the ease of installation. You don't need any professional knowledge or tools at all. Reading the article will be enough to roughly understand the strategy of actions during installation.
- Lightweight Foam boards weigh very little (which again simplifies the installation process). This means that you do not have to do extra work to strengthen the foundation of the house.
- Resistance to mold formation Various microorganisms such as mold, bacteria and other unnecessary products of our nature cannot live inside the material. Hence, it has a positive effect on your health.
- Does not absorb moisture Additional procedures for vapor barrier insulation are not required, since it does not absorb moisture
- High thermal conductivity Remarkable thermal conductivity values!
The above factors made foam plastic a universal material for insulation, both one-story and multi-story buildings.