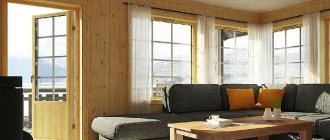
Barn and household insulation options. buildings
- The best option is to build two parallel walls with space for insulation;
- The roof as well as the walls must be insulated. To do this, you need to lay the insulation on the logs and press on top with boards. It is necessary to make a sloping roof so that moisture does not penetrate inside;
- To prevent the cold from emerging from the ground, you can put wooden pallets with straw on the floor.
This method is the cheapest, since everything can be made from scrap materials, and no special skills are needed.
If you decide to remodel an old barn for the winter, there are several ways to do it.
Planking
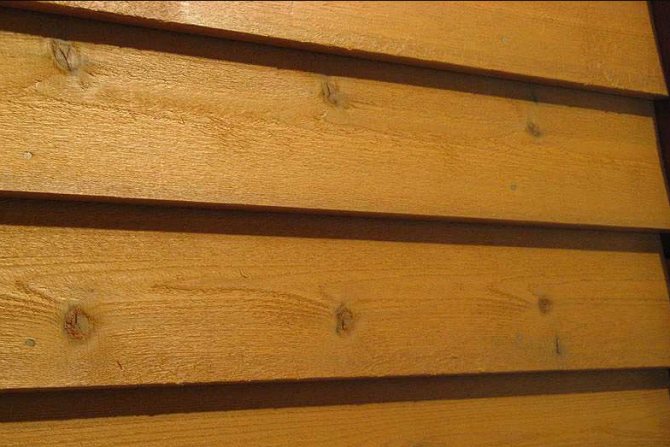
The easiest option is to make a second wall of planks with space for insulation. In this case, the boards will need to be overlapped to avoid gaps between them.
As you can see in the photo, to form a wall without gaps, two boards are first nailed with a retreat, and then it is closed on top of the third.
Edges that are too curved can be trimmed in advance with a circular saw.
In the process of erecting the wall, you need to fall asleep in the resulting compartment with insulation. Sawdust is well suited for this, but sometimes dry fallen leaves and pine needles are also used. The advantage of sawdust is that they are small, dry, and the price is practically zero, they can be obtained in any carpentry workshop.
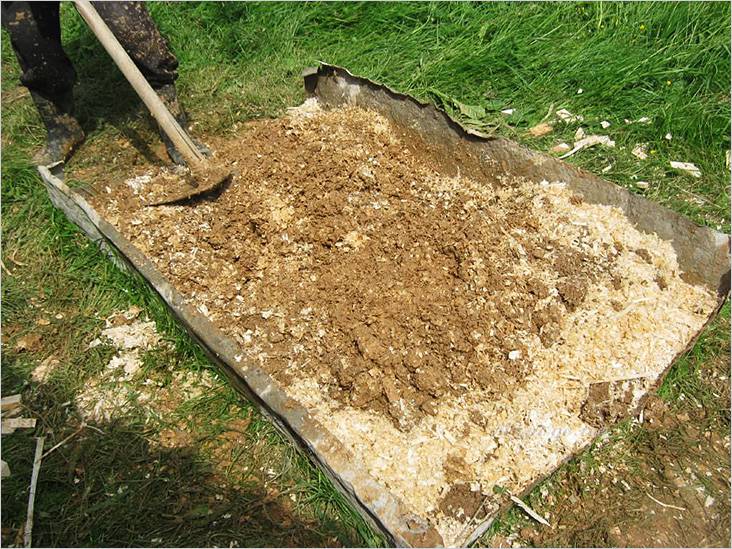
To avoid rodents between walls, mix sawdust with hydrated lime ("fluff") in proportions 25 to 1.
Pour the materials onto a wood or metal backboard and stir with a shovel.
The sawdust insulation layer should be 20-30 centimeters thick on the walls, ceiling and field. You need to fill them up in layers and tamp them constantly. After that, you need to give time for the sawdust to sit down, it is advisable to add more after 1-2 weeks.
The ceiling will need to be hemmed and sawdust filled in in the same way. To obtain a box for insulation, you need to make a false ceiling, filling the second layer of boards over the rafters. From above, they are covered with roofing material and nailed every 50 centimeters.
To protect it from rodents in the lower part of the barn, you can shield the walls with slate on both sides. The floor is insulated by pouring a layer of soil 10 cm above the main one, and then clay is poured and compacted from above. The main thing when insulating is not to allow moisture to penetrate into the sawdust, otherwise they will quickly begin to rot.
To make a warm door, the boards are knocked off diagonally, and roofing material is inserted between them. With this design, you will keep the heat inside the room as much as possible.
If money is tight, but you want to get a warm utility room, then the walls can be sheathed with shingles:
- To do this, you need to nail the slats diagonally, first in one direction, and then in the opposite direction. Reiki can be replaced with goat willow branches, then the clay layer can be made thicker;
- To apply clay to shingles, you need to prepare a solution. Soak the clay with water until the consistency of sour cream and gradually add sawdust or straw, achieving the desired consistency. Do not apply the solution right away, but let it stand for a while;
- Start work from the bottom, applying a clay mortar with a thickness of at least 3-5 centimeters. Throw it in and level it with a spatula. The layer should be even, pay special attention to the corners - you can increase the layer on them by rounding them;
- After the clay plastering, the walls should dry within a few days;
- Cracks will appear, which can be repaired with a solution of clay and sand, mixing them 1 to 2;
- Then you need to whitewash the walls with lime.If you work in the cold season, it is better to use slaked lime, as it will heat up on contact with water, but then be especially careful about safety precautions.
Lime Instruction: Dissolve the quicklime granules in half a bucket of water.
In just a minute, the reaction will begin and the solution will be very hot.
After that, fill the bucket with water to the end and add a spoonful of salt;
- With the same clay solution, fill up all the remaining gaps in the ceiling and floor. To insulate the ceiling, make a box of boards and bars, and fill it with clay and sawdust with a layer of about 10 cm.
This method is quite laborious, but does not require money.
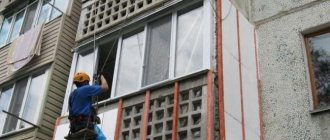
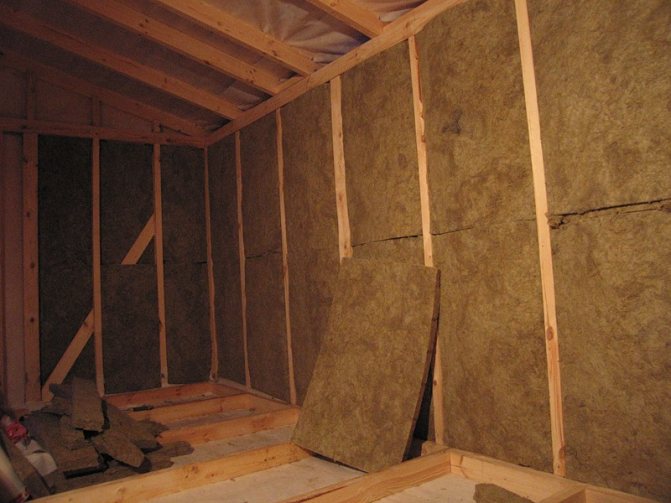
Insulation of the barn from the inside
The next method is to insulate the shed from the inside, it will suit you if the boards on the walls are more or less even and without cracks. It can be called the most expensive, since it requires the use of purchased materials, unlike the previous two options. But on the other hand, the appearance will be more or less beautiful, you can even convert the shed into a workshop.
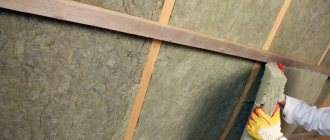
Usually, mineral wool is used for internal insulation, which is tightly packed into cells made of bars. As well as the insulation of the loggia and the facade, in the shed you need to protect the insulation from moisture with a layer of vapor barrier with foil. Also, for insulation from the inside, you can use foam, sprayed foam.

Insulation of the walls of the chicken coop
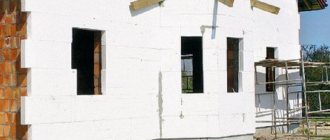
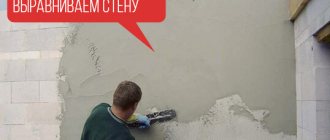
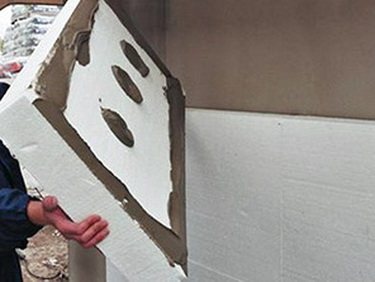
Wall insulation is carried out both outside and inside. It depends on the materials of the house. If you plan to keep chickens year-round, then they take the construction of a chicken coop seriously. The walls are erected from solid building materials (brick, foam block). The surface of the walls must be plastered and whitewashed with slaked lime.
In regions with harsh climatic conditions, the walls are additionally insulated with sheets of polystyrene or polystyrene foam. Let's consider the characteristics of these materials.
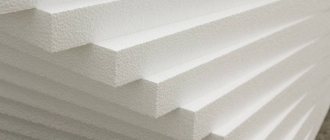
Styrofoam
Foam plastic is polystyrene granules, foamed and compressed to the required thickness. The main volume of the material is air, which gives high thermal insulation and lightness to the product. Polyfoam from different manufacturers has different strength and density.
It is worth giving preference to polystyrene, which contains antiperen - an important component that protects the insulation from fire.
It is used as a heat-insulating material, widely used in construction:
- for the foundation (protection against soil pressure, the influence of cold);
- for the floor (laying on the floor in front of the screed);
- for walls (fastening from the outside and inside);
- for the roof (it is laid in two ways - a warm roof 70 mm foam sheet in combination with bitumen and a cold one);
- for the facade (a sheet with a thickness of 50-60 mm is used, glued to even walls with special glue, fixed, plastering).
When buying polystyrene, it is worth knowing in advance certain nuances - the higher the density (stability), the lower the thermal insulation of the material. A low degree of strength and density implies protection against mechanical damage. The latter characteristics are used to insulate frame and other rooms.
A big plus when choosing foam as insulation is:
- excellent thermal insulation;
- its availability;
- relatively low price;
- durability;
- does not require additional waterproofing, resistant to moisture;
- light weight;
- ease of installation.
The disadvantages include:
- low strength of the material;
- does not allow air to pass through;
- emission of gases hazardous to health in case of fire.
Penoplex
Penoplex is a new generation of thermal insulation boards. It is a dense slabs with a fine-mesh structure, measuring 120 by 60 cm. The basis of the foam is also polystyrene. A feature of the penoplex is the presence of a solid L-shaped edge, which allows the slabs to be joined without cracks.
Besides the same purposes as the use of foam, it is also suitable for pipe insulation. Also has some properties:
- high thermal protection;
- does not emit fumes and harmful odors;
- extended temperature range (from -50 to +75 degrees Celsius) makes penoplex suitable for different climatic zones;
- does not absorb moisture;
- long service life (about 50 years);
- withstands sharp freezing.
The disadvantages include:
- not used without lining (plaster);
- toxic when burning;
- poor barrier against rodents.
Foil penofol
A relatively new type of insulation. It is a material characterized by high qualities of thermal protection, consists of a layer of polyethylene foam and reflective foil. The base thickness varies from 2 to 40 mm. Foamed polyethylene blocks direct heat transfer. It can be installed in combination with other thermal insulation materials.
If the walls of the hen house are thin (barn type of building), there will be much more insulation work. Warming is achieved by combining different types of materials. Additional materials are mineral and basalt wool - used for thermal insulation of walls and ceilings. These heaters perfectly tolerate temperature changes, are hygroscopic, have fire-fighting properties and are easy to use.
Let's summarize
In this article, we examined the basic methods of insulating a barn. Which one to choose - cheap, but laborious, or more expensive and durable, in the end it is up to you to decide. If the structure is made of poor material, then of course it is better to use the economy option.
The owners usually prefer to cope with the construction of households on their own. buildings. And quite often the question arises of how to insulate the barn. Even before starting construction, you need to know for what purpose you need it: to store unnecessary trash, tools, or livestock will live in it. Determine the dimensions of the future structure. Then mark the planned shed on the site, dig a trench under the foundation. It can be shallow, about half a meter. When pouring the foundation, you can use stones, pieces of old brick, mixing them with cement mortar. If the foundation suddenly subsides, you just need to add a new one.
The best option for insulating a barn.
In the event that you are building a barn for animals, you need to think about how to insulate the barn. The best solution to this issue would be to insulate the barn during the construction process. In this case, two rows of walls are laid out, and any heat-insulating material is placed in the resulting space. To install the roof, boards are fixed at the top of the walls, and they need to be screwed from the inside. The insulation should be laid on logs and covered with boards. So that moisture does not linger on the shed, the roof should be sloped. For the floor, you can take pallets and cover them with straw. Such a shed will be inexpensive if you use the materials at hand and do all the work yourself.
Possible options.
If the barn was built a long time ago, and you decided to insulate it only now, due to a change in its purpose or for any other reason, you have several options.
Barn design
Design is the foundation of construction. Anyone, including private. If you don't take care of the main purpose of the building in advance, as well as important and secondary details, then you won't be able to build anything more sensible.
And if it works out, then in the process of operation the negative sides of the previously not thought out construction process will be revealed. And you will feel more negativity than satisfaction from the operation of a building built with your own hands.
So how did I design my barn.It was supposed to store things for seasonal use - skis, a lawn mower, a pressure washer, garden hoses, winter and summer car tires, tents, sleeping bags, winter and summer garden shoes, fishing tackle, a boat, an outboard motor and a catamaran.
For this reason, the barn must be insulated and heated. When I was building a frame garage, the lack of experience in designing outbuildings affected. I did not include in the garage the possibility of storing all these things there. Therefore, the shed had to compensate for that lack of a garage - the lack of additional space and the ability to store seasonal items in a warm room.
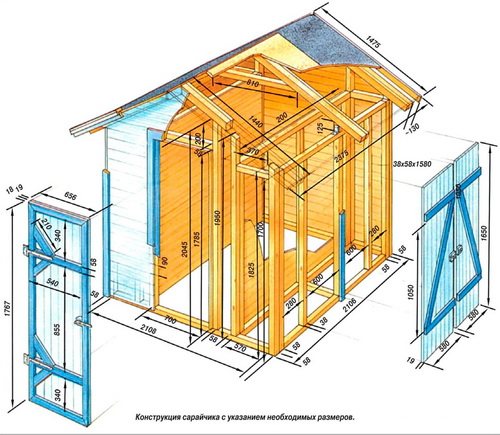
As a result, after drawing work and two days with a calculator, I had 3 documents at the output:
- Drawing of a barn in three projections.
- List of building materials with volumes and prices.
- An estimate for all construction, including the purchase and delivery of building materials.
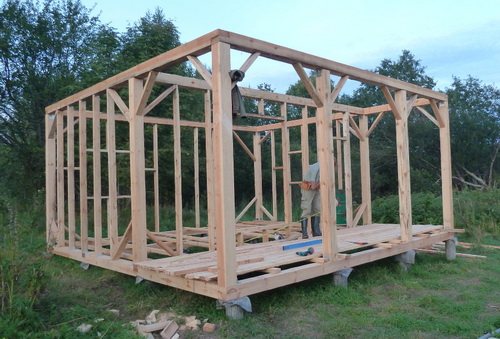
Based on these plans, I started building a frame shed.
The first method is boarding.
The shed outside can be sheathed with boards according to the principle of brickwork, closing the gap between the two boards of the third. The walls are upholstered with a slate in the same way that is used when covering the roof. In addition, the shed can be sheathed with boards from below. Sheets of slate are placed higher, and then timber is stuffed.
In the process of work, insulation is poured between the walls, which needs to be tamped with something. Pine needles, fallen leaves, sawdust can be used as insulation. These materials are mixed with lime in a ratio of one to twenty-five. This avoids problems such as rodents between walls. The ceiling also needs to be hemmed, and the same composition should be poured on top. Boards are stuffed above the rafters and covered with roofing material in several layers, which must be nailed with wooden slats at a distance of half a meter. The lower part of the shed can be furnished with slate on both sides, which will protect the room from rodents and predatory animals.
From below, the shed is insulated by sprinkling the floor with soil, 10 cm below the main floor, and then lay and tamp the clay mortar.
The door is made of boards knocked down diagonally, with a layer of roofing material between them, so as not to let out heat.
We insulate the floor
As you know, the coldest air is always from below (in this case, we will not consider the principle of operation of a warm floor). If the shed is not capital, then at best it is installed on a shallow, non-insulated strip foundation, and often it is not observed. One can only guess how the ground freezes. A blind area with insulation will seriously help, but not everyone will consider it appropriate to do it. Some people sprinkle manure, reeds or leaves around and cover it with clay on top, and in the spring this structure is removed so that the walls do not rot. The method is peculiar, but when there is frost on the walls and floor inside the building, then at least something is better than nothing.
To insulate the floor, you can add soil around the entire perimeter of the structure in order to raise the level by 10 см15 cm, and then pour clay on top and tamp it all down. Such a floor can be sprinkled with sawdust, which must be changed periodically.
You can also knead clay with straw and make a clay floor.
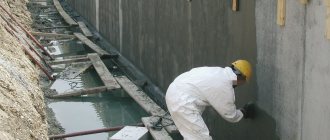
More seriously, thermal insulation is carried out in capital premises made of stone, blocks or bricks. In this case, the foundation is insulated with penoplex, a solid blind area is made, and from the inside (if necessary) the floor is insulated, and then a concrete screed is poured.
The situation is somewhat different with a barn built on piles.
The second method is shingling.
How to insulate the barn if money is tight? The walls must be sheathed with shingles, it must be nailed diagonally, starting from the corner. Do the work in one direction, then in the other, having achieved the criss-cross of the shingles.It can be replaced with goat willow branches, then the clay can be applied thicker.
Take up the preparation of clay mortar by adding sawdust to it. The clay must be soaked and diluted with water to the consistency of liquid sour cream. Sawdust needs to be added a little bit, achieving the required thickness of the solution. For cooking, it is better to take larger dishes so as not to knead several times. The finished solution should stand for a while.
Apply a generous amount of mortar to the bottom of the wall and smooth it out with a trowel. Its layer should be at least 3-5 centimeters. Apply the solution evenly, paying particular attention to the corners of the room. They can even be rounded and made even warmer. After finishing plastering, let the walls dry for several days. During this time, cracks are formed, which must be wiped with a solution of clay and sand in a ratio of 1 to 2. The walls must be whitewashed with lime. Take lime in granules, dilute in half a bucket of water. Within a minute, a reaction with water will begin, the solution will be very hot. When the reaction is over, fill the bucket with water to the top, add a spoonful of table salt.
Insulate the ceiling of the barn. At the level of 15 cm from the roof along the perimeter, fix the bars. The length of the boards should allow them to lie on the bars and fit snugly against the walls. Pour the boards on top with a solution of clay and sawdust, 10 cm thick, after opening the roof. Again, special attention should be paid to the corners.
The process of insulating a barn in this way is quite laborious, but the cheapest and very reliable. Now your animals will definitely not freeze!
Often, in a subsidiary farm or on a small farm, it becomes necessary to insulate premises, buildings where animals and poultry are kept. Usually these structures are not permanent, made of board panels, plywood.
The purpose of insulation is to maintain a positive temperature throughout the winter without heating or with its minimum power - up to 2 kW for a building of about 30 square meters, and also so that insulation is extremely cheap. But that doesn't mean bad. Savings occur on finishing, "brand" materials, fastening design, and also because it is done by hand.
Simple slots - large heat leaks
It is necessary to insulate the chicken coop, barn, shed in a complex manner. Most of the heat escapes with the exchange of air. No heating can withstand a draft ...
First of all, you need to put a second glass on the sealant, if there is a window. Effective insulation of windows - for the winter above the glass of 15 mm, along the strips on the sealant, install a plastic film - a double-glazed window for the chicken coop. At a minimum, it is necessary to seal the cracks in the windows and frames.
But there should be no non-adjustable gaps under doors or windows - this is the basis for insulating any building.
How to insulate the chicken coop?
Where it is required to insulate a chicken coop, a poultry house or a shed, there are often large quantities of natural insulation “underfoot” - straw, hay and wood shavings (small sawdust is not suitable).
To prevent any living creatures from starting up in them, they need to be prepared. You will need lime (fluff, crumbly) and this is the main cost - one volume of lime per 10 volumes of material. And also - boric acid and copper sulfate - excellent anti-rotting agents.
To use the material in shields, it must be strengthened by adding 1 part of cement to 10 parts of the material. A solution is made with the addition of antiseptics and mixed with the required volume of shavings, hay, and straw. It is laid in shields, on the overlap in a wet state, when it dries, it gains strength. It is advisable to prepare hay and straw with a length of 20 - 30 mm, which is sometimes problematic and laborious. But it is precisely the finely cut material that is easy to use, and has the best heat-saving properties.
An alternative to all this is the use of foam, a very cheap insulation, especially if you buy it in bulk. Sometimes it is cheaper, and most importantly faster and easier to install.
But lining with polystyrene will lead to a violation of vapor exchange in the wood, structures may eventually begin to rot and rot.
However, more often it is not critical for the chicken coop, moreover, with other heaters, steam insulators have to be used, which also negatively affects the wood. Therefore, foam insulation of a barn, a poultry house, a chicken coop, as a very cheap insulation, can be recommended as a way out of the situation.
We insulate the ceiling in a chicken coop or shed
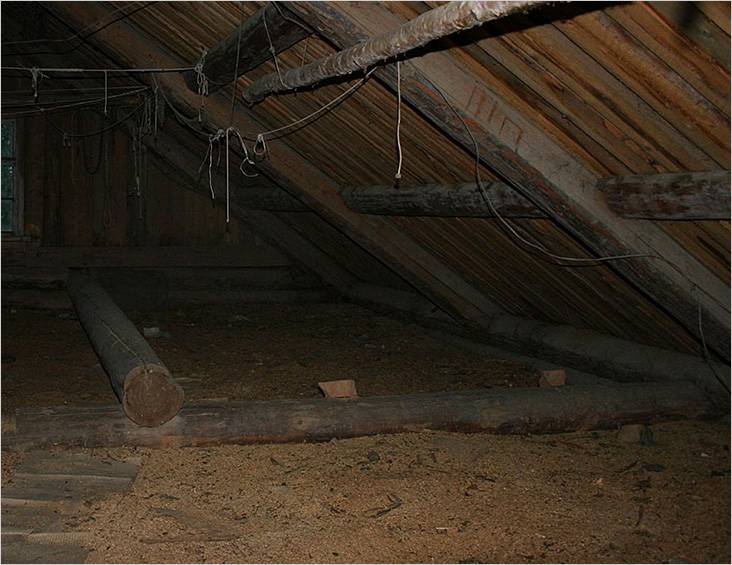
First of all, we insulate the attic floor. We'll have to use a vapor barrier, you can use ordinary dense plastic wrap. Without it, the insulation will get wet faster than dry. We cover with overlaps, over the entire floor area with a twist on the walls.
If nothing is stored in the attic, then it is enough to fill it with processed (but without cement) hay-straw with a layer of 20-25 cm thick.But if you plan to walk regularly, then it is better to do flooring on a crate with a height of at least 20 cm, taking into account ventilation. gap (insulation thickness 17 cm).
Foam plastic from 25 kg / m3 with a minimum thickness of 12 cm, it can be laid without lathing in two layers with bandaging of seams in layers, and on top of it you can throw boards, plywood on which you can walk.
Using polystyrene, it is advisable to seal all the cracks with crumbs on polyurethane glue.
How to insulate the walls of a barn, barn ...
Plank walls need to be converted into shields. On the inside there should be a dense layer that prevents steam, on the outside - more vapor permeable. If there is no dense layer of material from the inside, then it is advisable to apply a vapor barrier from the inside in front of the straw heater, as well as on the roof.
The order of work is to install from the outside (or from the inside, which is better?) Vertical beams with a thickness of 12 cm, a step of 600 mm, and between them fill in organic insulation with cement in series with the filling of the missing cladding from the bottom up. Coat the outer cladding with something water-repellent, for example, even waste oil.
The peculiarity of using foam on the walls is the absence of a vapor barrier and careful sealing of cracks. Dense foam can be glued to the walls, and on top of it you can glue some kind of protection from ultraviolet radiation and water - the same thin plywood that can be painted on top. The recommended foam thickness is 10 cm.
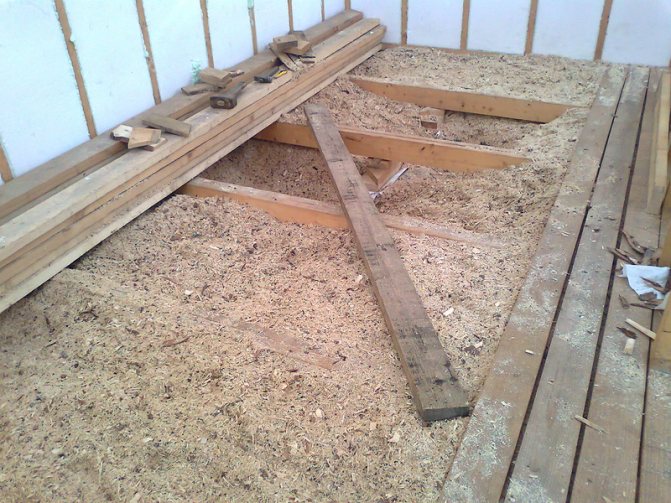
We heat-insulate floors and soil
Usually in a chicken coop, shed, barn, the floors are made on compacted soil with some kind of filling. Their warming is often reduced to adding natural (unprocessed) straw, hay, shavings for living creatures. You just need to remember to turn the contaminated layer, change it in time.
In winter, the soil is a natural heater of an auxiliary building, a barn, a garage. A positive temperature can be maintained by the heat of the earth. For this to happen, it is important to insulate the soil around the perimeter of the shed or poultry house to a width equal to the freezing depth in this area.
It is best to dig end-to-end to the foundation with extruded polystyrene foam with a thickness of 8 cm. But it is not cheap. Another option is all the same hay and straw 15 - 20 cm thick, protected from precipitation by shields, slate with a slope, and from the steam of the earth - with roofing felt. Or simply - hay with a thickness of 50 cm, covered with boards - a heap. Even in a wet state, such a layer will give the desired effect….
As you can see, insulating a chicken coop or a shed is really not expensive at all. Such insulation, as a rule, is done by hand, but the labor intensity is not small, and the quality will depend on the thoroughness of the execution….
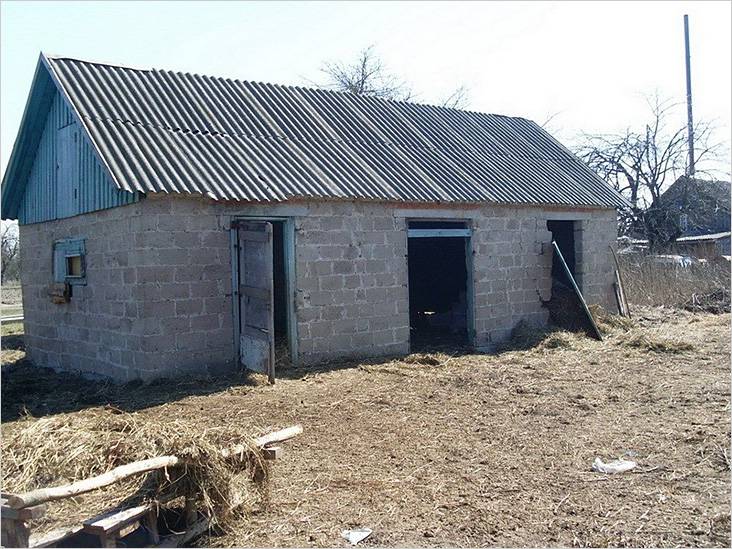
Let's first consider the ideal option - building a poultry shed for all requirements. Experienced summer residents recommend building a poultry shed from foam blocks and aerated blocks - in this case, the room will not have to be insulated.The disadvantage of this method is unnecessary financial costs. How to build a warm barn at minimal cost?
You can make wood concrete yourself - blocks of mixed wood chips, sawdust and cement. The only cost is the purchase of cement. It will need no more than 10% of the sawdust mass, for one cube of finished material - about 250 kg. The advantages of wood concrete in construction are obvious - the room can be built on a lightweight foundation, it will not need to be insulated, the shed can be made spacious and high due to the cheapness of the finished wood concrete.
But with all the advantages, there is also a drawback - arbolite does not tolerate moisture too steadily, therefore it is recommended to plaster it from the outside or upholster it with a waterproofing material, for example, the same roofing material.
Inside, the floor can be made of wooden planks - the material itself is quite warm. Do not forget about the roosts - you can use old wooden boxes filled with straw. If there are many chickens, they can be arranged in several levels. By the way, one of the ways to insulate the shed from the inside is to increase the number of chickens themselves, so if you build a large room, then you can have more chickens. We figured out how to make a warm shed with our own hands!
Wall insulation
Plank structure
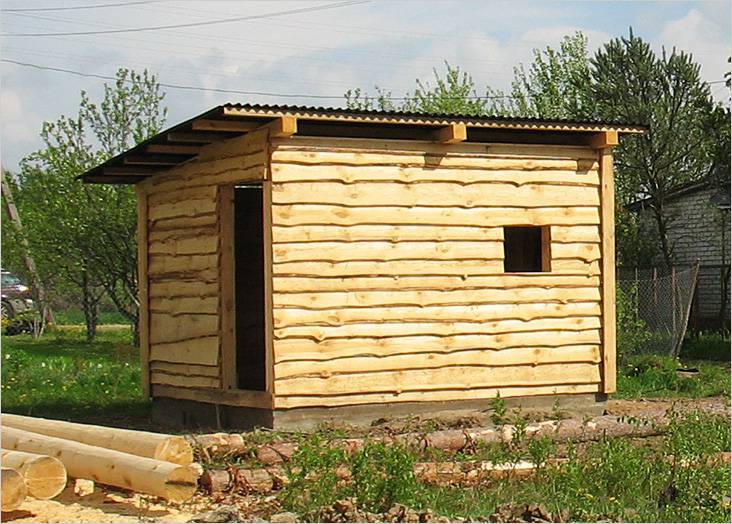
Shed of boards
Even if the barn is built of planks, it can be well insulated.
- Boards crack even with good care, and even more so in a wooden shed. This phenomenon will have to be fought. You can use materials at hand (tow or dry moss) in order to seal cracks, but this can be done much faster with the help of polyurethane foam.
- Now, from the inside, you need to make a second wall at a distance of 30 cm from the main one. A frame is simply made onto which the OSB sheets are screwed, and the space is filled with heat-insulating material. Design features do not matter, the main thing is that the system is reliable. Instead of OSB, you can use an unedged board, nailing it with a herringbone. In this case, the cracks from the inside will have to be sealed with polyurethane foam.
- To prevent the insulation from pulling moisture from the floor, roofing material is laid on the ground under it.
How to carry out work
Various materials can be used for insulation.
This natural material can effectively and very inexpensively insulate walls. Of course, if there is no straw nearby, then it will have to be purchased and delivered, but it will be relatively inexpensive. This material cannot be used in its pure form, as insects can start in the straw, or it will simply begin to rot. Therefore, for every 25 kg of straw, add 1 kg of lime. Everything is thoroughly mixed, and only after that the composition becomes suitable for filling the gap between the walls. Do not confuse straw and hay, as it is not suitable for insulation and will rot very quickly.
If there is a sawmill nearby (or there is another possibility of delivering this material), then dry sawdust can be used. They also need to be mixed with lime in a 1:15 ratio (lime / sawdust). You can also add cement, about 10% of the sawdust volume, which will make the mixture more resistant to caking and more moisture resistant. When laying sawdust, it is necessary to ram them, of course, that this will be done within reasonable limits. After a couple of weeks, it is necessary to check and, if necessary, add sawdust, as they could have caked.
Penoizol is very similar to foam crumbs. The degree of thermal insulation is much higher than that of sawdust and straw, and if you have to buy insulation, then it is better to purchase penoizol, since it is not afraid of moisture, and its cost is quite acceptable - about 5-6 thousand rubles. per m 3. The crumb is simply poured into a place prepared for it and is closed from precipitation with plastic wrap.
It would be easier to fill all cavities with penoizol, but it will not be cheap.
It is also a fairly effective insulation that is not damaged by mold. Its cost is almost the same as that of loose penoizol. No need to ram.
Expanded clay will cost 3, or even 4 times cheaper than the above materials. Give preference to the material of the fine fraction, since there are large voids between the large "stones", which are bridges of cold. If you have just such a material, then it can be mixed with clay and such "concrete" to fill the voids between the main and auxiliary walls. In this case, the filling is carried out gradually, the lower layer is allowed to grab, otherwise a large mass of the composition can squeeze out the inner wall.
Video: sealing gaps between logs with foam
Only half the battle has been done, since it is not enough to eliminate drafts to maintain an acceptable temperature inside the room.
Warming with clay with sawdust
We will not insulate a log shed using the same technology as a wooden house. There is another method, which is also very effective, but is no longer used in modern houses - clay mixed with sawdust.
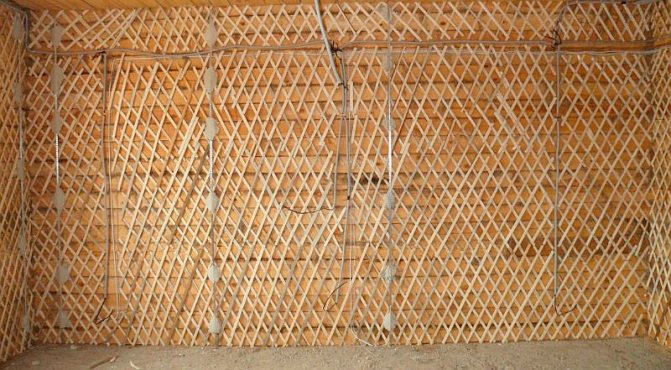
Of course, we will not apply the clay to bare walls, since with this kind of work it will simply fall off, but first we will fill the shingles from the slats.
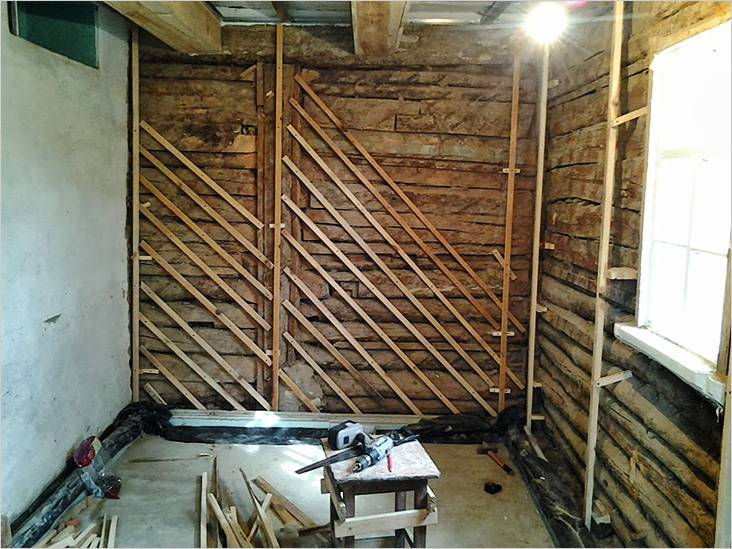
We nail shingles to the walls
The first layer of battens is nailed diagonally in one direction, and the second layer in the opposite direction.
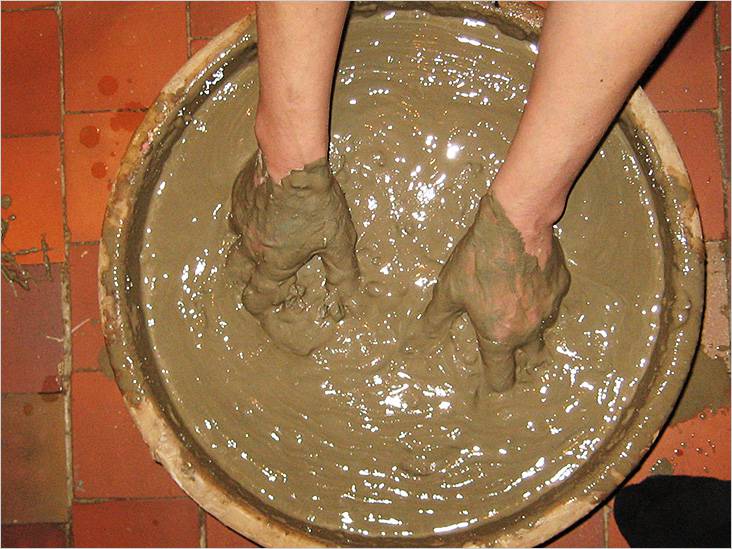
Clay needs to be diluted to the state of sour cream
Having finished with the shingles, we will soak the clay for half an hour so that there are no lumps left in it, and the mass itself turns out to be pliable and plastic.
If the clay is very dry, then it is better to fill it with water a few days before the start of the insulation process.
Sand can be added to the greasy clay in a 1: 1 ratio, and then, after mixing, add hay. To prevent rodents from settling in such plaster, slaked lime is added to the solution. Instead of straw, some use reeds, which are too tough for mice.
Now you can use the prepared solution, applying it to the wall in a layer of about 5‒7 cm. A thicker layer will crack. Essentially, the plastering of the wall is done. The solution is poured onto the surface and then leveled. The corners do not need to be made straight - it is better to leave them rounded, adding a little mortar in these places.
Depending on the season, the drying rate of the plaster may vary, but it should still take a few days until the wall is ready. The process should not be accelerated, as this will lead to the appearance of numerous cracks. Even with the most correct approach to performing the work, a certain number of cracks will appear, but this does not matter. Prepare a solution of sand and clay (2: 1), and then rub all the flaws with it.
At the end of the work, the walls can be whitewashed with slaked lime - the view will become more attractive and protection from rodents will be provided.
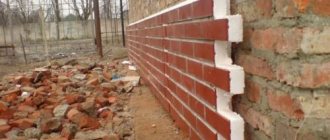
Stone or brick shed
Whether it's a brick or stone shed, its thin walls freeze through in winter. There are many options for insulation, but many of them will cost the owner a lump sum. In addition, the approach associated with the conversion of a barn for animal hibernation is somewhat different. For example, the use of Styrofoam can lead to increased humidity, and chickens will peck it out, so additional protection will be required.
How to insulate a chicken shed for the winter with your own hands - simple ways
But not always on the site there is a place for the construction of the necessary premises, and time is running out. In the summer you can even install, or use the existing one, but neither one nor the other is suitable for winter. Before you insulate a chicken shed for the winter with your own hands, check out our suggestions - you will surely find the right one. Most often, the shed is insulated from the inside with clay mixed with straw or the same sawdust.
If the walls are wooden, to increase adhesion, pack small nails into the boards before plastering and pull a wire or thread between them. If there are thin wooden slats, you can fill the crate with them. The plaster layer should be no thicker than 5 cm, otherwise it will not adhere well
... It is advisable to finish the plaster long before the onset of cold weather, so that everything dries properly.
The method is cheap and the result is quite good, but if your region has severe winters, you will have to spend money on the purchase of thermal insulation materials - mineral wool or foam. For insulation with mineral wool, you will also need to pre-fill the slats on the walls - they should be located vertically, from ceiling to floor, a little less than the width of the mineral wool rolls. We spread pieces of insulation between the slats - it does not need to be additionally fastened with anything. Then the layer of thermal insulation should be hidden under plywood sheets or board panels.
If you are insulating the barn with polystyrene, it is better to do this from the outside, since the material is rather fragile, and chickens can peck it. A layer of insulation on the walls should be plastered and whitewashed with lime. In order for the plaster to adhere well to the surface of the insulation, it is best to glue a special fiberglass mesh to the foam plastic, and only then apply a layer of cement.
We insulate the ceiling
The ceiling can be insulated both from the inside and from the attic side (if any).
From the attic
Insulation of the ceiling with sawdust
A plastic wrap is laid on the attic floor. If its size is not enough to cover the entire span from edge to edge, so that it goes onto the walls, then you can overlap it, gluing it together with tape. If you do not take care of the vapor barrier, then the insulation will soon get wet, and there will be little use from it. It remains to pack straw or sawdust, and the cold from the attic will not penetrate into the shed.
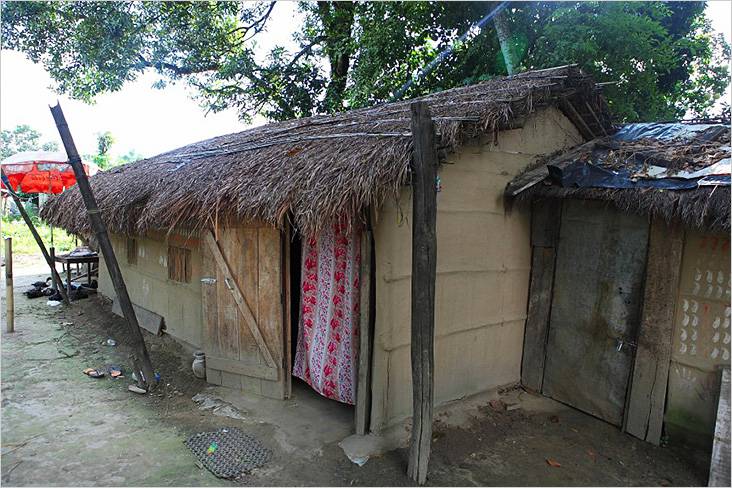
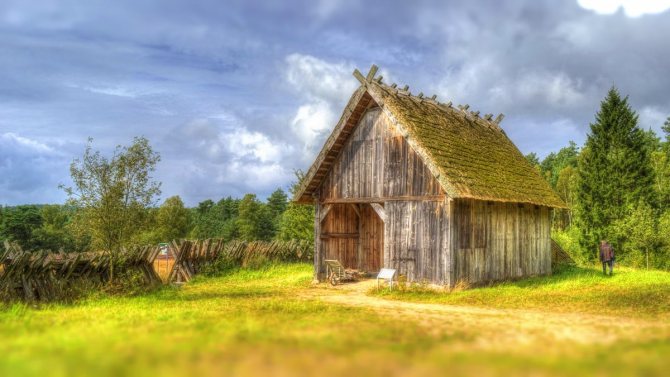
The roof of the barn is covered with thatch
Video: ceiling insulation with sawdust
Internal work
Not every shed is made with an attic - many are simply covered with slate or other roofing material. In this case, the insulation can be attached to the beams (make a rough ceiling or fix the lathing).
Video: ceiling insulation from the inside
It is advisable to know before construction what the shed will be used for, to foresee a method of insulation in advance and implement it.
How to insulate a poultry shed - a stove and scrap materials
How else to insulate the poultry shed, if not with straw. It is enough just to sketch it on the floor, you can also sketch out an old rag. Of course, this is an additional method of insulation that must be combined with the main ones. If the frosts are very strong, and poultry can hardly endure them, the most effective way of warming is the construction of a small brick stove. It is not recommended to make it out of metal - although it heats up quickly, it cools down just as quickly, but the brick will keep warm for a long time.
Very often old buildings require changes in the form of insulation. This happens for a number of reasons, including the choice of an imperfect project or a change in the purpose of the structure. This is especially true for outbuildings located on the territory of the site. So, the barn used to store the tool can be used for breeding animals. Accordingly, it is important to create the necessary conditions for raising poultry or livestock. Many of the methods used by the older generation are not sufficiently effective and costly, so it is worth knowing how to insulate a barn.
Of course, it is better to think over all the nuances of future operation even at the stage of building a building, however, improvement can be carried out for an existing building. There are two main ways to insulate:
- Furnace installation.
- Insulation of the structure itself.
The first method involves the use of two types of heating devices - metal and brick. Each oven has its own characteristics, so when choosing, you should focus on their disadvantages and advantages. Experts recommend installing a metal device for periodic work, because it can quickly heat up the surrounding space. And in the case of maintaining a household, use brick ovens that provide the required temperature for a long time.
In the second case, the walls, floor and ceiling of the barn are insulated using various materials. Well-known or modern technologies can be used, it all depends on the financial capabilities and the desired result. But when choosing a material for insulation, you need to take into account its characteristics, many simply do not tolerate moisture. Therefore, you will have to take care of waterproofing, which will entail additional costs.
Ways to insulate a chicken coop
Farming is constantly evolving, there are new ways to keep warm. There are both overly expensive (electric heating) and budget (wall insulation with available materials). You can create comfortable conditions for birds to live in one of two options:
- Natural. This method is advisable only in areas with a pleasant climate. As a rule, the farmer already at the stage of building the chicken coop provides for the function of natural heating and insulates the walls. But this method can also be used in a completed building, if the previously created insulation turned out to be defective.
- Artificial. It is used in cold climatic conditions, in which ordinary insulation does not give any result. The easiest way is to equip the house with electrical heaters. It is also the most expensive one.
Important! Even at the stage of building a chicken coop, it is worth paying attention to the gluing of the walls, ceiling, floor. The latter is usually a concrete pavement, which freezes severely in winter and is dangerous.
Natural insulation
If the chicken coop is just being built, high-quality insulation of all surfaces should be provided:
- walls and ceiling are made with double walls, insulation is placed between the skin;
- floor: a layer of expanded clay 10-15 cm high is laid under the concrete screed.
If you have an attic, insulating the roof from the inside would be a suitable option. But first you need to make sure that it is completely sealed. For this, the roof is closed with sheets of roofing material, which will protect against snow and rain. The joints of the sheets are coated with construction resin or other fixing compound. All the cracks from the inside also need to be covered.
Ventilation in the hen house is a prerequisite for a comfortable stay of chickens
There are several ways to naturally insulate a chicken coop, if the room is already ready. It is best to use them together to provide the birds with maximum comfort.
Artificial insulation
If chickens are reared in frosty regions, natural warming may not be sufficient. Therefore, artificial methods have to be applied. The modern market offers a lot of devices for artificial insulation of chicken coops. The most popular methods are shown in the table below.
| Way | Description | Installation principles |
| IR lamps | ||
| IR heaters | ||
| Electric heating | ||
| Gas heating | It is a volumetric gas boiler and pipes that are installed around the entire perimeter of the chicken coop. The water in the boiler heats up and circulates through the pipes, due to which the temperature in the room rises. | The equipment is very expensive and requires complex installation, so it is advisable to use it only on industrial farms. It is very unprofitable to heat small chicken coops in this way. |
| Furnace heating | Some farmers choose stove heating for chicken coops. These are very economical potbelly stoves that can be fired with anything. | The most fire hazardous way. Stoves require indispensable control, since the smallest coal can cause a large fire. It will be safer to install a convection oven in the chicken coop. |
| Water heating | Water heating is the best option for a chicken coop, which is adjacent to a private house. A separate heating circuit is created, which is distributed around the entire perimeter of the chicken coop. It is enough to equip a small poultry house along the contour with two metal pipes. |
The choice of a suitable heating option depends on the individual needs of the farmer and the characteristics of the farm. As a rule, the most popular methods are infrared heaters or potbelly stoves.
Important! If an electrical device was chosen as the heating system, it is advisable to provide for an automatic shutdown of the device in the event of a fire. In addition, it is important to follow all safety regulations when installing the system.
Combination of natural and artificial systems
Combining natural and artificial insulation methods in a poultry house is not only possible, but also necessary. Because even the highest quality surface insulation will not be able to give a full-fledged result and protect chickens from frost.
When creating a combined insulation, you first need to pay attention to the competent insulation of the chicken coop from the inside and outside, and only then think about the method of artificial heating.
Chickens under an infrared lamp
External insulation is a good choice
In order to insulate the barn for the winter, you can use improvised means, work with which does not require special skills. The next set of measures is able to provide comfort for a long time, namely, you will need:
The second popular method is shingle wall cladding, it gives a warm room with little or no investment. However, this technology is laborious, so it is worthwhile to think in advance about a suitable option for better insulating the barn.
To do this, you will need the following materials:
- slats;
- nails;
- clay;
- water;
- sawdust or straw.
First, a kind of shingle frame is erected on the walls, the slats are stuffed from bottom to top diagonally, from above the next layer is nailed in the opposite direction. You should end up with a 45 ° cross-batten surface. Next, a solution is prepared, for this, water is poured into the clay and stirred until a sour cream consistency. Sawdust or straw is added in portions, while the mixture must stand for some time.
The clay solution is applied to the walls starting from the bottom row, the resulting layer should be 3-5 cm thick. For uniform application, use a spatula, with which the mixture is pulled along the wall. Near the corners, the clay layer may increase slightly, while the surface is rounded. This plaster dries up within a few days.
Cracks appear on the plastered surface, but sand and clay in a 2: 1 ratio will help to cope with them. From above, such insulation needs to be whitewashed with a lime solution. To decorate the ceiling, a box of wood is built and the resulting space is poured with a mixture of clay and sawdust. For effective insulation, a layer of about 10 cm is made.
Construction and insulation - we act outside the barn
Villagers hardly need to be told what pets are and how to care for them. But yesterday's "urban", who decided to move closer to nature, everything is new! As a rule, chickens are the first on the list of pets, not counting dogs and cats. In spring and summer, taking care of them is not at all difficult, the main thing is to provide quality food and a shelter where they can hide from the sun.But in winter, the question is different - you can't invite a chicken "gang" led by a pugnacious rooster to the house for the whole winter, and the animals will simply freeze in the tool shed.
The issue should be resolved quickly and efficiently. And, as everyone thought at that moment, it is desirable - inexpensive. Even a leaky tool shed can be turned into a warm room for the winter with your own hands. The easiest option is to knock down a wooden frame from the boards, hollow inside.
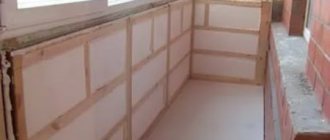
Internal insulation of the structure
Often they try to use technologies for outdoor insulation - this is considered an easier and cheaper way. But if it is necessary to insulate the shed from the inside, they buy modern materials, however, all surfaces should be smooth without significant flaws. Styrofoam, spray foam or rock wool can be used.
In the process you will need:
- slats or timber;
- nails;
- insulation;
- vapor barrier film;
- cladding material.
A frame for insulation is prepared from the slats, the nailed wood creates cells in which the mineral wool is embedded. A vapor barrier film is preliminarily pulled onto the walls, it will ensure the integrity of the insulation and the material from which the walls are made. Next, the laid layer is covered with boards, plastic or chipboard. This creates neat surfaces that do not require further finishing.
The above are the simplest ways to provide the necessary conditions in the barn, it is quite feasible on its own. Of course, to install a furnace in a building, you need to have construction skills and provide for all the nuances in the project for safe operation. But for external or internal insulation of the structure, it is enough to have available tools and detailed recommendations. In order to know how to insulate a barn with your own hands, we offer the following video.
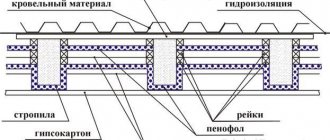
Insulation of the roof of the chicken coop
When planning a building, it is recommended to think about an attic and make a structure with a reliable black ceiling. Subsequently, bedding and feed material can be stored there.
With regard to the finished structure, almost the same materials are used (for roof insulation, additional waterproofing and vapor barrier are used), only the fastening methods change:
- Vapor barrier (vapor barrier films, membranes) is the protection of the insulation from moisture that is generated inside the building.
- Waterproofing (roofing felt) serves the same purposes, but is placed outside to protect the insulation from precipitation and condensation resulting from temperature changes.
Step-by-step instructions for warming a chicken coop
Based on the cost, the most convenient type of insulation is foam and mineral wool. Before starting insulation, the following tools are required:
- electric drill;
- roulette;
- screwdriver;
- level;
- assembly knife for cutting foam;
- construction stapler;
- hacksaw.
Next, the material is calculated for the entire room. List of materials:
- timber for making the frame (4 / 4cm);
- sheets of polystyrene or polystyrene foam;
- self-tapping screws (for installation in wooden walls), dowels (for hard surfaces);
- mineral or basalt wool;
- vapor barrier film;
- any available panel material (plasterboard, plywood, reinforcing mesh).