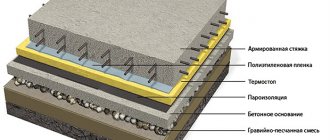
Concept and necessity
A screed is a layer of mortar that is applied on top of the surface. But with regards to the warm floor, then the screed plays different functions each time, depending on the selected layer.
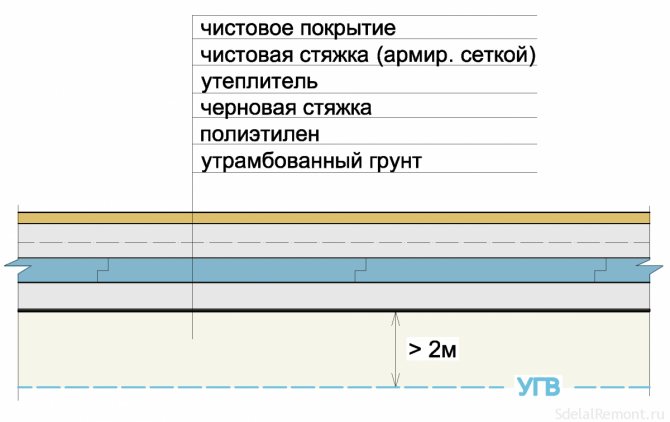
The first layer is carried out on the rough base. It is mainly used to create a flat surface for the subsequent laying of materials. In principle, this layer is suitable for all surfaces that have even minor effects. Instead of a rough layer for insulation, a floor slab or soil prepared according to all the rules can be used.
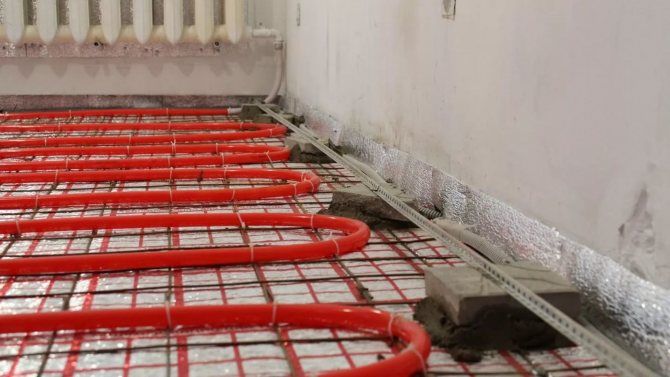
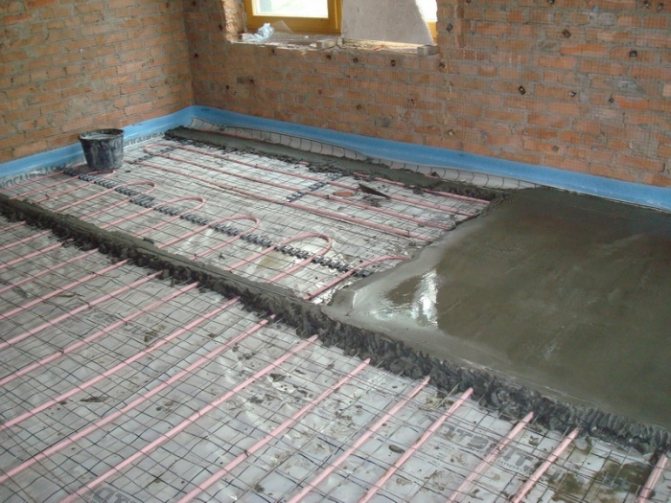
The second layer is poured over the thermal insulation layer. It will be designed for laying the underfloor heating cable on it. If everything is done according to the instructions and technology, then the installation of the cable floor will be much faster. As a result, the result will please everyone.
All that remains is to “close” the underfloor heating by filling in the underfloor heating. It will contribute to an even distribution of heat on the floor itself, as well as inside the room. This layer of pouring the underfloor heating screed will subsequently serve as a flooring surface for the selected floor covering.
The device of the final layer of the underfloor heating screed can be arranged only if the operability of the entire system has been checked. The pressure in it must be kept at the required level. Otherwise, you will have to remove the screed and see what problems there are in the operation of the warm floor.
Only these points will already indicate how to properly fill in the warm floor so that it can warm the air in the room from the base to the ceiling. If you move away from technology and try to do everything at your discretion, then over time you will have to dismantle the surface and possibly even elements of the warm floor, electric or water.
System types
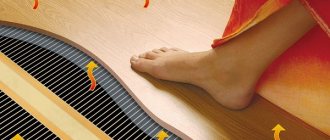
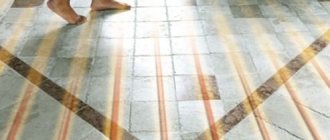
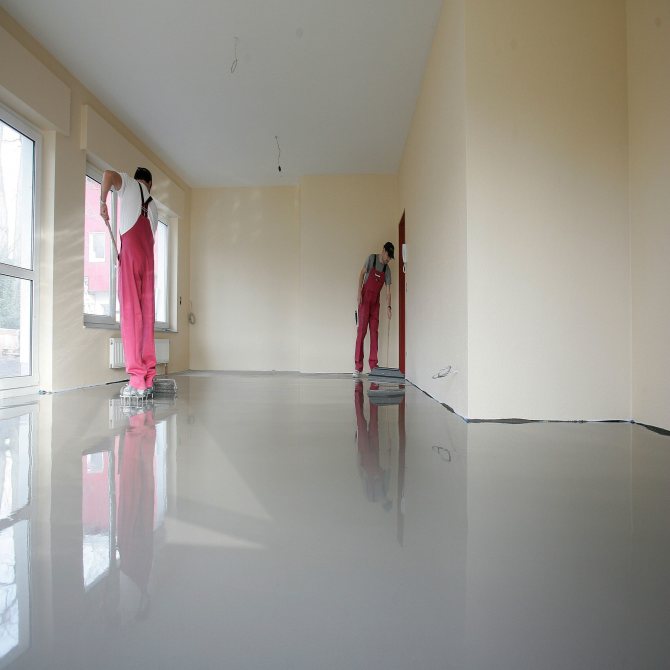
A self-leveling floor installed on top of a warm floor will create a cozy atmosphere in the house, no matter what the weather is outside. In addition, it allows barefoot walking on it in winter.
Depending on the heating system used, the warm floor under the self-leveling floor can be as follows:
- electric - this type is most often used in Russia. This is due to the fact that its device is simpler, and installation is much easier;
- water-based - this variety is more economical than the first. Its operation is associated with much lower costs than in the first case. But, at the same time, it is much more difficult to install such a system.
Let's take a closer look at these heating systems. Let's start with the water one.
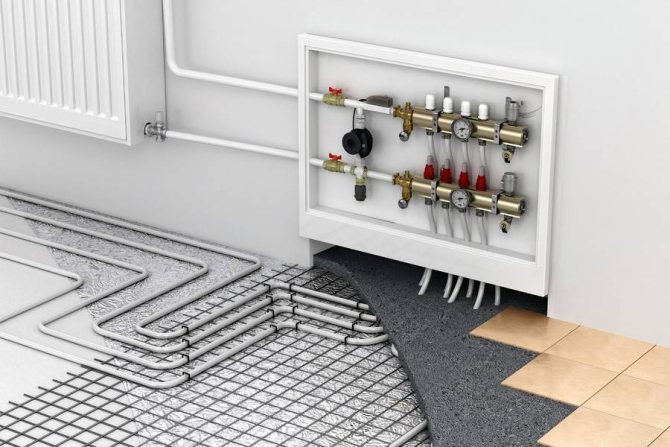
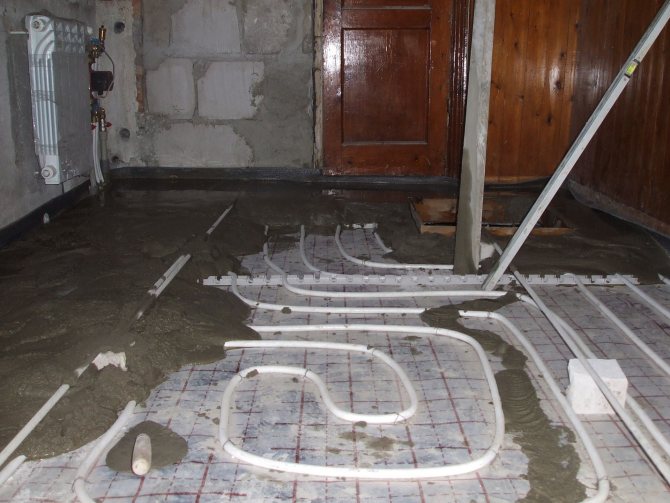
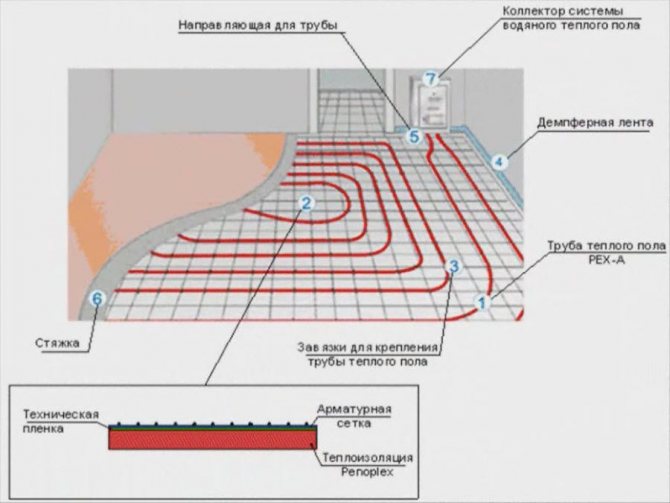
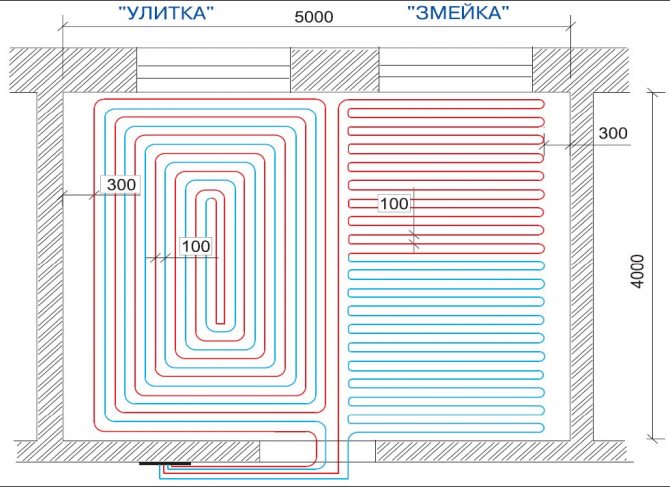
Water floor system
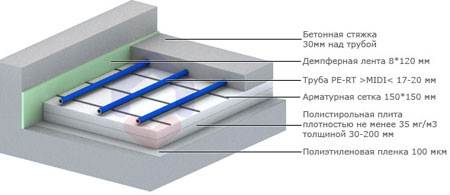
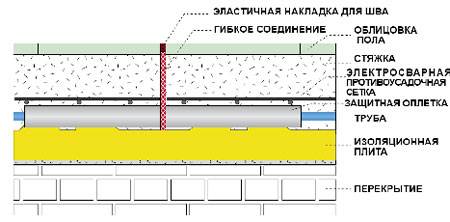
Floor layout with water heating
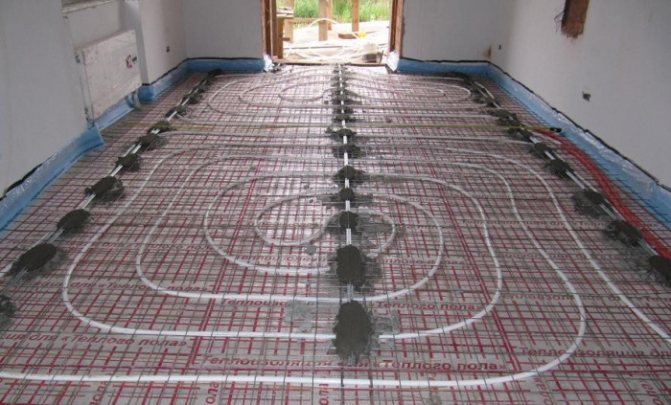
Its heating element is pipes with hot water in them. To create a similar self-leveling floor on a warm floor, these elements are simply poured with concrete or flooring is made on top of them. But, in this case, you will also have to install special guides.
As for the pipe material, it is better to prefer metal-plastic or copper. The second option is more expensive. But products made from it will be more durable.
The thermal conductivity of the self-leveling floor will be higher if plastic pipes are used.
Advice! Do not use PP elements for them. They are inexpensive, but very short-lived.
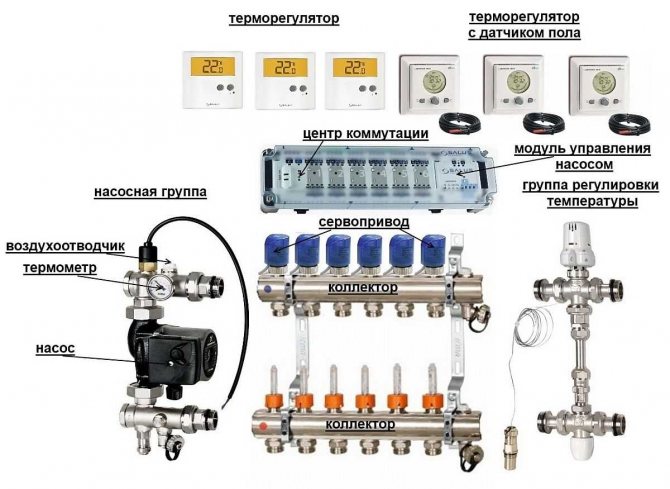
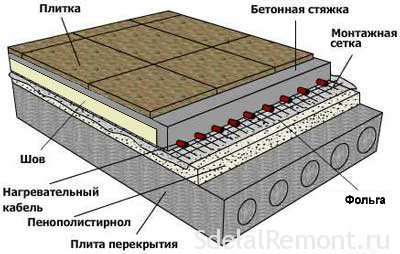
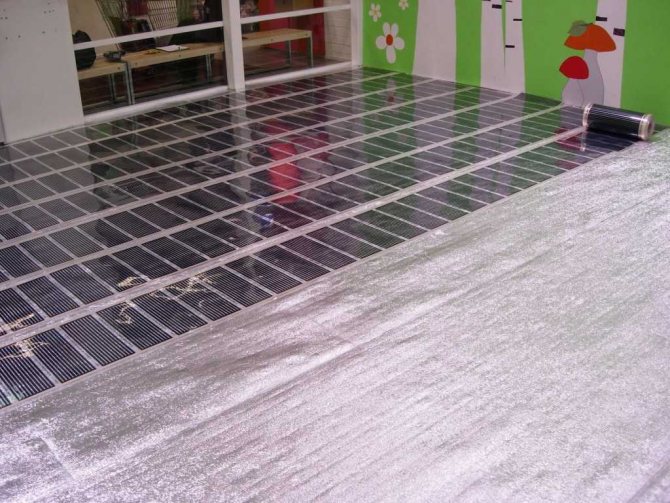
Electric floor system
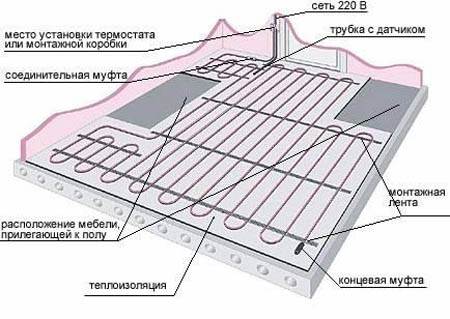
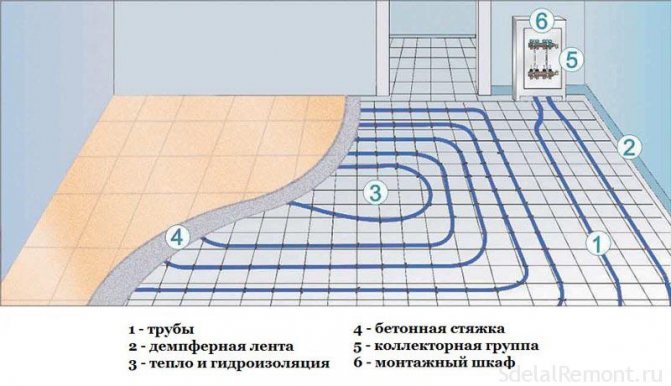
Floor plan with electric heating
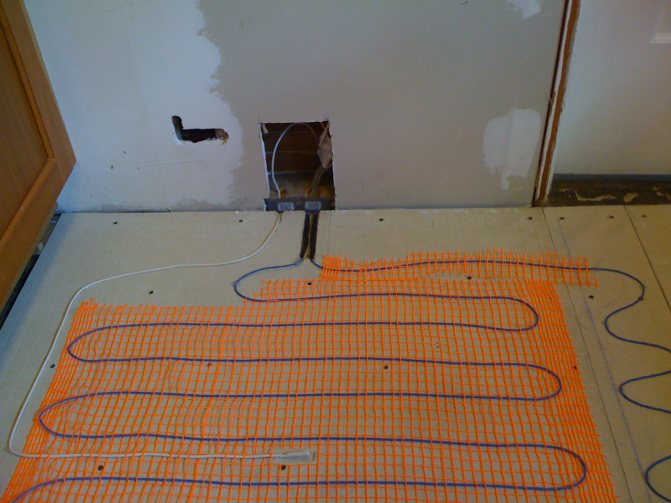
It is created using an electric heating cable located under the cover. It is safe to use and able to heat the room well.
In this design, one- or two-core wires are used. They have a certain amount of radiation. But it is many times less than the permissible value. Such a system is controlled by a thermostat.
Requirements for work execution
For underfloor heating screed, there are no regulatory documents that spell out the exact requirements that apply to it. But there are rules that cannot be deviated from. Among them, the most important requirement is a flat screed surface for the underfloor heating system. But this point can also be attributed to flooring to get a positive result. An even floor will serve as a good basis for all subsequent types of work. In addition to the classic floor screed, self-leveling mixtures can be used during installation. Everything will depend on the underfloor heating system itself, as well as on the installation possibilities.
Another important requirement is the required level of thickness. The screed layer should normally be 30-50 mm. It is these indicators that will allow you to get the floor heating evenly over the entire area. In this case, the strength of the base will be sufficient to withstand external loads.

The optimal layer of the screed will allow it to dry equally over the entire area, without cracks and subsidence. If cracks are formed on the surface, then they will cause negative moments, which include:
- Uneven heating of the entire floor, as well as heating of a room or, in general, an apartment.
- Separate areas with elevated temperatures will appear. In these places, the heating elements will warm up above the permissible rate, which will lead to reduced service life and failure.
If cracks have already formed, then all measures should be taken to carry out high-quality repairs. An important factor is the time delay until the cement screed is completely dry. Usually this period is up to 30 days. During this time, no work should be carried out, but wait until it is completely dry. It will not be superfluous to get rid of drafts and sunrays at first. The same temperature conditions must be created over the entire area in the room. Some resort to covering the screed with polyethylene film.
How to properly prepare the surface?
Before pouring the floor, preparatory work is carried out:
- The floor covering is completely dismantled so that the subfloor or floor slabs remain.
- Then the base is carefully examined to identify cracks, irregularities, debris is swept away from it.
- Carry out putty, priming work, lay waterproofing.
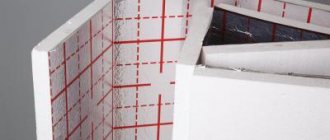
Waterproofing
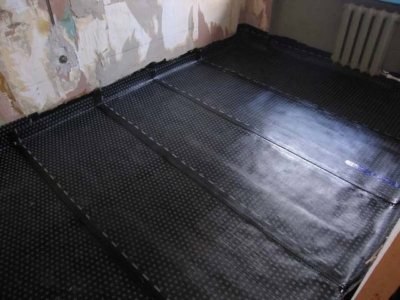
Before installing the thermal insulation, the base is covered with a waterproofing film. It prevents the formation of condensation at the points of contact between the lower part of the underfloor heating structure and the cold base.
Without waterproofing, moisture destroys the thermal insulation layer, in addition, due to high humidity, mold and mildew are formed.
Waterproofing is represented by several types with different composition, principle of operation and efficiency.
- Roll: inexpensive and popular insulating material based on roofing material, a dense film.
- Weldable: applied to the base, warming up with an open fire or a building hair dryer.
- Water based mastic: more effective in preventing moisture from entering the surface. Most often used for installation in multi-storey buildings.
Do-it-yourself putty and primer technology
- After cleaning the debris, the base is carefully examined for cracks and crevices.
- The walls are leveled until a 90 ° right angle is obtained between them and the floor.
- Cleaning the angles of convergence of walls and floors.
- All identified defects in the form of cracks, cracks are putty or plastered, then carefully primed for better adhesion of the waterproofing to the subfloor.
- Putty is applied to the lower edges of the wall 40-45 cm high from the floor.A soft damper tape is attached to it as a heater - when heated, the edges of the fill increase in size, and without such a tape, they can crack. Heat will begin to escape into the formed cracks.
Rough fill
Experts recommend plastering the walls, installing windows and other elements of the room before carrying out the rough floor screed. The same applies to existing communications (sewage, electricity, etc.). The fact is that a warm floor can be laid exclusively on a flat base that does not have defects, pebbles, adhesion of a solution. This will only negatively affect the process of his work. If you do the opposite, then it is best to lay a plastic wrap on the surface, which is subsequently removed.
When it comes to insulation under a warm floor, then it should also lie down evenly, without flaws. So you should take all measures to conduct a high-quality preparatory stage, before pouring concrete underfloor heating.
The mortar should not be in the corners of the room, an angle of 90 degrees should always be maintained. Otherwise, it will not work to achieve a snug fit of the insulation.
There are tolerances for unevenness. They are usually + -5 mm. Otherwise, the pipes may bend during installation, which will lead to the appearance of air pockets. If they are to be overcome, then it is necessary to install a mixing unit with a pump.
Only when all these measures have been taken can the first layer of the subfloor be poured. As for the solution, everything will depend on which options for pouring the warm floor are selected.
When the rough version is poured, you should wait until it is completely dry before laying the layer of thermal insulation. But even up to this point, all adhering parts of the solution must be removed from the surface, all debris and even dust must be removed. After that, do not forget to fix the damper tape around the perimeter in the room, which serves as a compensator for the thermal expansion of the floor screed itself.
Next, the insulation is laid, the next filling of the screed is made. This completes the filling of the floor under the warm floor.

What is needed for work
Now we list the possible material and tools that you will need to do this important job.
Tools:
- Broom or construction vacuum cleaner.
- Rubber boots.
- Knee pads.
- Laser or other level.
- Long rule.
- Screwdriver.
- Perforator.
- A container for mixing the mixture.
- A special nozzle for a perforator for mixing mortar like a mixer or a concrete mixer, if the volumes are very large.
Materials:
- Sand.
- Cement M400.
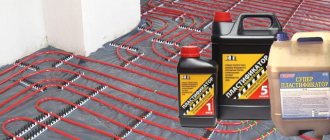
- Plasticizer for concrete.
- Fiber.
- Damper tape.
- Nylon tie (it will be necessary to press the pipe against the mesh).
- Pipes with a diameter of 20 mm.
- Lighthouses.
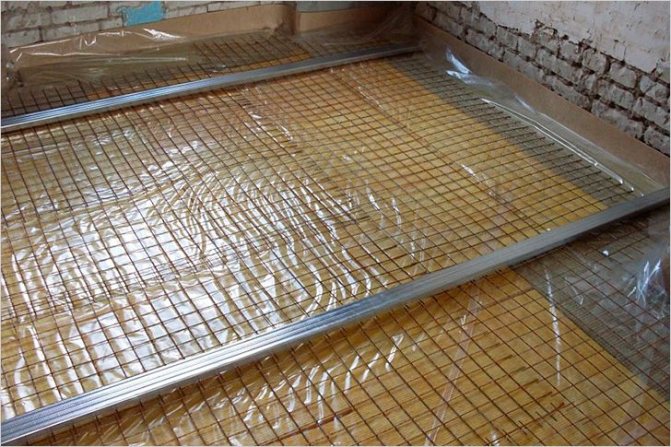
- Mounting grid.
- Polyethylene film.
- Insulation.
With all this in place, you can safely get down to work. First of all, it is worth noting that the screed must rise at least 30 mm above the level of the pipes.
Preparation for pouring underfloor heating
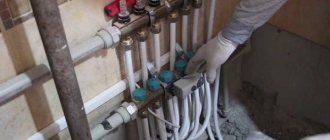
When the rough screed is mounted, you can start installing the underfloor heating. To do this, you should choose an electric or water option, which will practically not have any differences in the subsequent execution of the pouring. But not everyone knows how to fill in a warm floor. To do this, the established technology should be followed evenly.
When the underfloor heating system is installed. You should check its performance. For this, it is exposed even within 1.5-2.0 atmospheres. It should remain in the process of pouring the screed. But the system should not warm up above 25 degrees.
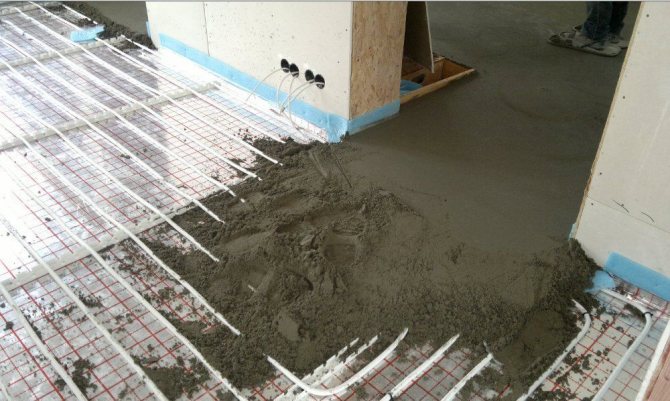
Pouring solution
Advice! Before performing this operation, you need to remove all debris from the surface, at least sweep the floor. It is advisable to remove all dust with an industrial vacuum cleaner so that the adhesion is good.
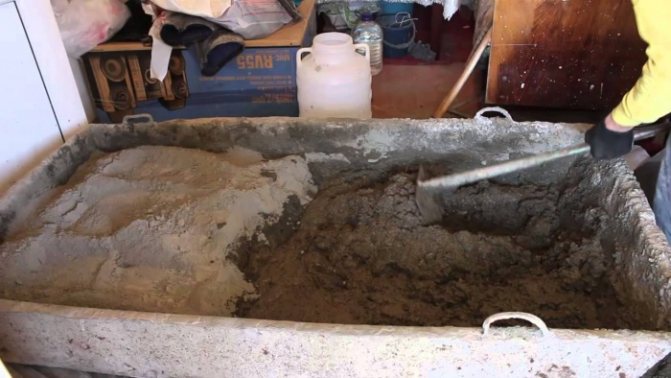
For small volumes of work, the solution can be mixed by hand in a large container, but in large rooms you cannot do without a concrete mixer.
How to fill in a warm floor?
Instructions for preparing the solution:
- Cement M300 and above - 1 part;
- Sifted sand - 4 parts;
- Water - until a homogeneous pasty mixture is formed;
- It is also imperative to add a plasticizer and polypropylene fiber to the solution to increase strength and elasticity.
Stir the solution or order a ready-made mixer and fill in the warm floor. First, pour it into one pile and level it evenly with a shovel. Then we take the rule, and leveling the floor, moving along the guide beacons.
Mixing the solution
The density of the future screed will depend on the selected cement grade. In this case, it is very important to understand how to fill the pipes of the warm floor. Basically, the recommended grades of concrete are 150-300. Everything will depend on the destination, whether it is residential or industrial construction. The composition of concrete can include various additives that give the mortar certain qualities.
There are features of pouring underfloor heating with a solution. A water heat-insulated floor cannot fully work with a cement-sand mortar. Here, we use concrete based on screening, which includes fractions with fine grains together with sand. A ready-made version is purchased, which is used for filling. This is due to the better strength of the concrete, fewer possible cracks and better heat dissipation. The solution for pouring water-heated floors must meet certain requirements.
If screening is used, then 1 portion of cement is poured into 4 portions of it. But sand and crushed stone has slightly different proportions - 1 to 4, as well as about 3.5 sand. In some cases, you should independently conduct preliminary experiments to create the ideal consistency. Only then can work be carried out on the pouring of pipes in the floor. It is also worth noting that in the implementation there are ready-made mixtures for the solution, into which it remains only to pour a certain amount of water, looking at the instructions from class = "aligncenter" width = "1024 ″ height =" 390 ″ [/ img]
For screed such a floor, instead of a reinforcing element, fiber is usually used, which has better performance and qualities, as well as having a slightly lower cost, if we take into account the consumption of material for each square meter of the room.
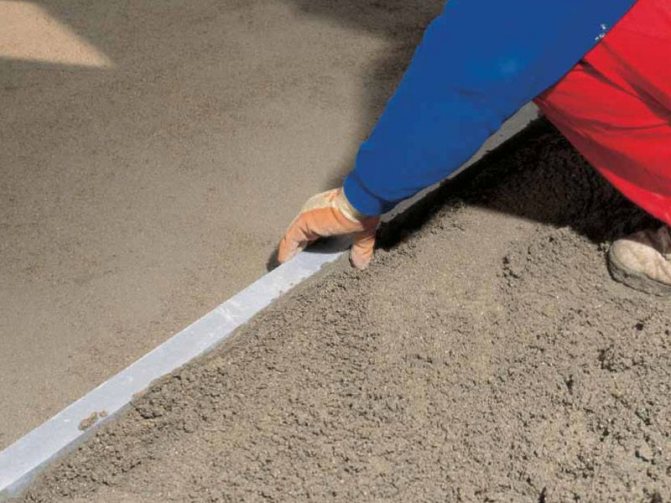
Expansion clearances
Most often, cracks appear due to improper location of temperature gaps. Unlike a simple screed, the technology of pouring a warm floor does not allow the installation of a monolithic slab in rooms of a large area or complex shape.
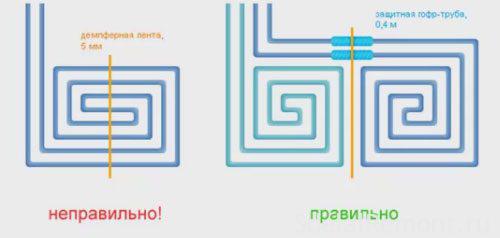
In such cases, the room is divided into small zones and separated by a damper tape 0.5-1 cm wide.
The photo shows a diagram of expansion joints
- The area of each plot should not exceed 30 sq. m, and the length of the sides should be less than 8 meters. In this case, the ratio between the length and width of the walls of the room should not exceed 1 to 2.
- If the room has an angular or more complex shape, it must be divided into rectangular or square sections.
- Intermediate dividing lines are also sometimes used. They are made with a trowel 1/3 the depth of the mortar.
- After the concrete has dried, all seams are then sealed.
Also SP 41-102-98 recommends:
- Use solid pipes for laying the contour;
- When pipes pass through the expansion joint, they must be protected by a sheath made of corrugation or other material, more than 1 meter long;
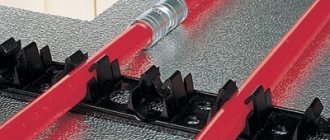
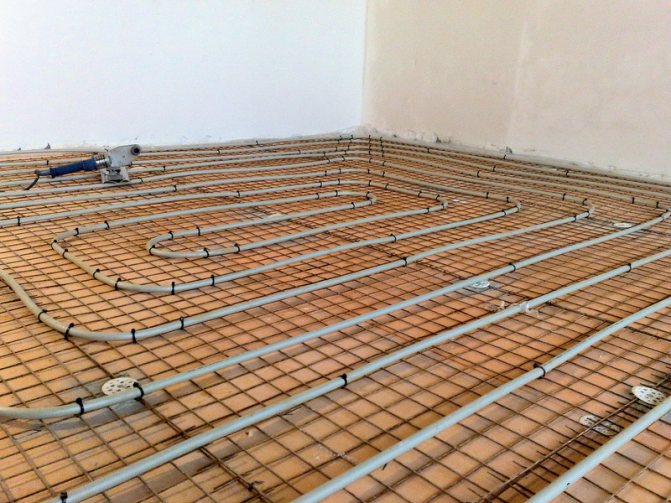
- Fasten the heating pipes to the floor using special V-shaped brackets or wire with a soft lining.
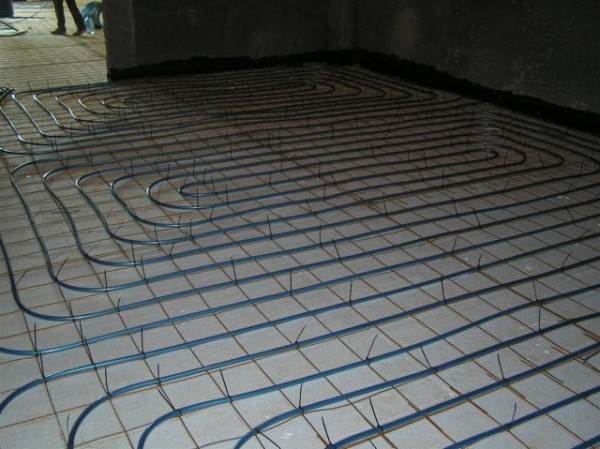
Fastening pipes to the grid
Thickness selection
The floor screed layer under the warm floor or over it will depend on certain situations. Usually, for the rough version, a thickness of 50 mm will be enough, but the final screed is 50-100 mm.Everything will depend on the purpose for which the premises are used. In residential premises, a thickness of up to 70 mm is chosen, but industrial ones with heavy loads - up to 100 mm.
As for directly pouring a warm floor, then an optimal thickness is needed so that not only it retains heat, but also a certain time. Otherwise, the boiler will have to work more time, waste time and money. Therefore, it should not be too thin. The average indicators of such a screed should be kept in the region of 70-80 mm.
When building or carrying out repair work, you should understand how to properly fill in a warm water floor, choosing the optimal layer performance.
Types of self-leveling floor and prices for it in Moscow
The classification of the self-leveling floor depends on the elements included in the composition. Thus, there are 2 main types:
- polymer concrete. The mixture is made on the basis of sand, plasticizers and cement. The mixture is laid on a ready-made base using beacons to facilitate installation. Reinforced mesh reinforces the structure. Such floors freeze after two days;
- polymer. This variety has 3 subspecies;
- epoxy. The combination with an infrared system will bring the greatest effect, due to the need for a fill thickness of 2-3 mm. Endowed with protection against the effects of chemically active compounds, have many color variations. However, there are also disadvantages: loose fit to the base due to increased density and low elasticity, the heating temperature should not exceed 24-25 ° C;
- polyurethane. Durable, flexible, fits snugly with any base. After hardening, the floor becomes resilient and resistant to vibration. It is pleasant to move on the finished surface. Self-leveling floor of this subspecies is combined with all heating systems;
- methyl methacrylate. Environmentally friendly subspecies of the floor, resistant to chemicals, heating temperature range from -65 to + 140 ° C. The poured solution hardens in 2-3 hours, it is combined with all types of heating.
In online stores in Moscow, you can order various types of self-leveling floors. Consider popular brands:
- Volma Level Comfort. Suitable for use in bathrooms. Cures quickly, self-distributing. The average cost is from 300-350 rubles per bag;
- KnaufTribon. It cures quickly so that the flooring can be installed after one day. Price from 350-400 rubles for 1 piece;
- Bolars Optim SV-210. Used in industrial plants. Fast hardening, withstands increased loads. Prices start from 360-400 rubles for 1 piece;
- VetonitFastLevel. Used for large rooms, it can be combined with any finish. Cost from 400 rubles per bag of 20 kg;
- VetonitFinishLevel. An economical option if you need to fill a large space with a thin layer. Price from 550 rubles.
We recommend: How to install Devi underfloor heating?
Self-leveling floors vary in price and quality. Choose coverage based on your preferences and financial implications.
The pouring process and the creation of expansion joints
When the underfloor heating system is exposed, you should think about preparing for subsequent pouring. This is why lighthouses are exhibited. For their correct location, a level is used. Usually they are made in the form of mounds of solution, which support the guide at the required level.
After that, you can start pouring the warm floor using the technology. After spreading the concrete over the surface, it must be tamped. For this, a vibrator is used, specially designed for such purposes, a rake, hoes or other improvised means. This is done to remove all possible air bubbles from the solution. If they are present, the level of thermal conductivity decreases, and, consequently, the efficiency of the warm floor after pouring the screed will be reduced.
Zone of passage of the heat separation seam
You can do without setting beacons, and use self-leveling mixtures in your work. The entire area of the room is filled at once. When you are not confident in your ability to fill, it is best to seek help from specialists who can complete the work from start to finish.
For large rooms, as well as after pouring just the final version of the underfloor heating screed, expansion joints should be arranged. For insurance purposes, they are also arranged in rooms with an area of up to 20 m2. The seams prevent cracks in the screed during expansion under the influence of temperature during the heating process. This suggests why there is no need for such a screed for a rough cut. After their installation, you can not worry about the quality of the entire screed during operation.
Compositions and types of screed
A concrete screed for an electric floor heating will turn out to be of high quality if you choose the right proportions of materials and mix them thoroughly.
Cement and sand alone are not enough to prepare the screed. It requires plasticizers and additives that increase the plasticity and homogeneity of the mass.
Dry screed
Advantages of a dry screed over a wet one:
- no special equipment is required: mixers, containers for solution, etc.;
- less effort is spent on material delivery;
- speed of work execution (in 1-2 days);
- there is no need to wait for the screed to ripen;
- the possibility of a phased installation of a warm floor with a breakdown into zones;
- lack of dirt and excess moisture;
- small specific gravity of the screed;
- the floor acquires the properties of noise absorption and thermal insulation without the use of special materials, the price of which is sometimes high;
- the possibility of laying communications in the thickness of the material;
- the surface is flat and ready for finishing flooring on it.
With all the advantages, the coating turns out to be quite lightweight and durable. It will not withstand the load from an interior partition made of gypsum boards or bricks, but frame structures made of plasterboard can be installed on it.
Dry screed is not used in the following cases:
- if there is a slope in the room;
- in the presence of large dynamic loads (vibration effects or high intensity of the human flow);
- in rooms with high humidity or with the possibility of water spills on the floor;
- in tight spaces where there is no way to tamp and level the composition with high quality.
When preparing a dry screed, the following materials are used:
- Waterproofing film.
- Damping tape around the perimeter to compensate for thermal deformation.
- Dry backfill of fine gravel, expanded clay, slag pumice, perlite. Instead, high-density insulation boards can be used, for example, extruded polystyrene foam, etc.
- The top layer is sheets of moisture resistant plywood, asbestos cement, chipboard, OSB. They are also used for thicker thicknesses. The best option is to use waterproof gypsum fiber sheets to match any floor finish.
Building materials manufacturers produce special complete and balanced dry floor systems. A whole line of "Knayf" dry screeds is produced for different types of premises. Among them, two-layer GVL with the ability to assemble on locks are popular. For housing, "Vega" compositions are produced on the basis of fine expanded clay screening in bags and other components.
When using production waste for dry screed, for example, whole expanded clay or slag, the size of the fraction should not exceed 5 mm. Otherwise, the floor will begin to sag and creak.
The thickness of the backfill must be more than 30 mm, otherwise the required quality cannot be achieved. If the upper limit is higher than 60 mm, a sheet spacer will be required. From above, the screed is additionally covered with a sheet covering, the thickness of which is about 20 mm.
The backfill base must be even.
Semi-dry screed
The screed is a cement-sand mixture with the addition of fiberglass and plasticizers, but with a low water content. A distinctive feature is a large layer thickness of 70-100 mm. At a lower thickness, the layer may crack.
The advantages of a semi-dry screed are its warmth and soundproofing properties due to its porous structure.
The disadvantage is the need to use construction equipment, but in small rooms the screed can be laid manually.
The ratio of the components, which include cement, sand and water, respectively, is 1: 3: 0.4. Fiber is added to them in the amount of 600-800 g / m 3.
The screed is laid using beacons, similar to the wet method. For grouting, a special machine is used, which can be rented. It is difficult to seal the screed by hand.
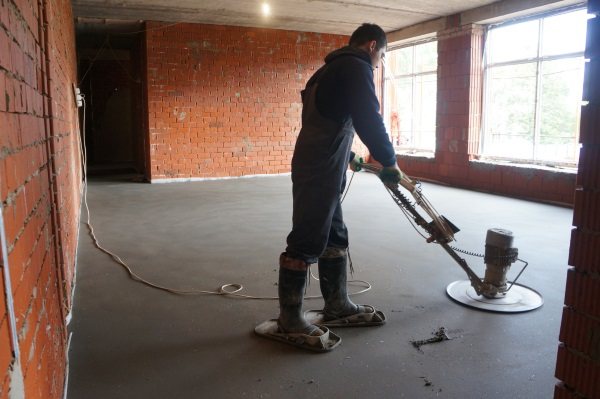
Sealing a semi-dry screed
Wet screed
A screed is a layer of mortar or concrete applied to the surface of the base.