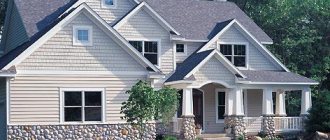
Advantages of facade panels
Building a house made of stone or brick is a very expensive undertaking. Facade panels for cladding a house, on the other hand, are a popular modern material, and also easy to install.
Benefits:
- Due to the fact that the panels are made of high quality, but inexpensive polymer, their cost is several times lower than bricks and stones for cladding.
- The material is durable, weather resistant and can be easily washed with a hose.
- Facade finishing is quick and uncomplicated, as only a few fasteners are required to install one panel. It can be carried out without the help of technology, independently. Fastening materials can always be found at any hardware store.
- Provided that front panels are used, it is possible to additionally insulate the house. The cladding is installed on a crate, under which various insulation materials can be laid. This is the second main purpose for facade panels after decorative.
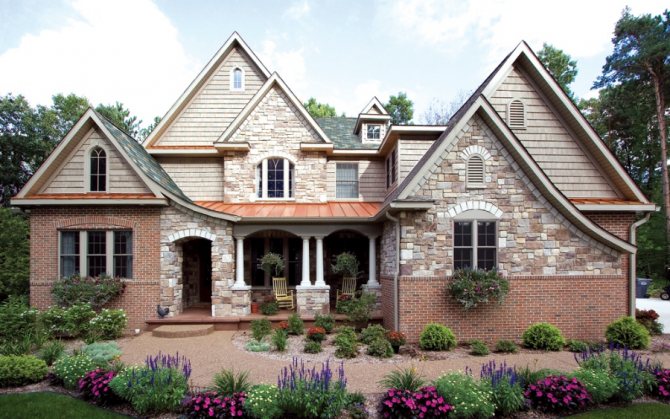
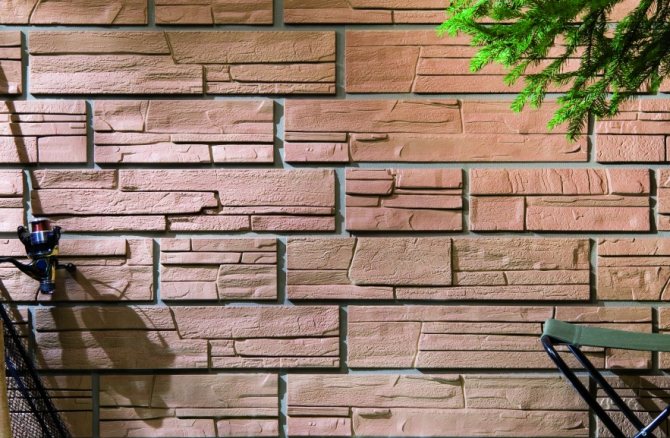
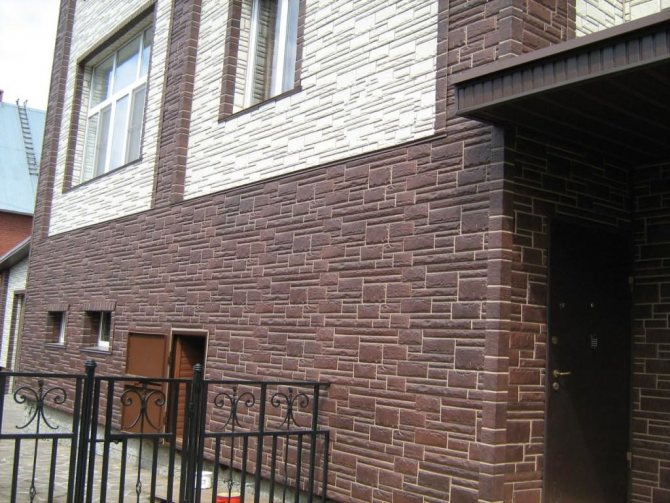
- The cladding can have an appearance for absolutely any texture: wood, stone, brick. The palette of shades is varied.
The disadvantages include the fact that the panels are susceptible to mechanical damage. To safely solve this problem, you need to buy cladding material with a small margin, in case of damage and replacement.
In a short period of time, an ordinary house will turn into an exquisite, noble building.
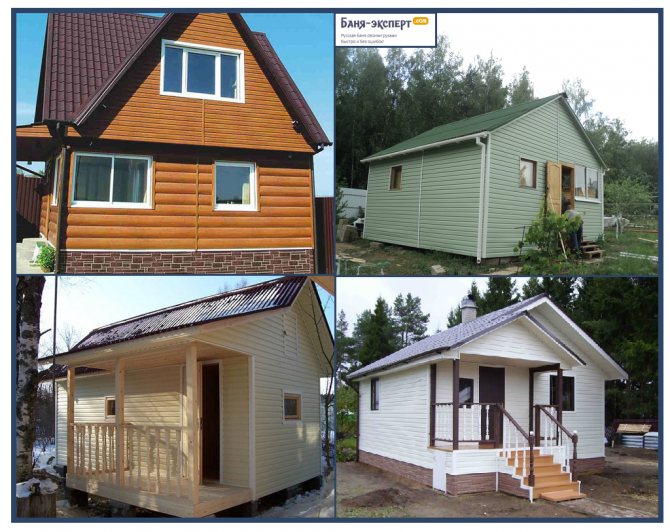
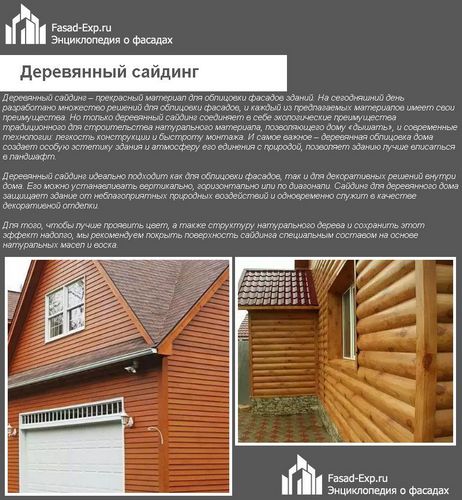
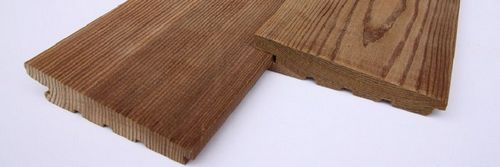
Wood siding
Perhaps one of the most expensive types of panels, but the most beautiful. The panels are made from pressed sawdust, treated with special solutions for strength and durability. However, if you do not take care of such a facade regularly (once every two seasons), then it quickly deteriorates. In addition, this finishing method is suitable only for one-story houses, since the panels are heavy, the frame may not withstand.
Wood siding
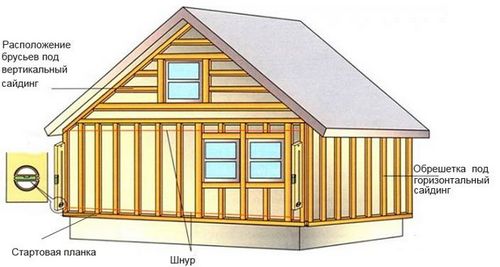
As in the case of metal siding, wooden panels are attached to a prepared frame. The installation methods are identical:
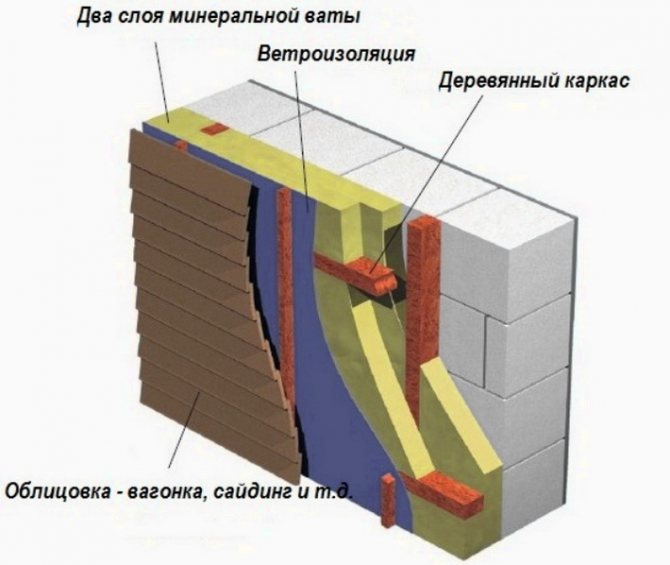
- the frame is made of wooden blocks. But it is possible to install from a metal profile to facilitate the construction. The first post is installed at right angles to the base of the building, and the rest, after half a meter, are parallel. Racks are installed between them;

Diagram of a wooden lathing device for siding - the frame made of wood must be treated with insect and moisture repellents;
- the resulting space between the racks can be filled with insulation. For insulation, mineral wool is recommended, since it will not only retain heat in the house, but also allow condensate to drain out;
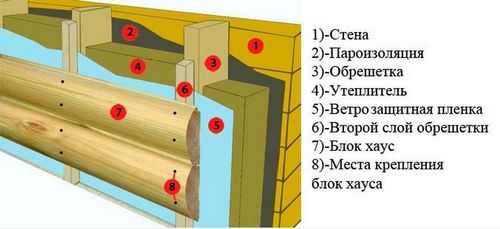
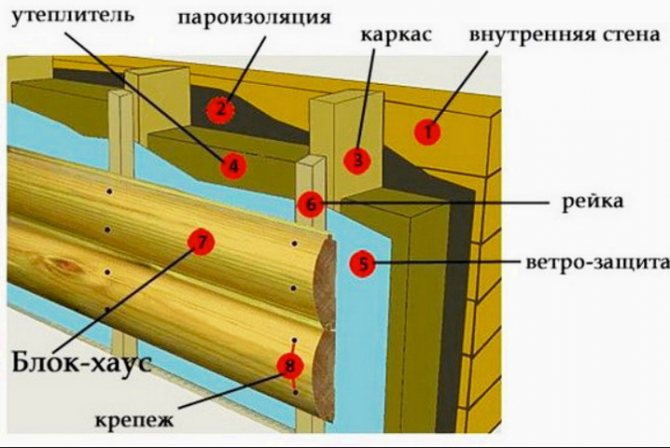
Wall cladding block house
Facade cladding technology with wooden siding - panels are fixed to the frame with clamps or screws.

Wooden siding for home decoration
The above panels can be replaced with longer ones. The advantage of such panels is that they are fixed directly to the wall one after the other in a row. The length of such products is 6 meters. This is a faster way to install. But in order to complete the work on the facade, you need at least two people. One person will not be able to cope with such a job, since the panels may be installed incorrectly.
In order to cut off the unnecessary part of the panel, it is recommended to use a grinder. She will most quickly cope with such a product and evenly cut off a part of the panel.
The complexity of such products lies in their mass. It is best to call an assistant for installation. So, the process will be optimally fast and correct.
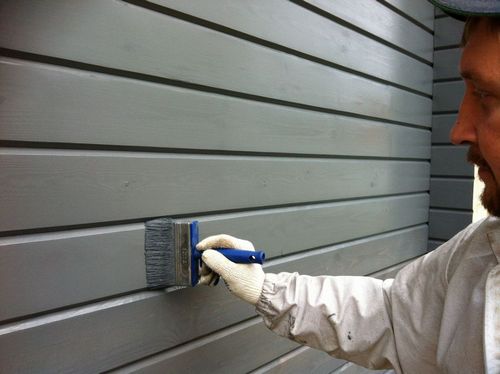
After installation, the wooden facade is covered with a protective paint layer
Types of facade panels
There are many types, they differ in the material of manufacture, installation method, sizes, colors. About the most demanded further.
Metal siding
Models from aluminum, stainless steel, are reliable and durable construction. Metal siding is perfect for facing summer cottages, one-story houses. The panels repeat well the "effect" of wood and are easy to assemble. Maintenance is very simple - wash the contaminated part of the house.
Installation is as follows:
- A drainage is applied to the base.
- U-shaped profile is attached to p-shaped brackets.
- The initial bar is set in the joint to the drainage system.
- Metal siding is mounted.
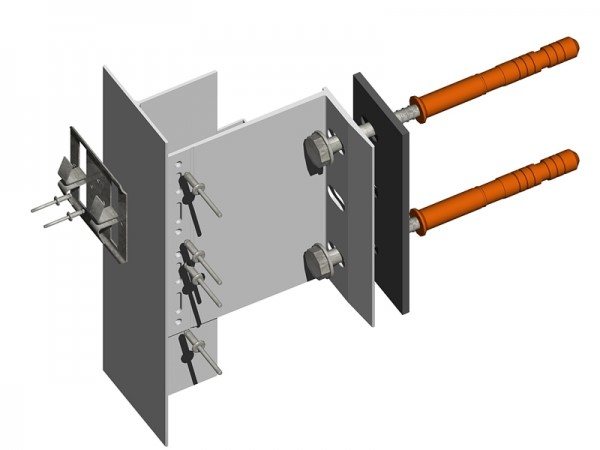
Types of fasteners and fasteners used for ventilation facades
A large number of different types of fasteners are intended for installation work, depending on the type of panels. To determine the required amount of fasteners, you need to be guided by the footage of the house, the number of fasteners for each coating. Among them are:
- facade screws;
- rivets;
- all kinds of dowels;
- concealed mounting bolts;
- fasteners duet facade and others.
Facade self-tapping screw
Fasteners for a ventilated facade - stainless steel screws (to avoid rust). Front screws are not used for galvanized systems, rivets are suitable for them. And for aluminum panels, they fit perfectly.
It is important to tighten the self-tapping screw correctly, you must not tighten and twist the fasteners.
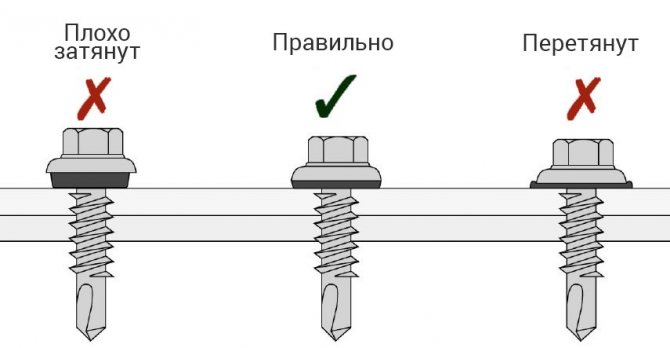
How to work: the sheathing is evenly applied to the crate, then screwed one by one onto the screws.
Rivets
Aluminum and stainless steel rivets are also used in the installation of ventilated facades made of aluminum profiles. They have sides that are enlarged and protruding. The diameter is the same as the side.
The rivet consists of a sleeve (stainless steel or aluminum) and a sleeve (stainless steel). A sleeve installed in the structure connects the bracket to the profile. The sleeve is stretched into the sleeve. The fasteners are reliable.
Front dowel for mounting brackets
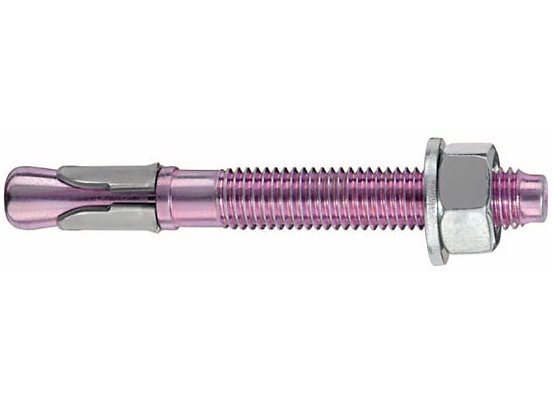
In systems of ventilated facades, dowels of various configurations are used. When choosing them, you need to pay attention to the following nuances:
- the dowel should bend easily, not break;
- thickness from 12 to 16 mm;
- the dowel cover must be suitable for fastening the facade tiles;
- the diameter of the dowel depends on the load, the weight of the sheathing;
- most often, dish-shaped dowels (umbrellas, fungi) are used to fix the thermal insulation: a hole is drilled slightly larger than the size of the fastener and the dowel is installed.
Concealed bolts
It is an anchor or a screw for hidden fasteners of a facade made of stone, plastic, fiber cement. It is installed in a pre-drilled hole, mechanically secured.
Basic rules for installing panels
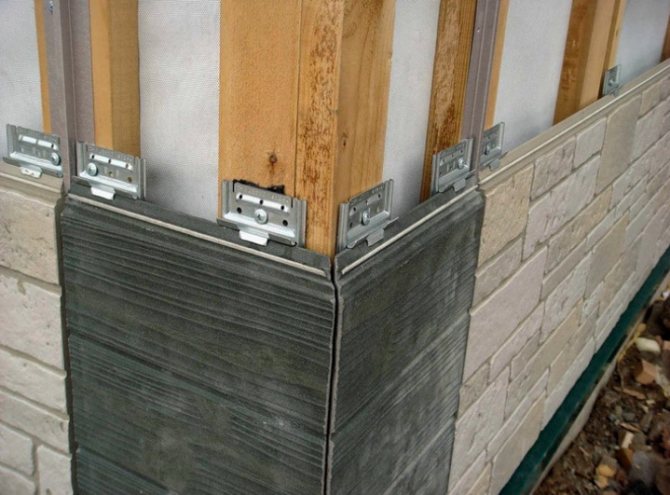
The cladding is installed in two ways: hidden and open.
Open-type installation involves reinforcing the panels on the purlins by simply drilling holes for fastening and attaching. All fasteners are visible in this case. But they can be matched to the color of the panels or decorative caps can be used, or simply painted in the color of the panels.
The hidden fastening method securely fixes the structure and remains invisible at the same time.
For facade panels for brick, stone, additional fastening strips are used. The hidden method is more difficult than the open one and more expensive. However, the exterior of the building is perfect. Often they use hidden installation, partly at the doors, the lower part of the house, and the upper part and the rear facades are strengthened in an open way.
When installing the coating, you must remember the basic rules:
- Installation should start from the bottom of the house and from the corners.
- Laying of rows should be checked with a level. With proper assembly, all seams are joined, and you get a one-piece facade sheet.
- Installation of cladding is an important component, it reduces the load on the walls, makes it possible to additionally insulate the house, hides defects and unevenness of old walls.
Step instructions
- Before starting work, markup is performed, since crookedly fixed panels do not look neat.
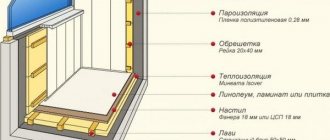
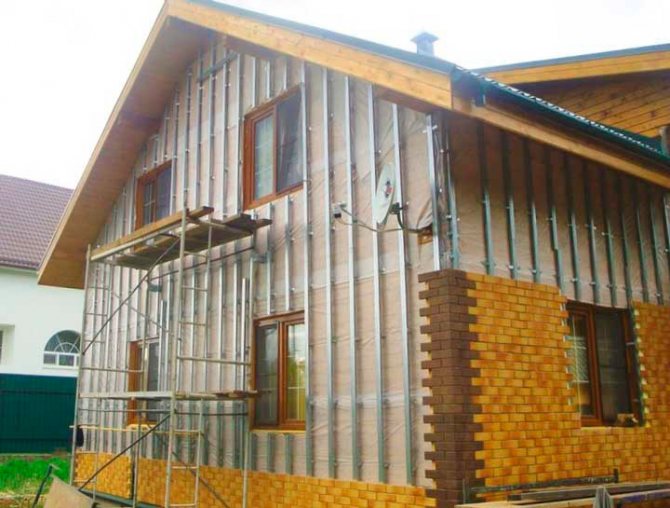
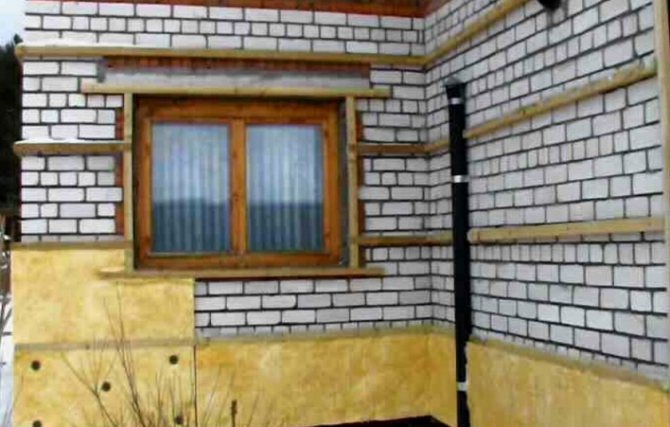
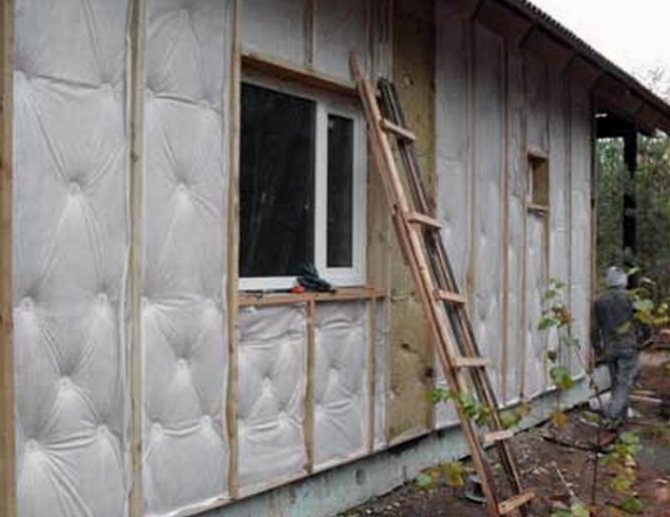
- A waterproofing film is attached to the facade. The next steps depend on the manufacturer of the panels, read the instructions carefully, if you do not plan to insulate the space, you can immediately install a metal or metal crate. Each manufacturer recommends rails of different sizes, so check with the instructions.
- Fix vertical slats 50x50 mm. To keep the finish well, the slats are installed at a distance of 10 cm from the corner of the house.
- If necessary, the space between the slats is filled with insulation.
- Fasten a metal crate 25x25 mm for installing panels.
- The initial bar is mounted according to the pre-made markings. It should be fixed with nails or screws every 30 cm. 5-6 mm are left between the batten and the plank to avoid damage to the cladding when the temperature changes.
- Attach the J-profile to the corners of the building, the installation step is 15-20 cm.
- Installation of front panels is carried out from left to right, according to the location of the tongue-and-groove elements. The walls are finished in turn to avoid moisture ingress until the end of the work. Each next row is mounted with a shift in half or a third of the size of the elements. This contributes to a better fit and a natural look.
- The outer panels are trimmed from the left side, but so that more than 30 cm remains. It is better to calculate this in advance in order to immediately trim the elements accordingly. Trim the panels so as to preserve the integrity of the pattern. Begin to cut the elements from the side of the perforation.
- Nails or screws are screwed exactly in the middle of the special hole. It is not recommended to do them yourself, the panel may crack. If there is no way out, carefully drill a hole, and only then fix it. To avoid the appearance of rust, choose galvanized or aluminum nails with a countersunk head 6-8 mm and a leg diameter of 3-4 mm. The step of the fastener is 40 cm.Important: do not tighten the fasteners to the end, leave 1 mm, as due to temperature changes, the panels expand and contract, therefore deformation is possible.
- When the installation of facade panels on one wall of the house is completed, a j-profile is attached at the top so that moisture does not get under the structure.
- Fastening of special parts for the corners of the house, door and window openings. Do not forget about the low tide to rid the wall of excess water.
Strictly follow all the rules so that the decoration of the house remains intact for a long time. It is not difficult to do the installation of front panels with your own hands, but it will not be easy for a beginner to fix the frame evenly. Buy building materials only from trusted sellers and check the quality of the goods, since there are many low-quality products on the Russian market. Consult on special forums and calculate the amount of materials in advance. Happy construction.
Previous
Following
External wall panels installation technology
Installation must be carried out in accordance with all requirements and instructions in a specific sequence. Before purchasing materials, it is imperative to make sure that the facade tiles are compatible with the fastening.
Surface, tool and material preparation
The walls of the house are prepared for work in advance:
- The walls are cleaned of dirt, drains and cornices are removed. Wooden facades are treated with antiseptics against mold.
- Potholes and irregularities in the walls are leveled and grounded.
- For each type of facade fastening, certain materials, fasteners and tools are prepared.
- If wall insulation, sealing is provided, then insulation materials are additionally prepared.
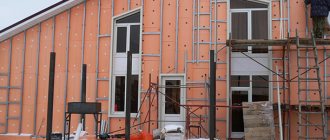
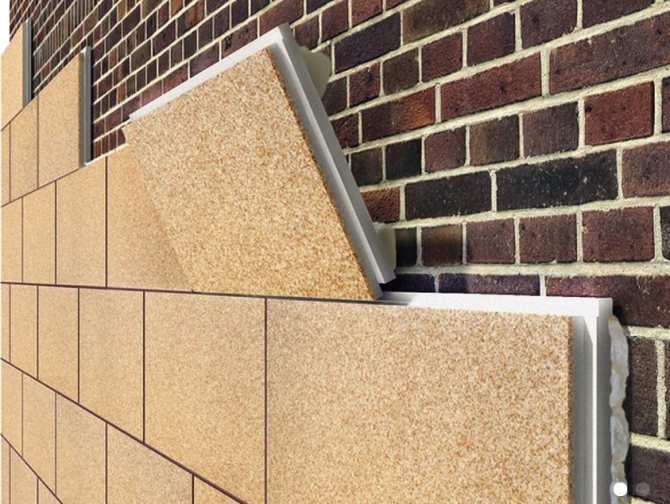
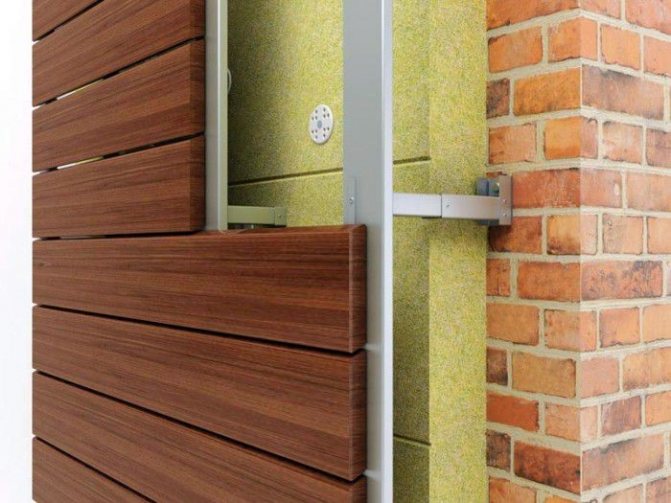
Lathing for panel mounting

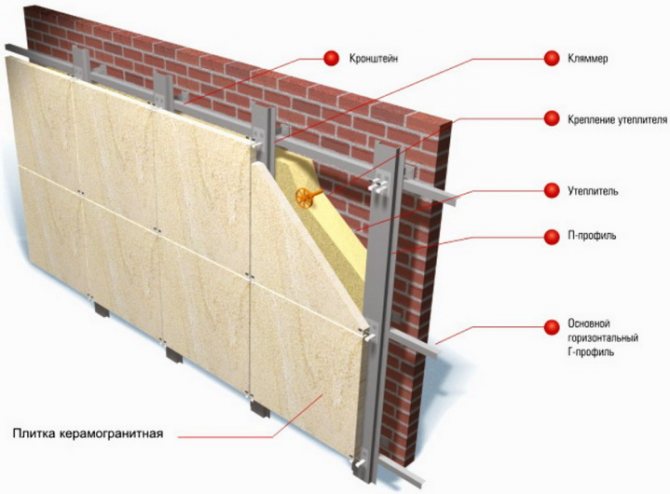
For the installation of the cladding, a wooden or metal crate is installed. Metal is preferable - it is stronger and more durable. The lathing is installed using brackets, profiles, leveled with a level. Insulation is laid. With flat walls, installation of some panels (without insulation) can be carried out immediately.
Ventilated facade battens and finishes
The ventilated façade is distinguished by the fact that there are no wet processes during its creation. The structure can be assembled in stages, intermittently, if necessary, disassemble, remake ... Assembly does not require the special qualifications of a plasterer-finisher. All work can be done by hand.
For facade finishing, a sub-supporting structure is assembled - a crate made of wooden or metal parts, which is firmly fixed to the supporting wall.
Pliable insulation mineral wool is more often used. In this case, the alignment of the wall is not required, it is enough that the lathing is made in one plane.
Another vapor-transparent insulation is gaining popularity - low-density aerated concrete. But to eliminate the gaps between it and the wall, it is necessary to align the wall and apply insulation. Aerated concrete is more durable, according to manufacturers, but this insulation has not yet passed the test of time.
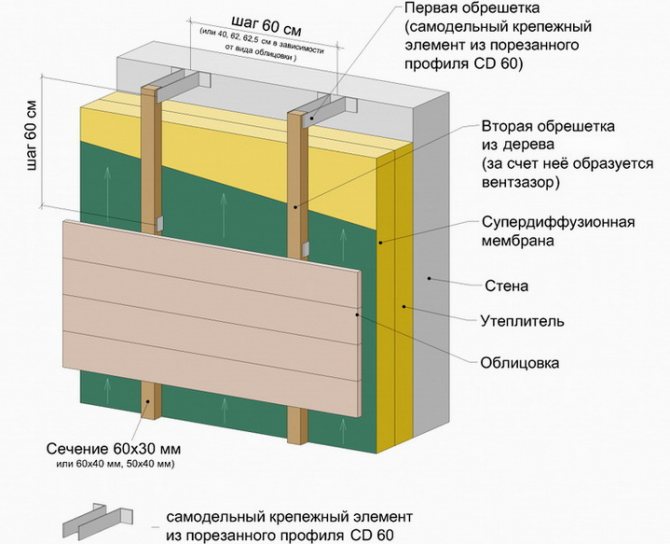
The battens for a ventilated facade can be of various designs. Heavy and durable panels for facade finishing are completed with metal battens with special fasteners, including a layer of insulation on the wall. But more often an economical option is used - a crate made of dry wooden beams.
Triple wooden lathing for a ventilated facade
The bars are packed in three layers - first a vertical crate, then a horizontal one, and again a vertical one. Despite the seeming cumbersomeness, this is the most versatile option.
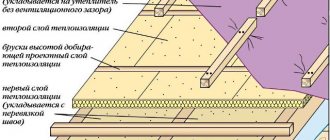
For the insulation of walls made of dense heavy materials in our climate, economically feasible, a layer of insulation with a thickness of 100 - 150 mm is required. This thickness is taken from insulation boards in 2 or 3 layers of laying.
Typically the use of insulation boards with a thickness of 50 mm. 2 layers are placed first between the vertical battens, one layer between the horizontal battens. The next vertical counter batten serves to form a ventilation gap above the insulation 40-50 mm thick.
The bars of the upper vertical lathing are placed with a step necessary for fixing the panels - 30 - 80 cm. For example, for vinyl siding, it is necessary to fasten it more often, every 30 - 40 cm, and the required width of the wooden planks is 60 - 80 mm.
The bars of the lower battens are installed in increments of the optimal placement of the insulation, the width of the plates of which is usually 60 cm. Therefore, a distance of 59 - 60 cm is chosen between the bars, so that leaks are not allowed when installing the raspor.
Sizes of beams
The height of the used beams: - bottom vertical - 50 or 100 mm, depending on the number of layers of insulation; - horizontal - 50 mm, - for one layer of insulation; - the second vertical - 35 - 50 mm in the size of the ventilation gap.
(the insulation can be selected and in accordance with the calculation, for example, 80 or 120 mm thick, accordingly the height of the beams is also selected, how to calculate the thickness of the insulation for the wall)
The minimum width of the beams is 40 - 50 mm. They are fastened with steel dowels with a diameter of 6 mm or more passed through the timber. The distance between the fixing points along the length of the bar is no more than 800 mm.
The bars of the first sheathing are aligned in one plane - along the plumb line and along the cord. If necessary, pieces of plywood are placed under them.
At the corners of the building, on the slopes of windows and doors, at various openings, pediments, usually wider strong beams are installed along the perimeter - 80 - 100 mm.
The choice of insulation
For insulation of vertical walls, mineral wool slabs with a density of at least 60 kg / m3 should be used. Insulation with a density of more than 80 kg / m3 (top layer of insulation) can be used without a windproof membrane.
It is recommended to use only insulation with the highest vapor permeability, even for walls made of dense heavy materials. Usually either mineral wool or low density aerated concrete is used. The best drainage of the wall contributes to a longer service life.
Unimpeded air movement over the insulation along the ventilation gap from bottom to top between the bars of the counter-lattice must be ensured. Protrusion of insulation or furniture is unacceptable.
The bottom and top gaps are fenced off with a stainless plastic or metal mesh to prevent the entry of insects and rodents.
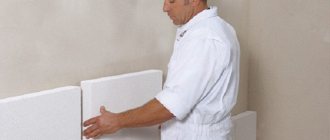
Fastening insulation boards
The layers of mineral wool laid between the battens are pressed against the wall with plastic disc dowels - from 5 pcs. per square meter The wedging plastic dowels are inserted into heavy materials to a depth of at least 5 cm, and for porous light materials, screw fasteners are used to a depth of at least 9 cm.
A windproof diffusion membrane is used on low density mineral wool insulation to prevent blowing through the insulation layer and spreading microfibers. It is fastened with a stapler to the beams and pressed with dowels together with insulation.
It is important to observe the continuity of the insulation layer, cold bridges are not allowed, including at the borders, at the joints of wall and roof insulation, wall and basement ...
Simplified options for wooden lathing
To insulate walls made of light porous materials (aerated concrete, porous ceramics ...), usually, for economic expediency, a layer of insulation of 3 - 7 cm is sufficient. Accordingly, the insulation can be laid in one or two layers.
Then the previous version of the lathing for a ventilated facade can be simplified - only a horizontal lathing is used, on which vertical bars are packed to provide ventilation. clearance and fixing trim.
The horizontal lathing is more expedient - it prevents the insulation from slipping, crushing, less dense and cheap samples of mineral wool can be used with it.
One row of vertical bars
With an insulation thickness of up to 100 mm, you can use the most economical version of the lathing - one row of vertical bars, which are fixed with dowels through them.
But the distance between the beams will have to be chosen - either optimal for the front panels, or along the width of a solid insulation plate. On top of the bars, a counter-batten is stuffed to form a ventilation gap.
It is recommended to use such a high single lathing if the outer cladding is made with rigid, durable materials that would give rigidity to the entire structure and prevent distortions, which are especially significant when using large blocks. For example, rigid facade panels include corrugated board, metal siding, wooden lining, etc.
Suspended bars
Another option is to install thinner wooden beams on galvanized (stainless) steel hangers. The design significantly saves wooden materials, but requires punching the insulation slabs with suspensions, which are installed on the wall first. The step of installing suspensions along the length of the bar is no more than 0.8 meters. Insulation thickness - no more than 100 mm.
The first layer of insulation is usually placed under the timber with a continuous covering, which removes cold bridges. The second layer is often placed between the crate.After installing two layers of insulation, which are attached to the wall with disc dowels, a counter-lattice is filled for the ventilation gap.
In this design, it is possible to lower the lathing under the influence of the weight of the insulation and external finishing due to the lack of frictional force between the beams and the wall. It is recommended that the beams rest against the basement or blind area at the bottom with the help of protruding bricks drilled into the base of reinforcing rods ....
Nevertheless, due to its cost-effectiveness, this option of lathing for a ventilated facade is most often used in regions with not too cold climates.
Ventilated facade panels - popular options
The following panel materials are most often used for facade decoration. But this list cannot be complete, since new materials and their combinations are constantly appearing.
- Vinyl and plastic panels. Vinyl siding. The most common facade finish, which is characterized by acceptable durability at a modest price.
- Metal siding is a more expensive and aesthetic option.
- Flat metal sheet, a siding option, but in a panel configuration. Polymer coated metal is used, durable reliable finish option
- Profiled metal sheet - corrugated sheets with a wavy configuration, a very popular construction option. When installed vertically, they do not require the creation of a ventilation gap using the crate, since there is enough space for air movement due to the configuration of the material itself.
Another finishing of the ventilation facade
- Composite materials, such as polymer-metal products ...
- Fiber cement dense panels that imitate various finishes - stone, granite, brick, wood ... - are relatively new options for facade finishing.
- Porcelain stoneware or ceramic slabs - heavy and expensive finishes, which are usually supplied with a special mount, a set of sturdy rails with hangers.
- Slabs made of natural granite, - the option of finishing with natural materials, fixed mechanically without gluing, - the most inexpensive aesthetic and durable option for finishing the facade on the crate.
The ventilated facade can also be formed by brickwork. Learn more about creating warm three-layer walls
However, there are some disadvantages. A more expensive wide foundation is required, the brickwork is non-separable, so control over the condition of the insulation is difficult. The insulation itself is needed as durable as possible and therefore expensive. But for the increased cost, we get a facade made of clinker bricks ...