In what cases does it apply
The slab foundation has a large area, and therefore, when applied, the pressure on the soil is reduced.
Solid reinforcement allows you to remain intact at various ground movements, including deeply freezing and very heaving.
It is advisable to use this type of foundation on swampy and unsteady sandy soils, when constructing structures on them without basements.
What should be the floor in the steam room?
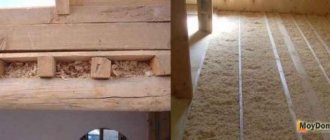
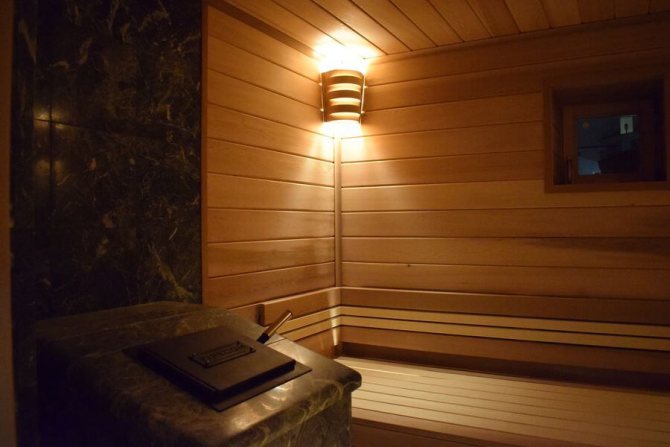
Regardless of whether you are building a Russian bath or a new-fashioned dry Finnish sauna, its floors will certainly come into contact with water. In a Russian bath, this contact will occur more often and more intensely. This is splashing water on the stove and washing the floor and washing off the leaves from the broom and so on.
In a modern Finnish sauna, of course, there will be much less contact between the floor and water. But hygienic washing of the floor after each session in the sauna is a mandatory procedure, and this is moisture again.
What can we say about when the steam room and the washing room are combined and when the bath is used for its direct classical purpose: not only to "warm up" with a broom, but also to wash? This is where the basic requirements for the floor in the steam room follow: resistance to water and high temperatures.
Organizations engaged in the construction of baths say that in 90% of cases, the floor in the steam room is installed from wood ...
But a wooden floor, at least in that classic version of its execution, which is used everywhere, has its drawbacks. In turn, it cannot be said that the tile floor in the steam room is just as perfect. But which choice is better and why?
Slab foundation device
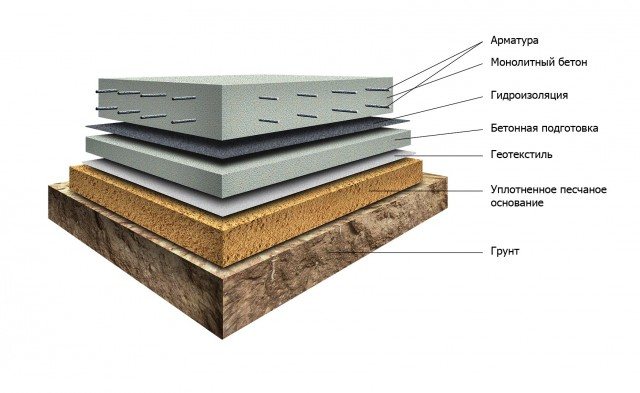
The slab foundation is a solid monolithic concrete slab, which is the foundation for the future construction. If you have swampy soils on your site, but you want to put a bath of a solid size, then there is simply no alternative to a slab under the foundation.
Stiffening trench and drain pipe
In the presence of highly heaving clayey soils, the concrete slab monolith in winter can rise with the building, and fall in the spring. For this reason, it is also called a floating foundation. Having a large area in comparison with the "strip", the slab foundation works as a one-piece single platform. This results in less ground pressure.
A monolithic slab in its structure can be of two types: with and without stiffening ribs. It is clear that the first option makes the foundation more resistant to deformations and horizontal displacements. This is due to the fact that the stiffening ribs go deep into the soil along the entire perimeter, much lower than the main foundation. Such a foundation structure can be figuratively represented as a cup turned upside down, only with very low walls.
The second type of foundation is easier and faster to install, but it does not have such rigid characteristics as the first. It is an ordinary flat concrete slab, without any additional elements.
Slab base for a bath
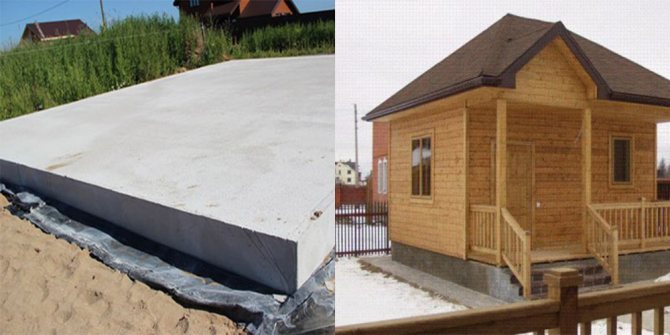
The most rarely used foundation is a slab for a bath. This is due to the greatest complexity in its construction, which will be discussed in more detail below. A slab foundation for a bathhouse or a house is an example of a flat floating foundation, which is a reinforced concrete slab made directly during the construction process.
Base plate for a bath
The technology for the manufacture of such a base requires a large amount of ground work, the manufacture of a complex reinforcing frame and the obligatory high-quality compaction of the concrete pour to give maximum strength. At the same time, a bathhouse on a slab foundation will reliably serve for decades on such problematic soils as peat and swampy, characterized by high seasonal mobility.
Tips for laying tiles
In order for ceramic tiles to decorate the steam room, dressing room and other departments of the bath as long as possible, it is necessary to finish in accordance with the recommendations of specialists. For example, before starting work, the tiles should be soaked in sufficient water. This will make it more damp, which will improve grip on the floor. In addition, one should:
- start finishing from the most visible corner,
- use special cross-separators and a building level,
- apply glue with a comb-type trowel and remove any residues immediately after application,
- rub the seams with a rubber spatula,
- tap the tiles with a rubber mallet so that it adheres firmly to the floor of a steam room or other room.
Having selected high-quality ceramic tiles for the steam room, dressing room or other sections of the bath, you can be sure that it will help maintain their hygiene and attractive appearance for a long time.
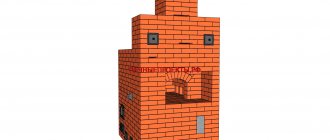
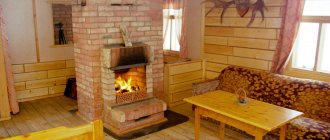
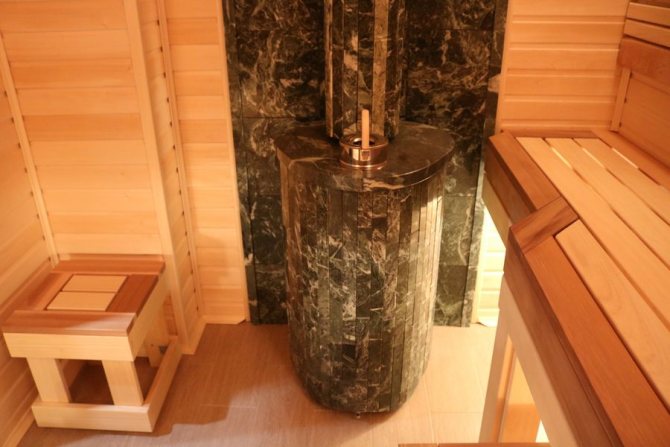
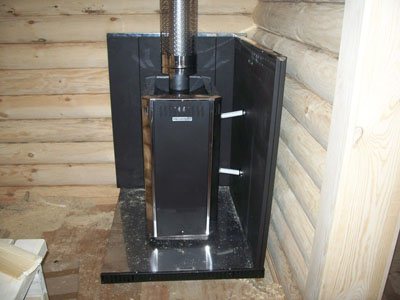
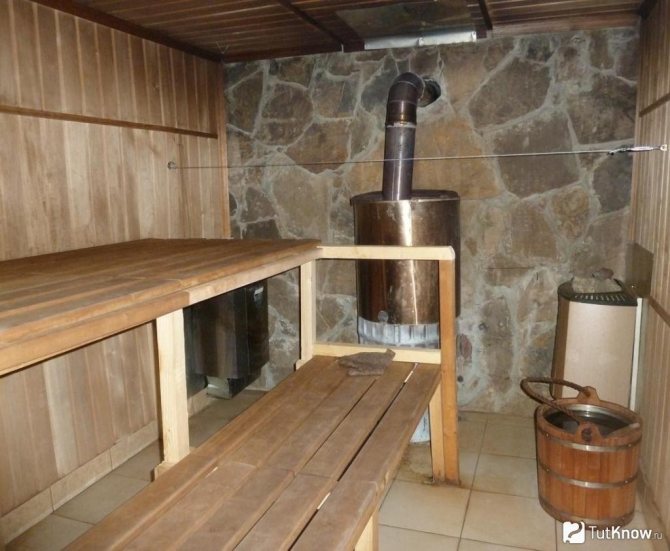
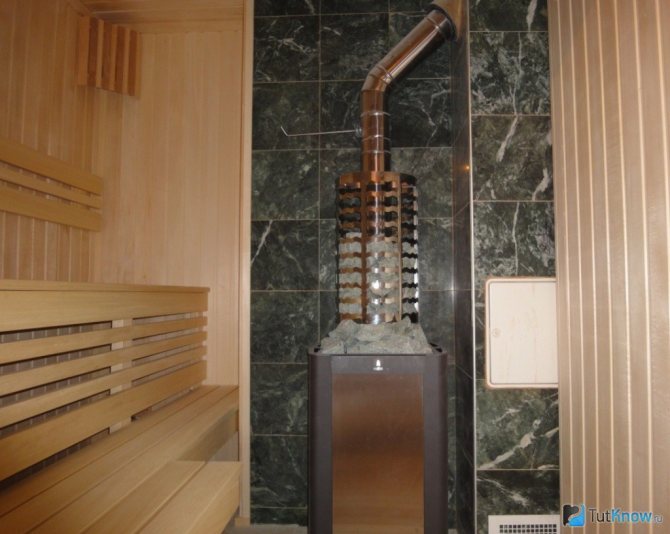
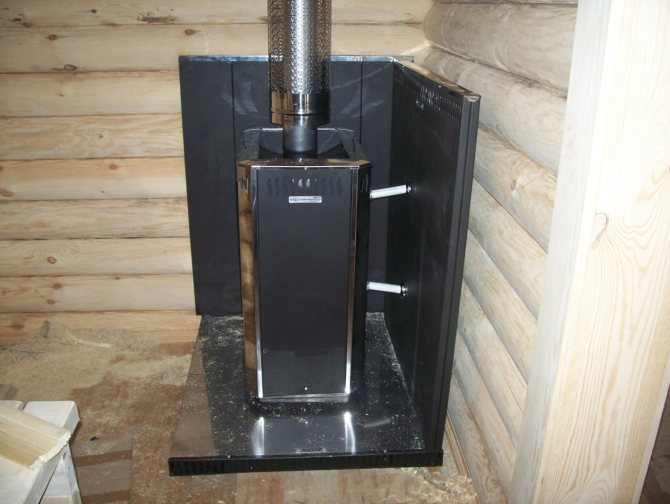
There is no bath without a stove, so it must be provided for in any project. A wood-burning stove is usually installed, which can work as a stove for generating steam in a steam room. The boiler only copes with the heating function, and does not generate steam. If there is little firewood in the region, then the smallest stove is installed, and the lack of heat is compensated for by a boiler.
The sauna stove can be either ready-made or self-built from bricks. In any case, it is necessary to finish the stove in the bath. It is required, as it protects wooden walls from overheating. You can trim either the oven, or the walls, or both. The stove cannot be used without decoration, except in very rare cases when the stove is in the middle of the room.
Advantages and disadvantages
The main advantages of a monolithic foundation are:
- Low, in comparison with other types of bases, the cost of construction. The slab is poured directly from the concrete mixer without the involvement of highly qualified specialists and the use of expensive equipment.
- Good bearing capacity of this type of foundations due to the large area and structural integrity.
- Thanks to the common slab on which the walls of the structure are located, their integrity is ensured, even with seasonal swelling of the soil.
- The construction of a monolithic slab ensures the absence of large labor costs for earthwork.
The absence of large volumes of earthworks significantly reduces the cost of the estimated cost of the foundation being erected due to the uselessness of heavy equipment on the site (bulldozer, excavator, etc.).
One of the main disadvantages of a monolithic slab is the inability to combine the structure of this foundation and the basement.
For those who have groundwater close to the site, this is not necessary, but for summer cottage construction in the absence of groundwater, such a disadvantage can be critical.
The second disadvantage of this design is its high material consumption. A lot of concrete and reinforcement is required.
The reinforcing mesh needs to be knitted, and in large volumes of the slab base it is a lot of time.
And the third drawback of a monolithic slab is that pouring can be done only under favorable weather conditions.
But comparing all the pros and cons, we can conclude that when erecting this type of foundation, there is a lot of savings on other materials and work, so such a foundation cannot be called particularly costly.
Advantages of bricks
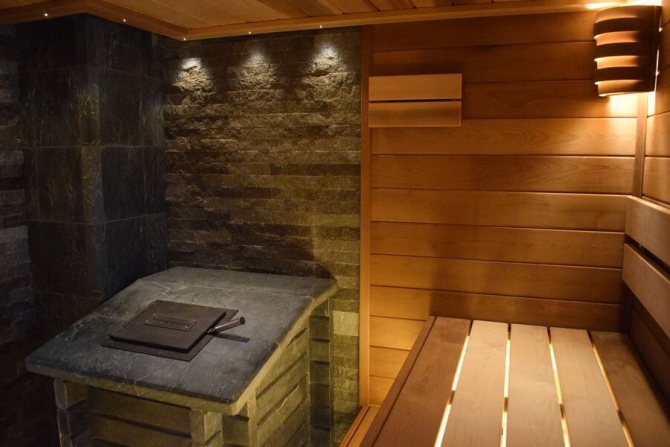
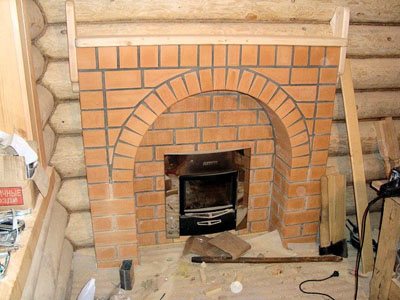
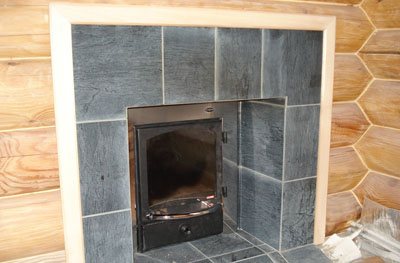
This solution can be seen in almost any bath. The brick finish protects the wall from overheating. Very often this protection is made even more powerful and extended to the floor. Decorating the stove in the bath with bricks performs both a protective and decorative function. For it, the same type of brick is taken as for the rest of the furnace, or another facing brick of the required appearance is additionally purchased.
The brickwork rules for walls, a stove, and a protective portal around the stove are common.
Strict adherence to the levels of the rows, neat and thin seams are necessary.
On the walls and in the oven, bricks are laid with overlapping joints. If the portal is laid out in one layer, then it is not at all necessary to comply with this requirement. That is why you can often see protective portals, where bricks are stacked on top of each other.
The horizontal row is checked by level. Brick lining the walls - along a plumb line. For a corner stove, three planes are laid out with bricks, two on the walls and one on the floor.
For a stove against the wall - only two, of which one is located on the floor, and the other is on one wall. Brick, even if it is laid in one layer, has good thermal insulation properties. Its masonry is carried out directly on the wooden walls and floor without other fire-retardant insulation.
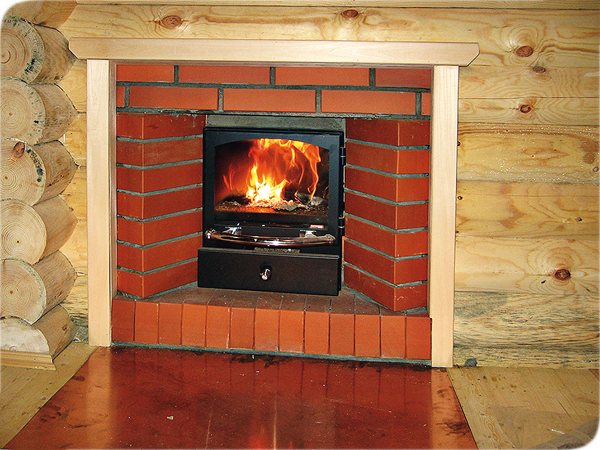
It is advisable to lay the horizontal part of the portal in one row between the foundation of the furnace and the subsequent laying next to it. This advice should only be followed with brick sauna stoves. For metal, it is not suitable.
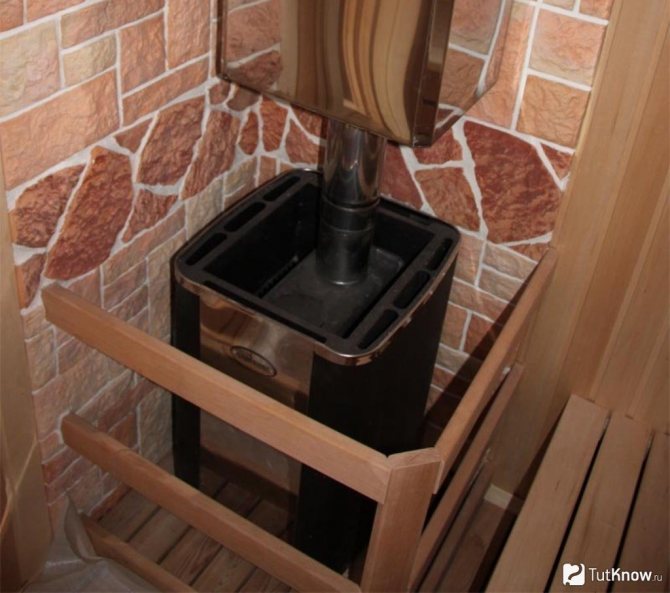
In baths, thick fire-resistant cardboard, minerite or basalt wool are most often used. There are also basalt cardboard and other materials that are a variety of the previous ones. Minerite is most preferred. These are ready-made slabs specially designed for thermal protection in rooms around ovens.
Warming and waterproofing
When using a monolithic slab in the construction of a bath, the foundation itself will be the subfloor.
Many private developers are wondering about the insulation and waterproofing of such a base.

To make a good decoupling between the foundation slab and the cold soil, you need to make it heat-insulated, that is, put the slab on a cushion made of insulation.
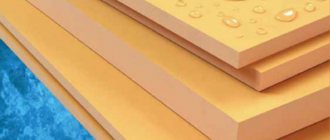
As a rule, extruded polystyrene foam is used for this in our country.
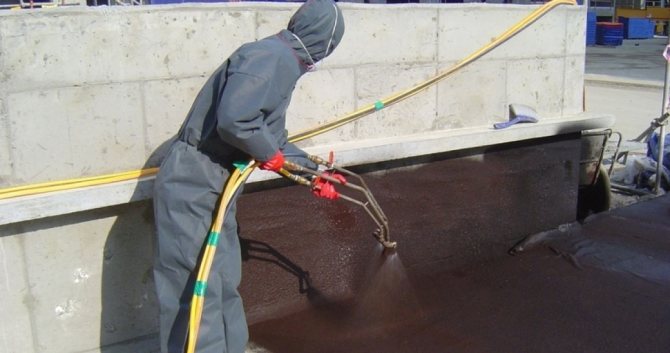
A kind of carpet is lined with this material, on which a layer of waterproofing is laid, and only after that, the monolithic slab foundation itself is erected. This modern material has good thermal insulation properties, does not rot, has great strength and durability.
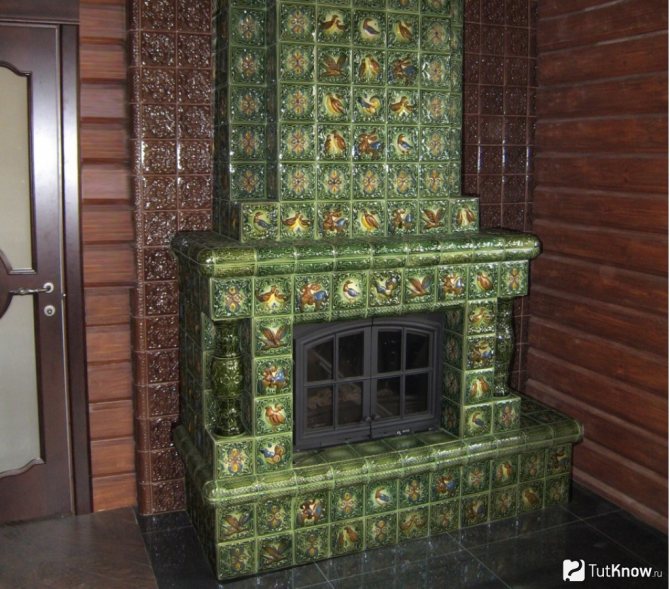
Finishing the stove in the bath with various materials
The decoration around the sauna stove can only be made of safe, fire-resistant materials. The most common of these is brick, but this is optional. Other materials are also suitable:
- Kiln red brick, decorative facing brick;
- Tiles, ceramics for decorating fireplaces;
- Natural stone: various slabs and tiles from it;
- Decorative plasters (applied only with a thick fire retardant layer);
- Steel fire retardant finish (requires good design).
As you can see, the choice of materials is quite large. Brick is reliable and practical. The rest of the materials are taken either because of the design, or when the budget for the brick is not enough, and another fire retardant material is already available. We will consider the finishing of each type of material in more detail.
Designing for a bath
When designing, you need to take into account several main factors that affect the strength of a monolithic slab.
The properties of the soil, the mass of the future structure, the level of groundwater, the distribution of loads and their direction, modeling of possible slab rolls are taken into account.
We strongly recommend ordering all calculations from a specialized organization, which, using special computing systems, will issue detailed working drawings.
Construction technology
Monolithic slab foundations, as a rule, are erected on complex soils, and therefore the most stringent requirements are imposed on their design and construction, as well as on materials, which are regulated by the following regulatory documents: SNiP 3.03.01-87 and SP 50-101-2004.
The construction of all monolithic slabs is carried out according to the same scheme:
- Project creation.
- Marking on the site of the contours of the future structure.
- Preparing the soil for the construction of the foundation.
- Laying of engineering communications in the ground (sewerage, water, etc.).
- Arrangement of a sand and gravel cushion of the required thickness.
- Laying of an insulating layer with its subsequent waterproofing.
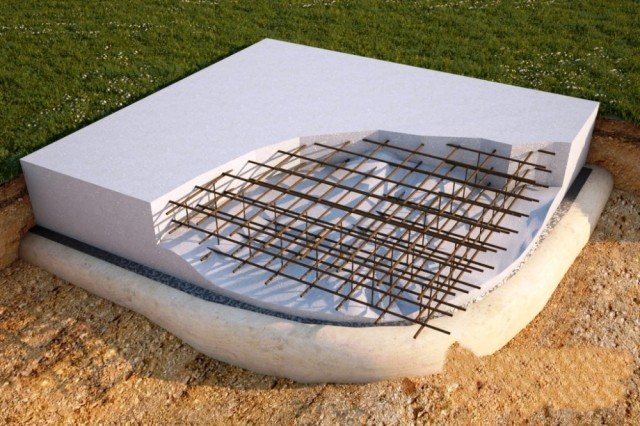
- Reinforcement cage creation.
- Assembly and careful fastening of the formwork.
- Pouring the "sole" with concrete.
If you decide to build a monolithic slab foundation, then you need to act according to the same scheme.
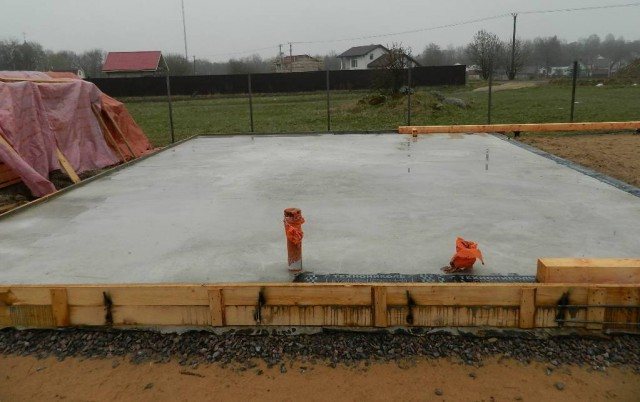
Slab foundation construction
All work on the construction of a floating foundation begins with a marking. All dimensions of the future structure are accurately marked. Then a pit is pulled out 1-2 meters larger than the future building in each direction. These "extra meters" are needed for the convenience of further work. The depth of the pit can be different. It all depends on the specific conditions: the type of soil, the size and weight of the structure, the level of occurrence of groundwater, and so on. But practice shows that the depth of 50-100 cm is often used by private developers.
DIY filling recommendations
- The most difficult question is the thickness of the slab. Please note that if you decide to make a monolithic slab without any calculations, according to the principle, the thicker the better, then choosing a sole thickness of 20 cm may require additional reinforcement in some especially loaded places, since the weight of the building may be too great. The plate thickness of 25 cm allows the reinforcement cage to be knitted evenly, without additional reinforcement. A thickness of 30 cm will be quite strong and durable, but no savings will be obtained due to the large amount of concrete used.
- When making a sand and gravel pad, sprinkle the material in layers, no more than 10 cm. Each layer should be carefully tamped. If you plan to use one sand to create a pillow, then each layer must be spilled with water.
- Before laying the insulation, the pillow should be covered with dense polyethylene to prevent water leakage from the concrete mixture. It is recommended to glue or solder the film at the joints or overlap the sheets.
- Insulation boards must be at least 100 mm. Use extruded polystyrene foam as it.
- When creating a reinforcing frame, you should know that according to SP 52-103-2007, the reinforcement of the slab should be at least 0.3%. This can be calculated independently: a slab cut is taken and the total cut area of the reinforcing rods is calculated. After that, their percentage in the plate is calculated. It can be made easier: as practice has shown, for low-rise buildings, it is enough to make a two-tier reinforcing frame with a rod thickness of 12-14 mm.
Using our recommendations and construction technology, you will certainly get a high-quality and durable monolithic slab foundation for your future bath.
Features of choosing the type of tiles for a bath
The specifics of any room in one way or another dictate the requirements for the selection of finishing materials. It's time to figure out which types of tiles are suitable for use in the bath, and which ones are best left for more favorable conditions.
Which tile is suitable for a bath
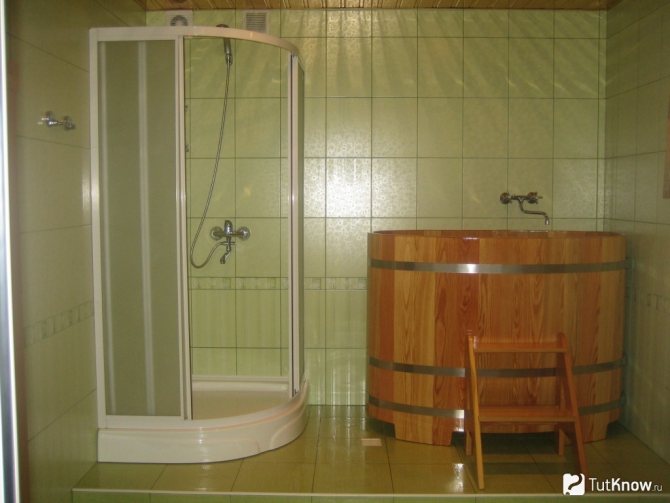
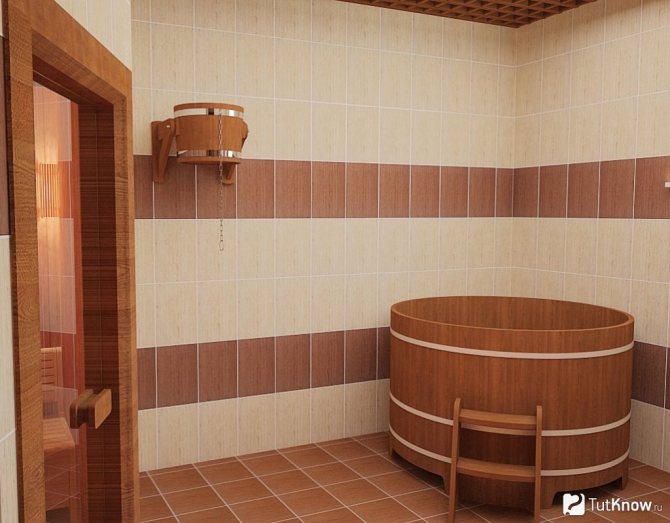
The bathhouse is a zone with "extreme" conditions: humidity is too high, temperature drops are critically sharp. And if wood is considered the best material for finishing a steam room, then facing tiles are more suitable for a shower, dressing room and rest room. It is easy to clean, does not lend itself to the influence of the surrounding humid environment, does not emit harmful vapors when heated, does not lose its presentable appearance as a result of sudden temperature changes.
As you know, tiles can be very different. Its differences are not limited to color palette, texture and size. Performance is still considered a more important criterion. There is an opinion that it is customary to use only glazed tiles for decorating a bath, but this is not true.
Recall that for the manufacture of unglazed tiles, in most cases, refractory clay and high firing temperatures are used. This in itself makes this material the most suitable for installation in high temperature areas. Unglazed non-slip tiles for a bath on the floor are considered many times safer than many smooth types, because its rough surface will easily exclude the possibility of falling on a slippery floor.
When choosing tiles for a bath, the level of moisture absorption plays an important role. If we take an average indicator, then unglazed metlakh material is considered more suitable than some types of glazed.
The only drawback of such a coating is the uniformity of the color palette. But in a bath, this is most likely an advantage. The tiles will not draw too much attention, leaving the accent on wood surfaces.
Which tiles are not suitable for a bath
There are several types of material that are completely unsuitable for installation in a bath. Their quality can be quite high, but the technical characteristics are impermissible for sudden changes in temperature and high levels of humidity.
Let's consider these features in more detail:
- Glazed tiles are not suitable for finishing a protective screen above a stove or stove. Over time, it will begin to crack and crumble under the influence of high temperatures.
- Porcelain stoneware is a material with a high density and a fairly smooth surface. He has no place where there is high humidity. As a flooring, porcelain stoneware tiles run the risk of causing many traumatic situations.
- Smooth tiles are also not suitable for a sink and shower. Neither floor-mounted nor wall-mounted. Slippery wall surfaces can also cause injury.
- For floors, you should not buy tiles with a low level of wear resistance and a high level of moisture absorption, regardless of their type.
Types of tiles that are not suitable for a bath are not necessarily of low quality or insufficiently strong and durable. Most likely, such materials are simply not suitable for the extreme microclimate in a hot, humid room. At the same time, they can perfectly cope with the assigned functions within the boundaries of a city apartment or a public pool.
Monolithic slab and its features
Monolithic slab type
A monolithic slab for a bath is a flat concrete reinforced structure, buried in the ground for a short distance. If, when constructing most types of foundations, it is a prerequisite that the base of the structure lies below the freezing line of the soil base, then the monolithic slab does not have to be lowered to such a depth. The slab foundation structure is not afraid of seasonal movements of the earth base caused by the constant change of freezing and thawing cycles, heavy precipitation. A monolithic slab is a classic example of a floating structure, which is capable of lifting and lowering, as it were, along with the subgrade.
Since the concrete monolith has great strength, the seasonal movement of the soil will not cause any destruction of the walls of the bath.
Ceramic tile
Ceramic tiles have the same fire resistance as brick.
Moreover, she simply has an incomparably greater variety of external forms.
Now, instead of tiles, almost all manufacturers have mastered the technology of semi-dry pressing, which allows you to create any patterns and textures on the tile surface.
This material received the trade name "Keramogranite", although there is no granite in its composition. Decorating the stove in the steam room with tiles has its own advantages, and the main one is the design variety of solutions. Unlike bricks, tiles can be of any color.
The side of the old tile had a size of 10-15 cm. In modern porcelain stoneware tiles, the side length can reach 40 cm. The longer the side length, the more accurate the coating is. It has fewer seams, but the complexity of the installation is significantly increased. Porcelain stoneware tiles should be installed by specialists.
A lot of experience is needed here. If the tiles are small, then the cladding can be carried out independently. There are no particular difficulties here. Laying is carried out using a conventional mortar on a sheet of heat insulator. It is better to use a special mortar based on a dry construction mixture for the appropriate purpose.
Advantages and disadvantages
A monolithic concrete massif as a foundation for a bath has many advantages:
- "Floating" mobility of the foundation structure.
- High load-bearing capacity of a solid slab.
- The upper horizontal surface of the slab serves as the floor of the bathhouse.
- Unlimited service life.
The disadvantages of the foundation for a bath in the form of a slab include:
- Significant cash costs for the purchase of building material and for the production of work on the device of the monolith.
- Large amount of earthworks.
- Increased labor costs when carrying out earthworks.
Protecting a wooden wall from the heat of the stove
Wooden baths require especially careful observance of fire safety rules during their arrangement. The source of a fire can be anything, an unextinguished cigarette, coals falling out of the furnace, an uncleaned chimney, but the main source of threat is the stove itself.
Related article: Do I need to putty the walls under the wallpaper
The surface of the stove heats up to 300 ° - 400 °, the heat falls on the wooden walls, which leads to their excessive heating and charring. Stopping the process of burning wood surfaces is extremely difficult; the best way to avoid a fire is to prevent it. There are two really effective ways to insulate the surface of wooden walls from the heat of a sauna stove - protecting equipment in the form of a screen or erecting special sheathing made of non-combustible materials.
Foundation slab manufacturing process
The sequence of the device of a monolithic slab
The technological process of constructing a foundation for a bath in the form of a slab consists in the sequential execution of a number of intermediate processes, such as:
- Preparatory work.
- Foundation marking.
- Excavation.
- Installation of restrictive formwork.
- Concrete pad and insulation.
- Assembly and installation of the reinforcement cage.
- Filling the foundation structure with concrete.
- Curing.
Attention should be paid to the quality of the materials used to perform the work. For pouring the slab foundation, it is recommended to use a concrete mixture of at least B15 class.
Whenever possible, it is best to use pre-owned, factory-made concrete of the correct grade.
Slab foundation
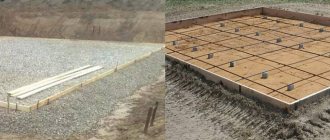
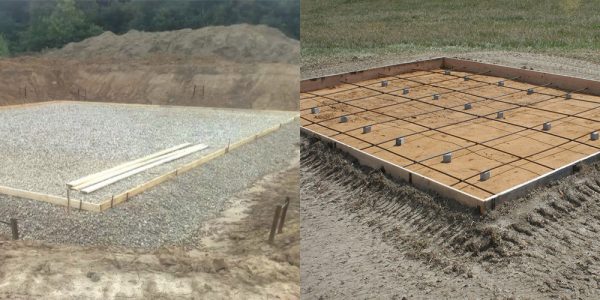
1. Clearing and leveling the territory... Removal of fertile soil from a building spot.
2. Markup... Having outlined the dimensions of the future bath with construction thread and pegs, add 0.5-1 meters on each side - these will be the dimensions of the pit.
3. Sand and gravel pad it is poured onto the bottom of the pit with a layer of 15 to 30 cm, leveled, spilled with water and compacted.
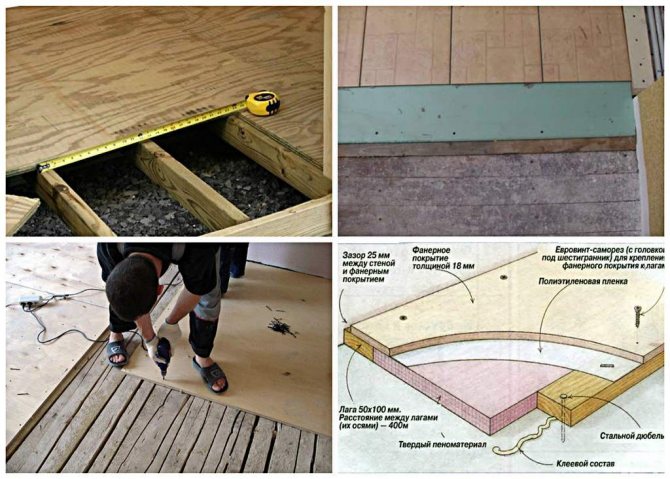
4. Formwork... Removable formwork is made in the same way as for strip foundations, but it is possible to make permanent formwork from fiber-optic plates. In this case, the slabs are fastened with ties and corners. Like the removable formwork, this one also needs to be reinforced with struts.
IMPORTANT! Holes for communications are made at the formwork stage. If you forget something, you will have to hammer in the concrete.
5. Waterproofing... Polyethylene or geotextile is placed on the sand cushion. You can do with roofing material. It is important to make the joints of the waterproofing material with a good overlap and close the formwork with it too.
6. Reinforcement... Small baths can be reinforced with a mesh made of 8-10 mm reinforcement. The grid spacing is 10-15 cm. For heavier buildings, more durable reinforcement is needed - 12-14 mm. The same mesh is made from it. With a large thickness of the foundation, it can be reinforced several times.
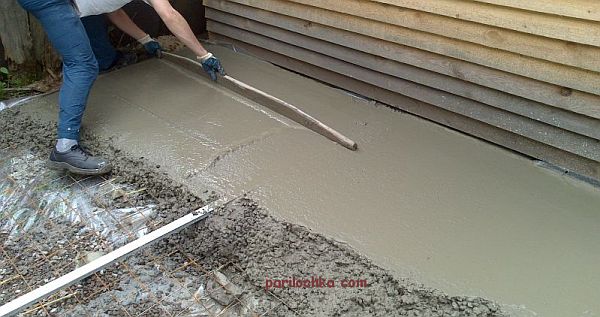
7. Fill... Better to fill in one go. Pour slowly, evenly. Sealing with a vibrator is mandatory.
In a month and a half, the foundation will be ready for the next stages of construction. But in the first weeks it needs to be watered with water so that the plate does not crack when it dries.
Laying of engineering communications
At the bottom of the pit or deeper, sewer and water pipes, an electric lead-in cable are laid, if the entrance to the bath will be made by an underground cable. Sewer pipes are taken orange, intended for laying in the ground, and water pipes are laid in a sleeve - a plastic pipe of a larger diameter, so that the pipes can be replaced. The cable is also routed in a sleeve. All pipes are laid on a sand cushion. Plumbing and sewerage can be insulated with foam sheets.
Site preparation
Monolithic foundation diagram
In order to mark the configuration of the foundation slab, it is necessary to clean the area of the site. The top soil layer is removed to a depth of 15 - 20 cm and removed from the site. The work of removing the vegetation layer can be done independently with the help of a shovel. If it is possible to use a bulldozer for these purposes, then this will make it possible to make a preparatory period in 1 - 2 hours.
The site must be freed from growing shrubs and trees by uprooting and not leaving the remnants of roots in the body of the future foundation.
Layout work
The foundation of the slab for the bath is marked immediately along the entire perimeter of the structure. For marking, wooden pegs or trimming of metal reinforcement rods are used. You will also need a sturdy rope or colored polyester cord. The marking of the site for the construction of a bath is carried out in the following order:
- A marking peg is driven into the ground 30-40 cm into the far corner of the future foundation pit.
- In a straight line at a distance equal to the length of the building, a marking cord is pulled and a second peg is hammered.
- Next, a sequential marking and installation of marking stakes is carried out, which are installed strictly at right angles.
Thus, a regular rectangular or square linear configuration with right angles is obtained. In construction practice, a geodetic device is used to construct right angles - theodolite. Private developers do not always have the opportunity to use such a device and use the "rule of diagonals" as a check.
If the marking is done correctly, then the diagonals will be equal. An error of 10 - 15 mm is allowed.
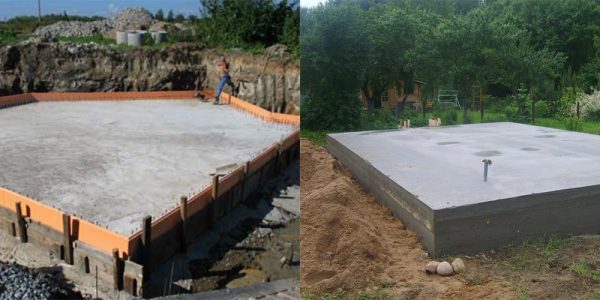
Formwork installation is an important stage of work
In order for the monolithic slab for the bath to have the correct shape, and the concrete after pouring does not flow out of the future monolithic foundation, it is necessary to install formwork along the edges of the pit. It represents shields, the width of which is 30-50 cm greater than the depth of the pit.This value will allow the future base to be raised above the soil layer.
Formwork panels are made from edged boards, moisture-resistant plywood, OSB, flat slate. From the outside of the future slab, the formwork must be fixed with spacers, which rest on the trims of the boards driven into the ground. Shields are mounted directly at the construction site of the slab foundation or use ready-made ones. Installation, for example, of a columnar foundation does not need formwork.
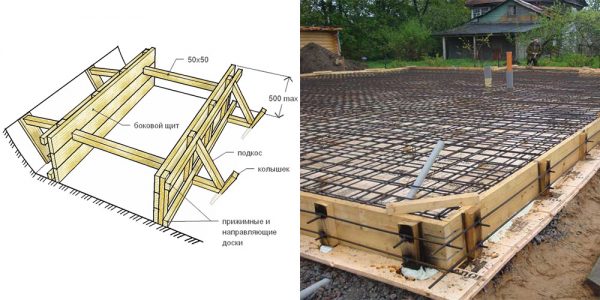
Formwork for a monolithic slab
Often, slab insulation is also installed on the inside of the formwork for a floating foundation. This is due to the small thickness of the slab, which in turn does not allow it to have high thermal insulation properties.
Earthworks - choose the soil
Under the monolithic reinforced slab, soil is selected to a depth of 60 cm and 1 meter wider than the slab. Dumping is carried out with coarse building sand, 40 cm thick with careful compaction. For a good compaction of the sand, it can be filled with water.
In this case, self-compaction of the sand will occur and the water level can be used as a reference point for uniform filling of sand into the horizon.
Mandatory element - filling the bottom of the pit
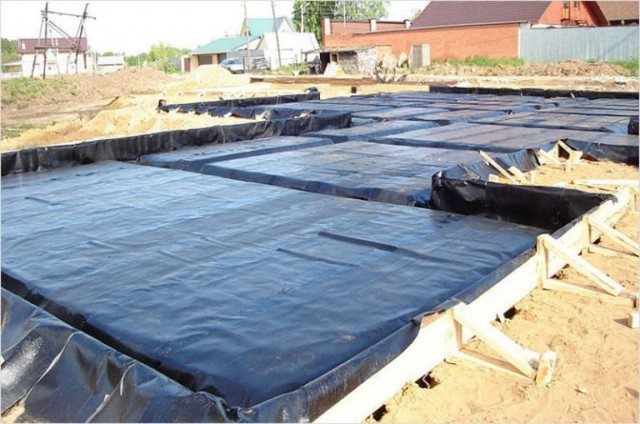
Having finished the excavation work and having rested for a couple of days, you can continue making the floating foundation with your own hands. The next stage is filling the bottom of the pit with crushed stone and sand. This is necessary to create a compensation layer that reduces the effect of soil movement on the base of the bath. The technology for performing this stage of work is as follows:
Filling the bottom of the pit with rubble and sand
- The bottom of the pre-leveled foundation pit for the floating foundation is lined with several layers of geotextile - a special woven material widely used in the construction industry;
- Clean seeded sand, quarry or river, is poured onto the material. It is advisable to fill in several layers with moistening and tamping each. The total thickness of the sandy floor for a monolithic foundation should be at least 30 cm. You can compact bulk material manually using a simple device from a meter-long trimming of a bar or log, to the ends of which a piece of thick plywood 40x40 cm and a handle made of a wooden block are nailed. There is also a mechanical assistant for performing such work - a vibrating plate.
- Crushed stone of the middle fraction is poured onto the sand layer and also compacted.
Creating a tiled floor
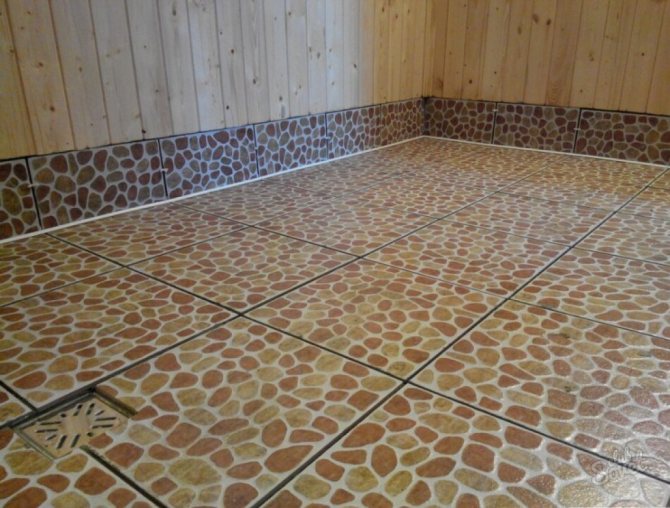
In Russian bathing traditions, it is not customary to use tiles to cover the floor in bath rooms. Despite this, steam lovers still opt for the ceramic field. When creating it, the craftsmen take into account the type of floor base (concrete or wooden) and its slope towards the drain. Consider creating varieties of tile flooring.
Smooth floor
Before laying ceramic tiles, preliminary preparation of the subfloor in the bath should be carried out. The next ethane is floor markings. It is done if you plan to lay out a tile pattern on the floor.
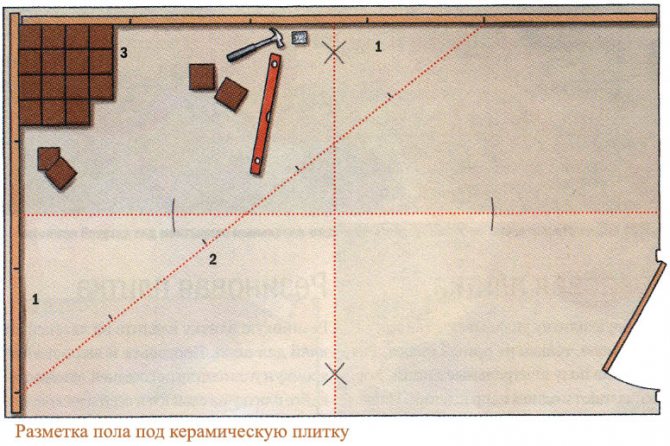
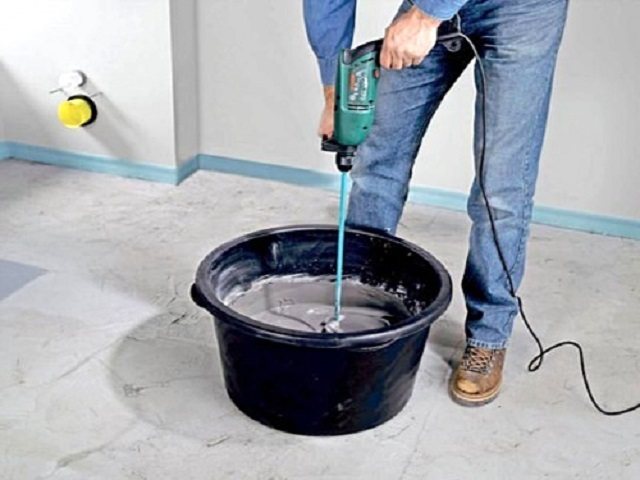
If the laying will be from a single-colored tile, then the markup will not be required. In this case, the floor is laid with tiles, starting from the front corner of the room. The adhesive used must be diluted in water according to the instructions for use on the packaging. For mixing and obtaining a homogeneous composition without clots, a construction mixer or a drill with a special attachment is used.
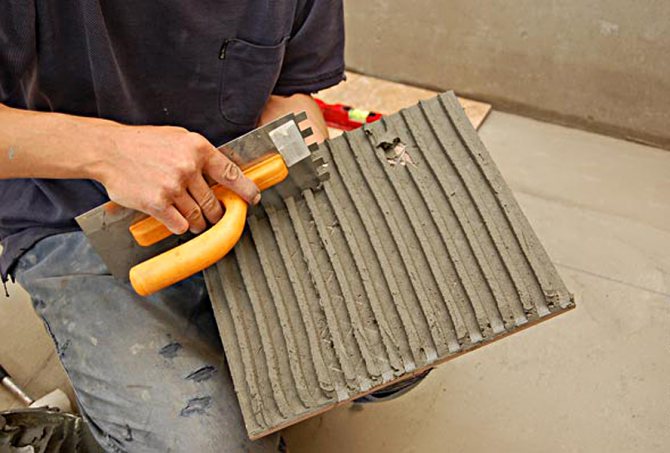
First, the glue is applied to the area of the floor required for laying 4–6 tiles. To apply it, use a medium-width spatula or a trowel. The applied layer is then spread with a notched trowel.
The adhesive is also applied to the back of the tile using the same spatulas (even, then notched).
The final stage of creating a flat tile floor: grouting and removing excess glue with a wet rag or damp sponge.
With drain
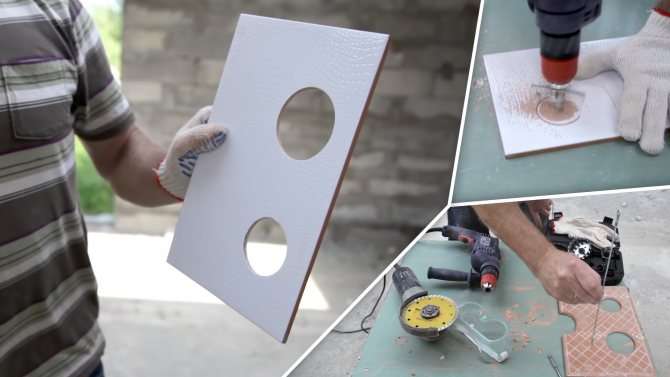
Tiling the floor in the bath provides for a slope towards the drain.For a reference point, craftsmen use either a building level, or a fishing line, or a bar with the desired slope. It is placed on a tile, and already on top of it is measured with a building level. The tile is cut with a special tool - a tile cutter, the holes for the drain are cut using a drill with a core drill.
If the drain in the bath is in the middle of the room, then the tiling of the floor begins from the central part (from the place of drain). At the same time, the necessary finishing slope is formed. First, the tiles are laid out without glue for more accurate measurement of the desired slope.
On a concrete floor
First of all, the entire area that is planned to be tiled is cleaned of debris and dirt. You can use a vacuum cleaner for this purpose. After cleaning, the cracks, cracks and flaws at the base of the floor and at the joints of the walls and floor should be sealed with sealant. When the sealant is dry, the excess should be removed. Then a ready-made liquid primer is applied to the subfloor. The required layer of primer in height is 20 cm (measured along the wall).
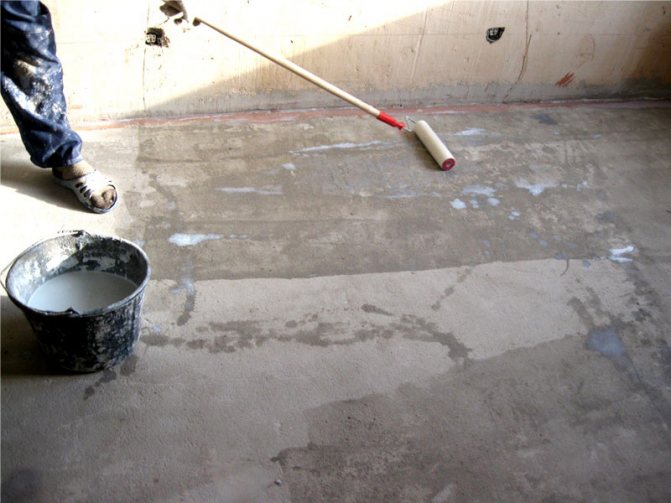
After the soil has dried, the floor should be waterproofed. For such purposes, it is practical to use rubber or the so-called liquid glass. These waterproofing compounds are applied to the subfloor with a wide brush in two to three layers. Then you need to let them dry. Tiles are laid on the floor prepared in this way according to the usual scheme.
On a wooden floor
The planks of the wooden base must be of good quality and condition, not decayed. If there are damaged boards, they should be replaced. The best option is to completely disassemble the base, lay insulation, remove varnish and paint from old boards, and treat the floorboards with an antiseptic. Leave 3–5 mm gaps between the floorboards. Fill these holes with polyurethane foam.
Then you need to putty all the holes, apply latex impregnation or heated drying oil to the boards. This will be the first layer of waterproofing on the wooden floor. The second layer is made using fluid or free-flowing components or roofing material or other roll materials.
The next stage is the screed. A metal mesh is mounted along the perimeter of the bath, which contributes to the stability of the screed. Filling is carried out taking into account the slope towards the drain. Laying tiles on a wooden floor is done in the usual way. Of course, taking into account the bias towards the drain.
Tiled tiles are a practical solution for decorating a bath. It is durable, wear-resistant, aesthetically pleasing in appearance, easy to maintain, and most importantly, it is the best fit for such a "water" room as a bathhouse or sauna. And it is quite possible to lay tiles with your own hands on any floor: both wooden and concrete. And even the presence of a drain in the bath will not be a hindrance - you get a perfectly flat plane.