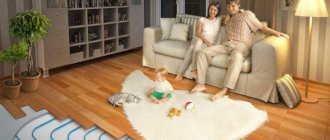

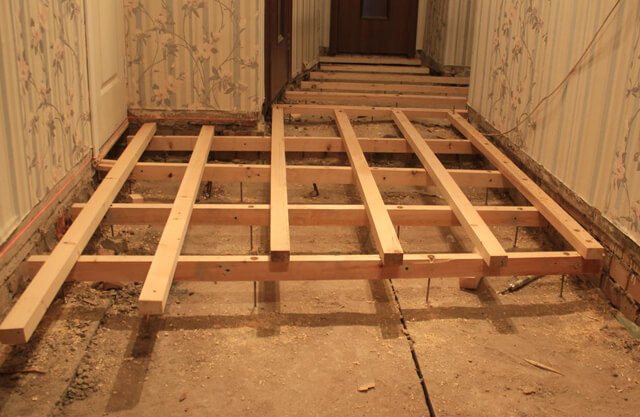
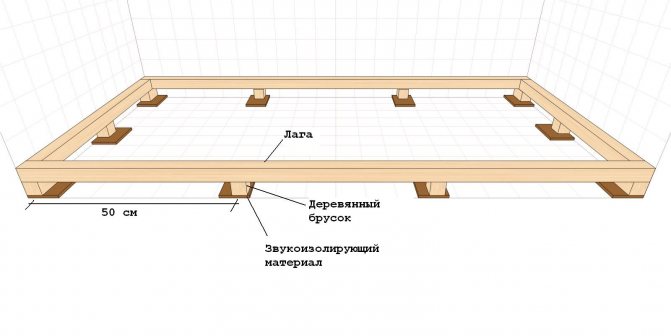
Basic data for calculation
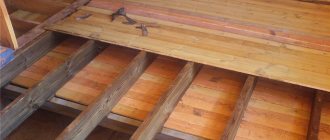
Logs are wooden or rectangular beams made of another material, which are laid on the floor of the room in order to level it and create a reliable support for the finishing flooring.
Basic information on logs and floor construction is presented in the article "Wooden floor on logs: DIY device". For the calculation, the following points are most important.
The dimensions of the premises and the planned mode of its operation.
The dimensions and purpose of the premises are important for determining the length of the span (the required length of the logs, solid or composite), their position and the choice of wood. For walk-through rooms or corridors, it is customary to place the frame across the direction of movement. Accordingly, short logs can be used.
In rooms with natural light, it is important to consider the direction of the light rays and their intensity. If the illumination is sufficient according to the norms of SNiP 23-05-2010, it is important to place the logs across the direction of the luminous flux. In this case, they will warm up (and deform, age under the influence of heating) evenly.
The choice of wood is influenced by the humidity in the room. For dry spaces, a tree of common conifers is used (spruce, pine, fir, smereka), for wet spaces - larch. In especially critical cases, oak is used.
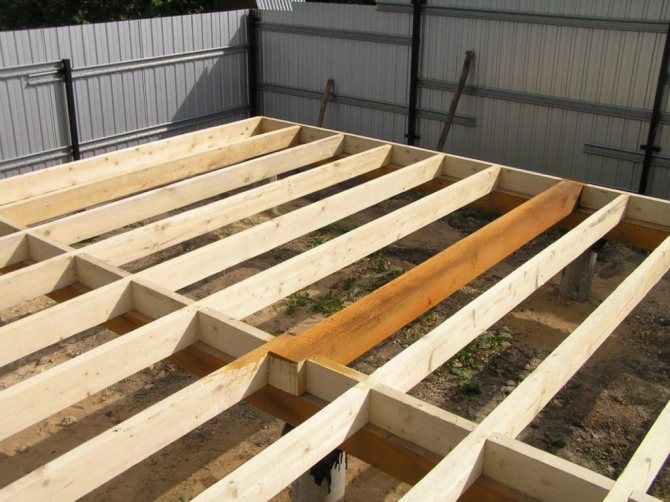
The type of support of the beams - on a solid foundation (screed, reinforced concrete slab or masonry), on adjustable or non-adjustable supports, along the perimeter of the room on the ledges of the foundation or grillage. The support of the lags is directly related to their location. When installing a floor over a floor of wooden or metal beams, the logs are attached directly to the beams.
If, at the same time, the distance between the floor logs does not meet the required for flooring (from the strength conditions), then a second layer is arranged on top of the first layer of beams, with the necessary step. In this case, leveling is performed for the first layer. On a solid base or ground, the logs are located according to strength standards.
The arrangement of the beams is only in one direction or along and across the room. The frame is arranged in the form of a lattice, if increased strength of the flooring is required or a "floating floor" is planned. In both cases, the connection of longitudinal and transverse beams increases not only strength, but also the rigidity of the structure, its resistance to deformation.

The section of the lag is selected depending on the thickness of the floorboard and the span. The greater the load and the longer the span, the larger the cross-section of the beam. The thicker the floorboard, the more you can increase the span and reduce the cross-section of the beams.

Insulation technology
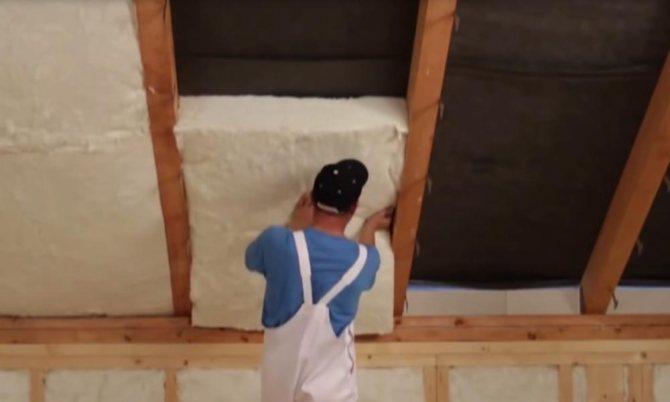
Spraying is a fast and high-quality, but expensive way of insulating a wooden floor. It is applied to absolutely any surface, it is used in private houses, and in apartments, and in industrial premises. Polyurethane foam is sprayed after removing the old coating. At the same time, there must be appropriate equipment; without it, the process is impossible.
Thermal insulation of a wooden floor is a responsible process that requires certain knowledge. It is important to choose the right material, since not everything that is good for a private house is suitable for insulation in an apartment. It is also important to correctly divide the warming process, especially if the installation is done by hand. Any mistake can lead to the fact that you have to redo the work done earlier.
Let's look at several options for how you can make do-it-yourself thermal insulation of wooden floors.
It is much more convenient to insulate the floor in a private house at the construction stage. But quite often this moment is missed and it is necessary to produce thermal insulation already during the operation of the building. To do this, you must use the following technology of work:
- First of all, it is necessary to dismantle the old flooring. If you have linoleum, remove it carefully, it will still come in handy for waterproofing.
- After that, the floorboards are removed. If they are in good condition, they should be numbered to facilitate re-assembly.
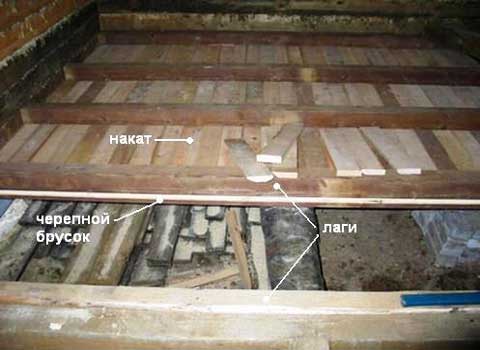
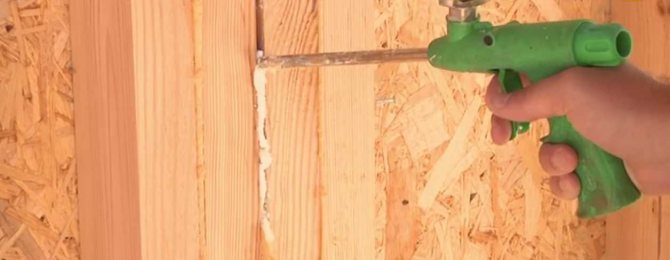
- Then from below on the logs along the entire length cranial bars are stuffed, on which, in turn, the subfloor is laid. For its installation, you can use a non-edged board. Laying should be done as tightly as possible, and it is better to fill the remaining cracks with polyurethane foam.
- The next step is the installation of waterproofing material. Here you can use old linoleum or dense polyethylene.
- Heat-insulating material is laid on the waterproofing.

- The insulation must be covered with a layer of vapor barrier. Foamed polyethylene, which has a foil base, is best suited for this purpose.
- The final stage is the installation of old or new boards, you can also use plywood. Insulated linoleum can be placed on plywood sheets, which will increase the level of thermal insulation and reduce the noise level from steps.
In the apartment, wooden floors are insulated using a similar technology. It is a little easier to make thermal insulation here, since there is already a rough floor, which is a concrete floor slab. The technology for insulating wooden floors in an apartment is carried out in the following order:
- Just like in a private house, it is necessary to dismantle the flooring and boards.
- Wooden logs are installed on a concrete base. The remnants of the old insulation between the logs must be removed, sweep away other debris.
- After that, a layer of waterproofing is laid. In this capacity, you can use old linoleum, roofing felt or plastic wrap. It will be better if the beams are also covered with waterproofing so that they do not absorb moisture.
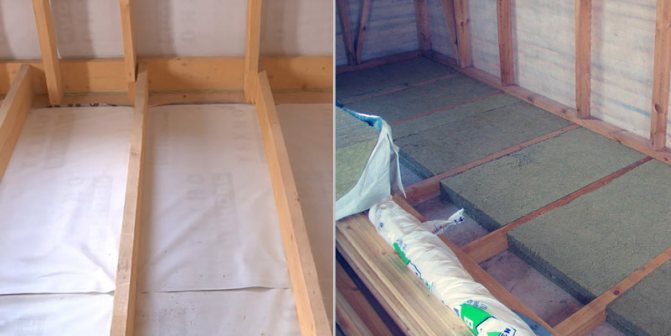
- Then the space between the lags is filled with heat-insulating material as tightly as possible. In this case, it is also necessary to provide a small gap so that the flooring boards do not lie directly on the insulation.
- The thermal insulation material is covered with a vapor barrier, the function of which is perfectly performed by inexpensive penofol.
- Now you can install the flooring. To do this, you can use old boards if they are in good condition, or lay new ones.
You can also install plywood sheets. It will subsequently need to be covered with a fine coating. To do this, you can use linoleum on an insulated basis, laminate with a backing or carpet.
The timber frame structure is found not only in wooden houses, but also in many buildings built in the first half or middle of the 20th century. At that time, this was the most affordable way to quickly build a residential building. The characteristic features of such coatings are good thermal insulation properties.
In addition, the installation of logs is one of the effective options for creating a warm base in modern residential buildings, however, due to a decrease in the total height in the room, it is not always acceptable for standard apartments and houses.
- In most cases, the logs are installed on a rough wooden base, thereby forming several separate cells on the surface. Those. the insulation will not be evenly distributed over the entire surface, but will only fill these zones. The difference between the heat transfer coefficients of the beams and the heat insulator can cause uneven temperature distribution on the surface.
- The insulation material should not negatively affect the wooden structural elements. To a greater extent, this relates to its hydrophobicity - moisture absorption. Therefore, the technology of floor insulation along the logs provides for increased waterproofing measures.
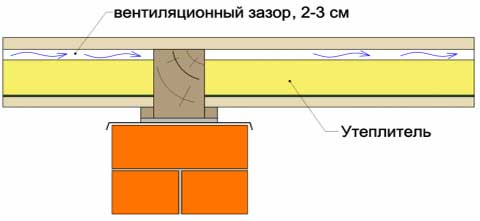
- Mandatory air gap. It is necessary for the timely removal of water vapor emitted by wood. To do this, provide for the presence of ventilation slots between the insulation and the upper base of the floor.
Given this specificity, you can start choosing the optimal insulation scheme. To do this, consider various options for the design of the heat-insulating layer.
It is best to consider floor insulation along the logs visually, with options for installing various types of heat insulators. But first, you should carry out a number of preparatory work with a wooden structure.
Advice
If the thermal insulation layer will be installed in an old structure, a thorough revision of the wooden floor should be carried out.
During long-term operation, wooden elements could be exposed to moisture or mold, which leads to a deterioration in their performance properties. Therefore, they are carefully checked and, as necessary, they carry out restoration work or a complete replacement. This procedure is not required when installing new floors.
After that, you can start installing the insulation. Regardless of its type, the subfloor is waterproofed first. Often it is also made of wooden planks, much less often you can find a subgrade. In the latter case, the beams are attached to the walls of the building and to the ground using special support structures.
At the end of the condition check, you can proceed with the installation of the thermal insulation layer. The general scheme is as follows.
- Formation of an internal waterproofing layer. For this it is necessary to use special mixtures. It is best to process the base before installation - in this way, you can ensure maximum impregnation with a waterproofing compound. Most often, bituminous mastic with the addition of polymer components is used for this. It is necessary to process both the outer and inner surface of the flooring.
The use of roll materials is not recommended. During use, a condensation film may form between the boards and the film, which will be absorbed by the wood. The reason for this phenomenon lies in the temperature difference between the plane of the foundation and the inner surface of the board. Often the dew point is located here, which leads to the appearance of condensation in winter.
- Installing lag. If the supporting timber structures have not yet been installed, they must also be treated with a protective waterproofing material. During their installation, the optimal distance between the lags should be taken into account. It depends on the span width and the size of the beams to be installed.
If the installation takes place on a brick or concrete wall, you need to equip the place for connecting the lag and the supporting structures of the building. To do this, it is best to use a roll-up waterproofing material, such as roofing felt. Upon completion of the installation, you can proceed directly to the insulation.
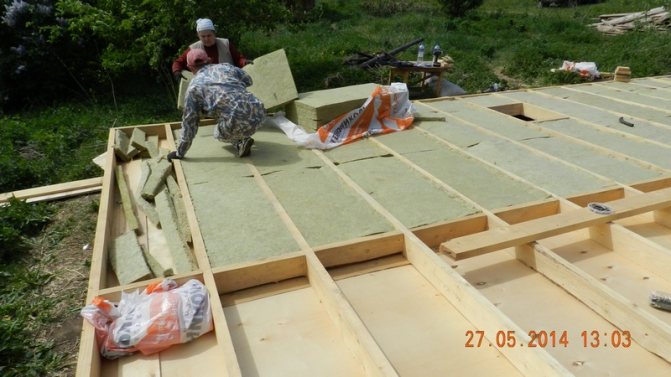
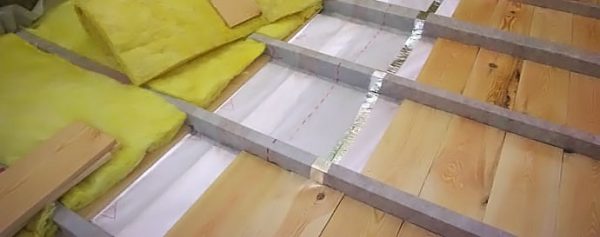
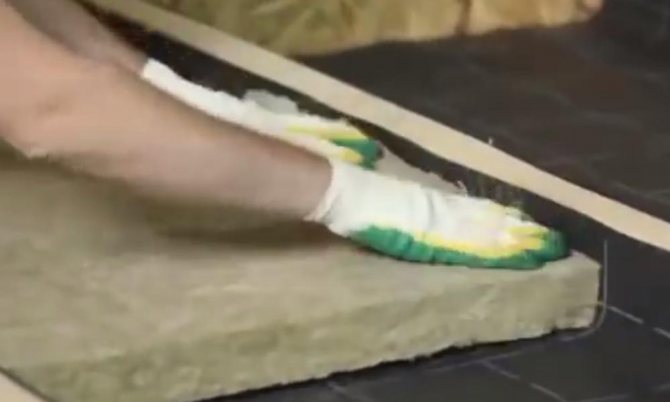
- Installation of thermal insulation. The choice of technology for installing insulation directly depends on its type. For roll materials (basalt wool), it is enough to spread the material on the surface of the subfloor. During work, it is important to minimize the size of the gaps between the layers. Due to the fact that the height of the lag is often 250 mm, several layers can be installed. It is recommended to develop the scheme in such a way that the joints of each subsequent one do not coincide with the previous one. This is required to prevent the appearance of so-called cold bridges - zones where the temperature will be significantly lower than in the main heat-insulating layer.
Read more: How reverse osmosis works: scheme and principle of operation
Advice
For sheet material (polystyrene, extruded polystyrene foam), it is not recommended to fix it with mounting dowels. Since individual insulating elements will be located between the beams, it is important to draw up a plan for their cutting correctly. When tightly docked with each other, an optimal energy saving factor will be ensured. The absence of mechanical stress contributes to the preservation of the primary layout of the insulation sheets.
If loose heat-insulating materials are used - expanded clay, you must first prepare the composition. To do this, mix components of different fractions (from 10 to 20 mm), and then evenly fill the space between the lags.
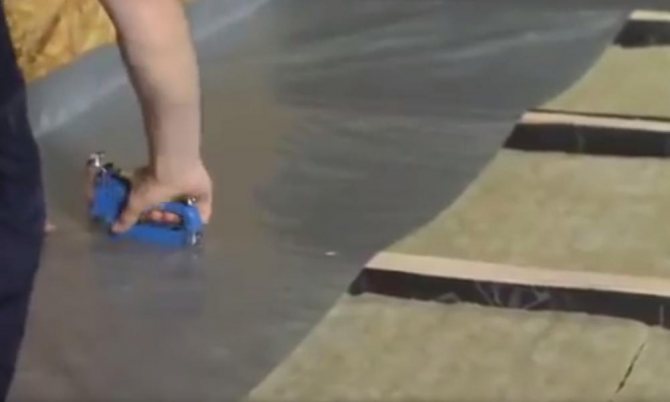
- Ventilation gap. Before installing the main covering (boards or solid overlap), equip an air gap between it and the thermal insulation. It is better to install wooden slats on the surface of the beams for this. With their help, you can make ventilation voids necessary to remove moisture and level the finishing surface.
Insulated floor device
Tabular data
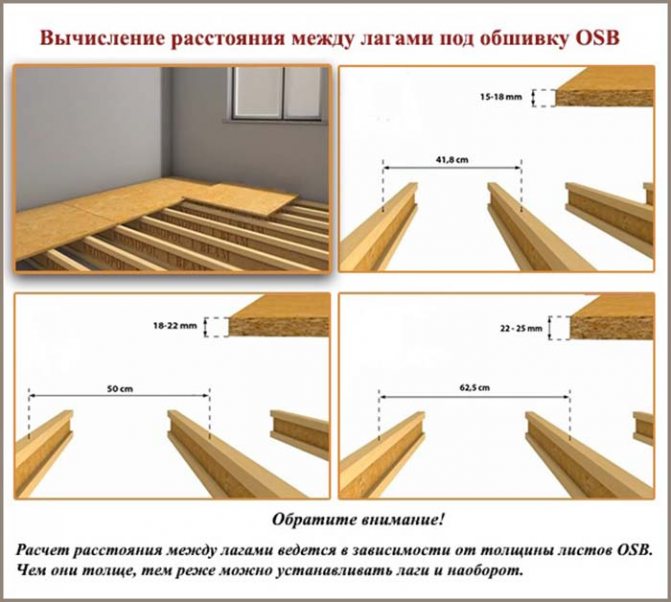
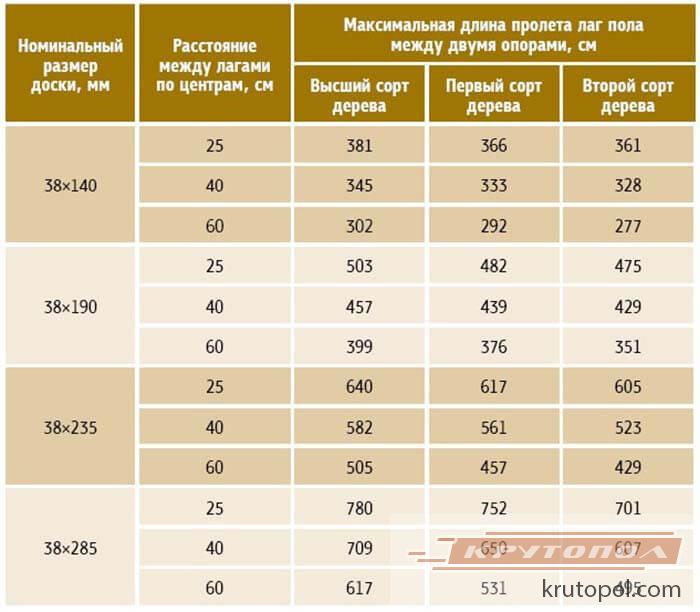
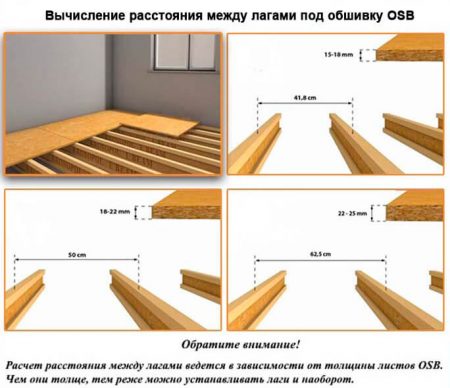
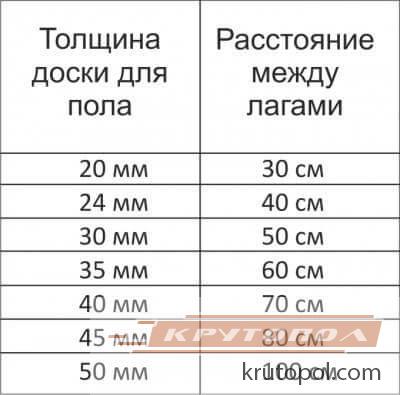
The analysis of statistics and calculations based on the data on the load capacity of coniferous wood (averaged) made it possible to compile a table of the distances between the logs, to derive the relationship between the thickness of the boards (slabs) of the flooring and the pitch of the support beams.
Important: if the permeability of the room is increased or the installation of heavy furniture (equipment) is planned, an amendment must be made. At the same time, the thickness of the floorboard increases, as does the cross-section of the beams, and the size between the lags decreases.
For flooring on a solid (reinforced concrete slab) foundation, the minimum allowable cross-section of the beams and the maximum distance between them are taken. When creating a flooring in a frame or wooden house, not only the payload on the flooring is taken into account, but also the own weight of the structure - beams, rough flooring, heat, sound and waterproofing, finishing.
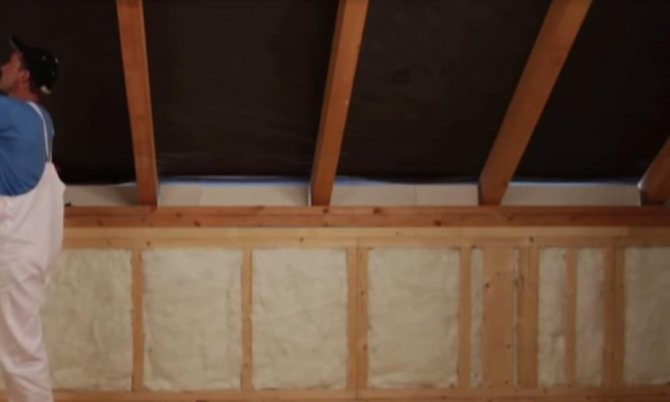
Insulation of the attic floor (ceiling) of a frame house
WITH top floor everything is the same as with the floor of a frame house, only it makes no sense to insulate from below, we do everything from above. Remember that in a cold attic, you can pour or lay not only 150-200 mm of insulation (in the size of the overlap lag), but also 300, 400 or even 500 mm of insulation. Walking on it will be problematic, but it will be very warm in winter and cool in summer.
Calculation 1.
Initial data - support on the floor slab along the base screed, with adjustable clamps (screw), under the laminate. The dimensions of the room are 3x5 m, the span is chosen 3 m (parallel to the wall with the window). Under the laminate, a rough plywood flooring of 20 mm is required.
According to the table, for such a thickness of the flooring (plywood), the lag step can be taken as 300 mm, and the section of the beam for a span of 3 m is 150x80 mm. The estimated amount x will be at a distance from the walls of 50 mm, a beam width of 80 mm and a lag step for plywood of 300 mm
5000 - 80x - 300 (x-1) - 100, x = 12.1 beams.
Since the number of lags cannot be whole, we take the number of beams 13 or - with a low load, you can increase the distance to the wall - 12 pieces.
If, under the same conditions, the lag step is calculated for a floor made of boards with a thickness of 50 mm, then the estimated number of beams x with a distance between them of 1000 mm will be
5000 - 80x - 1000 (x-1) - 100, x = 3.6 beams.
We accept a whole number of 4 pieces (here it is undesirable to reduce their number).
Basement insulation
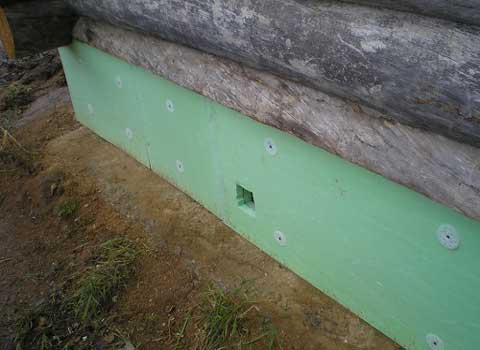
This is the same wall, only with the difference that the position is horizontal, so the thermal insulation techniques are similar. A strapping bar is installed on the bottom of the floor, which is covered with an overlap on all sides with a windproof membrane.To prevent the thermal insulation material from squeezing and tearing into the laid frame, the film is fixed with a subfloor. After that, in 2-3 layers with a breakdown of the seams, the thermal insulation protection is mounted.
For the basement covering, a thermal insulation material with a thickness of at least 200 ml is needed, the attic floor is insulated with a layer of 250 mm, and the interfloor one is not less than 150 mm.
Calculation 2
Initial data - support on wooden floor beams, located with a step of 1000 mm, the same dimensions and configuration of the room, the same finish.
Determine the distance through which the logs should be laid under the plywood flooring. According to the table for plywood with a thickness of 20 mm, the lag step is 300 mm, while the distance between the beams is 1000 mm. It is first necessary to place the logs according to the number of beams with attachment to their side side and alignment, then place the beams across the primary logs with a step of 300 mm.
Since the beams are 3000 mm long, the primary logs must also be 3000 mm long and have a cross section of at least 200x150 mm. For a five-meter room, such logs (according to the previous calculation) will require 4 logs (or five, depending on the position of the beams). The placement of secondary supports goes along a span with a length of 5000 mm, with a distance of 300 mm and a beam width of 150 (section 200x150 mm) they will be required
3000 - 150x - 300 (x-1) - 100, x = 5.3 pieces.
Taking into account the rounding, the required number of five-meter (composite) lags is 5 pieces.
For a floorboard with a thickness of 50 mm, the required distance between the joists is 1000 mm, which is equal to the pitch between the beams. Therefore, the number of lags corresponds to the number of beams (4 or 5 pieces).
In both cases, a correction must be made for the increased floor load. Depending on the operating conditions, you can increase the cross-section of the beams / reduce the distance between them / apply a complex correction (increase the cross-section and decrease the distance between the logs under the boards).
If we accept an increase in the cross-section, then in both cases the nearest higher value should be taken according to the table, that is, 220x180 mm (primary and secondary in case of cross decking) and 180x100 mm for decking under the boards. Correction for changing the distance of the log under the floor (step) leads to an increase in the number of bars. For the first calculation, the number of primary lags will not change, but for the secondary ones, the number will be (with a reduced step of 250 mm)
3000 - 150x - 250 (x-1) - 100, x = 6.
When attaching the lag to the beams, the step does not change, therefore, this method of making corrections is not applicable.
Wall insulation in a frame house
Wall insulation in a frame house is similar. We stick the insulation between the wall posts. Remember that the spacing of the uprights should also be 20-30 mm larger than the width of the insulation. Usually the spacing of the posts is made 625 mm with a 40 mm board and 635 mm with a 50 mm board. By the way, it seems to me that it is better to cut OSB-3 a couple of times than to constantly cut the insulation.
Video about wall insulation in a frame house from the Rockwool company (manufacturer of the insulation of the same name):
What kind of insulation for walls is there?
Types of wall insulation: mineral wool with a density of more than 30 kg / m3, ecowool (wet method) and foam. It is these three modern insulation materials that are used in 95% of the walls of frame houses in Russia. It is difficult to say for sure that the best thermal insulation of walls is ecowool or mineral wool or polystyrene, since each insulation has its own pros and cons.
Insulation for external walls
A special external insulation for walls is used if you want to make a plaster facade with insulation. In such cases, you have 2 options: foam or high density mineral wool (about 125 kg / m3).
The cheapest and best wall insulation
We can say for sure that the cheapest insulation for walls is a mineral insulation with a minimum density, but it is not recommended to use it, although some take risks and even use glass wool in the walls of a frame house. Over time, low-density basalt can settle in the walls and cracks appear.
In my opinion, the best insulation for the walls of the frame is ecowool. Therefore, it is with her that we insulate the houses of clients with her and there have not been any dissatisfied ones for 7 years of work. Ecowool can even withstand fires.So contact us, we will insulate your walls with ecowool. But we had to throw mineral wool out of the walls more than once due to the fact that it fell into disrepair. It is clear that she herself was not to blame for this, the insulation technology was simply not followed, but ecowool forgives such a thing.
Online calculators
To simplify calculations, you can use an online calculator. However, in order to enter data into it, it is necessary to first determine the section of the timber, the thickness of the flooring and what step of the floor lag is adopted.
Note: This calculator distinguishes between subfloor and floorboard. This refers to a two-layer plank flooring, in which first the subfloor boards are laid with an interval of 2 cm (to compensate for the temperature and humidity deformation), and then a floorboard is created from the floorboards and they undergo finishing (varnishing, painting).
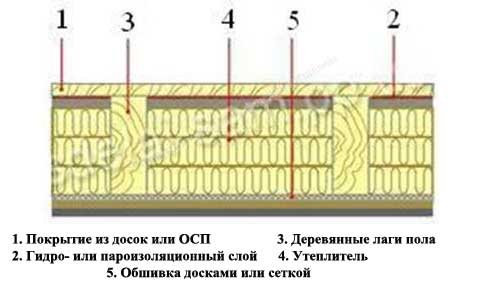
Thermal insulation of a wooden floor along the logs
Whatever the material for insulation, the technology remains the same. The main thing before installation is to determine the conditions in the house in which the wooden floor will be used. The level of humidity and temperature, the degree of load and the purpose of the room are important here.
To insulate a wooden floor with your own hands, you need to know a clear procedure:
- Installation of wooden logs;
- Fastening of rough boards from the bottom of the lag and waterproofing flooring;
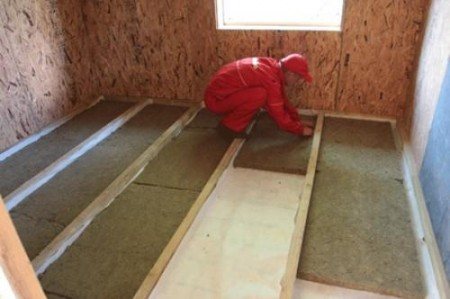
- Placement of insulation between the lags. Experts recommend laying the insulation as tightly as possible. All gaps are sealed with sealant or foam;
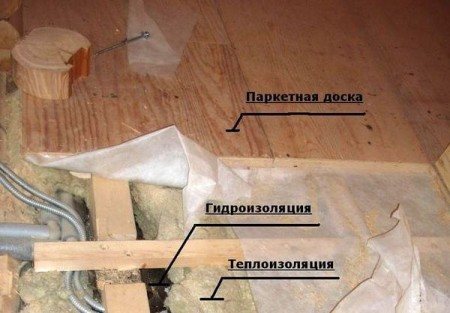
Wood floor insulation device
- Vapor barrier flooring for insulation. It is fixed on the logs, and if gaps or joints are formed, then they must be glued with tape;
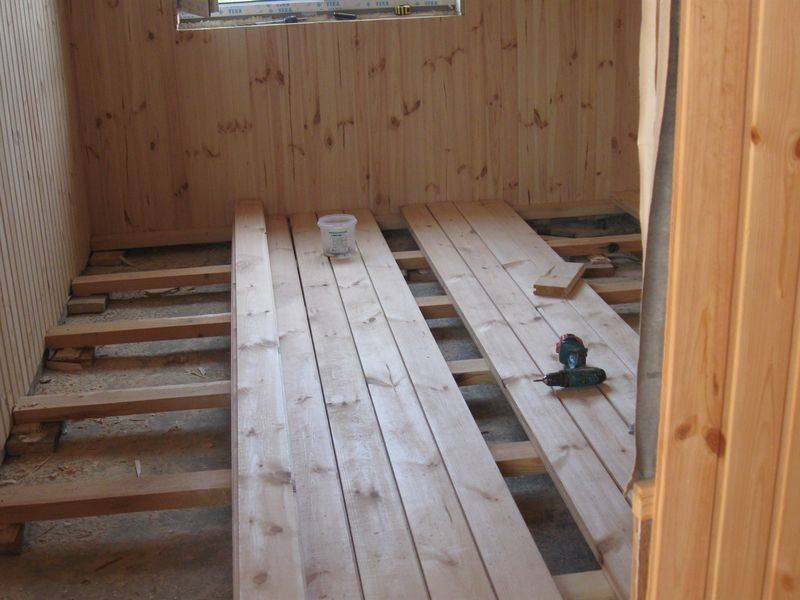
- Laying boards on an insulated structure, finishing.
Thermal insulation of the floor along the logs is the method of thermal insulation of the floor covering that is most often used. Its feature is the simplicity of work and at the same time high efficiency of insulation. The thermal insulation of the floor in the house can significantly reduce heat loss.
It is recommended to insulate wooden floors in this way, which are located at a minimum height from the ground. This method should be used when insulating floor coverings on ground floors and basements.
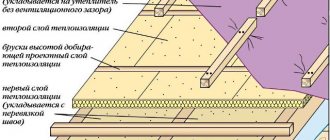
The technology of floor insulation along the logs includes the following stages of work:
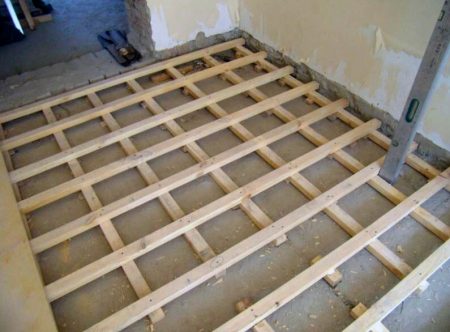
- The work begins with the installation of wooden beams with a T-shaped cut into the frame or laying on the foundation in compliance with a step of 1 m.When this is done, it is necessary to fix the boards, on which the thermal insulation material will subsequently be laid. Boards are sewn from below. Alternatively, skull bars can be used. Next, the flooring is performed between the logs, after which the insulation material is laid;
- The next step is to create a layer of steam and waterproofing. This stage of work must be carried out only in individual cases. Everything largely depends on the type of insulation used in the work. For example, if the owner of the house made a choice in favor of mineral wool, then one simply cannot do without a vapor barrier and a waterproofing layer. Also, these works should be carried out in cases where insulation is carried out with ecowool. The vapor barrier sheets should be overlapped with an overlap of 150 mm. In this case, the material should be placed in such a way that its edges are bent to a height of no more than 100 mm. In the process of installing a vapor barrier, it is necessary to use materials with the appropriate properties. It is also allowed to use plastic wrap to create this layer;
- The stage of work on floor insulation in this way is completed by the installation of floorboards and subsequent finishing with flooring material.
Thermal insulation of a wooden floor along the logs has its advantages. The simplicity of thermal insulation is one of the main ones. To cope with this work is within the power of every owner of the premises. At the same time, the effectiveness of thermal insulation is quite high.Another plus of this method of insulation is that there is no load on the insulation. This allows you to use almost any material for work.
It is technically correct to insulate wooden floors in a private house from below, which is due to a number of reasons:
- this avoids changing the size of the room in height on the ground floor;
Insulation of floors protects the house from freezing
- you do not need to choose a hard insulation that can withstand the weight of furniture and home appliances;
- thus, the owner protects the entire wooden floor from freezing;
- the line of condensate settling outside the structure is reduced. This prevents the whole house from rotting.
The choice of materials and methods of floor insulation in the house depends entirely on the structural features of the structure, the individual capabilities and preferences of the owner. The nuances of installation and the specifics of the operation of the wood itself must be taken into account.
Wooden houses can be:
- frame type;
- on screw piles;
- on a strip foundation;
- on a pile foundation.
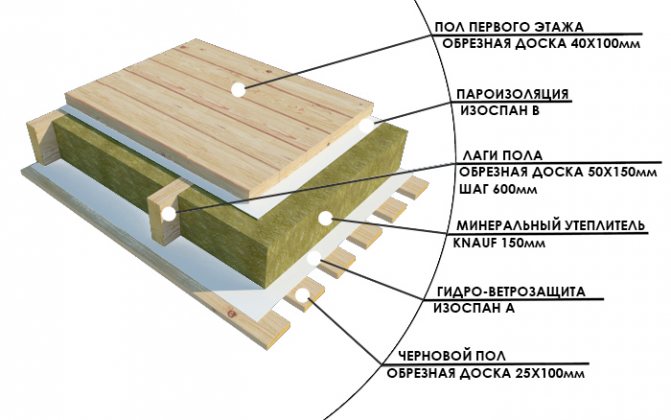
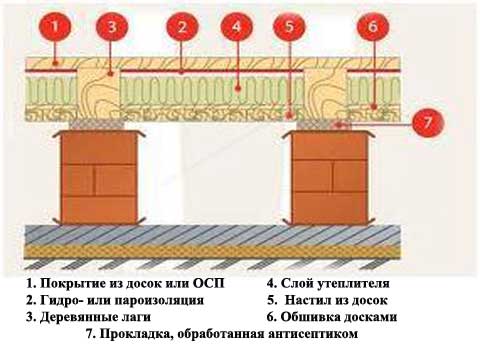
Floor insulation scheme in a wooden house: 1 - beams (logs), 2 - cranial bar, 3 - subfloor boards, 4 - glassine or lutrasil, 5 - backfill from shavings or sawdust, 6 - lime mixture, 7 - finishing floor boards
Regardless of what type the structure is, the insulation of a wooden floor in a private house has general specific nuances:
- the use of waterproofing is a must. This will prevent the boards from swelling. The best material for waterproofing is one-sided fiber;
- to provide warmth in the room, it is necessary to make a two-layer insulation of the wooden floor from below in a private house. In such buildings, the flooring consists of boards tightly fitted to each other. This material is constantly exposed to changes in temperature and moisture. Therefore, wood for the floor must be treated with special means;
- the performance characteristics of the insulation should not change upon contact with wood.
All of the above points must be observed when carrying out floor insulation in the country and in a private country cottage.
Today, a great many training videos for self-installation of insulation are presented on the Internet. Viewing them will allow you to understand the technology for performing work, the principles of selection and the main stages of laying materials. In addition, these videos contain a large number of useful points. So you can find out, for example, about the correct filling of the floor screed with foam insulation.
Floor insulation scheme on the first floor
In order for the floor in the house to turn out to be warm, many nuances must be taken into account. The correct choice of insulation plays an important role in this. When choosing a material for yourself, you should not start from the price or installation technology. Consider the type of building, the nuances of the landscape and the features of the operation of the house (permanent or seasonal). Based on this, you can choose the perfect floor insulation.
What are lags for?
Lags in a frame house
Lags are called bars that are laid on a previously prepared base. Such a base can be a concrete slab, posts or beams.
Logs are made from various types of wood. In dry rooms with low traffic, a spruce or pine timber is placed. If under the ceiling there is damp soil or the operation of the room is associated with dampness, then it is better to put a larch bar.
Regardless of the base on which the lathing will be located, you need to use waterproofing. Roofing material is best suited for this. Before installation, the wood must be well dried and treated with an antiseptic.
In some cases, a crate made of metal, plastic or reinforced concrete posts is arranged under the finishing cladding.
What decision to make, to choose a developer, focusing on their financial capabilities and skill.
Laying floors on logs provides the following advantages:
- An increase in the thickness of the floor, which will reduce its thermal conductivity, will improve the sound insulation characteristics. Between the logs, you can place communications, lay a heat-insulating material. This will have a positive effect on the comfort and interior of the room. Creation of a uniform load on the subfloor, which will increase its service life. Obtaining a perfectly flat base for the finishing coat.
In the absence of a timber, the logs can be made independently from the boards. Several lamellas are glued together and tightened with screws. Such products are distinguished by their increased strength and the absence of deformation during changes in humidity.
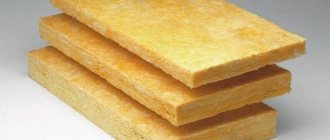
Thermal insulation of the floor with mineral wool
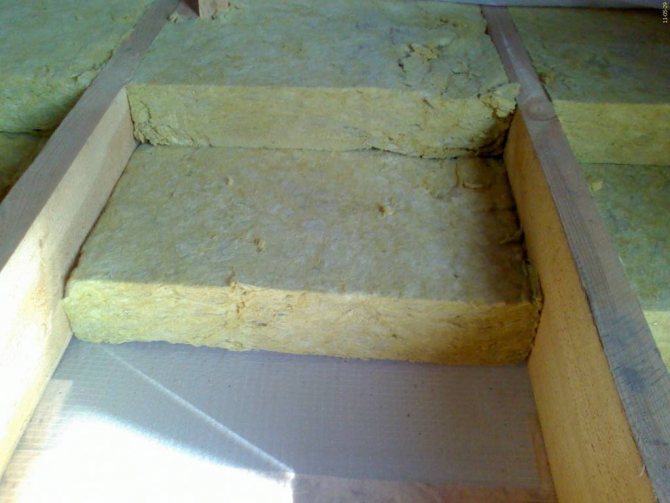
Minvata is most often used to insulate a wooden floor in a private house. It does not burn, easily transfers aggressive chemical substances, has good noise and heat insulation. The disadvantages include only low strength.
Read more: Calculation of pipes for underfloor heating formulas for choosing a laying step how to determine the flow rate
Mineral wool should not be in contact with water. That is why waterproofing must be of particularly high quality. Many people refuse such insulation because of its non-environmental friendliness.
Base insulation scheme with mineral wool
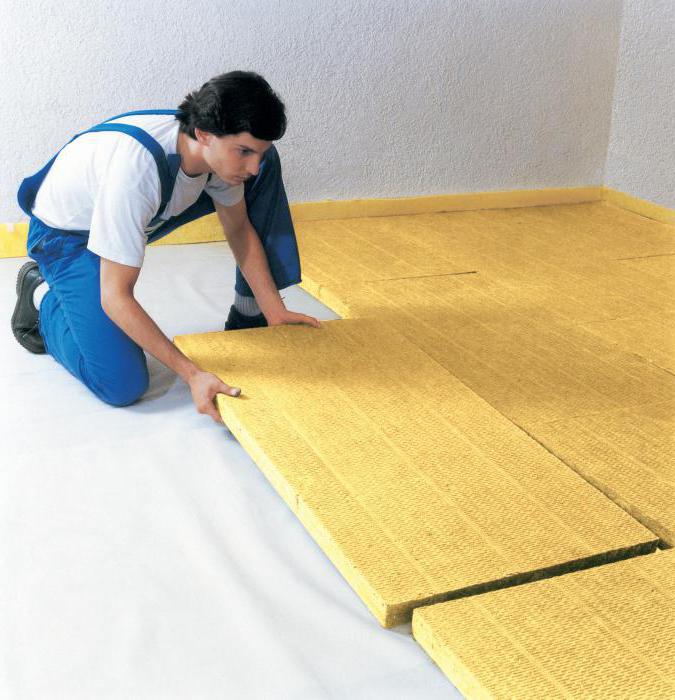
Mineral wool is a flexible soft board. They are cut into the desired elements, and this is done easily. The marking is applied with blue stripes on the hard side. During installation, it is worth making sure that these stripes look up. Also, do not forget that the insulation material is in one layer.
Among all heat-insulating materials, the most demanded among consumers is mineral wool. It is offered on the market in several varieties: fireplace, glass, slag. Its main plus is absolute incombustibility. It also has other advantages: fire resistance, chemical resistance. We also note the high properties in terms of sound and heat insulation, which are inherent in this material.
Minuses
Note that this insulation also has its drawbacks. Its main disadvantage is weak mechanical strength and low vapor permeability. This material absorbs moisture well. When it is humidified, it loses its thermal insulation characteristics and does not provide effective insulation. Therefore, when working on insulation using this material, they arrange protection from moisture in the form of a vapor barrier layer. You should also know that mineral wool is a material that is not absolutely safe for human health.
Manufacturers produce it in the form of slabs and flexible mats. Hydrophobized mineral wool is used as a base for the manufacture of solid slabs. The blue stripe on the slab insulation indicates the hard side. When this material is laid on the floor surface, it is necessary that the side with the marking faces up. The main application of mineral wool slabs is to insulate a wooden floor. When carrying out work, the insulation is laid in one layer.
Calculation of the floor from planks
Beam for lags
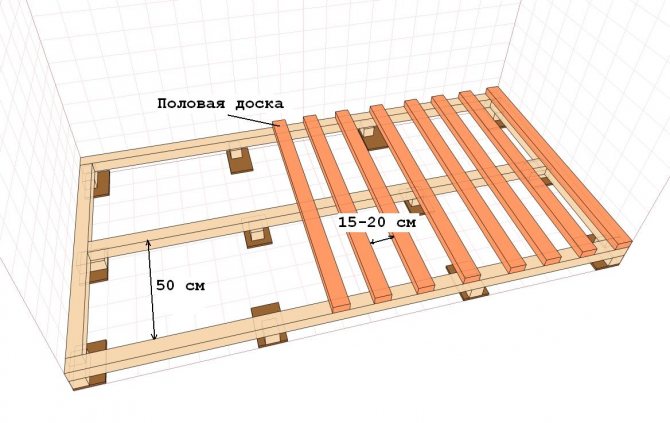
Before laying the plank floor, you need to decide on the configuration of the timber for the log.
The parameters of the longitudinal supports depend on the thickness of the topcoat and the length of the purlin between the support points. They are considered to be beams and supports that are placed under the logs. The more such supports, the thinner the timber will be.
When carrying out calculations, you should adhere to the following ratio of the span length and the section of the bar:
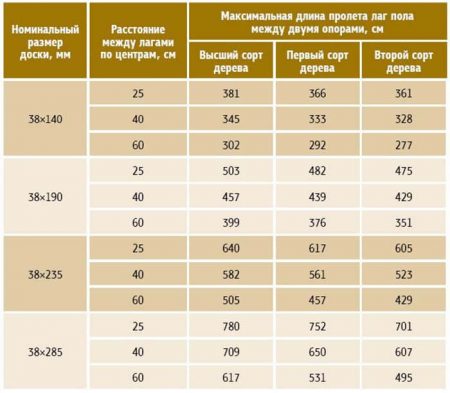
- 200 cm - 100x50 mm; 300 cm - 150x75 mm; 400 cm - 180x100 mm; 500 cm - 200x150 mm; 600 cm - 220x175 mm.
The aspect ratio of the laid lags should be 1: 1.5. Position the beam so that its longer sides are vertical.
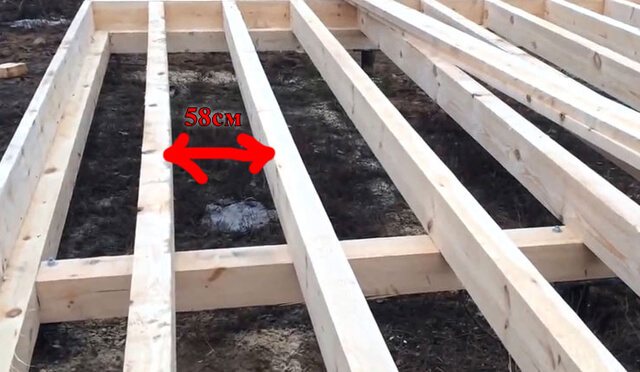
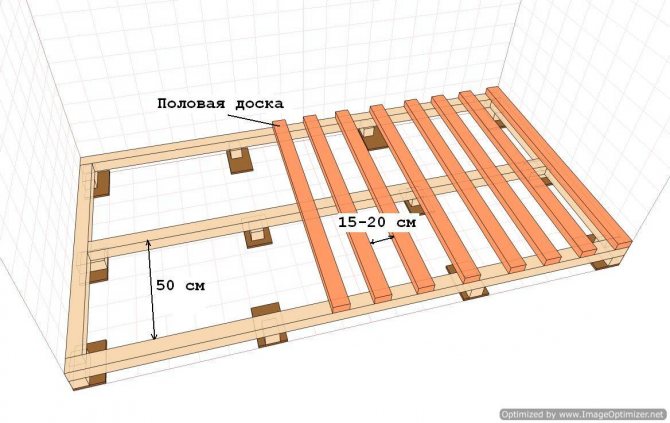
An equally important indicator of the strength of the finished floor is the interval between the lags. It must be such that the finished coating does not sag under a weight of 300 kg / m².
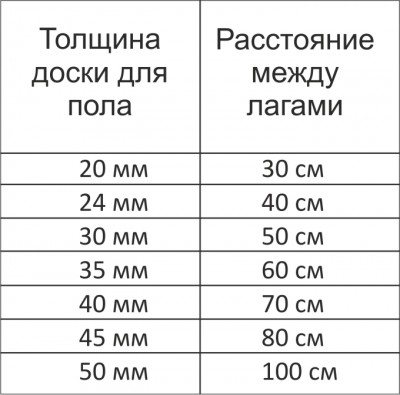
Such a norm is established for residential premises. With a board thickness of 20 mm, the step between the lags will be 30 cm.When the thickness of the finish coat increases for every 5 mm, the distance increases by 10 cm.

Before laying a floor from a bar and slats, you need to take into account the following rules:
There should be a small gap of 3-5 mm between the insulation and the topcoat. It is necessary for ventilation of the wood. The edges of the boards should be at a distance of 3-6 mm from the walls.
This is necessary to expand the coverage when it swells from high humidity. When carrying out installation, it is advisable to place supports under the timber every 100-150 cm. They can be made from bricks or lumber scraps. Small differences in height are compensated by pieces of roofing material.
When choosing a material for a log, it is necessary to purchase a bar with a safety margin. Such a measure will allow not to limit the weight of interior items.
Insulation schemes
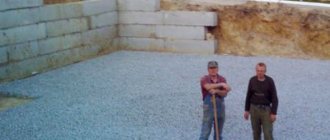
Warming on the ground
Insulation of the floor along the logs can be done on the ground. Thermal insulation work begins with soil compaction. A layer of crushed stone, fastened with bitumen mastic, is then poured onto it.
On a note
In this case, bitumen performs the function of waterproofing.
Further, brick columns break the surface into sections 2 * 0.5 m. Waterproofing is first laid on the columns, for example, roofing material in one layer, or even better - in two, then wooden logs. In order for such a structure to withstand the design load from the floor, a section of 100 is sufficient; 120 or 150 x50 mm.
From the side to the lags at the very bottom, support blocks are knocked out, on which the roll is laid or a metal mesh is attached. A windproof membrane with a vapor permeability is laid on them. Insulation, usually mineral wool, is placed between the logs immediately on the membrane.
On a note
Today, mineral slabs are also manufactured with a windproof coating, in which case the need for a metal mesh and membrane disappears.
A layer of waterproofing is laid on the insulation with full sealing of the joints. The tongue-and-groove board can now be laid. A gap of at least 4 cm must be maintained between the insulation and the board.
This insulation scheme leaves the underground space cold. Therefore, if a brick house is insulated, then given the high thermal conductivity of the brick, its foundation should also be made warm. Otherwise, "cold bridges" will surely appear.
On a concrete base
The sub-floor can also be made of concrete, and then a different insulation technology is used. First of all, the base is cleaned, various debris is removed from it and other work is carried out that are aimed at eliminating all kinds of defects that make it difficult to carry out thermal insulation. Having spread a waterproofing membrane over the surface, logs are laid on top of it from each other at a distance of half a meter. Insulation is laid between them, and overlapped vapor barrier is placed on top. Small slats are used to fasten it. Next, the finishing floor is laid.
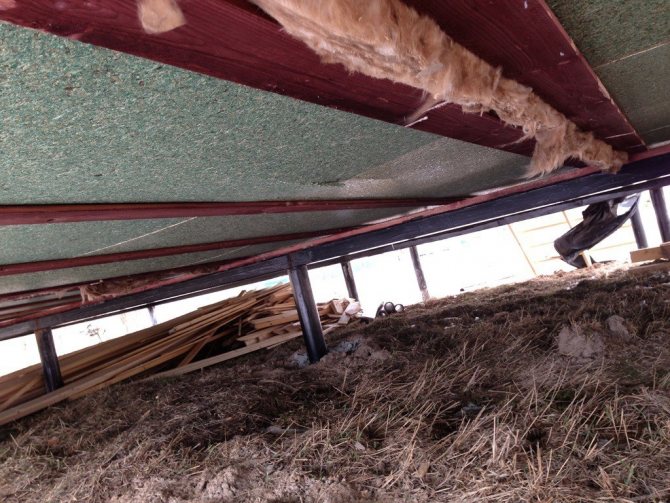
Between the logs in a wooden house
Simple calculations show that wooden floors are simpler and cheaper than concrete floors. To insulate wooden floors, logs are used, installed in increments of 60 or 100 cm. This method, worked out to the smallest detail, is very affordable and relatively faster.
Insulation, according to the technology, is laid on boards or knocked down shields made of wood, laid between the logs. They should be secured to reliable steel wire or planks. In cold weather, moisture usually condenses, which can affect the effectiveness of the insulation. Therefore, for some heat-insulating materials, protection, laying of steam and waterproofing is required. It is performed with an overlap of 10-15 cm, bending the edges to a height of 10 cm.
The insulation is laid back to back and covered with a PVC membrane or plastic wrap.It is laid above the insulation, since a warm room is located higher, and, as you know, water vapor diffuses (tends) from a warm to a cold room. At the edges along the entire perimeter, the film is nailed to the wall with a plinth.
Advice
For greater reliability, the thermal insulation material can be strengthened with a special glue.
Underfloor ventilation
Ventilation under the floor is provided due to the natural movement of air masses, which is provided by air vents, special ventilation holes.
Advice
It is recommended to cover the holes with a metal mesh to block the path of rodents.
It is impossible to provide adequate ventilation only with holes made in opposite corners of the floor or in the baseboards of the floor, as some non-professionals often prefer to do. Airflows are needed in the basement - for this, one or two holes are made in all its walls (ø10x10 cm). In the presence of internal blind partitions, air vents are made in them as well. It is better to do them not against each other, but with a slight offset on each side.
It is advisable to insulate the space under the house, since modern materials for thermal insulation negate heat loss in the house, and the basement, as it once was, is practically not heated due to them. Then you should not close the air vents for the winter, but if it is still cold, then some of them can be closed.
Creating a base for plywood
Despite the fact that this material is highly durable, its resistance to bending and pressure is much lower than that of solid wood.
Based on this, the distance between the lags when building a plywood floor is taken less than when working with boards. Typically, plywood is used to create the subfloor. Linoleum, carpets and rugs, parquet and engineered board are laid on the floor.

For work, you should purchase plates with a thickness of at least 12 mm. If the coating is two-layer, then you can limit yourself to 8 mm plywood.
When designing the parameters of the crate, one should be guided by the dimensions of the plywood. In hardware stores, you can purchase sheets in the 1525x1525 mm and 1220x2440 mm format.
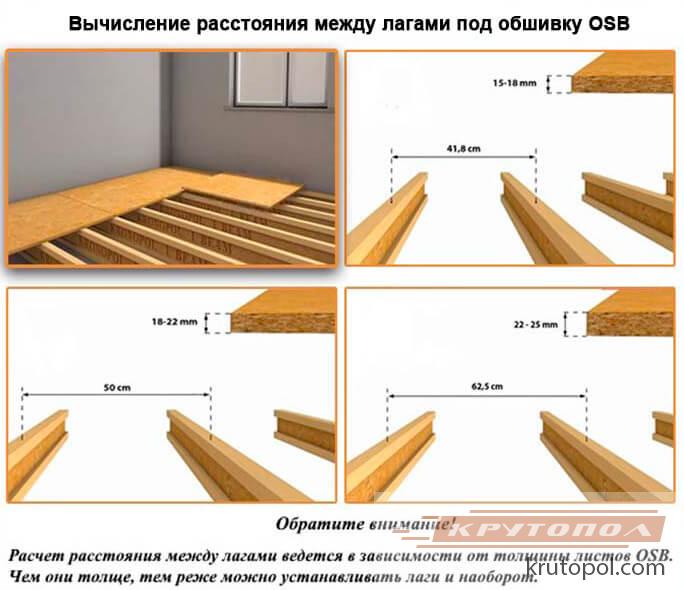
When working with slabs of 1525x1525 mm, the logs are laid in 50 cm increments. If the coating is made in a single layer, then the interval should be reduced to 38 cm. After laying the logs, the crossbars are fixed between them at the same distance.
If the choice is made in favor of a material with a format of 1220x2440 mm, then a frame is made with a side of 40 cm.That is, in all cases, the step of the distance between the logs is a multiple of the dimensions of the plywood. This is done so that the edges of the sheets are on the beam, and not in a suspended state.
Since the plywood, after fixing on the frame, will be covered with a topcoat, plates with one-sided grinding should be bought. To create the first layer, it is advisable to purchase unpolished plywood. When carrying out construction in rooms with high humidity, the choice should be made in favor of a waterproof material.
Plates are stacked in a checkerboard pattern. Before screwing in them, you need to make holes for self-tapping screws and chamfer them.
This is to prevent the plywood from cracking and the heads of the screws to be sunk into the subfloor. It is necessary to leave a technological gap with a width of 2-3 mm between the sheets of material. After laying it is sealed with mastic.
In order for the floor covering to serve for a long time and to be durable, the floorboards do not creak or bend underfoot, you must first correctly calculate all the design parameters, including at what distance to lay the floor logs. The correctness of this calculation will determine not only the durability of the floor covering, but also the amount of material used for it, and hence the cost of the work.

Floor insulation material
The construction market offers a wide range of materials for floor insulation.They differ in cost, installation technology, optimal operating conditions, etc.
Mineral wool for floor insulation
Materials used for floor insulation in a wooden house from below:
- mineral wool;
- ceramisite;
- penofol;
- polystyrene or expanded polystyrene;
- sawdust;
- penoplex;
- ecowool.
Each of the materials has its own advantages and disadvantages. The choice of it as a heater depends on the characteristics of the house, the financial capabilities of the owner and the type of flooring.
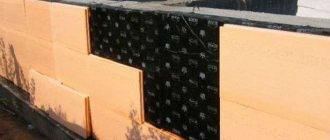
Penoplex is a common foamed polymer. It is distinguished by high strength, ability to keep its shape well. For the production of foam, the extrusion method is used. This allows for a strong structure with a large number of small cells inside for better heat transfer. Moisture does not penetrate inside the holes, so the material does not need additional waterproofing.
Penoplex does not need additional waterproofing
Mineral wool
Mineral wool is used most often as a heater. It is lightweight, does not burn, and has a high degree of protection against extraneous sounds.
There are three types of this material:
- glass;
- slag;
- stone.
You can use rolled mineral wool for floor insulation
This material is produced in the form of a dense plate or flexible mat. For ease of installation, the plates are marked with a blue stripe. This allows the sheets to be positioned in the desired direction.
The big disadvantage of this material is the ability to absorb moisture. Therefore, when insulating the floor in a private house with your own hands, it is necessary to conduct a good vapor barrier.
Additional insulation of pipes with mineral wool insulation
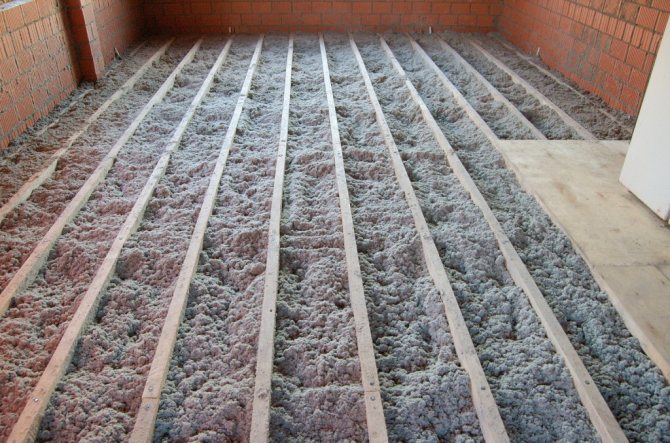
Expanded clay is a small round porous balls of shale or clay. They are obtained by firing materials in a furnace at a high temperature. Expanded clay is considered a safe and environmentally friendly material. Among its advantages should be highlighted:
- high sound insulation;
- resistance to low temperatures;
- environmental safety for humans.
A noticeable disadvantage of this material is its own weight seal. Expanded clay balls are pressed together. This leads to an increase in the weight of the substance and a decrease in thermal insulation properties.
Expanded clay is often used to insulate a wooden floor
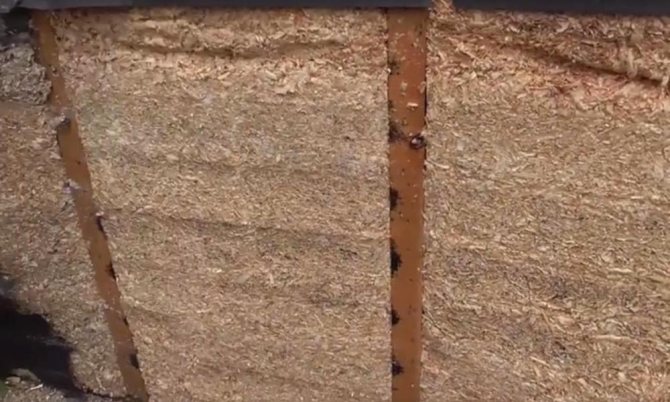
Sawdust is a waste product of the woodworking industry. They have good steam and sound insulation characteristics, retain heat, and are environmentally friendly for humans. Sawdust is of low cost. The resulting thermal effect is not worse than that of expensive materials. Thanks to the cement component, they are also well suited for floor insulation in a ground floor apartment. Subsequently, such a screed can be used for laying laminate, linoleum, tiles, etc.
Sawdust is subjected to special processing before use. This prevents the appearance of rodents and beetles in them. After that, they are mixed with cement and water and evenly applied over the entire area of the flooring.
Sawdust is a very cheap material for floor insulation.
Sawdust is ideal for insulating floors on the ground, especially if the building does not have a solid and solid foundation.
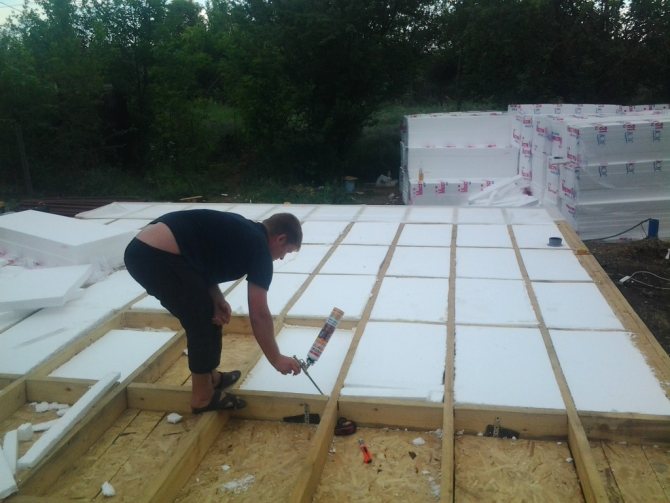
Floor insulation with expanded polystyrene is popular. Most often, this material is called foam. The advantages of this insulation:
- low vapor and sound permeability;
- low thermal conductivity;
- resistant to external factors and chemicals;
- does not lose its properties for a long time;
- easy to install.
Polyfoam is not afraid of fire and exposure to high temperatures
A significant disadvantage of foam is its susceptibility to moisture. He can absorb it into himself. This negatively affects the basic performance characteristics. He is also afraid of the effects of fire and high temperatures.But a simple and inexpensive technology for insulating floors with polystyrene is its significant advantage. This is what, in most cases, the owner of the house is guided by.
Ecowool
Polyurethane foam (ecowool) is a great way to solve the problem of floor insulation in an apartment on the ground floor and in a private house (dacha). This material is blown into the free space using a compressor. In this way, he evenly fills all the voids. Small particles that make up ecowool provide excellent vapor barrier.
After hardening, a solid, even layer is obtained. It can withstand the load perfectly. Light weight does not increase the weight of the structure. The service life of this insulation is more than 20 years.
Thermal insulation of a wooden floor with ecowool
A significant disadvantage of ecowool is the need to use special industrial equipment.
The combination of polyethylene foam and a thin layer of aluminum foil is called penofol. It is sold as a rolled roll. The thickness of the seal is from 3 to 10 mm. Penofol retains heat well, is environmentally friendly, and has high sound insulation.
Penofol retains heat well
The big disadvantage of this material is exposure to moisture due to the presence of aluminum foil in the composition. Another disadvantage is that penofol does not differ in long-term operation. After five years, it is necessary to re-insulate.
The modern market offers a wide range of materials suitable for insulating a wooden floor on logs. You can familiarize yourself with the properties of the most commonly used heaters in the following table.
Table. Popular heaters
| Heat insulating material | Basic properties |
| Sawdust | One of the most budgetary, and sometimes completely free thermal insulation material. It is characterized by good thermal insulation properties, helps to normalize the level of humidity inside the floor structure. The main disadvantage of sawdust is its poor resistance to the effects of various kinds of insects, fungi and other harmful microorganisms. In addition to this, the material supports combustion, which is also a big disadvantage. |
| Mineral wool insulation | Materials based on mineral wool are characterized by high thermal insulation properties and do not support combustion. Along with this, the material does not tolerate contact with moisture - it swells under the influence of water and loses its original performance characteristics. If mineral wool is used for insulation, waterproofing will need to be equipped on both sides of the material. |
| Expanded clay | A relatively inexpensive and easy-to-equip material with good thermal insulation characteristics. For insulation, it is recommended to use granules of different sizes - so the backfill will turn out to be denser. |
| Styrofoam | One of the most popular heaters. It is sold at a relatively affordable cost, provides highly effective insulation, is not afraid of contact with moisture, but supports combustion, while releasing substances that are unsafe for human health. In addition, the foam attracts rodents, "encounters" with which do not in the best way affect the service life of the material. |
- Bulk;
- Bulk;
- Roll;
- Tiled (block);
- Sprayable.
Various types and types of heaters for a wooden floor (bulk, spray, roll, block)
For insulation, you can choose:
- Styrofoam;
- Penoplex;
- Expanded clay;
- Glass wool;
- Cork material;
- Reflective insulation (penofol);
- Cellulose;
- Gypsum fiber;
- Fiberglass;
- Foam glass;
- Polyurethane foam.
- Drill with various drills;
- Screwdriver;
- Saw;
- Plane;
- Electric jigsaw;
- Construction mixer.
Read more: Well cementing methods and technologies
What should be considered when calculating?
When performing the calculation, the following factors are taken into account:
- the thickness of the flooring material (chipboard, boards, etc.)the approximate step between the floor joists; the estimated specific maximum load on the floor.
All these parameters will determine the cross-section of boards, beams and other lumber used for arranging the floor.
When calculating what distance should be between the floor logs, it should be remembered that the extreme logs cannot be located further than 30 millimeters from the walls, it is imperative to make a correction for this in the calculations.
As a result of calculations, usually not an integer number is obtained, but it should always be rounded up so that the real number of lags does not turn out to be less than the calculated one. Otherwise, the strength of the floor structure may not be sufficient, especially when you consider that the savings will be quite small compared to the likely risk.
The cheapest floor logs can be found on sawmills, followed by construction online stores.
When it comes to installing the floor, it is not advisable to save too much.
The lags must have not only a suitable cross-section, but also sufficient density. If you make the lag step for the floor of the boards too large, then the boards will begin to bend, "play". Similarly, if the distance between the lags for the OSB floor is made more than permissible, then the plates will begin to crumble and crack.
How to make a wooden floor on poles
In old books and regulatory documents on construction, you can find floor structures on posts using non-effective thermal and waterproofing materials.
Modern floors on logs in a private house do this
Support posts are laid out of ceramic bricks or concrete blocks. The distance between adjacent posts along the log (span) is recommended to be no more than 2 m. The base of the post can be a layer of compacted crushed stone 50-100 mm thick, spilled with bitumen mastic. Or, instead of mastic, a waterproofing film is used.
The top of the columns is leveled at one level with a solution. If the thickness of the solution is more than 3 cm, the masonry mesh is sunk into the solution. The top of the posts is covered with a sheet of waterproofing material.
Wooden beams are laid on the waterproofing layer. The distance between adjacent lag beams (lag step) is determined by their section, as well as the bearing capacity and stiffness of the overlying floor layers - lathing, subfloor, topcoat. Usually, a step is taken that is convenient for laying between the logs of standard slabs of mineral wool insulation, about 600 mm.
For the above step of the lag and the span between the posts, taking into account the thickness of the insulation and the crate, with the usual loads on the floor, the section of the lag is sufficient 100-150x50 mm. At the bottom of the lag, lying on the posts, a galvanized steel mesh is attached. Instead of a grid, boards can be nailed into a breakdown, slats with a thickness of at least 20 mm.
A windproof, highly vapor-permeable film is laid on top of the mesh (boards) and the lag.
Such a film prevents blowing out heat from mineral wool insulation,
makes it difficult for the insulation particles to be carried away by the air stream (dust formation), but does not prevent moisture from evaporating from the insulation and wooden parts.
A sheet of windproof vapor-permeable film is laid on top, across the log, and lowered on both sides of each log until it stops against the steel mesh so that a tray is formed between the logs. The film is nailed with a stapler to each side of all lags.
Mineral wool insulation is laid on the windproof film in the formed channel between the logs. You can do without a windproof film if you use special insulation plates with a compacted windproof layer for the bottom layer.
An example of calculating the distance between floor joists
The distance between the joists of the floor under the board can be relatively large, since thick board is a stronger material than, for example, thin plywood. Accordingly, for thinner finishing materials, more frequent lagging will be required.
For clarity, consider an example of a floor arrangement with the following data:
- a room of 12 meters in length; the use of a beam of 100x180 mm for logs; the use of 30 mm boards as a topcoat.
Table of distance between floor joists under the board:
According to the table above, for a 30 mm board, the optimal distance between the floor joists should be 50 cm.
Let us designate the total number of beams by the letter "k". Then the total width of all logs will be (100 mm * k). The distance between the wall and the extreme beams will be 30 mm. Accordingly, the step between adjacent logs will be (k - 1). The distance between all elements will be (0.5 * (k - 1)).
The calculation of the distance between the floor joists begins with determining the step between the beams according to the following equation:
length of the room = total width of the beams + the sum of the distances between the beams + indents from the walls
I.e,
12 m = 100 mm * k + 0.5 * (k - 1) m + 30 mm * 2
It is important to bring the equation to a unified system of calculation. As a result, we get:
12 m = 0.1 m * k + 0.5 * (k - 1) + 0.03 * 2
Remembering the school algebra course, we solve the equation:
12 = 0.1 * k + 0.5 * k - 0.5 + 0.06; 12 + 0.5 - 0.06 = 0.1 * k + 0.5 * k; 12.44 = 0, 6 * k;
k = 20.7 pcs.
Since the number of beams can only be an integer, it is rounded up, that is, 21 bars are required.
The sum of all the intervals between the lags will be:
12 - 21 * 0.1 - 0.06 = 9.84 m
It is necessary to divide the resulting amount by the number of intervals, and we get the distance between adjacent lags:
9.84 / (21 - 1) = 0.492 m
Thus, we were able to establish through what distance to lay the logs for the floor in this example - 0.492 m or 49.2 cm.
How to prevent damage to insulation
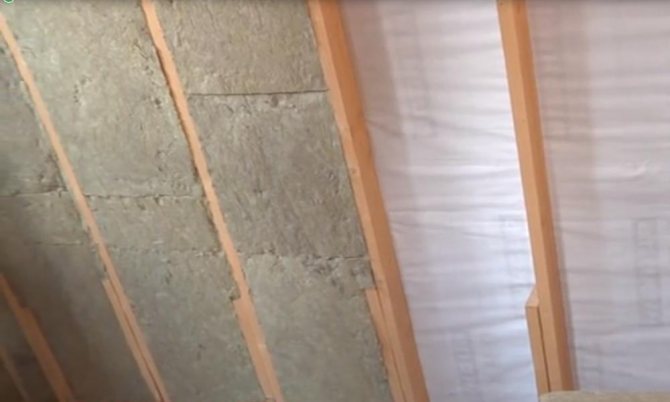
According to the usual scheme, the thickness of the thermal insulation layer is 150 mm, but the following points must be taken into account:
- The thermal conductivity coefficient of a frame house is much higher than the indicators of even the highest quality thermal insulation material.
- After the external thermal insulation of the walls, it is MANDATORY to use a vapor barrier film inside, and a windproof membrane outside.
- Power cables are installed inside the frame and led out through the vapor barrier, so the heat partially escapes outside by letting the cold through, making the film leaky. Even double-sided tape does not solve the tightness problem.
- Therefore, to solve this problem, an additional sheathing with insulation of 5 cm thick is created on the inner side of the frame. Using a level or laser, it is important to set it level, as drywall or other material for the final coating will be attached to it.
- The lower part of the lathing beam should recede from the foundation monolith about 15 cm., This is necessary so that during the pouring of the screed, it does not go onto the heat-insulating material and the lathing.
- To perform high-quality internal thermal insulation, drywall must be installed in 2 layers, first in a horizontal and then in a vertical position. This will allow you to install sockets without violating the vapor barrier, and the additional crate will strengthen the thermal insulation, blocking the penetration of cold air.
- For high-quality insulation, it is necessary to choose leading brands, time-tested, they are certainly more expensive, but more reliable and durable.
You can ask your question to our author: