A little about the advantages and disadvantages
All classes of underfloor heating have both advantages and disadvantages. The first are:
- there is no need to carry out large-scale repair work;
- you can create an effective heating system in a wooden house or a structure with ceilings on beams;
- there are no strict requirements for the existing base - a water-heated floor without a screed or an electrical system can be arranged on almost any surface;
- you can carry out any thorough work on floor insulation;
- much higher maintainability of the system. To access the pipes or the heating element, it is enough to disassemble or remove part of the finish floor covering;
- a number of ready-made options are offered, constructs that allow you to assemble a heating system in a matter of days.
Cost is one of the main characteristics that water underfloor heating without a screed or an electrical system have. At the same time, not only the cost of creating a structure is higher than the classic schemes, but also the monthly operating costs. This is due to some of the disadvantages of underfloor heating without a screed:
- not surrounded by a layer of concrete, pipes or electric heaters are protected from damage only by the floor covering. Therefore, it is recommended to use sufficiently rigid materials as a finishing layer;
- without a damper, a heat accumulator in the form of a layer of concrete, water-heated floors without a screed become low-inertia. They lose heat quickly;
- there is a pronounced temperature difference in certain areas of the floor if the tubes are laid with a large pitch.
Infrared underfloor heating has similar problems. However, in the case of using electric heaters, the average user is immediately ready for both low inertia of the system and increased bills for paying for the energy carrier.
When pipes are laid with a small mesh pitch, the costs of basic construction materials immediately increase. In addition, underfloor heating without a screed will require a larger amount of heating medium to ensure sufficient energy efficiency. This immediately places increased demands on the heating boiler. But for all their shortcomings, heating systems without screed are quite popular, since they are easy to arrange and show reliable operation.
Conditions for installation as a sole source of heat
Underfloor heating is considered to be a more profitable heating system from an economic point of view than radiator heating. But to make it effective, you will need to carry out careful calculations and take into account all the key parameters. In addition, it is necessary to determine in advance the technical feasibility of implementing this or that type of heating.
Among important conditions for installing a warm floor as basic heating, the following can be distinguished:
- The power of the heating elements must be sufficient to maintain the room temperature at 20-24 ° C, even during colder months.
- When calculating the heating of an apartment, heat losses through walls, doors and windows must be taken into account. For a private house, losses through the roof are also taken into account.
- The walls of the building not only transfer heat to the outside, but also let the cold through, therefore, when designing the system, it is necessary to increase the heating of the room along the walls.
- Installation of a water floor in an apartment building requires a special permit. Even if it is available, the installation will be difficult from a technical point of view.
- Installation of electric floors is possible for any type of room, however, their connection requires a properly working electrical wiring. In addition, heating a home with such a system increases energy consumption.
- All types of underfloor heating, except for film ones, are laid under a concrete screed, due to which the height of the room is reduced by 6-10 cm.
How to make an electrical type system
Let's briefly dwell on the arrangement of infrared electric type warm floors. These are very popular systems not today, especially in old wooden houses. They perform well both in the role of additional and main heating.
The electrical system can easily be made by hand. Today, manufacturers of film heaters immediately plan to use their constructs to build large systems and provide connection diagrams in the documentation that allow regulating power consumption.
On the retail market, you can purchase:
- film heaters with a conductive structure sandwiched between layers of a very strong film;
- road-grade carbon film heaters, which are a development of the previous technology;
- continuous warm floor, which is a continuous area of the resistive element located between the layers of the protective film.
The most reliable today are conductive film heaters and carbon track heaters. The technology for making films allows you to put furniture on them, the system is protected from water, and has good fault tolerance.
Separately, it is worth noting: the conductor system is built on a parallel type of connection. Therefore, one large heating film never fails completely if the surface is damaged. It stops working only if the connection is broken in the system.
Compared to conductive heaters, carbon track heaters are 40-60% more economical. They do not show any other improved operating results, they have the same recommendations for connection. Carbon technology is more expensive, but it allows you to get more heat output at the same cost of paying your electricity bills.
Continuous underfloor heating is even more economical. Compared to film heaters of a conductive structure, electricity bills are reduced by 5 times. But the film has some limitations. Heavy furniture should not be placed on it because of the danger of the formation of local overheating zones, where the structure of the carbon resistive site is destroyed.
The general characteristics of film electric floors without a screed looks like this: they fit under any coating (linoleum, laminate, carpet), they are connected according to a simple scheme, no control equipment (floor sensors) is required, adjustment is made only by applying different voltages. The nominal electric heater temperature is 30-40 degrees, maximum - up to 80 degrees Celsius.
Heating the house with a warm water floor
Discussing the features of heating a house with a water floor, many developers are interested in the factors that we will explain below.
System life
Manufacturers like to mention that floor heating can last at least 50 years. Underfloor heating pipes are designed for this period. With regards to external parts: manifolds, cranes and other things, most likely they will fail earlier. But changing them won't be a big problem.
Our experience shows that objects from 1996 to the present day feel quite well and the underfloor heating system works without problems.
System efficiency
Manufacturers often like to mention that heating a house with underfloor heating as the main source of heat is more economical than many other heating systems. As practice shows, in most cases you do not get significant savings. But condensing boilers, heat pumps and solar collectors (for heating) can be connected to underfloor heating.In these cases, floors can be significantly more economical.
Comfort
Many developers are confused by the fact that it will be uncomfortable to walk on the floor. It will also be uncomfortable to sleep at night. The surface temperature of the warm floor is only 28 degrees. You will hardly feel it. For the bedroom, you need to provide a room thermostat so that you can set a comfortable temperature.
Water and cable electric floors without screed
The device of water and cable heating structures without a concrete layer is in many ways similar. The answer to the question of how to make a warm floor without a screed will contain a listing of the same surface requirements for flooring, a description of similar laying structures, consumables, and control systems. Therefore, the general technology will be considered, without focusing on a specific type of heat source (water tube or electric cable).
To equip an underfloor heating system without a screed, you will need:
- strong and relatively flat base surface;
- insulation layer;
- supporting structure for accommodating a tube or cable;
- elements for better heat dissipation;
- finishing floor covering.
Depending on the characteristics of the house or apartment, namely the degree of their insulation, the laying step is chosen. Depending on the availability for sale in the region of the work, certain components are selected.
Heating options without batteries
Today there are several types of warm floors, each of which has its own pros and cons. The feasibility of installing each type as the main heating depends on the parameters of the room and the planned heat source.
Water floor
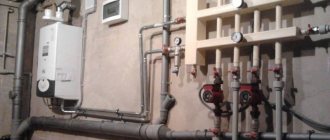
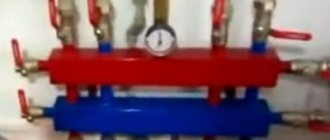
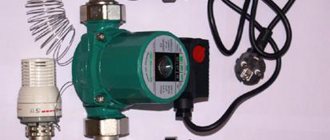
For this type of heating to work, a boiler is needed to provide heating of the coolant, and a pump, due to which the water circulates through the pipeline. Installation of a water floor is very difficult and requires the laying of several layers of material (thermal insulation, reinforcing mesh, concrete screed, finishing coating). Both independent and additional heating can be used for rooms of any size, however, for large houses, complex calculations and the installation of one or more collectors will be required.
Thermal insulation
A layer of heat insulator, required for a dry, without screed arrangement of warm floors, is required. Moreover, he can perform several tasks at once:
- work only as a means of reducing parasitic heat losses through the ceiling;
- increase the strength of the floor as a whole;
- serve as a reliable base for laying the topcoat.
In the latter case, when arranging the heat insulator layer, a power frame is made. In old houses or structures with weak floors, this method is optimal. The resulting strength and rigidity of the floor increases, and the weight of the structure is rather low.
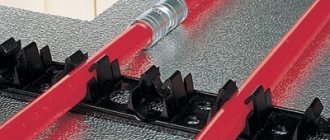
Base for laying pipes or cables
When arranging a dry floor without a screed, the following can be used as a basis for laying:
- special pads where protruding elements for horizontal laying and turns are formed;
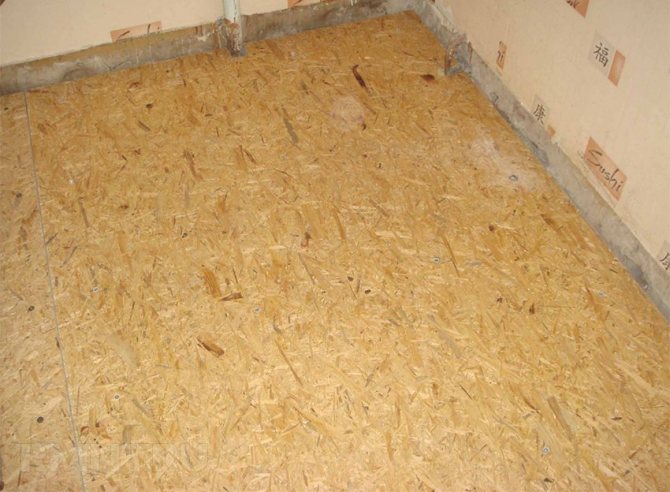
- special constructions made of chipboard, boards, plywood or OSB;
- processed board, strips 21 or 28 mm thick.
The technology for working with different substrates is not much different from each other. To lay the circulation network you will need:
- cover the surface with a substrate, while the finished constructs are connected by themselves with lock zones, a rack system is formed from a thin board to accommodate the heating circuit;
- carry out a rough installation, if necessary, moving individual zones of the substrate;
- check docking or electrical connections for compliance with the recommendations of the tube or cable manufacturer.
At this stage of work, there is no need to fix or in any other way fix the coolant circulation routes or cable.If everything went well and the installation is in accordance with the plan, you should fix the substrates on the base (mandatory for boards and structures made of wood-containing materials).
Ready-made panels for laying the underfloor heating tube without screed are strips located at a distance from each other, united by a single perimeter. In terms of functionality, they are no different from prepared boards, but more expensive. Ready-made constructs allow you to work faster, but they can impose certain restrictions on the laying of the heating route.
Types of "dry" installation of a water floor
There are two flooring systems: wood and polystyrene. Regardless of the material, they consist of two components: the blocks of the flooring system and the heat distribution metal strips. Due to the low thermal conductivity of the base materials, laying pipes directly into the grooves of the blocks gives too low heat transfer. For better heat transfer, metal (aluminum-based) plates are laid.
Wood flooring systems
Wooden structures are more popular. Firstly, because they are natural (or almost, when using fiberboard and OSB), and secondly, this material is more affordable, the system is easily assembled on its own.
There are ready-made modular "wooden water floors". These are blocks of OSB or chipboard, in which channels for laying pipes are molded. The width of such a module is standardized - 13.18.28 cm. They are interconnected by a standard method - a lock.
There are shell boards - this is already clean, processed, well-dried wood. The parameters of the boards (thickness * width) may be different for different firms, but more often they are 21 * 120 mm or 28 * 120 mm.
The width of the block or board is chosen based on the required pipe laying step. Boards are nailed to the logs, the blocks are also laid on the logs. In this case, both are located so that the grooves for the pipes repeat the selected laying pattern (simple or double "snake", "snail", etc.).
Polystyrene water floors
Polystyrene systems weigh even less. Standard modules can have a thickness of 15 mm, 30 mm, 50 mm or 70 mm, pipe laying spacing - 15 cm and 30 cm. In this case, polystyrene is also thermal insulation.
The slabs are laid on an even and clean base. If necessary, first a layer of thermal insulation is laid, and then mats of a polystyrene dry-laying system for a water floor are placed on it. Plates of the system are simple, there are "rotary" ones. They are combined so that the scheme chosen for the pipes can be laid.
Interestingly, for laying dry warm water floors, it is quite possible to do with standard polystyrene plates with locking lugs-bosses. Metal plates are perfectly installed in them. Moreover, in this case, a much more complex stacking scheme can be assembled than with special modules.
After completing the laying of wooden or polystyrene modules, metallized heat distribution plates are laid out on them. They have grooves in which pipes are fixed.

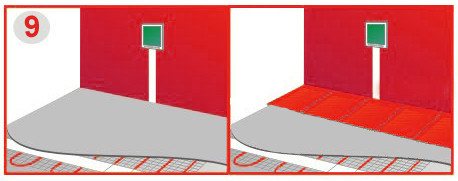
Regardless of the system chosen, a damper tape is required around the perimeter of the room. It will compensate for the thermal expansion of the floor and prevent cracks between the floor and the wall. If there are several circuits in the same room, they also need to be separated with a damper tape; circuits from different rooms that are connected (for example, a room and a corridor) should also be separated. Consider several options for a "dry" water floor system.
Additional constructs
For better heat dissipation in warm floors without screed, special panels are used. It is an aluminum alloy profile element. It has a straight recess for the tube. These constructs are located in the straight zones of the contour and act as an effective reflector, distributing heat over a larger area.
The use of diffusing panels improves the operation of the underfloor heating without screed. This is especially noticeable if the surface is covered with a finishing layer with high thermal conductivity, for example, ceramic tiles. Diffusion panels should be handled carefully.
They perform well (do not shift, do not creak) on a solid base surface. When installing heating circuits without a screed on ready-made structures made of wood-containing materials or a rack structure created from boards, the diffusion panels can be fixed with self-tapping screws.
Do you need radiators for safety net?
Installing a warm floor as the main heating in a house is only effective if the walls, floor and roof are well insulated. Otherwise, the heat loss may be higher than the amount of energy generated by its heating elements. To prevent this, accurate calculations and installation of high-quality components are necessary, the costs of which will pay off in the future by reducing the cost of the coolant.
Of all types of underfloor heating, only water-based ones are capable of providing full-fledged heating of an average or large country house instead of radiators if they are used as the main heating.
Other types can be effective for heating small spaces or individual rooms, but their operation will depend on the uninterrupted operation of the electrical network. That is why, in cold regions, it is more rational to use a combined heating system, including radiators and warm floors..
It remains to polish
After installing the heating structure without screed, you do not need to do a lot of work. All that remains is to locate the control temperature sensors and lay the topcoat. Laminate does not require additional preparation. It is necessary to spread the substrate and assemble the flooring. For tiles, you will have to work with adhesive building mixtures. But even such work will not take much time.
In apartments on the 1st floor and in private houses, the floors are not very warm, which gives residents discomfort, and heat leakage through the floors reduces the weight of their wallets. How to quickly and inexpensively make the floor warmer?
Since there are many design options, there is no definite answer. Let's consider the basic principles of how to make floors warmer, as well as insulation technologies for floors that are often used.
Make your floor warmer quickly with cheap materials
Often no one wants to start long repairs. But at the same time there is a great need to make the floor warmer.
In order to quickly, slightly warm up the floor, you need to put a layer of heat insulator on top of the existing coating, but elastic, on which you can walk. We are talking only about felt up to 2 cm thick. On top of the felt, you can also put carpet up to 0.5 cm thick. Under the furniture legs, you will need to put planks, for example, from a laminate, so that it does not heavily load.
In total, you can quickly, in one fell swoop, make the floors a little warmer. But such warming will not fundamentally correct the situation with cold floors. Why?
A little theory about floor insulation
A significant part of the heat from the house (apartment on the 1st floor) leaves through the floors, if they are not insulated. This requires increasing the heating power in order to keep the indoor temperature within the normal range. And the floors themselves become cold, forcing the tenants to keep their legs higher.
You can change the situation and make the floors warmer only with the help of insulation. Those. a barrier made of insulation is needed, which would significantly reduce the escape of heat through the floors.
The floors above cold undergrounds and basements must have a certain resistance to heat transfer, which is regulated by the standard. For the southern-temperate climatic zone, this value is 3.7 m2C / W (while for walls only 2.8 m2C / W). But when there is outside air below the floor - for overlappings over driveways, or when the house is on stilts…. - already 4.2 m2C / W is required.
The farther north, the greater the resistance to heat transfer should be at the floors - for the north-temperate zone - 5.5 and 6.2 (m2C / W), respectively.
At the core of the economic benefit
The requirements of the standards are “invented” based on economic feasibility. The state does not order to create less heat resistance, because it is not profitable in the first place.
Conventional floors have very low resistance to the movement of thermal energy - it is either just a concrete slab or a 40 mm plank. Therefore, to achieve the required thermal resistance, a significant thickness of the insulation will be required.
To make the floor warmer in the south-middle regions, you need to apply 10 centimeters of Styrofoam or 13 cm of mineral wool. And for the northern ones - 15 and 20 cm, respectively.
Underfloor heating systems
Underfloor heating is a type of heating in which the heating medium circulation system is located under the floor.
As you know, the most common type of heating is wall heating, in particular with the help of batteries. This type of heating has a number of drawbacks, one of which is that the heating of the room is uneven and not rational. The fact is that the heat from the heating radiators tends upward, and it turns out that the warmest places in the room are the part near the radiator and the ceiling, and already from these zones the heat spreads through the rest of the room. Many will say that, despite such irrationality, the apartment is already warm enough - we do not deny it, but it could be even warmer, or more economical in terms of resource costs.
In turn, underfloor heating is more efficient, since heat transfer goes from bottom to top, spreading over the entire area of the room, moreover, you have a warm floor on which you can walk barefoot, only there will be no battery on which you can hang things to dry. The maximum area of heat is just the height of a person's height, thereby creating the most comfortable conditions for the inhabitants, and does not warm the ceiling.
Underfloor heating has its pros and cons, some of which we have already covered. Of the advantages, it should be noted:
- Aesthetic beauty, as communications run under the floor.
As for the disadvantages of underfloor heating, then:
- The coldest area of the room - the window, will be unheated;
- There will be no opportunity to dry things on the battery;
- Time-consuming process of laying underground communications;
Underfloor heating is a great option for those residents who don't like carpets and prefer to walk barefoot. In addition, underfloor heating is an excellent heating solution for an apartment located on the ground floor above a damp and cold basement. If you are making a complete replacement of heating with an autonomous one, then you can think about floor heating.
Types of floor insulation systems
Nowadays, there are several types of floor heating systems: water underfloor heating, electric, infrared. Their main advantage is the even distribution of heat over the entire surface of the floor and the room, the absence of external heating devices (batteries and radiators), as well as the ability to control the temperature in the room. Their main disadvantage is the high cost of installing the system itself, installation by qualified specialists and further maintenance by specialized workers.
But you can insulate the floor without using these expensive and time-consuming structures, as well as without professional help. To do this, you need extruded polypropylene boards and OSB wood boards, with standard batteries in the room, such a floor will be no less warm.
Types of underfloor heating
Separately, it is worth touching on the types of underfloor heating. If there are a lot of types of heating, then there are only two underfloor heating: water and electric.
Water underfloor heating
As the name implies, water heating is based on the circulation of a water coolant inside floor communications. The essence of water underfloor heating is that a pipe is laid under the floor through which hot water is heated, heated to the required temperature by a gas or electric boiler. And one more nuance, floor heating refers to autonomous, that is, making a branch from a centralized heating system for a floor heating is illegal, and besides, it is inappropriate. In the next article, you will learn how to calculate a water-heated floor.
Electric underfloor heating
The second type of underfloor heating is electric. This type of heating is known to many as "warm floor". This heating system is based on special electric heating sections, they are cable and infrared. These methods are an excellent alternative to water heating.
Below we will briefly tell you how to properly install floor heating with your own hands.
Choice of tool and material
To insulate the floor, you will need the following tools:
- Perforator.
- Screwdriver.
- Drill.
- Mixer.
- Rule aluminum trapezoidal 2-2.5 m.
- Aluminum level 2-2.5 m.
- The jigsaw is electric.
- Sealant gun.
- Wood plane.
- Roulette.
- Knife.
- Plastic bucket with a volume of 20-25 liters.
- Pencil.

When choosing a material, the manufacturer is not so important as its quality and characteristics. You will need:
- Extruded polypropylene plates (at least 30 mm thick).
- OSB boards (at least 10 mm thick).
- Self-leveling starting and finishing floors.
- Deeply penetrating polymer waterproofing primer.
- Polyethylene (at least 100 microns).
- Driven dowel (not less than 8x80 mm).
- Liquid nails for styrofoam and wood floors.
- Plastic wedges up to 10 mm in size.
Floor preparation
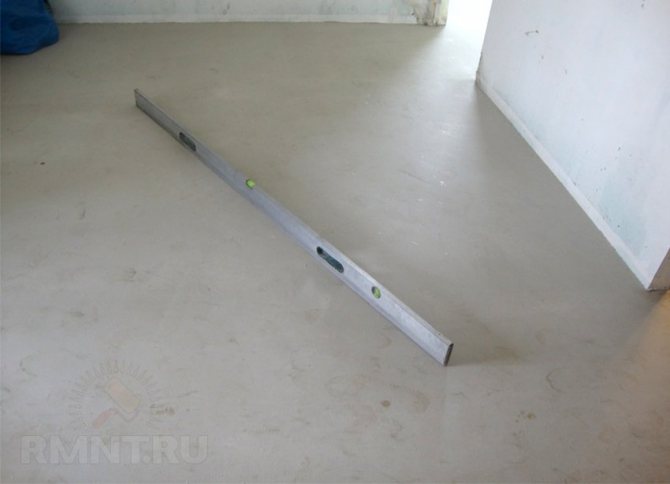
Before laying the insulation system on the floor, it is necessary to prepare it. Floor differences should not exceed 3 mm per 1 meter.
Subfloor quality check
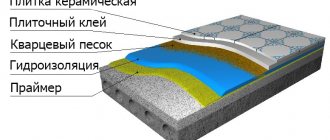
If there are old floors in the room (wood, laminate, linoleum), then they need to be dismantled. Weak and peeling areas must be removed. Then prime the entire floor with a deep-penetrating primer according to the manufacturer's instructions. Further, after the primer has dried, it is necessary to fill in a preparatory bulk cement mixture, which has a high leveling ability. If the differences in the floor exceed 5 mm, then it is necessary to fill in with a starting self-leveling leveling mixture, with differences of less than 5 mm, finish self-leveling self-leveling floors are poured. Such a surface is environmentally friendly, and in the future will have high wear and water resistance.
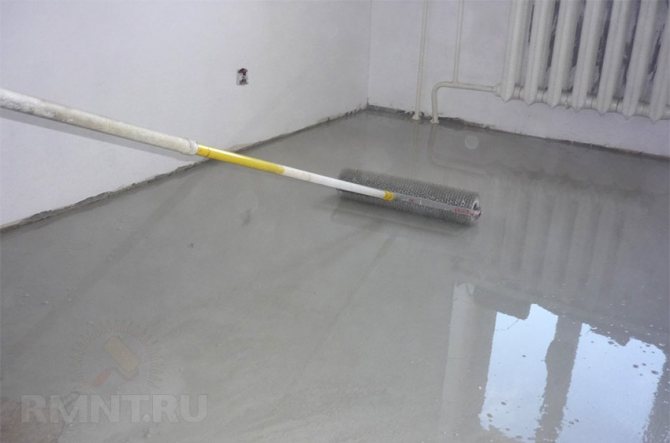
Pouring the self-leveling floor
To do this, you need to take a bucket with a volume of 20-25 liters, pour 10 liters of water into it. Gradually pour the dry mixture into the water, stirring with a mixer with a whisk until the mixture is homogeneous and without lumps, and the density has the consistency of liquid honey (the mixture should be poured out, but not spread like water). The finished mixture must be poured onto the prepared floor immediately after preparation, since it quickly settles in the bucket and you need to mix it again. After the solution is poured onto the floor, it is leveled over the floor surface by the rule, and then evenly rolled out with a spiked roller. Such a surface, as a rule, hardens after 6-10 hours, and after a day you can confidently walk on it. After 2 days, further work can be carried out.
Installation of extruded polypropylene plates
After the floor is leveled with a bulk mixture, you can proceed directly to the installation of the system itself. To do this, first you need to spread polyethylene on the floor, this is done for complete waterproofing. Polyethylene must be at least 100 microns thick.
When joining on the floor, polyethylene must be laid with an overlap of 10-12 cm and with a margin of 8-10 cm on each side of the wall. Then, extruded polypropylene plates are laid on the floor, the thickness of which in this case should not be less than 30 mm. Polypropylene boards are, first of all, a very good thermal insulation material with practically zero capillarity, very low water absorption and high compressive strength.
In addition to these characteristics, polypropylene is durable (does not rot) and is chemically resistant. Plates have standard dimensions 1250x600 mm and end locks for better joining.
When laying the slabs, each subsequent row must be shifted from the previous one by 30-40 cm, so that the end seams in the end result are in a zigzag position. When installing polypropylene, liquid nails for expanded polystyrene are applied to the sheet lock using a sealant gun, the amount and method of application of which is performed according to the instructions. Polypropylene is easy to cut with a knife, so if you need a smaller sheet, it can be cut without much difficulty.
Installation of OSB wood-based panels on the floor
After all the extruded polypropylene boards are laid, proceed with the installation of OSB wood boards, the thickness of which must be at least 10 mm. It should be noted that OSB boards are specially designed for the construction industry. With this in mind, they can be used as a finishing material on roofs, walls and floors.
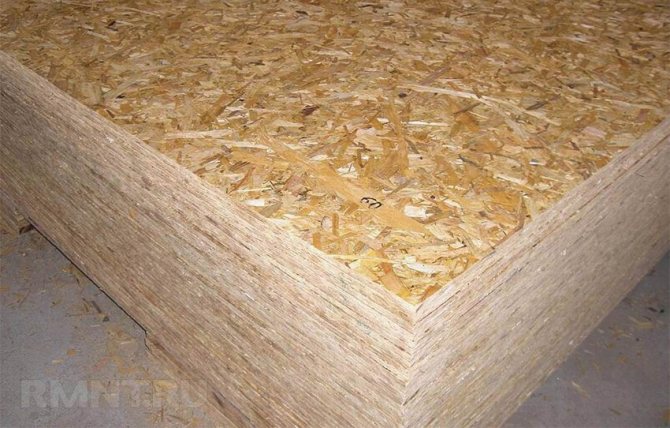
OSB Wood Boards
OSB boards are chips that are oriented to each other glued to each other using special resins by pressing. Thanks to the three-layer perpendicular stacking of the chips and the homogeneous composition, the boards have high strength. When laying the slabs on the floor, the gap between them and the wall must be at least 5 mm, therefore, in this case, it is better to insert wedges from the wall, with the help of which the distance will be observed. After installing all the slabs, the wedges must be taken out. OSB boards are stacked close to each other and should be perpendicular to the rows of extruded polypropylene.

Stacking OSB sheets
OSB sheets, as a rule, are cut with a jigsaw, it is better to direct the cut seam to the wall, since the factory ends will still be smoother than those cut off on their own.
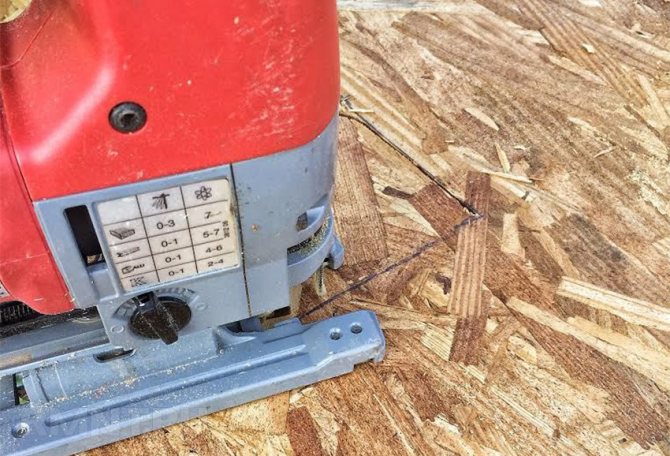
Cutting OSB sheets with a jigsaw
After all the slabs have been laid, proceed to fixing them to the floor. To do this, using a drill and a wood drill with a diameter of 12 mm, holes 3-4 mm deep are drilled on the sheet, at a distance of 25-30 cm from each other in 4 rows along the length of the sheet. Next, a puncher and a drill with a diameter of 8 mm to a depth of 10 cm make holes for a driven dowel 8x80 or 8x100 mm. The dowels are driven in with a hammer and then tightened with a screwdriver.
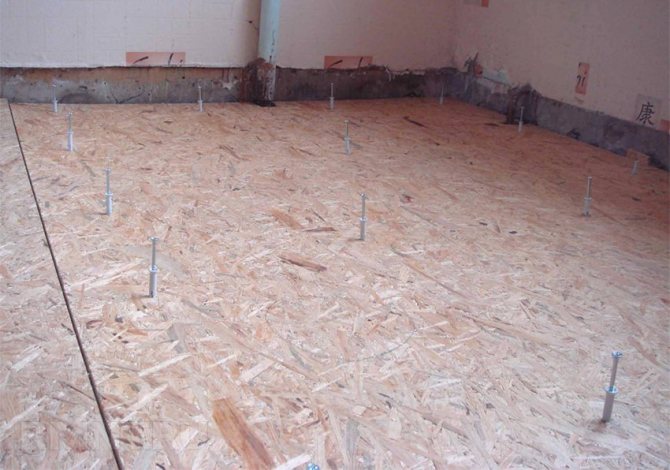
Fastening OSB with dowels
So that when drilling with a perforator the sheets do not walk and there is no further displacement, 2-3 holes are drilled at different ends of the sheet and dowels are immediately hammered into them, only after that the remaining holes are drilled. Before you start sealing all the ends of the dowels with a sealant, you must carefully walk over the OSB boards with a plane on a tree, since they may have small differences in their joints, which must also be removed with a plane.
Now you need to thoroughly vacuum the floor and only after that all the ends of the dowels and gaps are sealed with liquid nails for wooden floors, using a sealant gun and a metal spatula. The floor is insulated, in a day you can lay linoleum or laminate on it.
Installation of electric underfloor heating
Now we will describe the features of the installation of each of the above types of electric underfloor heating.For convenience, the article is divided into four sections for four types of electric underfloor heating systems.
Installation of heating mats
The heating mat is placed on a leveled, cleaned floor subfloor.
| 1) it is necessary to prepare the installation site for the temperature controller, as well as the temperature sensor. 2) it is recommended to install the regulator on the wall in the most convenient place, at a height of at least 30 cm from the floor level, so that it is not covered by furniture during its future placement. Further, a blind hole is made in the wall for the installation box and a vertical groove is made for the mounting wires of the mat, as well as a horizontal groove is made in the base of the floor with a size of at least 20x20 mm, and at a distance of at least 450 mm. from the wall for the temperature sensor. | |
| 3) the floor is marked out into areas where the mat will be laid out and areas where it is planned to install large-sized furniture, household appliances, plumbing, etc. | |
| 4) the mat is laid out with a cable upward according to the previously marked plan and is attached to the base of the floor. It is important to note that it is not recommended to use the same heating mat for floor heating in different types of rooms and with different floor coverings. When cutting the polymer mesh to change the direction of the mat, damage to the cable is not allowed. The cable must not be crossed, as this will directly lead to overheating and failure of the entire system. It is advisable to keep the distance between the sections of the cable equal to the distance with which it is laid on the grid. It is also necessary to take into account the indentation from the walls to the cable - 5 cm or more cm. And the indentation from other heating devices, furniture, household appliances - 10 cm. When laying out the mat, it is important that the temperature sensor is at the same distance from the adjacent cable sections. |
|
| 5) the mounting ends of the heating mat are brought out to the place where the temperature controller is installed. A visual check is made for the absence of cable damage possible during installation. At this stage, it is very important to check the performance of the temperature sensor and the cable itself. To do this, you need to measure their resistance. The values must match the values specified in the product data sheets. | |
| 6) sketch the layout of the mat in the instruction manual, indicating the location of the couplings and the temperature sensor. | |
| 7) you need to place the temperature sensor in a corrugated mounting tube (as a rule, the tube is supplied with a warm floor). From one end of the tube, the contacts of the temperature sensor are brought out, and the other end (with the sensor) is tightly closed with a plug to prevent the solution from entering. Place the corrugated tube with the temperature sensor in the previously prepared groove, while its bend in the corner between the floor and the wall should be at least 5 cm so that the sensor moves freely inside it. Next, you can lay a groove with a corrugated tube with a solution. | |
 the ends of the wires of the mat and the temperature sensor must be tinned for more reliable contact and connected to specific terminals on the thermostat. Check if the wires are connected correctly and turn on the power for a short period of time (about a minute). Check the entire system for operability - the LED (or electronic display - depending on the model) on the thermostat should light up, and the cable should begin to heat up. Turn off the system. the ends of the wires of the mat and the temperature sensor must be tinned for more reliable contact and connected to specific terminals on the thermostat. Check if the wires are connected correctly and turn on the power for a short period of time (about a minute). Check the entire system for operability - the LED (or electronic display - depending on the model) on the thermostat should light up, and the cable should begin to heat up. Turn off the system. | |
| 9) a solution of tile adhesive is applied to the mat in sections so that it completely covers the cable. The tile is laid and adjusted in place, pressed into the mortar with a little effort. It is important that no air bubbles remain in the solution between the hotplate and the heating cable. |
|
| It is necessary to turn on the warm floor only after the layer of tile adhesive has completely dried. The time of its complete drying is determined by the characteristics of the composition. It is usually noted by the manufacturer on the tile adhesive packaging. It is also desirable to exclude drafts and possible temperature changes. |
| Return to the table of contents of the article |
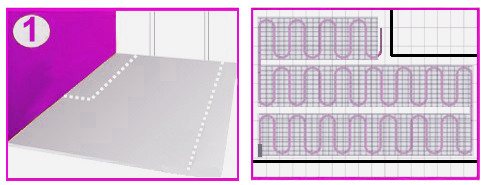
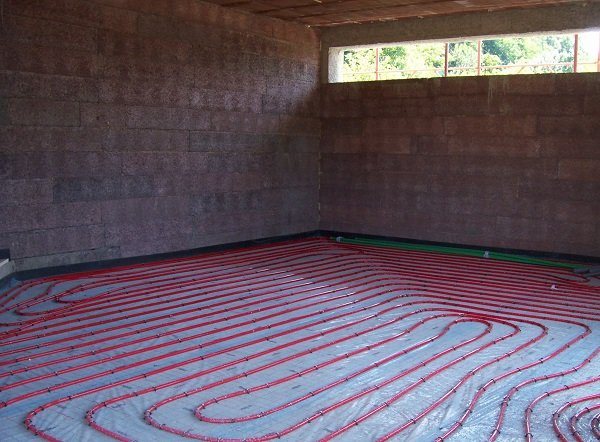
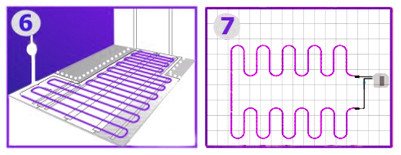
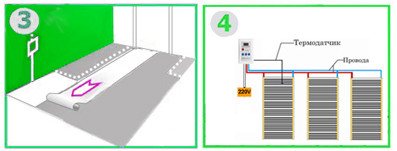
Installation of heating sections
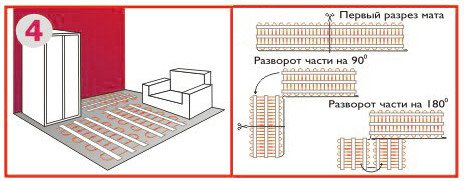
The sections are laid in a concrete screed 3-5 cm thick, as a result of which the floor level rises, but it can be laid with a certain step, which should not be less than 8 cm. (Cable sections will overheat each other) and more than 15 cm. (Temperature "Zebra" - what it is?). The same step size can be used for heating sections to obtain two types of heating: basic or comfortable. The smaller the laying step, the higher the power density and vice versa, respectively.
The main heating is assumed in the absence of other heat sources in the room or their insufficient power. With the main heating, the design power is taken from 150 to 200 W / m2. Comfort heating is used when there are other heat sources in the room. With this type of heating, the floor heats up to a comfortable temperature of 23 to 26 ° C. For comfortable heating, the design power is 120-150 W / m2.
| 1) the base of the floor is cleaned (swept), cracks and other irregularities are repaired. | |
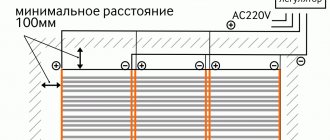
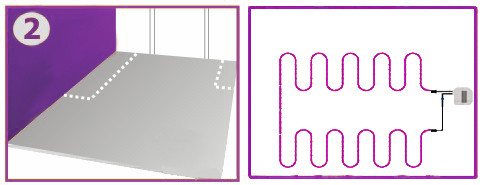
| 2) the heating area is marked, along which the section is planned to be laid. The locations of large-sized furniture, household appliances, plumbing fixtures, risers are excluded from the total area of the room; it is also necessary to retreat from the walls at least 5 cm and from the above objects by at least 10 cm. Sketch on paper the layout of the section and the location of the thermostat, approximately keeping (during installation, deviations of no more than 1 cm are allowed) the laying step over the entire area. It should be borne in mind that single-core sections require both ends to be connected to the location of the thermostat, two-core sections only at one end. |
|
| 3) if under the base of the floor there is an unheated or weakly heated room, then it is necessary to use a thicker special thermal insulation. In general, an insulating layer of no more than 1 cm is laid. | |
| 4) Determine the location of the temperature controller. It is recommended to place it at a height of at least 30 cm from the floor level in a place free for the future arrangement of furniture. Make a recess for the soldering box in the selected area on the wall and grind a 20x20 mm vertical groove to the floor, into which the wires of the heating section and the temperature sensor will subsequently be placed. | |
| 5) on the marked heating area, mount the mounting metal tape. Fasten it securely using dowels and self-tapping screws, keeping the distance between adjacent strips of tape from 50 to 100 cm. | |
| 6) lay the cable, fixing it on the mounting tape. Remember: the sleeves must be on the floor. If the section is two-core: lay the end of the cable with the mounting wire to the place prepared for the temperature controller, fix the other end of the cable on the floor and start laying from it. If the section is made of a single-core cable: place both ends to the place prepared for the temperature controller, fixing them, start laying the cable. It is impossible to cut, build up, bend the cable at a steep angle. Maintain the calculated cable spacing over the entire heating area. The recommended laying step is 8 to 15 cm. 7) sketch the layout of the section, the places of the couplings and the temperature sensor. |
|
| place the temperature sensor in the corrugated tube (it comes with a heating section, 14-20 mm in diameter). The thermal sensor should be at one end of the tube, its wires at the other end. Place the corrugated tube in the gutter on the floor and run it along the wall to the junction box. The bend of the tube should be 5 cm or more, but not less, so that the sensor can move freely inside the tube and be able to replace it without opening the floor. The end of the tube, closer to which the sensor, must be closed with a plug (supplied with the tube) to exclude the ingress of cement-sand mortar.It is recommended to take the distance from the wall to the end of the tube in the range of 50-60 cm. Fix the tube at an equal distance between adjacent cable sections. | |
| 9) check the cable of the heating section and the temperature sensor for damage that could have occurred during installation by measuring their resistance. The values should correspond to the nameplate values for these products. Record the results on the cable laying diagram. | |
| 10) with the mains voltage off, connect the thermostat. In accordance with the connection diagram from the Passport for the thermostat, connect the heating section and the wires of the temperature sensor to it. For a short time (no more than a minute), apply the mains voltage in order to check the operability of the entire system (the electronic screen or the indicator light on the front panel of the thermostat should light up and the cable should start to heat up). Turn off the power again. You can turn on the warm floor only after the concrete screed has completely dried. | |
| 11) fill in a cement-sand screed 3-5 cm thick with comfortable heating and at least 5 cm with the main one. Do not use underfloor heating until the screed is completely dry. The time for complete drying depends on the properties and characteristics of the mixture and the ambient air. It is advisable to exclude drafts and possible temperature drops. Drying times are usually noted by the manufacturer on the mix packaging. The recommended time to ensure complete drying is 28 days. |
| Return to the table of contents of the article |
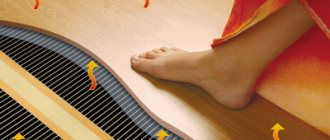
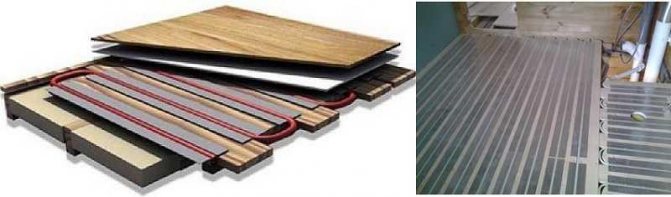
Installation of a film infrared warm floor
Laminate or parquet flooring is quite popular these days. The most suitable systems for them are infrared underfloor heating systems that do not raise the floor level.
It is worth choosing those floor coverings that show special icons that allow their use with a warm floor (). It is not recommended to install a film warm floor in rooms with high humidity, as well as in bathrooms.
| 1) prepare the location of the thermostat. The total power of an infrared floor heating system can be quite high. It is not recommended to plug directly into a household outlet. It is necessary to foresee and draw a dedicated line of the required section and install a separate machine. Also, for safety, an RCD (residual current device) is very often installed. It is recommended to install the thermostat on the wall in the most convenient place, at a height of at least 300 mm from the floor. so that it does not interfere with the arrangement of furniture. Further, a blind hole is made in the wall for a soldering box and a vertical groove is made for mounting wires of at least 20x20 mm. | |
| 2) the floor is marked out into areas where the heating film will be laid and areas where it is planned to install large-sized furniture, household appliances, plumbing, etc. | |
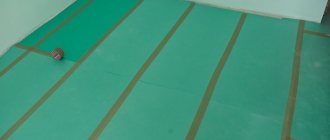
| 3) the film is rolled out and cut into pieces of the required length according to the previously marked plan. It is recommended to lay the film by rolling it along the long wall of the room - this will minimize the number of contact joints, and the gap between the film sections is at least 5 cm. The film can be cut strictly along the line marked on it graphically. It is not allowed to damage the heating layer. Do not allow film sections to overlap. It is necessary to take into account the indentation from the wall - at least 5 cm and the indentation from other heating devices, furniture, household appliances - 10 cm. 4) when planning the wiring, it is advisable to avoid crossing them. Their connection diagram may be different. The most common connection pattern is on one side of the film sections. There are situations (example: a complex configuration of a room) when it is more rational to connect zero and a phase from different sides of the room. The second option requires extreme care, in the worst case, a short circuit will occur. |
|
| 5) it is recommended to place the thermal sensor in the center of the width of the heating film and at a distance of at least 50 cm from the wall. Extension of the temperature sensor wire is not allowed. | |
| 6) before laying the film, it is necessary to cover the entire floor area with a foil-coated heat-reflecting substrate. Its foil part should be oriented outward. The parts of the underlay are stacked end-to-end, attached to a clean and even subfloor with double-sided tape. The joints are glued on top with foil tape. The thickness of the substrate is important. Grooves will be cut in it for laying wires, terminal connections and a temperature sensor. | |
| 7) the laying of the film floor is carried out with copper current-carrying buses downward. Sections of the film can be fixed to the substrate with tape. The section layout, the location of the couplings and the temperature sensor.
| |
| 9) the thermal sensor is attached to the underside of the heating film on the heating carbon layer using an insulating bitumen tape and placed in a pre-prepared groove in the substrate. After that, this section of the heating film is attached to the substrate, as well as the others. | |
| 10), the terminals for connecting the heating film to the electrical circuit are installed. The upper part of the clip (most often the clip type of contact terminals is used) is inserted into the cut at the point of contact of the film itself, so that the second part of the clip is at the bottom of the film. After that, the clip must be squeezed neatly, but tightly enough. The stripped wire is pushed into the mounting part of the terminal and crimped securely. | |
| 11) it is necessary to insulate all contact connections very carefully! For this, the same tape is used, the strips of which were glued to the top and bottom of the contact connection, then they are tightly crimped to obtain a tightness that completely excludes the possibility of moisture entering the terminal. | |
| 12) the wires are placed in pre-prepared cutouts in the foil substrate and fixed there with mounting tape. |
| Return to the table of contents of the article |
Installation of thin heating mats
Thin heating mats are made of heating cables with a maximum thickness of 3 mm. fixed on a foil substrate with a thickness of about 0.1 mm. Such an innovative technological solution allows you to get the main advantages of cable underfloor heating and heating film in a single design.
Raising the floor level when using such mats will be limited to a maximum of 5 mm. Installation of this type of underfloor heating is simple; careful isolation of contacts is not required, as when installing a film floor. The connection to the thermostat is also simple due to the two-core cable structure.
Recommended to be laid under parquet, laminate. When choosing a floor covering, you should also pay attention to the recommendations of their manufacturers as far as possible use with underfloor heating systems (special icon).
| 1) it is necessary to draw up a plan for laying thin mats in the room, taking into account the areas used for stationary furniture, household appliances, plumbing, other heating devices and indents from them at least 10 cm.Also, the indentation from the walls of the room should be at least 5 cm. |
|
| 2) it is necessary to prepare the base of the floor, to make it even: sweep the debris, repair cracks, potholes. It is recommended to prime the clean, leveled subfloor with a primer. | |
| 3) the location of the thermostat is selected and prepared and a groove 20x20 mm is grooved. for laying the wires of the temperature sensor and the mat. It is recommended to locate the thermostat at a height of at least 30 cm from the floor.The recommended distance for removing the temperature sensor from the wall is 50 cm. | |
| 4) The resistance of the temperature sensor is measured, the measurement result is recorded on the plan. The temperature sensor is pulled through the corrugated mounting tube and placed in the prepared groove. | |
| 5) then the thermal insulation is laid. Most often, foil, less often cork, thermal insulation is used. Insulation sheets are attached to the base of the floor using double-sided tape, and between themselves with foil tape. A slot is made in the substrate above the groove prepared for the temperature sensor in the floor. | |
| 6) before laying, the resistance of the heating mat is checked and compared with its passport characteristics. To change the laying direction, it is allowed to cut the foil layer of the mat without any damage to the cable! It is also undesirable to twist the cable when turning the sections of the mat. The strips of the mat are held together by an aluminum tape. Measure the resistance of the mat to check for damage during installation. | |
| 7) connect the thermostat to the mat and to the temperature sensor. Check the system performance by short-term start-up (no more than 2 minutes). Cover the installed mat with plastic wrap. | |
| the finishing decorative floor covering (laminate, parquet) is laid. For soft surfaces such as linoleum or carpet, it is recommended to pre-lay fiberboard or plywood no more than 6 mm thick. |