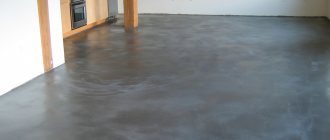
Owners of wooden houses under construction or during operation often come to the idea of insulating a wooden house, although wood itself is a natural material with good thermal insulation properties.
The modern construction market suggests using mineral wool, foam plastic, ecowool for thermal insulation, but penoplex has become the undoubted leader among the materials. Subject to the fastening technology, modern insulation will provide a comfortable climate for any home.
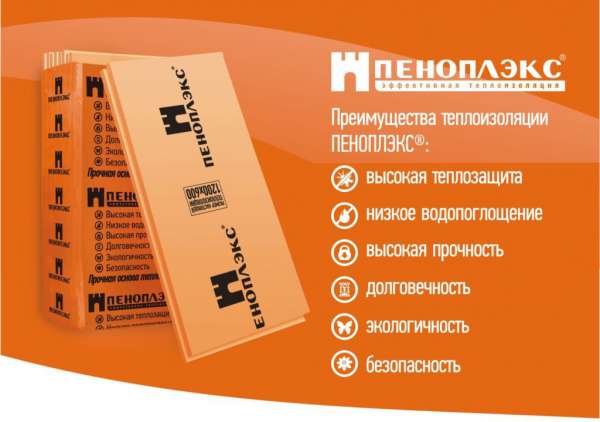
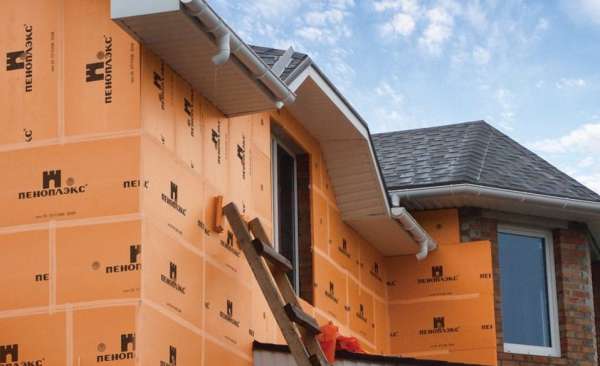
Penoplex - modern heat insulator
The choice of penoplex among heat insulators is considered optimal because of its undeniable advantages:
- durability of the material;
- low thermal conductivity;
- environmental friendliness and safety;
- moisture resistance;
- fire resistance.
You can learn more about the technical characteristics of penoplex from this article.
Why do you need insulation
Insulation of new houses is carried out in connection with the desire to optimize energy costs, that is, to do without turning on heating devices and air conditioners.
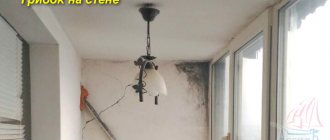
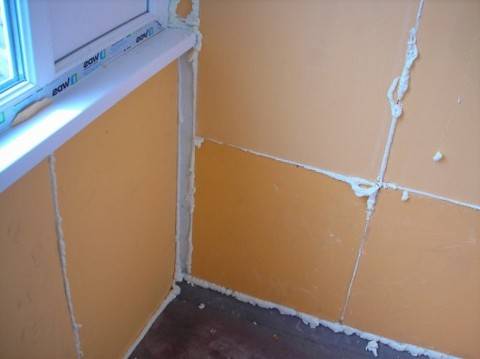
Those who have settled in wooden houses for a long time, over time, find cracks and cracks in the log house at the joints or corners. This is due to the partial shrinkage of the house due to weather factors.
The violation of the tightness leads to the fact that, despite the general favorable climate, the heat gradually leaves outside.
How to insulate the floor in a private house with your own hands, read here.
Warming methods
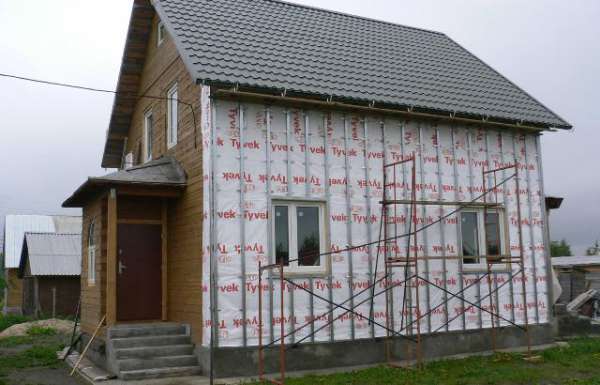
Insulation of the house outside
The solution to the issue of warming a wooden house is possible without the invitation of specialists; basic skills in working with building materials are enough. It is important that thermal insulation with foam is possible both from the inside of the building and from the outside.
But practice shows that external or external insulation of the house is preferable for a number of reasons:
- Insulation on the outer walls will last longer as it will be better ventilated.
- The external structure will not only serve as insulation, but also to protect the walls from negative natural factors.
- External thermal insulation will not reduce the internal living space.
- Work can be carried out in a populated house without disturbing the internal order.
Features of the installation of penoplex outside
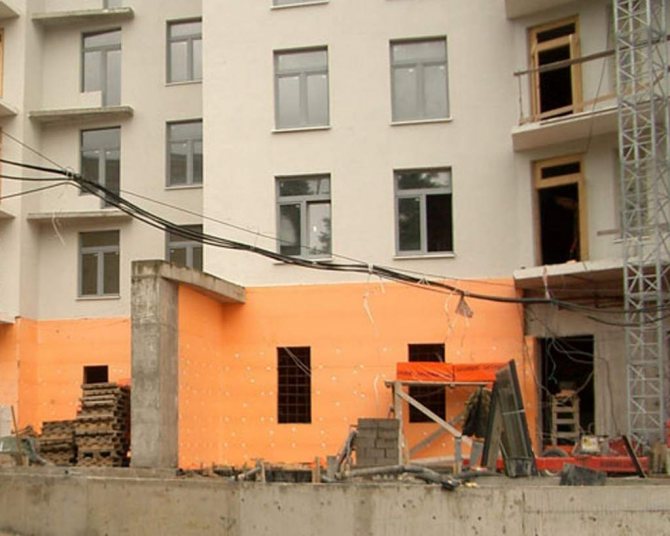
Penoplex is also successfully used for external insulation, which is important for multi-storey buildings of old buildings, especially for corner rooms. Self-insulation of apartments from the outside is hardly possible, the only exception is the apartment located on the ground floor. But knowing the basic rules for installing a penoplex outside, you will be able to control the work of hired professionals.
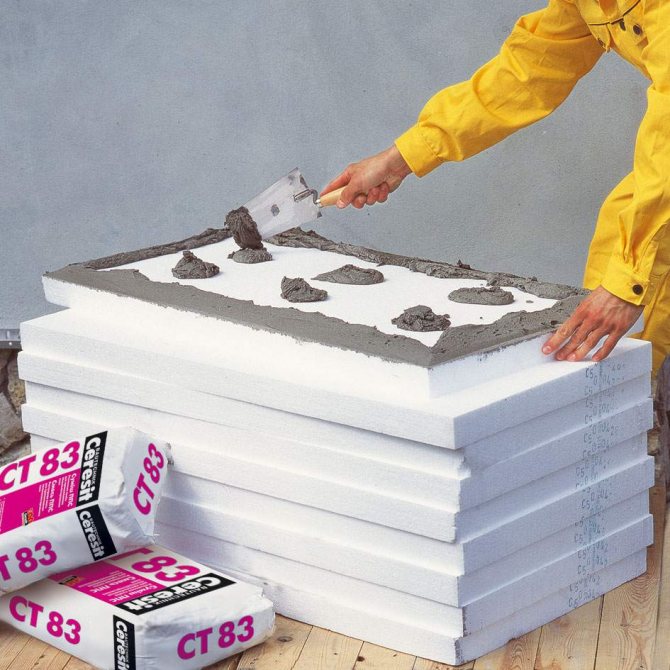
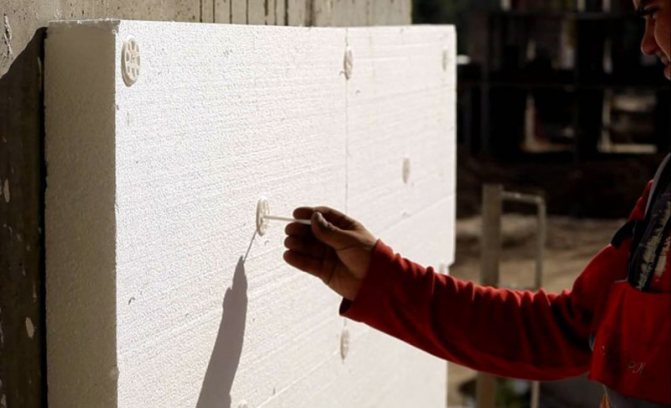
- During installation, it is imperative to combine a special adhesive designed for attaching the foam to concrete, and plastic dowels. The adhesive is applied to the board evenly rather than in individual spots.
- In order to prevent the insulation from slipping during installation, a starting plinth is attached around the entire perimeter. It can be made of a bar or a metal profile and is attached strictly horizontally, for which a level is used.
- A layer of insulation 30–40 cm should extend beyond the surface to be insulated to prevent heat outflow at the edges.
USEFUL INFORMATION: Cleaning walls from old wallpaper and paint: removing mold and old plaster
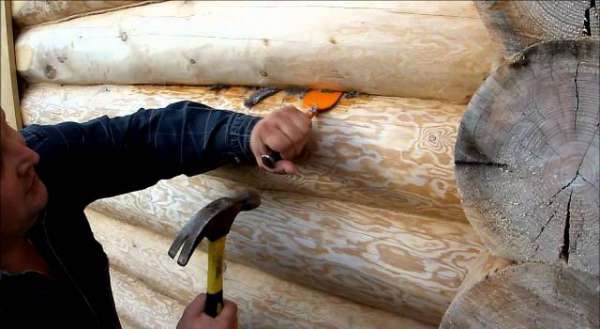
Features of the insulation of wooden surfaces
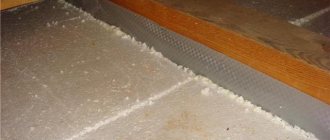
It is known from the school curriculum that wood has the property of "breathing", and in conditions of air isolation, after a while, the process of decay will begin. If you provide the wood with an air flow, then the quality characteristics of the tree will remain for decades.
This means that there must be an air space, or ventilation gap, between the wall of the house and the insulation. If you do not follow this rule, then over time, moisture condensation will lead to rotting of wood and insulation.
The main stages of external fastening
When working with penoplex, it is recommended to maintain the technological process and observe the sequence of the main types of work:
- Surface preparation. The walls of the house must be cleaned of dirt and dust. Then treat the wood with an antifungal compound. In the presence of mold, especially thoroughly saturate the affected area with antibacterial agents.
- Installation of the lathing. The lathing is made from wooden blocks. Ensuring clearance is an important part of the process. If the wall is a log, then the natural shape of the logs creates the necessary ventilation. With a smooth wall surface, you need to fill the slats up to 2.5 cm, providing the desired gap. Between the slats, it is optimal to leave a distance of no more than 1 meter. If the surface of the wall is not even enough, under the bars you need to use substrates to level the plane. If necessary, the protruding parts of the logs are cut off. Check the geometry of the battens around the perimeter with a level. Doorways and windows are upholstered with a bar in order to fix the edges of the future cladding along these boundaries. The trim is installed with the expectation that the foam boards will be placed tightly between the beams. The height of the lathing, or frame, should correspond to the thickness of the plates, and the distance between the vertical beams should be made 0.5 cm less than the width of the foam, to ensure a tight fit.
- Laying a vapor barrier layer. For protection against condensation, you can use foil or dense polyethylene film. Its fixing is done with construction tape.
- Fastening of the penoplex. A clear geometry and a special edge make it easy to mount the foam boards, like a children's designer. The insulation is laid end-to-end, in rows from bottom to top. If necessary, the penoplex slab can be easily cut with a knife, despite the fact that the average thickness of the slabs for outdoor decoration is 8–12 cm. The slabs should be held due to a tight fit, but if necessary, they can be fixed with wedges or nails. Insulation joints must be glued with metallized tape.
- Securing the waterproof layer. A moisture protective film is stretched over the foam to ensure waterproofing. It must be overlapped and secured with a construction stapler or tape.
- The final stage. At the end, a wooden frame is attached to the layer of protected insulation for finishing the house with siding or other type of cladding.
Read about which glue to choose for penoplex here.
How to fix penoplex to the wall
Before you start attaching the penoplex to the wall, you must draw a diagram with the exact location of the insulation sheets and indicate the dimensions, as well as perform the markup. This helps to calculate the required number of sheets, fasteners, glue.
Video:
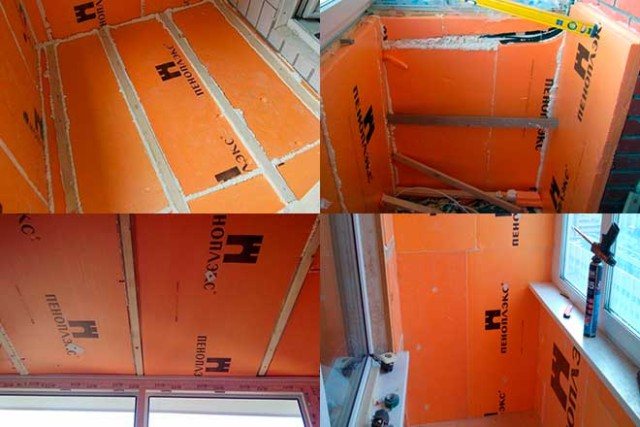
Inside
In the room, work on insulation with penoplex is carried out sequentially:
Insulation inside.
- preparation of the surface of the walls (dismantling of old finishes, priming, sealing of cracks);
- the plates are fastened in rows (with a shift placed along the perimeter) or with a pyramid (the first row is along the perimeter, then the corners are laid out);
- glue protruding from the seams is removed with a spatula;
- a mounting mesh is laid on the surface of the heat insulator, finishing work is carried out.
Video:
Internal mounting features
Experts pay attention to the following factors:
- internal insulation with foam boards is carried out only if there is no opportunity to do work from the inside;
- in the house, insulation can be done only after final shrinkage, as practice shows, in a year.
- the thickness of the foam should not exceed 30 mm, and its density is needed the smallest to avoid the formation of condensation on the wall;
- it is necessary to fix a foil film on the insulation to prevent the appearance of dampness and deterioration of the microclimate. The algorithm of actions as a whole remains the same as for the exterior decoration of the house, taking into account the above factors.
Recommendations
The main recommendation of specialists is strict adherence to foam insulation technology. Deviations from them can lead to the formation of cold poles, condensation or fungal infections.
Internal insulation procedure
Knowledge of the features of the external and internal insulation of the walls of the building, taking into account the requirements for the installation of penoplex, will make the atmosphere at home comfortable at any time of the year.
How to insulate a wooden (frame) house with penoplex, see the video:
When the question arose of paying for energy carriers - it doesn't matter if it was gas, electricity, coal or firewood, a lot of homeowners thought about wall insulation to reduce heat loss and save on heating.
Warming of wooden houses causes especially heated debate, here there are discussions on how to insulate - from the outside or from the inside, what kind of insulation to choose, what kind of insulation system to choose. Do-it-yourself insulation of a wooden house outside with penoplex is the answer of an economical owner.
A bit of theory
Regardless of the material of the walls, in the house, external enclosing structures that provide the heat transfer resistance required by the norms, there are drafts, and in the absence of proper ventilation, mold forms, walls and ceilings are affected by fungus.
In the case of a wooden house, the walls of which "breathe" - they release water vapor through the natural pores of the wood, improper insulation without ventilation will lead to the formation of mold. In order for such a disaster not to happen, the insulation design must freely release steam, which means that each subsequent layer in the direction of the street must have greater vapor permeability.
For wood, this indicator is 0.06 mg / (m * h * Pa), for penoplex - 0.018 mg / m * h * Pa. That is, when the house is insulated from the outside with penoplex, water vapor will settle on the surface of the wooden wall, which will gradually lead to its rotting. You can avoid this trouble by laying a vapor-permeable film and an air gap between the insulation and the wall.
This solution will allow the steam to be removed to the outside, accumulate condensate on the vapor barrier, and then ventilate it through the air gap. Since penoplex has a minimum water absorption (from 1 to 4%, depending on the brand), water vapor coming from the house will not be able to significantly affect its thermal conductivity, and low vapor permeability will not allow water vapor to penetrate from the atmosphere to a wooden wall.
Insulation systems
You can insulate a house with penoplex using two systems:
- "Wet" - plastering system;
- "ventilated facade".
The plastering system of insulation involves fixing the insulation directly to the outer wall, but since it is necessary to create a ventilation gap between the wall and the insulation, the use of this system in the case of a wooden house is structurally not justified.
The ventilated facade system will allow meeting all the requirements of heating technology, and will provide comfortable conditions and a healthy microclimate in the house, without additional costs for forced ventilation.
Any slab or slatted facing material can be used as a finish.
Insulation
Performing work will require care and accuracy. At the initial stage, it is necessary to inspect the walls, dig in the seams, repair cracks, impregnate the wood with a fire retardant and antiseptic to protect it from burning and decay.
Thermal insulation of a wooden house with penoplex can be divided into several stages:
- Preparatory stage - fastening the starting bar around the perimeter of the house, making ventilation holes in the wall for air flow into the ventilation gap.
- The device of the frame from a bar of 40x40 mm to create an air gap, fastening a vapor barrier film.
- The device of a frame for fastening thermal insulation from a bar of 40x100 mm (depends on the required thickness of the insulation), fastening the insulation.
- Fastening of a moisture-windproof film or a superdiffusion membrane with a 40x40 mm bar, with the creation of a ventilation gap.
- Fastening the curtain wall.
The crate is attached to the prepared base, adjusting the horizontal and vertical planes according to the building level. The evenness of the finishing planes depends on the accuracy of this stage. Minor irregularities of the timber or log facade can be leveled with wood gaskets, significant irregularities must be planed. A vapor barrier film is attached to the crate with a construction stapler. The film is overlapped with an overlap of 15 cm, the edges are sealed with a special vapor-permeable tape.
The main supporting frame is built and attached. When laying insulation in two layers, the frame is made double, fixing the bars in the perpendicular direction. Accordingly, the insulation is laid in one or two layers, by surprise. The distance between the frame beams is equal to the slab width minus 5 mm. Fastening to the insulation bar is carried out in two ways: first, on elastic foam glue, after it dries - with self-tapping screws.
With the help of a bar, a moisture-windproof film is attached, creating another ventilated gap.
The hinged facade is attached. The exterior insulation of the house with penoplex is done.
Insulation of a house from a bar with penoplex will cost more than insulation with expanded polystyrene, but cheaper than a mineral wool board. All work is relatively simple, but requires accuracy and the ability to use a drill and a level. Subject to the requirements of the manufacturers of materials and the technological sequence of work, the result of labor will delight you for many years.
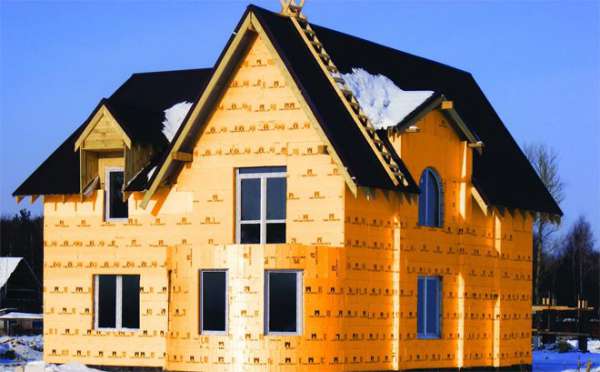
Any house needs to be insulated. This also applies to wooden houses, although wood itself perfectly retains heat. The wooden base of the house will last much longer if it is insulated from the outside. External treatment is a kind of protective function of the frame of a wooden house. In any room, mainly walls need thermal insulation. It is through the walls that almost a third of all heat from the house is lost.
Wall insulation can be carried out both inside the house and outside, but most often external insulation is used using "Penoplex" - extruded polystyrene foam. This building material has become especially popular and widely used in recent years due to a number of its characteristics. Insulating a wooden house with Penoplex from the outside with your own hands is actually not as difficult as it seems at first glance. It only takes time and patience.
Correct installation of insulation
How to fix penoplex to the wall after completion of preparatory work? The whole process can be broken down into several stages:
- Installation of a starting scarf. It is attached along the lower contour of the insulated zone and is necessary to support the sheets from below. Thanks to it, the insulation plates will not slip during the installation process, which will greatly simplify the installation itself. The plank can be specially purchased by the factory or made independently (for example, from a wooden beam of the same thickness as the sheets of thermal insulation used).
- Preparation for fixing the foam to the wall.It consists in the fact that the side with which the material will adhere to the base must be rolled with a needle roller to create a roughness. This is only required when fastening with an adhesive to ensure a stronger connection.
- Installation itself. Its features depend on how the plates are attached (glue, dowels, something else), but there are no difficulties or special techniques. The only thing is that each subsequent horizontal row is recommended to be installed with an offset of half the slab to improve the quality of thermal insulation and the overall strength of the structure.
- Sealing of seams. Seams between the plates can be sealed with polyurethane foam or special mastics.
Not everyone knows which side to attach the penoplex to the wall, and whether it is fundamentally at all. In fact, this does not matter at all, since this insulation is double-sided.
In conclusion, it is necessary to list how penoplex is attached to a brick wall, as well as to other hard surfaces. The most popular mounting options are by means of fastening methods (listed as popularity declines):
- bitumen-polymer mastic;
- disc dowels;
- dry cement mixtures;
- polyurethane foam;
- foam glue;
- "Liquid nails".
Knowing how to attach penoplex to a brick wall and other surfaces correctly, you can independently mount high-quality and durable thermal insulation or effectively control the craftsmen involved for this work.
The advantages of outdoor insulation
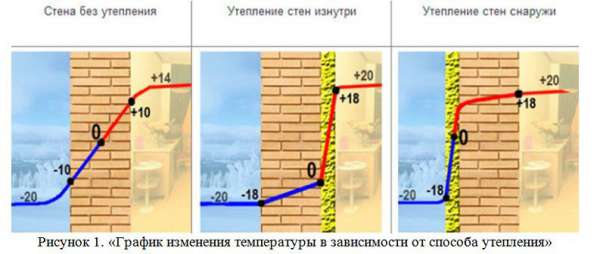
If we insulate a house, including a wooden one, from the inside, then the dew point shifts. Thanks to this indicator, the required temperature level is determined. If the temperature falls below the required level, then condensation will form. The dew point in this case will be located inside the building. As a result, the humidity will rise, the walls of the room will "sweat" and various mold will appear.
In addition, if you carry out the interior decoration of the building, it visually reduces the room. Another negative factor of internal insulation is the general deterioration of the indoor climate. If the house is insulated from the inside, but the tree will not be able to "breathe", and this also negatively affects its properties.
Insulation of a wooden house with Penoplex eliminates all these negative aspects.
Mounting options for penoplex
Glue mastic
The most used option today is a special adhesive bitumen-polymer mastic. The main plebs of this mounting option are its simplicity and affordability. The mastic is sold ready-made, your task is to apply it pointwise with a spatula to the back of the foam sheet around the perimeter and stick it to the wall. As you can see, even a person who has not previously encountered repair work can cope with this task.
Cement-based dry mixes
By giving preference to dry cement-based adhesives, you choose a low price, availability and reliability of fastening. In order to proceed with the installation, you will need to dilute the mixture according to the instructions using a construction mixer, and then simply apply with a spatula to the back of the plate and press it against the wall surface. Insulation glued in this way will be fixed more than reliably.
Adhesive foam
Another common method of attaching insulation. The fastening principle is similar to the two described above - the plate is also glued to the wall. A feature of such an attachment is the material of the wall surface - it is recommended to use glue-foam for gypsum and plastic coatings. The glue foam is sold in cans and is applied with a glue gun. It's fast and convenient.
Liquid Nails
This option is suitable only if it is necessary to insulate a small section of the wall with the help of EPSS. The reason for this is the high cost. But, if you only need to insulate a balcony or loggia, we recommend that you consider this option. It is convenient for independent use.
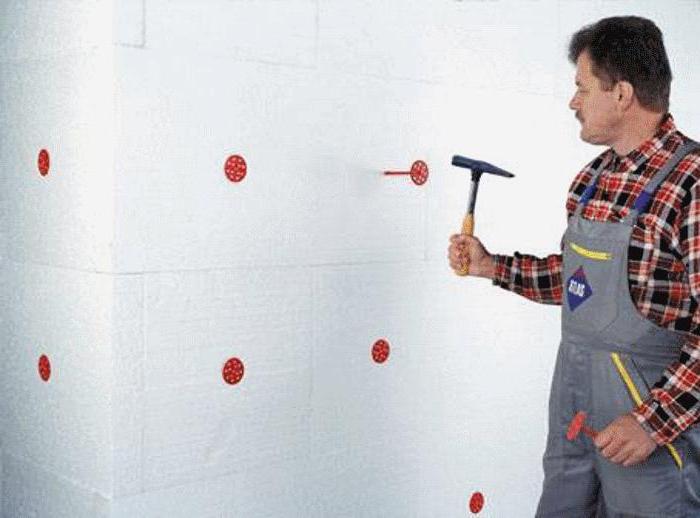
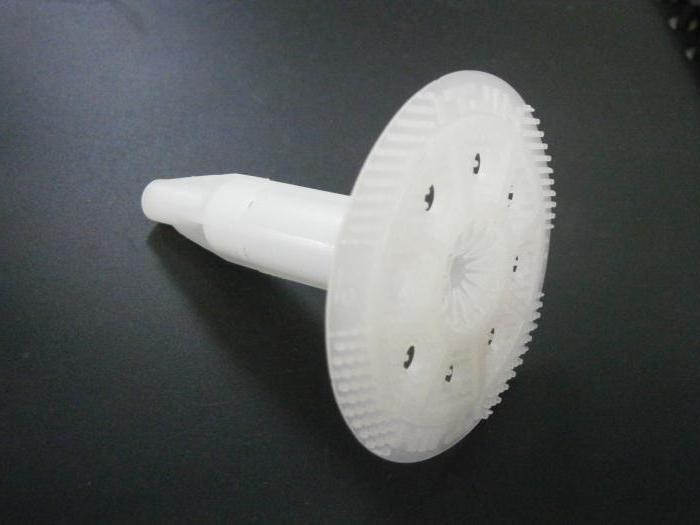
"Fungus" or disc-shaped dowels
Earlier, we considered four types of fastening for penoplex, they were based on one and the method - gluing the sheet to the wall with various compounds. For the highest quality installation, we recommend the fifth method, namely, fastening with disc-shaped dowels or, as they are also called, "fungi" or "umbrellas".
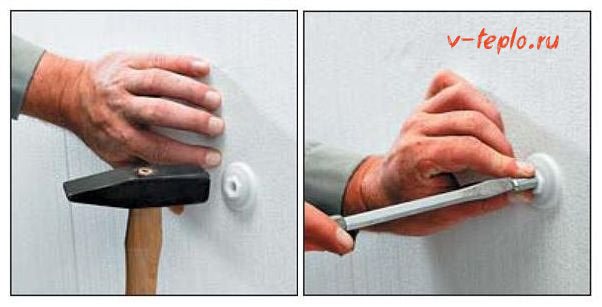
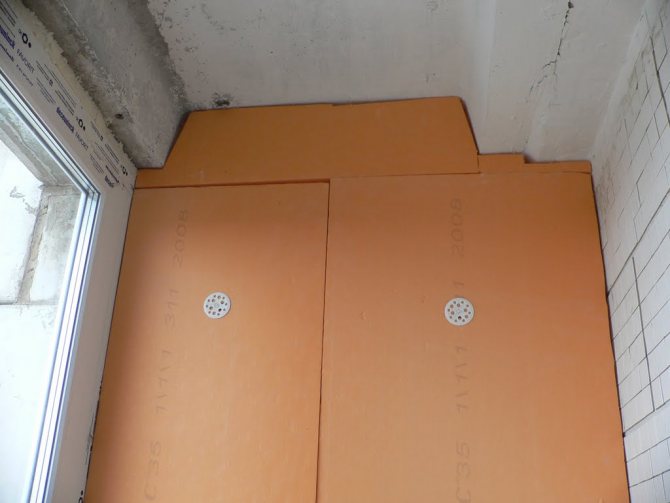
Penoplex has a low weight and there is an opinion among builders that any adhesive method will be enough, but in the final version, the layers of insulation and cladding will weigh a lot and it is necessary to consider more reliable options - fastening with dowels. In order to secure the foam sheet with high quality, you need five fungi - four in the corners and one in the center, a puncher, a hammer and a drill.
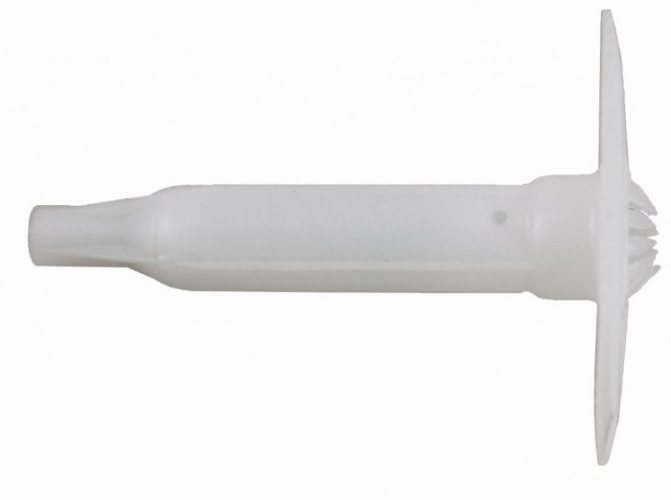
Dowels for attaching penoplex - varieties
Consider with you the varieties of dowels for attaching foam to surfaces. The most important difference is the dowel material. So, there are dowels:
Plastic "fungi"... These fasteners are recommended for use on brick and concrete surfaces, but only for light types of insulation. Plastic is a less durable type of material than metal, so its reliability is somewhat lower.
The advantage of plastic dowels is availability and low price.
Metal dowels... An excellent option for attaching any insulation, including the heaviest options. Metal, unlike plastic, is highly durable and will last for many years. The disadvantages of a metal dowel are only the high cost and the possibility of metal corrosion. The body of the dowel is made of steel, and the head of the nail is made of metal of low thermal conductivity. This option is technologically the most preferred, but expensive.
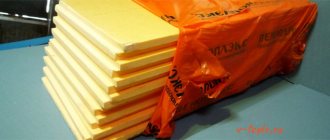
The main characteristic features of "Penoplex"
Penoplex is a brand of extruded polystyrene foam. This building material has a number of positive qualities, thanks to which it is considered one of the best heat insulators. It should also be noted that it is a very light material because it contains micro-granules of air.
The main distinguishing features of this material
- Penoplex does not absorb moisture;
- Effective heat insulator, due to which, when insulating, you can use not too thick layers of material;
- Fire resistance. This building material is almost not subject to combustion and does not produce any harmful substances arising from combustion;
- Relative ease of installation;
- Reliability, strength, invulnerability to various types of impact;
- Mold and mildew do not develop on the penoplex.
- Penoplex can be used in a wide temperature range: from -50 to +75 degrees;
- The service life is over 50 years.
Types of "Penoplex"
The material is divided into several types depending on its density:
- density 28.0–33.0 kg / m³ - used for roofing;
- density 29 kg / m³ - for foundation treatment;
- density 25 kg / m³ - for working with walls;
- density 25.0–35.0 kg / m³ - universal penoplex;
- density 45.0 kg / m³ - for industrial use.
Most often, universal polystyrene foam is used in the work, because it is in it that all the best qualities are combined, and it can be used to work with any part of a wooden house.
About the preparation of walls for fixing penoplex
On the one hand, the penoplex will not be the finishing coating of the walls, so it is not so important whether it will be evenly attached to the walls. However, it is much easier to plaster even walls made of penoplex than curved ones.Moreover, if large cavities take place under the penoplex, then this can further lead to the destruction of the material, because the penoplex is quite fragile (but not like foam) cladding material and, when pressure is applied to it, it can break in front of the cavity. Moreover, excessive moisture may appear in such cavities, which will lead to the development of mold and mildew and, in the future, to the destruction of your walls.
Before fixing the penoplex, it is necessary to work with the walls.
- First of all, all dirt and waste materials are removed from the walls, in the form of falling off plaster, etc.
- Walls that have oily stains must be degreased.
- It is advisable to cover the walls with a primer to collect all debris and dust.
- The walls also need to be coated with an antifungal solution to prevent mold and mildew from forming on them.
Having finished preparing the surface, we proceed to the choice of the method of attaching the foam.
The process of wall insulation with the help of "Penoplex" outside
- To insulate a wooden house with Penoplex with your own hands from the outside you need start from the preparatory stage... First, you need to align all the walls, get rid of the bulges and roughness on them, otherwise, later, when pressed on the insulation, it may break.

- Then it follows necessarily treat the walls with a primer... Insulation boards have a smooth surface, therefore, in order for the mixture to adhere well to them, their surface must be treated with a special drywall roller. You can also use a brush or knife for this. Before starting work, all slopes and window sills must be firmly fixed.
- When insulating a log house with your own hands outside "Penoplex", it is necessary install the crate... You need to equip it with wooden bars (25x50, 50x50), or you can also use metal profiles. This stage is very important when insulating a wooden building from the outside with Penoplex and is necessary for fixing a heat insulator. In order for Penoplex to be firmly established in the openings, the size between the beams or profiles must be made five centimeters smaller.
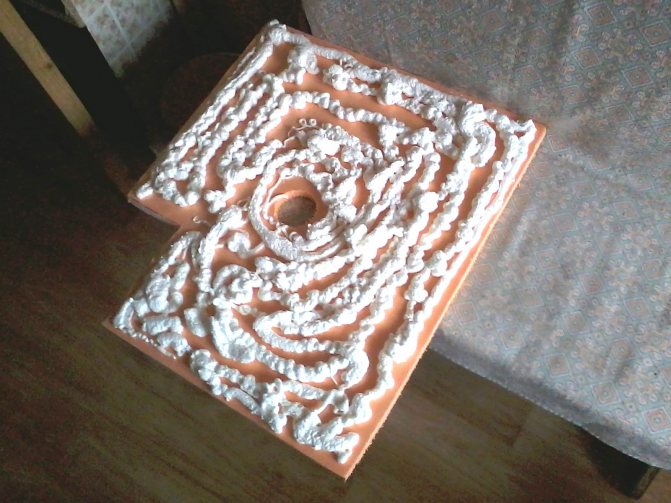
- When the preparatory stage is over, you should proceed to insulation sticker... To work, you need two spatulas: the small one applies the mixture to a large spatula, and the large one - we process the surface of the wall. If the walls are even, then you can apply a thin layer, if not very even, then it is better to apply the mixture in small piles, as in the photo.
Glue application process

The glue can be applied both to the walls and to the Penoplex sheets themselves. But it is better, of course, on the walls, because their surface has more roughness, and this will help the expanded polystyrene sheets to anchor well. After applying the glue, firmly applies and presses the heat insulator to the wall. After the penoplex is glued, you must wait at least three days for the glue to set as best as possible.
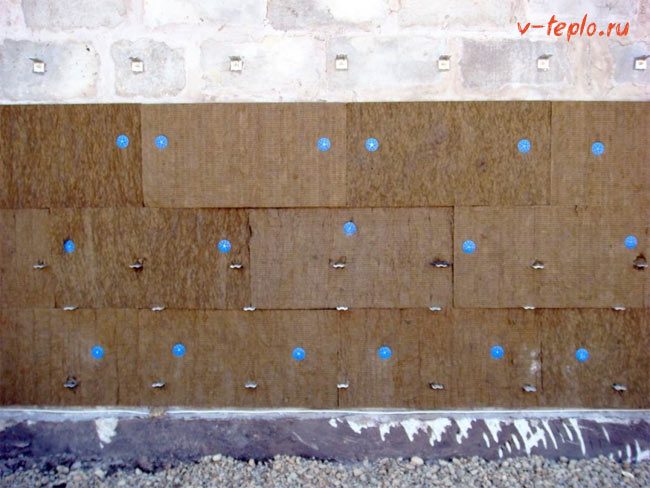
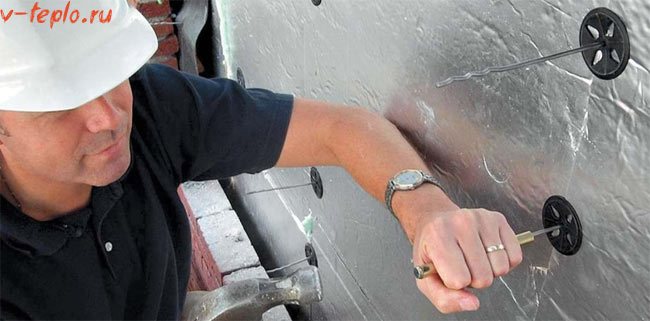
The process of attaching the "umbrellas"
After gluing, the insulation must be nailed. You need to nail on special dowels - dish-shaped umbrellas. These are plastic or metal dowels with large caps. It is better to use plastic ones, they will not attract cold like metal ones, and they cost less. However, you do not need to purchase very cheap ones - they will bend when used.
- So you need drill a hole for the dowel... The depth of this hole should be two centimeters more than the fungus. To calculate the required length of the fungi, you need to add five centimeters to the wall and one centimeter per layer of glue to the thickness of the heat insulator. Most often, 6 dowels - umbrellas need to be used on one sheet of penoplex, but if necessary, you can use more. There are several ways to arrange them (shown in the photo). But it is better to use the second option. Next, you need to insert the dowels into the prepared holes and hammer them.The hat should be flush with the foam.
- Further, when all the sheets are nailed, it is necessary check and process joints... The slots at the joints larger than five millimeters in size must be filled with construction foam. If the gaps are rather large (more than two centimeters), then additional pieces of foam must be inserted into them. Then you need to wait until the foam dries. This usually takes about five hours. Cut off any unnecessary dried foam.
- After all the work done, you need to carry out finishing the walls... First you need to carefully treat the walls with a primer, and then carefully rub with an emery float. The leveling layer should be approximately three millimeters long.
All work, painted in stages, is carried out to the leveling layer. This layer is already the last stage, after which the walls are primed and rubbed. After that, the insulation is considered complete. Following the advice described above, you can do it yourself, without the involvement of specialists, to insulate a wooden house with penoplex from the outside. The main thing is to have the desire to do it yourself and add a little patience.

Penoplex occupies one of the leading positions among modern insulation materials. It is used in both industrial and private construction, due to its excellent performance characteristics. The material also demonstrates good results when used in wooden houses. Today, the question practically does not arise whether it is possible to insulate a wooden house with penoplex, since most of the owners of log buildings have already tested this insulation in practice, and were very satisfied. In the article, we will analyze in detail the characteristics of the material, and also dwell on its types. In addition, you will learn how to properly perform foam insulation with your own hands.
Fastening materials
To fix the foam to the wall or ceiling, various adhesives can be used, as well as fastening equipment in the form of self-tapping screws with dowels or umbrellas. To understand which of these is the most convenient, you need to evaluate the pros and cons of each.
Mastic
Mastic is a composition that includes petroleum products and solvents that allow it not to solidify. Before using mastic for penoplex, it is necessary to find out whether the solvent will react with the insulation, simply destroying it. Mastics are most often used to provide waterproofing of surfaces.
They are especially useful for basements and foundations. They can be used in tandem with Penoplex "Foundation". Especially for ease of application of mastic to penoplex, it is packed in tubes for which it is easy to use a gun. When using this method, it is worth remembering that the surface of the wall must be flat so that the penoplex can lie flat.
Note! It is also important to apply mastic to the seams between individual sheets, which will not only increase adhesion, but also eliminate cold bridges.
Concrete mix
Cement-based dry mixes are used for various purposes. They are often used for laying tiles. They also occupied their niche among the compositions with which the penoplex is glued. It is possible to use such dry mixtures for penoplex when it comes to insulating a brick house or the like. Stir the adhesive strictly in the proportions indicated by the manufacturer.
Mixing the components is most convenient with an electric construction mixer. Thanks to him, lumps will not appear that would interfere with the installation. It is necessary to apply the mixture to the penoplex evenly. To achieve this, a notched trowel is helpful. After applying the glue, it is necessary to press the penoplex well and hold it for some time to set.
Note! If you add too much water to the mixture, then it will turn out to be floating and the foam sheets will not stay in place.
Self-tapping screws
Self-tapping screws are the ideal solution when you have to insulate a wooden house. For greater reliability, an additional crate is mounted, between the racks of which the penoplex is laid. Self-tapping screws should be selected of sufficient length so that they go into the wooden plane by at least 10 mm.
Polyurethane foam can act as an adhesive. It perfectly fixes foam sheets even to concrete walls. But with regard to penoplex, you should be careful when using foam. It is less reliable than any of the other options. It is necessary to apply it on the penoplex evenly, with a slight thickening in the middle.
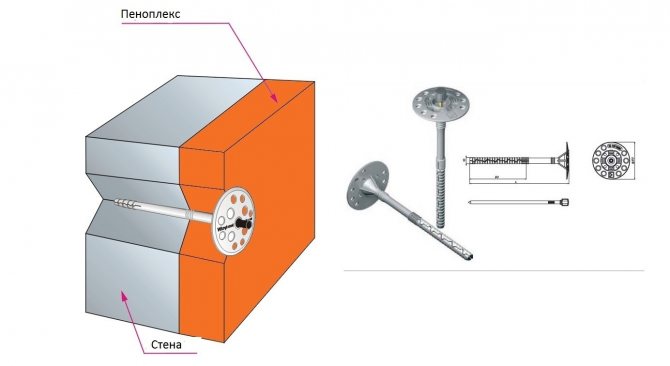
Fungi
One of the best options for attaching penoplex is fungi. The fastening element is a plastic dowel with a wide head. A plastic nail is inserted and hammered into it. With such fungi, the question of how to fix the penoplex to the ceiling disappears. The wide part of the fungus just won't let it fall.
It is necessary to acquire fungi more than the width of the foam, so that they can enter the concrete to the required depth. For installation, it is necessary to attach the insulation to the wall and drill a hole in the wall through it. After that, it is filled with polyurethane foam and a dowel is inserted into it. It is tapped with a hammer until it merges with the plane of the insulation.
Liquid Nails
Liquid nails are a versatile adhesive used for wood and metal. They are also suitable for penoplex. But there is a small caveat: the surface must be flat and well finished. Liquid nails are sold in the same tubes as silicone. You can use a skeleton gun for application.
Special glue
On sale you can also find special glue in the form of foam for penoplex. It is applied in the same way as with conventional polyurethane foam. The same pistol is used for these purposes. Such foam glue will be relevant for new flat concrete surfaces. It is necessary to apply the composition to the sheet evenly.
Note! Most often, penoplex is mounted under a facing material such as siding. In order to later be convenient to attach the siding to the penoplex, it is necessary to observe the vertical level of the wall so that the insulation does not bend or protrude. After warming the entire plane, a crate for siding is mounted on the penoplex.
Material features
Penoplex is an extruded polystyrene foam - a heater produced using a special technology, thanks to which a material with improved strength characteristics is obtained at the output. You can read about the characteristics and advantages of EPSP in the article "Step-by-step instructions for thermal insulation of a log house with expanded polystyrene".
Insulation characteristics
- Water absorption. The material shows the minimum values for the volume of absorbed liquid. At the same time, if water penetrates, then only into the upper layers, inside the structure consisting of closed cells, the access of the liquid is completely closed;
- thermal conductivity. Penoplex indicators are very low - 0.03 W / m-K, and the values remain unchanged, regardless of operating conditions. Therefore, the material can be used for thermal insulation of the roof, foundation, basement, as well as the floor and basement;
- environmental friendliness. The insulation complies with environmental standards, which is confirmed by the relevant certificates;
- vapor permeability. This indicator also has low values.The material does not let steam through itself, which, on the one hand, can be called a positive property, since condensation does not accumulate in the insulation, which, at critical values, passes to wooden walls and causes rotting. But on the other hand, the material does not allow the wood to breathe, which contributes to the creation of a greenhouse effect in the room;
- strength. As a result of applying the extrusion method, a homogeneous material is obtained, consisting of tiny cells. This structure provides high compressive strength;
- chemical resistance. The insulation interacts well with a large number of substances used in construction: alcohol-based and water-based paints, acids, alkalis, oils, concrete mixtures, etc.;
- life time. The material retains its properties for 50 years;
- fire safety. Penoplex has a G4 flammability class, which indicates a fairly high degree of flammability. Therefore, when using the material, it is necessary to use fire retardants;
- working temperatures: from -50 to + 75 degrees.
Penoplex types
The manufacturer manufactures several types of foam, which have different densities and differ in some technical characteristics. The following types are intended for insulating houses from timber and logs:
- Thermal insulation boards for insulation of external and internal vertical structures: walls and partitions. The insulation has a milled surface, which improves adhesion to adhesive and plaster solutions. Density 22 kg / m3.
- Universal insulation of the Comfort series. Suitable for finishing floors, including on the ground, plinths, foundations, roofs, walls. The material withstands high humidity well, so it can be used for thermal insulation of a bathroom, washing rooms, baths and saunas. Density from 22 kg / m3.
- Heat insulator for pitched roof. The material has a U-shaped edge on all its sides, thanks to which the plates are conveniently and easily joined. As a result, a flat surface is created, due to which the thickness of the thermal insulation is significantly reduced. Density 26-34 kg / m3;
- Slabs for foundation sheathing. The material is characterized by increased strength and wear resistance and can withstand increased loads. It is used for insulation of the foundation, floor, basement. Perfect for finishing garden paths. Density 27-35 kg / m3.
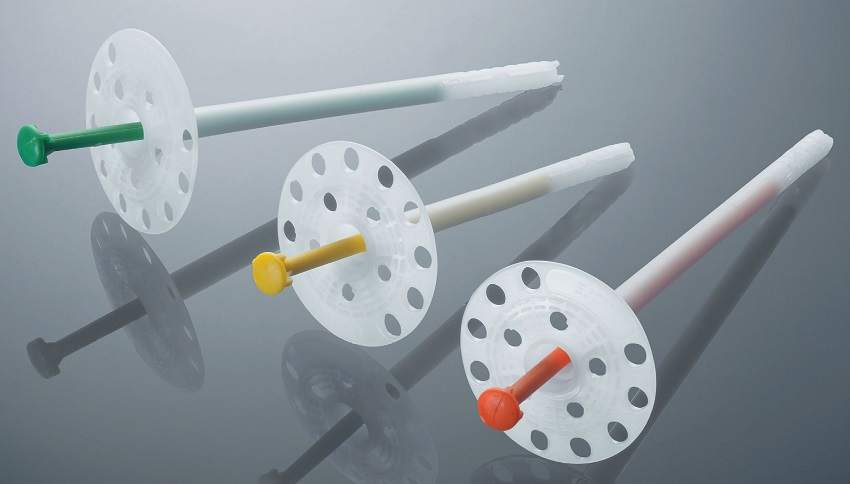
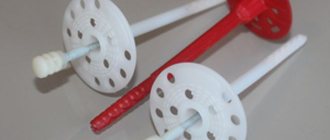
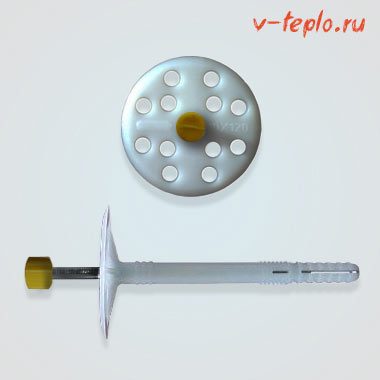
Fungi for attaching penoplex
Penoplex mount
Several types of fasteners have been developed for Penoplex, which allow the material to be used in any systems. You can fix it with dry mixes, mastics, foam and dowels. Before choosing fasteners, decide exactly with the structure of your system, whether any external dynamic or static effect will be exerted on Penoplex, whether you want the slabs to perform the function of waterproofing.
- Bituminous mastic
- TYTAN STYRO
- Dowels and cuffs
- Glue Bitumast (Bitumast)
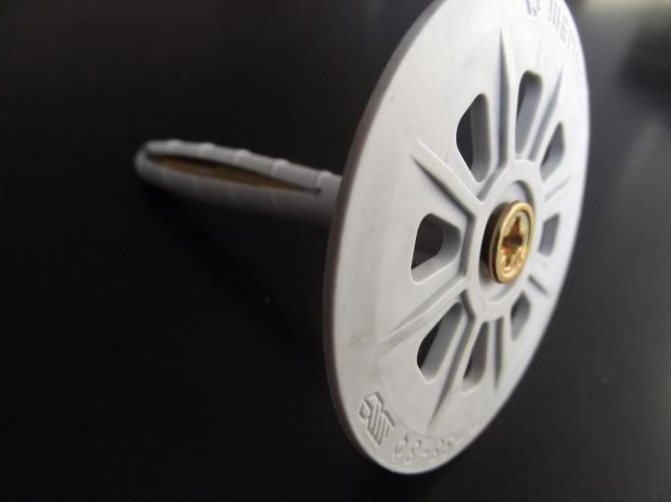
Disc dowel (mushroom dowel) - a polypropylene dowel with a wide head and a metal or plastic nail. It is used for rigid fixing of slabs to concrete, aerated concrete and brick foundations. Consumption - 6 pieces per square meter. The plastic nail is used in systems where there is a slight pull-off force on the slab, not suitable for the facades of high-rise buildings.
Bonding mastic
Bonding mastic
- bitumen-polymer pasty thick mass that does not flow down vertical surfaces. The mastic is applied to the prepared base pointwise (10 pieces per 1m2), or in strips at least four centimeters wide. Average consumption - 0.5 - 1.0 kg / m2. It is allowed to use the mastic in well-ventilated rooms, because it contains petrochemicals and a solvent.
Glue (dry mix)
Adhesive for fixing Penoplex slabs is a dry mixture with excellent adhesion properties to Penoplex, concrete, aerated concrete, brick.The finished solution is applied with a three-centimeter strip along the edge of the plate and pointwise (5-6 pieces, 8-10 cm in diameter) in the center. With the correct application of the solution, the adhesion surface area will be 40%. The thickness of the adhesive layer should be 15-25 mm.
Polyurethane foam
An excellent alternative to bulk adhesives is glue TYTAN STYRO 753
... The use significantly reduces the cost of transportation and installation.
It is widely believed among builders that Penplex is perfectly attached to any base with ordinary polyurethane foam, which is cheaper than dowels, mastic and special glue. In fact, the polyurethane foam is not intended for attaching any materials, since it cannot bear the load and collapses over time. Thus, you can only glue Penoplex to the polyurethane foam if the finished system allows the use of non-attached boards, for example, in self-leveling floor systems.
Fastening Penoplex on the plinth and facades of buildings
Penoplex on the basement and facades of buildings must be properly fixed, since then adhesive and plaster layers are applied to it, including a layer of natural stone. Therefore, an adhesive composition is applied to the wall of the building, the insulation is glued and, after drying, is mechanically fastened with dowels. This technology is also suitable for fixing polystyrene foam (expanded polystyrene) in the same systems. Polyfoam is used by those who want to save on the cost of the material, since there is no structural difference between dense polystyrene foam and polystyrene foam.
Fasteners in stock
Disc dowel with nail
Fungi for fixing insulation: types and technology of installation
Fungi for fastening insulation are common in everyday life facade fasteners, they are used to install thermal insulation to the internal and external surfaces of the walls of low and multi-storey buildings. Before choosing such consumable items, you must familiarize yourself with their varieties, as well as technological features.
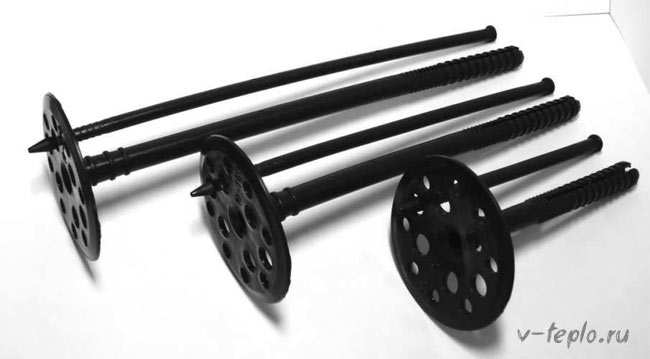
Product classification
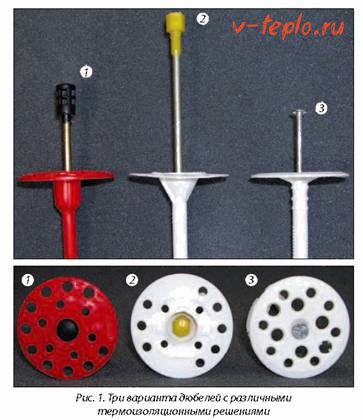
In order to meet the needs of the modern construction industry, today three types of fungi are made for installing insulation. Among them are fasteners with a polymer nail, a metal nail, and a metal nail with a thermal head.
Plastic plugs, for example, are made from polyamide, nylon or polypropylene. The main advantage of these products is their low price, but their durability leaves much to be desired.
Characteristics of plastic dowels
Plastic fungi for fixing insulation are intended for installing thermal insulation on brick or concrete surfaces, but they cannot be used to work with heavy insulation on hollow walls or foamed concrete surfaces. Today, the cost of one such fastener for thermal insulation with a polymer nail is approximately equal to two rubles per piece.
Features of metal fungi

Metal dowels are stronger than polymer counterparts, but their use is limited by the rather impressive thermal conductivity of the metal, which can worsen the effectiveness of thermal insulation. Metallic fungi for attaching insulation are able to form cold bridges, which are zones with a fairly high thermal conductivity. A dowel with a metal nail can corrode during operation, and if the installation was carried out on plaster facades, the surface can be covered with yellow rust spots. You will have to pay about 4 rubles for one such dowel with a metal nail.
Characteristics of Thermal Head Fungi
Mushrooms for attaching insulation, which have a thermal head, are common as an alternative to metal dowels. They are based on a steel nail, but the cap is covered with a metal with low thermal conductivity.In the role of a coating, impact-resistant polyamide is used, the thermal conductivity of which is 0.027 W / mk, this parameter can be compared with the same quality of a large number of popular heaters. Among other things, the metal nail is in the so-called polymer cover, which is why the dowel is not exposed to moisture and corrosion. However, you will have to pay more for all these qualities; the price of a product with a thermal head can vary from 4 to 6 rubles. per piece, the final cost will depend on the manufacturer.
Determining the length of the fastener
When the insulation is fastened to the wall with fungi, it is important at the first stage to calculate the required length of consumables. In this case, you need to be guided by the rule, which provides for the use of the formula: D = T + K + I + Z. In it, the value of T is the thickness of the applied thermal insulation, while K is the thickness of the adhesive layer, which is used to strengthen the insulation panels. The length by which the dowel will go deeper into the wall is indicated by the letter I, this value cannot be less than 4.5 cm. And finally, Z is the value that is applied when the wall deviates from the vertical. You need to use it if necessary.
Determination of the quantity
If you will use fungi for fixing insulation, the consumption per 1 square meter should be determined by you. For this, building codes and regulations should be used. To fix the thermal insulation on the internal walls or facades of one-story buildings, four fasteners must be used per square meter of insulation, each of which is located in a corner. In this case, you need to add one in the center of the panel. If we are talking about the corners of the building, then 6 fungi are required, which are installed parallel to each other. To install insulation on facades, the height of which starts at 8 and ends at 20 m, you will need 7 pieces per square meter. If you have to work with the facade of a multi-storey building, the height of which is more than 20 m, then 9 fungi will need to be spent per square meter of thermal insulation.
Length and cost
If you need fungi for attaching insulation, you can buy this consumable in St. Petersburg at different prices. For example, if we are talking about a dowel, the dimensions of which are 10 × 100 mm, and the nail has a polypropylene coating, then 2.39 rubles will have to be paid for one unit of goods. If the length increases to 160 mm, then the dowel for thermal insulation will cost 5.68 rubles. while doing so, he will have a metal nail. Fasteners with nylon nails 120 mm long will cost 3.86 rubles. Mushrooms for attaching insulation, the length of which is 120 mm, cost 6.27 rubles. in this case, there is a metal nail and a thermal head.
If you are interested in a type of fungus that has a metal nail and a thermal head, then the length of the fastener can be 160 mm, the price in this case increases to 7.74 rubles. With the same length, but with a polypropylene nail, the price will be 2.94 rubles. You can buy fungi for attaching insulation in Moscow at the same cost, if the length is increased to 200 mm, and the nail is metal, then for 1 unit you will need to pay 7.79 rubles. If necessary, you can find a metal nail, which looks like a dowel with a length of 220 mm, while the price is 9.82 rubles. Such fungi are also suitable for attaching TechnoNIKOL insulation, you can also use them with a length of 140 mm. If the nail is covered with polypropylene protection, then 2.67 rubles will have to be paid for the dowel.
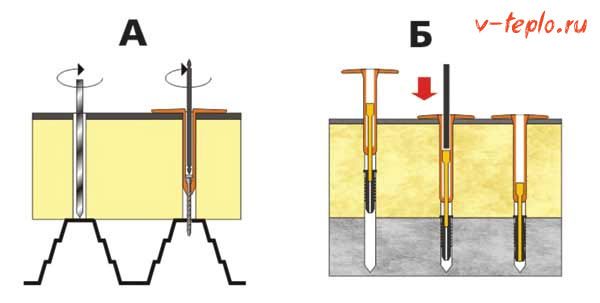
Installation technology
Whatever insulation you use, be it polystyrene, expanded polystyrene or expanded polystyrene, the technology for mounting the material using dowels will be identical. First, the thermal insulation is prepared, then the panels are installed on the glue solution, and at the next stage they are fixed with dowels.Do not forget about the need to process the joints, as well as the installation of an insulating film. At the final stage of thermal insulation, it is sheathed with finishing material or plastered. Before installing the insulation, it is important to prepare the surface, remove the plaster and repair the irregularities and cracks. In order to increase the adhesive properties of the glue, the base of the walls is degreased. Panels of polystyrene, expanded polystyrene or polystyrene foam are set on an adhesive composition that should not contain toluene or acetone, as well as other organic solvents. In order to prevent the thermal insulation from shifting under its own weight, a metal profile must be laid under the first row of plates. As soon as the solution is dry, additional fixation with fungi can be carried out. To install them, you will need holes, for making which you should use drills with a diameter equal to the diameter of the fastener leg. While the length of the hole should be more than the length of the dowel per centimeter, this will eliminate unreliable fixation if dust has collected inside the hole.
Additional recommendations
Fungi should be located at the joints of the panels, since this will not cause an increase in the holes in the thermal insulation, which can negatively affect the effectiveness of the insulation layer. If the fungus needs to be installed in a metal coating, then a self-tapping screw should be fixed to its leg, after which the fasteners are pressed into the thermal insulation with it, so that the self-tapping screw reaches the insulated surface. Then, using a screwdriver, the dowel is screwed into the metal, and the depth of the hole for the self-tapping screw should be about 15 mm. After the installation of the thermal insulation is completed, the joints formed between the panels of the insulation must be glued with reinforcing aluminum tape.
Your hairdresser wants you to know about these 10 points Very often, after visiting a hairdresser, you realize that he did not live up to your expectations. And to make the salon visit less confusing and stressful.
10 adorable star children who look completely different today Time flies, and one day little celebrities become adults who are no longer recognizable. Pretty boys and girls turn into s.
13 Signs You Have The Best Husband Husbands are truly great people. What a pity that good spouses don't grow on trees. If your significant other does these 13 things, then you can.
19 celebrities who looked completely different before gaining popularity World celebrities, whose images are now raving about millions of fans, looked completely different before. Our ideal idols had enough h.
15 Cancer Symptoms Women Mostly Ignore Many signs of cancer are similar to symptoms of other diseases or conditions and are often ignored. Pay attention to your body. If you notice.
Terribly beautiful: 15 shocking plastic surgeries that ended in failure Plastic surgery among the stars remains incredibly popular to this day. But the problem is that the result was not always perfect before.
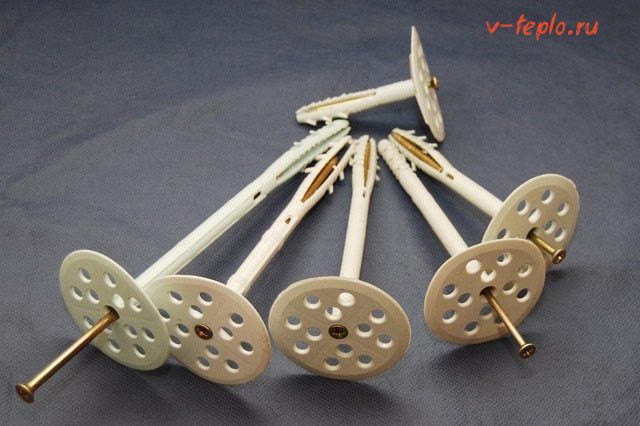
Fungus for fastening insulation The main advantages of a poppet fastening
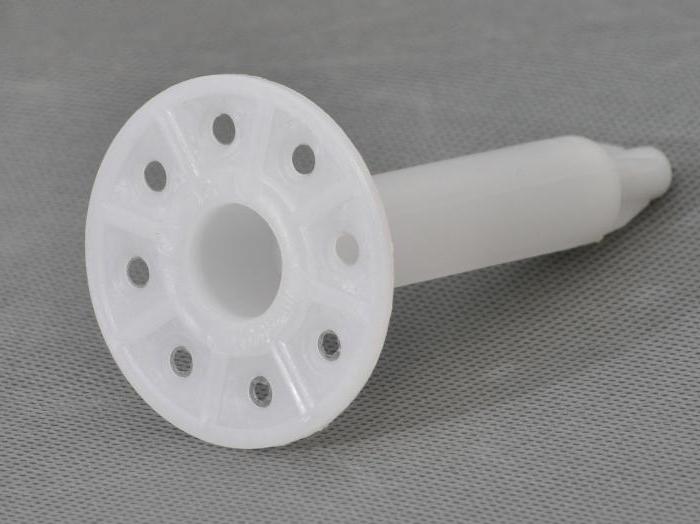
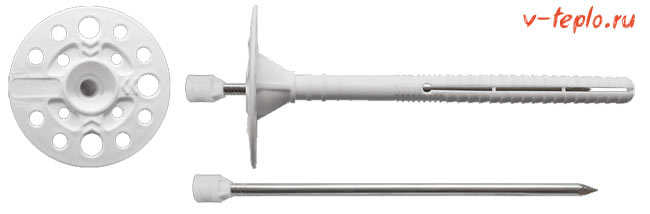
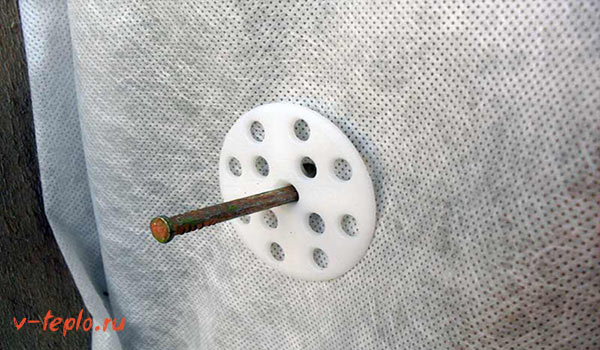
During the installation of any thermal insulation material, special dowels are used - they are called fungi for a heat insulator or umbrellas. Such products are able to reliably fix even the material that is fragile or of low density.
Using these fungi, you can attach the heat insulator to concrete, stone, brick and other materials.
As a rule, fungi are made of low pressure PE (or abbreviated HDPE), while the wedge can be made of polyamide or galvanized. The main advantages of the described element are listed below.
- The umbrellas owe their widespread use to a special design: the outer cap in them is wide enough, due to which any insulation (up to mineral wool) is reliably fixed.
- Having a long stem, the umbrella is able to withstand very significant bearing loads. Moreover, the fastening is strengthened by the long brace zone, which therefore consists of 3 sections. The cap itself is somewhat rough, it also has special holes.
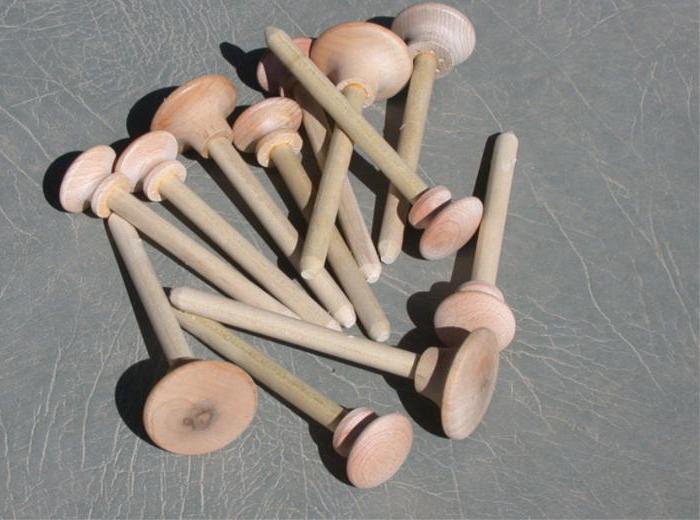
- Dowels for a heat insulator not only contribute to heat saving, but also have increased anti-corrosion properties. And if you compare them with the already outdated corks made of wood, then plastic umbrellas do not rot or degrade.
- Plastic is a reliable and durable, but at the same time cheap material.
- The umbrellas themselves are flexible enough to compensate for the narrowing / expansion of the surface in order to avoid damage to the insulation.
- In order for the connection to be as reliable as possible, the fungus inserted into a special hole using a wedge must be expanded. What is characteristic, the expansion is carried out at once in all directions, due to which the adhesion to the working surface is only enhanced.
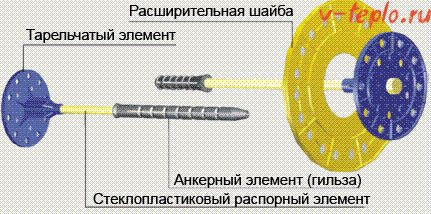
- Umbrellas with plastic anchors are products that represent a rod with a round cap and a spacer. In the manufacture, polypropylene is mainly used. The main difference between such dowels is that there are conical holes in their outer cap, which, in fact, provide the most reliable fixation of the heat insulator. The thermal conductivity of the umbrella does not exceed 0.004 W / K, it can be used at temperatures from minus 40 to plus 80 degrees. To determine the length of the umbrella, it is necessary to add up the thickness of the insulation layer and the height of the spacer. The load that such a fungus can withstand for attaching insulation is 20-380 kilograms. Elements are used to fix heat insulators with low weight (for example, the same mineral wool) to concrete, brick and stone. Main advantages: affordable cost, resistance to chemical attack, high adhesion to the surface. Disadvantage - heavy cladding material cannot be attached over the thermal insulation layer.
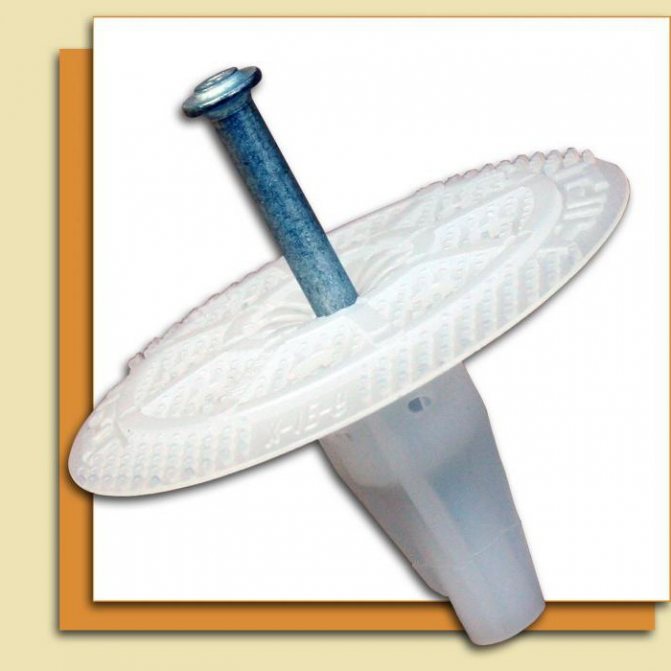
- Dowels with an iron anchor include a metal nail with a large cap and the actual expansion part. In the manufacture, a special polypropylene is used (resistant to impacts), while the rod is made of galvanized. The nail is covered with a special anti-corrosion layer, which significantly extends the service life of the entire cake. The spacer element can have a diameter of 0.4-0.8 centimeters, the umbrella itself can be operated at temperatures from minus 55 to plus 60 degrees. Typically, the ultimate bearing load in this case is 750 kilograms. The standard dimensions of the fungus are 20x1 centimeters.
Note! Such fungi are used to insulate ceilings and facades of buildings. Their main advantages include the fact that heavy facing material, as well as plaster, can be laid on top of the thermal insulation layer. As for the minuses, here it is only one: the so-called "cold bridges" are formed. - Umbrellas with a thermal head. The design of these products is as follows: a rod made of steel, a spacer sleeve equipped with a cap; a plastic head is put on one end of the rod.Due to the fact that the nail is metal, even rather heavy materials can be used for insulation. Thanks to the presence of a thermal head, heat loss is minimized to almost zero. The use of these umbrellas involves the installation of a heat insulator on a wooden surface. Advantages: resistance to chemicals and various manifestations of the environment, the ability to perfectly endure even the most significant loads (but not more than 0.92 kN). The downside is more than high cost.
- made of metal (we are talking exclusively about the core);
- made of plastic.
How to calculate the thickness of the insulation
Earlier we talked about how to make calculations of the required thickness of the wearer at home, in addition to this article, we advise you to read this information, read about it here
The main types of blocks for insulation
Any dish-shaped dowel consists of a sleeve, a core and a wide head. Below are the main types of fungi.
Video - Types of fungi for fixing a heat insulator
It is also worth adding that there are still threaded dowels that can simply be driven into the work surface. They are produced in two versions:
The cost of iron fungi is approximately twice as high, but they are also able to withstand much more weight. Scope of application - fixation to thin or hollow materials. Plastic dowels, in turn, are divided into:
- PP (made of polypropylene);
- nylon (used for surfaces made of any material).
It is also worth highlighting the roofing fungi. They are intended for installation of soft roofs, acoustic slabs or thermal insulation to a concrete surface. Such products consist of a 5 cm cap, fiberglass rod or self-tapping screw and anchor.
Note! An element made entirely of plastic is preferable to use for thermal insulation of walls. This is explained quite simply: iron conducts cold well, therefore, the notorious "cold bridges" will form along the entire length of the metal rods.
Operating principle
Despite the fact that technical progress is truly leaps and bounds, and building materials are constantly being improved, the dowel described here (or a fungus for attaching insulation) is attached in the same way as before - it holds due to the fact that it is acted upon by the holding force of friction. It is worth noting that this force is so significant that this method of attachment is not in vain called one-time: if you remove the umbrella from the hole, it will simply collapse.
Of course, there is another way to hopelessly ruin the element - you just need to pull it out along with the insulation material. To avoid all this, it is imperative that you ensure that the seat is equipped correctly. It is important that the opening for the umbrella fully matches the required depth and diameter. Chips and cracks in the holes are unacceptable, as well as the presence of assembly dust in them.
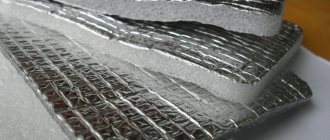
Insulation with foil
Earlier we talked about the advantages of insulating material with foil, its technical characteristics and cost, in addition to this article, we advise you to read this information, read about it here
How to correctly calculate the length of the fungus for insulation
In most cases, the following formula is used to determine the required length:
Let's figure out the conventions. They look like this:
- E
- this, of course, is the required dowel length; - BUT
- the thickness of the insulation material itself; - AT
- this includes the thickness of the previous plaster, as well as the glue; - WITH
- the depth of penetration into the working surface (wall), which should be at least 45 millimeters; - D
- an approximate margin, which is required with minor deviations in the plane of the working surface.
Although if you do everything "by eye", the procedure will look even simpler: 40-45 millimeters are added to the thickness of the thermal insulation material for deepening, then another 10 millimeters for the remaining layers of the cake. For example, the thickness of the insulator is on average 50 millimeters, which means - if you make simple calculations - it will require a fungus 105 millimeters or 10.5 centimeters long.
Note! If the walls are made of brick or concrete higher than the "fiftieth" mark, then an anchor element 0.5 centimeters long is quite enough. But if we are talking about loose concrete, hollow bricks or load-bearing walls, as well as other loose materials, then it is necessary that the length of the anchorage is about 10 centimeters.
Installation of insulation using special fungi
And now let's figure out how the insulation procedure generally takes place with the use of such fasteners. Let's make a reservation right away that there is nothing complicated about this, so you can easily cope with the work with your own hands. Below are the main steps in this procedure.
Stage one. First you need to prepare the base.
Stage two. Next, an insulating material is glued to a special solution.
Stage three. Then the fastening is performed, for which the already known disc dowels are used (this is also the name of the fungus for fastening the insulation).
Stage four. All joints are carefully sealed.
Stage five. A hydro and vapor barrier layer is installed.
Stage six. The surface is plastering using a fiberglass reinforcing mesh (if necessary, of course).
Stage seven. At the end, the final finishing is done.
Let's consider in more detail the technical aspects of the insulation procedure.
First you need to prepare the surface. For this, the previous plaster is cleaned off, all depressions and protuberances are removed, so that a flat surface is obtained. Then the insulation is attached to the work surface using a special adhesive mixture. If the surface is sufficiently flat, a notched trowel can be used for application; although in most cases the mixture is simply thrown onto the slabs in small heaps.
So that the first row does not fall under the weight of the subsequent ones, the so-called starting bar is attached at the bottom (you can make it from a metal profile or a rail), where the sheets will rest. Then, when the glue is completely dry (as a rule, this takes from two to three days), the sheets are finally fixed with the described fungi. First, holes are made in the appropriate places using a perforator. It is important that the drill used is the same thickness as the leg of the fungus.
The depth of each hole should be about 0.5-0.7 centimeters, so that the fungus is completely clogged there, regardless of whether there is assembly dust there. The number of dowels for one insulation plate depends on the height of the ceilings and their (slabs) location.
- If we are talking about an ordinary site, then it should be fixed at the rate of five fungi per square meter.
- In the case of corner areas, this number can be increased to six.
- If the height of the room fluctuates between 8-20 m, then the number of umbrellas will already be seven pieces per square.
- Finally, if the ceiling height exceeds 20 m, then one square of insulation is attached in 9 places.
It is advisable that the points of the fasteners are located at the joints of the sheets - this way you will be able to avoid the formation of additional holes "for ventilation", moreover, after the installation is completed, the edges of the plates will not be bent. In the image below, you can see what several common fastening methods look like.

Note! If the sheets of insulation should be attached to a surface made of metal or to a corrugated board, then first insert a self-tapping screw into the dish-shaped part, and then screw it all up with a screwdriver.
Next, the insulation is pushed through with a fungus to the very base. The screw is screwed into the metal in such a way that the cap fits as tightly as possible to the thermal insulation material. It is important that the self-tapping screw goes deep into the base by at least 1.5 centimeters.
More detailed instructions are shown in the image below.
Then all joints are carefully sealed with thermo-retractive metallized tape. If there are gaps of more than 0.5 centimeters, then they can be blown out with polyurethane foam. Although this should be done with utmost care, since some types of foam can corrode a polymer heat insulator.
If the construction of a ventilated facade is planned, then the mineral wool must be closed from above with a special membrane for hydro and vapor barrier. Although there are exceptions - heaters that absorb moisture poorly (polystyrene, for example, or polyurethane foam).
During plastering, the surface is covered with a 3 mm layer of adhesive, which will serve as a protection. The composition must be applied evenly, therefore it is preferable to use a notched trowel for this. Next, a reinforcement mesh made of fiberglass is pressed into this layer, while an overlap of ten centimeters is observed. For the final leveling of the working surface for finishing, the walls should be treated with the next layer of mortar and leveled using a long rule. The video below demonstrates how the thermal insulation material is installed if a fungus is used to fix the insulation.
Video - Installation of insulation with umbrellas, 4 cm
Video - Thermofix Fisher thermal insulation dowel
As a small conclusion
If you are planning to insulate your house, then adhere to the technology without fail, which means that it is absolutely not recommended to save on fasteners. Otherwise, they will not be able to withstand the mass of plaster and will collapse along with the entire thermal insulation "pie". In particular, this applies to the corner zones, as they are known to be the most loaded with gusts of strong winds.
- Self-tapping screws for fastening drywall to a profile Types of fasteners for drywall: self-tapping screws, screws, anchors Drywall has become a popular building material. After all, with him ...
- Apollo - high-quality Chinese sanitary ware The company began its activity back in 1982, but for the release of shower cabins and ...
- Simple and Delicious Homemade Baking - Tips for Beginners If you've never made buns, don't worry, you can still catch upBy baking at home - they decide ...
- Toilet leaking - repair tips Toilet device Necessary repair tools Possible malfunctions Do-it-yourself tank repair Leaking toilet - ...
Insulation installation recommendations
In most cases, external insulation is practiced in private houses, which, with competent performance of work and accurate calculations, provides effective thermal protection of the entire structure. External thermal insulation allows you to move the dew point towards the insulation, and thereby protect the walls from the formation of condensation.
In addition, penoplex has low vapor permeability, which is why it is not recommended to use it inside the house. It is possible to neutralize the negative consequences if you equip a high-quality ventilation system.
Thermal insulation of walls outside and inside the house
Over time, the fastening will weaken, causing the slabs and finishing cladding to settle, leading to cold bridges and loss of appearance. The same can happen with the frame finish.
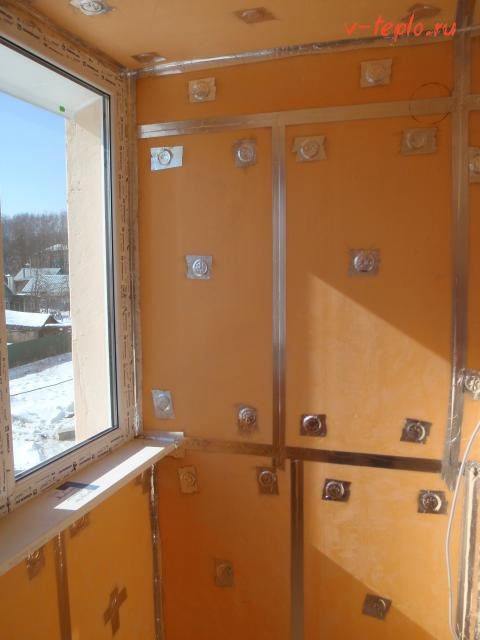
Therefore, many people have a question: how to fix penoplex to a vertical surface? Experts say that one cannot be limited only to gluing or laying insulation in the cells of the frame. In both cases, it is also necessary to fix the heat insulator with special fasteners-mushrooms with wide covers.
In frame houses, penoplex is placed inside the frame, where it is glued and additionally fastened with dowels.
Thermal insulation of a log house from the outside can be done in both ways.For thermal insulation of a house made of 150x150 timber and internal structures, it is better to choose a frame option. There should be a small space between the insulation and the walls of the house, in this case the air will circulate freely and prevent moisture from the wood.
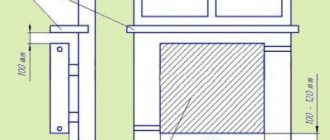
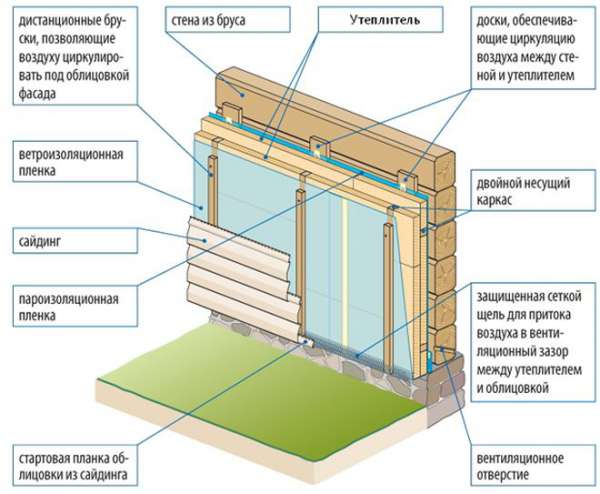
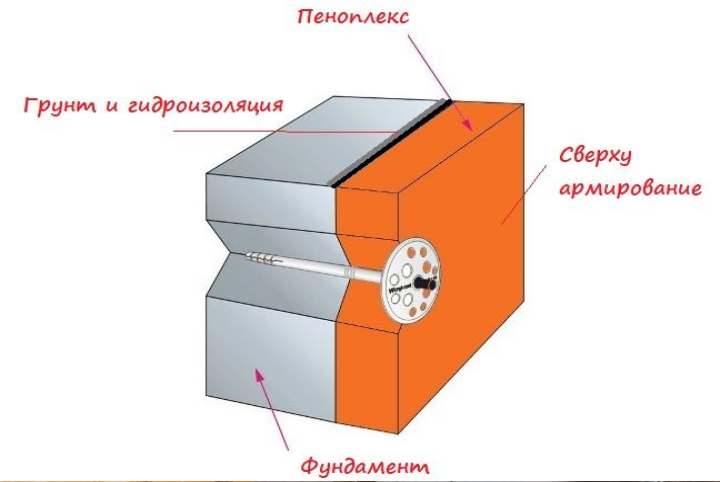
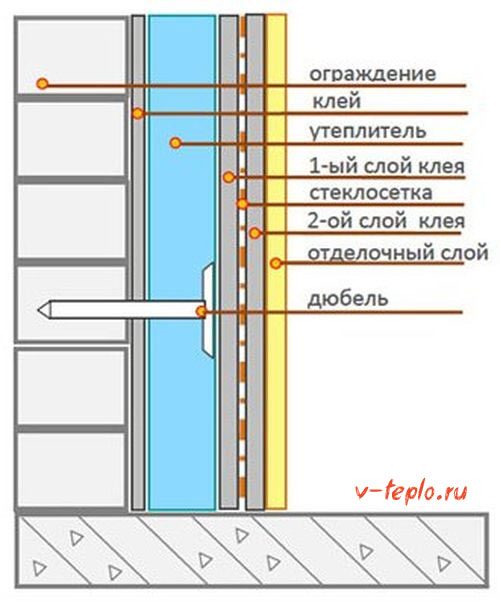
Thermal insulation scheme for the outer walls of the house
Due to the roundness of the logs, log walls have gaps where air enters, the surface of a log house is flat, which makes natural ventilation impossible.
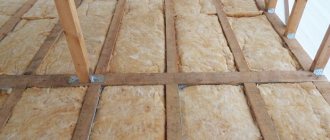
For the lathing, a bar with a section of 25x50 or 50x50 mm is used. The installation of the frame must be done in such a way that you get squares, where the insulation plates will then be laid.
To give greater rigidity to the insulated structure and prevent the entry of cold into the house, it is better to lay the penoplex in two layers. Sheets are installed offset or in perpendicular directions. In the second case, a counter-lattice is made for laying the top layer, the slats are placed perpendicular to the guides of the main frame.
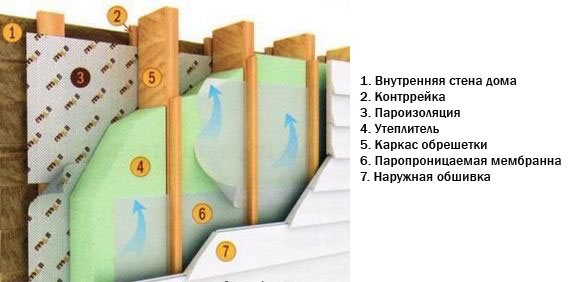
The facade insulation scheme for siding is as follows:
- vapor barrier film;
- wooden crate;
- thermal insulation;
- hydro-windproof film;
- finishing material.
When insulating inside the house, the same scheme is used, but the waterproofing will be located between the wall and the insulation, and the vapor barrier should be under the decorative cladding.
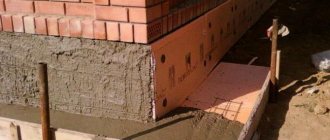
Insulation of the foundation
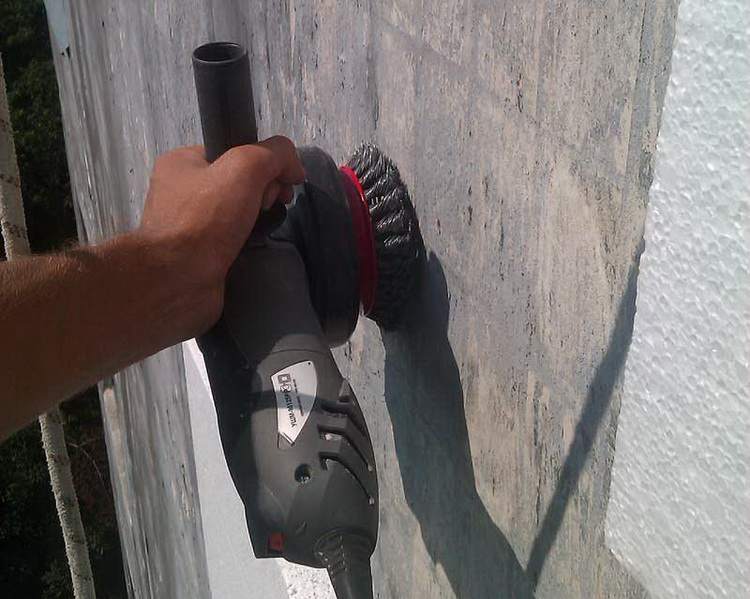
- To improve the adhesion of the base with the adhesive, it is necessary to carefully prepare the insulated surface: clean it of debris, dust, dirt. This is best done with a grinder.
- Bituminous waterproofing mastic is applied in a thick layer to the prepared base.
- Roofing material is glued, first the lower part of the foundation is glued, then the upper one. The strips of material should overlap each other on a horizontal surface - by 10 cm, at the corners of the house - by 15 cm. For reliability, it is recommended to close the foundation with another continuous layer of roofing material.
- Penoplex plates are glued to the waterproofing. To do this, you should use either a water-based bitumen mastic or an adhesive specially designed for working with expanded polystyrene. The glue is applied to the boards in 5-6 places pointwise, when gluing it should cover at least 40% of the surface area.
- The installation of the insulation begins from the bottom, the sheets are tightly pressed against the surface and the adjacent panel, while it is necessary to combine the groove-ridge joints. Plates located above ground level are additionally fixed with mushroom dowels.
How to insulate a wooden floor
Thermal insulation of a wooden floor with penoplex is usually performed along logs. Warming is done in the following order:
- Installation of a rough floor.
- Laying the waterproofing layer.
- Installation of foam boards.
- Fixing the insulation with self-tapping screws.
- Filling the gaps between the boards with foam.
- Laying a vapor barrier film.
- Placing the finished floor on the beams.
- Installation of finishing coating.
In more detail, the technology of floor insulation in a wooden house from below along the logs, as well as the rules for installing insulation under a concrete base, are described in the article "How to properly insulate the floor from below - rules and nuances."
Penoplex differs in that it can be laid directly on open, dry and well-compacted soil. This type of insulation is usually used under a concrete screed.
In this case, the following laying pattern applies:
- A layer of compacted gravel 30 cm is laid below.
- This is followed by a layer of sand, compacted to a thickness of 10 cm.
- Then they put penoplex 100 mm thick (thinner sheets can be laid in two layers perpendicular to each other). The plates are glued together with a special metallized tape.
- Next, a waterproof film is laid.
- A fiberglass mesh is laid on top.
- A 5 cm thick screed is poured from above.
Mounting methods
The installation method is selected based on the following factors:
- the quality and type of the processed surface;
- wall load level.
Fasteners can be made using dowels, self-tapping screws, glue or foam.
Each method has its own advantages and disadvantages.
Fixing with dowels
This method is usually used when it is necessary to ensure the high strength of the thermal insulation coating. Dowels are used if the installation of a heavy finishing coating is planned.

Dowel mounting
Fastening can be carried out on plastic or metal dowels. The cost of plastic products is lower and they do not transmit cold.
The main disadvantage of this method of fastening is the likelihood of cold bridges. The fact is that drilling the material can lead to a violation of the tightness of the product.
Fastening with glue
The glue is not very strong
For fastening, you can use solutions of different structure, their choice is made based on the characteristics of the treated surface.
For the foundation, the best solution would be glue with a bitumen base.
Mixtures with the addition of cement or polyurethane are often used.
This mounting method has its drawbacks:
- low adhesion strength. It is better not to use this method for finishing surfaces that will be heavily loaded;
- the possibility of material damage. This can happen with the wrong choice of adhesive solution. When processing penoplex, you cannot use mixtures containing aggressive chemicals such as acetone, xylene, benzene, toluene and others. For a full description of fixing the insulation to the wall, see this video:
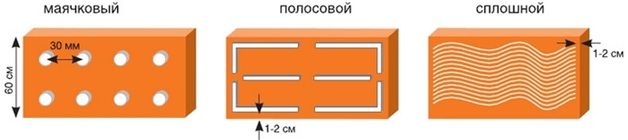
You can see the methods for applying glue in the following diagram.
Fastening with polyurethane foam

Foam has good adhesion to plastic and plaster surfaces
Fastening the foam to the wall with foam is used as an addition, for example, to dowels. To implement this method, it is necessary to treat the base of the material with polyurethane foam.
This mount is the best choice for plaster or plastic surfaces. The material is readily available and the processing method is simple enough that even a beginner in the construction craft can handle the job.
It is not recommended to use foam as an independent fastening, as it may collapse over time.
Fastening with self-tapping screws
Self-tapping screws can create cold bridges, which makes insulation ineffective.
This method has more disadvantages than a method similar in technology - fastening with dowels.
Self-tapping screws are quite narrow, so they are placed in the plate itself in several pieces.
Because of this, a large number of cold bridges appear, due to which the thermal insulation properties of the material are violated.
With the help of mushroom dowels, fasteners can be made in the corners between the slabs. Consequently, the dowels are less likely to violate the integrity of the coating, which allows you to maintain good thermal insulation in the treated room.