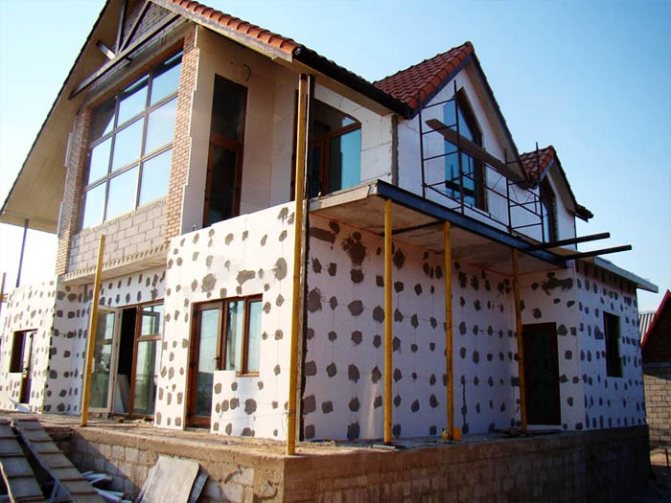

What it is?
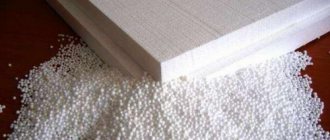
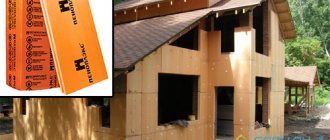
Today, the assortment of various finishing materials is so great that one can simply get confused in its wealth. So, one of the most popular coatings with many positive qualities is extruded polystyrene.
This product is a special synthetic material that was first seen in the United States in 1941. Currently, polystyrene is used for a variety of purposes. It is to this raw material that they turn to when insulating structures such as foundations and roofs. In addition, extruded polystyrene makes good contact with facade plaster.
The choice of plaster for finishing expanded polystyrene
Advice! Do not finish the polystyrene foam with a mixture of sand and cement. For a long time, such a plaster will not last.
For plastering work on expanded polystyrene, you will need a special facade plaster. Below are the general characteristics of the most suitable types of styrofoam plaster:
- Mineral compositions. Mixtures consisting of sand, cement and various additives. They are distinguished by their low cost, but the quality is inferior to acrylic ones.
- Acrylic materials. They are made on the basis of acrylic resins. To increase their effectiveness, various additives are included to ensure high quality. This compound was specially developed for working with insulated façades.
When using compositions based on acrylic mixtures, there is no need for special surface preparation of extruded polystyrene foam. The use of this type of facade plaster allows you to create decorative and textured elements.
In fact, the given materials constitute only a small part of the compositions that are intended for processing expanded polystyrene and its derivatives. Leading places in the unofficial rating of plaster in terms of polystyrene are occupied by mixtures of the following trade marks Knauf, Ceresit, Polirem, and Kreisel.
When choosing a material for finishing expanded polystyrene, you need to pay attention to its fire-fighting properties. This is an important point, most materials based on polystyrene have low resistance to high temperatures and open flames.
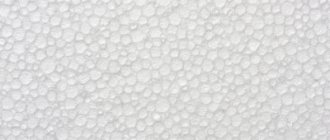
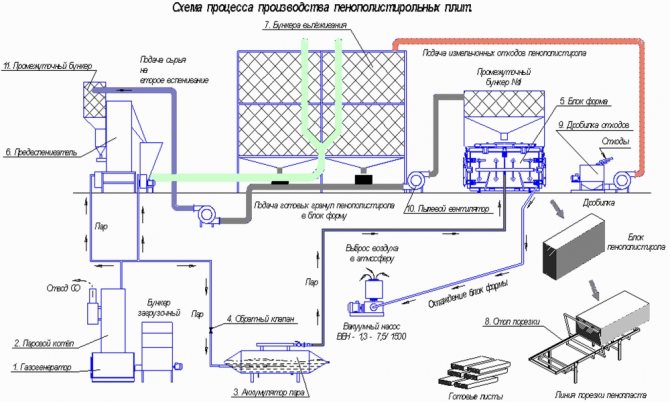
Features of production
Paying attention to the name of this popular material, we can conclude that it is one of the forms of deeper processing of foamed polymer raw materials, which is obtained due to the condensation of styrene under the action of catalysts in organic solvents.
The performance characteristics as well as the advantages and disadvantages of this material are due to the process and its manufacture.
- First, the feedstock is taken, represented by small particles placed in the reactor. There, under conditions of high temperatures and pressures, these components are saturated with a special gaseous component.
- After the pressure is released, the mass begins to expand rapidly, like foam. At the same time, it gradually cools down and acquires all the properties necessary for a solid.
- The hot and viscous mass is passed through extruders. Thanks to these actions, the polystyrene becomes denser and similar to multilayer plastic.
As a result of these stages of work, a special extruded material is obtained. In its immediate structure, polystyrene occupies only 1–2%.The remaining components are air purified from water vapor, which has a characteristic minimum thermal conductivity.
The main feature of extruded polystyrene (EPS) is its zero moisture and gas transmission. This modern and high-tech material does not allow water vapor to pass through its structure, like, for example, the well-known mineral wool.
Over time, polystyrene does not fill with water and does not lose its thermal insulation characteristics. You will not have to face such problems even if the installation of the material was not entirely correct, and the dew point fell on the surface of the insulation.
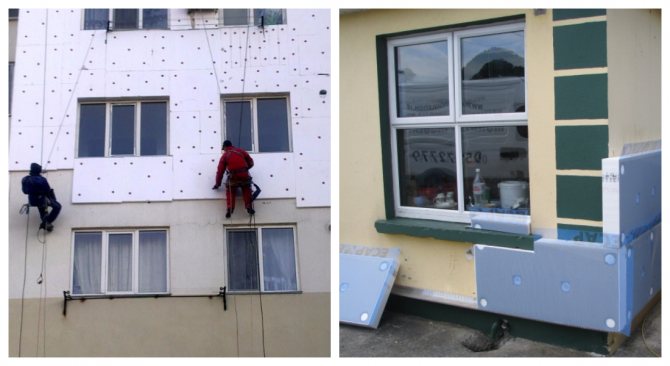
Plastering on extruded polystyrene foam (VIP access)
To get out of this situation, it was necessary to solve three questions:
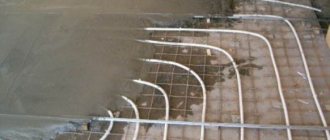
- Fix the reinforcing fiberglass mesh on the smooth surface of the expanded polystyrene:
- Ensure reliable adhesion of the leveling layer of plaster with expanded polystyrene (or rather, with a fiberglass mesh applied to the extruded expanded polystyrene);
- Remove the negative influence of the sun on the work;
Fastening the facade fiberglass mesh to the smooth surface of extruded polystyrene foam.
For a reliable connection of the reinforcing fiberglass mesh and expanded polystyrene on the Internet, you can find a recommendation - to process the surface of the insulation with sandpaper. This will have some effect. If further finishing is limited to structural plaster, this treatment will be sufficient. This may not be enough for a facing layer of ceramic tiles.
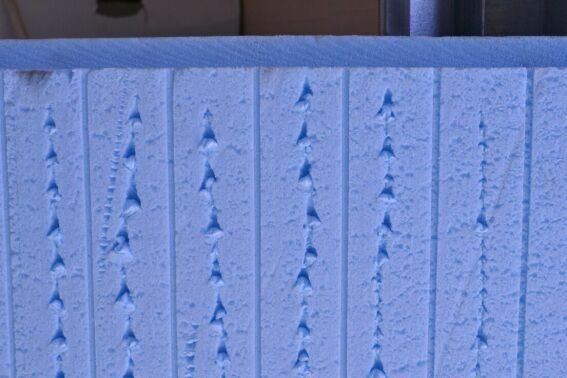
scratched polystyrene foam
Therefore, in order to provide a more reliable adhesion on the surface of the extruded polystyrene, we scratched the grooves with a nail. The stripe pitch is 10 centimeters. The stripes are not solid - dash-dotted. The nail pulls out pieces of insulation up to one centimeter deep.
And then everything is as usual. Application of glue to the surface (in our case, thorough filling of the formed recesses in expanded polystyrene). Fastening the facade fiberglass mesh by rubbing it into the glue. Applying an additional layer of glue to the fiberglass.
Naturally, glue must be used specially designed for this work.
Only, for the first layer, designed to fill the depressions, you can use the most expensive available. This is the most vulnerable area for fixing the tile to the base.
Provide reliable adhesion of the leveling plaster to the facade fiberglass mesh.
Any adhesive for ceramic tiles will give a secure adhesion to the fiberglass mesh.
After all, extruded polystyrene foam remains the weak link, and the glue manufacturer will not play a role here.
It would be possible to level the surface with one glue (this is usually the case, and we do it with a small layer, 2-3mm). But with a layer of 5-7 mm, the amount of glue required leads to a significant increase in cost. It is better to replace it with a cheaper outdoor plaster "Ceresit CT29" or a ready-made dry cement-sand mixture. For large layers, you can use the usual cement-sand mortar M100, prepared from sifted sand.
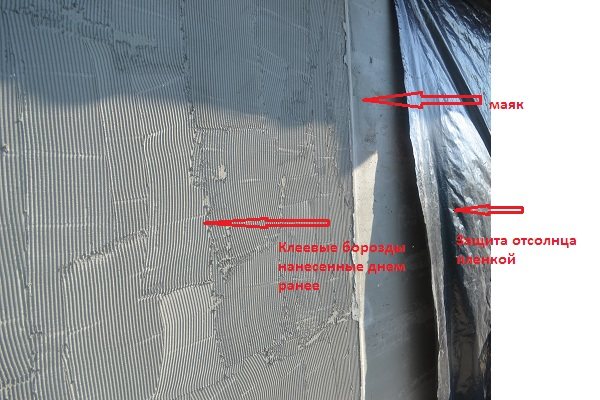
But the solution will not adhere to the smooth surface of the facade fiberglass mesh. Therefore, such a trick was applied here.
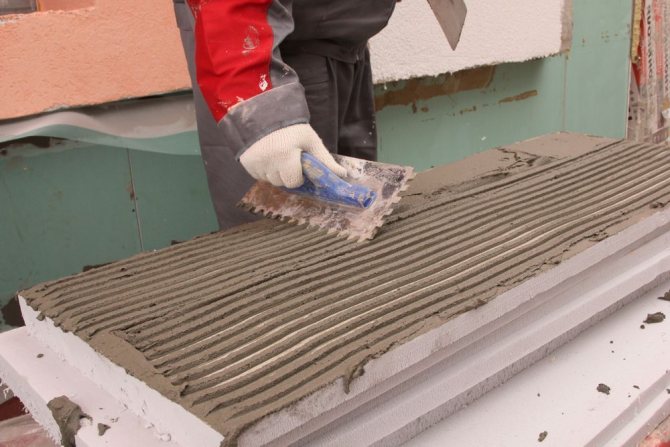
Glue grooves were applied to the wall surface with a notched trowel. The trowel used was 4-5 mm notches. The glue used was the one that was brought for gluing the ceramic tiles.
The next day, when the glue grooves were dry, Ceresit CT29 plaster was applied to the surface of the extruded polystyrene foam.
Surface prepared for plastering
During all these works, no primer was used.Extruded polystyrene foam practically does not absorb water and therefore does not draw water from the adhesives. That makes it possible for the mixtures to gain the required strength grade.
The use of adhesives at elevated air temperatures.
In the instructions of almost all adhesives, a ban is written on the production of work at an outside air temperature above 30 degrees. Not everyone reads the instructions. But in vain.
In such a heat, there is an intense evaporation of moisture from the prepared mixture. That is, some part of the cement will not have enough water for the reaction, and it will not turn into cement stone. If cement was added to obtain a strength equivalent to a grade of 100, then in heat this grade may be M70 or M50.
Which is what happened in our case.
To solve this problem, all work was carried out in the direction of the sun.
The working day began on the northern part of the building. Then we moved to the east. After 16-00 work was carried out on the southern part. On this wall, after applying the plaster, the surface was covered with a film. At first glance, the black film should be heating up, and there is little to help lower the temperature. The film was indeed heated, but the wind was blowing under the film, and the wall was cold. The film created an additional effect. It increased the humidity of the environment in which the hardening process took place, which contributes to the gaining of the strength of the solution.
The works on the western wall were left for the autumn period. The dark styrofoam surface remained hot even as the sun went down.
I think if the work was carried out on a non-insulated wall surface, the effect of temperature would be less. The wall would distribute solar heat throughout the entire massif.
And the dark foam heats up instantly, at the first rays of the sun.
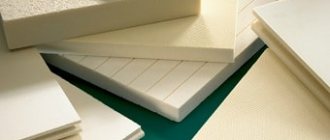
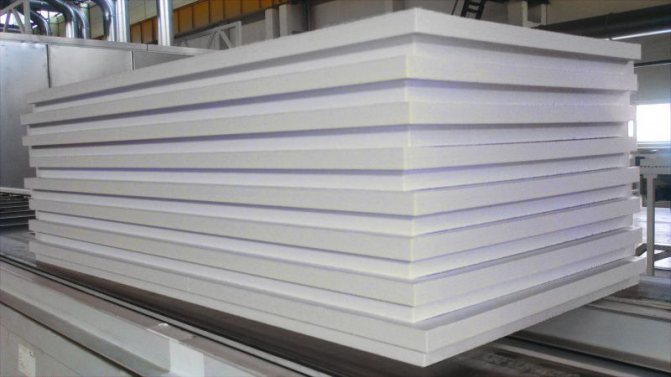
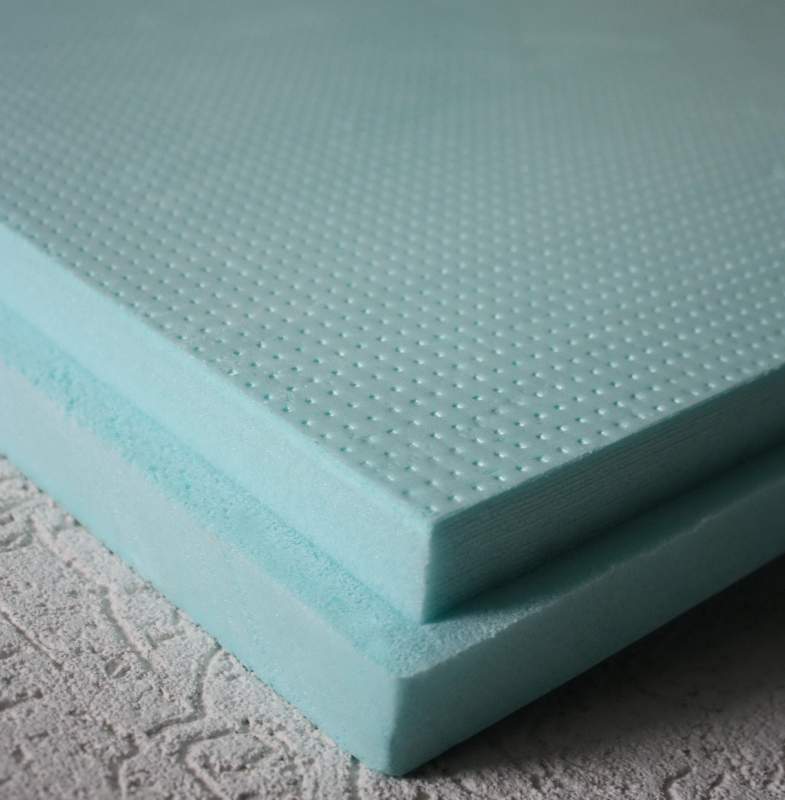
Properties and characteristics
Currently, extruded material is produced by many large and well-known manufacturers. Typically, the performance and properties of different products are almost the same. This also applies to their dimensional parameters.
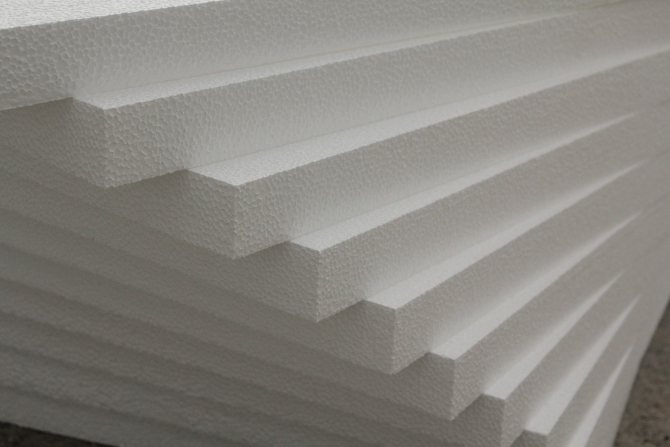
- So, the thickness of expanded polystyrene plates most often ranges from 20 to 150 mm.
- The standard dimensions of expanded polystyrene plates are 600 x 1200 mm, 600 x 1250 mm, 600 x 2400 mm.
- Their level of thermal conductivity can range from 0.03 to 0.032 W / mS.
- With regard to the index of density in compression, then at 10% linear deformation, it is 150 x 1000 kPa.
- The percentage of moisture absorption is usually 0.2–0.4%.
- Flammability class from G3 to G4.
- The level of vapor permeability is 0.013 Mg.
- Density - 26–45 kg / cubic meter. m.
Manufacturers and sizes
Modern manufacturers produce extruded polystyrene foam with various technical characteristics. Currently, there are three leading brands, whose products are considered the most popular and widespread:
- Penoplex;
- Technoplex;
- Ursa.
Let us consider in detail what characteristics and properties the EPS of these manufacturers have.
Evgeny Filimonov
Ask a Question
Expanded polystyrene "Penoplex" is a popular domestic product that is found in many stores and is in great demand. Such materials are used for both civil and industrial construction.
Let's get acquainted with the main characteristics of polystyrene foam of this company.
- The thickness of EPS "Penopless" can be - 2, 3, 4, 5, 6, 7, 8, 10, 12, 15 cm.
- The dimensions of the sheet are - 60 x 120 cm, 60 x 240 cm.
- The level of thermal conductivity is 0.03-0.032 W / m C.
- Compressive strength is 0.2–0.5 MPa.
- The level of water absorption does not exceed 0.4%.
- The flammability class of the material is G4.
Ursa is a large international company with representative offices in Russia. At the moment, this manufacturer produces three types of extruded polystyrene foam.Ursa materials have the following technical characteristics.
- The thickness of the materials is 3, 4, 5, 6, 8 and 10 cm.
- The length and width of all EPS sheets is the same and is 60 x 125 cm (there are also other dimensions on sale, for example, 50 x 600 x 1250 mm).
- The level of thermal conductivity of EPSP sheets is - 0.032-0.034 W / m C.
- Compressive strength ranges from 0.25 to 0.5 MPa.
- The material absorbs moisture by 0.5%.
- Flammability class G4.
Technoplex produces expanded polystyrene sheets with the following parameters.
- Their thickness can be 3, 4, 5, 10 cm.
- All sheets have standard dimensions - 60 x 120 or 58 x 118 cm.
- They are characterized by a high coefficient of thermal conductivity.
- Materials from Technoplex absorb moisture worse by 0.2% than raw materials from Penoplex.
The products of these brands are in great demand in our country and comply with all GOST standards. High-quality expanded polystyrene of these companies is in demand due to its excellent performance characteristics, long service life and easy installation.
Of course, these are not all large manufacturers whose products are popular today. For example, today products such as Ecotherm, Onda LLC, TechnoNikol (popular product - XPS) and many others are no less in demand.
If you want to buy really high-quality polystyrene foam, then you should contact a trusted brand store. Don't look for too cheap materials - EPS is already an affordable thermal insulator.
Benefits of functional plastering materials
- Designed for operation in difficult climatic conditions, a special cement-based plaster material, characterized by good adhesion to foam and polystyrene foam, resistance to external influences.
- The elastic coating can withstand temperature extremes without consequences, compliance with environmental standards determines the suitability of the plaster for interior work.
The disadvantages of plaster for expanded polystyrene are, first of all, the increased cost and a special technology for applying to the work surface. The unique properties of the plaster material do not exclude the need for mesh reinforcement.
Fiberglass mesh is more perfect and durable, since it effectively distributes internal stresses during shrinkage hardening. Retains working properties in an alkaline environment throughout the life of the plaster coating.
Working solutions of different densities can be used for gluing a reinforcing mesh, as well as for leveling problematic microrelief. The quality of the coating is guaranteed by observing the recommendations for the preparation and application of plaster on the expanded polystyrene base.
Particular attention is paid to obtaining a homogeneous structure of the solution, therefore, it is recommended to use a construction mixer for mixing, and for small-scale work - a nozzle for a household electric drill. Stirring is done in two steps with a five-minute break.
Where is it applied?
Extruded polystyrene foam is used in various fields due to its positive qualities and performance characteristics.
- This material is very useful for private construction. With its help, both internal and external insulation of the floors of houses is produced. In addition, they can insulate roofs, communication lines and even basements. Often this material is consulted in the course of waterproofing work.
- EPPS is a popular material in state industrial construction. It is ideal for high-quality thermal insulation of various buildings, underground rooms, as well as various trunk lines.
- Expanded polystyrene is also useful when laying highways or large runways.
- It is used by EPS for the production of refrigerators and refrigerators.
- Extruded polystyrene foam is a wonderful material that is often used in the construction of economic buildings. These include large vegetable stores, farms, greenhouses of various sizes, and greenhouses.
Whatever this popular material is used for, its main focus will remain the insulation of wall ceilings, foundations and roofs.
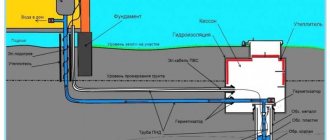
Do-it-yourself foundation insulation
To insulate the base with foam or extruded polystyrene foam, no special knowledge and skills are required. It is quite possible for an ordinary person to complete all the work. To do this, it is enough to be able to use a hand tool and have it on hand.
Another recommendation is that it is not recommended to save on consumables. You should first prepare everything you need: both tools and consumables, only after that start working. To carry out the installation of insulation on the basement of the house, you will need the following:
- insulation plates;
- reinforced mesh;
- molten bitumen;
- glue for fixing insulation;
- hammer drill or hammer drill;
- drainage pipes.
Installation of thermal insulation
As mentioned earlier, it is not so difficult to make a protective facade that insulates the foundation. For more information on insulating the basement, see this video:
The whole process can be conditionally divided into several stages:
- trench preparation;
- checking the integrity of the base and its repair;
- waterproofing;
- insulation;
- drainage system installation.
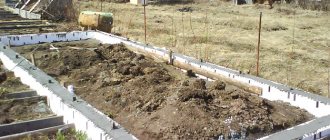
Before insulating the basement, dig a trench around the perimeter
Having prepared everything you need, you need to dig a trench. In depth, it should reach the lower level of the foundation, and in width, it should allow free movement of a person.
A ditch is being dug along the entire perimeter of the walls. It is not recommended to throw the earth far away, since in the future it will need to be covered back.
- The excavated foundation is cleaned of the soil adhering to it and inspected for damage. If there are any, you need to seal them up with cement mortar, but first clean all the delaminations with a metal brush with high quality.
- Further, the surface of the foundation is primed, and after complete drying of the solution, it is treated with bitumen mastic. It will act as the first layer of waterproofing.
- Roofing material is glued to the mastic. In this case, the overlap of adjacent strips on top of each other should be at least 10 cm. It is not recommended to glue the entire surface of the foundation at the same time. It is better to choose small areas for this. While you fumble on one side, the mastic on the other will dry out.

- The insulation is attached to the base of the house using special glue, instructions for the use of which are printed on the packaging. The joints between the plates can be treated with mastic or foamed with polyurethane foam, then sealed with reinforcing tape.
- It is recommended to install the first row of thermal insulation on a rigid base, and best of all on a foundation ledge (if any). This will avoid possible shifts of the entire structure under the influence of soil heaving processes. If it is not possible to fulfill this requirement, you need to make a sand pillow under it with a thickness of at least 5 cm.
- Having finished fixing the insulation boards to the foundation and making sure that the glue is dry, it is recommended to plaster the surface using cement mortar and reinforcing mesh. This will increase the external strength of the erected structure.
- Having finished with the insulation of the foundation, we proceed to the installation of the drainage system. To do this, a cushion of sand mixed with gravel is poured into the dug trench. Geotextiles and a pipeline are laid on it.
- After all the work has been completed, fill up the trench and make a blind area at least 80 cm wide.
If you did not have time to glue the roofing material, and the mastic is already dry, you can melt it with a construction hair dryer or blowtorch.
On the ground
EPPS is quite often laid on the ground floor located on the first floor, when it is planned to install laminate, parquet, ceramics or linoleum on top of such a base. Expanded polystyrene is perfect for the future arrangement of a spectacular self-leveling floor.
To insulate such a floor, you need to thoroughly prepare the base. It must be strong enough.
In addition, the floor should not shrink in the future. For this, the ground level must be 50-60 cm below the design level of the surface of the future floor covering. It should also be taken into account that the base must be absolutely dry and tamped down.
When the base is prepared, the first layer of dry gravel is laid on it (instead of gravel, you can take gravel). The height of such a coating should be approximately 30–40 cm. This layer also needs to be properly leveled and tamped.
Then on the rubble you need to lay out a layer of granite screening or Mediterranean sand. The height of this layer should not exceed 10 cm. It must be leveled from above. To control the process, you should use the building level.
In rooms where there will be no high mechanical loads, polystyrene foam plates can be laid directly on a sand base. In this case, it is recommended to buy materials that have docking grooves at the edges. As for the joints of the plates, it is recommended to pre-glue them with a special metallized tape.
The thickness of EPS sheets can be from 3 to 10 cm - it all depends on the living conditions and the level of insulation of the foundation of the house.
When you lay the insulating underlay on the floor, its surface should be covered with a waterproofing material. Next, you need to make a reinforced cement-sand screed along it. Always check the flatness of the surfaces. You can proceed to laying the floor covering only after the screed is completely dry.
If the laying of expanded polystyrene is planned in a room where the floor will be exposed to serious mechanical stress, then before installing the insulation boards, it is necessary to install a concrete screed (on a sand and gravel cushion and waterproofing). EPSP boards can be laid on the base only after it is completely dry.
Installation of extruded polystyrene foam under siding
When installing extruded polystyrene foam under siding, it is necessary to create a vertical sheathing from antiseptic coniferous wooden blocks or galvanized metal profiles. Attach the crate to the facade
structures with a step of 30-40 cm, using dowels, while it is necessary to control the plane of the frame using a level.
Extruded polystyrene foam is placed between the frame guides, the insulation is fixed using disc dowels. From above, the heat-insulating layer is covered with a hydro-windproof membrane, which will help remove moisture from the heat-insulating layer to the outside.
There must be a ventilation gap between the thermal insulation layer and the cladding material. To do this, create another crate on top of the structure, the step of the guides of which should be 30 cm. The height of the ventilation gap should be 1.2-1.5 cm. Siding panels are attached to the guides of the frame.
Details on the installation of a ventilated facade here.
On concrete
If you are going to insulate a concrete floor, then you need to make sure that its surface is flat - without drops. Any crevices and cracks must also be removed.
If the concrete base is an overlap of a basement or basement, then the insulation is recommended to be laid on top of the waterproofing film.Although expanded polystyrene is not afraid of dampness and moisture, these components can penetrate into the joints of the plates, so excess waterproofing in this case will definitely not be superfluous.
If there are irregularities on the concrete base, then first you need to get rid of them, and also fill up all the cracks and cracks. Make a leveling cement-sand screed. When the latter dries up, it is necessary to lay EPPS on it, and already on this layer - waterproofing. Insulation boards are recommended to be laid on a special adhesive designed for ceramic tiles. On top of the waterproofing, a screed is further made.
Insulation with expanded polystyrene can be used for floors in an apartment on a balcony or on a loggia. All work should be performed according to the same principle as above. However, it should be borne in mind that it is possible to start such a floor arrangement in an unglazed area only if the temperature there is at least 5 degrees. As for the glazed area, you can start work on it even if the temperature in this place is below 5 degrees. However, then it is necessary to additionally insulate the repaired area so that the screed dries to the end and it can be laid on it with expanded polystyrene plates.
Tips for using styrofoam
When using expanded polystyrene for the purpose of wall insulation, it is recommended to make thermal insulation behind the heating devices, given the fact that in these places the walls are slightly thinner than the rest of the surface.

Methods for installing expanded polystyrene: on glue, on cement mortar, on mastic, on dowels.
When implementing the external appearance of wall insulation, polystyrene foam can be fixed in the following ways:
- with glue;
- cement mortar;
- special mastic;
- using mounting devices.
In the case of external wall insulation, the insulation material must be protected with any non-combustible material. You can use bricks, various plasters, ceramic tiles, steel profiles, and so on.
It is possible to use expanded polystyrene for the purpose of insulating building foundations. This material is considered in cases of the construction of a monolithic foundation, in this case, expanded polystyrene will act as a permanent formwork. It is thanks to the use of this material that you can easily reduce the level of consumption of building material (the amount of concrete, reinforcement). In addition, the use of expanded polystyrene extends the period of operation of basements, as well as reinforced concrete walls.
Roofs
High-quality thermal insulation is necessary not only for the floor, but also for the roof. In this case, it is also permissible to use extruded polystyrene foam. In this case, its slabs must be correctly laid out under the roofing material.
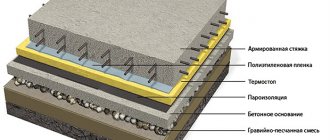
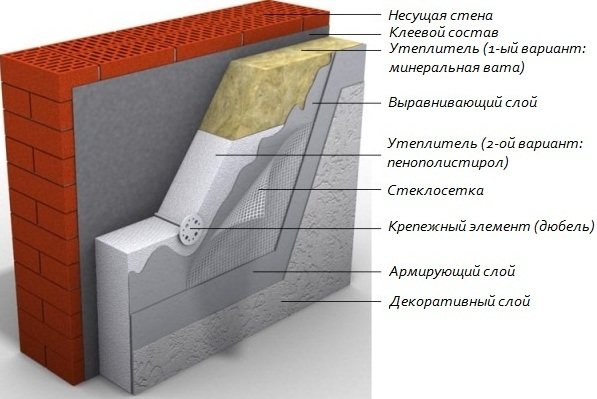
Consider what should be the order of arrangement of all the constituent elements (we look from the inside - out):
- first comes the decorative coating (the roof itself);
- then comes the inner crate, designed to support the insulation and ventilation material;
- vapor barrier film;
- insulation;
- waterproofing film;
- external lathing required for additional ventilation and installation of roofing;
- roof covering.
Evgeny Filimonov
Ask a Question
At the same time, many home craftsmen neglect the installation of steam and waterproofing films. This is a big mistake, since these components will protect not only the insulating layer from moisture and moisture, but also roof structures made of wood.
Also, EPS roof insulation can be done on the finished structure.
Consider what you need to do for this:
- install waterproofing material on the rafter;
- then fix the insulation on special suspensions;
- cover the insulation with a vapor barrier;
- nail the grill to the rafters (this frame structure will hold all the insulation, and also play the role of a ventilation area);
- Finally, install the finishing material.
In this case, you need to take into account one drawback - when installing polystyrene foam on an already finished roof, you will hide a certain amount of usable area. In the event of leaks, such a design will have to be changed to a new one.
How is the installation of extruded polystyrene foam
When choosing a heat-insulating material, it is worth preferring extruded polystyrene foam, despite its higher price with analogues.
Sheets of this material can be made in different ways using:
- Adhesive solution.
- Cement mortar.
- Special mastic.
- Mounting accessories.
When carrying out thermal insulation from the outside of the house, attention should be paid not only to the installation of thermal insulation sheets, but also to their protection with any non-combustible materials: brick, plaster, ceramic tiles, steel or aluminum profiles. Building codes state that there should always be a ventilation gap between the trim and the insulation boards, which will ensure that the insulation is always dry and does not lose its thermal insulation properties.
However, this method reduces the floor space, so alternative installation methods have been developed. For example, for external walls, specialized waterproofing materials are used that protect polystyrene foam from moisture... Roofing material or glassine is often used as this material.
To prevent moisture from entering the room, vapor barrier materials, such as plastic wrap, are used. The modern construction industry offers a wide selection of all types of materials.
Glue method of fastening extruded polystyrene foam
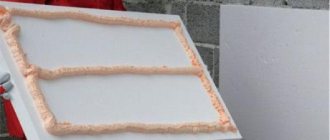
Fastening of expanded polystyrene can be done with mastic or baumit glue. Usually mastic contains bitumen, so it is always ready for use. The solution is applied to insulation sheets in the corners and in the center (5 points per sheet in total) or in strips. On average, from 0.5 to 1 kg of adhesive solution per m² is consumed.

The mastic is applied easily and is well attached to the surface, which ensures high-quality adhesion of the plates. However, the long drying time of the solution is its disadvantage. Without support, the plates can shift under their own weight, therefore this installation method is combined with mechanical - dowels or self-adhesive pins are used.
Before applying the glue solution, a thin layer of primer is preliminarily applied, waiting for it to dry for 30 minutes, and then glue is applied. In Russia, dowels are more often used to prevent slab displacement. In Europe, only adhesive solutions are used.
Mechanical fastening of thermal insulation
Mechanical fastening of expanded polystyrene sheets is carried out using self-tapping screws, dowels and self-adhesive pins. Self-tapping screws for such a task are in the shape of a mushroom with a wide head, which is made from high-quality polymers. During installation, holes are made in the plate with a drill, into which self-tapping screws are then screwed.
The thickness of the foam layer, the material from which the wall was built, are important when choosing the type and size of the dowels. To find out the size, add 50-70 mm to the thickness of the insulation sheet... Usually 6 dowels are used per 1 m² of insulation. Their location is identical to the location of the glue points.
For installation of a block of polystyrene foam of a standard area, 4 self-adhesive pins with a rectangular "die" are used. Thanks to the notch on the pin, the foam is firmly pressed against the wall surface.
Of the foundation
With the help of expanded polystyrene, you can also insulate the foundation.To do this, you should also adhere to a certain technology. Let's get acquainted with all the necessary stages of such work.
- First you need to competently prepare the foundation. It is possible to insulate such structures both for those under construction and for finished buildings. Make sure that the foundation is completely excavated and free of dust, grease, construction waste and other defects.
- If there are remnants of the previous waterproofing on the foundation, then you also need to get rid of them.
- Keep in mind that such a base can be insulated both from the outside and from the inside, however, external insulation is considered more effective.
- Find the right styrofoam. For the foundation, it is recommended to buy materials with a density of 35 kg / cu. m. The flammability class in this case is not so important.
- Get your foundation waterproofed. Thus, you can prevent materials from getting wet during the appearance of groundwater.
- Waterproofing can be installed under the insulation in any way. The only exception is the isolation of the base with the help of a special bitumen filling - EPS in contact with solvents can be severely damaged and even destroyed.
- Next, you will need to attach polystyrene to the foundation (its underground component). At the same time, insulating plates are attached to a special glue designed specifically for expanded polystyrene.
- The adhesive mixture must be applied around the perimeter of the board and in its center in several strips. Then you need to wait about 1 minute and press the polystyrene foam to the base. Wait a couple of minutes and proceed to the installation of the next part.
- It is recommended to fasten the plates using a level so that there are no distortions at the joints.
- If you need a thicker insulation, then polystyrene foam is allowed to be installed not in one, but in two layers. In this case, the plates must be glued in such a way that the second layer necessarily covers the joints remaining between the tiles of the first layer. If, after installation, the gaps remain on the material, they must be closed with ordinary polyurethane foam.
- Next, you need to protect the insulation itself. To protect expanded polystyrene from mechanical damage and attack by rodents, it is recommended to supplement this material from above with a reinforcing mesh or special shields. These components must be fastened along the perimeter of the foundation using dowel nails.
On top of the mesh, the foundation can be covered with a cement mixture with the addition of special waterproofing ingredients.
- If the house is located on damp ground, it needs to be provided with good drainage. It is installed around the entire perimeter of the foundation and taken out into the lowland or a special well.
- Next, you need to insulate the basement. This part of the foundation also needs additional insulation. The previously prepared surface, protected from moisture and moisture penetration, is now ready for the installation of EPS materials. They should be attached to the same adhesive.
- After a couple of days, it is recommended to additionally fix the expanded polystyrene plates on the plinth with special fasteners (for this, dowel-nails with wide heads are suitable).
- After these works, you can proceed directly to soil insulation (this process is described above).
Mechanical fastening of thermal insulation
Mechanical fastening of expanded polystyrene sheets is carried out using self-tapping screws, dowels and self-adhesive pins. Self-tapping screws for such a task are in the shape of a mushroom with a wide head, which is made from high-quality polymers. During installation, holes are made in the plate with a drill, into which self-tapping screws are then screwed.
For installation of a block of polystyrene foam of a standard area, 4 self-adhesive pins with a rectangular "die" are used. Thanks to the notch on the pin, the foam is firmly pressed against the wall surface.
Walls inside
Insulation of walls with expanded polystyrene from the inside presupposes compliance with a certain technology.Let's consider what stages such work consists of.
- First you need to prepare the bases. It is necessary to thoroughly clean the surface of the floors. Be sure to remove the old coating, especially if it is paint and varnish materials. Otherwise, the solvents in their composition will destroy the structure of the insulation.
- Next, you need to level the surface of the walls. If the floors are made of bricks, then they need to be plastered, and if they are made of concrete, then you can do without plaster. For fine leveling of substrates, first apply an acrylic primer with a paint roller.
- After that, the layer will dry for 12-14 hours. Eliminate all defects on the walls with a putty. Then apply another layer of soil. This will complete the preparation of the wall slabs.
- Now you can start installing polystyrene foam plates. For this, you can use a special adhesive. It can be dry or ready-made.
- It is permissible to apply the glue with a brush, or you can also use a roller, passing it along the surface of the walls.
- In this case, it is recommended to start installing the plates from the bottom. To begin with, they need to be cut out to size - for this they can be applied to the still dry floors. It is better to cut styrofoam with a hot string or a toothed hacksaw.
- The first row of slabs should be installed along the entire wall. After that, you can start installing the next row.
In this case, the slabs must be displaced relative to the lower elements in such a way that the joint between the first-row sheets falls on the middle part of the upper slab.
Let the adhesive dry thoroughly. This can take 34–42 hours.
- It is recommended to additionally fix the installed insulation with dowels. In this case, the walls must be drilled directly through the EPS. Then you need to drive dowels into the resulting holes. The thermal insulation material should be attached with self-tapping screws. Large sheets can be installed in 6 locations.
- Now you should proceed to the sealing of the seams. If their dimensions exceed 30 mm, then the remaining scraps of expanded polystyrene can be glued into them.
- At the end of all work, the joints must be treated with polyurethane foam. Make sure that it does not contain toluene - this component corrodes plastic.
Evgeny Filimonov
Ask a Question
Excess mortar must be quickly removed with a knife, and then the seams must be treated with glue solution.
- Now you need to apply a reinforcing layer (for example, a fiberglass mesh).
- Place on top protective coatings, as well as vapor and waterproofing.
- Finally, cover the walls with a finishing coat such as plaster.
Wall insulation from the inside
Insulating the walls from the inside is not a good choice. If it is possible to do it from the outside, then it is better this way. There is a lot of controversy about insulation from the inside of the house, the result of which dwells on the fact that insulation from the outside is much more effective.
There are some side issues that appear after the insulation process inside the house. Condensation begins to accumulate between the wall and the insulation, when heated, this material releases toxic substances, plus it also has a fire hazard. If this does not bother you, then feel free to start work.
When you carry out the installation of extruded polystyrene foam on the wall, then it must be additionally well prepared first. In comparison with the usual one, the extruded one has a more dense good structure and a smooth surface.
If it is corrugated, then preparation, as it were, is not required. Very smooth sheets must be made completely rough. So for this you will have to use a good needle roller, you can also use a clerical knife.
The technology of wall insulation with expanded polystyrene during the construction of a house includes the main two possible ways of fixing the foam. Either to the racks, or to the wall surface, then there is a chipboard sheathing.
The walls need to be primed to obtain a flat appearance. The surface drops do not exceed two centimeters. If somewhere the wall is sprinkled, then it is necessary to finish it in those parts with a spray gun. In the rest of the others, you need to use a wide brush.
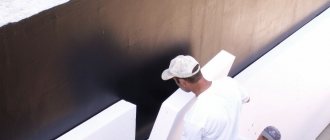
Facade
Many people turn to EPS insulation for house facades. This work should be done as follows.
- First, the outside walls are scrupulously cleaned of all excess, as well as old finishing materials, especially if it is paint.
- If the overlaps have irregularities, then you must get rid of them. This also applies to various damages, such as cracks or crevices.
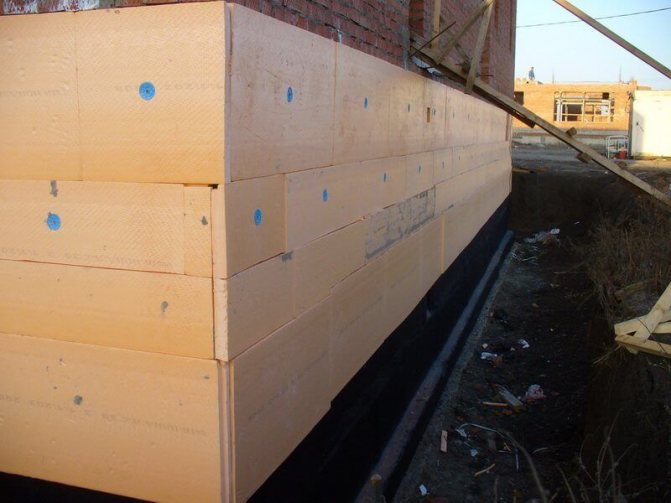
- Now you need to spread glue on the polystyrene boards (no need to apply too thick a layer), and then these parts must be pressed tightly to the bases and additionally attached with dowels.
- Attach EPS boards to all façade surfaces.
- After that, the sheathed bases need to be properly sanded.
- Install a reinforcing mesh over the entire area of the installed insulation. Soak it in the sticky solution.
- Next, be sure to wait until the surface covered with plaster is completely dry. Until then, no work can be started.
- After complete drying, the base must be covered with a high-quality primer.
- Only now is it permissible to go directly to the decorative design of the facade. For such bases, it is recommended to purchase only high-quality and high-strength coatings that are not afraid of temperature changes and precipitation.
It is recommended to insulate the facade only in the warm season. During such periods, the humidity of the air is significantly reduced, therefore, adhesive and cement compositions adhere much better, and dry out very quickly.
Based on materials from the site: stroy-podskazka.ru
Installation of thermal insulation
Building insulation begins with the starting profile
- Insulation of facades with extruded polystyrene foam begins with the installation of a basement (starting) profile. The bar will hold the fixed sheets of the heat insulator in the desired position, preventing them from sliding until the glue hardens. The profile is set, checking its horizontal level. Self-tapping screws or dowel-nails are used to fix the planks. They are positioned with such a pitch so as to exclude the profile deflection under the weight of the heat insulator.
- Before gluing polystyrene with thin plates, the slopes of door and window openings are trimmed. The width of the sheets should be 1 cm greater than the distance from the outer edge of the wall to the window or door frame. Panels protruding beyond the plane of the outer wall will allow for better joining of heaters.
- The composition for fixing thermal insulation should be prepared in accordance with the manufacturer's instructions in such a volume as to prevent its premature solidification. The mass is done in advance. The walls are covered with a continuous layer of glue. On expanded polystyrene, the solution is applied pointwise, along the edges and in the central part.
- The first row of slabs is fixed along the starting profile. The panels are joined to each other tightly so that there are no gaps. If this happens, the gaps can be filled with polyurethane foam or foam softened with acetone. Wide gaps are sealed with styrofoam scraps and glue.
- The panels of the next row of insulation are installed, shifted by half their length relative to the plates of the first. The rest of the insulation belts are mounted in the same way. The correctness of the installation of polystyrene foam is checked with a level.
- 3 days after gluing, the sheets are additionally secured with dish-shaped dowel-nails. Each plate is fixed at 5 points. The fasteners must be immersed in the wall by at least 5 cm. Before driving in the dowels, 10 mm through holes are drilled in the panels. After installing the caps of the fasteners, they are coated with glue.
Sometimes the insulation is mounted on the wall in 2 layers.In such cases, the horizontal and vertical seams of the coverings must not coincide with each other. The second layer is glued after the first is completely fixed. Then the poppet fasteners are placed.