Improving a homemade heater
If a similar design of an oil heater is planned to be used in another place, for example, in a country house, then some changes will have to be made to it. They will only touch the electrical part. The fact is that you are in the garage temporarily, but in the country, in comparison with the garage, you are permanently. Therefore, the requirements for the room temperature will be different.
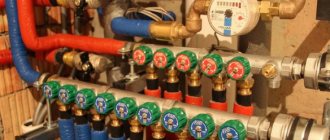
In order to achieve comfortable heating conditions for the country house, the wiring diagram of the heater must be slightly changed. For this, a relay is introduced into the heating element circuit, which will control the heating of the element, maintain the specified temperature of the coolant. And again, an old electric iron, or rather its bimetallic plate, can play a positive role. In the iron, it served as a regulator of its heating, here its purpose will be the same - to maintain the specified temperature of the oil. In addition to the direct effect, there will be an additional effect - energy savings. The dependence is direct - the lower the temperature, the less electricity is consumed.
Bimetal Iron Plate
A home-made designed oil heater completely replaces the purchased one, and even surpasses it in some parameters. This is, firstly, the manufacture of the required dimensions. Secondly, tangible savings in material resources
Of no small importance will be the fact that the garage will be slightly cleaned of unnecessary trash (pipes, trimming a corner, profile), from which a useful and necessary thing will be made
The video shows the manufacture of a slightly different model of an oil heater.
Rarely, when building a garage, it is possible to provide heating. Therefore, during operation, the premises have to be heated independently. Agree, buying heating devices for periodic use is sometimes costly and impractical.
Some craftsmen make the unit with their own hands, using inexpensive materials. We invite you to familiarize yourself with the three most popular solutions for organizing individual heating.
Before you make a homemade heater for a garage, you need to understand the principle of operation of each unit, its structure and study the assembly procedure.
The most commonly used types of heaters and an example of creating one of them
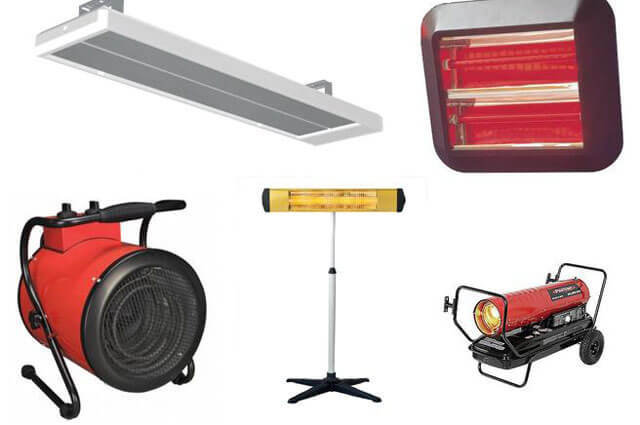
How to make a heater from improvised means? You can create such an object, but you need to be sure of its safety. This once again emphasizes the need to study all processes occurring in similar systems, and knowledge of the structure of the elements used in them. The most common types of devices used to heat a garage are the following variations:
- electric heater;
- gas heater;
- solid fuel stove.
You can create a home-made garage heater that runs on electricity only by understanding the technique and combination of components. Such devices are based on the principle of operation of a fan heater, which is based on the circulation of a heated air mass by means of a fan. Such an electric heater consists of four main parts:
- heating element;
- fan;
- protective grill;
- cord and plug.
Such a fairly simple set of components will make it possible to recreate a complete resemblance of a device produced by some industrial giant. Any spiral is suitable as a heating element.Its main quality should be high electrical resistance, which allows the element to heat up under the influence of current. As for the fan, both a household sample and a sample taken from a car can be used. Safety is one of the most important criteria to be adhered to. To achieve this, you will need a protective grill to limit access to the heating parts of the device and to the fan itself.
As a protective cover, the radiator grill is ideal, which optimally meets all the necessary criteria.
Back to the table of contents
Heating cables
Laying a warm floor in a garage is not always advisable, but in one situation such a design will be more than justified. We are talking about starting a car in cold weather - often a lot of problems are associated with this, and the presence of a heating cable will greatly simplify the task. In addition, you can only lay the cable under the car and turn it on only if there are problems with starting the engine.
The machine must first be covered with a cover that will cover it completely - this will allow concentrating heat energy in one zone. Air will not move into the garage itself, so the level of heat loss is minimized. This technique will allow you to quickly warm up the car, even in severe frost.
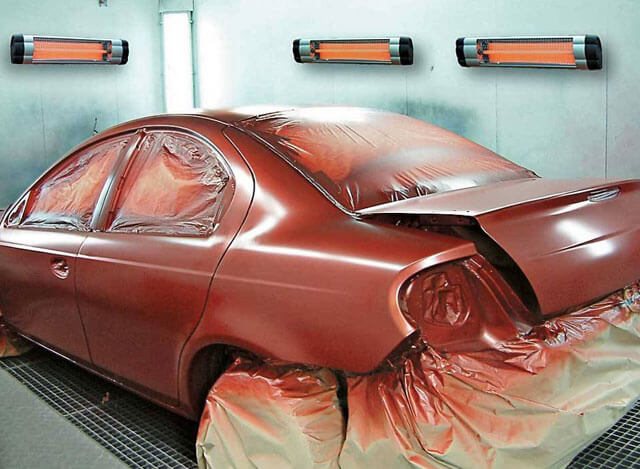
Infrared heaters and their features
The operation of infrared heaters is based on the principle of wave radiation, due to which objects and surfaces located in the path of the rays are warmed up. This is the key difference between infrared devices and other types of heaters, which primarily heat the air.
The main element of the considered type of heaters is the radiator. In household devices, the operating temperature of the emitter can reach 600 degrees. In addition to electric infrared heaters, there are also gas devices, but using them in rooms without good ventilation (and most garages fit this definition) is prohibited.
There are the following types of infrared emitters:
Metallic. Low-temperature heating elements made of stainless steel, equipped with aluminum radiating plates, are the simplest and most reliable elements available. When heated and cooled, such devices crackle slightly.
Ceramic. These emitters consist of a ceramic panel that is heated by means of a metal spiral. Such devices are characterized by relatively low efficiency.
Micathermic. The radiator plate of this type is covered with mica and heated to a temperature of 60 degrees. Devices with micathermic emitters are more expensive than the two previous options.
Quartz. The heating element is a tungsten filament, hermetically sealed in a vacuum tube made of quartz glass
Such devices must be handled with care due to their fragility.
Halogen. Such an emitter is structurally similar to a quartz one, but the tube contains an inert gas
The thread heats up to a higher temperature and glows during the heating process.
Carbon fiber. Another representative of lamp emitters. The vacuum quartz tube contains a carbon filament, which provides the highest efficiency compared to halogen and quartz devices. The cost of carbon emitters is the highest in comparison with analogues.
In garages, infrared heaters with aluminum emitters are usually used - they are cheaper, more reliable, and much stronger, which is important when operating the device in a garage. Aluminum heaters usually operate at temperatures no higher than 300 degrees
At this temperature, flammable materials (paper and wood) do not ignite, therefore such heaters comply with fire safety requirements. In favor of such devices is the fact that they do not burn out oxygen, and a person will be able to stay in a heated room for a long time without any problems.
Aluminum heaters usually operate at temperatures no higher than 300 degrees. At this temperature, flammable materials (paper and wood) do not ignite, therefore such heaters comply with fire safety requirements. In favor of such devices is the fact that they do not burn out oxygen, and a person will be able to stay in a heated room for a long time without any problems.
When choosing a heater with a plate radiator, it is imperative to find out what is the thickness of the anode layer - for normal and long-term operation of the device, this figure should exceed 25 microns. The heating element should be located in a stainless case, which will not rust at high humidity in the room.
Infrared garage heaters have the following advantages:
- The possibility of uniform heating of the entire room or the creation of local heating in a specific area;
- The ability to warm up any part of the garage, including even the most difficult to access.
Making an infrared heater with your own hands
Modern IR emitters for home heating are reliable, practical and have good efficiency. Such devices emit infrared radiation, which, without interacting with air, contributes to the rapid heating of various surfaces in the room. Thus, they efficiently convert electricity into heat energy.
The most affordable option for home assembly is an economical film heater based on a heating film.
For work, you will need to prepare the following materials and tools:
- two identical pieces of glass,
- aluminum foil,
- sealant,
- paraffin candle,
- epoxy glue,
- electric wire with a plug,
- candle holder,
- sticks for cleaning soot,
- sponge for cleaning the glass surface.
Do-it-yourself infrared heater is assembled according to the following scheme:
- Glass is thoroughly cleaned from dirt and degreased.
- A conductive base for the heater is assembled. A candle is applied to the back of the glass blanks with soot, which acts as a kind of current conductor. Before starting the procedure, the workpieces are slightly cooled.
- Along the perimeter of the blanks, the surface is cleaned from soot with sticks to obtain an even edging 0.5 cm wide.
- Strips of a width equal to the area of the conductive glass base are cut from the foil. They will be used as conductive electrodes.
- One workpiece is laid on a flat surface with the smoked side up, and glue is applied with a thin layer around the perimeter. Foil strips are applied to the glued surface with a slight shift beyond the edges of the workpiece.
- From above it is covered with a second blank, respectively, with the smoked side down, it is pressed to set the glue. All joints are carefully treated with a sealant.
- Checking the power of the finished structure. If the power indicator does not exceed 100 W per 1 sq. m of the room, then the heater is connected to the network using a conductive wire and a plug.
The resistance of the conductive base of the heater is measured with a multimeter. To calculate the power, a simple formula is used: N = U × U / R, where
N - power, U - mains voltage (220 volts), R - resistance.
For example, R is 20 ohms, then N = 220 × 220/20. The result is 2420 watts. This power is enough to heat a room with an area of 25 sq. m.
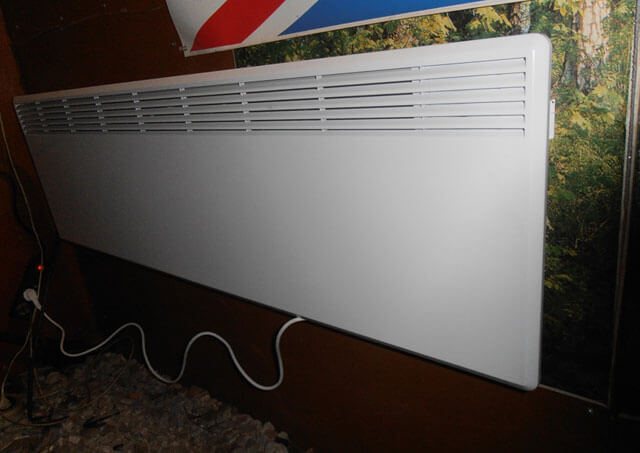
The device and features of convector heaters
Convection is a working principle in which heating occurs due to the different densities of cold and heated air. The cold air from the bottom enters the heater through special holes, heats up, its specific gravity becomes less, and the heated air comes out through the holes located in the upper part of the device.
In heating convectors, everything happens exactly according to this principle - i.e. the air moves naturally, heating up in the interior of the heater. An increase in the intensity of the intake of cold air significantly increases the heat transfer of the convector.
Convection heaters are usually wall-mounted - this allows the unit to draw in air from the bottom and release heat through the top panel. The holes in the upper part of the convector are equipped with special elements that allow you to regulate the direction of movement of the heated air.
There are several types of convectors:
- Electrical. They are characterized by simplicity of installation and operation.
- Gas. The main distinguishing feature of these devices is their high power. When installing gas heaters, it is necessary to provide a high-quality chimney for supplying air and removing combustion products. In small rooms, only devices with a closed combustion chamber can be used.
- Aquatic.
Among the advantages of convector heaters it is worth noting:
- Low temperature of the device, due to which the likelihood of burns upon contact with it is excluded;
- Limiting degree of fire safety of electrical devices;
- Simplicity of design and minimal probability of breakage.
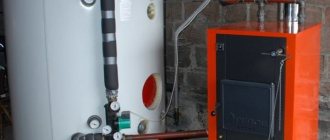
Making an oil heater with your own hands
Homemade oil heater is functional, safe and reliable. A similar device can be used to heat residential and technical premises.
Structurally, the device consists of a sealed metal case filled with a coolant - technical oil.
To independently make a powerful heater from a battery, you will need the following materials:
- used battery
- tubular heater,
- technical oil,
- heating temperature controller,
- 2-core conductor with plug,
- electric pump with a capacity of 2.5 kW,
- metal corners,
- tubes capable of withstanding heating temperatures up to 160 degrees.
All work is carried out using a welding machine and an electric drill.
The manufacturing and assembly technology of an oil heater includes the following steps:
- Making a rectangular frame of the required size for mounting the device. The corners are cut into pieces of the required length and welded together into a rectangular structure. At the bottom, legs are welded to each corner.
- Holes are made in the prepared container for the installation of heating elements. The holes should be located at the bottom of the instrument. An additional hole at the top of the tank is required to fill the coolant. For cutting, a grinder or welding is used.
- Installation of an electric pump on metal plates welded to the heater body.
- Heat-resistant tubes are used to fix the pump. They are welded to the body and connected to the pump with shut-off valves.
- Fixing the heaters to the bolted joints in the holes provided for this.
- An external threaded nipple is welded to the inlet for the coolant for installing a protective cover. A simple version of the cover can be made from a cut of a pipe with an internal thread type, which is screwed onto the fitting from above. A rectangular metal plug is welded to the other end of the pipe to prevent oil from spilling out.
- The container is checked for leaks by creating a small internal pressure.
- Connecting heaters in a parallel way to increase heat transfer from the heater.
- Installation and connection of a thermostat, as well as a conductive cable with a plug. Installation of the container on a prepared frame and additional grounding. Pouring coolant into the radiator.
What is required to make a heater
In every garage you can find a lot of useful things that, at first glance, would not seem to be of particular value, but in the hands of a skilled owner, they can turn into useful devices or devices. By its design, a home-made heater resembles factory counterparts, where the principle of operation is based on the fact that the heating element, in this case, it is a nichrome spiral, is hermetically sealed between the sheets of fiberglass, as a result of which the sheet heats up and heats the surrounding air.
To make a homemade heater you will need:
Nichrome wire heating element
- Glass fiber laminate.
- Glue Monolith.
- Nichrome wire.
- Electric wire.
- Metal rivets.
- Electric drill.
- Matches.
Fiberglass laminate will require two sheets, each 50x50 cm in size and no more than 1.5 cm thick. Although the dimensions may be different, the sheets should be the same in thickness and geometric dimensions. A garage heater can be square or rectangular, but the perimeter of its sides should not be more than two meters.
Fiberglass parts are necessary to fix the main heating element in our homemade device - a nichrome spiral, which is made from 24 m of wire. Two lengths of electrical wire based on the location of the heater and electrical outlet. Metal rivets can be replaced with bolts and nuts.
For a similar model of a home-made heater, the power of which will be equal to 100 W, nichrome wire is used with a cross section of no more than 0.3 mm.
Tabletop fan heater manufacturing
This type of device is a heater and a fan all rolled into one. If desired, a homemade fan heater can be used as an impromptu air conditioner.
This type of heater is convenient in that it allows you to adjust the heating temperature and the rotational speed of the cooler.
Selection of the required materials
To create a fan heater, you will need the following materials:
- rheostat;
- switch;
- power connector;
- electrical wire;
- LED Strip Light;
- 12 volt computer cooler;
- three-amp power supply for 12 volts;
To fix the heating element, you will also need two ten-centimeter rods of copper wiring with a cross section of 1.5 sq. Mm.
From the tools you need to prepare:
- jigsaw;
- hammer drill or drill;
- soldering iron;
- hole saw;
- glue for woodwork;
- "Moment" or superglue;
Fine-grained sandpaper is also required to clean wood by removing burrs along the edges.
Assembly of body parts
The future heater will be in the shape of a cube. The body of the device is assembled from wooden planks 9 mm thick.
- two square blanks measuring 12 * 12 cm;
- 3 pieces measuring 10.2 * 10.2 cm;
- two rectangular blanks 12 * 10.2 cm;
- four small rectangles measuring 1 * 1.5 cm.
To make the legs of the structure, 2 pieces of 3 cm long are sawn off from a wooden stick D12 mm.
To simplify your task, make paper patterns, the dimensions of which correspond to the dimensions of the workpieces 12x12 cm. The layout of the holes is applied directly to the patterns. They are applied to each side and drilled through.
In the workpiece 10.2 * 10.2 cm, keeping a distance of 2.5 cm from the edge, make a hole D7 mm. On the second same workpiece, two of the same holes are made, maintaining a distance between them of 2.5 cm.On the third workpiece, 10.2 * 10.2 cm, a through hole D9 cm is made in the center.
Holes D5 mm are made in each of the four rectangular blanks measuring 1 * 1.5 mm.
On the long side of a rectangle measuring 12 * 10.2 cm, stepping back from the edge by 1.2 cm, make two holes D12 mm, maintaining a distance of 7 cm between them.
A square workpiece with a 9 cm drilled hole is installed inside the body. After that, the last rectangular piece is attached, closing the body of the structure. At the final stage, the legs are glued.
Installation of heating elements
A spring stretched between two copper rods will act as a heating element. To determine if the spring is suitable, you must connect it to a 12-volt power supply and measure it with a multimeter.
So to create a warm flow, it is quite enough if the readings of the multimeter are 2.5 A. With such parameters, with a power supply of 12 W, about 30 V of heat will be generated.
The selected spring is soldered to copper rods, the ends of which are fixed on the workpieces measuring 1x1.5 cm. The assembled structure is glued to the corners of the body. Bare "tails" of an electric cable are soldered to the ends of the rods. After that, a bar equipped with holes is attached.
Having fixed the cooler inside the case, the same manipulations are performed with the rheostat, the switch and the power connector.
If all structural elements are connected correctly, then at the moment the rheostat is turned on, a blue light will light up on the LED strip. At the moment the switch is turned on, the LED strip will take on a red hue, which will create a purple color against the background of the main blue. After that, the heater spring will begin to heat up.
The assembled structure from the outside can only be sanded and treated with wood wax, or varnished in 2-3 layers.
Due to its presentable appearance, such a heater can be safely used not only for heating the garage, but also for arranging living rooms.
Alternative options for economical heating of the garage are described in this article.
Assembly work order
After completing the preparatory work, proceed directly to the assembly process. To do this, perform the following operations.
- The inner side of each sheet of fiberglass is cleaned with sandpaper.
- Above and below, an indent is made from the edges of the sheet, equal to 2 cm, and on the sides - 3 cm.
- On one of the pieces of fiberglass, to which it is planned to attach a wire spiral, a frame is drawn and the number of turns required to accommodate all 24 meters of wire is calculated. The length of one turn depends on the height of the device, excluding the indents left from the bottom and top.
- After calculating the exact number of turns of wire, the distance between them is calculated. It should be noted that this value should be in the range of 8-13 mm. According to the data obtained, small holes are drilled along the indentation line, into each of which a match is inserted.
Then you need to drill a couple more holes that will be needed in order to bring the wires out. This is necessary to connect the product to live devices.
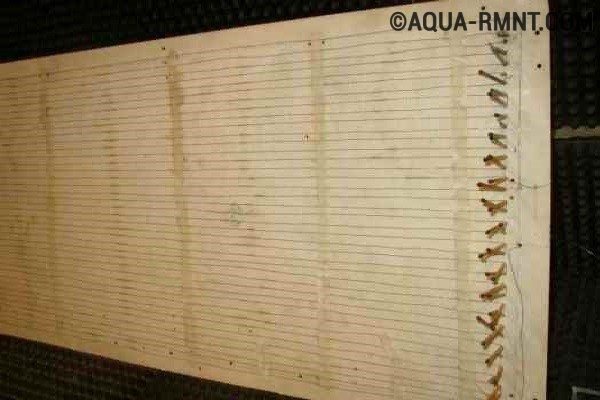
This is how it should look like. Fastening the edges of the turns can be done with paper strips, after removing the matches
- Next, the wire is laid with a snake, while the wire should not be pulled. The matches inserted into the holes help form the coils of the wire. Having laid 5-7 turns, fixing of the constructed filament is carried out with centimeter paper strips, pre-treated with Monolith glue.
- After completing the laying and securing the entire wire, the matches must be removed, and the resulting heating element must be trimmed and, if necessary, additionally strengthened with paper strips impregnated with adhesive.
- To fix the edges of the turns after removing the matches, paper strips and glue are also used.
- Metal rivets are inserted into the holes drilled to bring the wire out. Next, the free end of the wire is wound around these rivets.
- On the front side of the fiberglass base, each rivet is equipped with a washer, which allows you to firmly fix the conductive contact.
Important! The mains wire is connected from the side of the formed spiral, while its stripped ends are wrapped around the installed rivets.
Stages of assembling a homemade heater
After all materials, tools and fixtures are prepared, you can start assembling a homemade heater:
DIY garage heater
- Fiberglass sheets from the inside are cleaned with fine sandpaper.
- Marking is made - a line is drawn in the upper and lower parts, stepping back 2 cm. On the right and left sides of the sheet, the indent will be 3 cm. The heating coil will be attached to one sheet, for which it is necessary to make several holes on it along both edges of the sheet. Two more holes must be drilled to secure the supply wires. They are located on the edge where the indent of 3 cm is left.
- Before making a heater with your own hands, you need to turn the wire into a spiral by winding it around a nail or a long knitting needle.
- Matches, toothpicks or other fastening parts are inserted into the lower and upper holes, which can be easily removed after the end of the work.
- The spiral is laid in rows, winding each row behind a match in the hole. A distance of 8-12 mm must be observed between the rows. Every 5-7 cm, the spiral is fixed with paper centimeter strips, on which Monolith glue is pre-applied. When the whole spiral is evenly placed on the panel, the matches can be removed, and these places can be additionally strengthened with paper strips with glue.
- Metal rivets are inserted into the side holes, onto which the stripped ends of the electric wire are wound. On the outside of the fiberglass plate, a washer is put on each rivet so that the contact is firmly fixed.
- The next step will be to check how the assembled electric heater works with your own hands, for which they connect the product to an ohmmeter and an outlet.
- Now you need to glue the second sheet, for which you use epoxy glue. It needs 150 grams. Epoxy is applied between the rows of the spiral and a second panel is applied on top. In order for the gluing to occur qualitatively, a sheet of plywood is laid on top of the second sheet and loaded. The weight of the load must be 40 kg or more, but not less.
- The time for complete curing of the epoxy resin is a day. On the second day, you can already use a homemade device. But before that, you need to make a mount on the back wall if you plan to hang it on the wall or legs if it will be located on the floor.
How to make a homemade gas heater?
If you want to create a gas heater for a garage with your own hands, then check out the basic recommendations from professionals:
- It should have a design as simple as possible, no complicated parts and elements.
- Pay maximum attention to its safety, therefore, buy factory-supplied devices for supplying and shutting off gas to be sure of their quality and reliability.
- Be sure to consider its economy.
- It is important that it is not bulky and that it is activated as easily as possible.
- The amount spent on the purchase of everything necessary to create a heater should not exceed a third of the real cost of such a device in the store, otherwise there is no point in this undertaking.
Prepare the following tools and materials for work:
- Tin sheet.
- Scissors for metal.
- Rivets.
- Riveting tool.
- Fine metal mesh.
- Household sieve.
- Burner with valve.
- Collet gas cartridge with a capacity of 0.5 liters.
The assembly of a gas heating device is as follows:
- First you need to attach the heater to the burner. Take a household sieve for this, attach it to a galvanized sheet and circle it with a marker. Draw rectangular ears parallel and perpendicular to the circle. Cut out the resulting pattern with metal scissors, try to do it as evenly as possible.
- Now you need to fasten the parts together. Take the burner, bolt it to the tin circle. Attach the sieve with the ears rolled in the opposite direction. It will help the heat dissipate to the sides.
- Fastening the mesh. Cut the same circle out of the tin again using metal scissors. Bend the ears, drill ten holes in the cavity of the circle. Take a mesh, attach it to the ears of both obtained circles. Secure the bottom first, then only the top. It is recommended to carry out fasteners using rivets and a riveting device. As a result, you will have a mesh cylinder.
- Start your homemade gas heater.
Important! Although it will turn out to be small in size, the heat emanating from it is quite enough to heat the garage room, create a comfortable temperature for staying in it.
Heater power calculation
To calculate the thermal power required to warm up the garage, you need to use the following formula:
- N = V x dT x K, where
- N - heater power (kcal / h),
- V is the total volume of the room,
- dT is the temperature difference in the room and outside,
- K is the heat loss coefficient.
For calculations of heat loss, the following values of the coefficient K are taken:
- 0.6-0.9 - the garage is high-quality insulated;
- 1-1.9 - garages have an average quality of insulation;
- 2-2.9 - the garage has insufficiently effective insulation;
- 3-3.9 - the garage is not insulated.
To convert kcal / h to W, a simple formula is used:
- 1 W = 0.86 kcal / h, or
- 1 kcal / h = 1.163 W.
Electrical diagram and principle of operation
All of the above requirements are met by a home-made heater, which is assembled from fiberglass, glue and nichrome wire. This heater is structurally similar to the factory model, the main heating element of which is pressed into a non-combustible material. This constructive approach makes it impossible for the product to ignite.

Diagram of making a homemade heater powered by 220V
Important! When connecting a timer to the assembled device, it will be possible to adjust the operation of the heater with the desired frequency. The duration of the working intervals is set depending on the season and the air temperature outside the garage. Using the timer will automatically maintain a comfortable temperature in the room and save energy.
Heater selection criteria
A garage is a non-residential premises used not only for storing motor vehicles, but also for carrying out its repairs. Accordingly, in addition to the four / two-wheeled "friend", it also contains a considerable amount of all kinds of tools and materials. Most often, it is not possible to provide free access to this room for gas pipes, which means that it can be heated only with the help of heaters operating from the mains.
Thinking about which heater to choose for the garage, it is important, first of all, to determine for yourself the main criteria that it must meet in its work:
- compactness is perhaps one of the most important criteria, since there must be enough space to carry out vehicle repairs;
- health safety - despite the fact that the garage is not a living space, its owner can often spend a considerable amount of time in it, and the way he breathes air plays an important role;
- ease of operation, installation, etc. - undoubtedly an important criterion, since setting up a heater is not the purpose for which the garage owner visits him;
- autonomy.
A little later we will consider the most diverse options for heating devices, but before starting to get acquainted with them, it is important to determine for yourself what functions they will perform. It depends, first of all, on the area of the building, the presence of ventilation in it, etc.
Some say that it is more convenient to work at a not very high room temperature, and if you are one of those who think so, then a not very powerful compact heater model is quite suitable for you. But first things first.
Garage heater requirements
Garage heater requirements
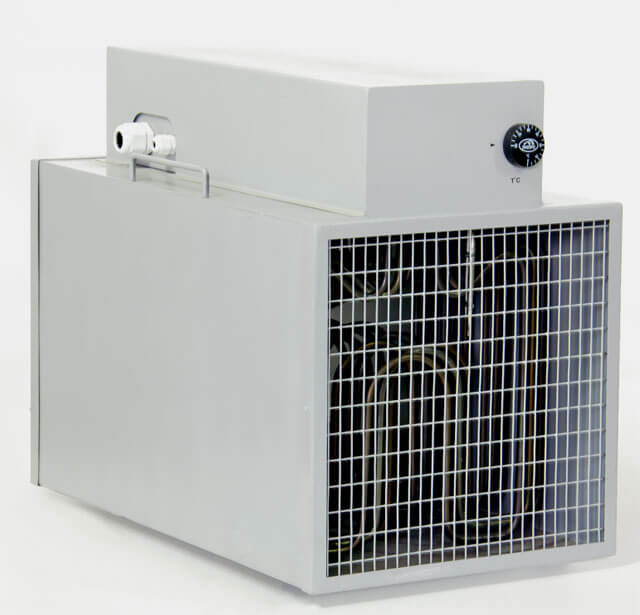
As a rule, garages are heated using small portable devices that can quickly warm up the room and maintain the temperature at the desired level. These heaters are used in garages, camping tents, greenhouses, etc.
Many craftsmen abandon the idea of creating a homemade heater, mistakenly believing that this will require buying expensive components and, in general, spending a lot of time. However, it is not. There are many simple and low-cost models of heaters that can provide the most comfortable conditions for using the serviced room.
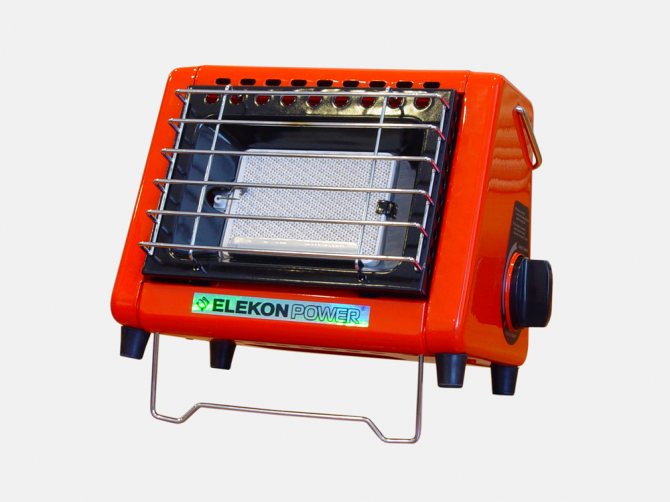
Heater Elekon Power PG3B
Self-made units are in many ways similar to factory-made mechanisms. Therefore, for the assembly of the heater, you can take some factory model as a basis. In general, the principle of operation of most existing home-made units is based on the same element - thermal film.
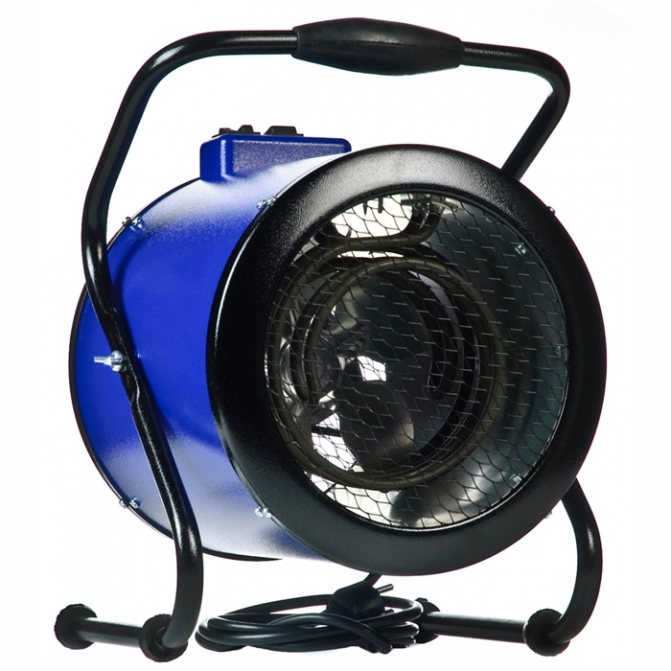
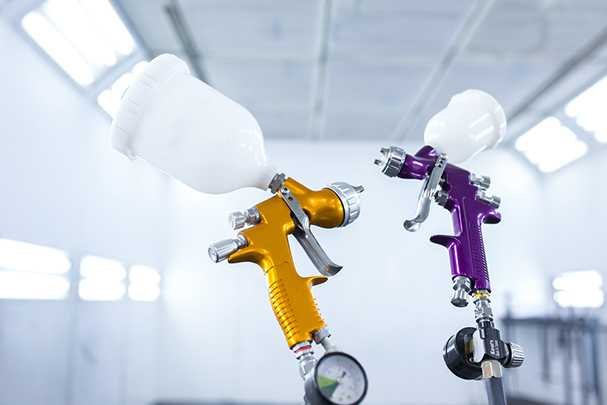
Heat gun Daire
The thermal film creates heat and transfers it not to the air, but to nearby objects, and they already heat the environment. That is, a homemade heater will not waste energy. The minimum amount of heat is transferred through the air, which makes heating as efficient as possible.
The device that you are invited to assemble will consume a minimum of energy and give off maximum heat.
Traffic

Run to keep warm
Not sure how to keep warm in the car if the above methods are not suitable for you? Remember the main character from the movie "The Irony of Fate or Enjoy Your Bath"? That shot of him jumping in place and jogging to keep warm. In fact, this is the most effective way to keep warm, but also the easiest. That is why I got to one of the bottom lines of the rating.
You can recommend the following: turn on the music (if there is enough charging in your mobile phone), put on headphones and beat out the rhythm with almost all parts of the body to the groovy melody.
It is also helpful to rub your limbs periodically to keep them from going numb.
If it does not help, then you need to leave the salon. And quickly run around the car for as long as possible. At the same time, you need to breathe slowly and evenly. After warming up, you should not stay outside. Get back in the car. Freeze - go out again.
Thermos seventh place in the rating
A regular thermos, preferably a voluminous one, will help to warm up well in the car. Or rather, not himself, but its contents. Hot tea has a good effect on blood circulation and does not constrict blood vessels, like coffee. And the best way is to carry just a thermos with a hot thyme drink. This tea will warm you very quickly. As you know, the substances contained in this herb growing in the mountains are very useful for the human body. Since ancient times, frostbitten travelers were warmed with just such tea, giving it to drink.

To keep warm, you can drink a cup of hot tea or coffee.
The British would suggest drinking some grog or mulled wine. But in addition to hot water, then you need to take a bottle of semi-sweet wine with you on the road.Ideally, the wine should be boiled, but on the road, it can simply be mixed with hot water. It will not only help you keep warm in winter, but also cheer you up. But it is better not to get carried away with alcoholic beverages, such as vodka, while sitting in the passenger compartment. They warm only illusory, but in fact the consequences can be disastrous. "Under alcohol" you can safely fall asleep and freeze.
You can also mix it with hot water with linden honey, which can be kept in the glove compartment of your car. A spoonful of honey mixed with hot water will warm you better than any other remedy.
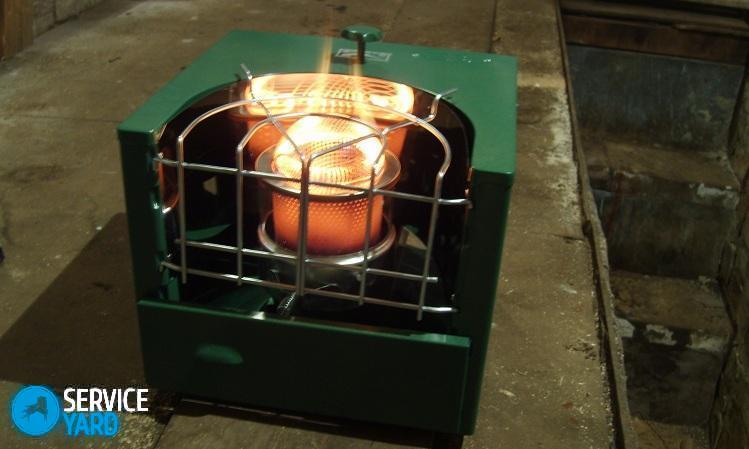
Heating with liquid fuel
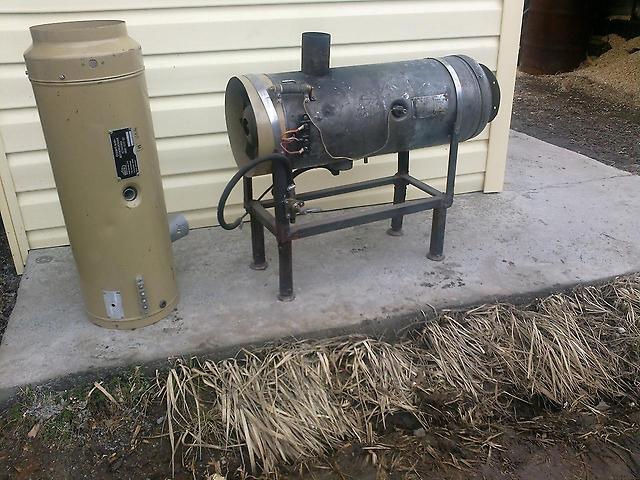
Do-it-yourself budget heating of a garage can be done using liquid heating units, including home-made ones. In our reviews, we have already described working furnaces that provide cheap and, in some cases, free heat. For example, if you are changing engine oil, then during the spring and summer you can collect several barrels of finished fuel. A properly assembled oil stove will generate a large amount of heat and will delight you with even combustion without soot and soot.
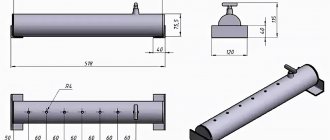
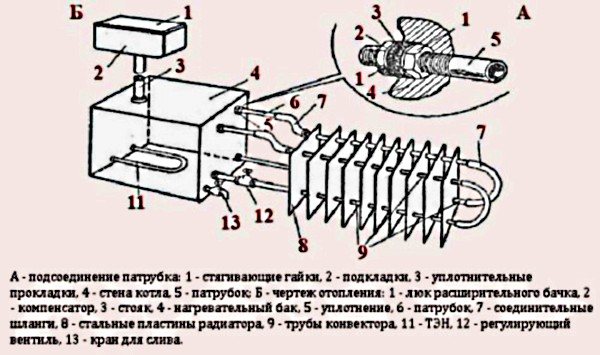
Good results are given by pyrolysis-type ovens, consisting of several parts, as shown in the figure. A fire is ignited in the oil container, as a result of which oil vapors and pyrolysis products begin to form. They are burned in a vertical orifice tube, generating a lot of heat. By adjusting the oxygen supply, you can adjust the intensity of combustion.
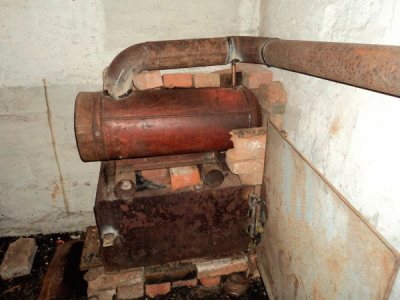
When using any oven, it is better to set a separate corner for it. You also need to think about a reliable base and lining of adjacent walls with non-combustible materials.
Using a plasma oven for heating a garage, you can achieve maximum heat output and minimum fuel consumption. The oil here breaks down into its constituent parts in a hot bowl, after which it burns to form a bluish-white flame, similar to plasma. Of course, there is not even a trace of plasma here, since it is formed at much higher temperatures. These ovens are characterized as the most productive.
Standalone gas burners
Self-contained gas burner
The third place in the rating is the best way, but since it implies the use of an autonomous heater, and we need methods of fighting the cold, so to speak, “with our bare hands,” he got to the third line.
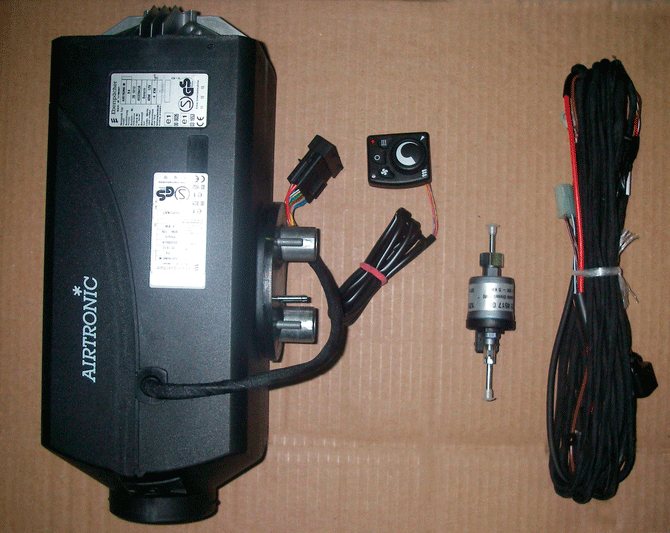
The choice of autonomous heaters for cars today is quite wide. Among the many models, a liquid heater can be distinguished, for example, such as Webasto. Such heaters will not only warm the car interior, but also help start the car engine, as they are pre-heaters for the liquid. Only now they are expensive and you need to correctly install this heater on the car.
Now about completely autonomous heaters, among which gas heaters come out on top. They use infrared burners as the main element. Such a heater will not only warm up the interior, but also make it possible to boil tea or warm up food. But in addition to the heater, you will have to carry with you a bottle of liquefied gas. So for a passenger car, a five-liter cylinder is fine.
The video shows how an autonomous gas burner works:
One kilowatt is the rated power of such a burner and it is quite enough to keep warm. As for the flow rate, it is unlikely that more than 80 grams of gas will go off per hour. This means that you will be able to provide yourself with heat for a day or even more. The gas burner itself is very convenient, lightweight and compact. Carrying it will not cause any inconvenience, only in addition to the cylinder, you must not forget to take a lighter, a hose and a reducer with you as an additional equipment.
Ignite the gas burner away from combustible materials and observe fire safety measures in every possible way. In addition, it will be necessary to periodically ventilate the interior so as not to suffocate in the smoke. Experts advise placing the gas heater in a special box in order to completely exclude contact between the burner and the car. Prometheus gas burners have proven themselves quite well.
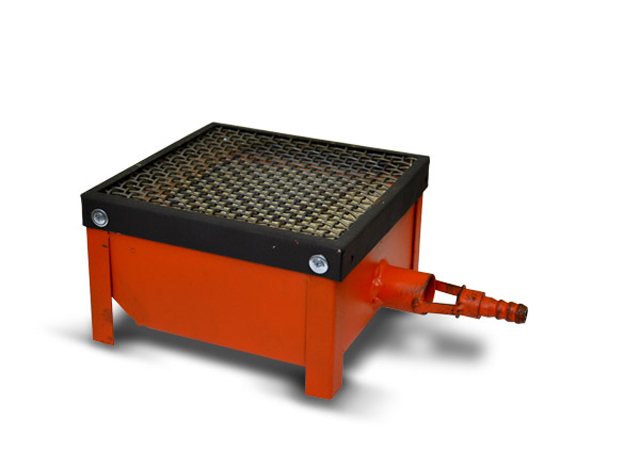
Making a heater for the garage
To maintain a comfortable temperature in the garage, it is not difficult to make a waste oil heater yourself. At the same time, the problem of its utilization will be solved, which is also an urgent issue for car owners. For its assembly, almost all elements and spare parts can be found in your own garage.
When making a heater you will need:
- metal pipes;
- TEN (heating element);
- waste oil;
- wire with a plug.
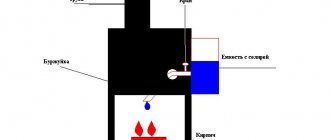
Structurally, the body can be made in any form, convenient for placement in the garage. The photo shows one of the possible schemes of the device.
Diagram of a homemade oil heater
Metal pipes are used of any diameter. It must be borne in mind that the thinner they are, the more they will be needed. The temperature of the room will depend on the area that gives off heat. The length of the pipes is also arbitrary, it is desirable that it be maximum, but at the same time ideally in harmony with the dimensions of the wall on which it will be installed. The metal from which the pipes are made is not essential. The wall thickness of the pipe can be any.
The heating element is selected by power and voltage. Practice shows that 1.5-5 kW of a heater is enough for heating. Here it is necessary to take into account that the comfortable temperature of the garage and the apartment is significantly different. And such a wide range of power is given based on the size of the heater. The voltage for connecting the heating element is taken as standard - 220 V. (we do not consider other parameters here).
Waste oil. Most motorists change the oil in their cars almost 2 times a year on their own. Therefore, working off, as a rule, is available to everyone. It remains to collect the required amount and start manufacturing the heater.
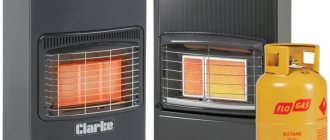
Gas heaters
Benefits of using:
- energy savings,
- compactness,
- high power,
- fast heating of the building,
- gas cylinders are inexpensive and readily available.
Mobile heaters are convenient not only because they can be placed anywhere, but also because they can be carried elsewhere.
Increasingly, gas burners are chosen for intermittent heating, because these devices are small and economical. According to their design, such heaters are divided into 2 types:
- open combustion chamber - safety valves and air analyzers are installed in them, blocking gas leakage,
- closed camera - such devices are more safe and reliable, because harmful substances are excluded from entering the room.
To operate gas ovens, a separate boiler room will be required at a regulated distance from the garage, since gas equipment in the same room with the machine is prohibited! And you also need special permission from the relevant services.
If the goal is to warm up the RV from time to time, you can use gas cylinders. Calculate the volume of gas required based on the expected mode of use and the power of the operating unit. You need to keep the cylinders in a metal cabinet, preferably insulated, which is located above the floor level.
Gas units are of several types:
- heat guns,
- infrared burners,
- gas convectors,
- catalytic devices.
As for the latter, their process of work occurs without a flame - a chemical reaction, which results in the oxidation of gas with oxygen, releases heat.The catalyst here is platinum or other elements of a similar group. These heaters are lightweight, easy to use, but there is one drawback - they are quite dangerous to handle.
A few words about the convector - it burns the gas-air mixture in the tank, which is separated from the room by hermetically sealed walls. A prerequisite is the prevention of drafts. Often, oxygen is taken from the outside of the garage, and combustion products are thrown out there, so you can not be afraid of carbon monoxide poisoning.
Infrared burners do not heat the air, but nearby objects. This heating method is also very effective and affordable for garage space.
Heating the garage with a heat gun is the most effective way to heat the air. The appliance will instantly raise the temperature to the required value. The gas cannon is often used in large garage complexes and service stations. The principle of operation consists in the combustion of gas and the operation of the fan, as a result, warm air blows.
When choosing a gas cannon, you should take into account the following nuances:
- squaring the garage,
- how much time do people spend in a heated room,
- what is the level of thermal insulation of the building.
An important point - these heat guns are contraindicated in facilities where people spend a lot of time, because a lot of decay products accumulate in the air. The advantage of the device is mobility, the disadvantage is the exhaust of harmful substances.
How to make a heat gun yourself
The base will serve as a gas burner and a cylinder, which is filled with lighters. We cut the gas pipe in half, and then we solder the desired piece of pipe with a diameter of no more than 90 mm. Then we mark the pipe into which the burner is inserted and make holes - about 5 mm - for air circulation. And the outlet of the burner nozzle itself is reamed up to 3 mm.
Furnace device:
- fan,
- burner,
- trumpet.
For more details, see the video:
Compliance with all safety rules and regulations when working with a gas cannon is mandatory!
What you need to consider when assembling a cannon with your own hands:
- it is necessary to exclude the possibility of ignition and explosion of the device,
- heating elements should not emit toxic substances and dry the air,
- there must be the ability to quickly heat the garage,
- the unit must take up a minimum of space,
- the cost of a homemade device should not exceed purchased counterparts,
- you need to equip appliances with thermostats to maintain a comfortable temperature in the building.
What is forbidden to do with a working heat gun:
- direct a hot stream of air to flammable substances,
- use the unit as a dryer for clothes,
- fill the cylinders yourself.
Method thirteen well, this is really for extreme people
If you often find yourself in situations where you have to deal with the cold in the car (for example, you are a traveler), then you can take an ordinary wood-burning stove with you on the road. If you don't believe me, take a look:
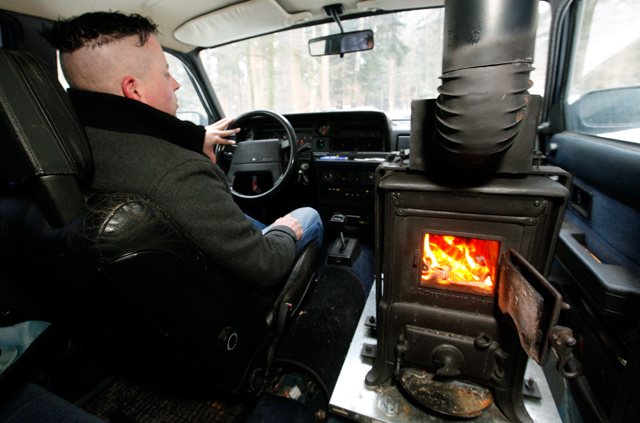
A real oven in the car
How is it? Believe it? You can stock up on firewood or brushwood for free, for example, if your forced stop occurred in the forest or next to an old and dilapidated building, in which there are many boards.
If the car stalled in winter, then do not despair. Armed with one of the heaters listed above and having studied all the tips described, you will not freeze and survive in harsh weather conditions. Even being in the car at night, alone with the cold and harsh winter, it will be possible to create all conditions similar to home comfort in the cabin. So, do not hang up the nose of motorists!
The best prices and conditions for the purchase of new cars
It has long been known that a comfortable temperature for a driver is in the range from + 21 ... 23 degrees Celsius. Cold temperatures negatively affect focus and alertness while driving, causing irritability. And driving with limited visibility due to icy windows affects safety.
If you at least once had to get to your car in the parking lot during severe frosts or just sit in an icy car interior, just leaving a warm home, then you know firsthand that this feeling is not pleasant. And how I would like to warm up at this moment. You can, of course, run around the car or leave the snow while the interior warms up, but there are also less radical methods. As always, there is a way out and has long been known among motorists - an autonomous interior heater, which will gladly give comfort.
Working with pipes
After the scheme of the oil heater is selected, it is necessary to make its case. We make a drawing, determine the dimensions and start working with a grinder. The pipes are cut to length in the required quantity. After cleaning the ends, they are carefully and thoroughly welded. The operation of the entire heater as a whole will depend on the quality of welding. A leaking seam is not only a nuisance, but also a possible cause of a fire. When welding the ends of the pipes, leave one (on the lowest pipe) free. Subsequently, a heating element will be inserted into it. This means that the stub will have a different configuration.
Finished pipes are tied together. The piping is done with pipes, only of a smaller diameter. On the uppermost pipe, it is necessary to provide a place where the filler plug will be located. Structurally, it can be made in the form of a welded short squeegee with a coupling, one side of which will be welded. Using your plumbing and mechanical experience, the configuration of the heater can be made more aesthetically pleasing than the one in the photo. By the way, the body can be not only tubular. For this purpose, radiators from cars, old cast-iron radiators and other closed containers are well suited.
Electric garage heating
The easiest way is to heat the garage with electricity by adapting a suitable heater, purchased or homemade, for this. If there is no money to buy factory equipment, you can make it yourself. The simplest heating device is a goat heater, the most affordable, but also the least efficient. It is done easily and simply - some kind of non-combustible dielectric is taken, a wire of nichrome is wound around it. Next, we connect an electrical cable to the product and plug it into an outlet.
Among all the options for heating the garage, this option is considered the most dangerous - with electricity in general, jokes are bad. Bare nichrome wire is used here, there is no insulation. Users could be burned or electrocuted and there is a risk of fire. It is forbidden to leave such heating unattended. And in general - you should not use such artisanal and extremely dangerous heaters.
Electric heating of the garage can be organized with factory heaters:

Before you start choosing the type of heating, it is worthwhile to attend to at least the minimum thermal insulation of the garage. Otherwise, the heat will simply go out into the street.
- Heat guns - they are extremely safe and provide fast heat injection into the garage. It takes a few minutes to warm up the entire volume, after which it will become warm in the room. Minus - increased noise level;
- Infrared heaters are a modern solution with high efficiency. Infrared heating of the garage does not dry the air and does not harm your health. Simple infrared heaters are used here, which do not heat the air itself, but the surrounding objects, as a result of which they begin to emit heat;
- Electric convectors are a great way to heat up a garage in winter and not have to worry about installing or manufacturing complex equipment;
- Electric boilers - in this case, a classic water heating using an electric boiler is organized in the garage. A boiler for a garage is selected in accordance with its area and heat losses, focusing on the formula of 1 kW of heat per 10 sq. m. area.
Heating the garage can also be organized with the help of a home-made boiler - for this you need an electric heating element of suitable power, which must be built into a metal pipe of one diameter or another. Further, bends are welded to the pipe, to which a water heating system with batteries is connected. By the way, the same batteries (heating registers) can be made independently using pipes with a diameter of 100 mm.
Classic electric heaters
This is a rather wide area, as there are a lot of heaters that run on electricity. Everyone knows what an electric heater is, since it is they that we most often use in everyday life. All devices have practically the same principle of operation: thanks to the electric current, the spiral heats up, giving off its heat either to air or to a heat carrier (most often oil). It is logical that for the operation of heaters of this type, an electrical network is required.
Among the advantages of such devices are:
- Ease of use.
- Mobility and accessibility.
- Good heating level.
- The ability to control the temperature.
All you need to do is connect the device to the network and press a button. This is a good choice if you need to use heating periodically. I would like to note that there are such types of devices that you can buy:
- oil-fired radiators;
- heat guns;
- wall convectors;
- fans and heat curtains.
Each of them has its positive and negative sides. It is unprofitable to use such devices to regularly heat the garage. Such heaters cannot be called energy-saving. Their use is rational for short-term use.
When choosing equipment, pay attention to the degree of fire safety of the device and its power. Remember, most often a garage fire occurs precisely because of a breakdown of an electric heater.
DIY oil heater
Due to their impeccable functionality, characteristics and efficiency, oil heaters have gained great popularity among summer residents. They are safe and compact, and have a high level of efficiency.
The device of a home-made oil heater is very simple: a sealed case with oil (any gas cylinder or other sealed container can do), around which electric tubular heaters are wrapped.
To make an oil heater, you need the following materials and tools:
- Hermetic container (radiator from the car, metal or aluminum battery).
- Transformer or technical oil.
- 4 heating elements.
- Electric motor or pump of low power (up to 2-2.5 kW).
- A set of drills, drill, welding machine, electrodes, switches.
The process of installing an oil heater at home follows the following scenario:
- Frame installation. The frame needs to be made so that it is transportable and easy to use, it is also worth considering the way it is stored in the warm part of the year. The corners are welded together using a welding machine.
- Holes for installation of heating elements. The holes can be made with a grinder or welding, and best of all with an autogenous one (if it is possible to get it).
- Mounting a pump or motor. You can install a motor or pump directly on the heater body or on a frame. It is necessary to ensure that the pump does not touch the heating elements.
- Fastening of heating elements. The heating elements are installed in a pre-prepared place using bolted connections.
- Tightness. To achieve tightness, all holes must be welded. For more convenient use of the heater and emergency drainage of the liquid, you can mount a cover that would be screwed to the body.
- Connecting heating elements. They need to be connected in parallel (this is how the heater will work effectively).You can select the desired temperature using the regulators.
- The oil heater is almost ready. It remains to assemble everything on the frame and ground the entire device.
A do-it-yourself oil radiator will be an excellent and effective heater for home and summer cottages. Its only drawback is dependence on electricity and its high consumption.