Today, the design of a country house in the national style with a brick stove is becoming more and more popular. Many live in renovated old houses, not knowing how to improve and how to paint a brick oven. It is not necessary to break it, it is better to give it a chance for a second life.
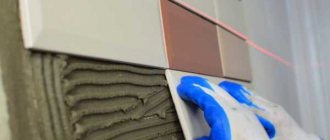
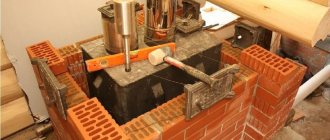
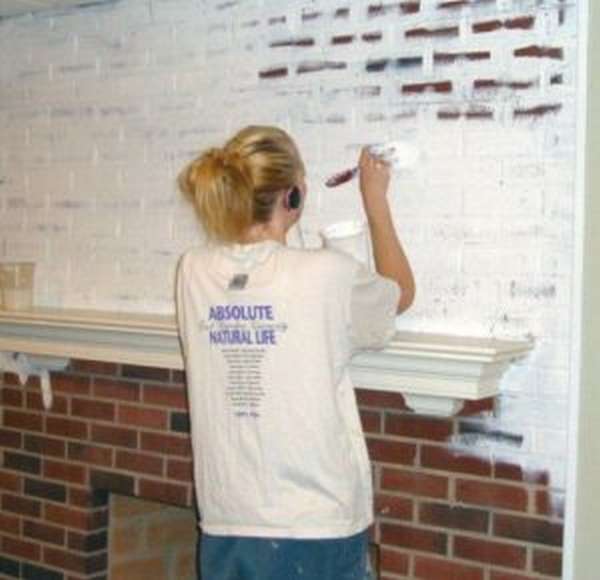
Brick lining of the furnace.
Cracks in plaster - a disease of brick ovens
Very often the walls of a stucco stove are covered with a large number of cracks. It's all about the overheating that happens when using the stove. Warm air, unevenly distributed, heats up one part of the masonry very much and not very much the other, that is, hot bricks expand and shift from overheating.
After the temperature drops, the bricks remain in place. Over time, repeated overheating leads to a curvature of the outer wall. It is very difficult to notice it, but this is enough for the appearance of cracks in the plaster. However, it would be premature to break the oven in such a situation, as it can still be fixed by making repairs.
Design Tips
Any designer who draws up architectural projects can help to make a stylish design of the stove and answer the question of how to paint a brick stove in the house. Also, a large number of creative ideas are on the Internet.
As for fashion trends, today all the designers of the world recommend decorating such heating units to a minimum, resorting to natural finishing materials and uniformity, deciding how to paint the stove. That is, some art objects and colored drawings are gradually going out of fashion. Stoves decorated with natural or artificial stone, as well as those complemented by ordinary ceramic tiles, look interesting.
How to extend the life of your oven
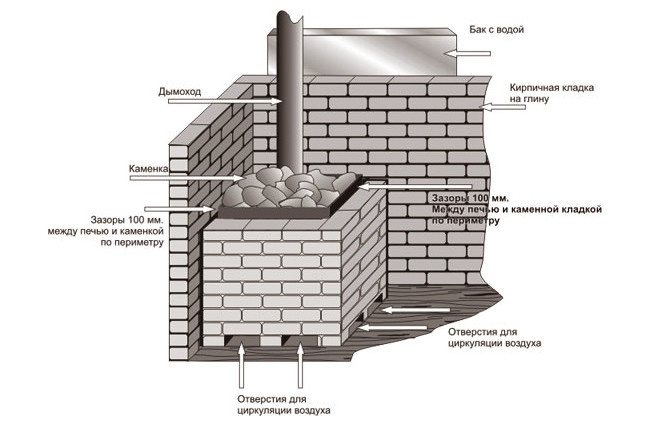
Stove-heater scheme.
Repair can be done by hand. This does not require a lot of free time and skills. If the walls are refurbished with high quality, the old stove will work for a very long time. The presence of cracked plaster may indicate that combustion products penetrate into the dwelling, and this is already serious.
Some simply fill up the cracks with clay and paint over the stove. Experts say this is wrong. The outer masonry of the stove must first be strengthened. To do this, it is enough to make a wire tie.
For work you will need:
- punch or hammer and chisel;
- steel wire;
- a hook or bar for tensioning the wire.
Outside, several horizontal grooves are grooved on the brickwork, having a depth of 1.5-2 cm. Subsequently, the wire laid in the groove should completely encircle the stove. After installing the wire, it is tensioned. To do this, you can take a metal rod or a special hook and make twists in several places. Furrows are sealed with clay mortar. The walls are plastered with clay-asbestos mortar.
It is better to put the plaster on a preheated oven.
All about greenhouses and greenhouses - parnikiteplicy.ru.
Painting of cast iron elements
During the operation of the heating furnace, all cast iron surfaces become very hot. To restore the beautiful appearance of the elements, it is recommended to paint the surfaces with a heat-resistant enamel that can withstand any extreme temperatures. The composition of the material includes components that protect metal parts from rust and erosion. This enamel is a reliable protection for oven fittings.
Before painting, the cast-iron surface is cleaned of dust and dirt. Further, it is recommended to grind the element with sandpaper, then degrease it with a solvent.Since paint for metal parts is sold in aerosol form, it is recommended to protect nearby walls with foil or plain paper. Shake the balloon before painting, then proceed directly to spraying.
Brick oven painting
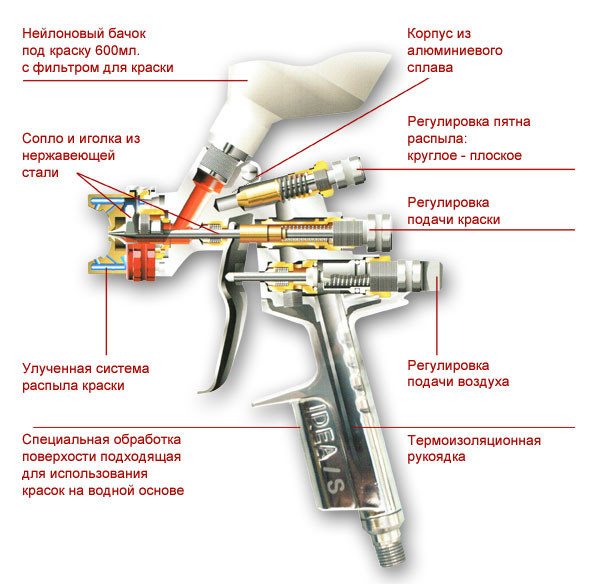
Spray gun device diagram.
The following materials may be needed to complete the work:
- brushes;
- containers for paint or lime mortar;
- roller;
- varnish;
- glue;
- lime;
- a piece of chalk;
- enamel;
- dyes;
- solvent.
If there is a plaster layer on the outer walls of the oven, painting can be done with both lime and chalk mortar. They are easy to do with your own hands. A solution of chalk is prepared as follows: it is necessary to place chalk (pieces, paste, powder, granules) in a large container and pour water in a ratio of 1 kg of chalk to 1.25 liters of water.
In addition, it is necessary to purchase special glue in advance at the rate of 0.1 kg per 10 liters of solution. You can find it in shops that sell painting supplies. As a substitute, wood glue diluted in water in the same volume is used.
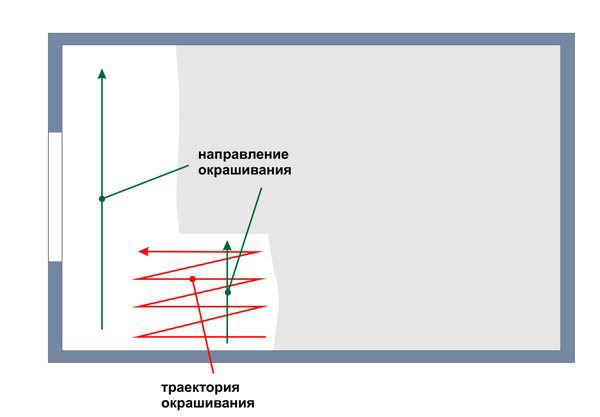
Brick wall painting scheme.
Dissolving chalk in water, by stirring, achieve the required density. The consistency readiness is checked as follows: whitewash is dripped onto a vertically installed glass, and if the drop stops moving after 20-30 mm, the consistency is ideal.
If you need to add color to the dyeing composition, use special dyes. When choosing, you need to make sure that they are resistant to heat. You can take a simple blue in the ratio of 0.1 kg to 17 liters of solution.
Blueprint is currently not available, so it will be quite difficult to find it. Before starting painting work, you must make sure the integrity of the plaster layer, then use a brush to clean it of dirt and dust.
They usually paint in two stages. Dry the first coat completely before applying the second coat. Of the disadvantages of cheap chalk staining, one can single out the fact that it is very difficult to achieve a solid color. Although this can also be used as a decor - the stains left by the maklovitsa will add flavor to the stove. Quite tolerable uniformity of paint can be achieved using a roller with medium pile.
If lime whitewashing is used, then 0.7 kg of slaked lime is taken for 1 liter of water. If you add a little drying oil or salt to the lime, this will increase the coefficient of water resistance of the coating. For color, as in the first case, add blue or dyes. The only difference in the production of work is that there is no need to wait for the first layer to dry, that is, the second layer can be applied immediately after the first.
The principle of operation of the spray gun.
You can not use chalk for whitewashing, and then lime and vice versa. If the old paint was made with lime, but you want to paint it with chalk, you must completely remove the old layer. Ideally, the stove should be revised after each winter, as multiple heating and cooling cycles can lead to cracks or defects.
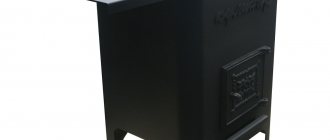
The metal parts of the stove should also be put in order; during operation, they become covered with soot, whitewash or rust. For painting them, simple enamel will not work; as a result of overheating, the paint will crack and change color. It is necessary to purchase heat-resistant enamel, it is produced in aerosol cans.
You can find paints that can withstand up to + 600 ° C without losing their characteristics. Such paints will not be covered with a cobweb of cracks, they are elastic. Using sandpaper and a rag, the metal elements of the furnace are cleaned before painting, then the surface is degreased with a solvent.
Newspapers are glued around metal parts with adhesive tape in several layers. Newspapers are overlapped. The floor is covered with oilcloth.Heat-resistant enamels do not require a primer layer, especially since it can rarely withstand high temperatures, that is, having cleaned the surface, you can paint immediately.
Before staining, the balloon is shaken well, otherwise the layer may turn out to be uneven. The aerosol is applied to the part from a distance of 0.25-0.3 m. There is no need to wait for the paint to dry, the oven can be melted immediately.
The nuances of staining
It should be understood that there are several reasons when you can resort to painting a brick stove. So you can approach this issue from the aesthetic side, from the practical and for the sake of safety. As for aesthetics, a stove in a house is needed not only to heat the house and be comfortable in it, but also to maintain the interior and create special coziness. On the practical side, after the fireplace is painted, the heat output increases and the stove surface is leveled.
We offer you to familiarize yourself with the Features of village life
Note! From a safety point of view, thanks to painting, it is possible to prevent the appearance of microcracks on the brick and, as a result, prevent a fire in the home.
There are several options for painting a structure. You can do this:
- enamel;
- oil paint;
- drying oil;
- heat-resistant varnish.
As for the enamel, it is strong, moisture resistant, interacts well with other materials and has increased durability. Experts cite the following figures: about 200 sudden changes in temperature are able to endure enamel. It should be noted that the color choice is very scarce.
Heat-resistant oil paint for ovens is the best solution, since there is a large selection of colors, the paint can withstand temperatures of 600 degrees Celsius, it is guaranteed to protect the brick from oxidation, has increased resistance and durability. In addition, it is easy to apply and does not need any additional priming on the outside. However, there are disadvantages in the form of unpleasant odor, toxicity and long drying times.
Drying oil is a material that is not able to change the color of the brick, but only slightly make it darker. As for the positive qualities, this coating is reliable and safe. The only drawbacks are the price.
Heat-resistant varnish is a coating that can improve the technical characteristics of a brick surface.
Note! The peculiarity in its use is that it can be diluted with gouache to acquire the desired color with a shade.
Metal furnaces are highly susceptible to oxidation degradation due to their molecular composition. Metal trace elements react with air and, as a result, lead to oxidation. Due to the high temperatures, this process is significantly accelerated. As a result, the service life of the furnace equipment is reduced.
Cast iron is a sufficiently strong metal that is favorably able to withstand prolonged exposure to high temperatures. According to some sources, it is possible not to resort to painting the metal, but it is better to do it. An excellent option for a cast iron stove is the use of water-based acrylic or polyurethane paint, which has already proven itself to be excellent. In addition, the cast iron alloy will be able to withstand even disturbances during painting more favorably.
The painting process itself looks like this. First, the surface is pre-cleaned with a metal brush. Next, the oxidations are sanded with sulfuric acid, and the mixture is washed off with a soap solution. Then the metal is degreased with a solvent and covered with paint. This is the whole dyeing technology. In this case, the painting of the metal oven should be uniform. All seamed corners should be reworked as much as possible.
Note! If you do not want to drip onto the surrounding elements of the oven, you must use cellophane with masking tape.
Brick stoves
You can paint a brick stove using enamel, oil paint, drying oil and heat-resistant varnish.
In the first case, the structure will be protected from moisture, will have good strength and durability. In the second case, the plastered and painted surface will be able to withstand high temperatures, and in the latter cases it will be able to impart strength to the brick.
How to paint the stove: tips and tricks
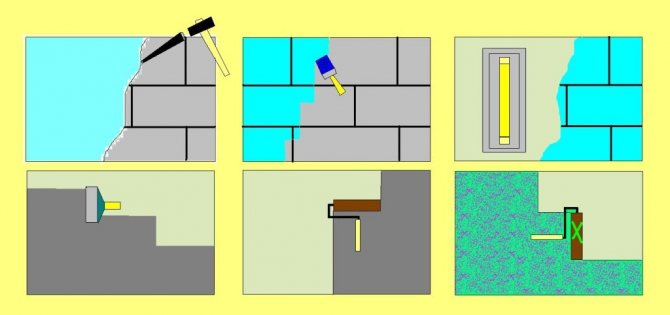
The scheme of plastering and painting the wall.
Not every paint is able to withstand temperatures up to 80 ° C, therefore the question of choosing a material for painting arises. In any case, before painting, it is necessary to put the surface in order, fix all defects, repair chips and cracks.
You can make your own oven paint. In this case, you will not need especially expensive materials. You need to purchase the following items:
- turpentine;
- PF-283 varnish;
- gouache of the required color.
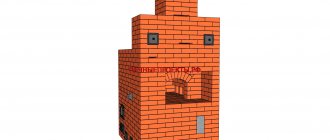
Figure 1 shows: 1 - gate valves; 2 - reverse thrust; 3 - cooking place; 4 - main riser.
1 liter of turpentine requires 1 liter of varnish. The materials are thoroughly mixed. The prepared solution has a transparent color, but after staining it will give the coating a matte shade.
To make colored enamel, you need to take gouache and dry it well. The color of the gouache does not matter and is selected individually. When the gouache is dry, it is ground into powder. It remains only to gradually add the powder to the turpentine and varnish solution until the desired color is obtained.
Paint selection criteria
Choosing an element such as heat-resistant paint for stoves in the country, it is necessary that it be stable, reliable and durable.
Note! It is better that it dries quickly and is moisture resistant, does not have a burnt smell.
Heat resistant paints
Heat-resistant paints for ovens are dispersion paints and varnishes made of an acrylate substance. They are made on a water-based hydrocarbon base. Any acrylic mixture is suitable for painting the boiler brick and plastering the surface. Specialized heat resistant metal paint for ovens will work great.
In everyday life, water-dispersive type of thermal paints are often used, which are designed to use a cast-iron stove with plaster heated to four hundred degrees Celsius. There are heat-resistant paints with organosilicon compounds, acrylic and alkyd components.
Water-based paint is a group of paints and varnishes, the most popular of which is a composition of acrylic, polyvinyl acetate, latex, silicone and silicate. The advantages of each of the above formulations are heat resistance, moisture resistance, strength, minimum cost, ease of use, short drying time, environmental friendliness, great variation.
When thinking about how to paint a brick stove in a house, it is important to note that tiling is more expensive than painting. Another advantage is easy and quick application: it can be applied in a few hours and the coating will dry. In addition, heat-resistant paint for fireplaces and stoves is not toxic, it can be used in the house and the choice in each store is huge.
Note! As for the disadvantages, they do not consist in the presence of an unpleasant odor during the drying process, but during the operation of the furnace equipment it does not exist, there is a deeply penetrating paint for the stove and peeling of the coating or color change with strong heating.
Another way to make paint
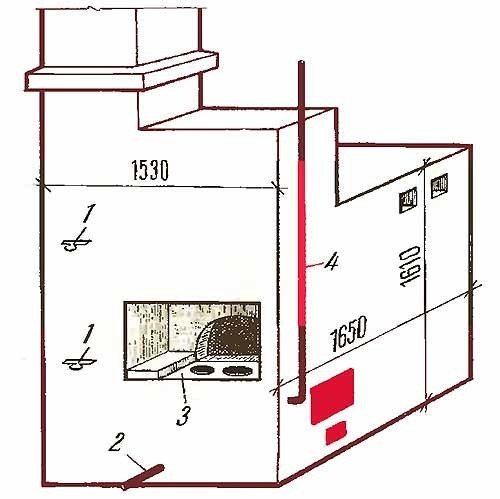
Image 1. General view of the furnace: 1 - gate valves; 2 - return pipeline; 3 - plate; 4 - main riser.
For cooking you will need:
- brick chips (brick ground into flour);
- eggs;
- milk.
Whipped protein and milk are added to the brick powder. The approximate amount of proteins ranges from 10-15 pcs. (depending on the surface area). It is necessary to achieve a consistency that can be easily applied with a stiff brush.
With the same solution, but with a thicker consistency, surface defects can be repaired. As a result, after painting, the oven should acquire a bright red hue. This color is resistant to temperature extremes, overheating and mechanical damage. If the color is not bright enough, then at the very end you can cover the surface with a layer of drying oil.
Folk painting methods
You can make the lining of the stove in different ways. You can plaster it, trim it with tiles, close it with facing bricks, use clinker tiles for this, decorate it with tiles or natural and artificial stone, or you can combine different materials with each other.
There is an option to simply whitewash the plastered walls or cover it with water-based paint, making some interesting pattern of Russian motives.
Homemade varnish
To make homemade paint, you need egg whites.
- Grind the red brick to a powdery state, then sift through a sieve.
- Add egg whites and fresh milk to the powder so that the mass resembles thick sour cream in consistency.
- Mix the ingredients well.
The solution is applied to a warm surface, after which it is recommended to additionally cover the brick with linseed oil or varnish from above. Such a coating will last a long time, because the mortar protects the brick blocks from cracking and abrasion. This option will look great in an interior with natural accents.
Stages of painting a brick oven
If it is decided to paint with enamel, it will be necessary to purchase heat-resistant enamels of silicon-organic type. Before painting, it is necessary to check the density of the enamel, if it is too thick, then it is difficult to work with it, it is almost not absorbed into the brick.
Therefore, when buying, you must immediately purchase a solvent. If for some reason there is no solvent, you can use ordinary turpentine. Having achieved the optimum consistency, start applying the first layer with a brush.
Before painting a second time, you must wait until the paint of the first layer dries. This may take 10-15 hours. Although some, having waited for the moment when the paint sticks when touched, but does not stain, they begin to apply a second layer.
The third layer is necessary only if, after applying the other two, a brick is visible or stains are visible. Brick fireplaces are painted in the same way.
Why paint?
There are several reasons for staining brick stoves:
- Aesthetic side: the stove in the house serves not only for heating and a comfortable stay in the house, but also for maintaining its interior, creating a special comfort in the atmosphere of the home,
- Practical side: after painting the fireplace, the heat transfer to the house increases, the surface of the stove becomes even,
- Increased safety: treatment of the furnace surface with various means prevents the appearance and growth of cracks in the brick.

Applying a pattern will make the oven more beautiful
Applying a pattern to the stove will make it special and even more beautifying. The stencil can be cut from hard cardboard, which is first decorated with the ornament. Painting is done with paint based on gouache and egg white. Gouache is diluted in water, an egg is added there. Everything is thoroughly mixed.
It is better to stock up on two stencils, and while one dries, use the second. It can also be noted that enamels and oil paints have a good heat transfer rate, and the lighter the color, the less heat the room will receive.
Chalk or lime
The whitewashing of the stove with chalk and lime has been known since the very inception of Russian society.All that is needed for this today is to take 50 grams of salt and dilute it with 1 kilogram of lime. Then dissolve this mixture in water to a creamy mass. It is better to use low-fat milk instead of water.
As for chalk, it needs to be crushed and several liters of milk must be poured into 1 kilogram of the composition. It is worth noting that the addition of 50 milliliters of blue is necessary. This is necessary so that during use the white stove does not turn yellow or look like bronze. The prepared high-temperature mixture in the first and in the second case should be used as quickly as possible, until the composition has frozen.
Recommendations
As in any other case, all users recommend working in a room with open doors and windows so that air flows freely and the person does not get poisoned. It is also advised to do staining with protective gloves and a special protective mask. Especially when it comes to using varnish.
Many users recommend using water-based formulations based on their experience, since components such as varnish can be toxic and lead to serious respiratory diseases.
Note! Some even recommend abandoning toxic paint and harsh enamel compounds if the stove is operated in the house, giving preference to natural tiles or even natural and artificial stone.
In general, there are many ways to make a beautiful stove. There are different staining methods. To do everything right, you need to choose the right paint and pay attention to the recommendations presented above. In the absence of experience in painting, it is better to give preference to another facing material or hire professionals.