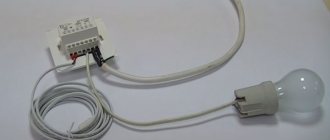
I want to make every home as comfortable and warm as possible. The heating system has gone through several transformations in recent years. Today, many houses are equipped with an element such as "warm floor". There are many old-timers in the heating technology market, but ambitious newcomers are offering innovative approaches to heating solutions. One of these manufacturers is the Swedish company Thermo.
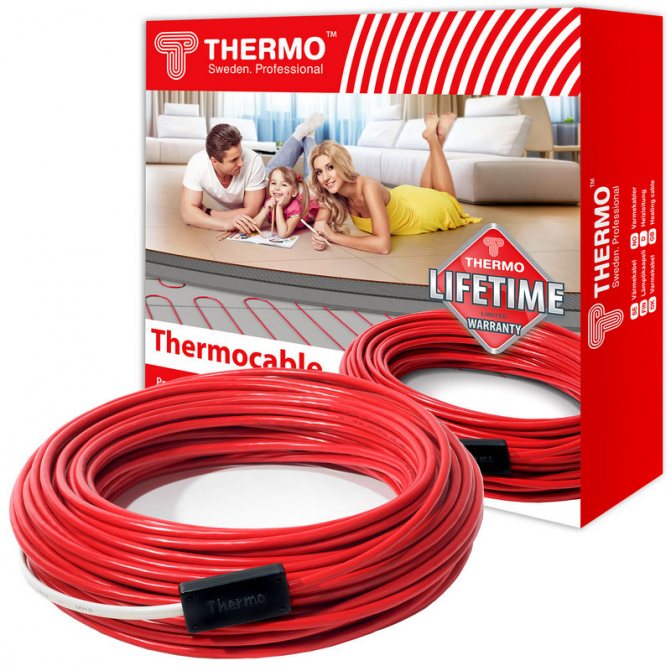
Warm floor Thermo
Warm floors from Thermo are electric heating devices. They are suitable for all types of premises, including unheated non-residential areas. You can even use Thermo floors as the only source of heat. With the correct selection of power, they are able to provide sufficient heating of the room.
The system is available in two versions
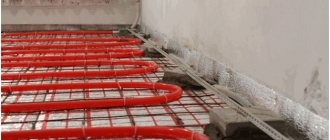
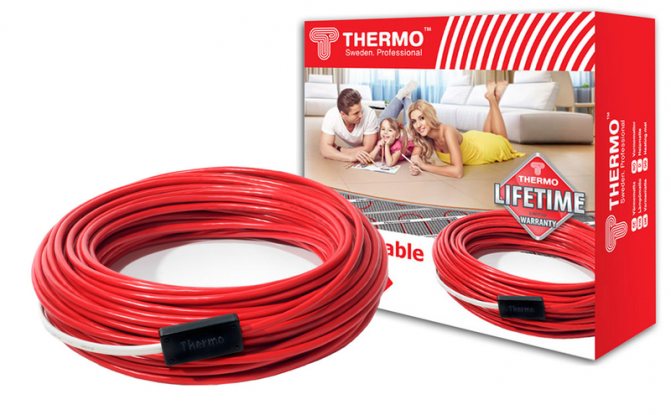
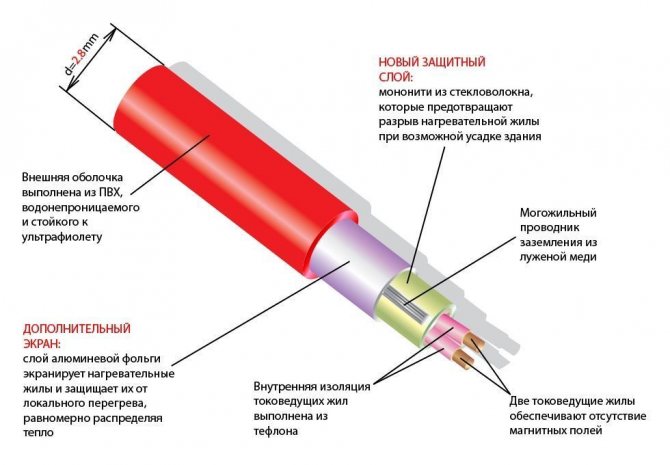
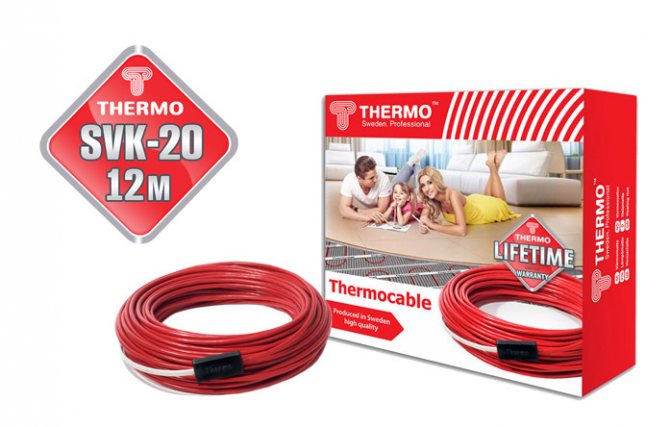
Warm floor Thermo Thermocable. It is only available in a cable version. The main difference between the floor is the need for a concrete screed with a thickness of about 4 cm and a power of 130 W per sq. The complete set of the floor includes: a two-core heating cable, armored with a connecting wire, and sealed couplings (end and transition). On the outside, the system is insulated with PVC, and inside the system is silicone.
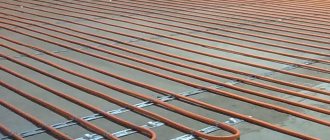
Installation of underfloor heating Thermo Thermocable in a screed
Heating systems that use a two-core heating cable have a lower level of electromagnetic radiation.
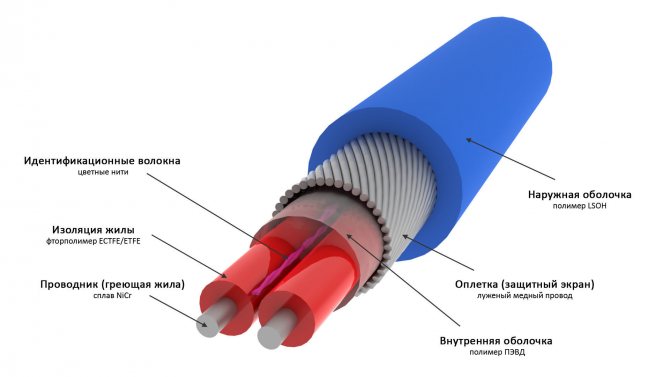
Diagram of a two-core heating cable
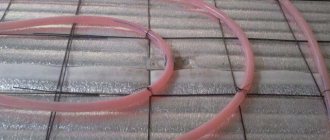
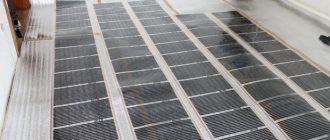
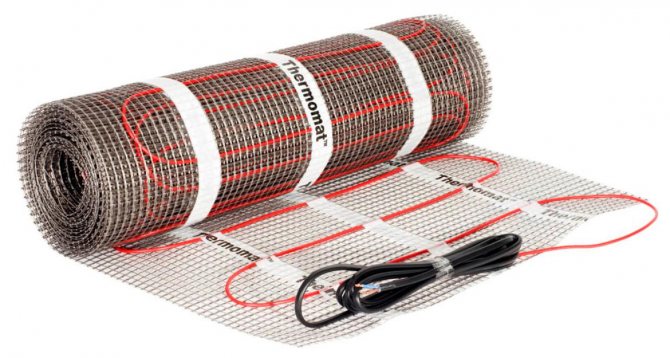
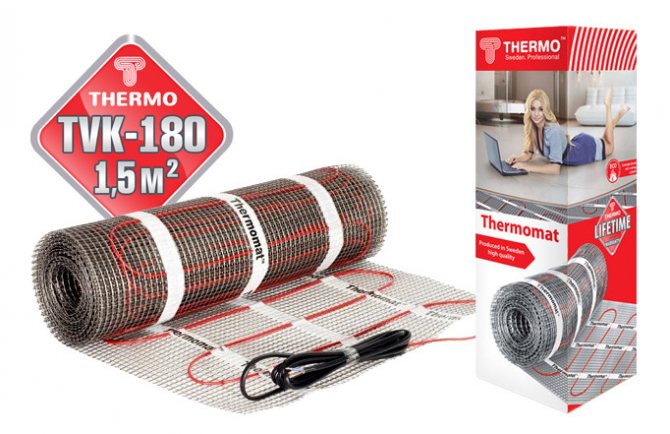
This equipment is based on a special mat. Thermomats, which are supplied in rolls and can be used under laminate flooring, are also made on the basis of a two-core cable. Such a floor does not require a concrete screed, tile adhesive is enough. System power - about 180 W per sq.m. The system includes a Teflon-insulated shielded mat.

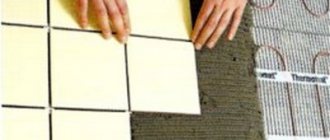
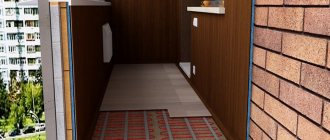
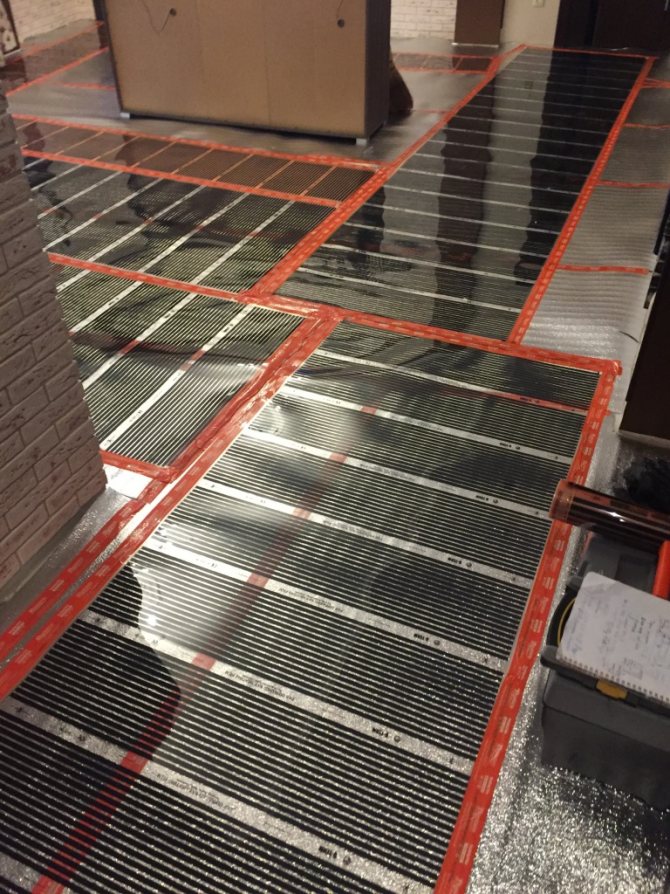
Underfloor heating installation under tiles, laminate, carpet, linoleum
When choosing one of the systems, it is necessary to proceed from the purpose of heating. The following factors will influence the choice:
- whether the warm floor will be the only source of heat or an additional one;
- what area is the heating designed for;
- the presence of restrictions on the installation of the cable.

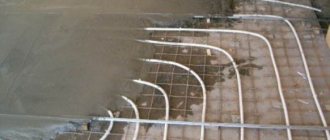
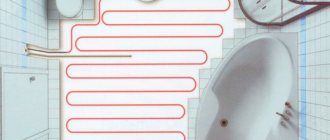
Thermo underfloor heating installation
Depending on these parameters, the optimal power required to heat the room will be determined.
Advantages of Thermo underfloor heating:
Thermo polymer pipe for underfloor heating
- High level of comfort. The system allows you to regulate the temperature that is set in the room using a thermostat. And the heated air itself goes from the legs to the head, therefore it does not create unpleasant sensations and does not interfere with normal breathing.
- Aesthetic appeal. The Thermo system is mounted under a laminate or other floor covering, so it is not visible. Only a thermostat can remind about the system, which organically fits into any interior.
- Durability. Thanks to modern technology and the reliability of the elements, Swedish floor heating systems have been serving for more than a decade.
Installation of underfloor heating Thermo - Ease of use. The automatic system does not require additional maintenance.
- Versatility of application. The heating element Thermo can act as the main source of heat, or it can be an auxiliary element of the heating system.
- Ease of installation. Even a beginner will be able to cope with the installation of the floor with the help of the hints in the enclosed operating instructions. Installation can be carried out both in a building under construction and in a residential one.
- Security. The heating cable has improved insulation for the safety of the electrician.
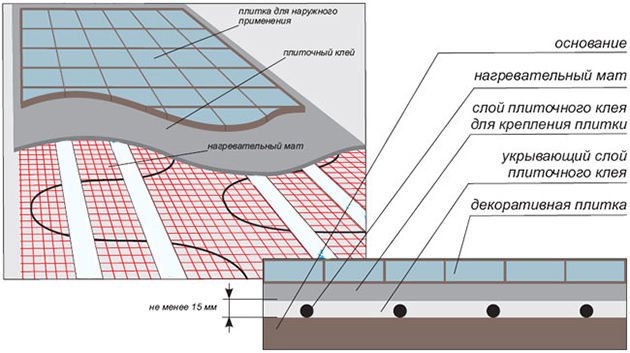
Thermo systems can be installed not only in a standard screed, but also in a layer of tile adhesive.Thanks to its modern design and attractive price, Thermo underfloor heating has managed to gain a leading position in the market for heating devices for heating.
Heating system description
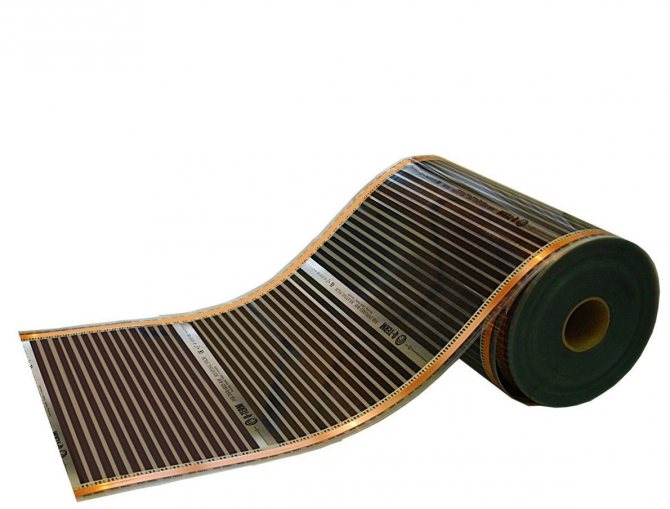
The "warm floor" system from "Q-Term" heats the room using infrared radiation. Wavelength 8-20 microns. They will not harm human health and pets. When the heating system is operating, a comfortable microclimate is created in the room.
- The film is made of polymer material.
- It is very thin from 0.27 to 0.38 mm.
- On its surface, a carbon mixture is applied in horizontal stripes. In this case, the sputtering method was used.
- The film is laminated. The top layer is sealed to the base, which ensures complete waterproofing of the heating elements.
- On the edges of the film there is a silver-plated strip and a copper bus. Electrical wires are connected to it.
- The device is produced in rolls 25 m long.The width can be different, from 50 to 100 cm.
- Depending on the type of system, the operating power can be 220-400 W / m2.
- The maximum heating temperature of the carbon layer is 70-100 ° C.
- To reach a temperature of 25 ° C in the room, the system is heated to 50 ° C.
The infrared floor can be installed in any room, regardless of humidity and size. It is recommended to lay laminate, parquet, carpet, linoleum on the film. The material is not compatible with tile adhesive. Chemicals can deform the laminated backing layer and destroy the carbon fiber element.
We recommend: Which concrete is suitable for a warm water floor?
Heating systems from "Q-Term" can be used as main or additional heating. It is quite economical, despite the fact that it is powered by electricity. For city apartments, I recommend covering the thermal film in the kitchen, bathroom, bathroom, corridor, play area of the children's room. The area is small, no more than 6-15 m2. What is the electricity bill when using an infrared floor?
- A room of 20 m2 will require 10 running meters. m of thermal film. If there is furniture in the room, then the footage will be even less. Covering 70% of the usable area. This means that for a furnished room of 20 m2, no more than 7-8 linear meters may be needed. m.
- For 1 m2, according to the manufacturer, an energy of 220 watts is required. If the temperature in the room is maintained at 25 ° C, the system spends 100 watts.
- The following amount of electricity will be consumed per day for heating the room: 0.1 kW * 10 * 24 h = 24 kW.
- 1 kW costs 4.22 rubles. 24 kW * 4.22 = 101.28 rubles will be spent per day. The amount is approximate, maximum, because the system will not work 24 hours a day. It turns off when the temperature rises, and turns on only when it drops.
- For a month, 3038.4 rubles will be spent on heating the room.
- If the house is located in a rural area, then the monthly costs will be 24 kW * 2.96 rubles. * 30 days = RUB 2131.2
- Manufacturers claim that in normally equipped rooms, the system consumes 50% of the power. This means that for a peasant, heating a room will cost 1,065.6 rubles. per month, for a city dweller - 1519.2 rubles. per month; provided that the heating will work 12 hours a day. In fact, the heating system turns on for 6-8 hours, which further reduces the cost of electricity. The carbon layer is capable of generating heat for a long time.
We recommend: How to install underfloor heating under the laminate?
It is often not necessary to equip such a large area with electrical heating. The floor area in the bathroom or in the play area of the children's room is no more than 10 m2. The cost of installing Q-Term underfloor heating will be minimal.
Infrared heating has a positive effect on the health of people who suffer from asthma or allergies to household dust. Radiator heating leads to increased air dehydration. The movement of warm and cold currents raises dust from the floor and from objects in the room.
This does not happen with underfloor heating.Air humidity decreases, but by a minimal percentage. Warm streams are evenly distributed from the floor and objects throughout the entire volume of the room, without forming a vortex.
Choice of flooring
Cable mats can be installed under almost any type of flooring: ceramic tiles, porcelain stoneware, stone. Some models can be used under laminate flooring. The systems have proven their worth even on the first floors of buildings, where low temperatures on the floor are usually noted.
Do-it-yourself warm floor
However, you should not lay the Thermo system under carpets, insulated linoleum and rubber-based coatings. Such materials are heat insulators, and therefore do not allow heat to spread around the perimeter of the room.
General installation instructions.
When installing cable mats or universal cables, the following conditions must be met:
- installation should be carried out according to the recommendations of the instructions included in the kit for installing a warm floor
- electrical connection must be carried out by a qualified electrician
- the heating cable must not be subjected to mechanical stretching or stress
- the heating cable must be grounded in accordance with the current SNIP and PUE rules
- it is forbidden to shorten or lengthen the thermomat or cable
- it is not recommended to lay the heating cable at temperatures below - 5 C.
- it is not recommended to lay thick carpets or carpets with a rubber base, as well as linoleum with a heat base, as they act as a heat insulator
- It is recommended to measure the resistance of the heating conductor and the insulation resistance before and after installing the heating mat or cable, and before and after installing the tile / screed. The ohmic resistance of the cable in the cold state must correspond to the norm indicated on the underfloor heating kit.
- do not place objects on the heated surface that are in close contact with the floor and block the air access and the ability to dissipate heat. Example: kitchen furniture, built-in wardrobes, shower cubicles, etc.
- heating cable and connecting sleeve must be completely filled with concrete. When the cable is pushed into the insulation or air pockets are formed around the cable, the temperature on the surface of the cable may rise above the allowable temperature, which can damage the cable.
Special care must be taken not to damage the cable during concrete work or tile installation. ATTENTION: Do not use the cable until the concrete screed has completely hardened. As a rule, this period is 28 days.
Installation
Regardless of the form of release of Thermo floor, there are a number of requirements for installation work:
- It is important to consider the layout of the system.
- Do not allow the cable to stretch.
Installation of Thermo heating mats under floor coverings - Do not shorten the heating cable. If necessary, you can change its configuration, starting from the initial step.
- Do not lay the system at temperatures below 5 degrees.
- During the installation process, electrical resistance measurements must be performed.
- It is forbidden to lay the heating cable in the places where the overall furniture is installed.
- The connection of the system can only be carried out after the screed has completely hardened. Better if done by a professional electrician.
Basic rules for laying thermomats
- Self-crossing of the cable during installation and its shortening is not allowed.
- When applying tile adhesive, the heating cable must be evenly coated with mortar without creating air pockets. If 1 heating mat heats 2 rooms, the connection section of the heating cable must have a good heat dissipation.
- You cannot check the health of the thermomat by connecting it to the network in a roll. Use a tester or connection for a few minutes on the unwound roll of heating mat. [Cm. resistance tables of heating mats.]
- Place the connecting sleeve (the junction of the heating cable with the power cable) in the glue layer, if necessary, make a recess in the floor.
- The surface of the floor must be solid. Cracking of a new concrete screed, deformation of a wooden base, insulation can lead to a cable break. It is necessary to carry out work to strengthen the floor (flat slate, 3 cm screed, screed reinforcement, etc.).
- Switching on the heating mat (first) only after the tile adhesive has completely dried.
* sealing the corrugated tube is needed for two reasons: firstly, for a possible replacement of the floor temperature sensor due to its failure or when replacing the brand of the thermostat. As a rule, the resistances of the sensors are different. Secondly, the ingress of water and prolonged operation of the floor sensor in it can lead to a change in its characteristics over time.
Laying mats
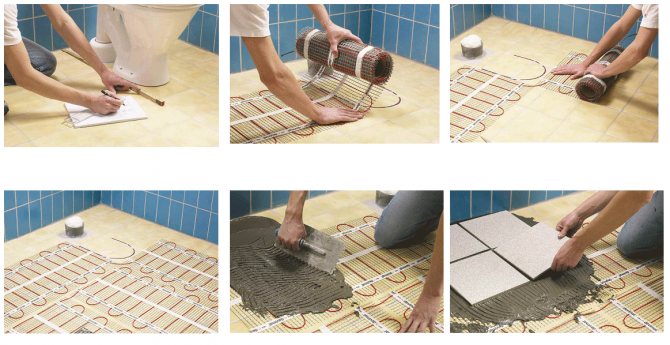
Installation of Thermo heating mats is quite simple: it boils down to rolling the finished rolls over the floor screed after complete drying.
The base is cleaned, after which it is necessary to outline the layout of the cable mat and the places of turns on it. The location of the temperature sensor and regulator is determined. A strobe is laid in the wall - a corrugated tube will be laid in it, in which the sensor and power wires will be placed.
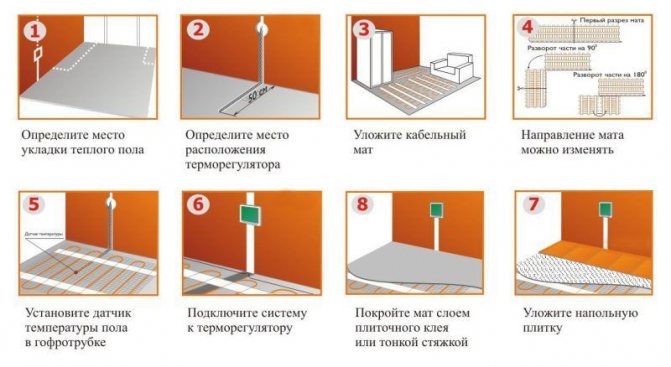
Step-by-step installation instructions for Thermo heating mats
After placing the entire system and filling it with a screed or adhesive base, laminate or other covering is laid.
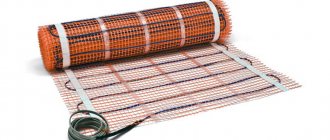
Installing the heating mat (Thermomat, Warmstad WSM, IQ Floor Mat, Devi DTIR)
- do not install the cable mat on a base that has the property of a heat insulator (wood, drywall, foam, cork, etc.) and directly on the heat insulation.
- it is important to follow the recommendations of the tile adhesive manufacturer to ensure that the screed is completely dry (approx. 7-15 days). The floor manufacturer's recommendations for the maximum permissible temperature must always be followed and monitored with a thermostat.
Training. Before starting the installation of a warm floor, prepare a flat concrete base, free of construction debris. It is allowed to install Thermomat floor directly on old tiles (after priming them).
Markup. For convenience and to prevent mistakes in installation, draw up an accurate diagram of where the cable mat will pass, and mark in which places you will have turns of the mat, so that you do not have an extra part of the mat or, on the contrary, lack it for the required heated surface. Marking where the temperature sensor will pass.
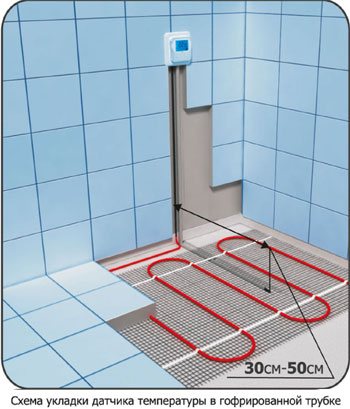
Installing a temperature sensor. It is necessary to make a strobe along the floor and, if necessary, along the wall to the thermostat - for the corrugated tube in which the temperature sensor will be located (a tube with a diameter of 16 mm, supplied with a warm floor, IQ and Devi come with a brass tip for more accurate temperature measurement) ... On the floor, the strobe should be so long that it is 20-30cm. go into the area where the thermomat will lie. It is laid between the "turns" of the cable and at the same time it is impossible to carry out the corrugation under the heating cable.
The floor sensor itself must be loosely in the corrugated tube so that it can be replaced if necessary. For free movement of the sensor in the tube, the diameter of its transition from the wall to the floor should not be less than 6 cm, and in order to prevent the ingress of concrete solution or tile glue into the corrugated tube, its end is wrapped with electrical tape. The corrugated tube is used only for the sensor - the cold connecting wire is laid in parallel with it in the prepared groove.
There are two main methods for installing heating mats:
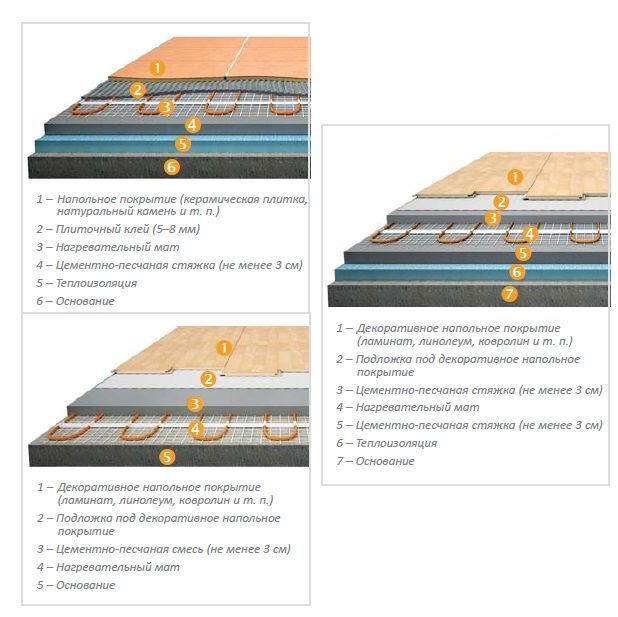
- the floor is primed and the heating mat is set to the floor, then tile adhesive is applied to the mat and the tiles are laid. The total layer (tile adhesive + tiles) must not exceed 20 mm.
- the floor is primed and the heating mat is attached to the floor. Then the heating mat is covered with a thin (3-4 mm) layer of self-leveling compound. In this case, the mat must be firmly attached to the floor, otherwise it will begin to float in the screed.The total layer (equalizer + tile adhesive + tile) should not exceed 20 mm.
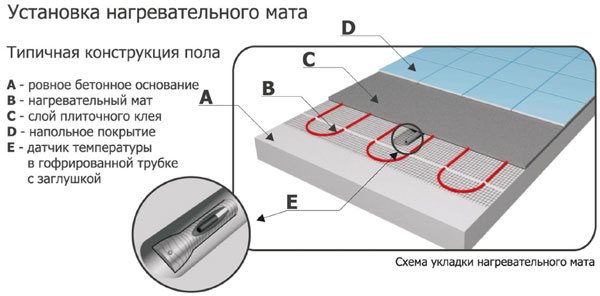
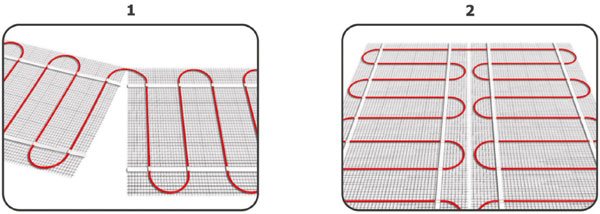
The heating mat is generally laid with the mesh on top and the cable on the bottom. However, in case of practical necessity, by turning the checkmate, you risk nothing. If the length of the heating mat exceeds the required length, the mat should be on reaching the wall to unfold it. This is done by cutting the mesh (NOT the CABLE), flipping the mat horizontally 180 degrees and then laying it parallel to the first line of the mat.
The heating mat should be laid over the entire free floor area and circled around the places where pipes, bathrooms, cabinets, sofas and other stationary furniture will be located tightly to the floor. However, it is permitted to lay the heating mat under the places where hanging cabinets, washbasins, etc. are installed. The heating mat mesh is attached to the floor with a glue gun, nails, staples, etc.
Variety of products
The company offers a wide range of heating mats and cables for underfloor heating. The main ones are:
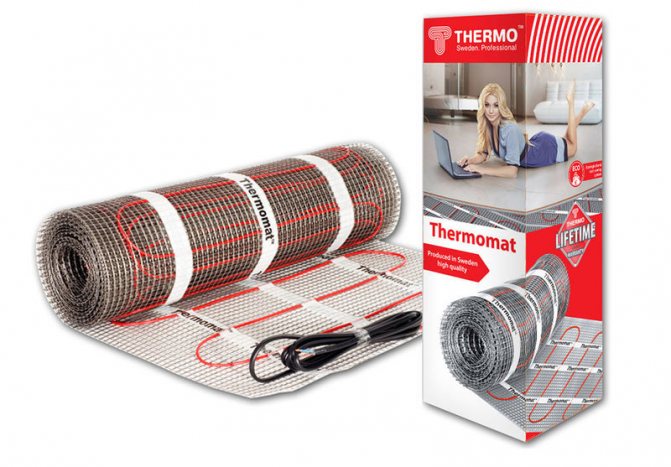
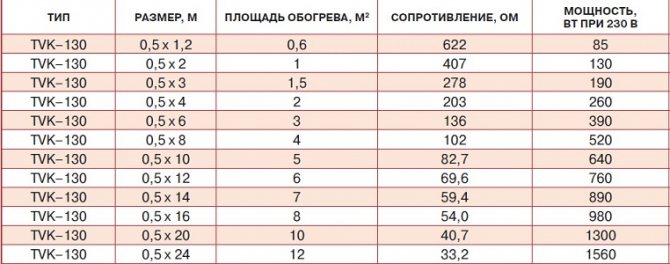
Technical characteristics of Termomat mats
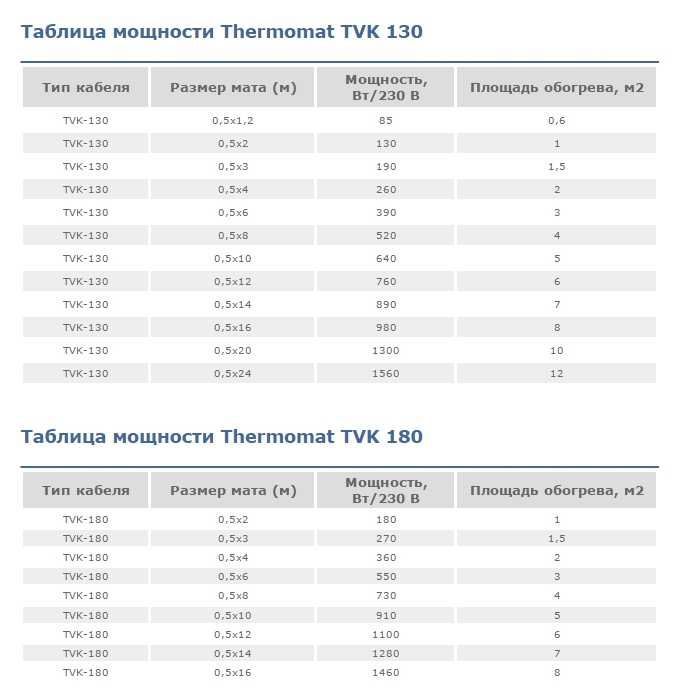
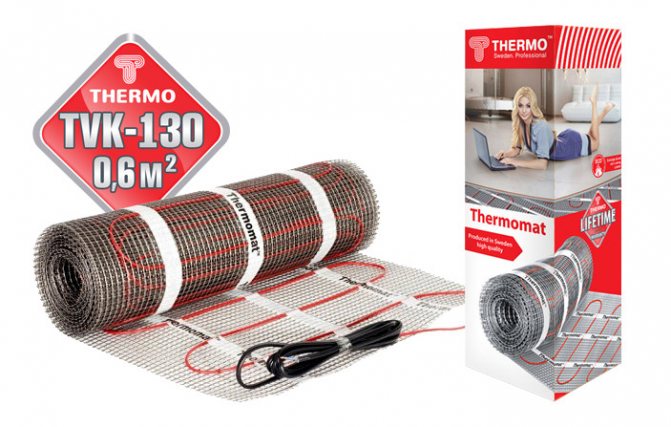
- Thermomat TVK-130. Thin mat for tiles to be laid in the floor adhesive.
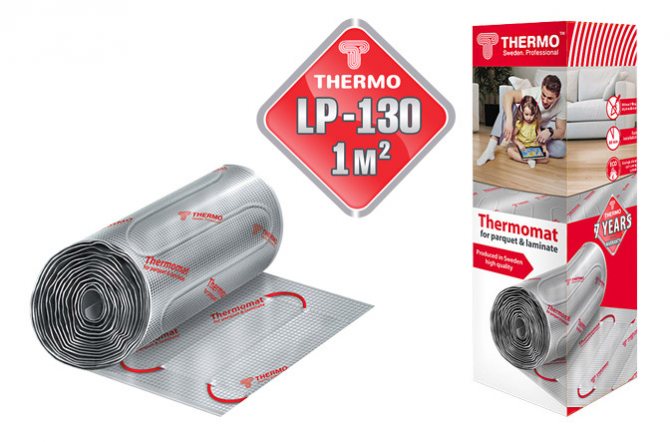
- There is a special warm floor under the laminate. Thermomat TVK-130 LP, specially designed for installation under laminate and parquet floors. It features additional protection with reinforced foil. Installation of this type of mat is carried out without additional preparation, right under the floor covering.
- Thermomat TVK-180. A mat equipped with a cable with an increased power, which provides a faster warming up of the room. Designed for cold rooms.
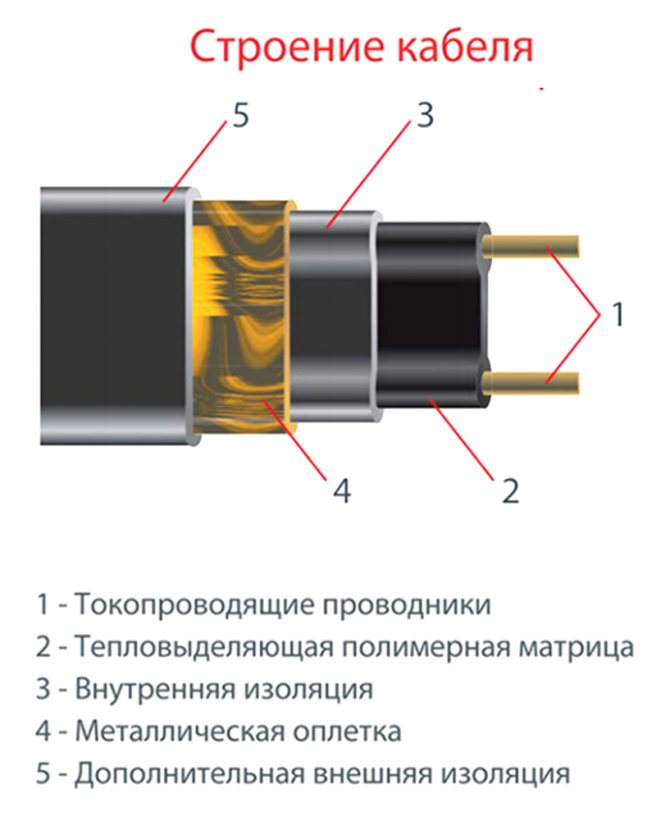
- Thermocable SVK-20. Heating cable for residential and industrial applications.
Thermocable SVK-20 heating cable device - Thermo FreezeGuard. Self-regulating heating cable designed for heating objects subject to icing. Supplied to the market with a sleeve and a heat regulating matrix.
Thermo FreezeGuard cable structure
Underfloor heating from the Swedish company Thermo is an excellent solution for ensuring energy efficiency in any residential building or apartment. The system, laid under a laminate or tile, creates an ideal temperature regime for a person.
How do I install the system?
It is necessary to draft a heating system for a specific room. It is recommended to draw the contour on the base of the floor, to carry out the markup. From it it is easy to determine how long and how much tape needs to be prepared.
Cut the film only along certain lines. They are applied with a dotted line every 25 cm. The carbon layer must not be destroyed. When drawing up a project, the location of furniture and other heating devices is taken into account. 5 cm should be retreated from the wall, from the cabinet, from the sofa. 10 cm from the heaters.
For "warm floor" "Q-Term" you will need to level and clean the base. It must be dry. Differences in bending and slope of the surface of 1 mm by 1 m are allowed.
Installation diagram:
- a substrate with a reflective screen is laid on the base;
- tapes are rolled out along the markings; the distance between them is 2 cm; the film should not overlap;
- strengthen the tapes with tape;
- a thermostat is placed at a distance of 20 cm from the edge of the tape; for it, you need to make a small hole in the sheet;
- connect the copper bus to the wiring;
- metal clips are installed on the tires; fix them with pliers;
- conduct parallel connection of all wires; the circuit is in the instructions;
- all bare edges are insulated with bitumen tape; it is included in the set for the thermal film;
- a thermostat is installed on the wall, near the outlet;
- all wires are taken into a corrugated tube; an outlet is laid for the tube in the floor and in the wall; it is masked with a concrete solution;
- if possible, then the wiring is removed under the baseboard;
- the system needs to be tested; if the result is positive, the finishing of the floor covering is started.
We recommend: How to make a dry warm floor?
Laminate or parquet cladding is immediately laid on the surface of the "warm floor".For carpet, it is not required to additionally install a rigid plywood backing. The thermal film is reliably protected from mechanical stress.
Aluminum foil is not used as a reflective screen. Choose a lavsan material. It can be purchased from the manufacturer. For cold rooms, a balcony or a veranda, additional insulation of the floor is required. This will make heating more efficient and reduce your electricity bills. Choose thermal insulation material "Q-Term" or "Caleo".
Heating systems are purchased through Internet portals or contact dealers in Moscow. It is advisable to use thermal foil as an additional heating of individual zones in the room.
Electric heating can be installed in all rooms, but it can be used only during the off-season, when the air temperature drops, but the centralized heating has not yet been turned on.
YouTube responded with an error: Access Not Configured. YouTube Data API has not been used in project 268921522881 before or it is disabled. Enable it by visiting https://console.developers.google.com/apis/api/youtube.googleapis.com/overview?project=268921522881 then retry. If you enabled this API recently, wait a few minutes for the action to propagate to our systems and retry.
- Similar posts
- How to install a water-heated floor under the tiles?
- How to lay underfloor heating on wooden joists?
- How to connect a warm floor from the stove?
- How to install Devi underfloor heating?
- How is the warm floor installed on the balcony?
- How to install a warm floor with a snail?
Disadvantages of warm floors
There are many advantages of the solution of this Swedish manufacturer. But some disadvantages are also present. Among the disadvantages, a thermostat is distinguished. Thermo is a manufacturer of cables and mats and related equipment. Thermostats, on the other hand, are ordered from other manufacturers. The quality of these products is not as high as that of heating elements, therefore there is a lack of durability. The equipment does not work as long as we would like. However, the company's management is aware of this problem and has taken appropriate measures. Thermostats in production undergo stricter quality control - there are practically no complaints about the durability of their work now.
The second drawback can hardly be called a drawback. Many of those who own this complex are sure that the system is produced not only in Sweden, but also in our country. Numerous checks did not reveal any counterfeiting of the product and even more - a special certificate was drawn up (which can be requested from the seller), fully confirming the origin of Thermo.
Where to buy Thermo underfloor heating
You can always buy Thermo warm floors in Moscow, St. Petersburg, Kazan, Novosibirsk and other cities of the Russian Federation in popular online stores. On the official website, you most likely will not find prices - these products are sold through a dealer network. The prices are recommended by the manufacturer himself, and dealers adhere to them.
Conclusion
For the specialists who create Thermo underfloor heating, Sweden with its harsh climatic conditions has become a real testing ground. You, like the inhabitants of this northern country, have the opportunity to fully appreciate the high quality of the products of a well-known company, their reliability and balanced characteristics. Feel free to buy components, install them, and enjoy the result!