Why insulate the floor
An insulating layer is necessary to prevent heat loss from the room. The microclimate in the bath is characterized by high humidity and temperature. In the absence of proper insulation in this case, several problems arise:
- The heat goes out quickly. It becomes difficult to melt the bath. In this case, the consumption of firewood or other fuel is greatly increased. Carrying out all the necessary measures during construction will save money.
- The material of the supporting structures is simultaneously exposed to moisture from the inside and cold from the outside. This combination has an extremely negative effect on both concrete and wood. In this case, operating costs increase again, but at the expense of repair costs.
- The bath cools down quickly. Drafts can penetrate inside. Cold air causes spoiled rest or illness.
Competent insulation of the floor in the bath with your own hands allows you to prevent problems, ensure the optimal indoor climate and not spend money on the services of professionals.
How to insulate the floor in a bath
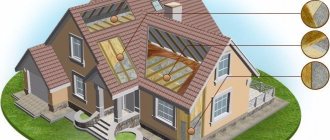
Thermal insulation of a bath or sauna should be carried out taking into account the fact that these rooms are very often exposed to high temperatures and high humidity. Such extreme conditions contribute to the appearance of mold and mildew, and adversely affect all structural elements of the building, including floors. To protect them as much as possible and at the same time prevent heat leaks, you need to imagine how to insulate the floor in a bath and choose an effective heat-insulating material.
Insulation for a bath must be moisture-resistant, fire-resistant, environmentally friendly.
High-quality insulation for bath floors should be distinguished by increased moisture resistance and fire resistance, tolerate high temperatures well, be environmentally friendly and at the same time not subject to rotting and decomposition. Extruded polystyrene foam (penoplex) meets all these requirements.
It is possible to start floor insulation only after the complete completion of all other basic measures for arranging the steam room - installing windows and doors, covering the roof of the bath with a roof, installing a drainage system.
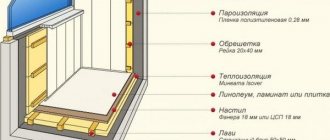
Thermal insulation of a wooden floor in a sauna or bath
Scheme of insulation of a wooden floor in a bath.
Wood flooring is the most economical and common option for arranging a bath floor. For steam rooms, two types of wooden floor are used: leaking and non-leaking. In both cases, the boards must be pre-treated with special mastics that increase moisture resistance, as well as fire retardant impregnations. When installing leaking floors, the boards are laid on the logs, but are not attached to them with nails. If necessary, wet boards can be easily removed and dried, or replaced with new ones.
Leak-proof floors have a much more solid construction. Planks of coniferous wood with tongue-and-groove profiles are laid tightly with a screed with brackets or wedges, while a slope is made towards the drain pit and a siphon is connected underground. Insulation is possible only for floors of such a closed structure; it is not possible to insulate leaking floors.
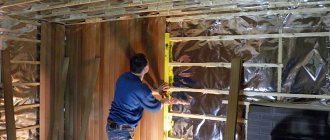
To insulate the floors well, the old wooden flooring must first be dismantled. Then, cranial bars and a vapor barrier are laid on the lower beam parts, which can be plastic film, aluminum foil or kraft paper (building board).It is not recommended to use roofing felt and roofing felt as a vapor barrier for a bath, as they will heat up, releasing chemicals.
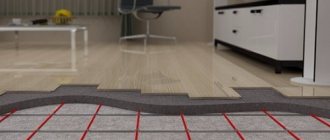
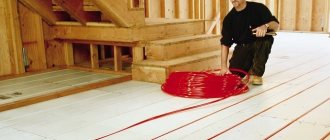
Installation of a wooden underfloor heating in the bath.
The spaces between the floor beams are filled with a heat insulator, for example, foam with anti-flammable additives. Insulation should be at least 10 cm thick. Expanded clay, perlite sand, ecowool are used as an alternative to penoplex. It is impossible to insulate with organic materials like sawdust, as they quickly absorb moisture. Another layer of insulating material is laid on the beams and insulation, then the boards are laid.
In the dressing room and shower boards must be impregnated with antiseptics, cleaning them from decay, mold fungi and harmful insects. It is not necessary to do this directly in the steam room, since when the board heats up, harmful substances will be emitted. If they forgot to soak the boards, and they managed to rot a little, they are passed over them with a plane, then with sandpaper and applied in two layers of drying oil. Then varnish or wax is applied to the boards.
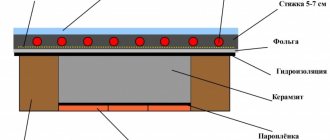
Thermal insulation of concrete floors of a bath or sauna
The scheme of insulation of concrete floors in the bath.
Concrete floors are reliable, durable and much more resistant to long-term exposure to hot water vapor. If the service life of a wooden floor is about 6 years, then a concrete floor is up to 25 years. It is especially recommended to pour the concrete floor in the steam room. High-quality waterproofing and properly selected insulation will help protect it from moisture and dampness.
Insulation of the concrete floor in the bath begins with the treatment of the foundation cushion with two layers of bitumen-based mastic. From above, the floor is covered with rolled waterproofing, for example, hydroglass or glassine. A layer of thermal insulation is laid on it (penoplex, mineral wool, building felt impregnated with bitumen). Then a reinforced concrete screed is made, on top of which either non-slip unglazed tiles or boards are placed.
Another way to insulate floors in a bath is to use perlite as a heat insulator. For the manufacture of perlite heat-insulating mixture you will need:
- one and a half buckets of water;
- one and a half buckets of cement M300 or 400;
- three buckets of pearlite sand.
Two buckets of perlite are mixed with a bucket of water, then cement is added and thoroughly mixed, then more perlite is added to the resulting mixture and water is added so that the mixture is not too thick or too liquid. The resulting solution is distributed in a thin layer over the foundation pad and, after it has completely dried, is poured with a screed. This method will help insulate the concrete floor not only quickly, but also efficiently.
https://youtu.be/NsR9aM9bcr8
Another way to insulate floors is to knead a concrete solution based on expanded clay. The thickness of the screed should be at least 12-15 cm. After it has solidified, roll insulation - mineral wool or building felt - is laid in two layers. A week later, concrete floors are poured. At this, the insulation can be considered complete. To prevent slippery floors, they are covered with wooden bars.
1poteply.ru
What materials to use
Water will be a problem in the thermal insulation of the floor. Many materials are not designed for installation in high humidity conditions. This applies to insulation with a high absorbency.
For example, it is not allowed to use mineral wool to perform work. This effective insulation is able to absorb water. In a wet state, cotton wool ceases to perform the established tasks, crumples, settles and loses its shape.
For damp rooms, it is recommended to choose materials that are resistant to moisture. These include:
- Styrofoam;
- extruded polystyrene foam (or penoplex);
- penoizol and the like
Styrofoam
The foam balls do not absorb moisture, but mention that water can accumulate in the spaces between them. In the very first winter, the insulation crumbles into separate particles. This is due to the fact that water freezes inside the foam, while increasing in volume (this is the only substance on the planet that expands when cooled).
To prevent problems, floor insulation in the bath with foam is carried out using additional materials:
- Vapor barrier. It is mounted on the warm air side. Prevents the effect of steam from the bath on the insulation. Available in the form of films or membranes. For a more efficient preservation of heat in the bath, special foil membranes are used. They not only protect the foam from getting wet, but also reflect heat back into the room.
- Waterproofing. It is fixed on the cold air side. Prevents atmospheric or ground moisture from entering the insulation. Films and membranes are used as a hydro-barrier. For insulation of floors in a bathhouse on piles, moisture-proof membranes are chosen. They prevent drafts.
How to make a floor in a bath with penoplex
The floor in the bathhouse with penoplex is a modern approach in construction. This material has excellent properties, good thermal insulation and water resistance. But in its composition there are harmful compounds released under the influence of high temperatures, which creates restrictions when using the material in bathing conditions.
Material features
Penoplex is a foamed polymer made by extrusion from general purpose polystyrene. Modern equipment makes it possible to produce material with an ordered structure in which small gas bubbles are evenly distributed. Such isolated and completely closed microscopic cavities are about 0.1-0.2 mm in size. The reagent for foaming is light types of freon with the introduction of carbon dioxide into them.
Penoplex is a foamed polymer made by extrusion from general-purpose polystyrene
By its nature, penoplex is chemically inert, which excludes oxidation or decay. The main goal of the development of this material is to provide high thermal insulation capabilities with low water absorption and very high compressive strength. An important characteristic is good manufacturability, i.e. it is easy to cut and bend, which allows it to be used in hard-to-reach places.
As you know, the thermal insulation characteristics of any foamed or porous material are sharply reduced under the influence of moisture, which is absolutely not characteristic of penoplex. A slight water absorption by the material is observed only for the first 7-8 days, when moisture fills the cells located at the surface. Subsequently, the penetration of water stops, and the initial saturation has little effect on the thermal insulation capabilities of the product. Moreover, it should be noted that it is impermeable to steam, which is very important for bathing conditions.
Basic form of slab production: width 60 cm and thickness from 2 to 15 cm
The material is divided into 3 groups:
- Penoplex 35.
- Penoplexstandard.
- Penoplex 45.
Its types differ in specific gravity, mechanical strength and heat resistance. Insulation of the floor in the bath with penoplex is carried out by the first 2 types of material.
On a note! Penoplex 45 has increased mechanical strength and is intended for floors where significant stress and vibration are possible.
The main form of production of the slab: a width of 60 cm and a thickness of 2 to 15 cm. Sheets with a thickness of 10-12 cm are very popular. The standard length of the slabs is 120 and 240 cm, in special cases material with a length of 4 or 4.5 m can be used.
The use of material for warming a bath
How to insulate the floor in a bath with penoplex?
There is a limitation under which the material can be reliably operated - these are temperature parameters - 50 ... + 75 ⁰С. It is this characteristic that complicates its use in bathing conditions. Already at temperatures above 70 ° C in heated air conditions, the release of harmful compounds dangerous to humans can begin.
At temperatures above 70⁰С in heated air conditions, the release of harmful compounds dangerous to humans can begin.
In the sauna, the temperature rises + 90 ... + 95 ⁰С, and with such heating, it is dangerous to use penoplex for interior decoration. In a Russian bath, the temperature of the steam room is + 60 ... + 65⁰С, which also raises doubts about the possibility of using the material, especially for insulation of the ceiling, where the overheated steam rushes. Another thing is the floor in the steam room. Taking into account the laws of physics at the floor level, you can not be afraid of maximum temperatures, but in reality they do not exceed + 45 ... + 50⁰С below. Here, the cooling of the floor from the side of the ground plays an essential role. It should also be borne in mind that the floor in the bath is not covered with penoplex from above. The material is used as thermal insulation, which is then applied with a topcoat. All this indicates the possibility of using penoplex in the steam room of a Russian bath. In any other bath rooms (washing, dressing room, rest room), the use of the material does not cause any doubts.
The material is used as thermal insulation, which is then applied with a topcoat
Required tools
When arranging a bath floor using foam boards with your own hands, you should prepare the following tools and devices in advance:
- grinder (when installing wooden floors);
- electric drill;
- screwdriver;
- sharp knife;
- scissors;
- furniture stapler;
- paint brush;
- putty knife;
- trowel and other tools for concreting and plastering;
- shovel;
- hammer;
- mallet;
- roulette;
- building level;
- metal ruler.
Insulation of the floor in the bath with penoplex
Penoplex features
Do-it-yourself floor insulation in a bath with penoplex is done depending on its design and material. There are several options for its provision: insulation of the foundation, the basement of the log house and the floor.
The process of warming a strip bath foundation provides for the application of waterproofing using bitumen mastic. Penoplex sheets are attached using an acrylic-type adhesive.
The work is carried out in the following order:
- The glue is applied to the starting board at 6-7 points, and then it is mounted on the lowermost area.
- The rest of the plates are fastened in turn, and they are combined with each other according to the "groove-thorn" system.
- Seams between the boards are sealed with glue or polyurethane foam.
- Installation of the second layer of foam is carried out in the same way, but the seams must be shifted relative to each other.
- After the second layer is sealed, a fiberglass reinforcing mesh is fixed. The joints are overlapped with an overlap of at least 8-10 cm.
- A layer of plaster is applied over the mesh.
- The final leveling of the foundation surface is carried out with a cement-sand mortar. Acrylic adhesive can be used as a leveling compound.
Advice! When insulating the lower part of the floor in the bath, it is recommended to separately take care of the thermal insulation of the basement part of the wall, which is in more difficult conditions.
The basement is insulated in the following order:
- The base is covered with a waterproofing membrane.
- Foam sheets 10-12 cm thick are glued to the top of the base.
- A second waterproofing layer is applied on top of the penoplex.
- The next step is to install the geotextile filter.
- Pouring a cement-sand layer.
Penoplex sheets are attached using an acrylic-type adhesive
Floor insulation
How to insulate a concrete floor in a bath with penoplex? The concrete floor in the bathhouse without reliable thermal insulation will be cold.Penoplex is the material that easily copes with this problem. Floor insulation is carried out in the following order:
- The first step is to apply 2 layers of bituminous mastic waterproofing to the foundation cushion.
- Additional waterproofing is applied from roll materials - roofing felt, but a thick plastic film can also be used. From modern materials, glassine or hydroglass is recommended. At the joints, an overlap of at least 11-12 cm is made.
- Laying foam sheets. They are aligned horizontally, which is checked by the level.
- Reinforcing metal mesh or steel wire is mounted.
- The concrete screed is poured with a layer of at least 7-8 cm. To ensure a flat surface, pouring is carried out using beacons. The surface of the concrete screed is usually formed with a slope towards the drain hole.
- The final stage is laying the topcoat. Wood flooring or ceramic tile cladding can be made.
The concrete floor in the bath without reliable thermal insulation will be cold
If the floors in the bath have a wooden base, then the procedure for applying foam insulation will be carried out as follows:
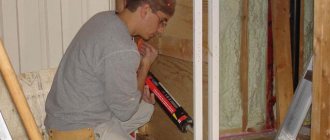
- Wooden logs and the space between them are covered with a vapor barrier material. For this purpose, modern roll materials with a layer of aluminum foil are best suited. You can use aluminum foil in combination with plastic wrap or kraft paper. Fastening to the joists is done using a furniture stapler. It is desirable to cover the seam with a film with a sticky layer.
- Penoplex sheets with a thickness of at least 8 cm are treated with a fire retardant and stacked in the space between the logs. The gaps between the plates must be sealed with acrylic glue or polyurethane foam. Before the slabs are laid, drain holes are formed in them.
- On top of the penoplex, a layer of waterproofing and vapor barrier are applied (foil up). The film is laid with overlap on the walls to a height of 15-20 cm.
- The final step is the installation of a non-leaking wood flooring, i.e. with a tight fit of the boards to each other.
A layer of waterproofing and vapor barrier is applied on top of the penoplex
Attention! An important condition: all wooden floor elements must be impregnated with an antiseptic compound before installation.
Penoplex is a modern excellent heat insulator. In the steam room, it should be used with great care and with additional protection against harmful emissions at high temperatures. In other bath rooms, the floor with insulation made of this material will provide comfort and will serve for many years.
banyabest.ru
Penoplex
The material is a close relative of polystyrene, but is devoid of its shortcomings. It is more expensive, but it is highly durable, quality and moisture resistance. The thermal insulation performance of these materials is the same.
The choice between them is carried out depending on the installation method and the expected load. When installing heavy furniture and laying insulation under a screed, extruded polystyrene foam is preferred. It will definitely not wash out under load (with the right choice of strength grade).
Thermal insulation of the floor in the bath with penoplex allows you to do without vapor barrier and waterproofing. If possible, they should be used (especially in places with the highest humidity), but this is not a necessary event.
Do-it-yourself internal and external insulation of the bath floor
From year to year, the Russian bath does not give up its popularity. But it is important to know that such a structure must be built in strict accordance with the norms and rules of construction work. Largely because of this, the relevance of the issue of methods of bath insulation remains high.
List of required tools
Starting to independently carry out work on the insulation of the floor overlap in the steam room with penoplex plates, it is necessary to prepare the following list of devices and various tools for work ahead of time:

- when arranging wooden flooring, a grinder will be required;
- electric drill;
- screwdriver;
- knife with a sharp blade;
- scissors;
- construction stapler (furniture);
- paint brush;
- spatulas;
- trowels and other tools designed for concreting and plastering surfaces;
- roulette;
- shovel;
- metal ruler;
- hammer;
- mallet;
- building level.

Insulation under the screed
If the bathhouse is built of bricks, most likely the floors are made of reinforced concrete. Also, sometimes there is a need to make the floor on the ground. In this case, the insulation is performed under the screed. When using this technology, the load on the insulation increases, so the following recommendations should be followed:
- choose material grade PSB-S 35 (polystyrene) or EPS 35 (penoplex);
- the thickness of the screed is assigned 30-50 mm (when using the "warm floor" system - more);
- when using polystyrene, the screed is reinforced with wire meshes with a diameter of 3-4 mm and cells 50 by 50 mm.
If it is necessary to insulate the floor on the ground, then the base is not only leveled, but also compacted. The floor cake in this case looks like this:
- compacted soil;
- sand and gravel mixture or sand of medium size (20-30 cm);
- concrete preparation from lean concrete B7.5-B12.5;
- waterproofing;
- insulation;
- vapor barrier;
- screed with a reinforcing mesh.
Concrete flooring consists of the following layers:
- reinforced concrete slab;
- waterproofing;
- insulation;
- vapor barrier;
- screed (with or without reinforcement).
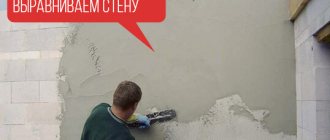
Bath insulation begins with clearing and leveling the base. All cracks in the concrete floor must be covered with cement mortar. After that, special leveling compounds can be applied. A line is drawn on the wall to mark the finished floor. This is required in order to control evenness.
Waterproofing is placed on the prepared base. It is mounted with an overlap of 10 cm (including on the walls), gluing the joints with a special film.
Styrofoam or styrofoam is laid on glue. The solution is applied only along the edges and on a few points in the center. When buying glue, it is important to check that it does not contain solvents and other substances hazardous to the insulation. Plates are mounted with bandaging of seams (at a distance). A gap of 1-2 cm is provided between the polystyrene and the wall, taking into account the expansion of the material during operation, this space is filled with a damper tape. Before pouring the screed, the slabs are fixed to the base on disc dowels.
Thermal insulation using perlite
Perlite mortar is convenient to use for insulation of concrete floors. In this case, a layer of thermal insulation material is placed in the space between the rough floor screed and the final leveling fill.
Important! Dusty volcanic sand scatters even from slight winds, so a carefully insulated room without the slightest drafts should be chosen to prepare the solution. Having closed the doors and windows tightly, proceed to preparing the mixture and performing the main stages of work directly. Recommendations for this are given in the following table.
Table. Floor insulation with perlite
| Stage of work | Description |
| Note! The unit used in this example is a bucket. Based on the given proportions, you can prepare the required amount of solution by measuring the original ingredients in fractions, kilograms, bags, etc. Pour 2 buckets of perlite into any deep container of a suitable size, add a bucket of water to it and let the mixture shrink completely. In the resulting solution, add half a bucket of cement not lower than M300, and then half a bucket of water.Important! Stir the mixture thoroughly after adding each component. Finally, you need to add a little more (about half a liter) of water to the solution. The result is a dry, crumbly mixture. Knead the semi-finished product until it becomes plastic. | |
| The resulting plastic mortar is evenly distributed over the rough screed. The recommended thickness of the insulating layer is up to 100 mm. You can level in any suitable way, for example, using a long rule. If a large area is insulated, for convenience, using self-tapping screws / anchors, you can attach several guides to the floor, for example, from a plasterboard profile or a wooden beam with a step corresponding to the length of the rule you are using. | |
| 5-7 days after applying the perlite solution (this is how much time it needs to harden), a fine leveling screed is poured over the insulation. The most convenient and easy-to-use option is a modern ready-made self-leveling floor compound. Reinforced mortars are available for sale, allowing you to equip coatings with a layer of up to 8 cm or more. The developer only has to prepare the mixture and apply it to the base in accordance with the manufacturer's instructions. Helpful advice! Before pouring a final leveling layer, the surface can be covered with a waterproofing material and a reinforcing mesh can be laid, but, as practice shows, the structure feels great even without such inclusions. After the leveling layer has dried, you can finish the insulated floor, for example, tiling it with suitable tiles. |
Perlite prices
Video - The whole truth about perlite
Installation on logs
Floor insulation in a bathhouse on screw piles (or for a wooden structure on any foundations) is most often performed between logs or beams. Unlike the previous method, here you can choose an insulation with a lower strength, since the material does not take the load from furniture and people.
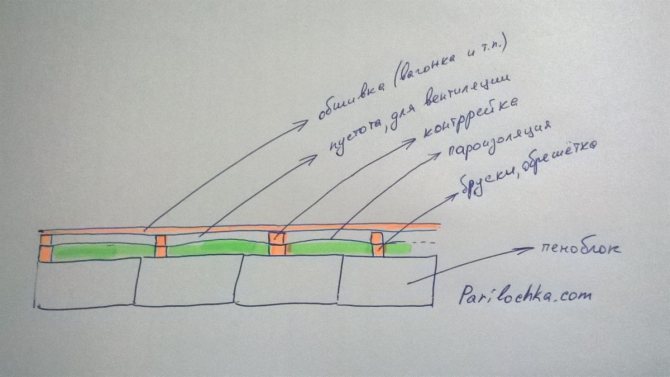
Expanded polystyrene is mounted between wooden floor joists or between floor beams. In this case, the pie overlapping a wooden bath looks like this:
- subfloor boards (or plywood, DSP, OSB);
- waterproofing;
- insulation between supporting wooden beams;
- vapor barrier;
- clean floor.
Insulation is simply laid between the beams. There is no need to use glue or dowels. But it is required to fill the gaps between polystyrene and wood with sealant or polyurethane foam.
Competent insulation of the bath will provide a comfortable microclimate and extend the life of the building. The increase in construction costs in this case leads to savings in operation.
- Baths