How to make a pipe from tin - do it yourself tin pipes
Home builders try to find the most budgetary options to solve problems. Therefore, the question of how to make a pipe out of tin with your own hands is relevant for many amateur craftsmen. After all, a home-made tubular product made of tin can be quite compared with gutters or casings that lie on the shelves in specialized stores.
Therefore, you need to learn more about the process of making a tin pipe, which has characteristics like factory products.
Features of the source material
Before you start making a pipe from a sheet of metal, you should get acquainted with the material from which the pipe will be made and its features. To begin with, it is worth saying that these are products of the rolling type, in other words, tin is a sheet of steel that has passed through the rollers of a rolling mill and has a thickness of 0.1-0.7 mm.
In addition to rolling operations, the tinplate manufacturing technology implies the treatment of finished rolled products from the formation of corrosion processes. To do this, a layer of material is applied to the steel after rolling, which is not subject to corrosion.
The result of the actions performed is a steel sheet, the width of which can vary from 512 to 1000 mm, with a chrome or zinc coating. The finished product is plastic, so tin can be easily handled. In this case, rolled stiffeners can be compared in strength with steel products. This allows the use of sheet metal in the manufacture of products of complex design.
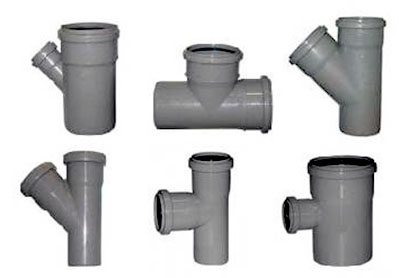
Types of tees
It is better to classify products by the type of material from which they are made. Even the alternative option - the installation method, in overwhelming cases is based on this.
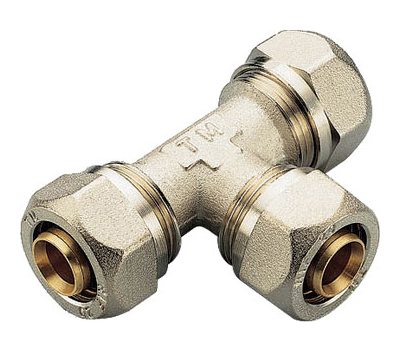
Metal tee for reinforced plastic pipes
You can also combine the two sorting methods to have an overview of the entire range of these connectors:
| Metallic | These include the following fittings:
Most often, tees are made using casting, for which they use:
Very rarely, these can be welded elements. We can say that the main advantage of metal products is their high strength. |
| Plastic | All products, including collet and welded fittings, are made of PVC and polyethylene. But, separately it is necessary to consider tees made of PVC sewer pipes made of plastic, installed in a socket or on glue. The main advantage of polymer fittings for sewage is complete inertness to the environment and to pumped substances, which allows them to operate for up to half a century. |
| Composite | These include fittings for low-pressure polyethylene pipes equipped with bronze or steel sleeves. Such fittings help to interconnect pipelines made of metal and polymers. The tee has a thread on the side of the metal sleeve, on the side of the polymer crimp or welded assembly. This makes it possible to include instrumentation, such as pressure gauges, into the system. |
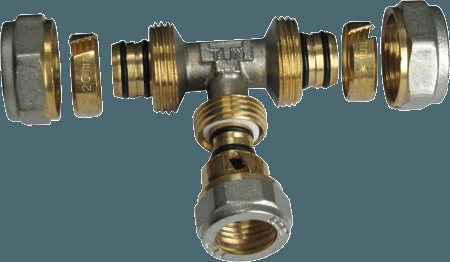
It looks like a collapsible tee for metal-polymer pipes
Additional way
There is also another popular classification method that takes into account the working dimensions of the tee:
- checkpoints;
- threaded;
- average diameter.
But, it depends on the diameters of the pipelines and the corresponding standards.The topic is quite extensive, so it will not be touched upon in our article.
Tee for PVC pipe of pressure type
Installation
Below we will consider the general recommendations of the process when installing fittings on pressure or non-pressure pipelines, which have a certain set of rules. Otherwise, the result of your work will be disastrous not only for you, but also for the neighbors downstairs.
Therefore, use the following guidelines:
- In pressure sewer systems, it is allowed to use fittings with a right angle, in non-pressure ones it is better to limit yourself to bends at 45 отв.
- When assembling a free-flow network on sockets, the instruction advises to correctly orient the connecting elements... In this case, the socket should be directed towards the liquid drain, i.e. the flow must first meet it and then the smooth pipeline, otherwise the joints may leak. If we are talking about sewers, it will be very unpleasant.

The photo shows how to make a tee from a pipe yourself
- When attaching the tee to the adhesive, select the position of the piping relative to the fitting within the first two seconds after aligning them... Do not move or rotate the assembly after this, and if you are not sure of your capabilities, use the guides.
Tip: when connecting a polymer tee with a polymer pipe with your own hands, mark the depth of its insertion on the last one. Otherwise, you can block the access of fluid to the assembly.
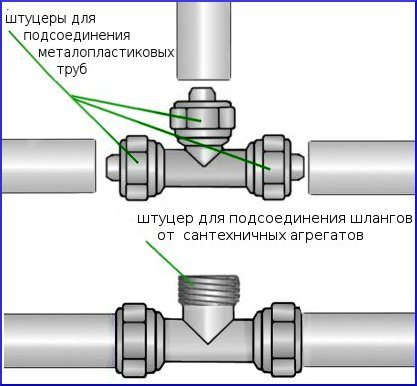
- When assembling a metal pipeline, pre-prepare material for squeegees and threaded ends... In this case, it is not recommended to save fum-tape, the price of which is insignificant, and always use a lock nut, after winding several turns of the seal between it and the end of the fitting before tightening it.
- Install detachable connections, including collet and threaded, in well-accessible places.
Tip: when installing plastic or metal pipe tees in hard-to-reach areas, use welding or press fittings (as a last resort).
Sewerage
Thanks to modern materials, the installation of sewage systems has become much more convenient and easier. Tees for sewer pipes made of plastic simplify as much as possible the task of making any scheme-project in private houses of different storeys. At the same time, you do not need to use complex equipment or special tools.
Sewer plastic pipe tees
In this case, 3 types of tees are used that perform their special functions:
- To connect vertical risers with horizontal pipelines, options with angles of 87 ° or 90 ° are used.
- When creating horizontal branches, products with an angle of 45 ° are used.
- A coupling with an additional hole for repair work is called revision. The third hole is screwed on with a special lid, which gives access to the pipeline.
Experience shows that this is quite enough to create sewer networks of any complexity in a private house. Therefore, you should always rely on this type of connection.
Required tools
The list of tools and devices necessary for making galvanized chimney pipes with your own hands is due to the properties of tin, in particular softness and plasticity. Processing of this type of material does not require the application of special efforts, which are necessary for working with sheet materials.
Therefore, in the production of tin pipes for the chimney, the following set of tools is required:
- Scissors for cutting metal. This tool helps to easily cut the sheet material into the desired pieces, since the largest sheet thickness reaches 0.7 mm.
- Hammer with a soft head. You can also use a wooden mallet, mallet, or steel tool with a soft rubber grip.However, the latter option is used very carefully or not taken at all, since it can cause deformation of a thin sheet of tin and ruin the whole work.
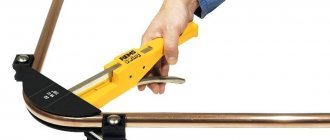
- Pliers. With the help of this tool, they solve the question of how to bend a pipe made of tin, because it is steel, although it is thin, therefore, it is impossible to bend it with your hands.
- Crafting table. This device is necessary when cutting material and when applying markings.
- Calibrating element. It can be a tubular product with a diameter of more than 10 centimeters, as well as a corner with edges of 7.5 centimeters. These elements must be well fixed, since riveting of the butt joint will be performed on their surface.
In addition to these tools, you should prepare a ruler or tape measure and a marker, which is a steel rod with a sharp edge.
Preparatory stage
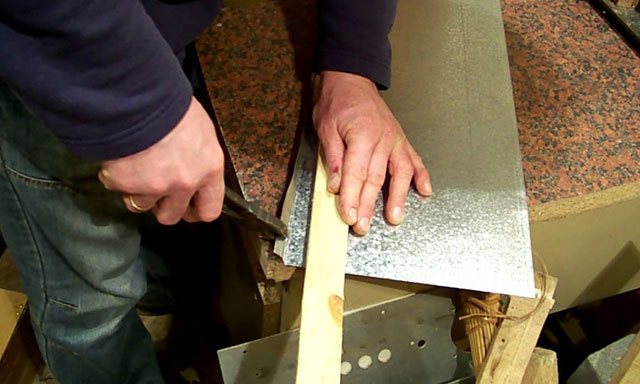
First, markings are applied to the sheet of tin, along which the semi-finished product will be cut. In other words, the necessary part is cut from a certain sheet of metal, from which the contour of the future pipe will be formed. The marking process is carried out as follows: the sheet is laid out on a workbench and a segment equal to the length of the pipe is measured from the upper edge. Here a mark is made by a marker.

Then, using a square, a line is drawn along this mark perpendicular to the side edge. Now along this line the circumference of the pipe, the same is done along the upper edge. At the same time, about 1.5 cm is added along both edges to form the joining edges. The upper and lower marks are connected and the workpiece is cut out.
To determine the circumference, you can use a tape measure, or you can recall the school geometry course.
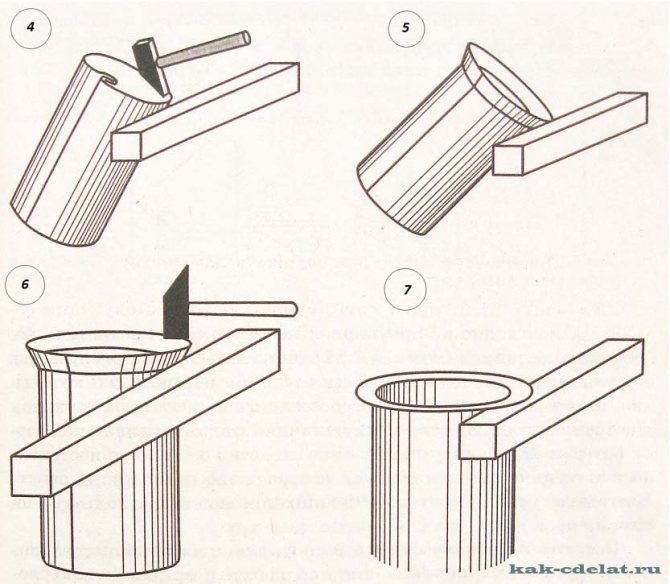
How to make a pipe body from tin
The purpose of this stage is to form the profile of the pipe. A line is drawn along the length of the workpiece at the bottom and top along which the folds will be bent. In this case, 5 mm are measured on one side, and 10 mm on the other. The folds must be bent at an angle of 90 0. To do this, the workpiece is laid on a steel corner, aligning the fold line with the edge of the corner. Striking the edge with a mallet, bend it to the perpendicular side of the corner.
It is recommended to bend the product gradually, passing with a hammer along its entire length. In this case, you can start bending with pliers.
Now, at the fold, the size of which is 10 mm, one more fold is made to form a kind of letter G. In the process of folding the fold, you need to ensure that the upper fold is parallel to the workpiece, and its length is 5 millimeters. Therefore, when drawing the fold fold line, on one side measure 0.5 cm once, and on the other side - twice 0.5 cm each.
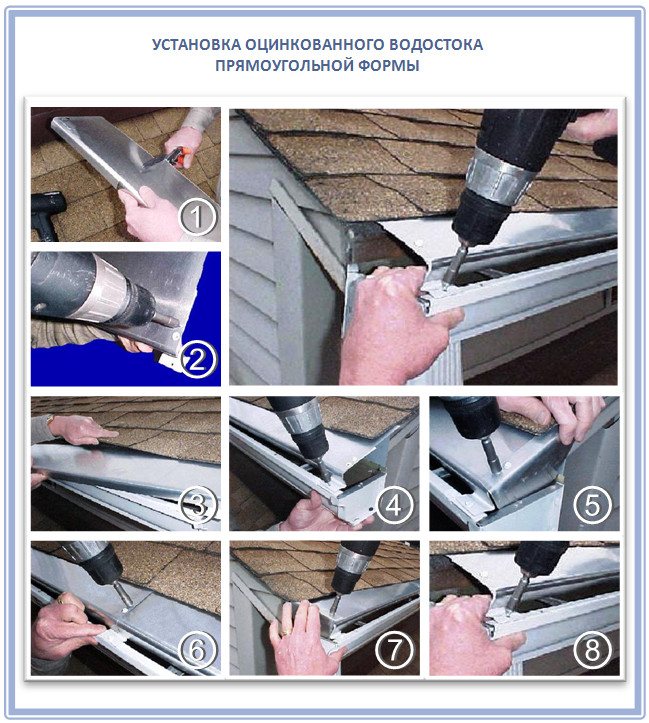
Stage VII. Protection of galvanized gutter from scratches and corrosion
The main enemy of galvanized gutters and drains is branches and debris that fall on the roof with the wind and are washed off into the gutter by rain. Such ones are capable of scratching even the most resistant polymer coating (and much worse without it at all), and therefore it is better to protect the entire system as much as possible.
The simplest method is gratings, which are produced today in standard parameters: slotted, perforated, stainless steel, plastic, galvanized, brass and cast iron. They need to be fastened with a latch or with screws and nuts. It is important that the top surface of the grating remains 25 mm below the surface of the roof covering so that rainwater can drain well into the gutter.
In turn, the basket will also help to cope with the problem. Water flows through the gutters, and the basket retains the largest dirt, such as leaves and branches. This basket is easy to remove and clean, which is its advantage. Also, such a modern element of the drainage system, like a sand trap, is designed for the same as a storm water inlet, but at the same time retains finer dirt and sand.
Here's a good example of how to protect a galvanized gutter from debris:
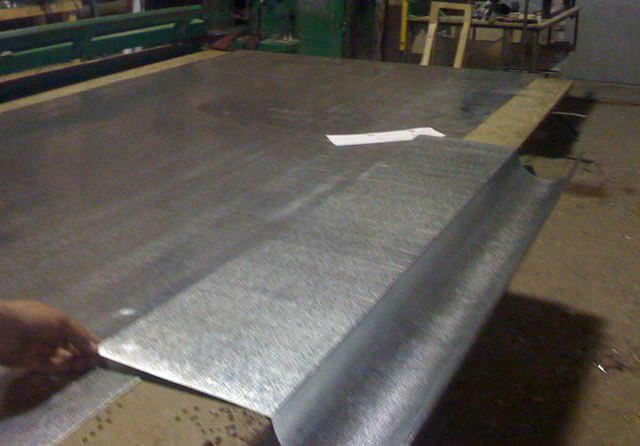
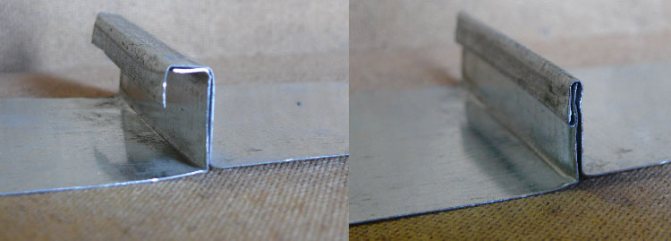
Processing the seam joint
The final stage involves processing the butt seam, that is, crimping it. To do this, the upper part of the L-shaped fold is folded down, wrapping the edge of the other fold. The result should be a kind of sandwich perpendicular to the pipe. To get a butt weld, you need to press the sandwich to the product.
For greater reliability, the butt seam is reinforced with rivets. However, do-it-yourself pipes made of tin using this method of joining do not need additional reinforcement.
How to make a pipe from tin - do it yourself tin pipes
Home builders try to find the most budgetary options to solve problems. Therefore, the question of how to make a pipe out of tin with your own hands is relevant for many amateur craftsmen. After all, a home-made tubular product made of tin can be quite compared with gutters or casings that lie on the shelves in specialized stores.
Therefore, you need to learn more about the process of making a tin pipe, which has characteristics like factory products.
DIY instructions for making a tin pipe for ventilation with a hood
To make a pipe from a sheet of iron means to follow a sequence of actions. The work consists of simple steps. First, preparation takes place, which consists of making markings of parts and cutting out blanks.
At the stage of forming the body of the structure, a circular section element is created. When connecting, it is required to fix the elements into one product.
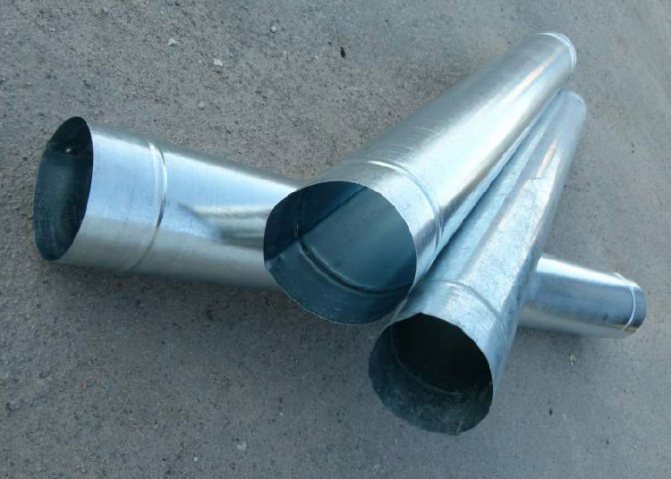
Adapters for connecting pipes made of sheet metal
You can make a markup and a blank in several stages:
- The sheet is placed on the surface without seams. A floor covering or workbench is suitable for this.
- A segment is marked from the upper edge, which is equal in size to the future highway. Marking is done by a marking device. Manufacturing also takes place.
- A line is drawn through the mark. In this case, a square is used.
- From the line, the width of the segment is marked, which is equal to the section of the pipe. To the resulting value, add 15 mm per joint.
- The resulting markings are connected, and the workpiece is cut.
When making a markup, it is worth considering the dimensions of the product. Width is the size of the diameter plus one and a half extra centimeters. The length of the workpiece must be greater than the straight section of the structure.
Do-it-yourself tin work is done as follows:
- The folds are bent to the sheet surface at right angles. Preliminarily, a line marking is made for them. mallet. The sheet is placed on the edge of the table with a descent to the desired length and bending is made with a rubber hammer. The work is carried out along the entire length of the product.
- A pipe made of tin with your own hands suggests another bend on the fold. In this case, the markup is performed.
- A round element is used to construct the pipe. On it is galvanized sheet metal, which is given a rounded shape. In this case, the bent pipe ends are connected.
Bends are made so that the mallet fits exactly on the surface of the corner. The blows are made accurate and clear, but not strong, otherwise the seam will flatten.
The production of tin products is completed by joining. In this case, the edges are combined, and
the seam is attached. In this case, the horizontal section bends down and covers the edge. The protruding seam is bent to the surface with a mallet. The fold is made to the side of the L-shaped fold. If you do otherwise, then the water will penetrate inside.
Do-it-yourself tin products need to be connected. The edges are fixed with aluminum or steel rivets.
- Rivet holes are made every three centimeters.
- The edges are folded towards each other.
- The workpiece is folded back so that the edges are on the outside of the structure.
- The edges are mounted with rivets.
To facilitate the connection of the structure, the element in the wide side should be slightly flared. To ensure rigidity at the edges of the product. Correct marking contributes to ease of docking with other elements, even factory production.
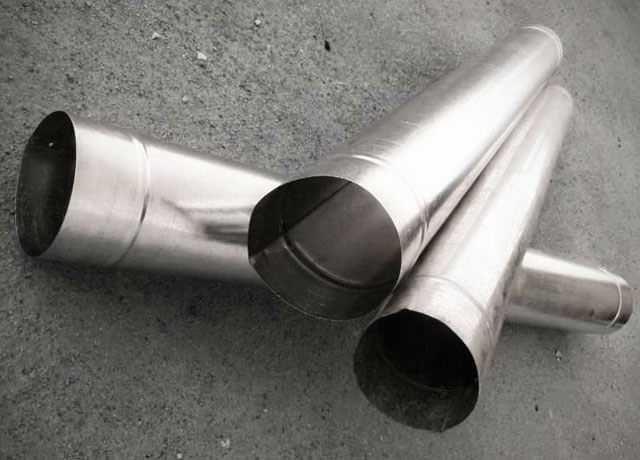
Similar products are used for gutters, ventilation systems and chimney structures.
Features of the source material
Before you start making a pipe from a sheet of metal, you should get acquainted with the material from which the pipe will be made and its features. To begin with, it is worth saying that these are products of the rolling type, in other words, tin is a sheet of steel that has passed through the rollers of a rolling mill and has a thickness of 0.1-0.7 mm.
In addition to rolling operations, the tinplate manufacturing technology implies the treatment of finished rolled products from the formation of corrosion processes. To do this, a layer of material is applied to the steel after rolling, which is not subject to corrosion.
The result of the actions performed is a steel sheet, the width of which can vary from 512 to 1000 mm, with a chrome or zinc coating. The finished product is plastic, so tin can be easily handled. In this case, rolled stiffeners can be compared in strength with steel products. This allows the use of sheet metal in the manufacture of products of complex design.
Material characteristics
Galvanized structures are made of sheet metal. The material is rolled sheet steel with a thickness of 0.1 - 0.7 mm.
Products of complex shapes are formed from a soft material
The production of sheets takes place on rolling machines, but the products obtained in this way need additional protection. Therefore, it is coated with a material that is resistant to corrosion. Ultimately, consumers receive a steel sheet with a width of 512-1000 mm, which has a micron-plated chromium, tin or zinc.
The product is characterized by plasticity, which allows manual processing of sheet metal. Moreover, if stiffeners are rolled on the material, it is not inferior in strength to steel counterparts. For these reasons, tin is used in the manufacture of products with complex shapes.
Required tools
The list of tools and devices necessary for making galvanized chimney pipes with your own hands is due to the properties of tin, in particular softness and plasticity. Processing of this type of material does not require the application of special efforts, which are necessary for working with sheet materials.
Therefore, in the production of tin pipes for the chimney, the following set of tools is required:
- Scissors for cutting metal. This tool helps to easily cut the sheet material into the desired pieces, since the largest sheet thickness reaches 0.7 mm.
- Hammer with a soft head. You can also use a wooden mallet, mallet, or steel tool with a soft rubber grip. However, the latter option is used very carefully or not taken at all, since it can cause deformation of a thin sheet of tin and ruin the whole work.
- Pliers. With the help of this tool, they solve the question of how to bend a pipe made of tin, because it is steel, although it is thin, therefore, it is impossible to bend it with your hands.
- Crafting table. This device is necessary when cutting material and when applying markings.
- Calibrating element. It can be a tubular product with a diameter of more than 10 centimeters, as well as a corner with edges of 7.5 centimeters. These elements must be well fixed, since riveting of the butt joint will be performed on their surface.
In addition to these tools, you should prepare a ruler or tape measure and a marker, which is a steel rod with a sharp edge.
Installation of galvanized flue gas pipes
Most manufacturers, when selling a kit for a smoke exhaust system, attach detailed instructions for installation with their own hands. It is not difficult to mount the structure yourself, it is enough to take into account some of the features that are well known to professionals:
- It is necessary to connect the chimney elements using the pipe-to-pipe method, starting from the lower segment of the structure.
- For cleaning galvanized chimneys, it is necessary to provide several inspection wells.
- Every half a meter, in order to ensure maximum resistance to the wind load, wall brackets are attached for installation.
- When passing floor slabs and roofs, a chimney passage assembly is installed.
Installation is carried out in accordance with existing fire regulations and SNiP.
Rules for outdoor and indoor pipe arrangement
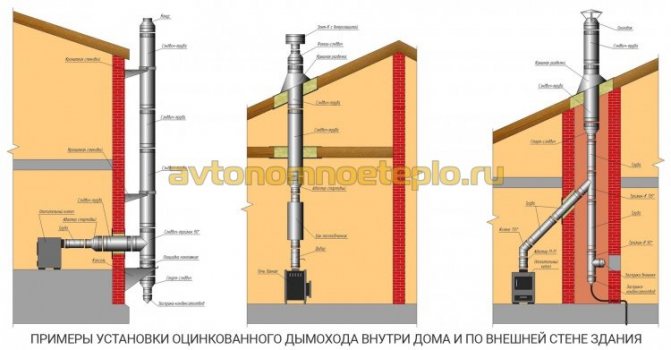
How and what to insulate a galvanized chimney
If you independently insulate the chimney pipe made of galvanized steel from condensate, you can reduce the cost of the structure by 1.5-2 times. To complete the work, you will need the following:
- Thermal insulation - mineral non-combustible insulation with a low degree of moisture absorption is used. Material thickness is not less than 5 mm.
- Protective layer - the top of the mineral insulation is covered with foil material. The layers are fixed with knitting wire or clamps.
Preparatory stage
First, markings are applied to the sheet of tin, along which the semi-finished product will be cut. In other words, the necessary part is cut from a certain sheet of metal, from which the contour of the future pipe will be formed. The marking process is carried out as follows: the sheet is laid out on a workbench and a segment equal to the length of the pipe is measured from the upper edge. Here a mark is made by a marker.
Then, using a square, a line is drawn along this mark perpendicular to the side edge. Now along this line the circumference of the pipe, the same is done along the upper edge. At the same time, about 1.5 cm is added along both edges to form the joining edges. The upper and lower marks are connected and the workpiece is cut out.
How to make a pipe body from tin
The purpose of this stage is to form the profile of the pipe. A line is drawn along the length of the workpiece at the bottom and top along which the folds will be bent. In this case, 5 mm are measured on one side, and 10 mm on the other. The folds must be bent at an angle of 90 0. To do this, the workpiece is laid on a steel corner, aligning the fold line with the edge of the corner. Striking the edge with a mallet, bend it to the perpendicular side of the corner.
It is recommended to bend the product gradually, passing with a hammer along its entire length. In this case, you can start bending with pliers.
Now, at the fold, the size of which is 10 mm, one more fold is made to form a kind of letter G. In the process of folding the fold, you need to ensure that the upper fold is parallel to the workpiece, and its length is 5 millimeters. Therefore, when drawing the fold fold line, on one side measure 0.5 cm once, and on the other side - twice 0.5 cm each.
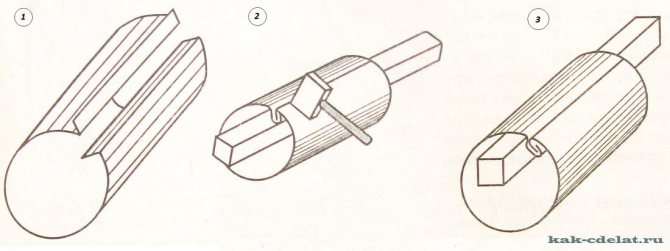
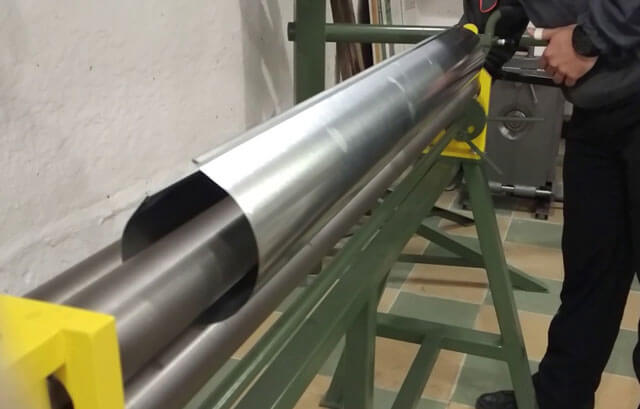
Having completed the forming of the folds, you can proceed to the formation of the pipe body. For this, a blank sheet is placed on a calibrating element and tapped with a mallet or other suitable tool in order to obtain a profile of a certain shape. The workpiece first takes a U-shape and then becomes round. In this case, the folds must be joined together.
How to make a galvanized pipe with your own hands: step by step instructions, calculation according to the scheme and drawing
Good day, dear guest!
The first galvanized sheet rolled off the assembly line of one of the British factories back in 1867. True, at that time the metal was covered exclusively with gold and silver. But before the First World War, the production of parts with a protective layer of zinc was put on stream, and since then they have been incredibly popular.
This is not surprising - zinc prolongs the life of iron 20-30 times. Products made of galvanized steel are durable, do not give in to rust, and behave in everyday life no worse than stainless steel, although they are much cheaper.
In today's article, I propose to pay more attention to this modest material and tell you how to make a galvanized pipe with your own hands.
The advantages and disadvantages of such a pipe
Galvanizing is primarily steel, a material that has many undeniable advantages.
These include:
- Strength;
- Ability to withstand high temperatures;
- Excellent thermal conductivity;
- Low cost compared to other materials.
But without a protective coating, ferrous metal is susceptible to corrosion, quickly rusts and becomes unusable. Zinc plating successfully solved this problem. And, despite the fact that galvanized and steel pipes are the same in shape, a galvanized product has a number of advantages.
Additional advantages of a galvanized product:
- Corrosion resistance, ability to withstand negative environmental influences;
- Extended service life;
- Increased strength;
- Wide operating temperature range;
- High resistance to mechanical stress;
- Galvanized pipe withstands high internal and external pressure;
- Simplicity and ease of installation;
- High resistance to fire;
- Zinc kills all pathogenic microorganisms;
- Galvanizing is practically not inferior in quality to low-alloy stainless steel, but it costs an order of magnitude cheaper.
But, like any engineering solution, galvanized iron piping is not ideal.
Disadvantages of the product:
- Not very attractive design;
- Expensive compared to conventional steel;
- Zinc complicates the welding process;
- Unlike plastic, in the presence of protrusions on the walls, it is almost impossible to ensure a smooth transition in a structure made of galvanized pipes.
Do it yourself or order
What is better, buy a galvanized sheet of the required thickness and bend the pipe yourself, or go to the store and buy a finished product?
Selection Tips
As usual, let's start with the price. A finished pipe with a diameter of 100 mm and a length of 3 meters will cost us about 500 rubles. The cost of the material in this case is 150 rubles, the rest is labor costs and the seller's margin.
And if you plan to organize an entire drainage system? You can see for yourself that you will have to overpay 2.5-3 times for finished products. Self-made pipes will significantly ease the financial burden.
In addition, factory products have strictly defined dimensions, and sometimes it is difficult to find the right one for your system. And the thickness of the finished pipe usually does not exceed 1mm.
It is imperative to remember that any factory product, unlike a home-made one, undergoes strict quality control, has a perfectly round surface and the accuracy of the weld.
Whether a home craftsman will be able to ensure that all these conditions are met is far from a fact.
What material to choose
If it was decided to make a part on your own, you should start by choosing a material, in our case, a galvanized sheet of the required thickness.
Material characteristics
Factory zinc-coated sheet steel must comply with GOST 14918-80. The main characteristics that you should pay attention to when choosing:
The most common galvanized thickness ranges from 0.35 to 3mm. The thinner the sheet, the easier it is to process, which is important for making products at home. But do not forget - less thickness - less strength.
- Zinc coating thickness
There are 3 classes of material, in accordance with the thickness of the zinc layer. Let's summarize the data in a table for convenience.
| Steel class according to the thickness of the zinc layer | The mass of the protective layer available on both sides (g) | Coating thickness (μm) |
| P (Increased) | 570 — 855 | 40-60 |
| I | 258-570 | 18-40 |
| II | 142.5-258 | 10-18 |
GOST allows some deviations in thickness and the presence of some defects
Marking:
- НР - normal thickness difference;
- UR - reduced thickness variation.
Sheet appearance options:
- KR - With patterns of crystallization (some cracks and darkening);
- MT - no patterns.
An important characteristic for the manufacture of pipes is the ability of a metal sheet to draw:
- H - normal hood;
- G - deep drawing;
- VG - very deep drawing.
Steel marking VG have the highest ductility, H - correspondingly the lowest.
What you need to work
After purchasing a sheet with the necessary characteristics, you should stock up on the necessary inventory.
Required tools:
- Scissors for metal. Choose a convenient tool for cutting a wide sheet of metal;
- Manual pick hammer (aka mallet) with a rubber or wooden tip. The mallet should be firm, heavy, but free of sharp edges;
- Steel pipe billet for forming the pipe body ("gun"). Its length is at least 1 meter, its diameter depends on the required diameter of the finished product;
- Ruler;
- Galvanizing marking tool (sharp metal rod);
- Crafting table. At the corner of the workbench table, there should be a metal corner, at least 1 m long. It will be used to bend the edges of the pipe, so it must be fixed very securely;
- Pliers.
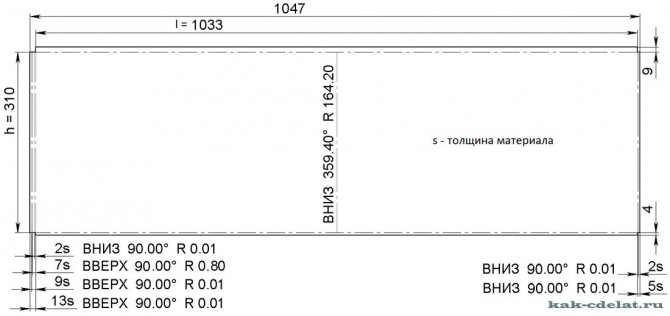
Sizing calculation
Standard galvanized sheet metal is either 1000 × 2000mm or 1250 × 2500mm, although other cuts can be found.
The width of the workpiece is calculated by the formula:
L (circumference, it is the width of the workpiece) = 2 * 3.14 * R (R is the required radius of the pipe, mm).
Thus, for the manufacture of a pipe with a diameter of 100 mm, a workpiece with a width of
2 × 3.14 × 50mm = 314mm.
Add 15mm bend to the resulting final length and obtain the required size for cutting -300mm.
An important point - the width of the workpiece - the value is not constant. On the one hand, it is 330mm, on the other, 340 (for a pipe with a diameter of 100mm). This is done for the convenience of subsequent installation of pipes with each other or with other elements of the system.
Drawing and diagram
Fig. 1. Pattern of a sheet for a pipe with a diameter of 100mm.
The fold formation scheme is as follows:
Fig. 2
Cutting out the workpiece
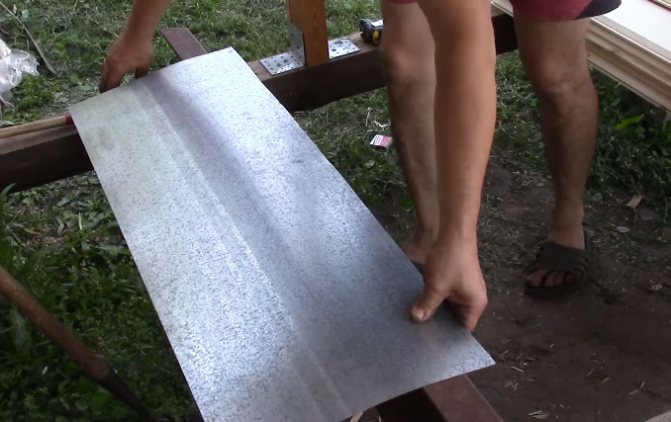
After calculating the required dimensions, the blank of the future product is cut out. For this:
- A sheet of tin is laid out on a horizontal surface, marking is applied in straight lines, strictly according to the size of the semi-finished product.
For a pipe with a diameter of 100 mm, along one edge of the sheet, segments of 340 and 330 mm are measured one after another (see Figure 1). The same segments, but in the opposite sequence, are marked on the opposite side. All perpendicular lines should be drawn using a square.
Do not forget to add 15-20mm to the width of the product for the fold!
- The tin is cut into rectangles according to the drawing.
Profile formation
The resulting rectangular blanks must be "turned" into a pipe. To do this, we will form its profile.
Stages of forming a profile:
- Two lines are drawn along the entire length of the workpiece, with an indent of 5mm from one edge and 10mm from the other. These lines are the borders of the fold bend.
In our case, a seam or seam lock means the type of joint of the pipe edges;
- Bend the edges along the marked line, strictly at an angle of 900. Use a metal corner for this, aligning the fold line with the edge of the corner. We start with pliers, continue with a mallet;
- We pass with a hammer along the entire length, gradually forming the future seam;
- At a fold 10 mm wide, we make another fold in the shape of the letter G. The width of the upper bar is 5 mm, the location is strictly parallel to the workpiece;
- After forming the folds, go to the pipe body. We put the blank on the cannon and use a hammer to give the sheet a round shape.
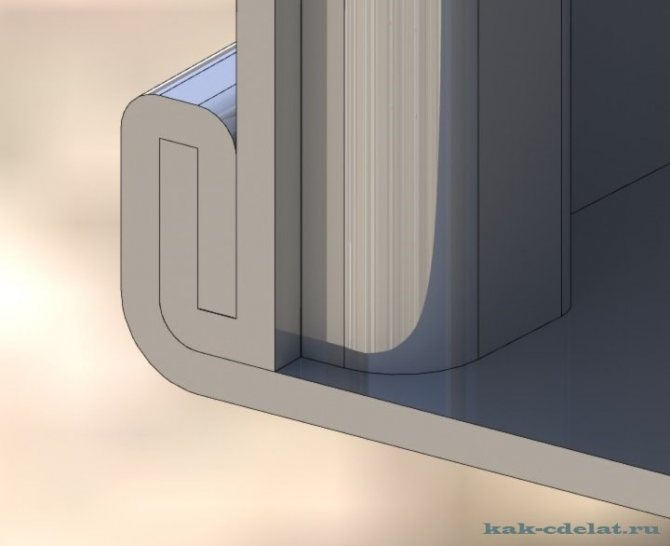
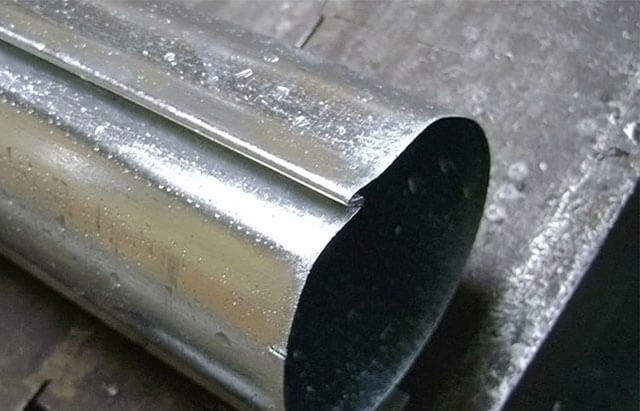
Butt weld processing
The final stage is the processing (crimping) of the butt seam.To do this, bend the upper part of the L-shaped fold downward, wrapping the opposite edge around it. The result is a fold of several layers of metal, which must be pressed against the pipe along its entire length.
In the factory, additional strength is given to the seam with special metal rivets.
For products made by hand, no additional processing is required.
making
Check out helpful related videos.
Pipe making:
Plane cut-in of a pipe:
Expert advice
For the convenience of connecting the finished pipe with other elements of the system, it is necessary to make a socket at the end of the product.
How to make a socket on a galvanized metal pipe
The bell is a technological extension designed for the convenience of mounting communication elements with each other and in-plane insertion. The socket on the finished pipe is made along a wide edge, by flaring the edge to a depth of 15-20mm. At the factory, a special tool is used for flaring - a flaring cone.
At home, you can expand the edge of the pipe yourself, using pliers. Ideally - install special rings on the ends of the workpiece - stiffeners.
Fig. 3. Flaring pattern:
Features of working with tin
Galvanized sheet is an inexpensive and reliable material. Its main feature is its small thickness (most often a sheet with a thickness of 0.3 to 1 mm is used at home) and plasticity. Thanks to its softness, it is convenient to work with galvanizing and it will not be difficult for even a beginner tinsmith to make the desired product on their own.
At the same time, despite the softness of the steel, the obtained seam seam is very reliable and is able to withstand significant mechanical stress.
Conclusion
The scope of application of galvanized pipes is extensive. They are used for drainage, chimney, ventilation systems, so the ability to independently make parts will definitely not be superfluous.
Personally, I find that whatever skill you learn is always useful. That is why I am waiting for you in our group and communities. Lessons, training videos, expert advice - everything is there. Join us!
(2 5,00 of 5) Loading ...
Source: https://vseotrube.ru/materialy/metallicheskie/kak-sdelat-trubu-iz-otsinkovki
Processing the seam joint
The final stage involves processing the butt seam, that is, crimping it. To do this, the upper part of the L-shaped fold is folded down, wrapping the edge of the other fold. The result should be a kind of sandwich perpendicular to the pipe. To get a butt weld, you need to press the sandwich to the product.
For greater reliability, the butt seam is reinforced with rivets. However, do-it-yourself pipes made of tin using this method of joining do not need additional reinforcement.
How to make a galvanized pipe with your own hands?
You can freely purchase galvanized pipes, but the cost of such products is quite high, so the desire to make a galvanized pipe with your own hands is dictated, first of all, by considerations of economy.
At the same time, the manufacture of galvanized pipes does not require the use of special efforts, special expensive fixtures and tools and some kind of professional knowledge, so any home craftsman can cope with this, in whose arsenal there is a set of standard carpentry tools.
Frame assembly process
After preparing all the parts for the boat, we proceed to the direct process of assembling the boat from galvanized steel and boards with our own hands. To do this, you need to do the following:
Recommended reading: Pros and cons of rubber boats with a hard bottom under the motor
- In the bow, it is necessary to combine two sides and a triangular blank for the bow. Nails or self-tapping screws can be used as connecting elements.If the block protrudes above the sides, then it must be cut into one level.
- The next step is to install a temporary spacer. This process must be approached carefully. So that when bending the sides do not burst, the spacer is filed at a not too large angle.
- After installing the spacer, it is necessary to bend the sides further. A rope or a couple of helpers will do the job.
- We substitute the back part, adjust, remove the necessary chamfer. You need to fit well so as not to leave gaps. Everything should fit snugly.
- Having finished the fit, we hammer the sides and saw off all the protrusions.
- After the sides are assembled, we install permanent struts while removing the temporary ones. How much detail to set depends on the owner's preference.
Before fastening the wooden parts with nails or self-tapping screws, it is worth pre-drilling the holes with a drill. This method prevents the boards from cracking.
The final stage in the assembly of the wooden structure will be chamfering on the lower parts of the sides, spacers and coating of a protective antiseptic layer.
Characteristics of galvanized pipes
Galvanized metal pipes are used to equip chimneys; they are popular due to their light weight and, accordingly, ease of installation. Galvanized chimneys do not require the construction of a foundation, and this significantly reduces the cost of chimney equipment.
Such pipes meet fire safety standards, withstanding temperatures up to 900 °, so they can even be used for smoke extraction from solid fuel heating boilers and stoves.
Also, galvanized pipes in home construction are used to equip gutters. Such pipes are already quite affordable in terms of costs, but at the same time the process can be made even cheaper by using hand-made products.
Can galvanized pipes be used for a chimney
Zinc coated chimneys are used under certain conditions.
When zinc is heated to 419 °, it begins to release substances harmful to humans. Therefore, it is recommended to install bends made of this material in flue systems, where the temperature does not exceed 350 ° C.
According to the rules of the Ministry of Emergency Situations of 2009, the use of metal smoke elimination agents for coal-fired stoves is prohibited.
In addition, a single-wall galvanized outlet will burn out after one or two seasons. In practice, it is used as an outer casing in double-walled structures with insulation.
What you need to make a galvanized pipe
At home, to make a galvanized pipe, you need a sheet of tin; the material does not require the use of special efforts due to its softness and ductility.
Tin is industrially made from thin sheet steel with a thickness of 0.1 to 0.7 mm on rolling machines, after which they are covered with an anti-corrosion protective layer of chromium, tin or zinc. Finally, the workpieces are cut to standard sizes, with a width of 512 mm to 2000 mm.
The strength of such products is in no way inferior to steel counterparts, especially if the material has additional stiffeners, but at the same time it is very plastic and allows you to manually mount pipelines of complex shape. Anti-corrosion coating protects the pipe from the external environment.
The problem of such pipes is insufficient bending strength, therefore, for the manufacture of open parts, stiffeners are introduced into the structure to strengthen the product.
- a wide range of such pipes of various sizes is presented in stores: single-circuit;
- double-circuit (made in the form of a sandwich and consisting of an inner and outer pipe);
- corrugated, characterized by increased flexibility.
Note! At home, it is technically possible to make only a single-circuit pipe.
When choosing the thickness of the sheet, the purpose of the pipe should be taken into account. For example, a galvanized pipe for flue gas removal from solid fuel stoves and fireplaces must have increased resistance to high temperatures, and at the same time high anti-corrosion properties.
It is important! The higher the temperature of the working medium, the thicker the pipe walls must be.
Tools
For work, special tools are required to bend, correctly measure the bend angle and cut the pipe to the desired length.
Types of galvanized iron smoke exhaust pipes
The consumer is offered single-wall and double-wall galvanized pipes. For ease of installation, manufacturers produce all the necessary components: tees, inspection channels and condensate traps. A standard range of diameters is supported. It will be quite problematic to order a pipe or adapters of non-standard sizes at the factory.
In order to select the necessary material for the smoke exhaust system, you will need to take into account the technical characteristics, the resistance of the material to burnout and the effects of an acidic environment, as well as the main possibilities of operation.
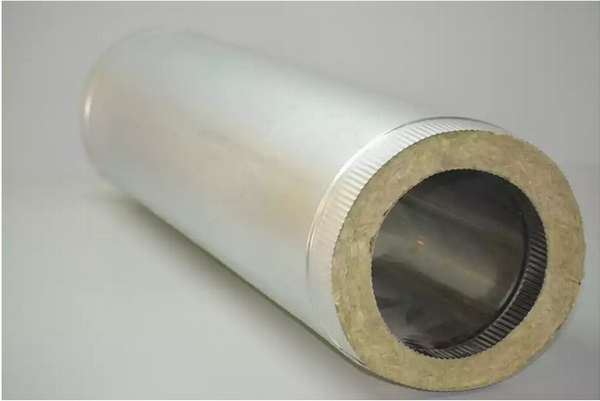
Galvanized chimney sandwich pipes
Double-circuit insulated chimney pipes made of galvanized sheet are available in two modifications:
- Sandwich pipes - a structure where the inner and outer layers are made of galvanized metal. The design reduces the production of condensate, but is not able to withstand significant heat. Deformation occurs when the inner layer is heated to 500 ° C.
- Modular chimneys made of acid-resistant stainless steel with external insulation and galvanized shell. Such a device significantly reduces the cost of the structure and increases the service life almost twice.
The inner layer of the pipe should be made of metal with a thickness of 1 mm, for the outer layer, 0.5 mm is enough.
Galvanized single-wall chimneys
The galvanized chimney quickly burns out in the following cases:
- There is no insulation.
- Incorrect pipe thickness.
- Non-compliance or disruption of the production process. Galvanizing is made from carbon steel, according to GOST 14918-80.
If all these conditions are met, a single-layer galvanized pipe can work up to 10 years.
Instructions for the manufacture of galvanized pipes
First of all, you need to mark the iron sheet, applying fold fold lines on one side with a size of 5 mm, on the other two times 5 mm each, the fold on one side should be wider than the second in order to form a strong seam in the future. Bend the sheet at a 90 ° angle on both sides using a corner and pliers.
It is important! Bend the shape gradually, moving from one edge to the other along the fold line.
Then, turning the workpiece, folds are formed, the angle is brought to 135-140 °, tapping with a mallet or a hammer with a soft striker on the edges of the tin carefully so as not to damage the material of the product. After the formation of the folds, you can proceed to the formation of the pipe itself.
Attach the workpiece to the sizing template to shape it and tap it again until the folds come together.
The wide edge is again bent parallel to the plane of the product at an angle of 90 °.
The last stage is to join the ends together with a flat seam using a mallet.
Align the folds, bend the horizontal part of the second fold, wrapping the first fold with it, and then bend this seam, pressing it tightly against the plane of the pipe.
You can additionally strengthen the joint with metal rivets using a welding machine, although most often galvanized pipes connected with a flat seam do not need additional reinforcement.